


Assult Sherman, Jumbo build
 01-25-2016, 10:19 AM
#51

Thread Starter

Ok so I battled the tank yesterday. First time I really operated it since it had about 10 minutes of time with it in the yard just for a function check.
The tank is quite slow with the mato 69:1 gears, however with several hits on the 9 lives it was really mobile nearly to the last hit. It kicked ass taking on a jaged panther and sturmtiger at the same time scoring many hits on both with certain death.
the big bad problem.... Both front wheels on the mato metal bogies froze up hard. i mean left and right front bogie, first wheel behind the sprocket just ceased up and the bogie jammed from the friction.
I cant figure why this happened. I went home and pulled the tracks and put some 30 weight oil in the wheels and forced themto turn, they now roll but have tight spots at various positions. The rest of the wheels spin super free. I did not oil these wheels to start with so im wondering if they gauled up... Very odd. The more I screw, play, fuss with this all metal mato sherman lower and its gear boxes the more I dont like it...
 01-25-2016, 10:55 AM
#52
Senior Member

Join Date: Nov 2006
Location: Grande Prairie,
AB, CANADA
Posts: 8,976
Likes: 0
Received 4 Likes
on
4 Posts
Ok, so I have been working on the details to the overall tank and screwing around with the gear boxes.
So far, I had to drill out the very short metric mounting holes in the hull because they were so short the stripped out, I knew it was going to happen eventually taking the gear boxes in and out so much. I drilled and tapped them for 4-40 and used nice long screws to secure them.
As for the gear boxes, one pinion came loose off the motor, and ofcourse the set screw is jammed in and ruined two allen wrenches trying to get it out. So I drilled it out and put a 4-40 set screw in and ground a flat spot on the motor shaft.
I also decided to try again to slide the final drive gear over and speed them up. After lots and lots of work and wasted time, I was successful at moving the final gear and eliminating a few gears. The results took the ratio from 69:1 down to 10:1 which was as fast as my old DMD Sherman gear boxes, pre the ones that are out right now. IT was really fast. But, had no torque so on the dirt it could barely turn. I think it was actually overloading the IBU2 and it would stall out and die, then come back after a few minutes and the motors were very hot. I moved the gear setting back to 69:1.
I ordered taigen 3.1 gear boxes which I think are 39:1 so we will see. I just have to drill them to fit the mato metal hull.
Last edited by YHR; 01-25-2016 at 10:57 AM.
01-25-2016, 12:08 PM
#53
Thread Starter
I think mato has moved completely to the 4.1 69:1 ratio gears.
i ordered the stock taigen sherman gears called 3.1 which I believe are 39:1 ratio if they are like the panzer set I put in the m3 lee.
t
Erik told me the 4.1 taigens are 90:1 ratio. Way too low for a sherman.
I am going to do a scale speed test tonight and see what my 69:1 does flat out.
if I stick with these mato gears, i really hope they replace them as I said one side is co pletely pos fubar. I sent them and email and theynasked for pictures with my description and them never got back to me after the pictures.
i have to say, the stock HL plastic gears are 49:1 and then with a 380 motor dropped in they appear to be a good sherman speed, a scale test would prove it though.
Last edited by RichJohnson; 01-25-2016 at 12:18 PM.
01-25-2016, 12:53 PM
#54
Sorry you had problems on the wheels and I don't want to sound like a broken record... DON'T assume anything & always go over everything with a fine toothed comb.
I learned that lesson taking NEW PARTS and before they went onto any car, I did a run-down on what's supposed to work and be there too.
Jeff
I learned that lesson taking NEW PARTS and before they went onto any car, I did a run-down on what's supposed to work and be there too.
Jeff
01-25-2016, 02:20 PM
#55
Thread Starter
The wheels rolled fine before i drove it out in the field. I only test drove it for about 10 min at home. It drove fine for a couple hours in the battle then i saw the bogies jammed up from the wheels being frozen. I suspect it was metal to metal gauling.
01-25-2016, 06:30 PM
#56
Senior Member
Join Date: Nov 2006
Location: Grande Prairie,
AB, CANADA
Posts: 8,976
Likes: 0
Received 4 Likes
on
4 Posts
I have had that trouble on a couple of my Metal installs. I now use graphite powder from the get go with them, and that seems to cure the problem. When they bung up they bung up good don't they
01-26-2016, 11:27 AM
#57

I was witness to the fouling and I must say…. they jammed up TIGHT. My main concern is the apparent difficulty servicing the bogies on a metal MATO hull. Erik mentioned the new Taigen bogies will have bearings. Wonder if this is more of a known problem. My builds have been on older hulls with these bogies and I have not had any such binding issues as I can get in and take em apart and work them if needed….
01-26-2016, 12:07 PM
#58
Thread Starter
Ehan is correct, the bogies are swedged into the hull with a clip that is then epoxied in place i believe. I do not think it would be a good idea to remove the bogie from the hull. So far I am not satisfied with the mato metal lower. I may in the future swap the whole lower onto a taigen or possibly a HL with the metal bogies they now have. I have high hopes for the new taigen shermans. I plan for at least one, and probably many if they are what I expect.
01-26-2016, 02:49 PM
#59

Join Date: Nov 2008
Location: Yass NSW, AUSTRALIA
Posts: 208
Likes: 0
Received 0 Likes
on
0 Posts
The clips that hold the bogies in place on the hull are glued in but I think it's only CA or at least they were on mine. They are pretty easy to remove if you can get something under them and lift up. I used a screwdriver but the back of a small hammer would have been easier. Once the clips are off the bogies will take some gentle persuasion to remove but tapping them from the inside should do the trick. The front bogies are easier to take out if the gearboxes have been removed. Getting them back in also takes some effort and I gave the pins a light once over with a file to make that easier.
I pulled mine apart for painting a couple of weeks ago and just put it all back together over the weekend. I whish I had thought to lubricate the road wheels as I don't intend to take them off again anytime soon.
I pulled mine apart for painting a couple of weeks ago and just put it all back together over the weekend. I whish I had thought to lubricate the road wheels as I don't intend to take them off again anytime soon.
 01-26-2016, 10:44 PM
#65
Thread Starter
Where could I try a pair?
What would happen to 7.2 v applied to 6v motors? would that smoke a motor or draw too much current? Well, I think that would actually lower the current if I remember ohms law correctly, raising the voltage lowers the amperage etc etc.
What would happen to 7.2 v applied to 6v motors? would that smoke a motor or draw too much current? Well, I think that would actually lower the current if I remember ohms law correctly, raising the voltage lowers the amperage etc etc.
01-27-2016, 07:19 AM
#68
Senior Member
Join Date: Nov 2006
Location: Grande Prairie,
AB, CANADA
Posts: 8,976
Likes: 0
Received 4 Likes
on
4 Posts
The Mato clip design is actually something I like, but I do not have a metal hull, just plastic with metal bogies, so am a little unclear as to what they might have done to screw up a good thing.. Easy to remove and work on with the plastic hull..
01-27-2016, 09:11 AM
#69
Most of the 400 6V motors are rated up to at least 7.2V:
[TABLE]
[TR]
[TD]Motor
[/TD]
[TD]Nominal Voltage
[/TD]
[TD]Voltage Range
[/TD]
[TD]No-Load RPM
[/TD]
[TD]NO-Load Current
[/TD]
[TD]Current @ Max Effic.
[/TD]
[TD]Stalled Current
[/TD]
[TD]Max Efficiency
[/TD]
[TD]Case Length
[/TD]
[TD]Case Diam
[/TD]
[TD]Free Shaft Length
[/TD]
[TD]Shaft Diam
[/TD]
[TD]Weight
[/TD]
[/TR]
[TR]
[TD]Speed 400
[/TD]
[TD]6v
[/TD]
[TD]2.4-7.2v
[/TD]
[TD]18,000
[/TD]
[TD]0.7A
[/TD]
[TD]4A
[/TD]
[TD]25A
[/TD]
[TD]70%
[/TD]
[TD]37.8mm
[/TD]
[TD]27.7mm
[/TD]
[TD]13.8mm
[/TD]
[TD]2.3mm
[/TD]
[TD]73g
[/TD]
[/TR]
[/TABLE]
01-27-2016, 09:36 AM
#70
Thread Starter
Hmm, looks cool, yeah I would like to try them. The benefit of the super low gearing was I was able to keep moving even after 8 hits on my tank. Higher rpm motors would mKe up the difference of the lost speed in the low gears. That is the optimum combination really.
Now I just have to screw around with those gear boxes some more. Ive had them out of the tank like 6 times now, hence why I had to drill and retap all the mounts for bigger longer screws.
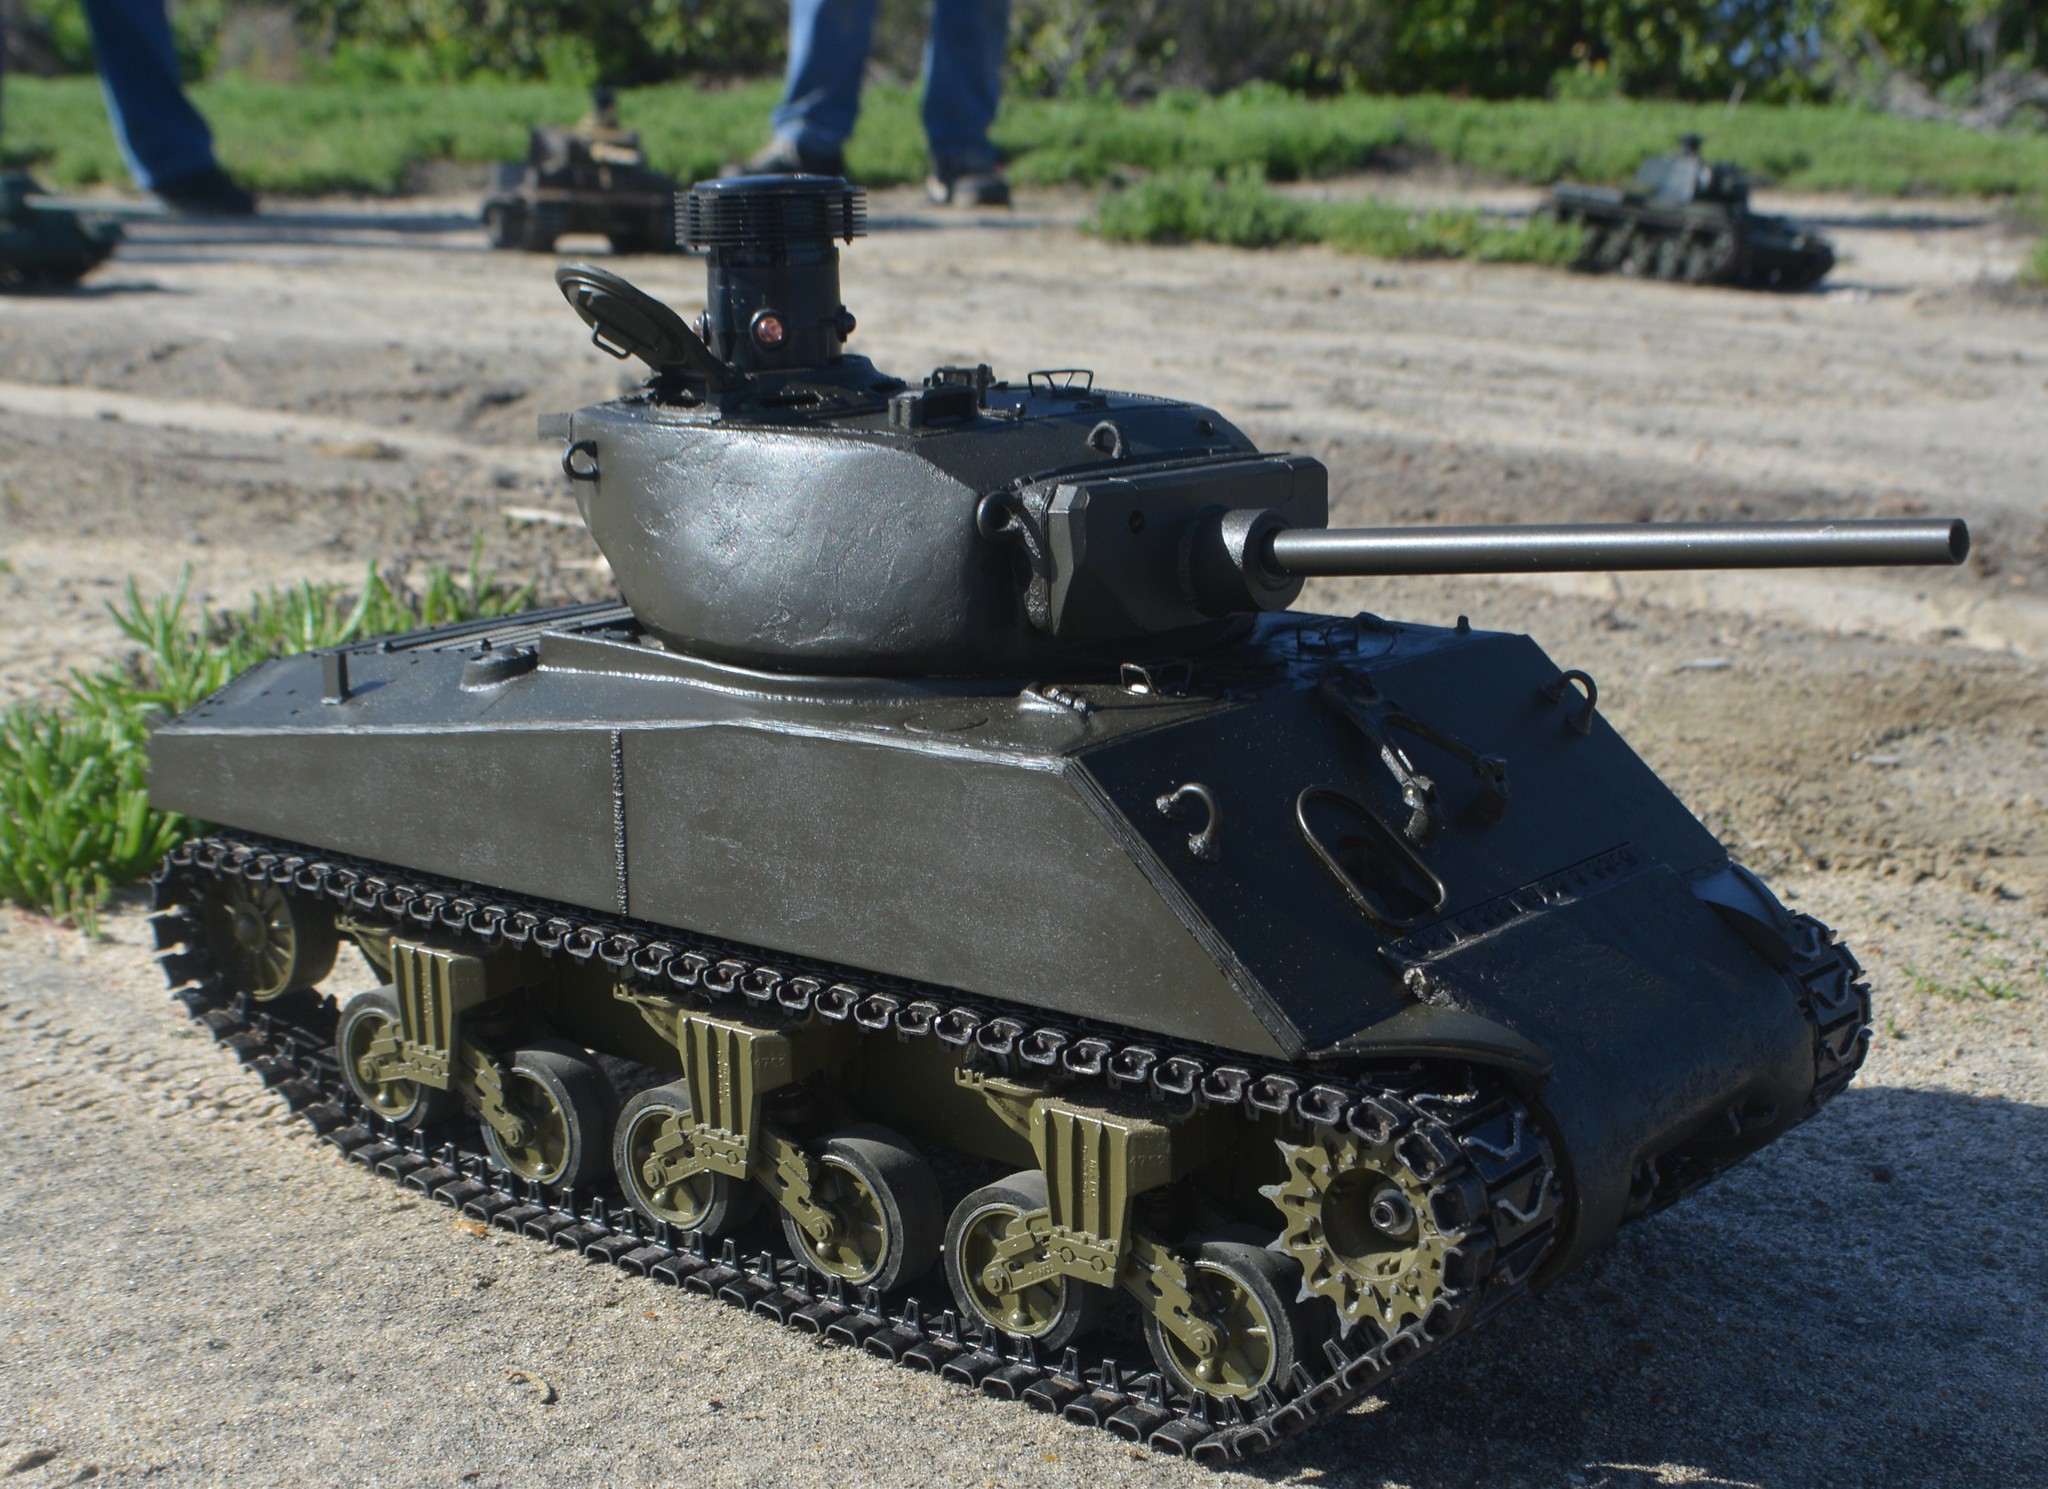
here is the pic Etahn posted a link to from his fliker page. Thanks Ethan, my camera batteries ran out before I got any really good pics on the field.

Now I just have to screw around with those gear boxes some more. Ive had them out of the tank like 6 times now, hence why I had to drill and retap all the mounts for bigger longer screws.
here is the pic Etahn posted a link to from his fliker page. Thanks Ethan, my camera batteries ran out before I got any really good pics on the field.
01-27-2016, 10:00 AM
#71
I would use 6V rated motors (and do) anytime as mentioned above, can handle above that rating.
Jeff
Jeff
01-27-2016, 01:47 PM
#72
Join Date: Nov 2008
Location: Yass NSW, AUSTRALIA
Posts: 208
Likes: 0
Received 0 Likes
on
0 Posts
01-27-2016, 03:41 PM
#74
Join Date: Nov 2008
Location: Yass NSW, AUSTRALIA
Posts: 208
Likes: 0
Received 0 Likes
on
0 Posts
Yes, they seem to be stuck firm but some gentle pressure will lift them off. I did crack one of mine when I was putting them back on and had to epoxy it back together, it seems okay now. I used CA glue for some extra hold when I re-installed them all and they appear to be solid. The bogies are a tight fit as it is so I don't think these are under much pressure.
The clips closest to the gearbox will have the round part at the top removed to give them more clearance. I didn't notice that until I put the wrong ones on and wondered why one of my drive sprockets was suddenly difficult to turn.
I'm not sure why Mato didn't replicate the plastic hull system in metal, it seems much better. This system makes the bogies difficult to remove and work on and there is more chance of damaging parts.
01-27-2016, 05:55 PM
#75
Senior Member
Join Date: Nov 2006
Location: Grande Prairie,
AB, CANADA
Posts: 8,976
Likes: 0
Received 4 Likes
on
4 Posts
Thanks for the pictures. Yes the design used on the plastic hulls seems better then this, If you break one of these You could take a large washer and cut a slot out of it, and then use it. I have done this when I have added the metal suspension to other tanks that weren't Mato. If you bend them slightly they jam in there pretty tight.

