


1/6 Scale Sherman T48 Tracks - Delrin Injection Molded - Spyker Workshop
 09-05-2018, 08:21 PM
#51
Ryan
Looking great. the strength of the braces is impressive. One question - do you think the screws from below are enough into the suspension bogeys? The bogeys only have a hook at top - which is still a bit floppy unless they are glued to hull. I like how you made the bottom bogey screws go though the brace though.
One other thought - the attach method for the upper hull needs to be improved. I'm sure you thought about this, but the screws from underneath into the posts in upper hull are inaccessible once tracks are on. Perhaps magnets on the upper hull posts instead of screws? Will be interesting to see what you come up with.
I use the AGM type motorcycle/watercraft batteries for my 1/6 models. For smaller 1/6 tanks (Stuart, PZ II) -I like the smaller 12V, 7-10 AHr like you show in video wired in parallel for double the capacity. In parallel I get 2-4 hours run time with an 80lb tank. This light model would run a long time with the AGM batteries - and give the tank some presence weight wise. Running Lipo's would be interesting as well - certainly a lot lighter. Would need a low voltage alarm/indicator/monitor for Lipos. I try to get the AGM batteries with terminals that have a good size bolt hole in the terminal leads, the push on type terminal leads always seem to work loose, or the crimped terminal works loose on the wire.
Great progress. Best regards,
Bob
 09-05-2018, 10:26 PM
#52

Thread Starter
Join Date: Mar 2009
Location: Saint Paul, MN
Posts: 288
Likes: 0
Received 0 Likes
on
0 Posts
I did not realize that about the upper hull screws. I planned to make the rear engine cover removable and leave the upper hull always screwed down. I don't really see a reason to make the entire upper hull removable. Should be enough room to load batteries out the back hatch.
This video 100% answers all about the suspension attachment! I changed something on its assembly that makes it 10x stronger and do a pretty extensive weight and moving test:
Also here is the video on the transmission:
This video 100% answers all about the suspension attachment! I changed something on its assembly that makes it 10x stronger and do a pretty extensive weight and moving test:
Also here is the video on the transmission:
Last edited by TheGreatestMoo; 09-06-2018 at 12:10 AM.
09-06-2018, 05:49 AM
#53
With all this R&D on this tank to make it R/C, I've been considering buying one. Dang you Spyker Workshop....
 09-06-2018, 09:47 AM
#54
You need to look into Solid Edge Generative Design. You may not need to print such thick (expensive) parts. Solid Edge Generative Design will take the load inputs and then optimize the geometry, removing material where it is not needed.
Disclaimer: I work for Solid Edge.
Disclaimer: I work for Solid Edge.
09-06-2018, 08:17 PM
#56
Ryan
Videos are looking good. Your transmission design is excellent. I like the use of standoff in the suspension bogeys. The spread-apart under load of the bogey housing was a problem - nicely fixed with the standoffs and screws on both sides. This is really looking good.
I would fill in the hollow region sprocket - mostly for cosmetics. But the hollow out is visible. It could be filled with resin. Or I might CNC mill a styrene insert that could be glued in. That's for the purists out there like me -lol.
I think you can use the rear access hole over the engine bay to get to electronics just fine. The large cover with grille panels can be held in place with magnets and removed easily to get to battery tray. You can also get to a lot of stuff by taking the turret off.
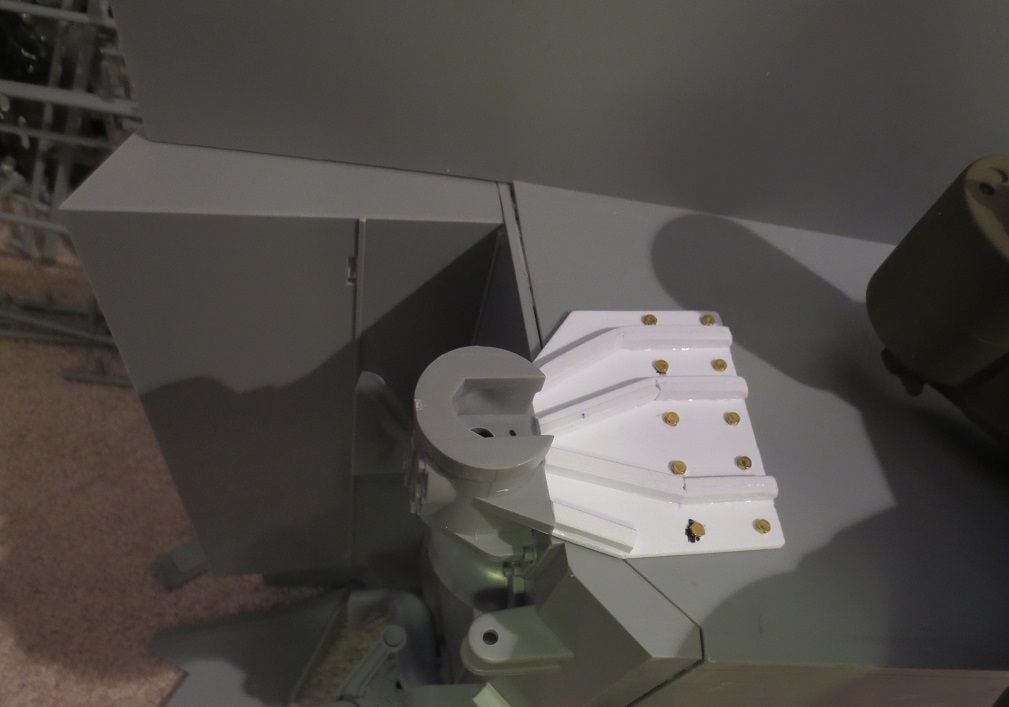
I'm interested in what you do to the idler. It definitely needs reinforcement, the ability to adjust track tension and some detailing. Above is a pix of the faux bracket detailing I added - this could be incorporated in an improved idler mounting housing - again for the detail nuts like me. Functionally not needed at all.
Do you have a target price for your kit?
Best regards,
Bob
Last edited by RC_BobM; 09-06-2018 at 08:22 PM.
09-07-2018, 05:12 PM
#57
Thread Starter
Join Date: Mar 2009
Location: Saint Paul, MN
Posts: 288
Likes: 0
Received 0 Likes
on
0 Posts
I just posted a vid on the idler wheel, I did similar to that image you posted, but I changed the pivot point to work better for RC use, check it out here:
Also a quick update to the track assembly:
Also a quick update to the track assembly:
Last edited by TheGreatestMoo; 09-07-2018 at 05:15 PM.
09-07-2018, 07:52 PM
#59
Thread Starter
Join Date: Mar 2009
Location: Saint Paul, MN
Posts: 288
Likes: 0
Received 0 Likes
on
0 Posts
09-08-2018, 05:54 AM
#60
 09-08-2018, 09:48 AM
#61
Ryan
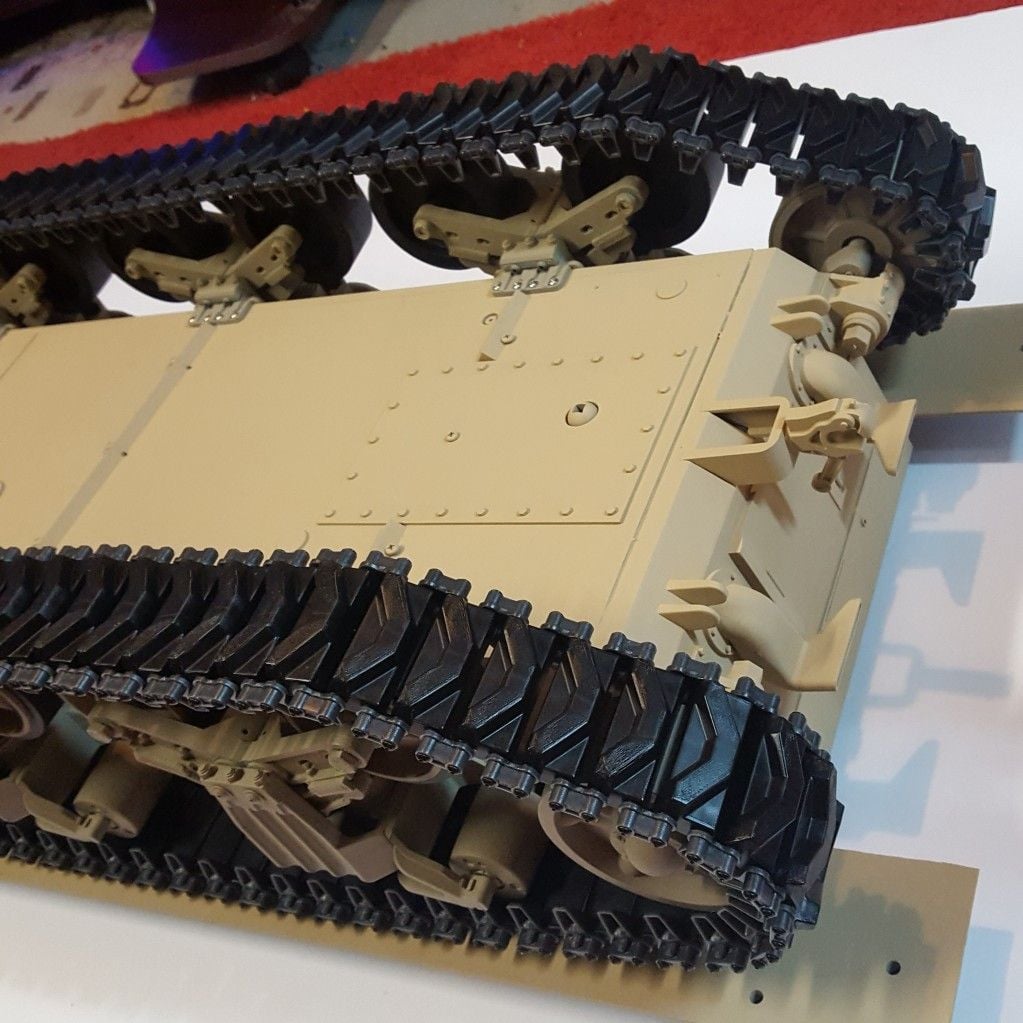
The idler design looks great -very rigid. Just wondering if there is enough travel/pivot of the idler for track tension. Its sometimes surprising how much travel is needed to get the track just right. Both sides of the tank will be slightly different as well. Seems like one side needs more tension than the other (on my Stuart and Sherman). The Sherman does need the track to be somewhat tensioned (ie not slack) at all times. The track will stretch a bit over time as the components wear/break in. But overall really good looking setup.
The track assembly fixture is very clever. That would be a can of worms trying to assemble the links by hand. I agree - get the Dewalt or similar clutched driver.
Very cool project, your design work is excellent!
Bob
09-08-2018, 06:34 PM
#63
you did an amazing job Ryan from start to finish. not bad for a couple months work. looking forward to the running video. the stress test was cool. sprocket timing is perfect! you should have the jeep Monday.
09-08-2018, 07:03 PM
#64
Yeah I second that this is an exceptional job. Can't wait to see it running in the dirt! It looks like motors have plenty of torque. Speed looks about right with 60lbs weight. An ESC will help control model speed as well. I think the model will need a little ballast (weight) for the proper stance and track grip. 2X batteries at about 10lbs (total) should be perfect.
PS I would not worry about the squeak. Tanks were very squeaky (and still are) - it will make the sound authentic!
I hope Ryan is planning on upgrading turret rotation, elevation, sound etc. This will be a great low-med budget full option RC model if so.
Best regards,
Bob
PS I would not worry about the squeak. Tanks were very squeaky (and still are) - it will make the sound authentic!
I hope Ryan is planning on upgrading turret rotation, elevation, sound etc. This will be a great low-med budget full option RC model if so.
Best regards,
Bob
09-09-2018, 08:26 AM
#65
ShockWave 2 Sound Module - Model Sounds Inc. - The Ultimate in Radio Controlled Model Sound Systems
really good sound system.
really good sound system.
09-09-2018, 09:16 AM
#66
Join Date: Jul 2018
Posts: 62
Likes: 0
Received 0 Likes
on
0 Posts
When are you planning on bringing these parts to sell? I'm really excited to see all that you've done! Your upgrades look phenomenal! It looks like your transmission and motor combination will have plenty of power to do anything that you'll ever wanna.
do you have any ideas on what esc and mixer you will use to connect to an RC receiver yet? Place turret controls on one stick and track controls on the other I would imagine. Then wiring in a sound system to give Sherman engine sounds.
do you have any ideas on what esc and mixer you will use to connect to an RC receiver yet? Place turret controls on one stick and track controls on the other I would imagine. Then wiring in a sound system to give Sherman engine sounds.
09-09-2018, 11:36 PM
#67
Thread Starter
Join Date: Mar 2009
Location: Saint Paul, MN
Posts: 288
Likes: 0
Received 0 Likes
on
0 Posts
I just got everything listed for sale tonight! Running video will come tomorrow, its all working really well. Check it out at my store here: https://spykerworkshop.com/product-tag/1-6sherman/
09-10-2018, 11:17 AM
#68
Thread Starter
Join Date: Mar 2009
Location: Saint Paul, MN
Posts: 288
Likes: 0
Received 0 Likes
on
0 Posts
I got a video of the tank running around outside up now! It worked great, check it out and what do you all think? It has 2 different pulley sets to choose from, in the video its running the high torque slow speed pulley set. The slow sets recommended for upper hull stuff weighing around 10-20lbs. Fast pulley sets for upper hull weight under 10lbs.


09-11-2018, 08:22 AM
#69
You're doing some very cool stuff there, Ryan. I checked out your website and I believe I'll be ordering a set of those 250 tracks before long because I have a 250 that I want to RC. I'll probably wear out the stock tracks first, though. But you sure do make that Dragon Sherman kit look a lot more tempting with all the work you've done. Very impressive.
09-19-2018, 10:59 PM
#70
Thread Starter
Join Date: Mar 2009
Location: Saint Paul, MN
Posts: 288
Likes: 0
Received 0 Likes
on
0 Posts
New vid on the turret rotation upgrade! Check out all my other upgrades for sale here: https://spykerworkshop.com/product-tag/1-6sherman/
09-20-2018, 08:12 AM
#71
Join Date: Jul 2018
Posts: 62
Likes: 0
Received 0 Likes
on
0 Posts
That looks fantastic!
couple of questions, first, can you provide a part list for the electronics portion that you used, the 2 ESC and the mixer to run the tracks off one stick?
Second, I'm wanting to use FOA paintball gun system in the turret, would you say that your turret rotation system would be strong enough to do that? Or would you consider designing a kit so that I can take nearly any paintball gun and modify it myself to work? Like you make the 3d printed elevation and fire control servo to mount say a 98 custom paintball gun. I'm just usingusin 98 custom as an example since it's still wisely available on the market for less than $200.
09-20-2018, 08:23 AM
#72
I modified a Spyder Opus paintball pistol for use in my 1:6 scale hetzer and it works great. It's .50 caliber so it's actually close to scale. My only word of caution about the FOA paintball systems is make sure that it's either .50 caliber or .68 caliber. I think they used to sell a .40 caliber system but you can no longer get .40 caliber paintballs.
09-20-2018, 10:26 AM
#73
SUCH cool stuff Ryan!
Those installing this kit I would definitely index the turret flange and ring gear plus place tape on the bit to set the hole depth for the pinion gear screw.
I know what I want to get myself for Christmas.
Those installing this kit I would definitely index the turret flange and ring gear plus place tape on the bit to set the hole depth for the pinion gear screw.
I know what I want to get myself for Christmas.
09-20-2018, 11:09 AM
#74
Join Date: Jul 2018
Posts: 62
Likes: 0
Received 0 Likes
on
0 Posts
I modified a Spyder Opus paintball pistol for use in my 1:6 scale hetzer and it works great. It's .50 caliber so it's actually close to scale. My only word of caution about the FOA paintball systems is make sure that it's either .50 caliber or .68 caliber. I think they used to sell a .40 caliber system but you can no longer get .40 caliber paintballs.
09-20-2018, 01:20 PM
#75
I use a 1/4 scale servo to do elevation in my paintball tanks. Believe it's a Hobbico CS-80 with external power connection since the small receivers can sometimes have trouble providing enough power to the 1/4 scale servos.

