


Weathering a Tank Help

 12-11-2007, 08:14 AM
#2
Senior Member

Join Date: Apr 2006
Location: Launceston, AUSTRALIA
Posts: 2,161
Likes: 0
Received 0 Likes
on
0 Posts
When I lightly weathered mine, I just used Tamiya weathering kit (Rust/soot/snow) and used the "rust" shade around panel edges etc... didnt want the "been at war for 20 years" look
12-11-2007, 10:20 AM
#4
Senior Member
Join Date: Apr 2006
Location: Launceston, AUSTRALIA
Posts: 2,161
Likes: 0
Received 0 Likes
on
0 Posts
http://www.tamiya.com/english/produc...ring/index.htm
Heaps of stores have them, even my local one (which is pretty slack when it comes to stuff like that)
I have Set B. Check out the link above for some examples, pics and vids...
Heaps of stores have them, even my local one (which is pretty slack when it comes to stuff like that)
I have Set B. Check out the link above for some examples, pics and vids...
12-11-2007, 12:35 PM
#5
Senior Member
Join Date: Jan 2006
Location: Colona,
IL
Posts: 365
Likes: 0
Received 0 Likes
on
0 Posts
Yeah the Tamiya weathering kits are Nice I have All the sets and weathering sticks along with every military color they carry I love Tamiya Paints. When you do use those weathering compounds try and get a hold of a semi stiff brush and rub it in the Rust soot snow sand mud or what ever you are using and drag it lighty aross raised detail till you get the right depth of color you want. Some people use water by dipping a brush in some then adding compund I tried this and it is messy makes the color look way to dark and sudden you want subtle. Also why you are at your local store see if they have rust all its a 4 part Kit that makes Unbelievable rust, This is liquid form and helps to bring out Details like Nuts Bolts and low spots on your tank.
Weathering is a Art and I am still learning how to do it. It is also one of those Tasks that make a basic model Look fantastic. Remember that less is more.
Weathering is a Art and I am still learning how to do it. It is also one of those Tasks that make a basic model Look fantastic. Remember that less is more.
12-11-2007, 12:54 PM
#6
Senior Member
Thread Starter
Join Date: Feb 2007
Location: sparta, NJ
Posts: 1,356
Likes: 0
Received 0 Likes
on
0 Posts
This is the tank I'm going to work with first. Would you paint the whole tank first or just weather it? See PIC. Thanks Ron
 12-11-2007, 01:41 PM
#9
Member

Join Date: Jul 2006
Location: Orange, CA
Posts: 64
Likes: 0
Received 0 Likes
on
0 Posts
If you know what the base primer color is on the real tank, paint the whole tank that color. Then paint your desert tan over that. Feather the paint on all the raised spots to look like natural wear. You can then go back and deatil any stains, watermarks, bare aluminum etc. Keep in mind what the armor is made of. You do not want to rust aluminum and things like that.
12-26-2007, 07:39 AM
#10
Senior Member
Join Date: Jul 2006
Location: londonengland, UNITED KINGDOM
Posts: 151
Likes: 0
Received 0 Likes
on
0 Posts
 Excellent tips all round![8D] I personally only use acrylics. Solvent base paints are great and very popular but I don't like the smell! I have also used those water based emulsion sample pots from the big stores. They often come in matt gold and milky coffee type colours. Great for desert scenes and equipment. They go through my air brush fine, most of the time... I seal paintjobs with PVA wood glue at approx 20% to 30% to water solution, it's clear and tough! I find best colour for Desert AFV use is Acrylic Tamiya Desert Yellow XF-59 edged and over washed or colourwashed, samething really, with a 10% solution of Tamiya Buff XF-57 and a hint of washing up liquid which helps the colourwash spread to the edges better and gives a "dusty" look. Running your finger over what would be worn areas and edges with a "dirt" and/or brown colour also works, remembering to stop when it looks right.
 If you seal your base colour with a good clear finish, you can weather it all with your chosen colours. If you over do it, you can "cut" or lightly rub away the added weathering colour back to original with no harm done, until it looks right. Have a look at the back of my Hummers in my Gallery and on Tamiyaclub.com same username as here. I have a 1:12 scale Abrams in Desert Trim as well.
 You could get a serious case of "rivet counting" [X(] and make your own rust by adding vinegar and salt to steel panel pins or whatnot and scrape it off to use as paint mixed with clear... wouldn't need much of it on a desert AFV anywho. Happy Trails and Happy New Year!
12-26-2007, 10:41 AM
#12
Senior Member

Join Date: Nov 2006
Location: Grande Prairie,
AB, CANADA
Posts: 8,976
Likes: 0
Received 4 Likes
on
4 Posts
I use a very simple method. First I paint the entire tank with a factory looking finish. I dullcoat this to protect it. Ususally a couple of good coats.
For weathering I use arylic paint, thinned with water. Use a couple of drops of liquid dish detergent. This cuts the surface tension of the water so it flows on better without water droplets forming. Now you have to experiment with how thin you want this wash. Too thin is better then not thin enough. You can always apply a second or third wash to get the desired effect you are looking for.
With a wide soft brush you just paint the wash on very liberally. You want lots of wash on in a hurry. I have one of those cheap battery powered tooth brushes that I go over the tank with while the wash is still wet. This helps to eliminate any brush strokes. For faded paint use a buff color or light grey wash. Allow this to dry, before the next application. Keep adding washes until you have the shade you are looking for. After the right shade has been achieved, now mix up a thinned black wash. This will pop out the molded in details. Just like the first wash use a large soft brush to try and wash the tank down as quickly as possible. Let dry, and then do it again if required. Again too little is better then too much. Far easier to do another wash then to remove too much. The nice thing about this method is, it can be redone. If you don't like the results, spray the tank with windex, let it sit for a couple of minutes and then wipe the tank down. The wash will be stripped right down to the dullcoat and you will be looking at a factory finish again.
Once you have the right look, then you just go around and highlight some raised surfaces with a light grey of silver, by dry brushing. Dry brushing is the technique of dabbing a small amout of paint on a stiff brush. Brush out the dabbed paint on a piece of paper until until very little comes off the brush. You then move to the model and brush against the raised surface details, like bolt heads, rivets, etc. Womens make up can also be used for this. There are many shades of metalizied eye liner that work great for this.
By this point you will have a pretty nice weathered tank. Now you move to the super weathering stage. This is where you pick an area and do something local and special. On my Sherman I choose to model the effect of spilled fuel. Over time this would fade and some times strip the paint. You do as much of this super weathering as you want. Just doing a couple of areas will be enough for people to notice, and really set your tank off from others.
In my opinion don't over do the weathering. I can't stress enough the importance of using a thin wash applied multiple times over just applying a heavy wash.
Factory finish

Weathered, by applying a wash of grey, a wash of black, and then highlighting raised areas and edges by dry brushing


Dry brushing metalic silver on raised casting numbers. Lightly rubbed with the end of my finger.

For weathering I use arylic paint, thinned with water. Use a couple of drops of liquid dish detergent. This cuts the surface tension of the water so it flows on better without water droplets forming. Now you have to experiment with how thin you want this wash. Too thin is better then not thin enough. You can always apply a second or third wash to get the desired effect you are looking for.
With a wide soft brush you just paint the wash on very liberally. You want lots of wash on in a hurry. I have one of those cheap battery powered tooth brushes that I go over the tank with while the wash is still wet. This helps to eliminate any brush strokes. For faded paint use a buff color or light grey wash. Allow this to dry, before the next application. Keep adding washes until you have the shade you are looking for. After the right shade has been achieved, now mix up a thinned black wash. This will pop out the molded in details. Just like the first wash use a large soft brush to try and wash the tank down as quickly as possible. Let dry, and then do it again if required. Again too little is better then too much. Far easier to do another wash then to remove too much. The nice thing about this method is, it can be redone. If you don't like the results, spray the tank with windex, let it sit for a couple of minutes and then wipe the tank down. The wash will be stripped right down to the dullcoat and you will be looking at a factory finish again.
Once you have the right look, then you just go around and highlight some raised surfaces with a light grey of silver, by dry brushing. Dry brushing is the technique of dabbing a small amout of paint on a stiff brush. Brush out the dabbed paint on a piece of paper until until very little comes off the brush. You then move to the model and brush against the raised surface details, like bolt heads, rivets, etc. Womens make up can also be used for this. There are many shades of metalizied eye liner that work great for this.
By this point you will have a pretty nice weathered tank. Now you move to the super weathering stage. This is where you pick an area and do something local and special. On my Sherman I choose to model the effect of spilled fuel. Over time this would fade and some times strip the paint. You do as much of this super weathering as you want. Just doing a couple of areas will be enough for people to notice, and really set your tank off from others.
In my opinion don't over do the weathering. I can't stress enough the importance of using a thin wash applied multiple times over just applying a heavy wash.
Factory finish
Weathered, by applying a wash of grey, a wash of black, and then highlighting raised areas and edges by dry brushing
Dry brushing metalic silver on raised casting numbers. Lightly rubbed with the end of my finger.
12-26-2007, 02:23 PM
#14
Senior Member

Join Date: Dec 2007
Location: Calgary, AB, CANADA
Posts: 185
Likes: 0
Received 0 Likes
on
0 Posts
Wow, fantastic weathering tips guys and great picks of the Canadian Sherman.
YHR, Did you make the figures or were they purchased. I would love to do a Canadian based Sherman. I met gentleman that commanded a Sherman in the Canadian Army. He was in Sicily and later on the Western Front. I showed him my friends Tiger and he had a story about them. He said they were coming out from some brush out into the open and in front of his tank were 14 Tigers. HE said there was a terrible mess in the tank to clean up after, as most of the crew had crapped them selves on seeing the large amount of Tigers when they were the only Sherman. I would too!! Funny thing all the Tigers were out of fuel and abandoned. This man joined the Canadian Army when he was 16. He lied to the recruiter.
I showed him my Panther and he got a bad look on his face. I asked did you see or fight any of these? "Yes" he said, and that was it. He did not talk any further! Sad how war can still have an effect on you so many years later. My hat is off to all the people who serve and have served to keep our freedom and our countries safe!
12-26-2007, 02:42 PM
#15
Senior Member
Join Date: Nov 2006
Location: Grande Prairie,
AB, CANADA
Posts: 8,976
Likes: 0
Received 4 Likes
on
4 Posts
The figures are 1/18 scale Century 21. I fabricated the head gear.
My Uncle fought in a Sherman, He passed away this past fall. He never talked about the war, and with him gone now I can't get the details I would like to have. This model is the best I could do with the info I had. It is decorated in the same regiment markings as my Uncles'. His Sherman got hit, and I don't think the crew faired too well. He forever had back problems because of the ordeal, and he literally never talked about anything that went on. His tank was lost in Italy, and he lived the last two years of his life in an assisted living Condo in Calgary, where my aunt still lives today.
Here is an interesting link to Canadian rules of engagement for the second world war. I like the one about staying with the tank until all the rounds have been exhausted.
[link=http://www.canadiansoldiers.com/mediawiki-1.5.5/index.php?title=Tank_Standing_Orders]Tank orders [/link]
12-26-2007, 05:35 PM
#16
Senior Member
Join Date: Sep 2007
Location: , PUERTO RICO (USA)
Posts: 381
Likes: 0
Received 0 Likes
on
0 Posts
I also use acrylics due to ease of cleaning. I did not paint the tank, I just started with a nice wash with the base color. This will bring out its surface details. I follow this with a technique called dry-brushing. I like a lighter than base color for this. For rust i used a pigment called raw sienna. Several washes and dry-brushing coats later I came up with this:
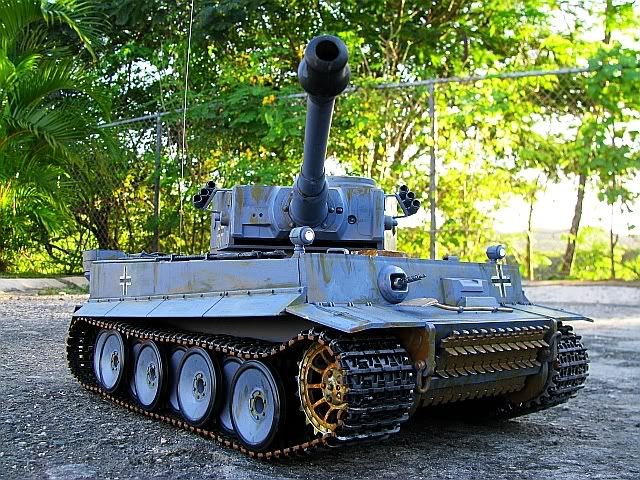
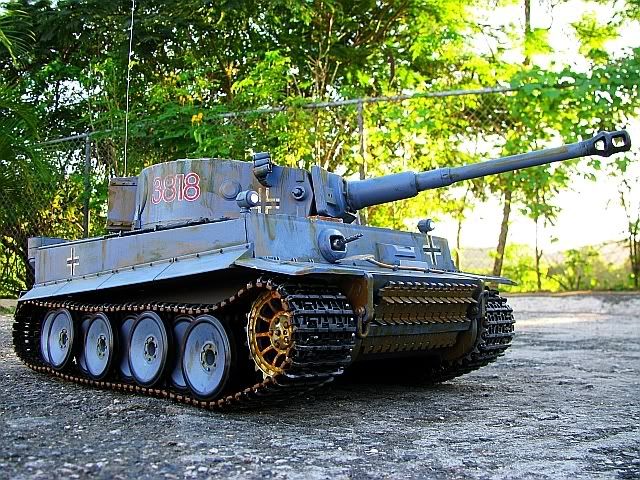
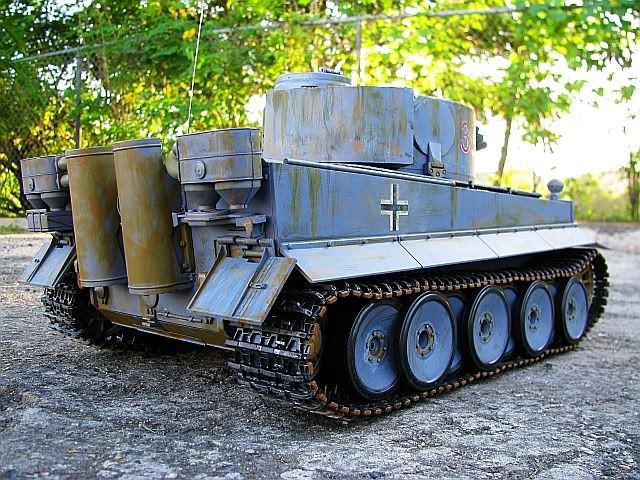
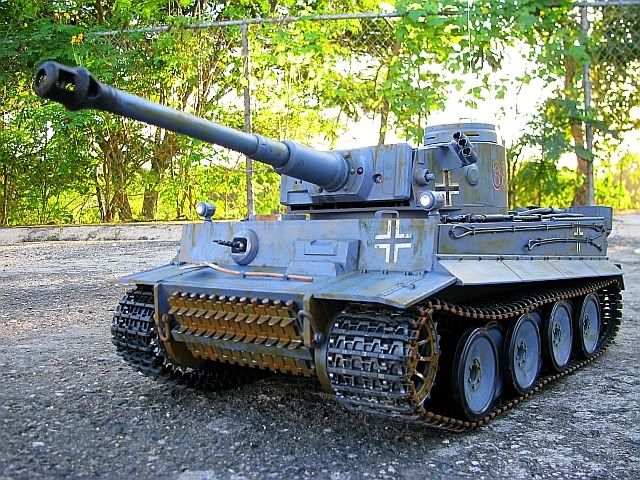
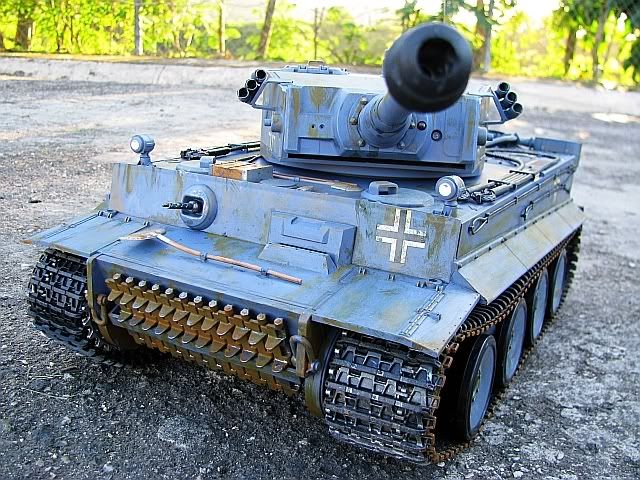
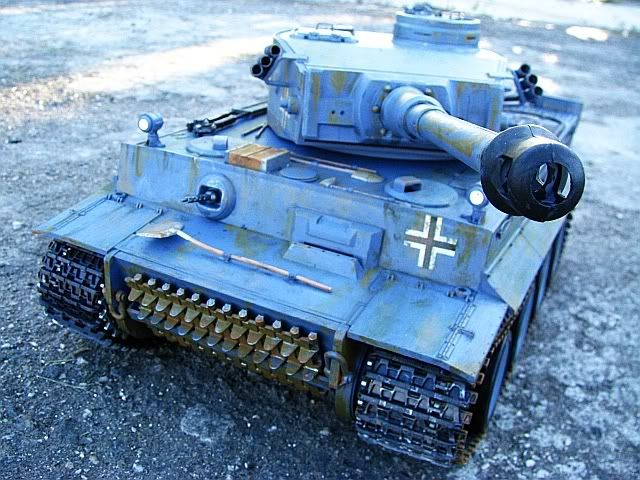
The look is a long standing unit with not too many serious battles. Came out very good for my first 1/16 weathering job.
The look is a long standing unit with not too many serious battles. Came out very good for my first 1/16 weathering job.
12-27-2007, 08:48 AM
#18
Senior Member
Thread Starter
Join Date: Feb 2007
Location: sparta, NJ
Posts: 1,356
Likes: 0
Received 0 Likes
on
0 Posts
Really nice work! I used that dry brush before works nice. I have to study your techniques better. I have two large tanks I want to do. First I'm trying to work on the workings of the tanks.
I want to work on my big tank first. The big TAN tank is 42 inches long. M1A2 ABRAMS TANK 1:9 tank. I need to somehow get a variable speed in it as it only goes forward and reverse at one speed, fast. I also need that front cannon to go up and down, now its manual. I also need to lose the fire mechanism in it which fires one missle at a time, and put in airsoft to fire 6mm or 40 cal paint balls whichever is easier probably 6mm. Sounds like a full plate for me. Any suggestions or leads on how to do this would be great.
http://www.rcuniverse.com/forum/fb.asp?m=6809526 This is where we are trying to work with a 1/12 tank first. Thanks Ron
12-27-2007, 08:57 AM
#19
Senior Member
Thread Starter
Join Date: Feb 2007
Location: sparta, NJ
Posts: 1,356
Likes: 0
Received 0 Likes
on
0 Posts
Chaman
My tan M1A2 ABRAMS TANK 1:9 42 inch tank should just get a wash in what color and than just dry brush in what color? Thanks for the tips. Thank you all for all the tips. Ron
My tan M1A2 ABRAMS TANK 1:9 42 inch tank should just get a wash in what color and than just dry brush in what color? Thanks for the tips. Thank you all for all the tips. Ron
12-27-2007, 03:18 PM
#20
Senior Member
Join Date: Jul 2006
Location: londonengland, UNITED KINGDOM
Posts: 151
Likes: 0
Received 0 Likes
on
0 Posts
[8D]Hi Guys, have a look at http://www.rctankcombat.com/articles/speed-control/ I made the Tri Pact Speed Controler and it works great! rctankcombat has some excellent articles that suit the larger scale tank. Lots of tips on motors, paintballs and tracks etc., etc.
12-27-2007, 03:24 PM
#21
Senior Member
Join Date: Jul 2006
Location: londonengland, UNITED KINGDOM
Posts: 151
Likes: 0
Received 0 Likes
on
0 Posts
Oh I forgot, darticus have you had a look at the Macfarlane figures? They must be around 1:10 but I guess could pass for 1:9? They are not articulated but can be cut and reglued to suit and with some epoxy putty modifing the helmets to Tanker style...
12-27-2007, 03:34 PM
#22
Senior Member
Thread Starter
Join Date: Feb 2007
Location: sparta, NJ
Posts: 1,356
Likes: 0
Received 0 Likes
on
0 Posts
Dinodog
I'm at present going nuts Trying to find a way to get my 1/6 Stuart m5 and 1/9 Abrams tank to move its gun up and down , shoot airsoft instead of a missile and get a variable speed in it. I don't know enough to even know if you unit will work, but it would be nice.
How do you know how many channels a TX has? left lever up and down is one or two channels? A push button on and off is one channel or two? Trying to figure out a tank tx. Abrams has Lever left =left track forward and backward. Lever right =right track forward and backward. It has 4 buttons one for fire missile one for turning turret right a button for turning turret left and a machine gun fire button. Are the 4 buttons channels and the two levers, which center to zero, are two each? Maybe the missile fire button can be used for firing airsoft and maybe the machine gun button could shoot the machine gun and raise and lower the cannon. [email protected]
I am a newbie and ALL help welcome. Thanks RON
12-27-2007, 04:02 PM
#23
Senior Member
Join Date: Jul 2006
Location: londonengland, UNITED KINGDOM
Posts: 151
Likes: 0
Received 0 Likes
on
0 Posts
Hello mate, There are loads of ways to do conversions and it helps to make things up as you go along! I have gutted my 1:12 Abrams and replaced the boards with a 4 Channel Futaba.
A Tx has has as many channels as you can afford but most basic entry level flyers use at least 4 channels. We can use 4 channel rigs in Tanks but the problems start when you need more channels! So Tamiya has developed DMD control units to suit it's Tanks and heavy trucks using the trim controls as extra function switches, they can be used in other models but need Futaba or Acoms style 4 channel rigs, and can only handle 7.2 volts I think! (Please put me right Guys!) However the costs do begin to add up!! The Tri Pact Speed Controler is cheap and cheerful but still needs 2 channels on it's own! Use one for the Turret turn and 1 more for the cannon up and down. We need number 5 to fire the weapon. So if we don't use a DMD a Tank needs at least 5 channels not including lights and sound or smoke. As you know the cam on the 1:12 Hailaing Abrams raises the cannon up and down on the turn of the Turret and saves a channel but it is a get out and independant control is of course best! There are lots of tricks to increase channel numbers by using the "sweep" of servo arms to switch mirco switches at the end of their travel but everyone does it differently! Have a look at rctanks.com and see if you can pick any tips up there, I certainly did!.
A Tx has has as many channels as you can afford but most basic entry level flyers use at least 4 channels. We can use 4 channel rigs in Tanks but the problems start when you need more channels! So Tamiya has developed DMD control units to suit it's Tanks and heavy trucks using the trim controls as extra function switches, they can be used in other models but need Futaba or Acoms style 4 channel rigs, and can only handle 7.2 volts
I think! (Please put me right Guys!) However the costs do begin to add up!! The Tri Pact Speed Controler is cheap and cheerful but still needs 2 channels on it's own! Use one for the Turret turn and 1 more for the cannon up and down. We need number 5 to fire the weapon. So if we don't use a DMD a Tank needs at least 5 channels not including lights and sound or smoke. As you know the cam on the 1:12 Hailaing Abrams raises the cannon up and down on the turn of the Turret and saves a channel but it is a get out and independant control is of course best! There are lots of tricks to increase channel numbers by using the "sweep" of servo arms to switch mirco switches at the end of their travel but everyone does it differently! Have a look at rctanks.com and see if you can pick any tips up there, I certainly did!.
12-27-2007, 04:27 PM
#24
Senior Member
Thread Starter
Join Date: Feb 2007
Location: sparta, NJ
Posts: 1,356
Likes: 0
Received 0 Likes
on
0 Posts
I went to the rctanks.com and it just sent me to other places like to buy stuff. Maybe I'm at the wrong section of rctanks.com. Ron
12-28-2007, 12:44 AM
#25
Senior Member
Join Date: Jul 2006
Location: londonengland, UNITED KINGDOM
Posts: 151
Likes: 0
Received 0 Likes
on
0 Posts
[8D]Hiya Ron, as far as I know rctankcombat.com doesn't sell anything but is a club advice site for 1:6 paintball combat Tanks, very useful for construction or repair advice, but I can now see I wrote only rctanks.com by mistake! Whoops. Click on the link I posted before for rctankcombat.com and you should go straight to Speed Controls but there is loads of "How to" articles on there.
If you are used to a 2 channel TxRx on a car or truck you have 2 joysticks, the left one normally used for steering, only works on the left and right sweep of it's restricted travel and the right one which is used for throttle only works on it's up and down restricted travel.
OK hopefully so far so good, [&:] on a 4 channel the 2 joysticks aren't restricted but can move freely, like a ball joint. They work in the left, right, up and down travel of both of the joysticks, operating 4 servo channels which can be set up to control anything. Some people stick to 2 channel operation for a Tank or tracked snow plough etc., or go all the way and fit 8 channel radios! So the possibilities are endless![&:]
It depends on your time and budget. I try to keep costs down and some members on Tamiyaclub.com have called my Abrams a "Main Budget Tank" rather than "Main Battle Tank"! They love spending money! I have spent about £250UK/$500US total including a new 4 channel radio set and plan b toys crew etc. on my 1:12 Abrams. Considering the cost of an 1:8 "Kit" I think thats a bargin. Of course mine is part, or even all, poser and would lose in a race yet alone in a fight but it has given me hours of fun setting it up and keeping it running! It's very scale and is perfect for conversion! Click on
http://uktankclub.star-one.co.uk/jam...conversion.htm and have a look at James offering.
Cheers Dino.
If you are used to a 2 channel TxRx on a car or truck you have 2 joysticks, the left one normally used for steering, only works on the left and right sweep of it's restricted travel and the right one which is used for throttle only works on it's up and down restricted travel.
OK hopefully so far so good, [&:] on a 4 channel the 2 joysticks aren't restricted but can move freely, like a ball joint. They work in the left, right, up and down travel of both of the joysticks, operating 4 servo channels which can be set up to control anything. Some people stick to 2 channel operation for a Tank or tracked snow plough etc., or go all the way and fit 8 channel radios! So the possibilities are endless![&:]
It depends on your time and budget. I try to keep costs down and some members on Tamiyaclub.com have called my Abrams a "Main Budget Tank" rather than "Main Battle Tank"! They love spending money! I have spent about £250UK/$500US total including a new 4 channel radio set and plan b toys crew etc. on my 1:12 Abrams. Considering the cost of an 1:8 "Kit" I think thats a bargin. Of course mine is part, or even all, poser and would lose in a race yet alone in a fight
but it has given me hours of fun setting it up and keeping it running! It's very scale and is perfect for conversion! Click on http://uktankclub.star-one.co.uk/jam...conversion.htm and have a look at James offering.
Cheers Dino.