


1/8 King Tiger R/C Armory build
 11-02-2009, 03:38 PM
#1
Senior Member
Thread Starter

Join Date: Feb 2006
Location: melbourne, AUSTRALIA
Posts: 114
Likes: 0
Received 0 Likes
on
0 Posts
Heres a few pics of my latest addition. A 1/8 King Tiger from R/C Armory. Information on these unique tanks is few and far between so i thought i would share my experiences with you all. Like a lot of you I have always dreamed of buying a large scale tank but the high prices simply put them out of my reach. That was until I stumbled on R/C Armory. Although many still consider the price to be quite high they are are a far cry from the European and Asian manufactures in terms of price. They also appeared to be a very well engineered product so for the price of a couple of blinged out Tamiya's you could land one of these instead. Another big factor for me was although I wanted something large I also wanted it to be semi easy to move around without having to buy giant lifting jacks etc. 250kgs sounds great but imagine getting it stuck in the mud or having a flat battery out in the field!
Anyway apart from a few customs related dramas it arrived safely in a giant wooden crate.

It was much larger in the flesh than on paper.
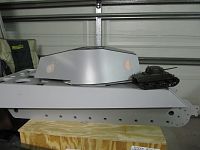

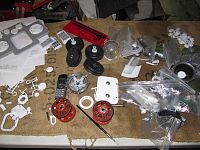
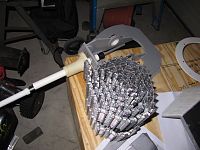
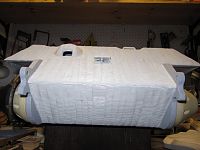
As you can see the majority of the hull and turret comes pre-constructed and is made out of a material called Sentra. It it quite light but feels rock solid and is cut and glued to very good tolerances. This kit is a far cry from a Tamiya kit though as none of the bags are labeled and the instructions come on sheets of A3 paper and are more like blue prints than a step by step guide so a pretty good degree of modeling skills are required. The parts comprise of injection molded plastic, cast resin and alloy and laser cut steel. I was very impressed with there quality. The tracks are massive and shudder to think about how big those would be for the 1/4 scale guys.
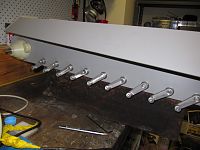
So the build begins with the suspension. Everything went together smoothly and looks very strong. Pretty standard setup and basic design should prove to be reliable.
The drive system comprises of 2 giant gear reduction motors and a simple chain drive.

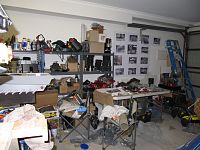
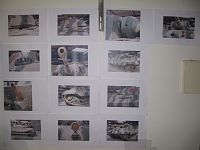
I decided to model mine on the only currently running Tiger2 located in France so gathered up as many pics as I could. Heres the war room and wall of inspiration!
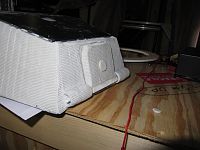
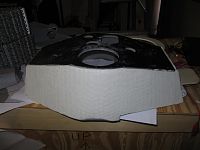
Then came the most frightening task of all. the dreaded Zimmerit process. I have never done this before so was really worried how it would go but turned out pretty well for a first time job. The secret is a large brass gear from my old Tamiya Sherman gear box and some Apoxie Sculpt!
Thats about it for now. Will post more as I progress...
Anyway apart from a few customs related dramas it arrived safely in a giant wooden crate.
It was much larger in the flesh than on paper.
As you can see the majority of the hull and turret comes pre-constructed and is made out of a material called Sentra. It it quite light but feels rock solid and is cut and glued to very good tolerances. This kit is a far cry from a Tamiya kit though as none of the bags are labeled and the instructions come on sheets of A3 paper and are more like blue prints than a step by step guide so a pretty good degree of modeling skills are required. The parts comprise of injection molded plastic, cast resin and alloy and laser cut steel. I was very impressed with there quality. The tracks are massive and shudder to think about how big those would be for the 1/4 scale guys.
So the build begins with the suspension. Everything went together smoothly and looks very strong. Pretty standard setup and basic design should prove to be reliable.
The drive system comprises of 2 giant gear reduction motors and a simple chain drive.
I decided to model mine on the only currently running Tiger2 located in France so gathered up as many pics as I could. Heres the war room and wall of inspiration!
Then came the most frightening task of all. the dreaded Zimmerit process. I have never done this before so was really worried how it would go but turned out pretty well for a first time job. The secret is a large brass gear from my old Tamiya Sherman gear box and some Apoxie Sculpt!
Thats about it for now. Will post more as I progress...
 11-02-2009, 04:21 PM
#2
Senior Member

Join Date: Jan 2007
Location: Santa Rosa,
CA
Posts: 1,332
Likes: 0
Received 0 Likes
on
0 Posts
This would be fun to do, I'd like to see as much as you can of this build. I built a very detailed 1/16 Tamiya KT that you may or may not have read but if not here is a link to it and it may give you some help or ideas. http://www.rcuniverse.com/forum/m_7003543/tm.htm
Gary
Gary
11-02-2009, 04:41 PM
#3
Senior Member
Thread Starter
Join Date: Feb 2006
Location: melbourne, AUSTRALIA
Posts: 114
Likes: 0
Received 0 Likes
on
0 Posts
Thanks for the link Gary. I actually had this bookmarked way back last year when I was considering the Tam version but had forgot about it. Will be sure to revisit it as I actually find the R/C builds more useful in terms of ideas than the static model builds.
 11-02-2009, 04:58 PM
#5

This is great project. The rest of us will have to live vicariously through you. Please post as many pic's as you can.
Best of all looks like it came packed with a beer. Was that extra?
Perry
Best of all looks like it came packed with a beer. Was that extra?
Perry
11-02-2009, 06:09 PM
#6


Looking good so far, a few years ago I came across these tanks though back then they had plastic tracks nice to see they have been up graded to metal.
Whilst basing your Tiger on the French Tiger a few things you should take into consideration firstly this Tiger is not painted in accurate colours and the turret number may not be right, Tigers in Normandy had a three colour pattern it belonged to one of two abteilung 503 or SS101 most though not all of 503 Tigers where of the Porsche turret, SS101 where all Henschele.
What sound unit are you going to use
11-02-2009, 07:00 PM
#7
Senior Member
Thread Starter
Join Date: Feb 2006
Location: melbourne, AUSTRALIA
Posts: 114
Likes: 0
Received 0 Likes
on
0 Posts
Cannot mention cost in case the wife sees my post but there website has all that..lol
Funny though how Aus. customs and taxes added up more that the cost of the actual freight from the US. Actually, once I submitted all the paperwork the customs guy came back to me a few hours later with a couple of other officers and started asking me for additional government clearance papers etc. I was stunned until I realized they thought i was actually trying to import a real King Tiger...I kid you not! Didn't help that my home address resides on an ex military base which also came up on there system. Unbelievable.
Anyway unfortunately the beer didnt come with the kit but I should have factored it into the overall cost as I have had so many during the build
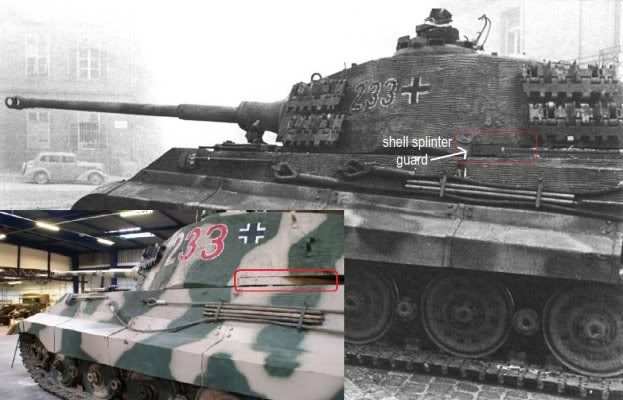
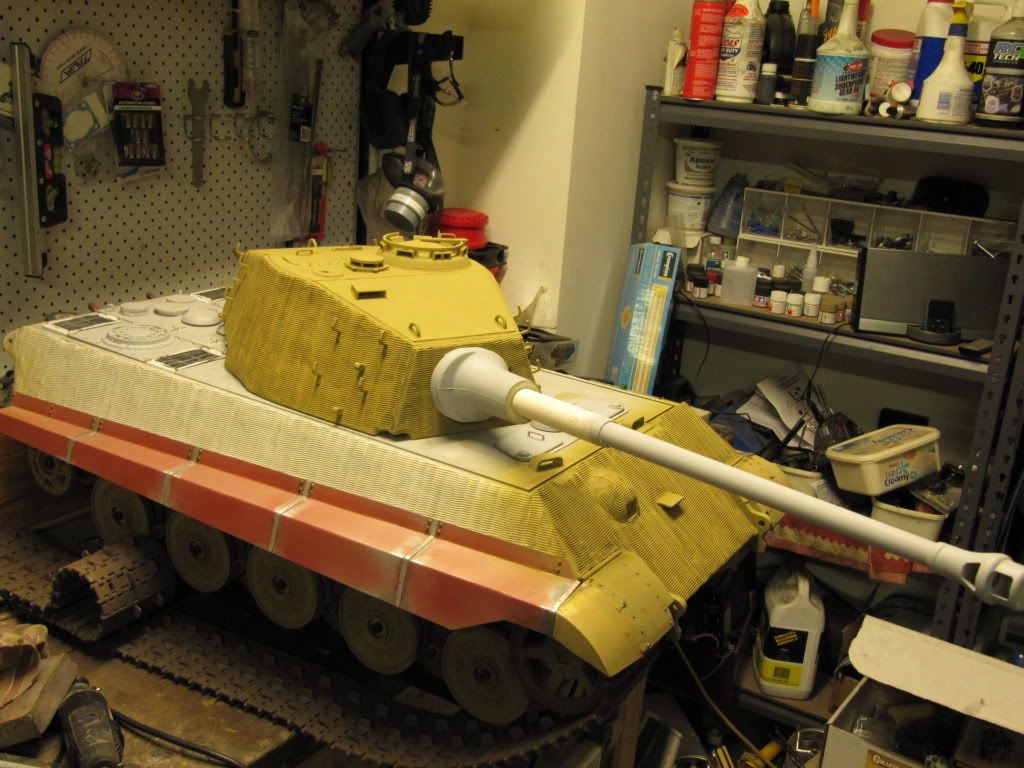
Thanks RC for the info. I guessed the colours were not 100% but I kinda like it anyway. Its more a cream than a dark yellow but I figured I can take a little artistic license since the colours would have varied so much anyway. The only pic I have of its potential origins is this.
Funny though how Aus. customs and taxes added up more that the cost of the actual freight from the US. Actually, once I submitted all the paperwork the customs guy came back to me a few hours later with a couple of other officers and started asking me for additional government clearance papers etc. I was stunned until I realized they thought i was actually trying to import a real King Tiger...I kid you not! Didn't help that my home address resides on an ex military base which also came up on there system. Unbelievable.
Anyway unfortunately the beer didnt come with the kit but I should have factored it into the overall cost as I have had so many during the build
Thanks RC for the info. I guessed the colours were not 100% but I kinda like it anyway. Its more a cream than a dark yellow but I figured I can take a little artistic license since the colours would have varied so much anyway. The only pic I have of its potential origins is this.
11-02-2009, 07:02 PM
#8
Senior Member
Thread Starter
Join Date: Feb 2006
Location: melbourne, AUSTRALIA
Posts: 114
Likes: 0
Received 0 Likes
on
0 Posts
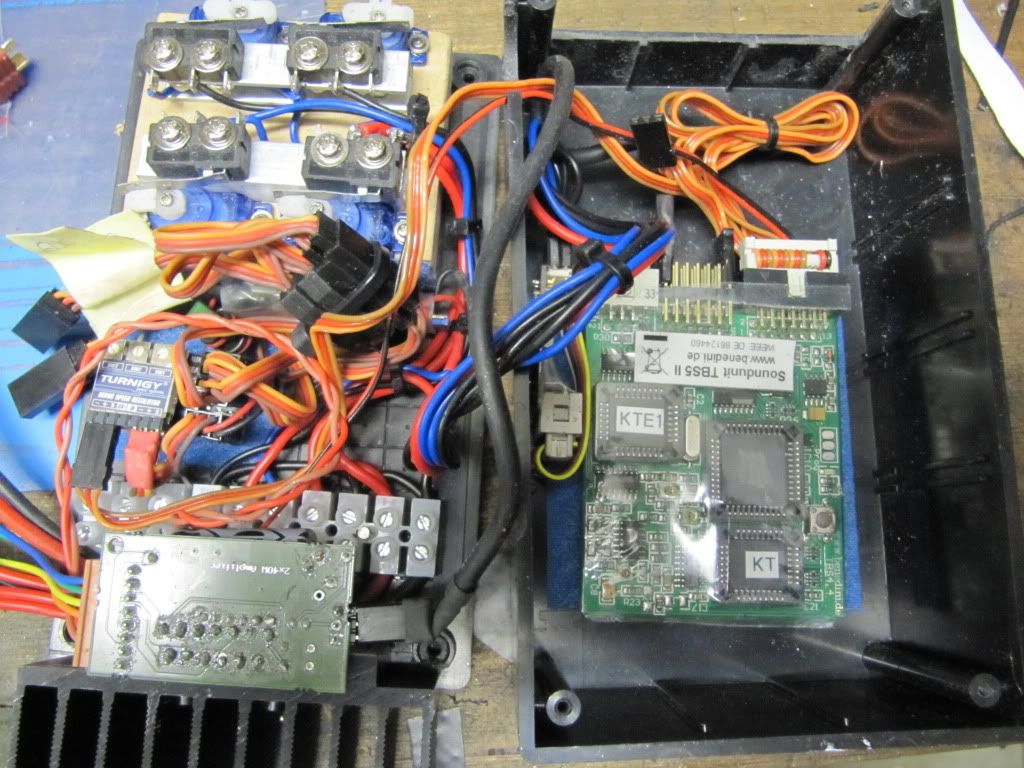
Oh the sound is from a Benedini TBS5 with digital control which is controlled by 4 mcro servos. Made this while waiting for the tank to arrive.
11-03-2009, 09:03 AM
#9
This picture of 233 came from s.Pz.Abt 503 and was taken in Budapest as oppose to Normandy and is not the Tiger from France when you saved this picture from the Armourtek forum the red marks are referring to the forward second mesh screen this was to prevent nines and grenades being placed under the turret overhang this is a part that is missing from the 1/6 kit and also from your own.
When the French captured various Panthers and Tigers no records of turret numbers or divisions where kept so trying to verify which unit a particular tank came from is very difficult if not impossible.
I have the Benidini sound unit for my own 1/6 Tiger
When the French captured various Panthers and Tigers no records of turret numbers or divisions where kept so trying to verify which unit a particular tank came from is very difficult if not impossible.
I have the Benidini sound unit for my own 1/6 Tiger
11-17-2009, 04:19 AM
#10
Senior Member
Thread Starter
Join Date: Feb 2006
Location: melbourne, AUSTRALIA
Posts: 114
Likes: 0
Received 0 Likes
on
0 Posts
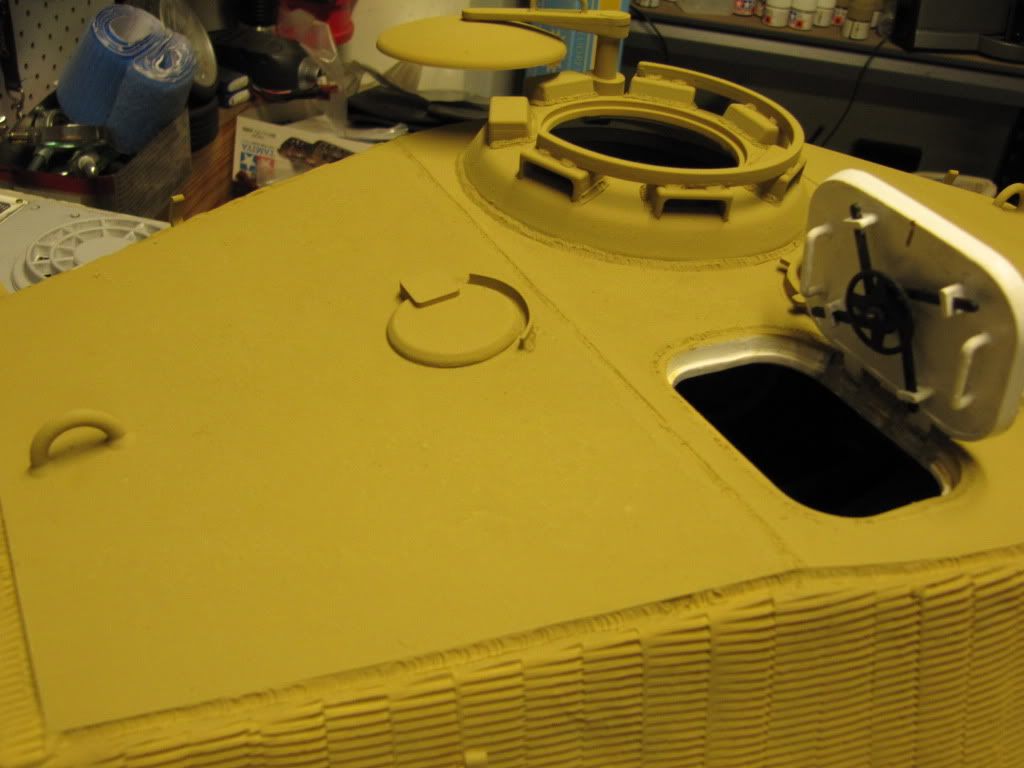
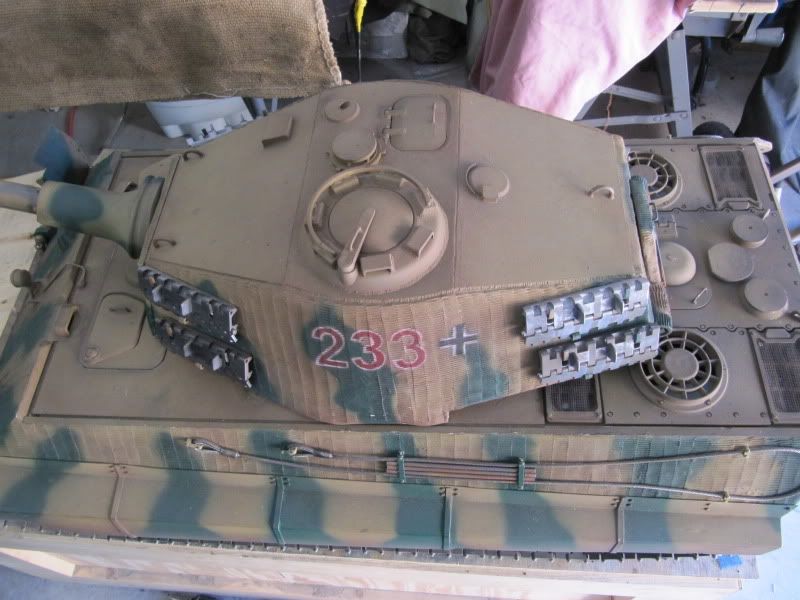
Been a bit slack with the pics but hears how shes progressing. The first thing you notice with the larger scale (besides the size) is the sheer amount of time they consume. A small job on a 1/16 becomes a HUGE one on a 1/8. It also seems R/C Armory have really taken the modelers approach in that it goes together like a smaller plastic model. What I mean by that is where as R/C Armory could have injection molded a part as a single piece (such as the wheel spacers or gun barrel for example) they have instead oped to spit these parts into two pieces which you have to individually put together making assembly take much more time. Anyone into putting things together will love this kit as it truly is a time sponge. I must also admit I have enjoyed the build so far even if I am a little on the impatient side.
I have also decided not to detail it much more than it already is as if I do I would never get to see it run. Plans for the future include gun recoil, side and rear details and a few other goodies but for now will just finish off the paint and continue with the essential mechanical and electrical items.

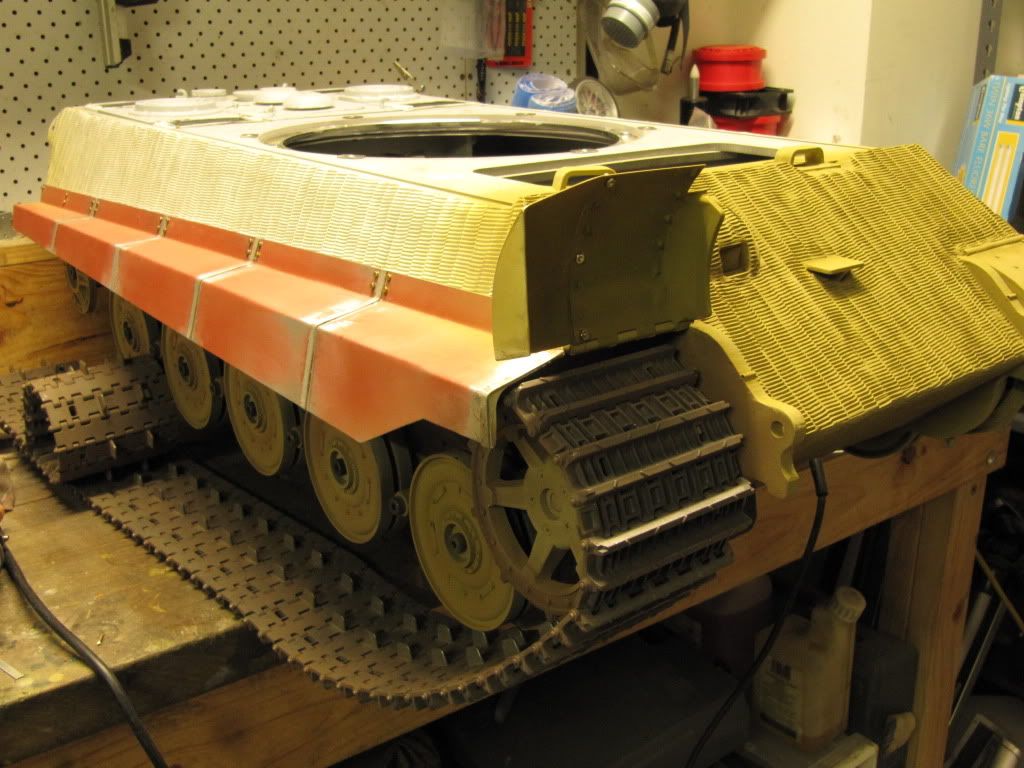

I have also decided not to detail it much more than it already is as if I do I would never get to see it run. Plans for the future include gun recoil, side and rear details and a few other goodies but for now will just finish off the paint and continue with the essential mechanical and electrical items.
11-17-2009, 06:59 PM
#12

Looks to be a nice kit. [sm=thumbs_up.gif]
I see they are to release a Stug III which would be of interest to me.
I see they are to release a Stug III which would be of interest to me.
11-18-2009, 01:41 AM
#13
Senior Member
Join Date: Mar 2007
Location: Brea, CA
Posts: 1,751
Likes: 0
Received 0 Likes
on
0 Posts
Really interesting King Tiger and your zimmerit looks great, that must have been a major task in itself! Looking forward to hearing and seeing it run in a video.
11-18-2009, 09:58 AM
#15
I have to agree with you the bigger the tank the longer it takes to detail or do anything though they do attract more attention than the 1/16 stuff, let me know how you get on with the “Turnigy” and the “Benadini” when the Tiger is running it would be nice to see some film with the Turnigy” fitted this is something I have earmarked for my 1/6 Tiger when it’s finished
07-11-2010, 08:06 PM
#16
Junior Member

Join Date: May 2008
Location: Kaukauna, WI
Posts: 8
Likes: 0
Received 0 Likes
on
0 Posts
Great vehicle. I spent some time watching your youtube videos today. The Model solutions card sounds great. I'd love to see pics of the internals of the build especially the options you added that the vendor does not offer (sound, gun recoil) Call me noisy.
It looks like you have an extensive background in all aspects of RC modeling. How would you rate RCArmory's kit for degree of difficulty to build? I have not attempted anything this involved (in modeling at least) and would be interested in your opinion.
Kevin
It looks like you have an extensive background in all aspects of RC modeling. How would you rate RCArmory's kit for degree of difficulty to build? I have not attempted anything this involved (in modeling at least) and would be interested in your opinion.
Kevin
07-11-2010, 09:37 PM
#17
Senior Member
Thread Starter
Join Date: Feb 2006
Location: melbourne, AUSTRALIA
Posts: 114
Likes: 0
Received 0 Likes
on
0 Posts
Thanks Kevin, I’ll try and answer your Q’s as best I can. Firstly by no means do have extensive modelling experience apart from the fact I have been into RC for about 30 years however this was with basic kit building only. My only real “modelling” experience started with my Tamiya Sherman I bought a few years back so don’t be afraid about this kits complexity as it is very easy to put together. Its only the detailing that takes the time but that can be done after the build anyway.
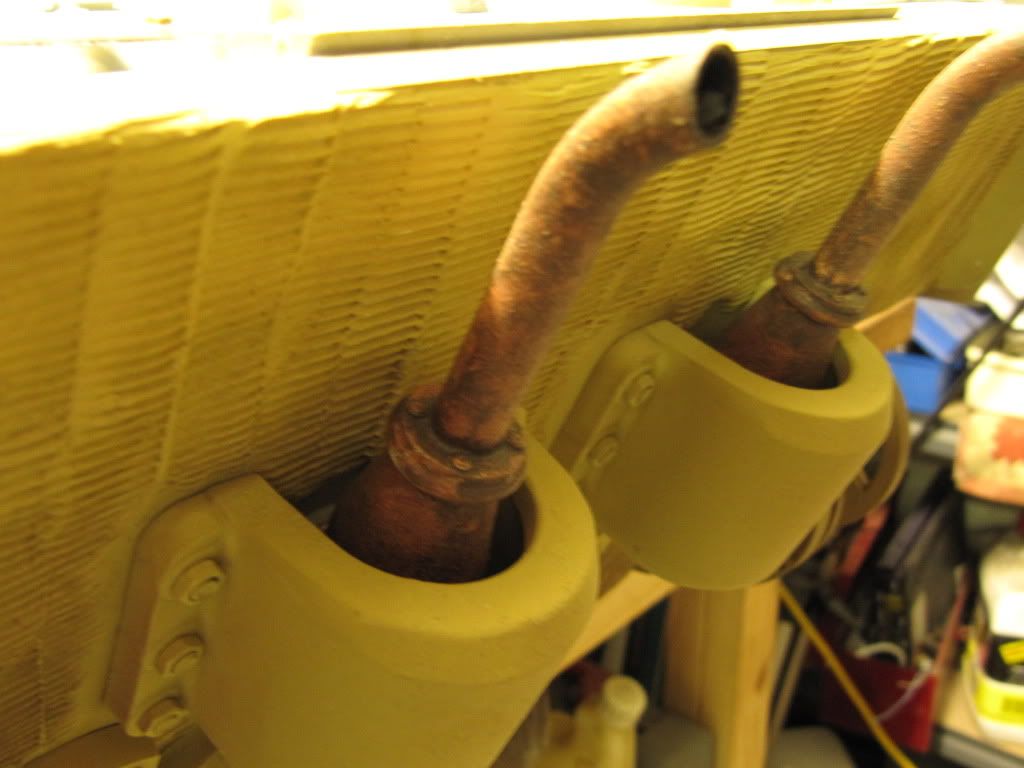
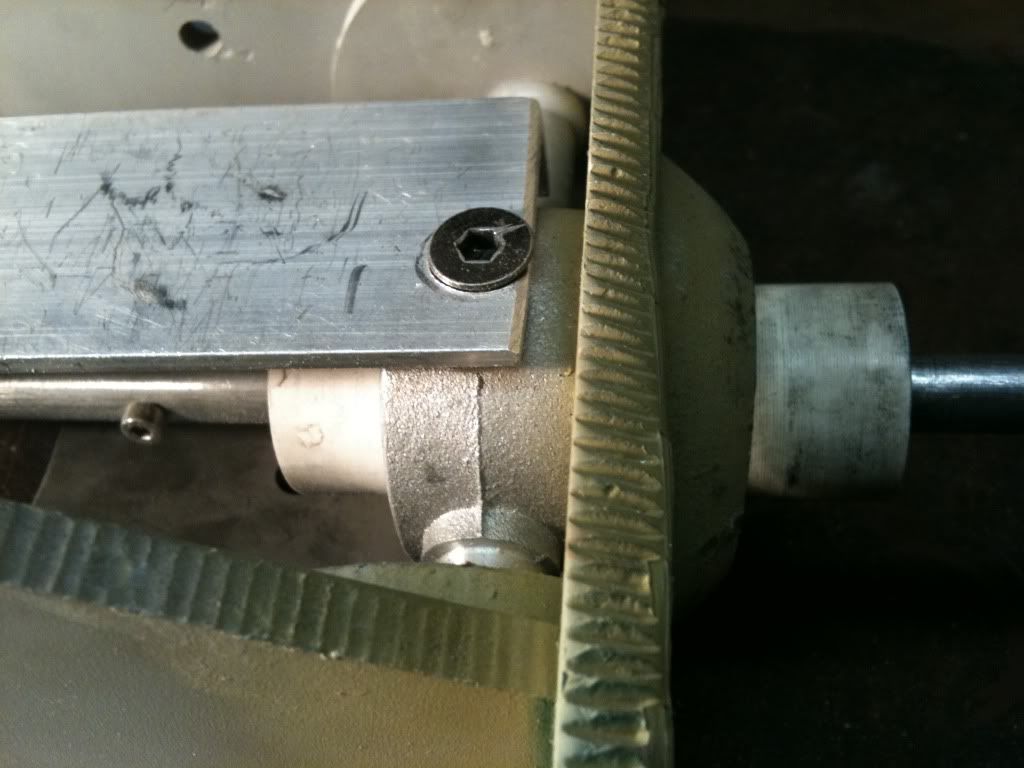
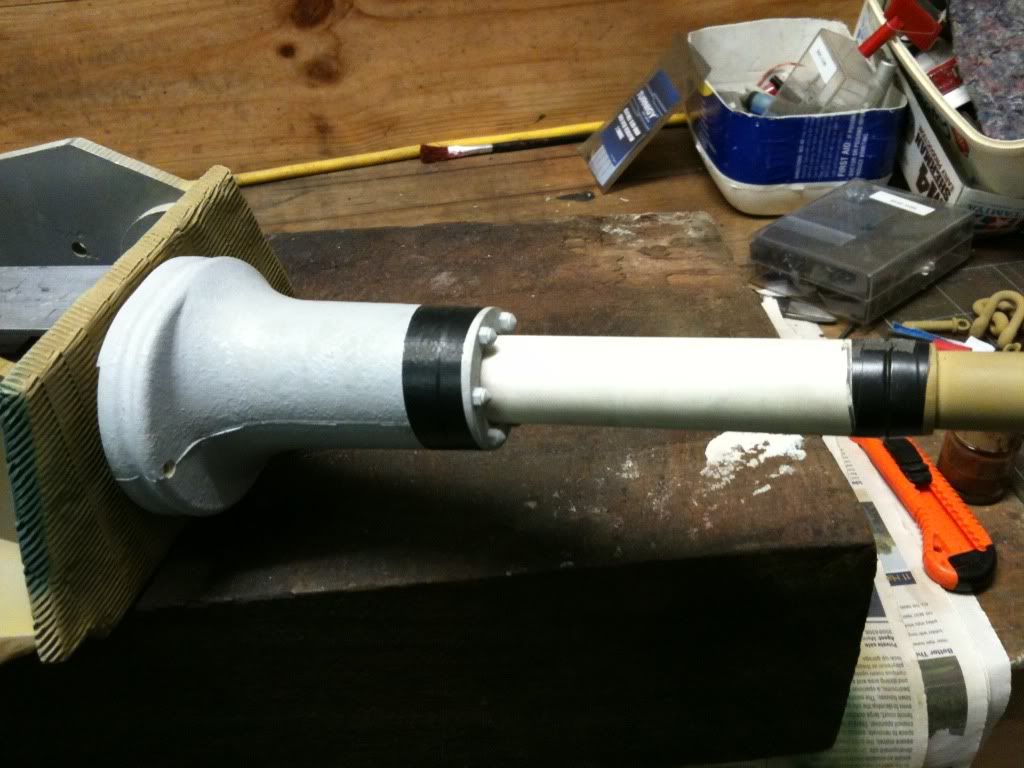
The RC Armory KT kit doesn’t come with a recoil option so I had to fabricate my own. The hardest part was nutting out how to do this but it is really quite simple. The barrel fits into a plastic tube which is attached to the elevation hinge. All I had to do was cut out a section of this pipe to allow the barrel to be able to slid back as shown below. The barrel has an alloy core which runs through this via some sleeving and a servo link is bolted to this to activate the recoil. Hard to describe but hopefully the pics will give you some idea on how its done.
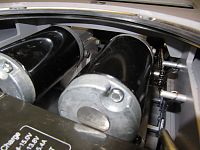
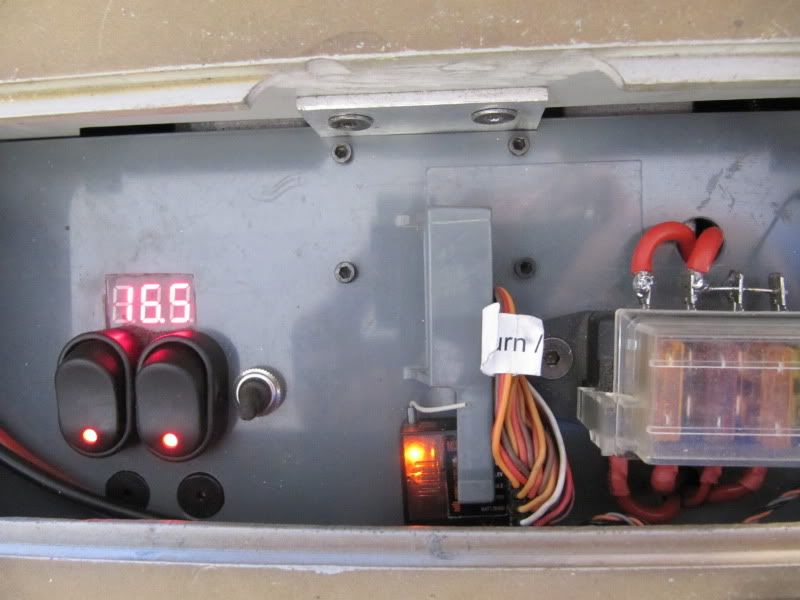
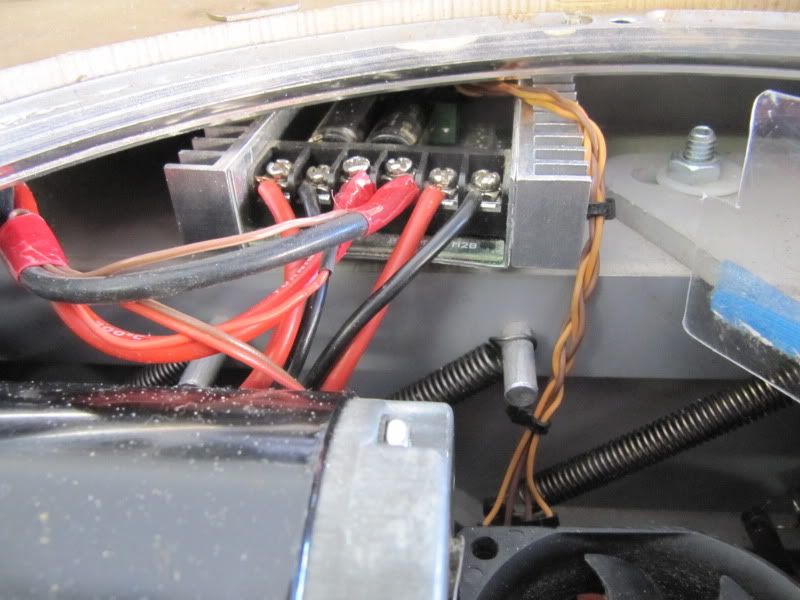
As for some other internal pics I will start with the front which houses most of the electronics. A removable plate under the hatches which has some nifty items such as voltage display for both main power (16v 4x4s 5000mah lipos) and sound power (24v 6s 5000mah lipo) It has audible low voltage buzzers for both packs and a fuse box. Underneath (which you cannot see) has a 6v voltage regulator for the receiver and recoil servo and a Sabertooth 2x10A controller for turret and elevation. A giant umbiblical cord runs from this to the rest of the tank which means I can remove all the electronics in a matter of minutes.
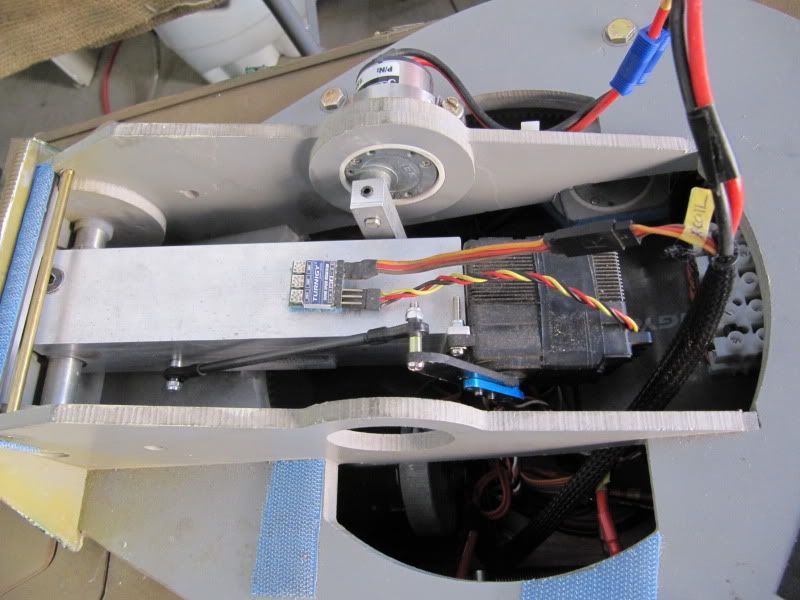
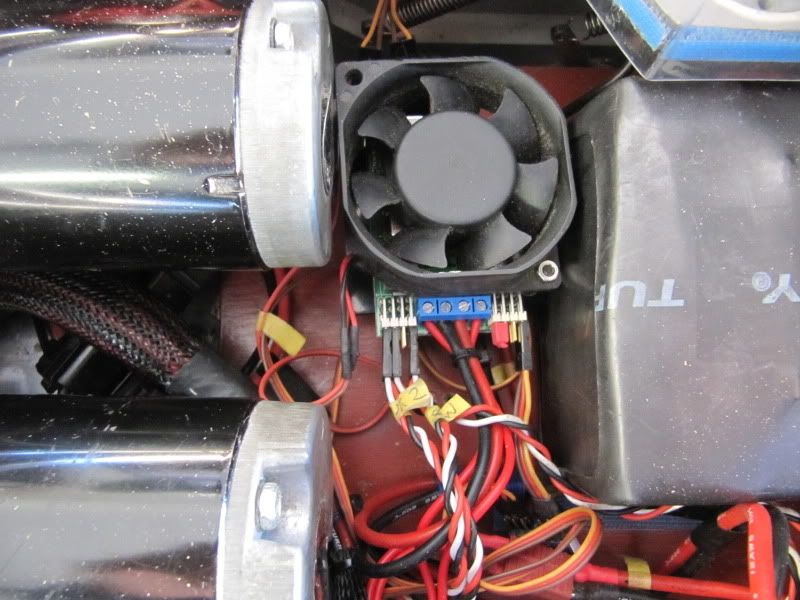
The turret can be removed in less than a minute as well allowing for easy internal access into the main compartment. Here you can see the throttle/steering speed control (Sabertooth 2x25) main drive motors, the sound module which I installed a small fan to keep cool and the 4 lipo packs heatshrinked together.
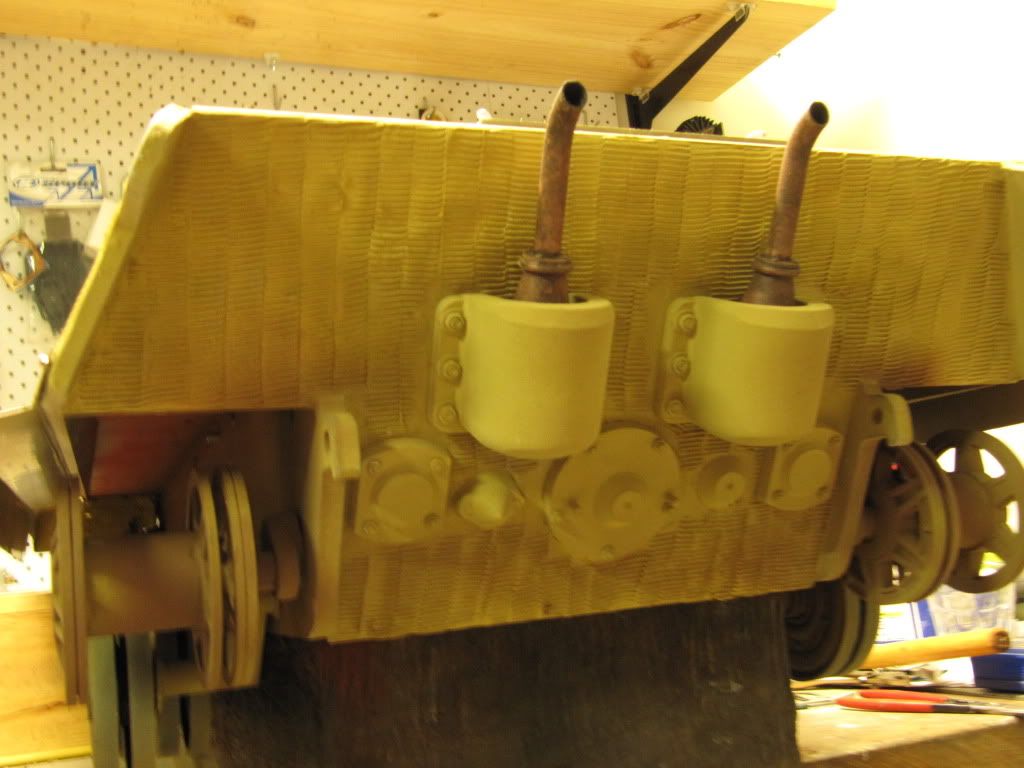
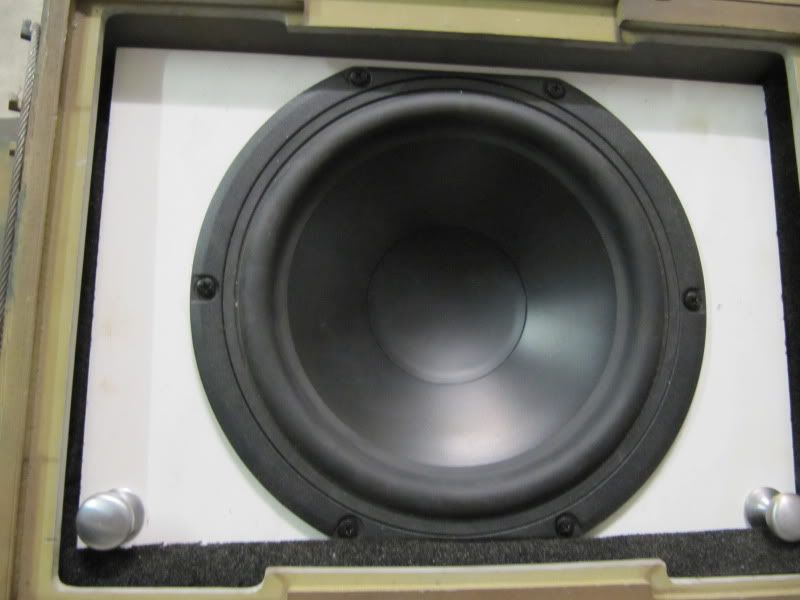
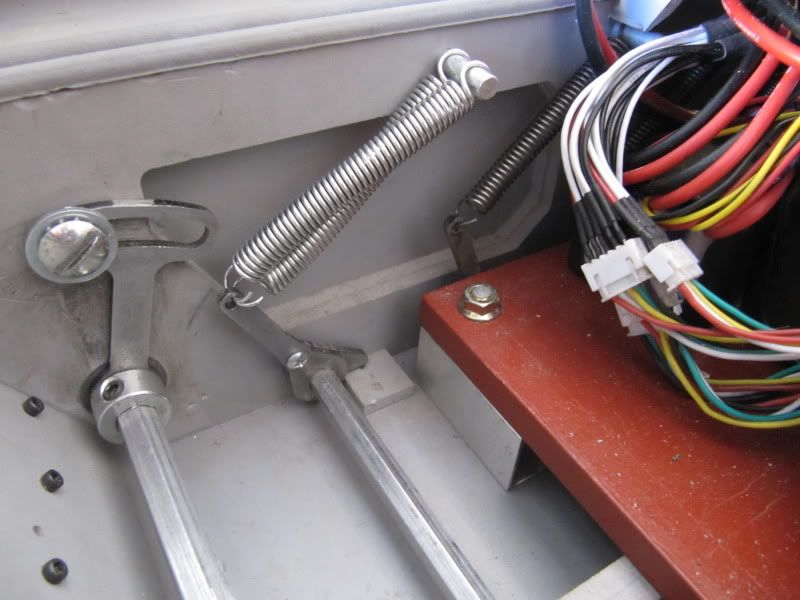
Moving to the back is my 8” Pearless speaker and underneath is the idler adjusters. I found the stock suspension a bit stiff so replaced the springs on all the roadwheels apart from the front and rear where I doubled up on the original springs to prevent the tank rocking backward and forward. This addition makes for a very smooth runner even over rough terrain.
I also recently cut a groove between the sprocket teeth (as this is what the real KT has) not sure why but I think it helps prevent the track riding up on the sprocket
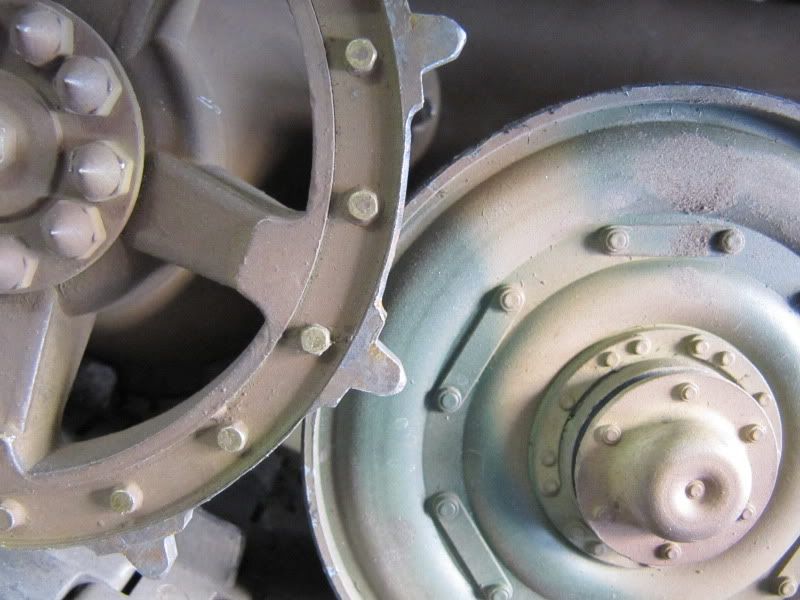
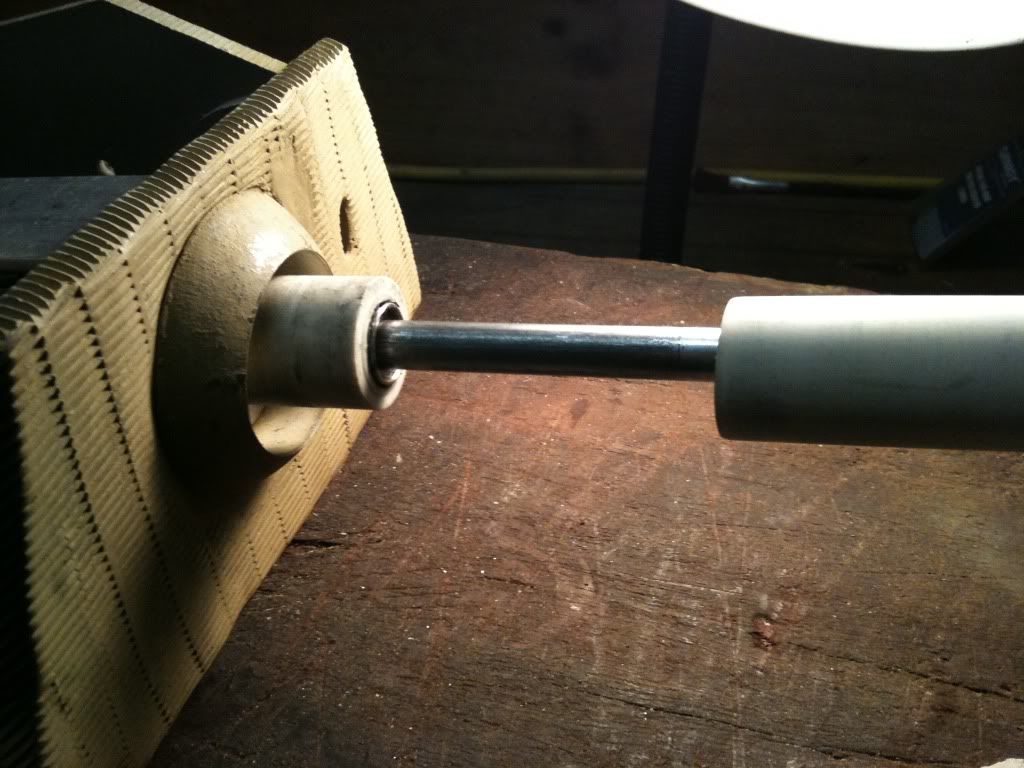
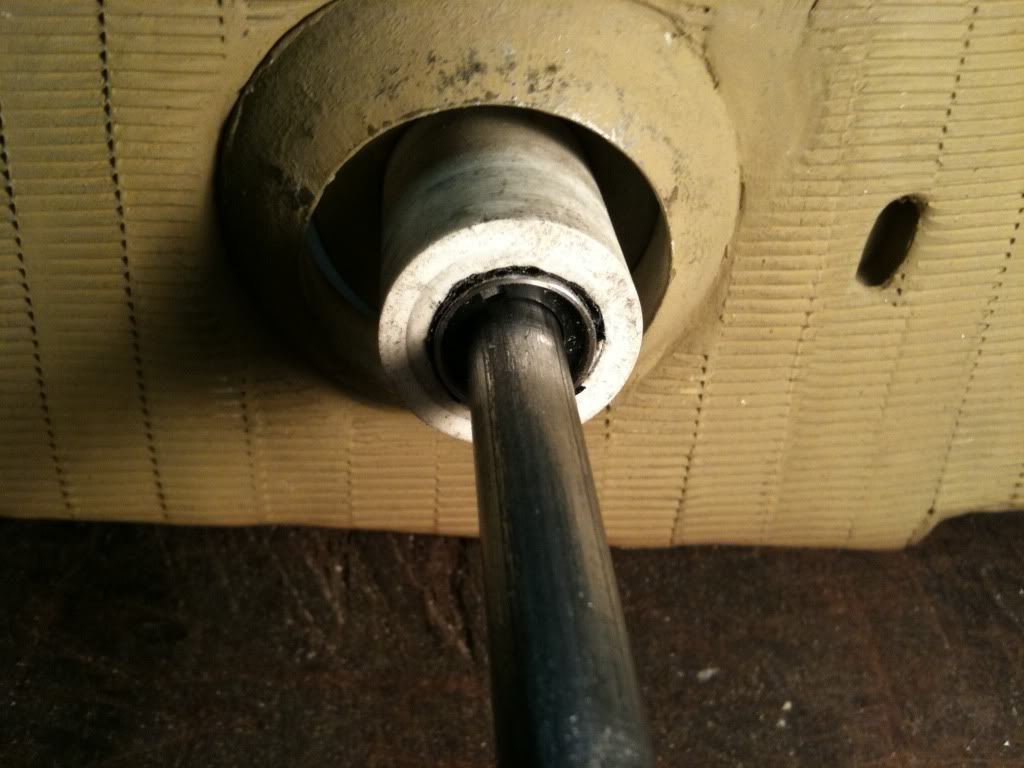
And Finally I added ball bearings to the road wheels which required a fair bit of precision drilling but in all honesty I think the standard bushings would in some ways be better as they wont rust out if planning to go through a lot of muddy stuff.
The RC Armory KT kit doesn’t come with a recoil option so I had to fabricate my own. The hardest part was nutting out how to do this but it is really quite simple. The barrel fits into a plastic tube which is attached to the elevation hinge. All I had to do was cut out a section of this pipe to allow the barrel to be able to slid back as shown below. The barrel has an alloy core which runs through this via some sleeving and a servo link is bolted to this to activate the recoil. Hard to describe but hopefully the pics will give you some idea on how its done.
As for some other internal pics I will start with the front which houses most of the electronics. A removable plate under the hatches which has some nifty items such as voltage display for both main power (16v 4x4s 5000mah lipos) and sound power (24v 6s 5000mah lipo) It has audible low voltage buzzers for both packs and a fuse box. Underneath (which you cannot see) has a 6v voltage regulator for the receiver and recoil servo and a Sabertooth 2x10A controller for turret and elevation. A giant umbiblical cord runs from this to the rest of the tank which means I can remove all the electronics in a matter of minutes.
The turret can be removed in less than a minute as well allowing for easy internal access into the main compartment. Here you can see the throttle/steering speed control (Sabertooth 2x25) main drive motors, the sound module which I installed a small fan to keep cool and the 4 lipo packs heatshrinked together.
Moving to the back is my 8” Pearless speaker and underneath is the idler adjusters. I found the stock suspension a bit stiff so replaced the springs on all the roadwheels apart from the front and rear where I doubled up on the original springs to prevent the tank rocking backward and forward. This addition makes for a very smooth runner even over rough terrain.
I also recently cut a groove between the sprocket teeth (as this is what the real KT has) not sure why but I think it helps prevent the track riding up on the sprocket
And Finally I added ball bearings to the road wheels which required a fair bit of precision drilling but in all honesty I think the standard bushings would in some ways be better as they wont rust out if planning to go through a lot of muddy stuff.
07-12-2010, 06:01 AM
#18
Senior Member
Join Date: Mar 2008
Location: Hong Kong, HONG KONG
Posts: 527
Likes: 0
Received 0 Likes
on
0 Posts
The little grooves on KT sprockets are because...
Originally KT had 18 teeth sprockets, later a new track design was adopted and it only required 9 teeth sprockets. So, all the sprockets which were fabricated before the change had every other tooth cut to become 9-teeth sprockets.
Originally KT had 18 teeth sprockets, later a new track design was adopted and it only required 9 teeth sprockets. So, all the sprockets which were fabricated before the change had every other tooth cut to become 9-teeth sprockets.
07-12-2010, 03:34 PM
#19
Senior Member
Thread Starter
Join Date: Feb 2006
Location: melbourne, AUSTRALIA
Posts: 114
Likes: 0
Received 0 Likes
on
0 Posts
Thats an interesting piece of information hatakashi. I do find this groove also helps prevent the track from slapping onto the face of the sprocket helping to reduce it riding up on it especially when reversing down a slope which is where I tended to have problems with this.
07-12-2010, 04:14 PM
#20
This is also the reason why the Germans didn’t just remove the extra tooth they also reduced the radius in this area for the bridge link.
I think you have done an excellent job on this Tiger I’m particularly taken with the sound unit that you have produced it has to be the best I have heard sounding more like a real tank than an RC tank with 3 steps in the rev range.
Keep up the good work.
I think you have done an excellent job on this Tiger I’m particularly taken with the sound unit that you have produced it has to be the best I have heard sounding more like a real tank than an RC tank with 3 steps in the rev range.
Keep up the good work.
07-18-2010, 04:31 PM
#21
Junior Member
Join Date: May 2008
Location: Kaukauna, WI
Posts: 8
Likes: 0
Received 0 Likes
on
0 Posts
Thank you Mono for providing more detail. All I can say is WOW, what wonderful work. I believe I understand how you did the recoil, but what blows me away is the layout and detail of the electrical system. I have been lurking on RC tank boards for over a year but I have not seen an electrical system with fuses, voltage meters, low battery alarms etc. Beautiful. If you want to elaborate on this aspect of the build (design, parts), I am all ears.
PS: Do you have an electrical background?
PPS: What are the switches (two rocker and one toggle) on the electrical panel control?
Kevin
PS: Do you have an electrical background?
PPS: What are the switches (two rocker and one toggle) on the electrical panel control?
Kevin
 07-19-2010, 02:16 AM
#23
Senior Member
Thread Starter
Join Date: Feb 2006
Location: melbourne, AUSTRALIA
Posts: 114
Likes: 0
Received 0 Likes
on
0 Posts
Thanks, if you really want to See AWESOME electrical work check out some of the stuff going on with those Armortek builds!
As for what I have done there is basically 3 separate circuits going on powered by 2 individual power sources (one 16v and one 26v lipo packs) The 16v is wired directly to the 2 speed controls (drive and turret/elevation) via a 40A fuse for the drive and a 20A fuse for the turret/elevation. A feed also goes into a 6v voltage regulator (via a 5A fuse) which powers the receiver and recoil servo.
The 26v lipo has its own individual circuit which powers the SFX6 sound module (via a 5A fuse)
The rocker switch on the left switches this 16v and 6v circuits while the rocker switch on the right turns on the SFX6. The reason for this is so I can drive the tank in silent mode (i.e. without turning on the sound module) which can be handy for those late night test runs.
The smaller switch you see is there so I can switch the voltage readout display between both packs and for additional safety I have added 2 voltage alarms to beep if either pack gets low (trust me you do not want a flat battery out in the middle of a field with this thing as it doesn’t have a clutch gear release so it cannot be dragged if something goes wrong)
Heres my hybrid lipo pack which is 4x 4s,5ooomah packs in parallel. This effectively provides me with 20,000mah which is equivalent to the 12v lead acid battery I used to use.
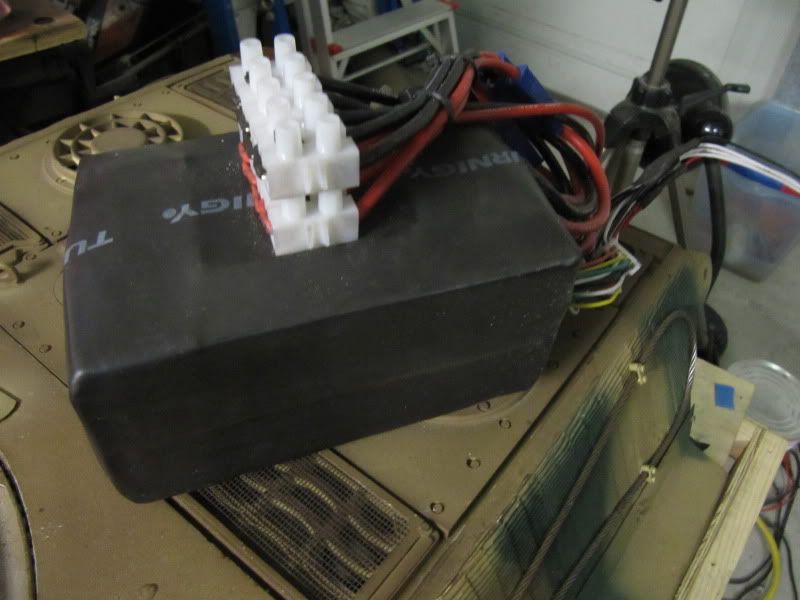
Oh and another VERY important electrical item is the Turnigy speed regulators. I stumbled across this idea a long time ago as i wasn’t happy the way my Tamiya Sherman could accelerate like a dragster and stop like an F1 car so this is a great way to add realism to you model as you can set the accelerate end de-accelerate curves to give the model giving a sense of weight and mass. There also great for setting the recoil action so that the initial kick back is fast but the return is slow.
Best of all there CHEAP!
Heres a list of bits I used
http://www.unitedhobbies.com/UNITEDH...idProduct=7227
http://www.unitedhobbies.com/UNITEDH...idProduct=7225
http://www.unitedhobbies.com/UNITEDH...idProduct=8319
http://www.unitedhobbies.com/UNITEDH...idProduct=4319
http://www.unitedhobbies.com/UNITEDH...idProduct=8863
http://www.dimensionengineering.com/...ooth2X10RC.htm
http://www.dimensionengineering.com/Sabertooth2X25.htm
http://www.modelsolutions.ca/catalog_sound_systems.htm
Hope that helps...
As for what I have done there is basically 3 separate circuits going on powered by 2 individual power sources (one 16v and one 26v lipo packs) The 16v is wired directly to the 2 speed controls (drive and turret/elevation) via a 40A fuse for the drive and a 20A fuse for the turret/elevation. A feed also goes into a 6v voltage regulator (via a 5A fuse) which powers the receiver and recoil servo.
The 26v lipo has its own individual circuit which powers the SFX6 sound module (via a 5A fuse)
The rocker switch on the left switches this 16v and 6v circuits while the rocker switch on the right turns on the SFX6. The reason for this is so I can drive the tank in silent mode (i.e. without turning on the sound module) which can be handy for those late night test runs.
The smaller switch you see is there so I can switch the voltage readout display between both packs and for additional safety I have added 2 voltage alarms to beep if either pack gets low (trust me you do not want a flat battery out in the middle of a field with this thing as it doesn’t have a clutch gear release so it cannot be dragged if something goes wrong)
Heres my hybrid lipo pack which is 4x 4s,5ooomah packs in parallel. This effectively provides me with 20,000mah which is equivalent to the 12v lead acid battery I used to use.
Oh and another VERY important electrical item is the Turnigy speed regulators. I stumbled across this idea a long time ago as i wasn’t happy the way my Tamiya Sherman could accelerate like a dragster and stop like an F1 car so this is a great way to add realism to you model as you can set the accelerate end de-accelerate curves to give the model giving a sense of weight and mass. There also great for setting the recoil action so that the initial kick back is fast but the return is slow.
Best of all there CHEAP!
Heres a list of bits I used
http://www.unitedhobbies.com/UNITEDH...idProduct=7227
http://www.unitedhobbies.com/UNITEDH...idProduct=7225
http://www.unitedhobbies.com/UNITEDH...idProduct=8319
http://www.unitedhobbies.com/UNITEDH...idProduct=4319
http://www.unitedhobbies.com/UNITEDH...idProduct=8863
http://www.dimensionengineering.com/...ooth2X10RC.htm
http://www.dimensionengineering.com/Sabertooth2X25.htm
http://www.modelsolutions.ca/catalog_sound_systems.htm
Hope that helps...
08-02-2010, 12:43 AM
#25
Senior Member
Thread Starter
Join Date: Feb 2006
Location: melbourne, AUSTRALIA
Posts: 114
Likes: 0
Received 0 Likes
on
0 Posts
ORIGINAL: War-Hammer7
Thanks again Mono for the detailed info. Whose receiver do you use with this setup?
Kevin
Thanks again Mono for the detailed info. Whose receiver do you use with this setup?
Kevin
Spektrum DX6i supplied standard AR6200 DSM2 reciever.