


150% enlarged WingontheWeb HO-229


 03-09-2013, 04:48 PM
#378
ORIGINAL: Ram-bro
looking good. WHat is your recipe for your ''wash?''
looking good. WHat is your recipe for your ''wash?''
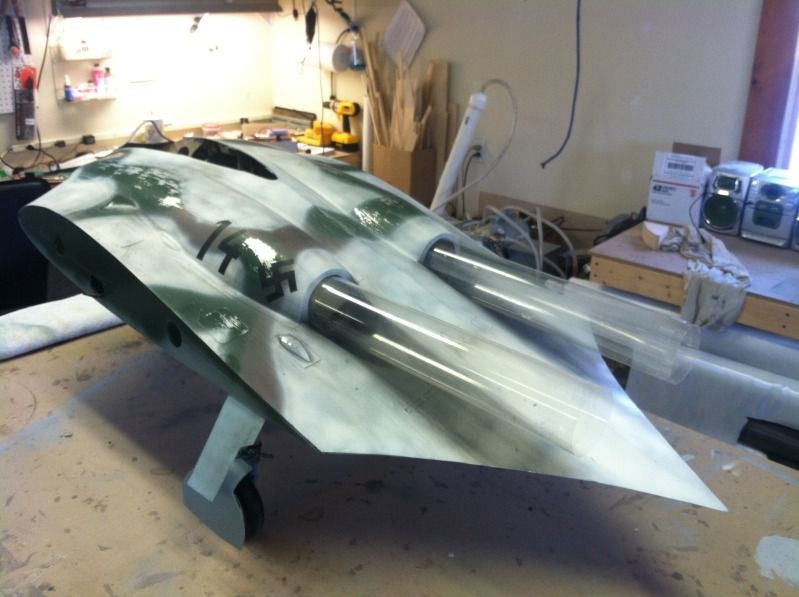
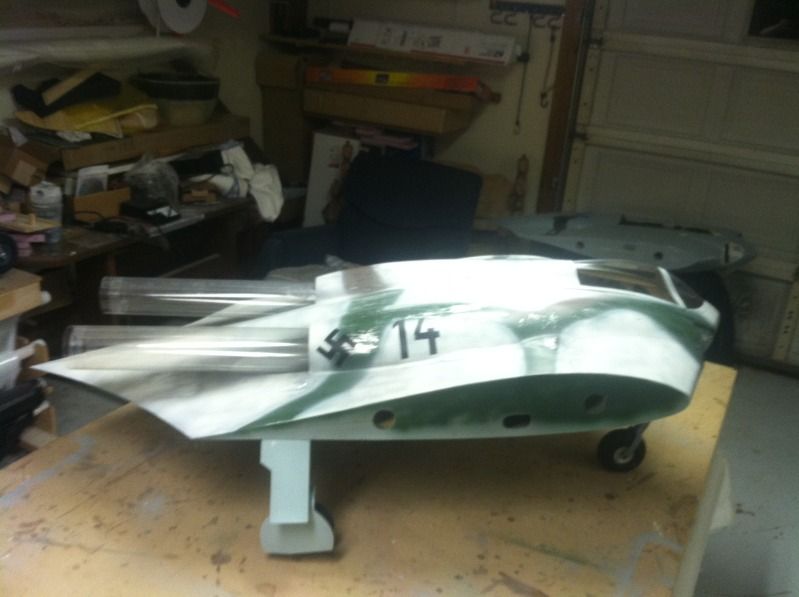
First step is "flat earth". It is sprayed heavily (lighter colors need more pigment applied than darker ones) in proper area's (mostly on the bottom of the surfaces behind wheels, gear bays and anywhere else dirt and mud could collect and then "run" once the airplane is in flight. Then a paper towel Wet (Not damp, but not dripping wet either) with Denatured alcohol is run from the front to back in the direction of the airflow. This collects the thinned paint and runs it down the model.
Once the bottom is done with the brown, I put Flat black in the same bottle (I like to have a little left over brown in the bottle as well) then thinner it again. The black needs very very little pigment applied to the surface to make a very definitive black smear. The same technique is used as the brown. The black is applied heavier around hatch panels, cowling panel lines (where the cowling separates) and aft of any bulges.
Then whatever flat black is left is applied where the exhaust stains will go. It is whipped off, it is left in place but it starts out very heavy immediately around and aft of the exhaust and then lightens and spreads out the further aft it gets. Then I use un-thinned Gun Metal. This is applied moderately over the black but doesn't completely cover the black. The gun metal gives the black a metallic sheen. Then I take un thinned smoke and apply that heavily in the center up close to the exhaust exit and progressively lighter as you move aft and to the sides.
I think it produces a pretty authentic weathering. I typically do a dirty white wash as well (flat white with a little brown and a small amount of black mixed together) and do this from the top of the fuselage (as it sits on its landing gear) and run it vertically down. This replicates weathering from rain-fall as the aircraft sits on the ground.. since this model is predominantly white, i didn't bother doing this step
03-09-2013, 05:00 PM
#379
Unfortunately i didn't get everything done in time to get outside and get some good photo's, but that will come tomorrow..
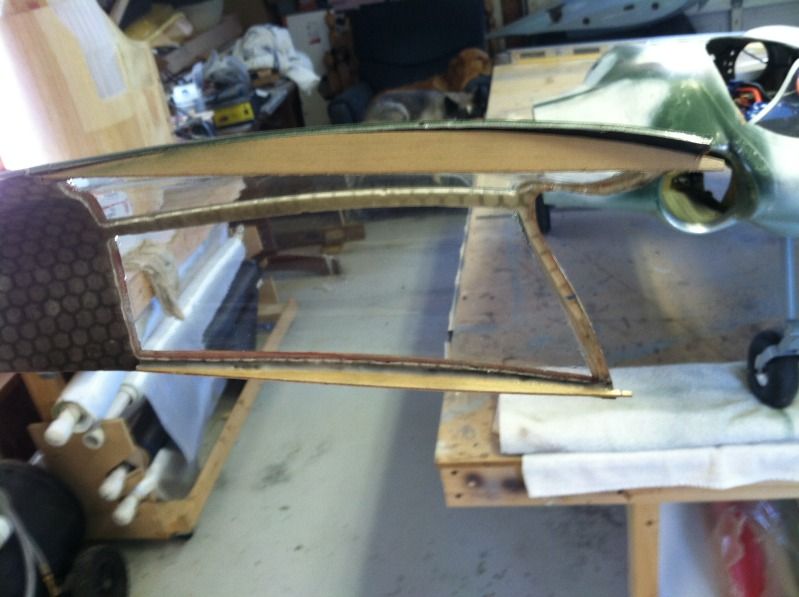
I epoxied in place the canopy frame stiffeners. These will also act as supports for the false cockpit floor, when i get around to doing that.
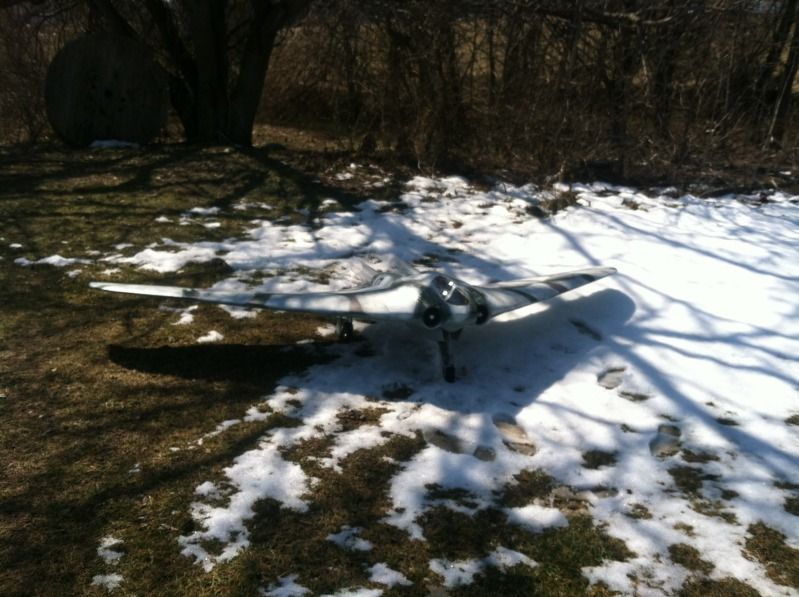
Then a few hours later, I had the fan unit and tail-pipes installed, battery mount plate installed, gear valve and all hooked back up and it repositioned and remounted. The new gear valve mount setup doubles as a battery mount plate and allows the 2nd set of lipo's to lay down more so they aren't visible in flight anymore.
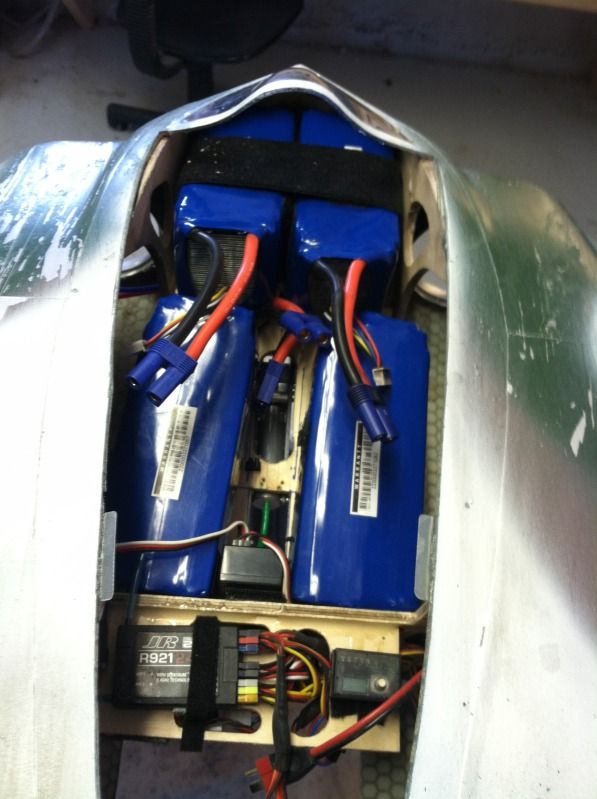
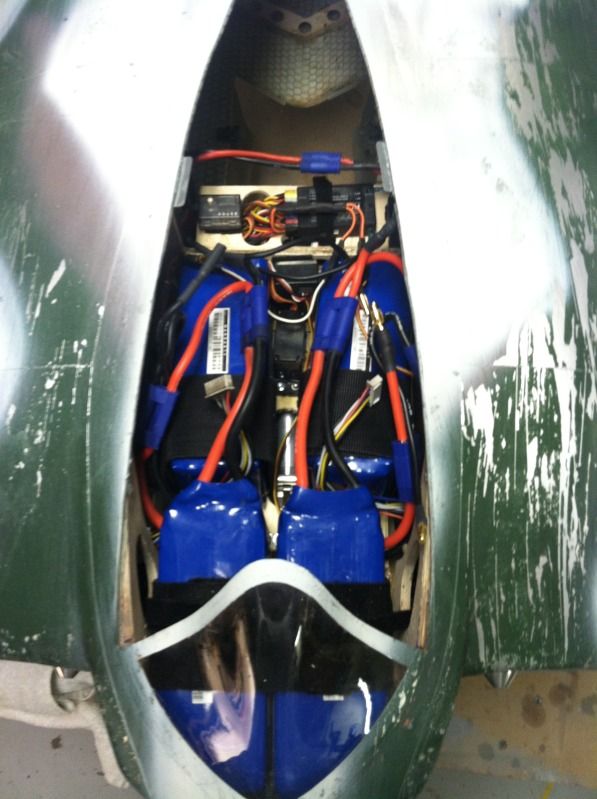

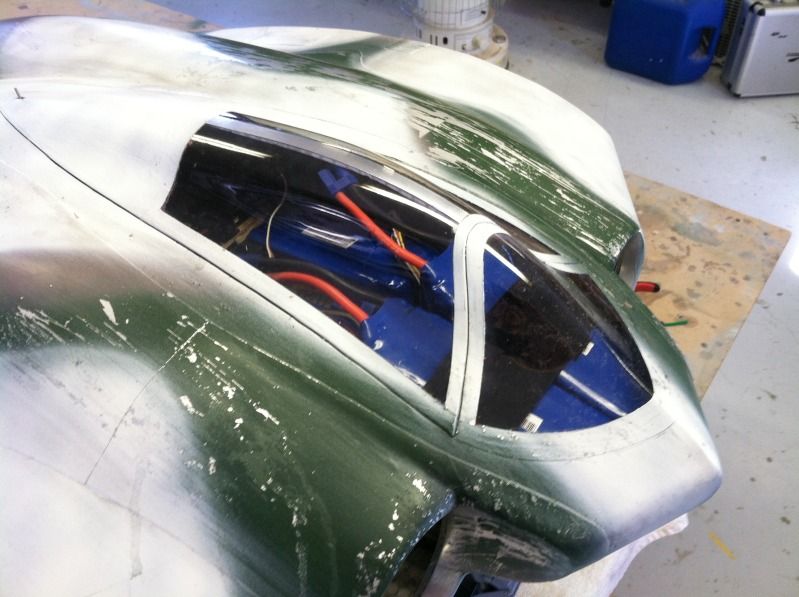
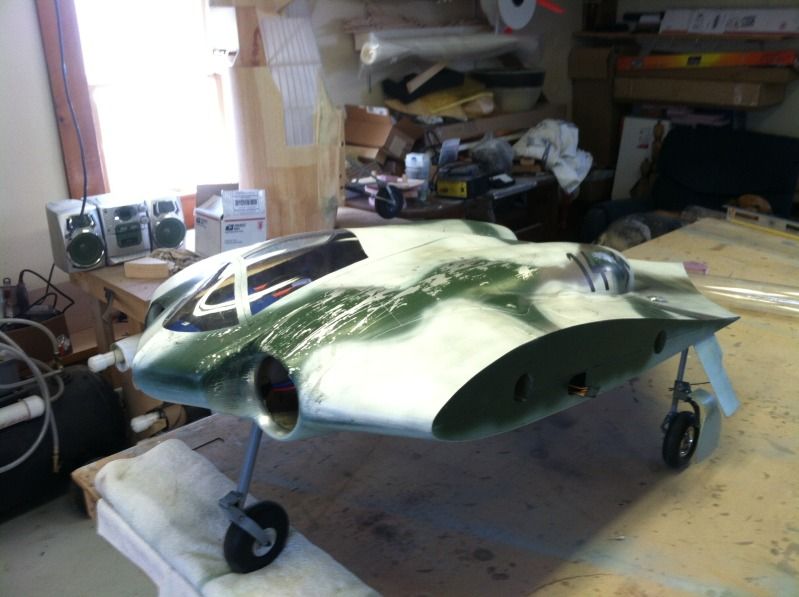
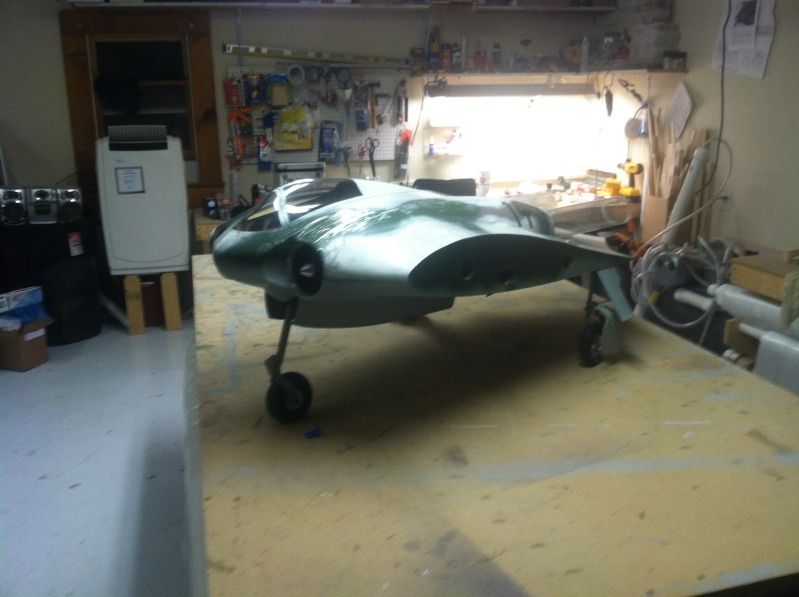
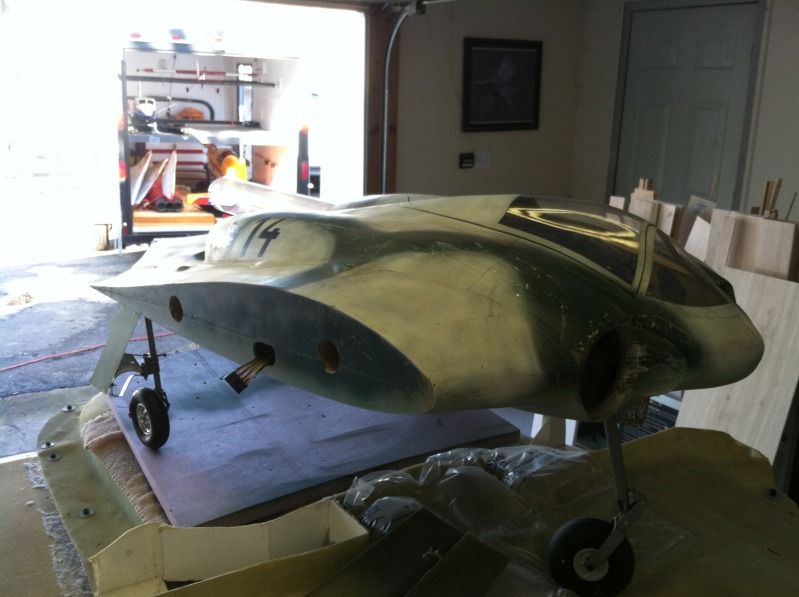
As you can see in some of the photo's above, there is not a whole lot of room available for a cockpit. The cockpit will consist of a glare shield (to help cover the forward lipo's) and a false floor and pilot figure. IF I can find a 1/5 scale Luftwaffe pilot bust.
I also did some test runs of the power system, but didn't get any thrust measurements. One fan unit draws 96amps at full power and produces 4136watts of power. That makes up almost 8300watts of power, which is FOUR times higher than what it originally flew with. Needless to say, its performance should improve. Once I got done playing around with the tests and data logging, I hooked up both fan units and powered them up. I then did an ole mk.1 elbow thrust test. Needless to say, i'm pretty sure that it produces the same thrust as the last power setup at about 1/3 throttle. I am very excited to fly this thing!
Taxi tests were also performed. The 136oz/in servo originally in place for steering proved to not be strong enough with the new nose gear unit. So, the JR 8711 i had laying around was put in place for steering. Torque is now acceptable, but the Heavy Duty JR servo arm was actually bending when it was sitting still and trying to turn the nose gear. So now I get to upgrade the servo arm to a metal unit.. unfortunately I don't have any laying around and neither does the LHS. This isn't to big of a deal, as the snow is still around so its unlikely we will get to fly it tomorrow anyways.
I epoxied in place the canopy frame stiffeners. These will also act as supports for the false cockpit floor, when i get around to doing that.
Then a few hours later, I had the fan unit and tail-pipes installed, battery mount plate installed, gear valve and all hooked back up and it repositioned and remounted. The new gear valve mount setup doubles as a battery mount plate and allows the 2nd set of lipo's to lay down more so they aren't visible in flight anymore.
As you can see in some of the photo's above, there is not a whole lot of room available for a cockpit. The cockpit will consist of a glare shield (to help cover the forward lipo's) and a false floor and pilot figure. IF I can find a 1/5 scale Luftwaffe pilot bust.
I also did some test runs of the power system, but didn't get any thrust measurements. One fan unit draws 96amps at full power and produces 4136watts of power. That makes up almost 8300watts of power, which is FOUR times higher than what it originally flew with. Needless to say, its performance should improve. Once I got done playing around with the tests and data logging, I hooked up both fan units and powered them up. I then did an ole mk.1 elbow thrust test. Needless to say, i'm pretty sure that it produces the same thrust as the last power setup at about 1/3 throttle. I am very excited to fly this thing!
Taxi tests were also performed. The 136oz/in servo originally in place for steering proved to not be strong enough with the new nose gear unit. So, the JR 8711 i had laying around was put in place for steering. Torque is now acceptable, but the Heavy Duty JR servo arm was actually bending when it was sitting still and trying to turn the nose gear. So now I get to upgrade the servo arm to a metal unit.. unfortunately I don't have any laying around and neither does the LHS. This isn't to big of a deal, as the snow is still around so its unlikely we will get to fly it tomorrow anyways.
03-10-2013, 01:29 PM
#381
Well... it was fun while it lasted.
Before:
After:
So it all comes down to...
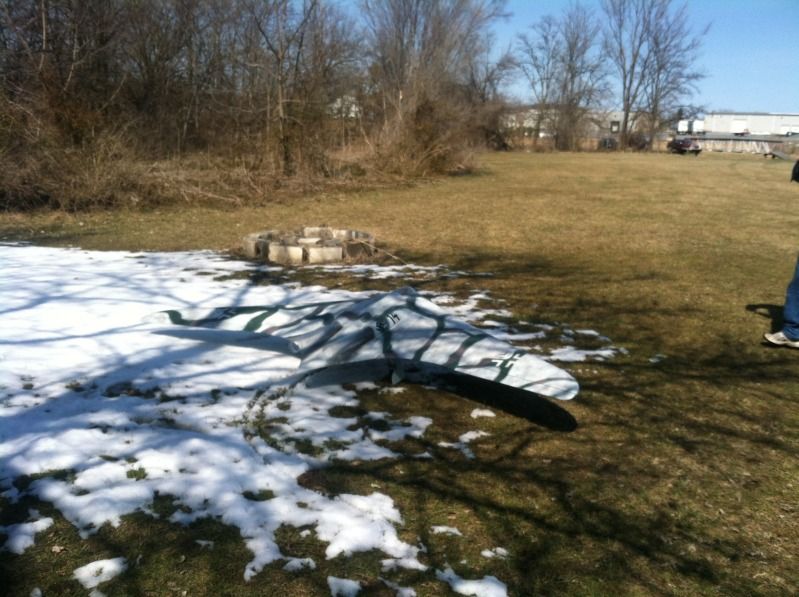
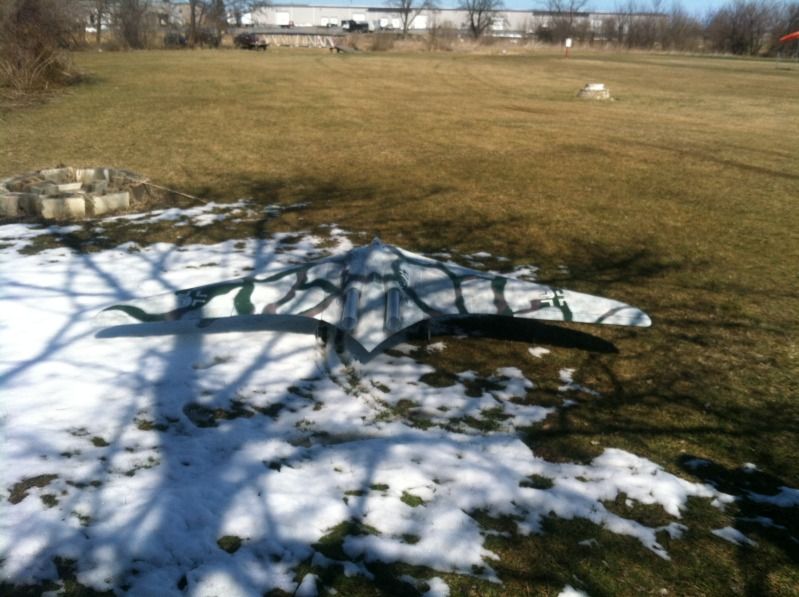
I was being stupid and optimistic thinking that flying with out new setup at 1/2 throttle in cruise flight we would be able to do 6 minute flights.. well, I made it to 5:30 before the left fan unit hit LVC. Needless to say, the horton doesn't fly well one a single engine! But what you see isn't the result of a spin, the airplane was in controlled gliding flight when it went in. The problem is the model went behind a hill and i was flying blind.
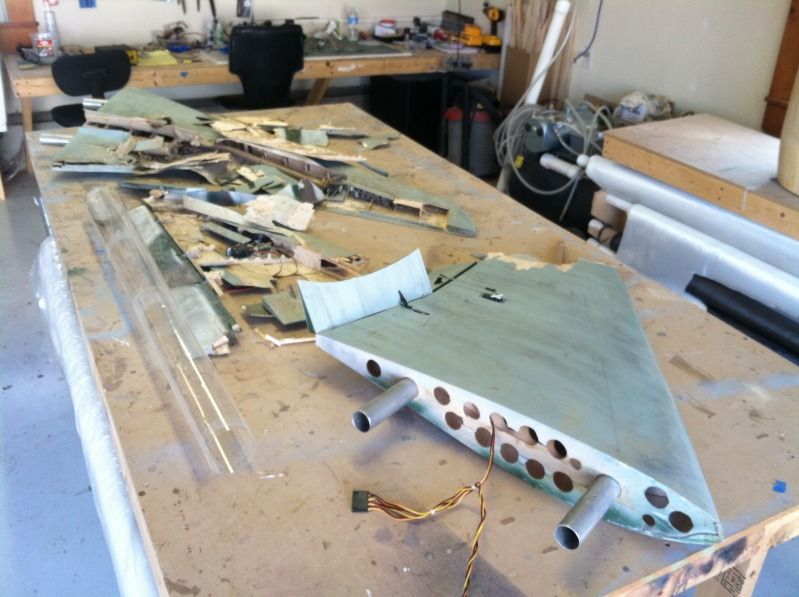
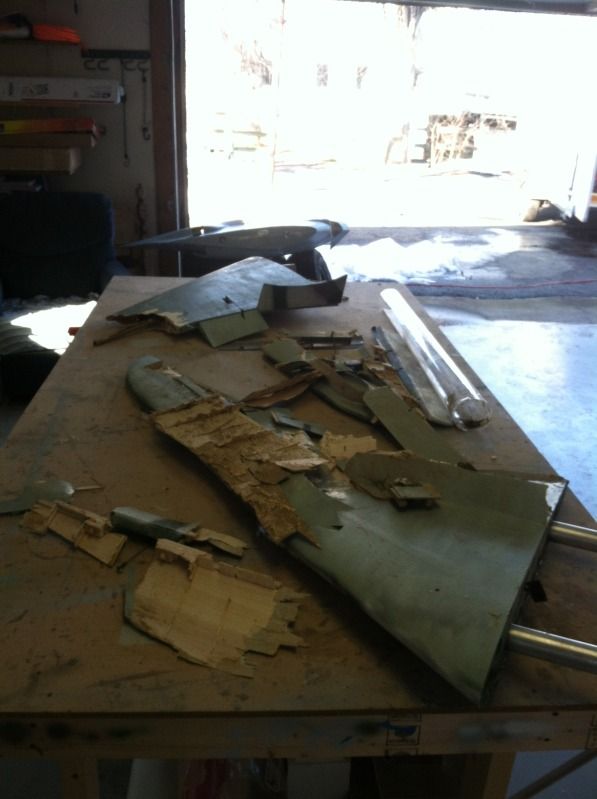
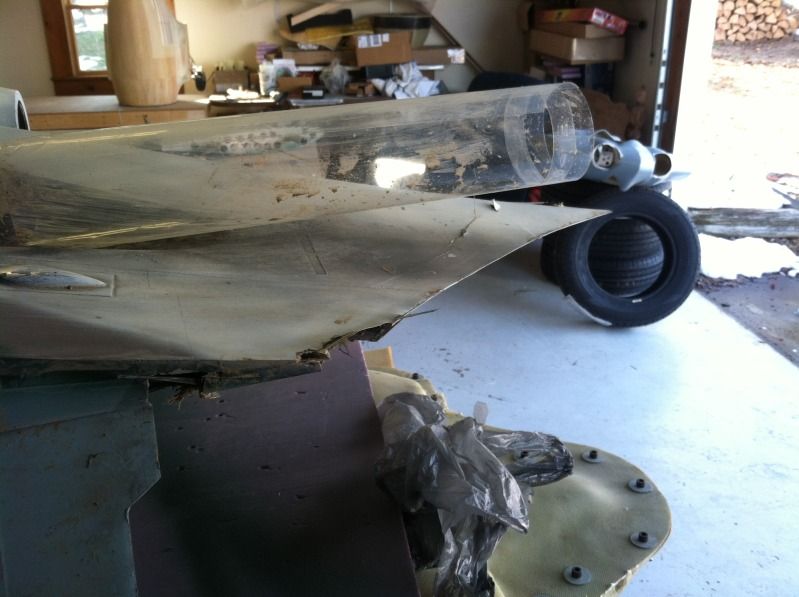
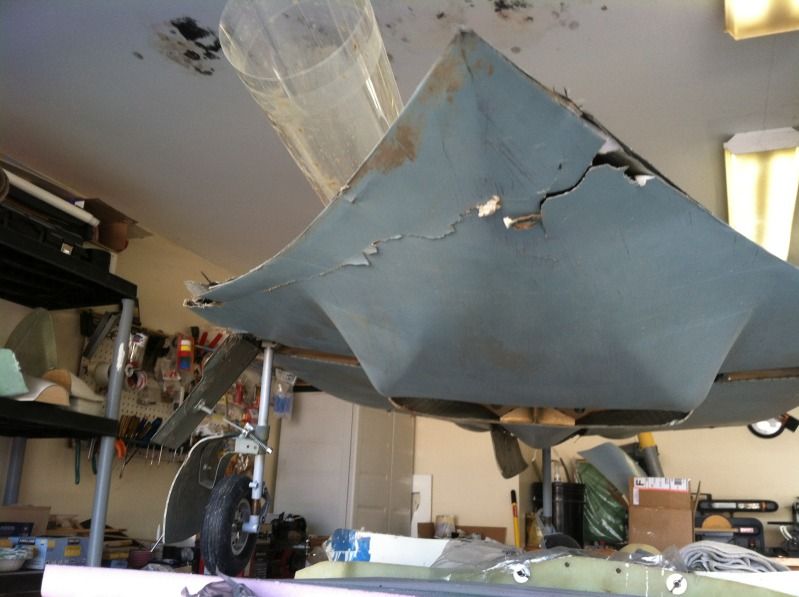
Damage is pretty extensive. The outer wing panels are a write off. Currently I am debating on if it would be wiser to replace the center section or repair it. The extensive to the center section is primarily gear doors and the bat tail TE, as you can see in the photos
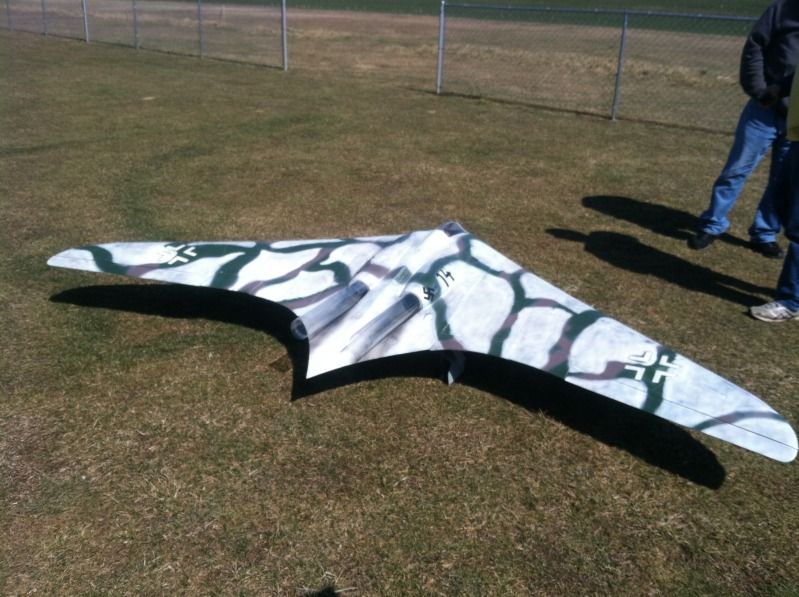
The model flew exceptionally well. It was very stable in level flight at all speeds. The drag rudders are very effective, but there effect is slightly delayed. I had the CG at 19.25" aft of the LE at the centerline, which proved to still be nose heavy.
So, my Horton days are Over for now.. That may be a few weeks, or a few months, i'm not really sure. I'm going to help my buddy Tom get his done and re-access my horton in a few days after i recover.. If it proves that I can repair the center section pretty easily, I hope to still get it ready for Warbirds over Delaware.
Before:
After:
So it all comes down to...
I was being stupid and optimistic thinking that flying with out new setup at 1/2 throttle in cruise flight we would be able to do 6 minute flights.. well, I made it to 5:30 before the left fan unit hit LVC. Needless to say, the horton doesn't fly well one a single engine! But what you see isn't the result of a spin, the airplane was in controlled gliding flight when it went in. The problem is the model went behind a hill and i was flying blind.
Damage is pretty extensive. The outer wing panels are a write off. Currently I am debating on if it would be wiser to replace the center section or repair it. The extensive to the center section is primarily gear doors and the bat tail TE, as you can see in the photos
The model flew exceptionally well. It was very stable in level flight at all speeds. The drag rudders are very effective, but there effect is slightly delayed. I had the CG at 19.25" aft of the LE at the centerline, which proved to still be nose heavy.
So, my Horton days are Over for now.. That may be a few weeks, or a few months, i'm not really sure. I'm going to help my buddy Tom get his done and re-access my horton in a few days after i recover.. If it proves that I can repair the center section pretty easily, I hope to still get it ready for Warbirds over Delaware.
03-10-2013, 04:53 PM
#382
Junior Member
Join Date: Jan 2013
Location: Berlin, GERMANY
Posts: 17
Likes: 0
Received 0 Likes
on
0 Posts
Accept my deep sympathy. for this crash. It's hard if you work a long time and then the maiden have not a good end.
greatings
Leo
03-10-2013, 07:23 PM
#384
Alrighty, i'm done for the day and ready for bed..
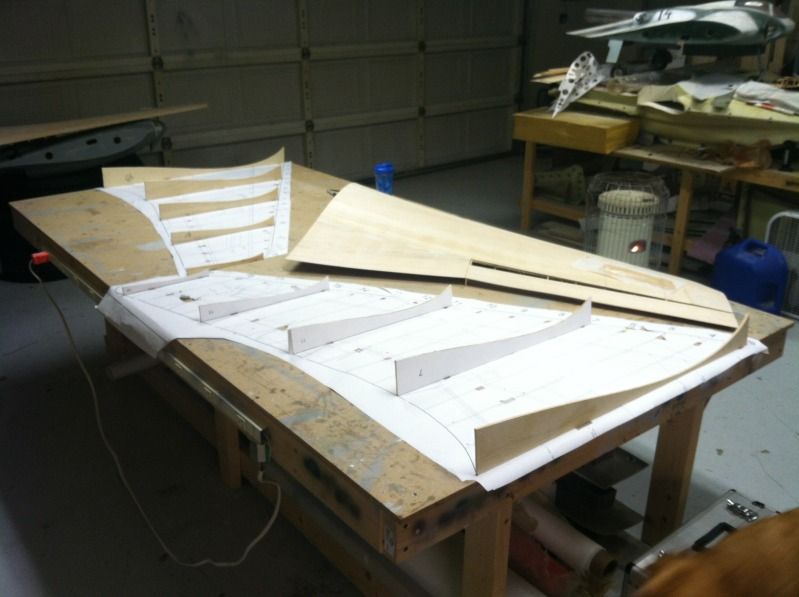
First thing, get the plans aligned and on the table:
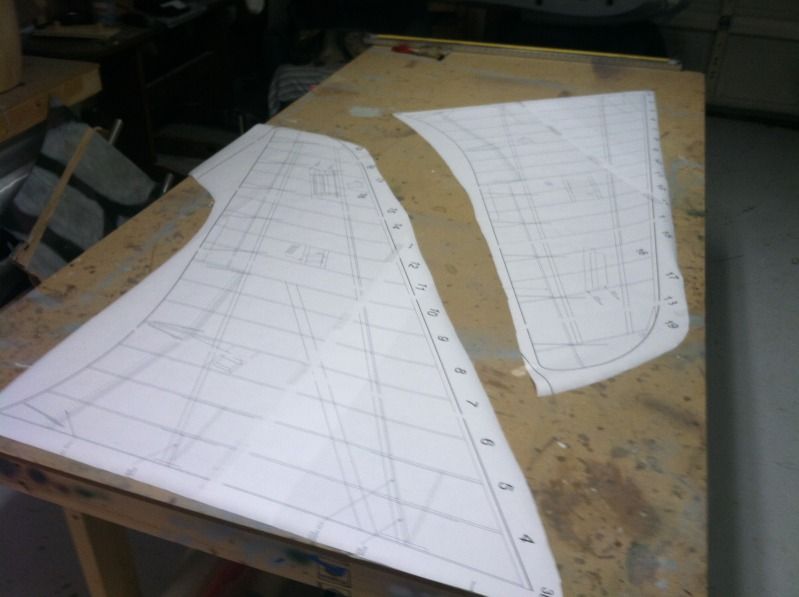
Then layout the wing ribs and mark the plans for the glue-through holes for the ribs to the building table
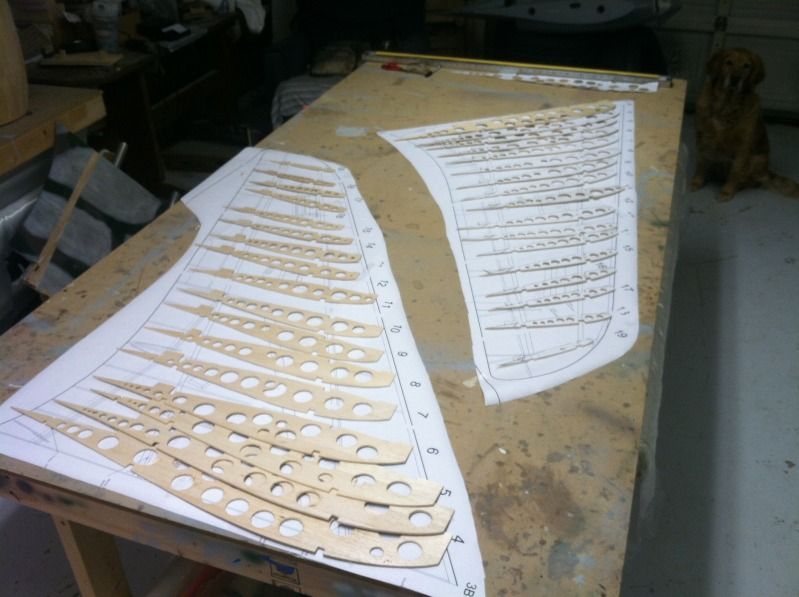
Then install all of the wing ribs with them canted outboard with the alignment jig:
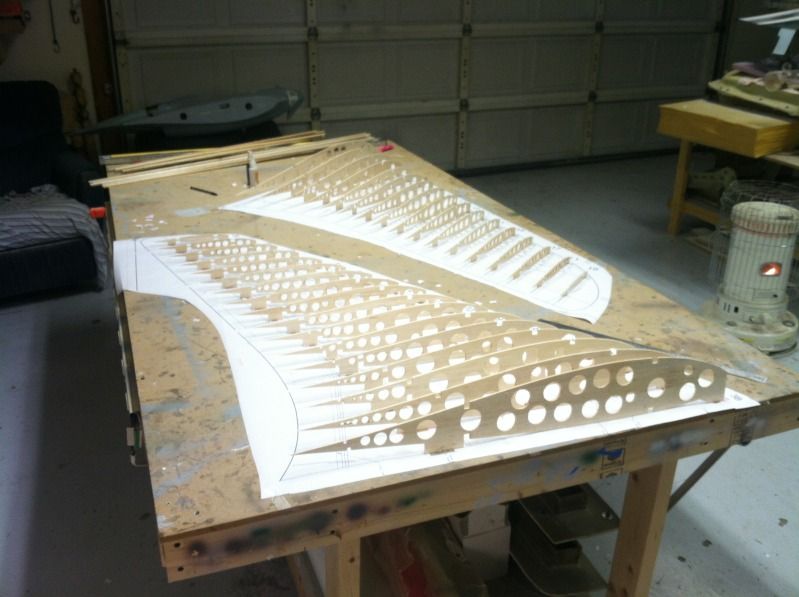
Then two hours later, the wing spars are all installed, false leading edge installed, Wing TE and flap LE's installed and then all the wing spars and leading edges were planed down to near flush with the ribs.

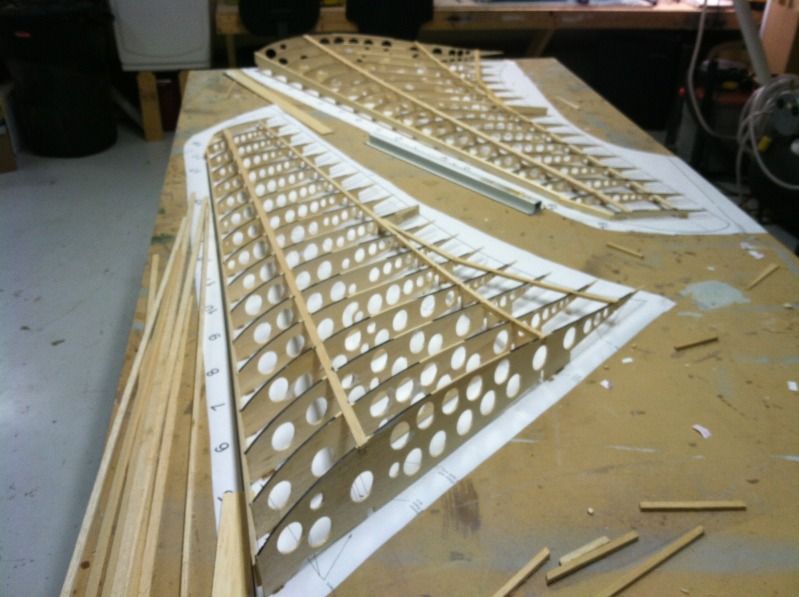
So both wing panels need some final sanding on the LE and wing spars to get them airfoiled in with the ribs and then they are ready to be sheeted. I fully expect to have top of both wing panels sheeted by the same time tomorrow.
First thing, get the plans aligned and on the table:
Then layout the wing ribs and mark the plans for the glue-through holes for the ribs to the building table
Then install all of the wing ribs with them canted outboard with the alignment jig:
Then two hours later, the wing spars are all installed, false leading edge installed, Wing TE and flap LE's installed and then all the wing spars and leading edges were planed down to near flush with the ribs.
So both wing panels need some final sanding on the LE and wing spars to get them airfoiled in with the ribs and then they are ready to be sheeted. I fully expect to have top of both wing panels sheeted by the same time tomorrow.
03-11-2013, 03:58 AM
#386

My Feedback: (2)
Wow and then WOW.. thomas you're killing me here bro  I think 4 mins is SAFE and maybe Five is to close. Remember just because you have more umph via batteries you use more umph via the fans!
Any way.. you got a great project! Outstanding actually so it would be a shame not to have a completed flight or TEN or Twenty! lol
I think 4 mins is SAFE and maybe Five is to close. Remember just because you have more umph via batteries you use more umph via the fans! Any way.. you got a great project! Outstanding actually so it would be a shame not to have a completed flight or TEN or Twenty! lol
03-11-2013, 11:30 AM
#390
Senior Member
ORIGINAL: leo12305
Accept my deep sympathy. for this crash. It's hard if you work a long time and then the maiden have not a good end.
greatings
Leo
Accept my deep sympathy. for this crash. It's hard if you work a long time and then the maiden have not a good end.
greatings
Leo
03-11-2013, 11:32 AM
#391
Senior Member
ORIGINAL: leo12305
Accept my deep sympathy. for this crash. It's hard if you work a long time and then the maiden have not a good end.
greatings
Leo
Accept my deep sympathy. for this crash. It's hard if you work a long time and then the maiden have not a good end.
greatings
Leo
03-11-2013, 12:23 PM
#393

ORIGINAL: vertical grimmace
Short flights are one of the things I dislike about high performance electrics. I know it is only money, but turbines seem to be the ticket here.
Short flights are one of the things I dislike about high performance electrics. I know it is only money, but turbines seem to be the ticket here.
 ) would it be to make the modifications and install a turbine?
03-11-2013, 03:07 PM
) would it be to make the modifications and install a turbine?
03-11-2013, 03:07 PM
#394
My Feedback: (12)
Join Date: Jul 2002
Location: Alexandria,
VA
Posts: 706
Likes: 0
Received 0 Likes
on
0 Posts
Oh no! Sorry about your set back. Electric is not too much fun at WOD. My he 162 I basically take off do two passes and start setting up for landing. Can't risk getting caught up in the pattern waiting. I have maybe 5 min of flight time pushing it. 4 is safer. Also if the gear stay down or a gear door hangs up. The extra juice to keep the speed up takes a lot of time of the clock.
03-11-2013, 06:18 PM
#395
ORIGINAL: Ramstein44
I agree. Something that looks that good deserves to be in the air for a longer period. Hey Invert, how much harder (for you) would it be to make the modifications and install a turbine?
ORIGINAL: vertical grimmace
Short flights are one of the things I dislike about high performance electrics. I know it is only money, but turbines seem to be the ticket here.
Short flights are one of the things I dislike about high performance electrics. I know it is only money, but turbines seem to be the ticket here.
) would it be to make the modifications and install a turbine?
For twin turbines it would be extremely easy. The problem would be getting it to CG correctly. The 11lbs of lipos in the nose help to balance this thing.
There is still lots of room in the model, so i may pickup some 6s 2650 lipo's and put these in parallel with what i have now. That would put the weight to around 38lbs, but would probably add 2 minutes of additional flight time.
With my new powerlab 8 charger, i can charge four 6s 5000 lipos from 50% capacity to full charge in 20 minutes at 1c charge rate. With two sets of batteries you could fly all day long ever 15-20 minutes.
03-11-2013, 06:22 PM
#396
ORIGINAL: lrb75
Oh no! Sorry about your set back. Electric is not too much fun at WOD. My he 162 I basically take off do two passes and start setting up for landing. Can't risk getting caught up in the pattern waiting. I have maybe 5 min of flight time pushing it. 4 is safer. Also if the gear stay down or a gear door hangs up. The extra juice to keep the speed up takes a lot of time of the clock.
Oh no! Sorry about your set back. Electric is not too much fun at WOD. My he 162 I basically take off do two passes and start setting up for landing. Can't risk getting caught up in the pattern waiting. I have maybe 5 min of flight time pushing it. 4 is safer. Also if the gear stay down or a gear door hangs up. The extra juice to keep the speed up takes a lot of time of the clock.
Or i may just have to drop the cash on some TP 6s 6500 packs, since they are the only manufacturer i know who has packs over 5000mah
03-11-2013, 06:36 PM
#397
Both wing panels are sheeted and removed from the building table:
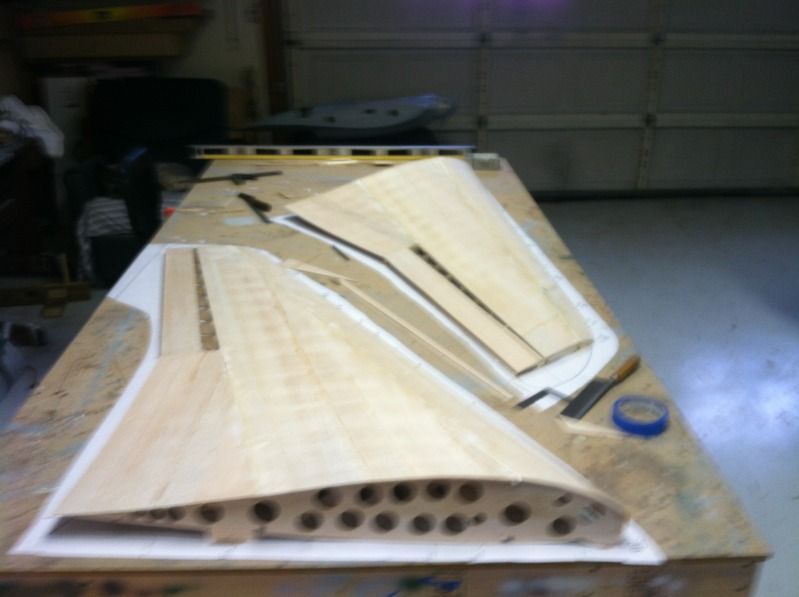
Then the Drag rudder position transferred to the top wing skins:
Then the area around the drag rudder cutouts was glassed:
Then the plans were repositioned so as to allow both wing panels to fit onto the table and the center section to overhang the ends, so later on the wing tubes can be installed without having to remove the wings from the sheeting jigs. The sheeting jigs were also glued to the table in their respective positions and canted outwards 5*:
Tomorrow evening i'm planning to cut the drag rudder assemblies from the previous wing panels free to reuse them in these wings. I have also ordered the wood, hardware and tube sockets needed to complete these wing panels, hopefully all of this will show up this week. My hope is to have the drag rudders, bottom wing spars, sheer webbing and the extension conduit tubes all installed in both wing panels by Saturday.
These wing panels are going quicker and better due to having learned how to do allot of stuff from the first set. The drag rudder linkages will be better as well with the use of ball links instead of z-bends and music wire.
03-11-2013, 07:28 PM
#398

My Feedback: (134)
Join Date: Jul 2005
Location: Ladera Ranch,
CA
Posts: 825
Likes: 0
Received 0 Likes
on
0 Posts
Thomas
Curious. Did you get any video of the last flight? Besides the LVC how was the performance of the fans?
It sounded like you had the sweet spot. Just ran out of MAH.
For what it's worth. I keep most my edf flights on a 4 min timer. Only one I push to 6 min is the eBandit at 7600mah packs with considerable throttle management.
03-11-2013, 07:49 PM
#399
My Feedback: (12)
Join Date: Jul 2002
Location: Alexandria,
VA
Posts: 706
Likes: 0
Received 0 Likes
on
0 Posts
I have tons of room in the HE-162.... But at almost 20lbs the gear and the wing loading can't take much more. So 6000mah is what I got. BTW you build tooooooo fast!

