


Ziroli 1/6 Hellcat Build
 09-22-2022, 01:32 PM
#301

Thread Starter
Good to hear from you! I did make it to Florida, but not by SUV. Stuff happened, so we just made a quick trip down and back by air, in July. Hot, humid, but no crowds. Clearwater Beach ain't nothing like I remember - too bad. Looks "disney-fied." Did stop by FOF for an afternoon. Kermit wasn't there, but I did get to see a completed Curtis Robin that was once in pieces on a floor up near me in Howell, Michigan. Apparently, the owner up here got the restoration done and sold it to Kermit. The tour guide at FOF said it flies like a brick - severely underpowered. So, it's a museum piece.
When you get your Hellcat flying, please post some flight pictures!
When you get your Hellcat flying, please post some flight pictures!
 09-22-2022, 02:01 PM
#302
Thread Starter
Progress! I completed the rib stitch/tape job on the rudder, today. Used pinked tape from Dynamic Balsa and simulated stitching from Ken Kosmenko (BC, Canada).
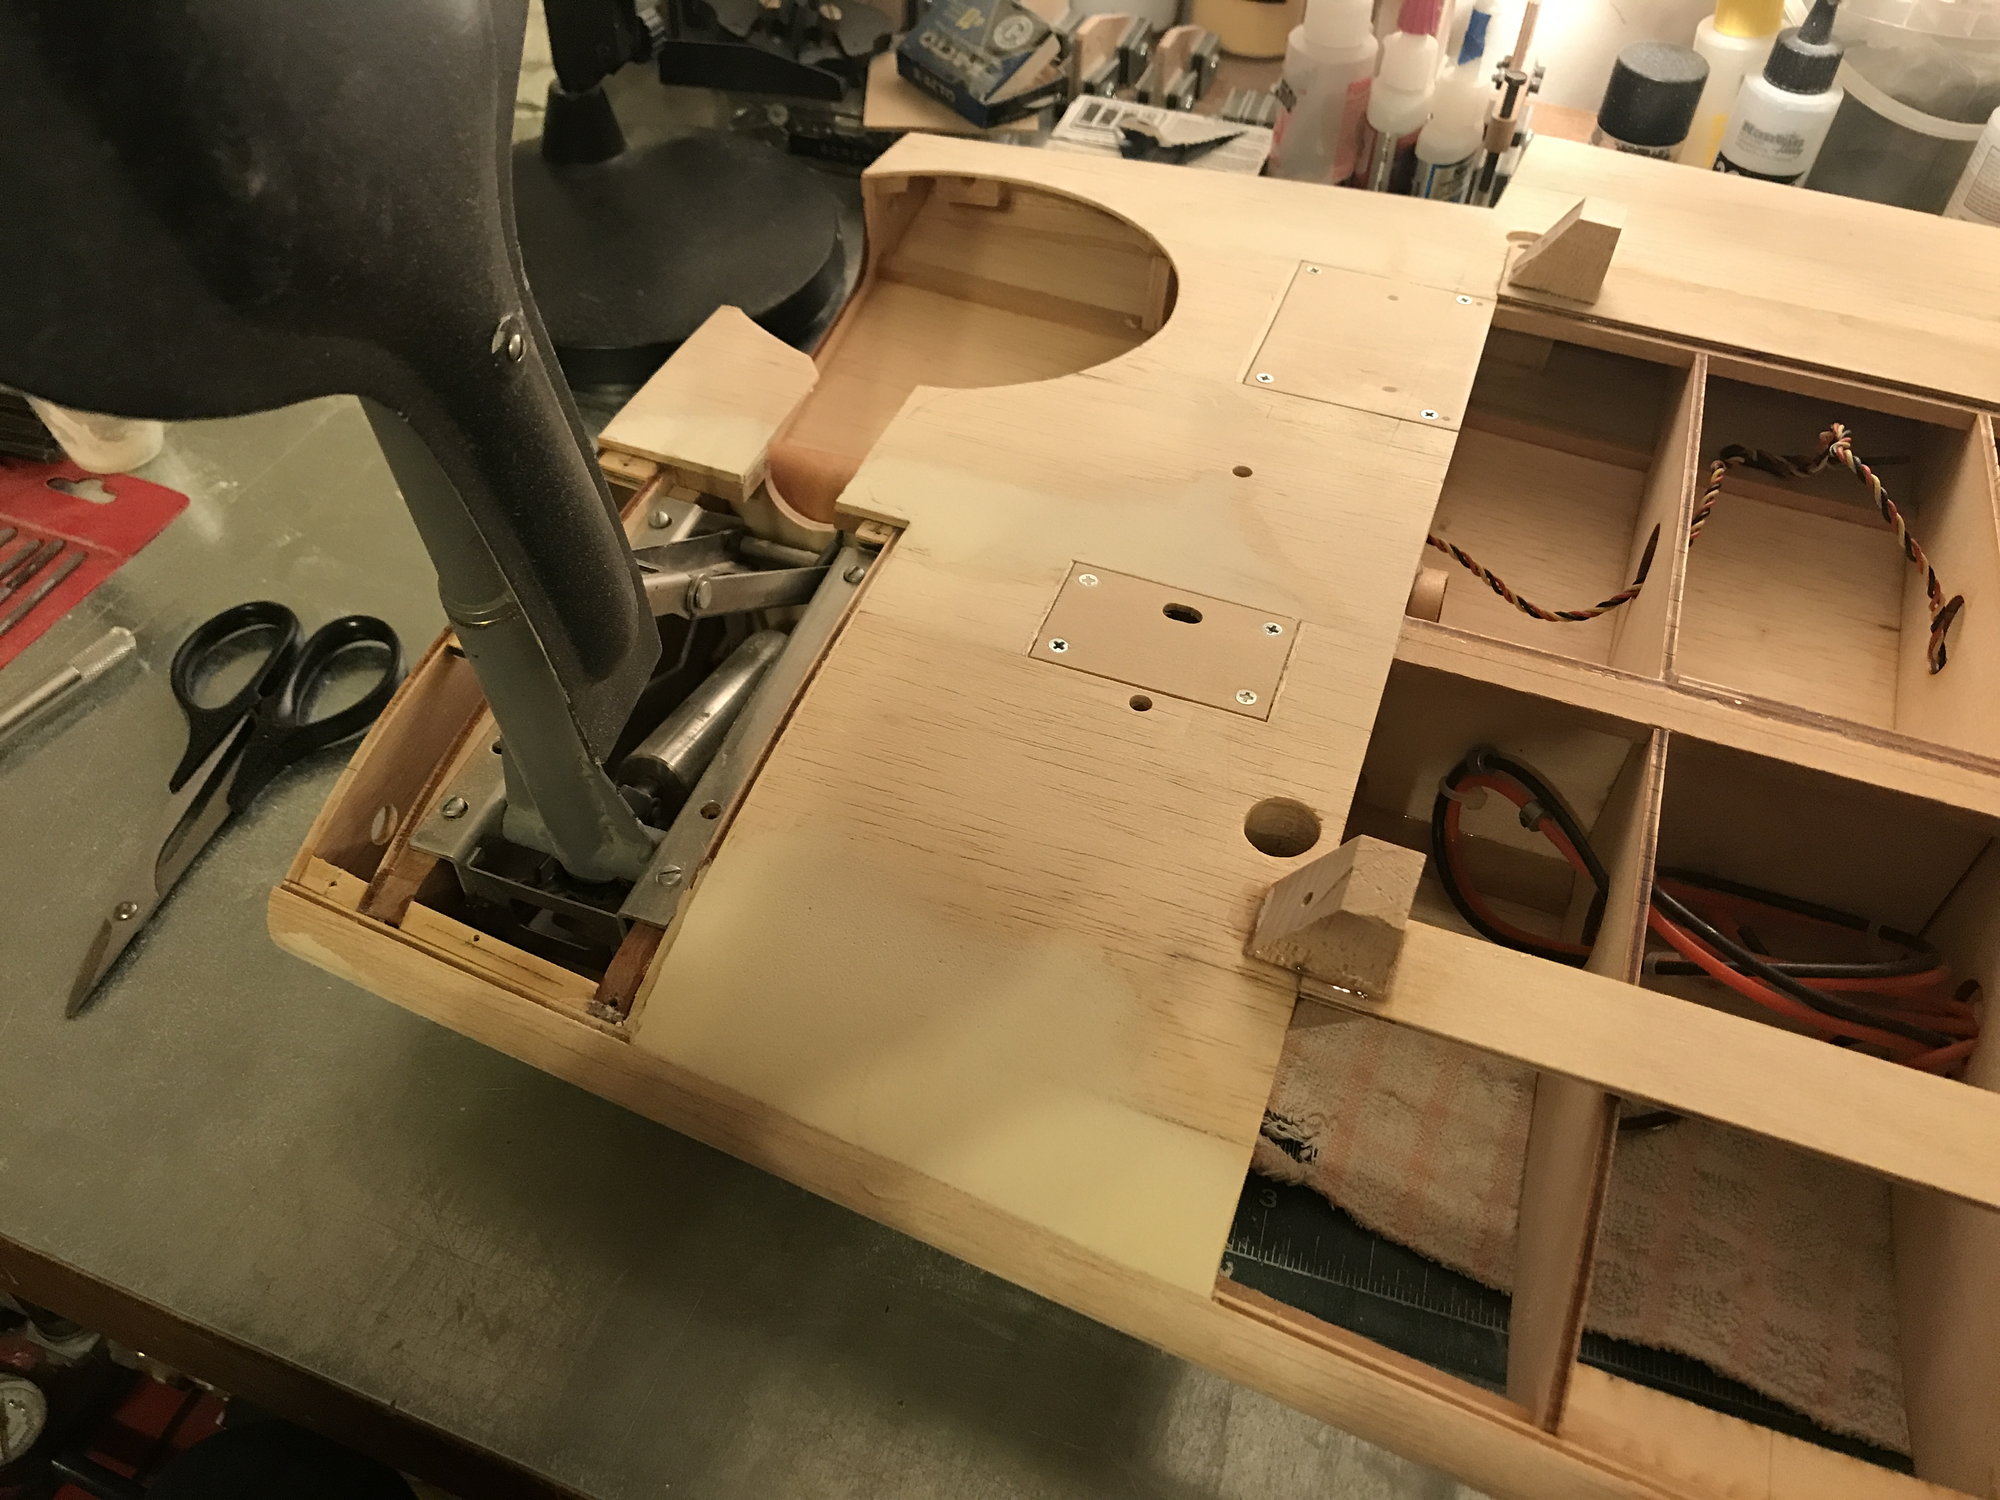
Struggling with my control panel access hatch. I'm not satisfied with the latches I'm finding on-line. I've got some ideas on how to cobble together something using magnets or making a couple custom latches from bits from the shop. I'll try to get some pics of the space I have to work with and my magnet concept. Ideas, welcomed!
Cockpit detail source is out of production for the moment. Emailing with JP Warbirds - they may have room in their schedule next Spring. If anyone else is looking for a 1/6-scale Hellcat cockpit details, let me know or perhaps contact JP Warbirds. If there's enough interest, perhaps they'll, put a kit together. Yes, I have a kit, but I'm looking for one to match the detail that ChadV was producing.
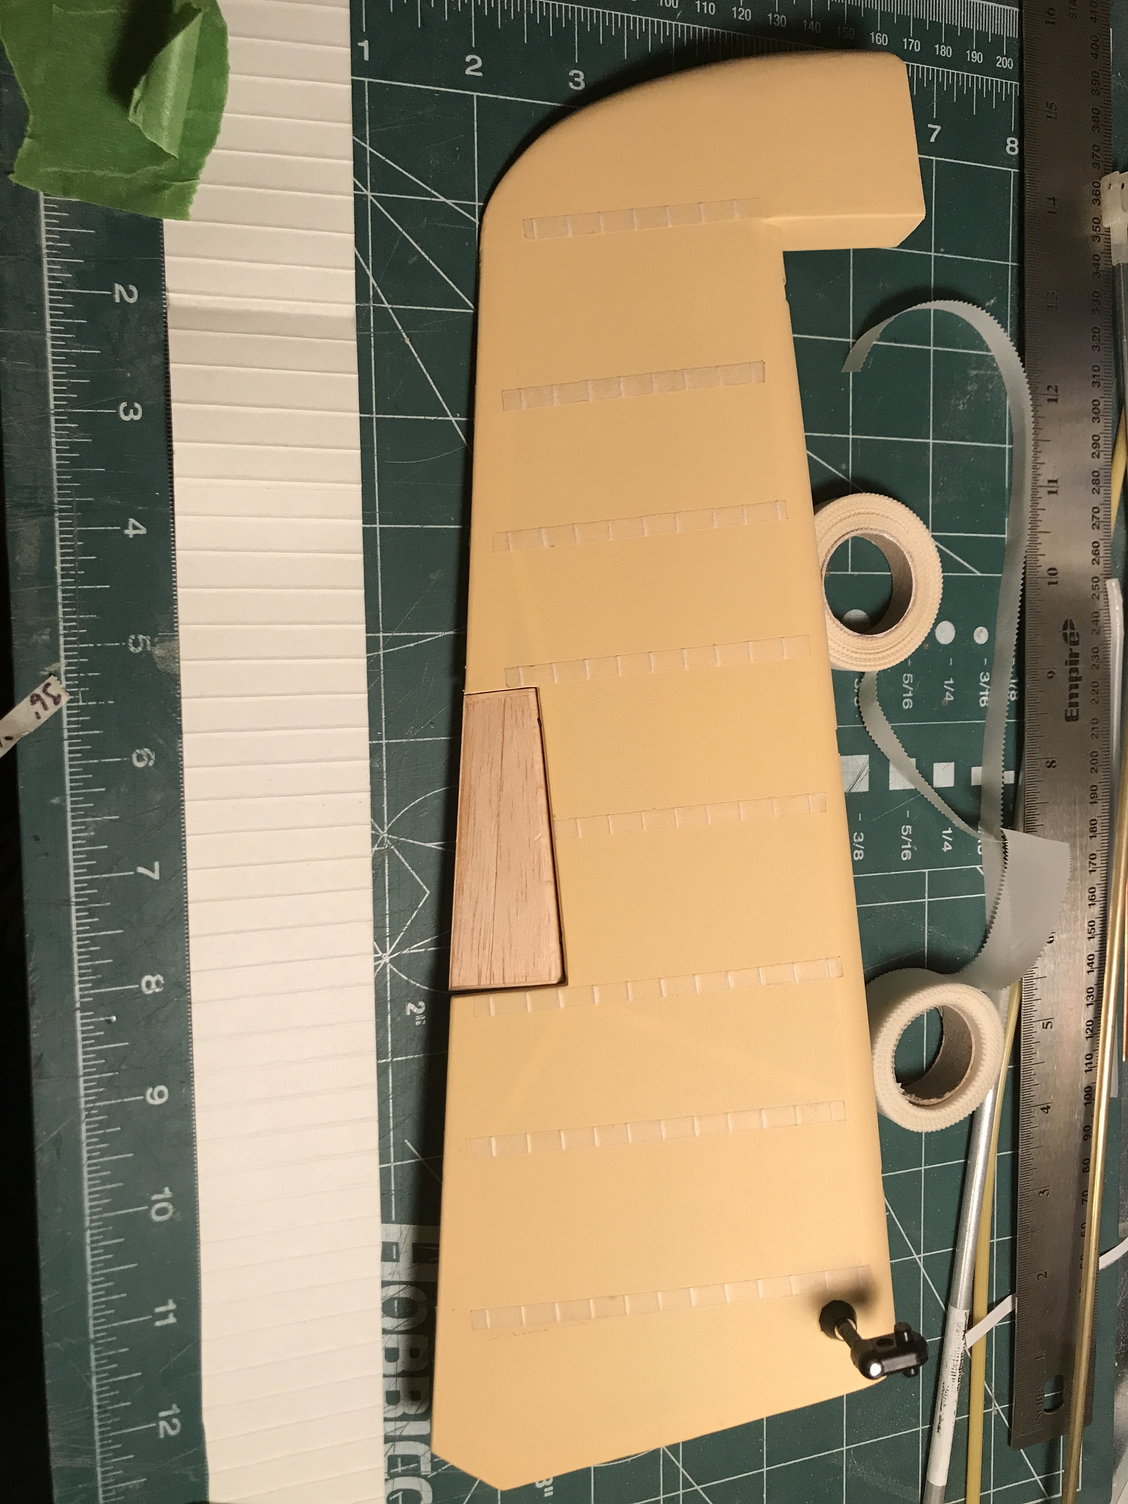
Simulated stitching in place.
Stitching taped. There's something satisfying about this.

Just missing rockets!
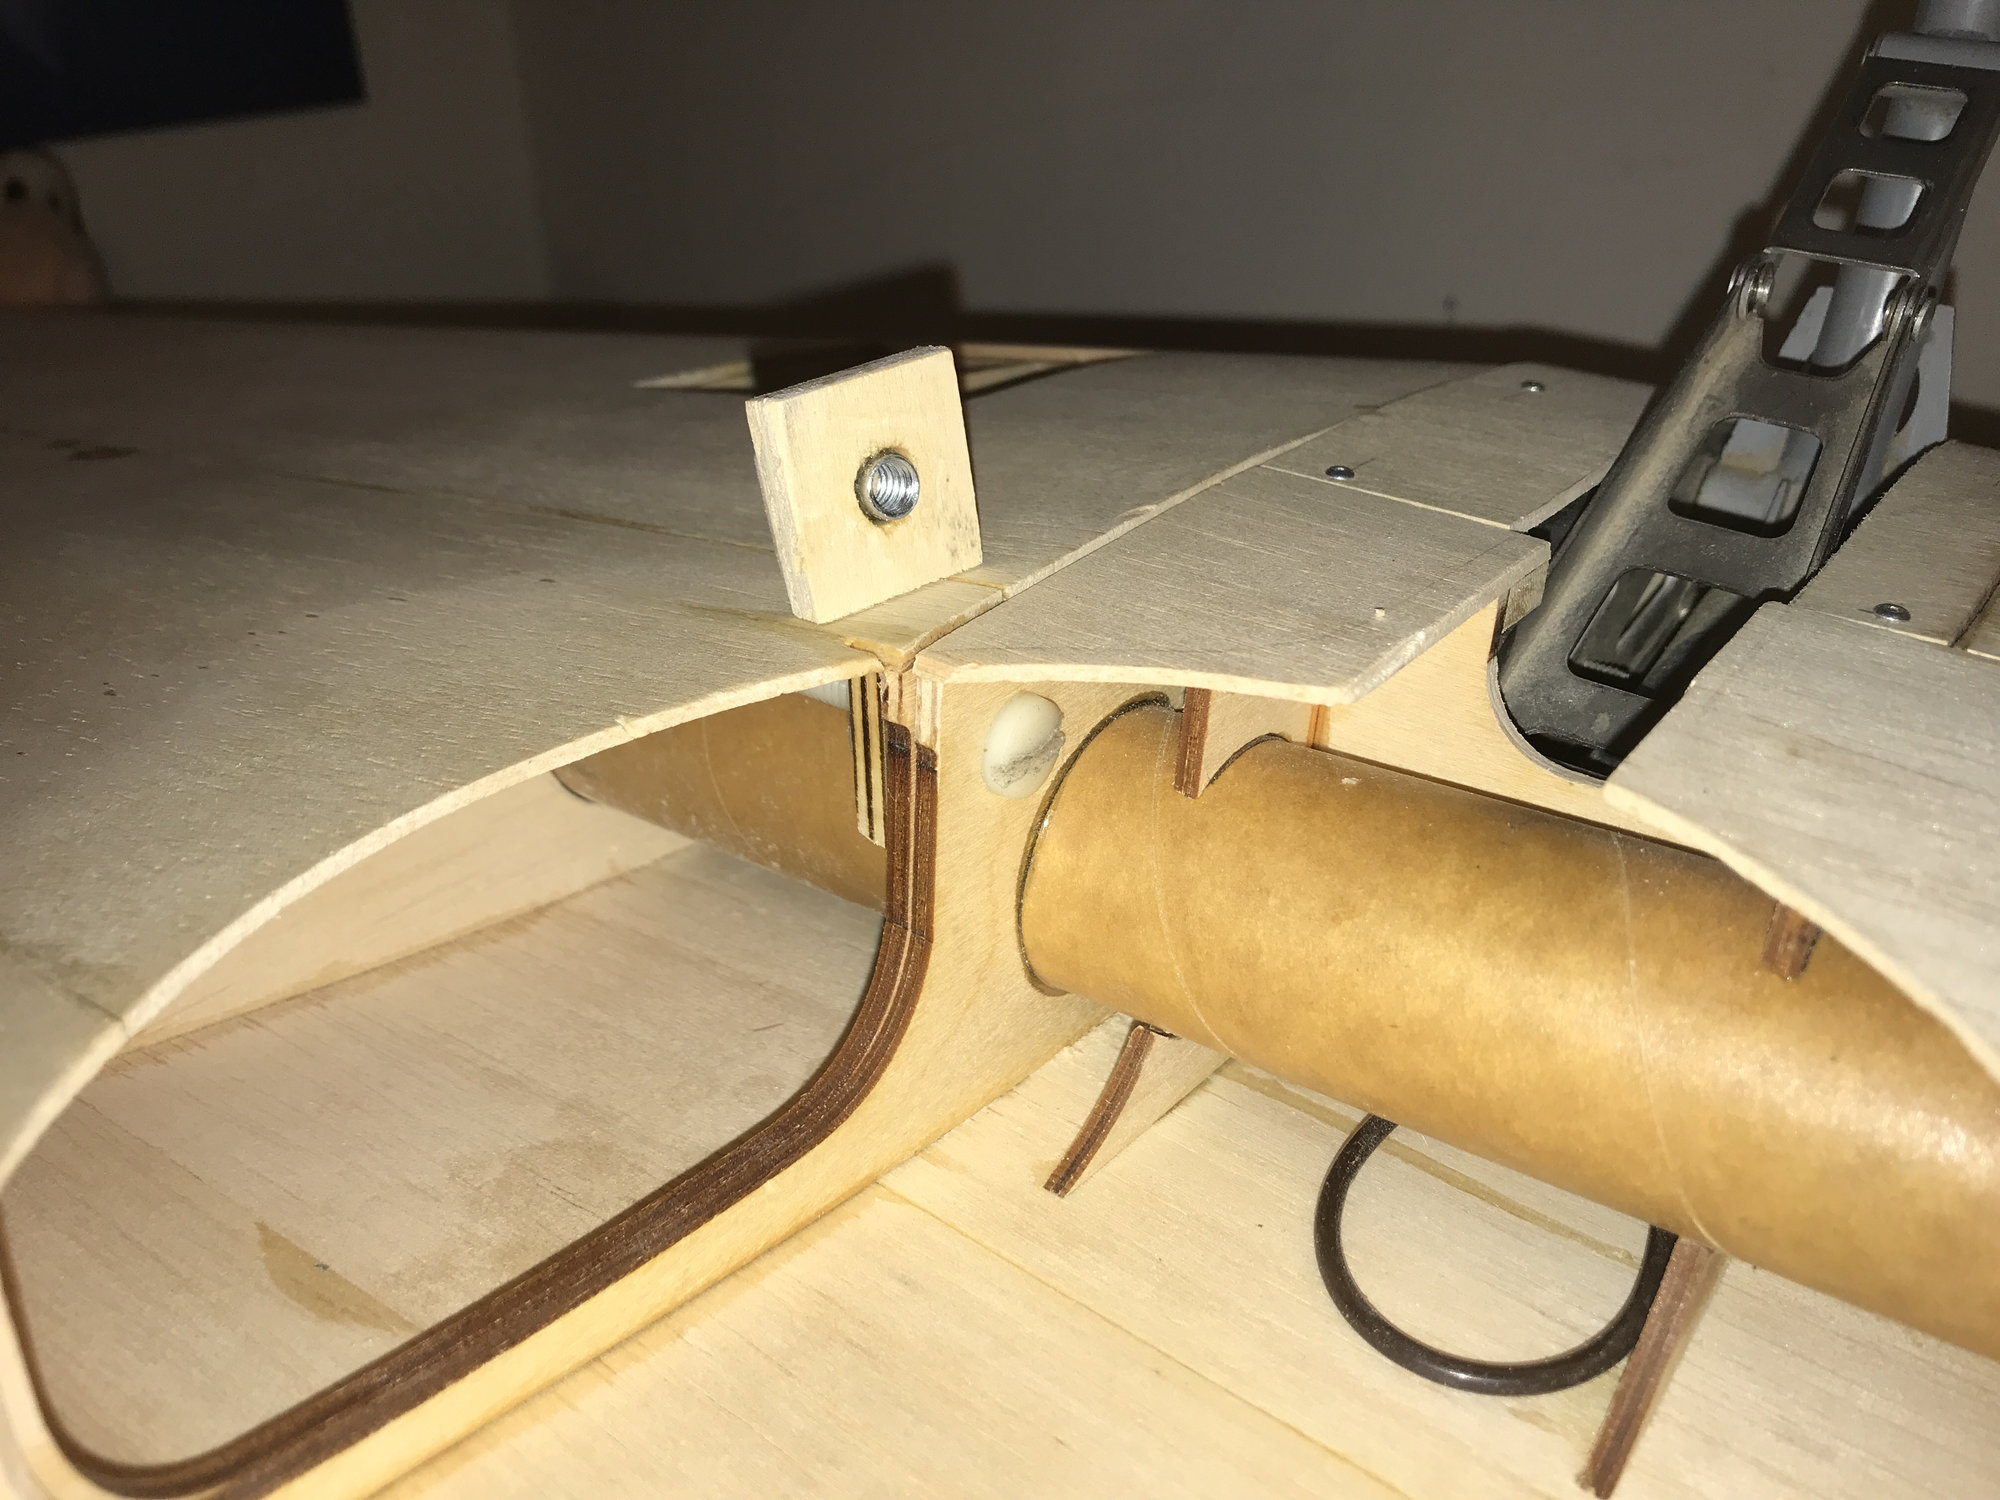
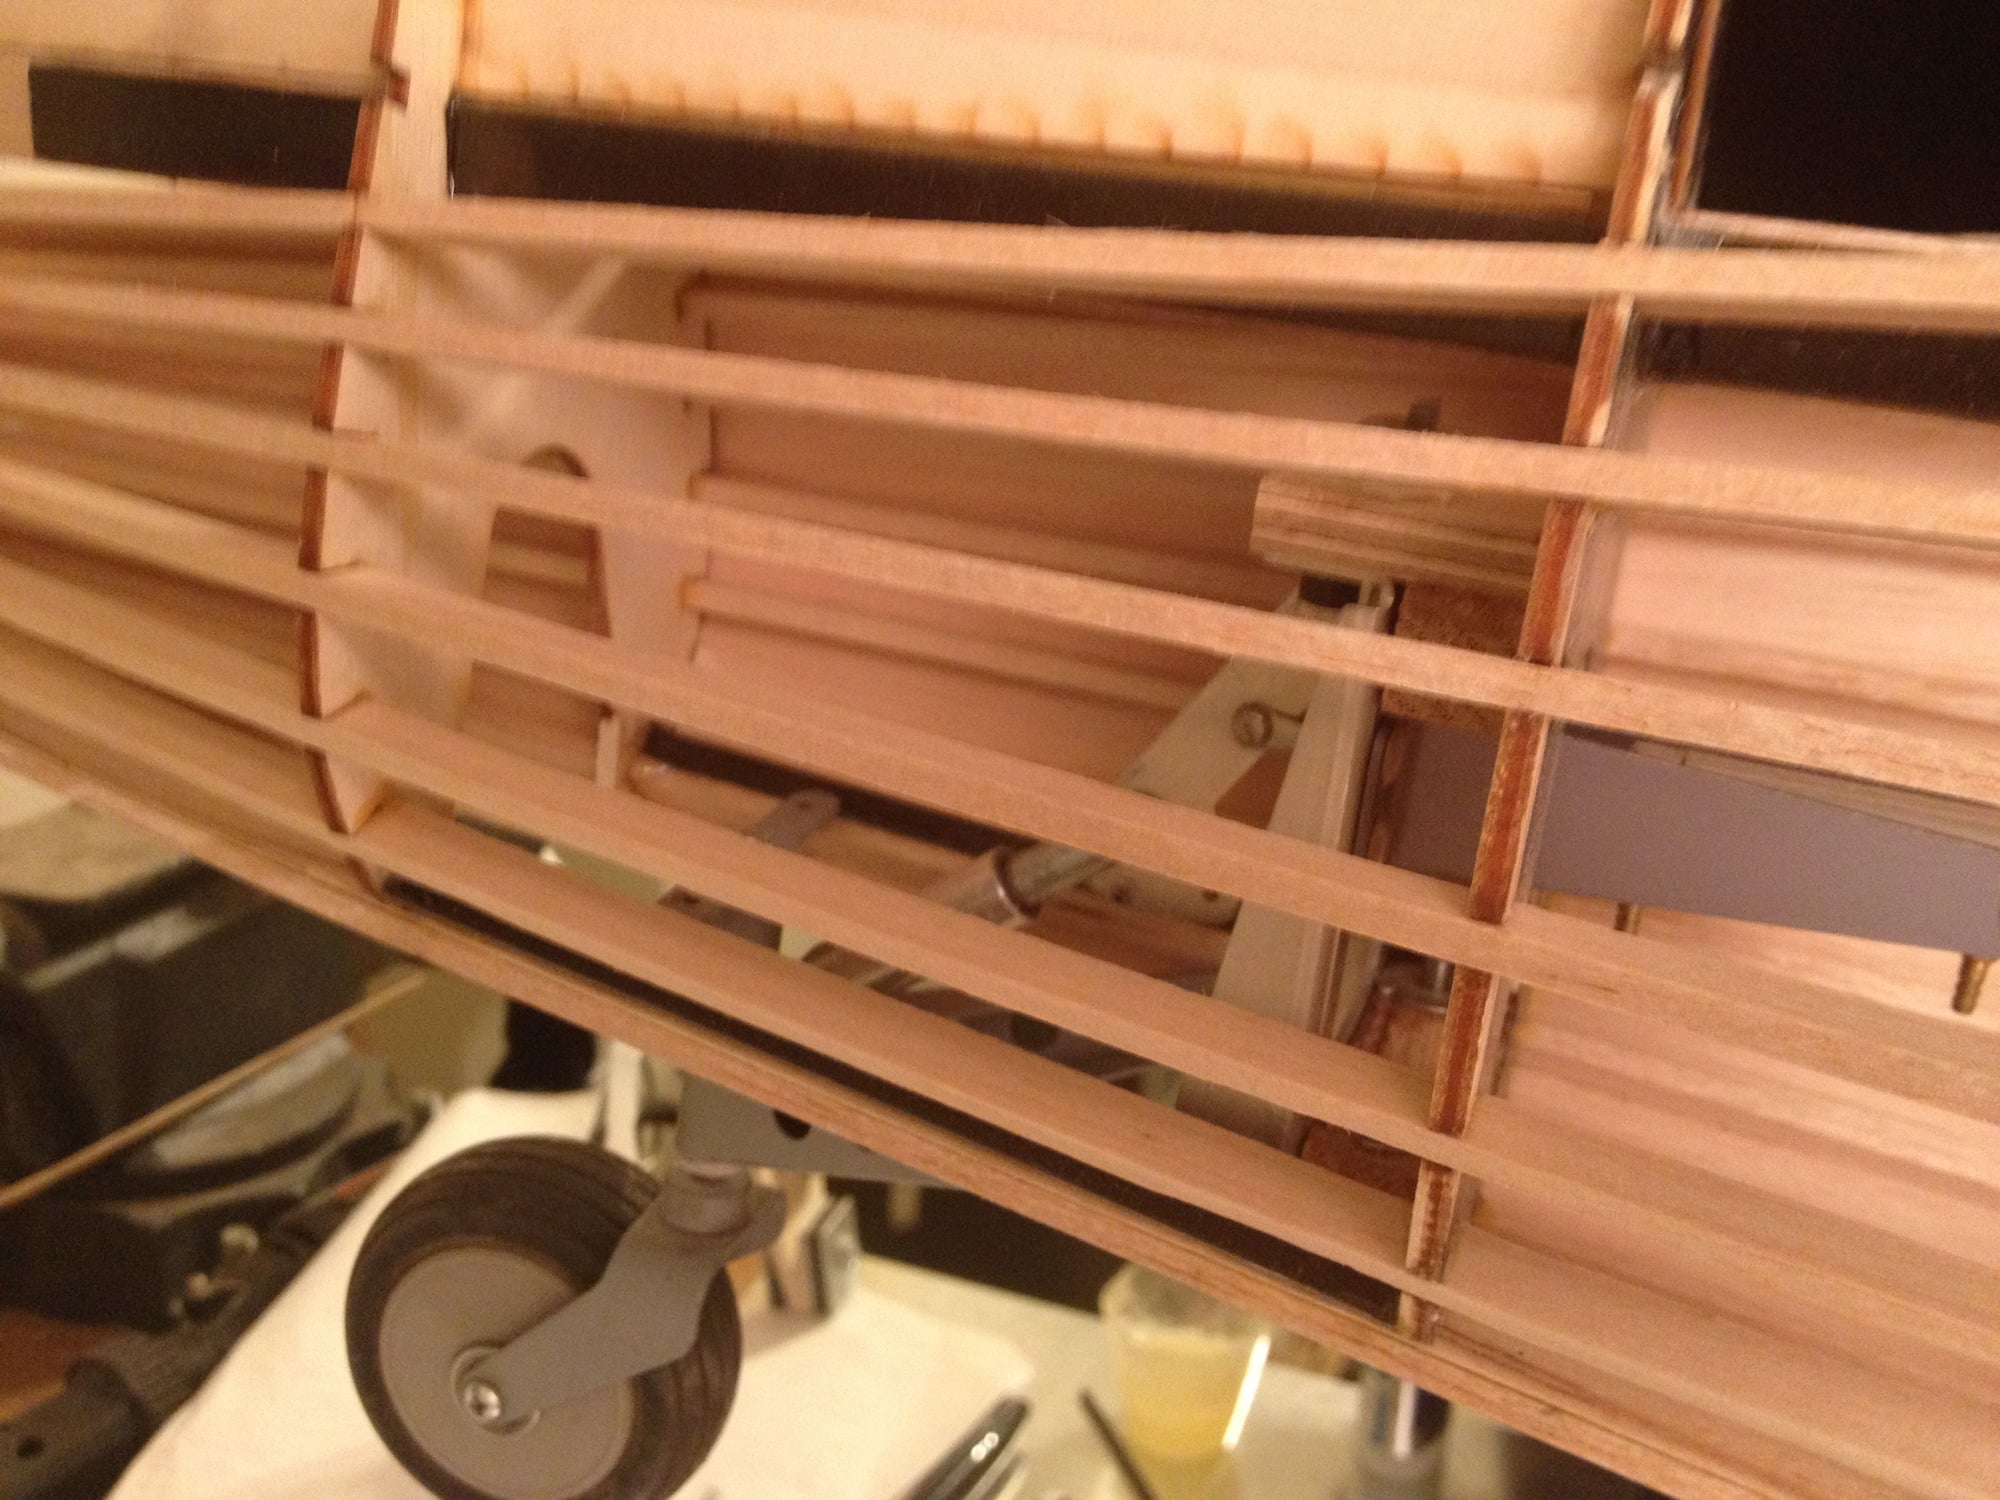
Tried and true wing retention method. I used the same on Byron Hellcat as a backup. I really didn't want to put holes through the carbon fiber tubes. The block resting on the wing is for the left wing. The block contains a 1/4-20 retainer nut. There's an identical block in the right wing, shown with a nylon bolt clamping the outer panel to the inner panel. I plan to use nylon socket head bolts - should be easier to tighten with an Allen-key vs. standard screwdriver.
Struggling with my control panel access hatch. I'm not satisfied with the latches I'm finding on-line. I've got some ideas on how to cobble together something using magnets or making a couple custom latches from bits from the shop. I'll try to get some pics of the space I have to work with and my magnet concept. Ideas, welcomed!
Cockpit detail source is out of production for the moment. Emailing with JP Warbirds - they may have room in their schedule next Spring. If anyone else is looking for a 1/6-scale Hellcat cockpit details, let me know or perhaps contact JP Warbirds. If there's enough interest, perhaps they'll, put a kit together. Yes, I have a kit, but I'm looking for one to match the detail that ChadV was producing.
Simulated stitching in place.
Stitching taped. There's something satisfying about this.
Just missing rockets!
Tried and true wing retention method. I used the same on Byron Hellcat as a backup. I really didn't want to put holes through the carbon fiber tubes. The block resting on the wing is for the left wing. The block contains a 1/4-20 retainer nut. There's an identical block in the right wing, shown with a nylon bolt clamping the outer panel to the inner panel. I plan to use nylon socket head bolts - should be easier to tighten with an Allen-key vs. standard screwdriver.
02-04-2023, 01:20 PM
#303
Thread Starter
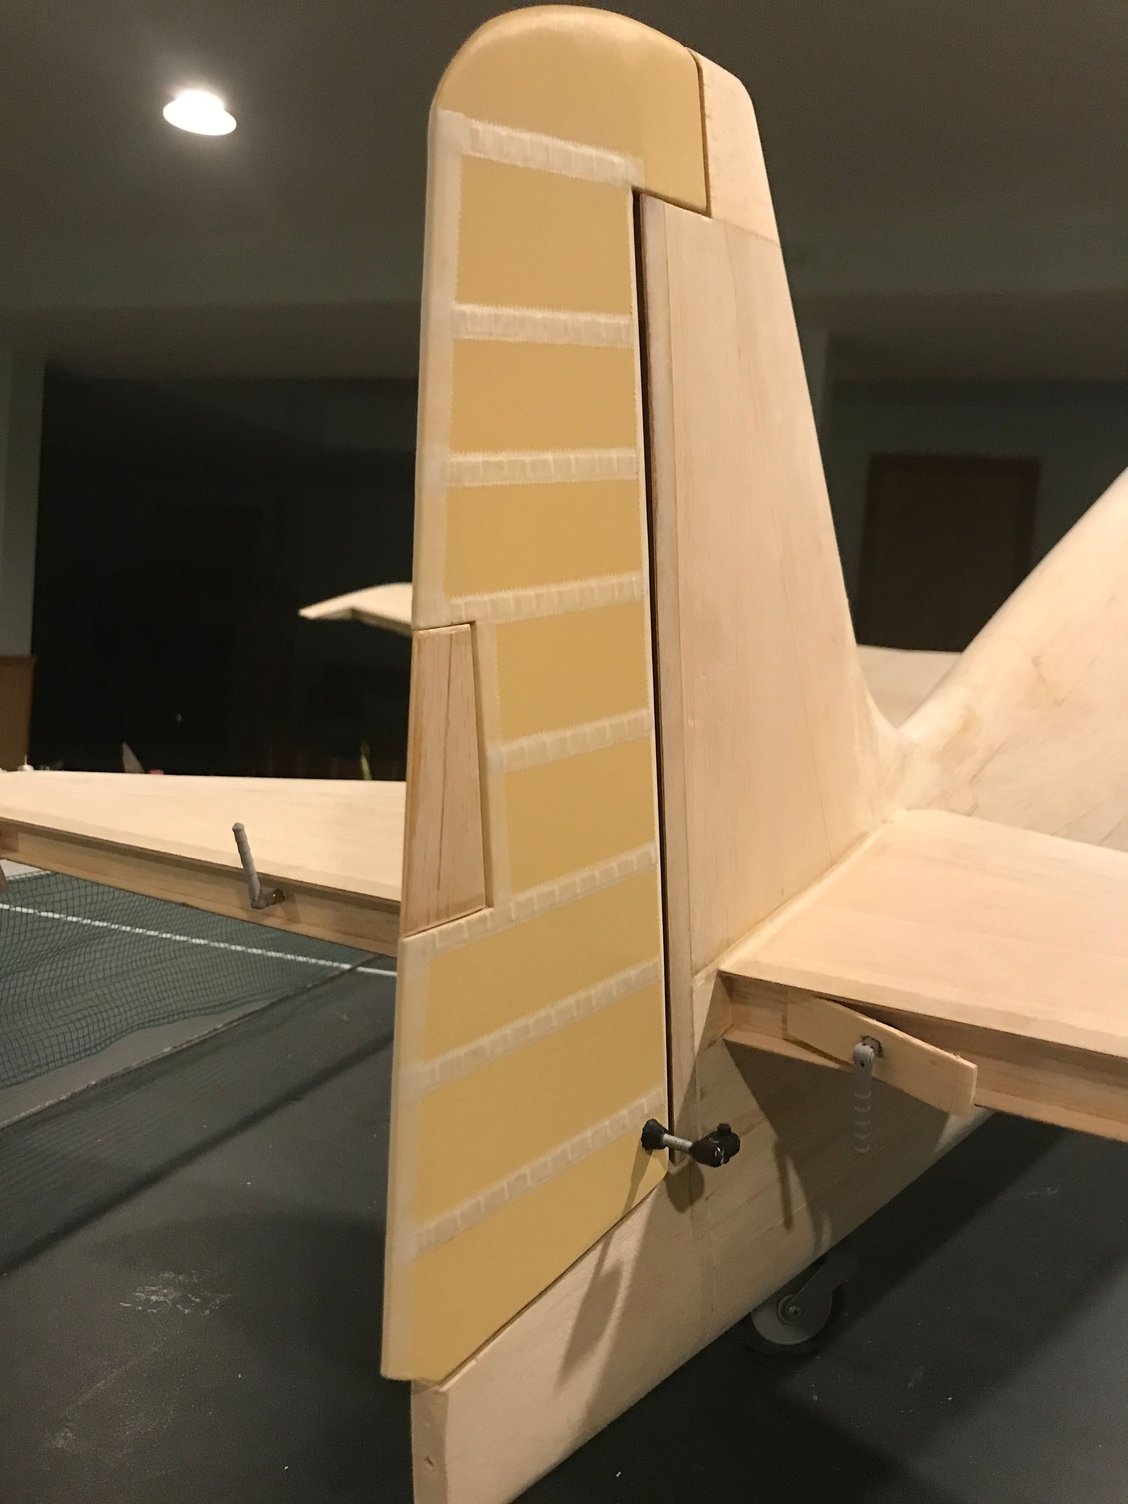
Rib stitching/taping completed, finally (rudder, ailerons, elevators and outboard flaps). The rib stitching came from Ken in British Columbia (can be find on this site); the pinking tape came from Dynamic Balsa. Both were easy to apply. However, cutting, applying, ironing for over 150 strips was time consuming. Cutting in batches (say, I need 24 strips of the same length), using some bits and bobs as templates and always using a fresh X-acto blade helped immensely.
Next steps:
Dummy Engine: I started detailing the vacuum formed dummy engine, but I'm now looking for a 1/6th scale printed version - years have passed on this project, and there must be something better available, today, then vacuum forming. I've found some offerings, but all in too small of a scale - enlarging them would probably not provide enough detail? Print-Beat has a 1/6.6 scale R-2800 for a Corsair from 3DPrintLab - a little small but perhaps it has enough detail and can be scaled up? I've not done any 3D printing so I don't know if scaling files up or down is easily done, or not.
Access Panel Closure: Not satisfied with anything, yet, so I may go forward with my idea of using magnets for closure with a small slot for prying open with a screwdriver. Looking for something that is secure but unobtrusive, minimizing the impact of seeing something that wasn't part of the original Hellcat.
Body prep: Time to get filling and sanding done before glassing starts.
Cockpit: Getting closer to Spring, so I'll need to check in a month or two if JP Warbirds decided to offer an F6F cockpit in 1/6 scale, or not. 3D printers are getting cheap - maybe I should learn? My last drawing was of a house, done on a drafting board...
Hope everyone is doing well.
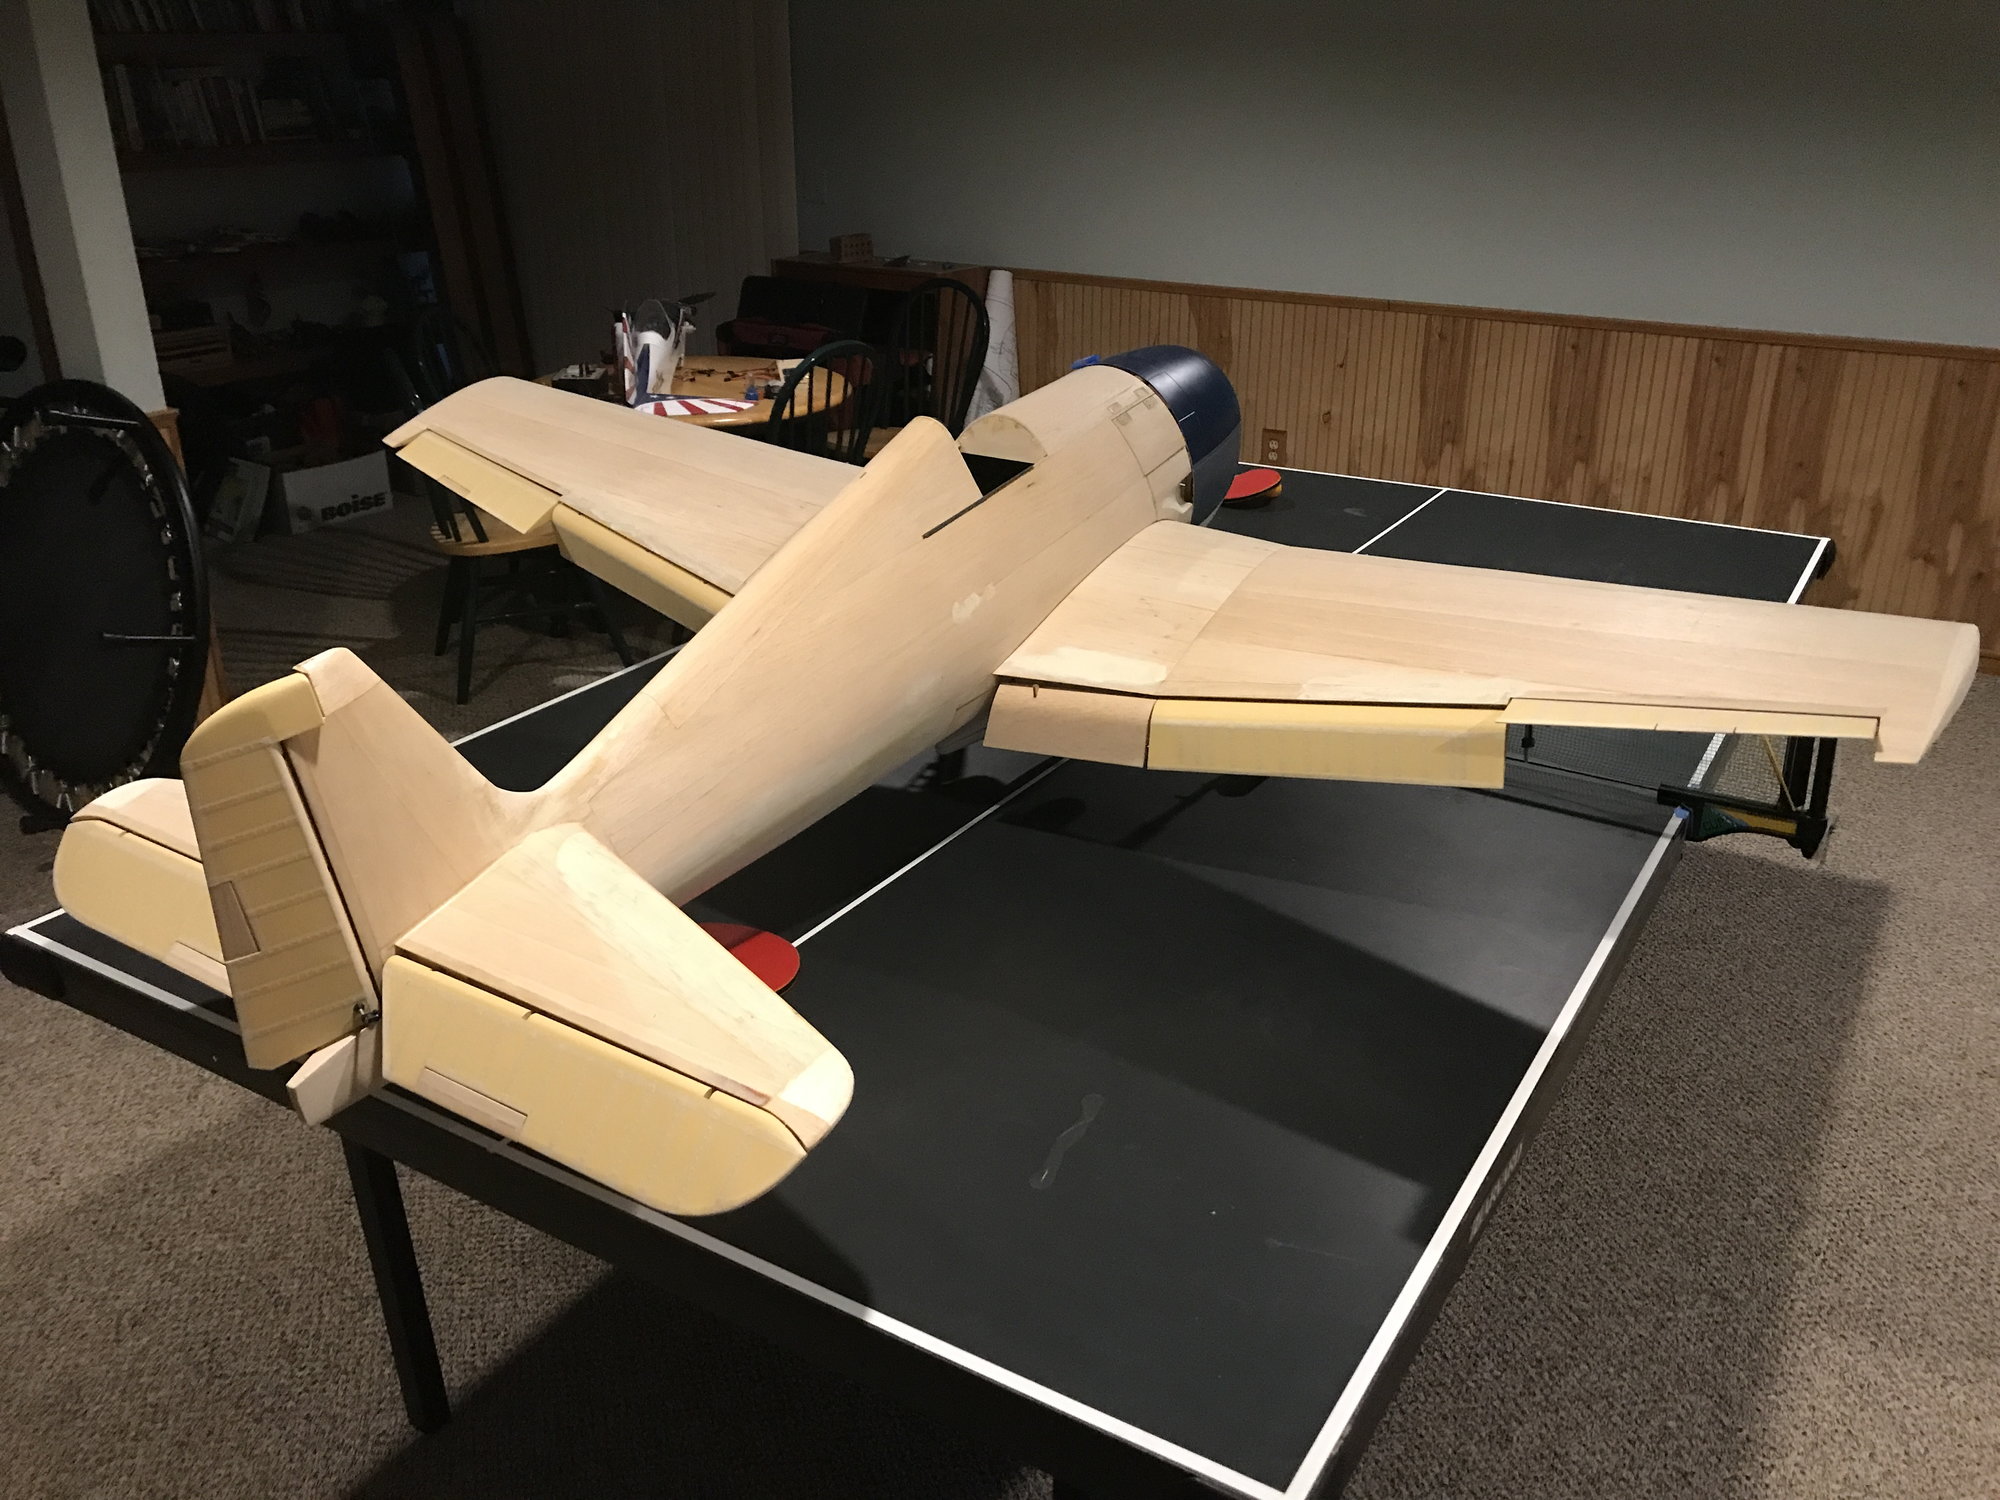
Finally, all rib stitching/taping completed!
Next steps:
Dummy Engine: I started detailing the vacuum formed dummy engine, but I'm now looking for a 1/6th scale printed version - years have passed on this project, and there must be something better available, today, then vacuum forming. I've found some offerings, but all in too small of a scale - enlarging them would probably not provide enough detail? Print-Beat has a 1/6.6 scale R-2800 for a Corsair from 3DPrintLab - a little small but perhaps it has enough detail and can be scaled up? I've not done any 3D printing so I don't know if scaling files up or down is easily done, or not.
Access Panel Closure: Not satisfied with anything, yet, so I may go forward with my idea of using magnets for closure with a small slot for prying open with a screwdriver. Looking for something that is secure but unobtrusive, minimizing the impact of seeing something that wasn't part of the original Hellcat.
Body prep: Time to get filling and sanding done before glassing starts.
Cockpit: Getting closer to Spring, so I'll need to check in a month or two if JP Warbirds decided to offer an F6F cockpit in 1/6 scale, or not. 3D printers are getting cheap - maybe I should learn? My last drawing was of a house, done on a drafting board...
Hope everyone is doing well.
Finally, all rib stitching/taping completed!
04-28-2023, 02:28 PM
#304
Thread Starter
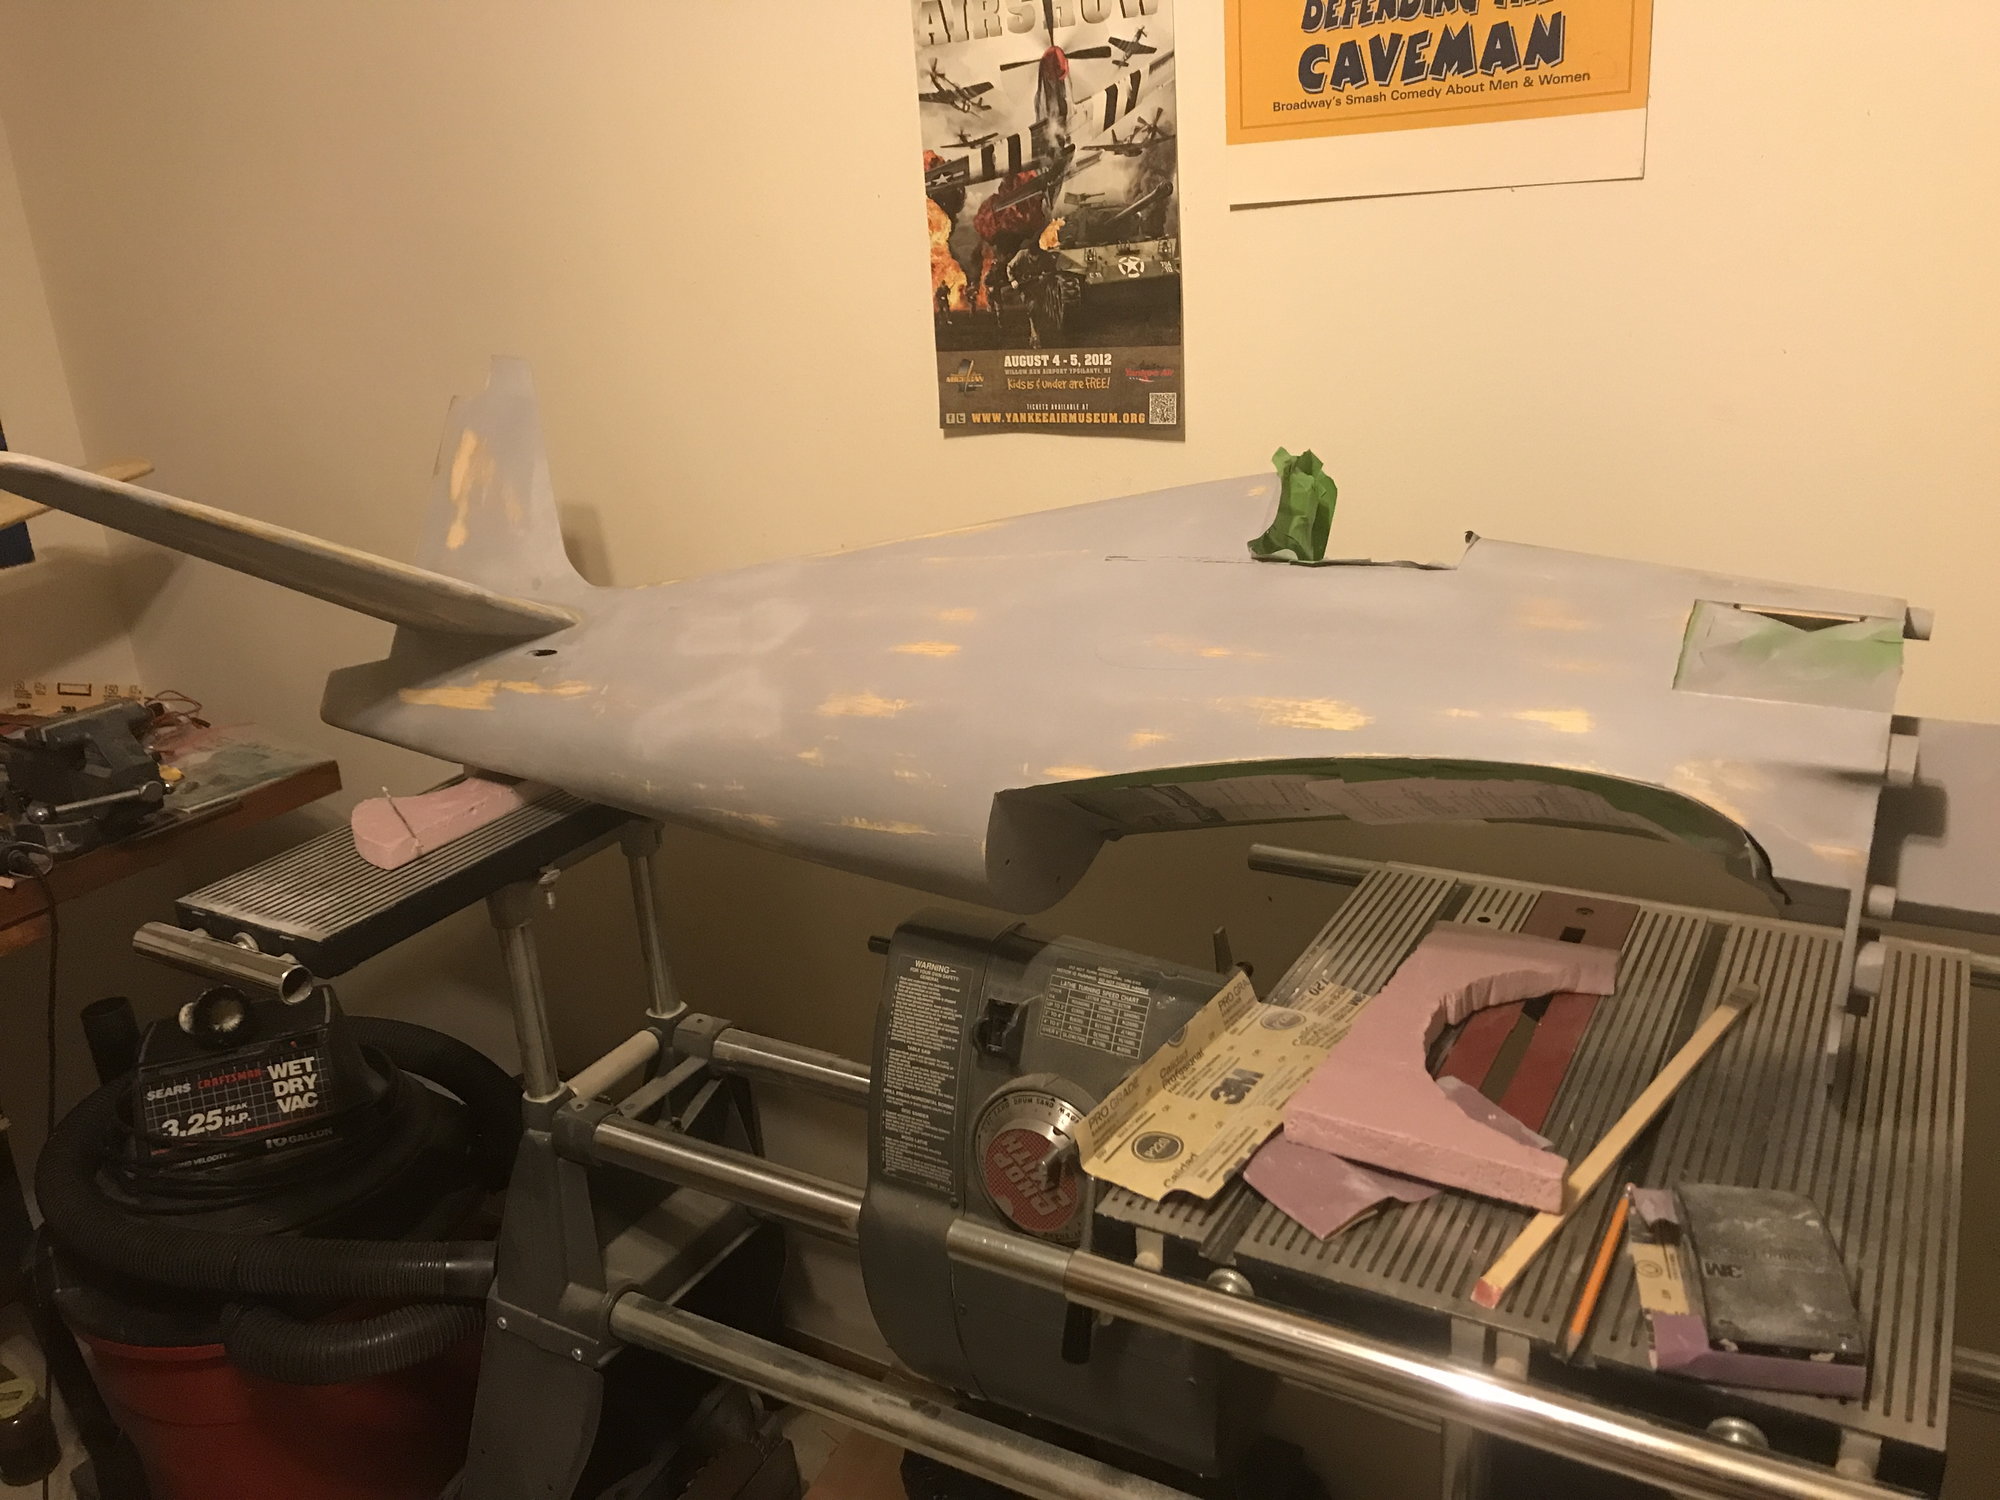
Filling and sanding completed, finally! Need to order glassing material, primer and paint. Nelson's appears to be out of business. Would like to stay water based if possible. Used latex paint on my last Hellcat, which worked well-enough, though the "deep sea blue" and gloss level weren't very accurate. I was good enough that no one questioned it, but I knew.
I'm trying to find recent discussions on primers, paints. So far, I'm finding advice on products which are no longer available. I should have built faster!
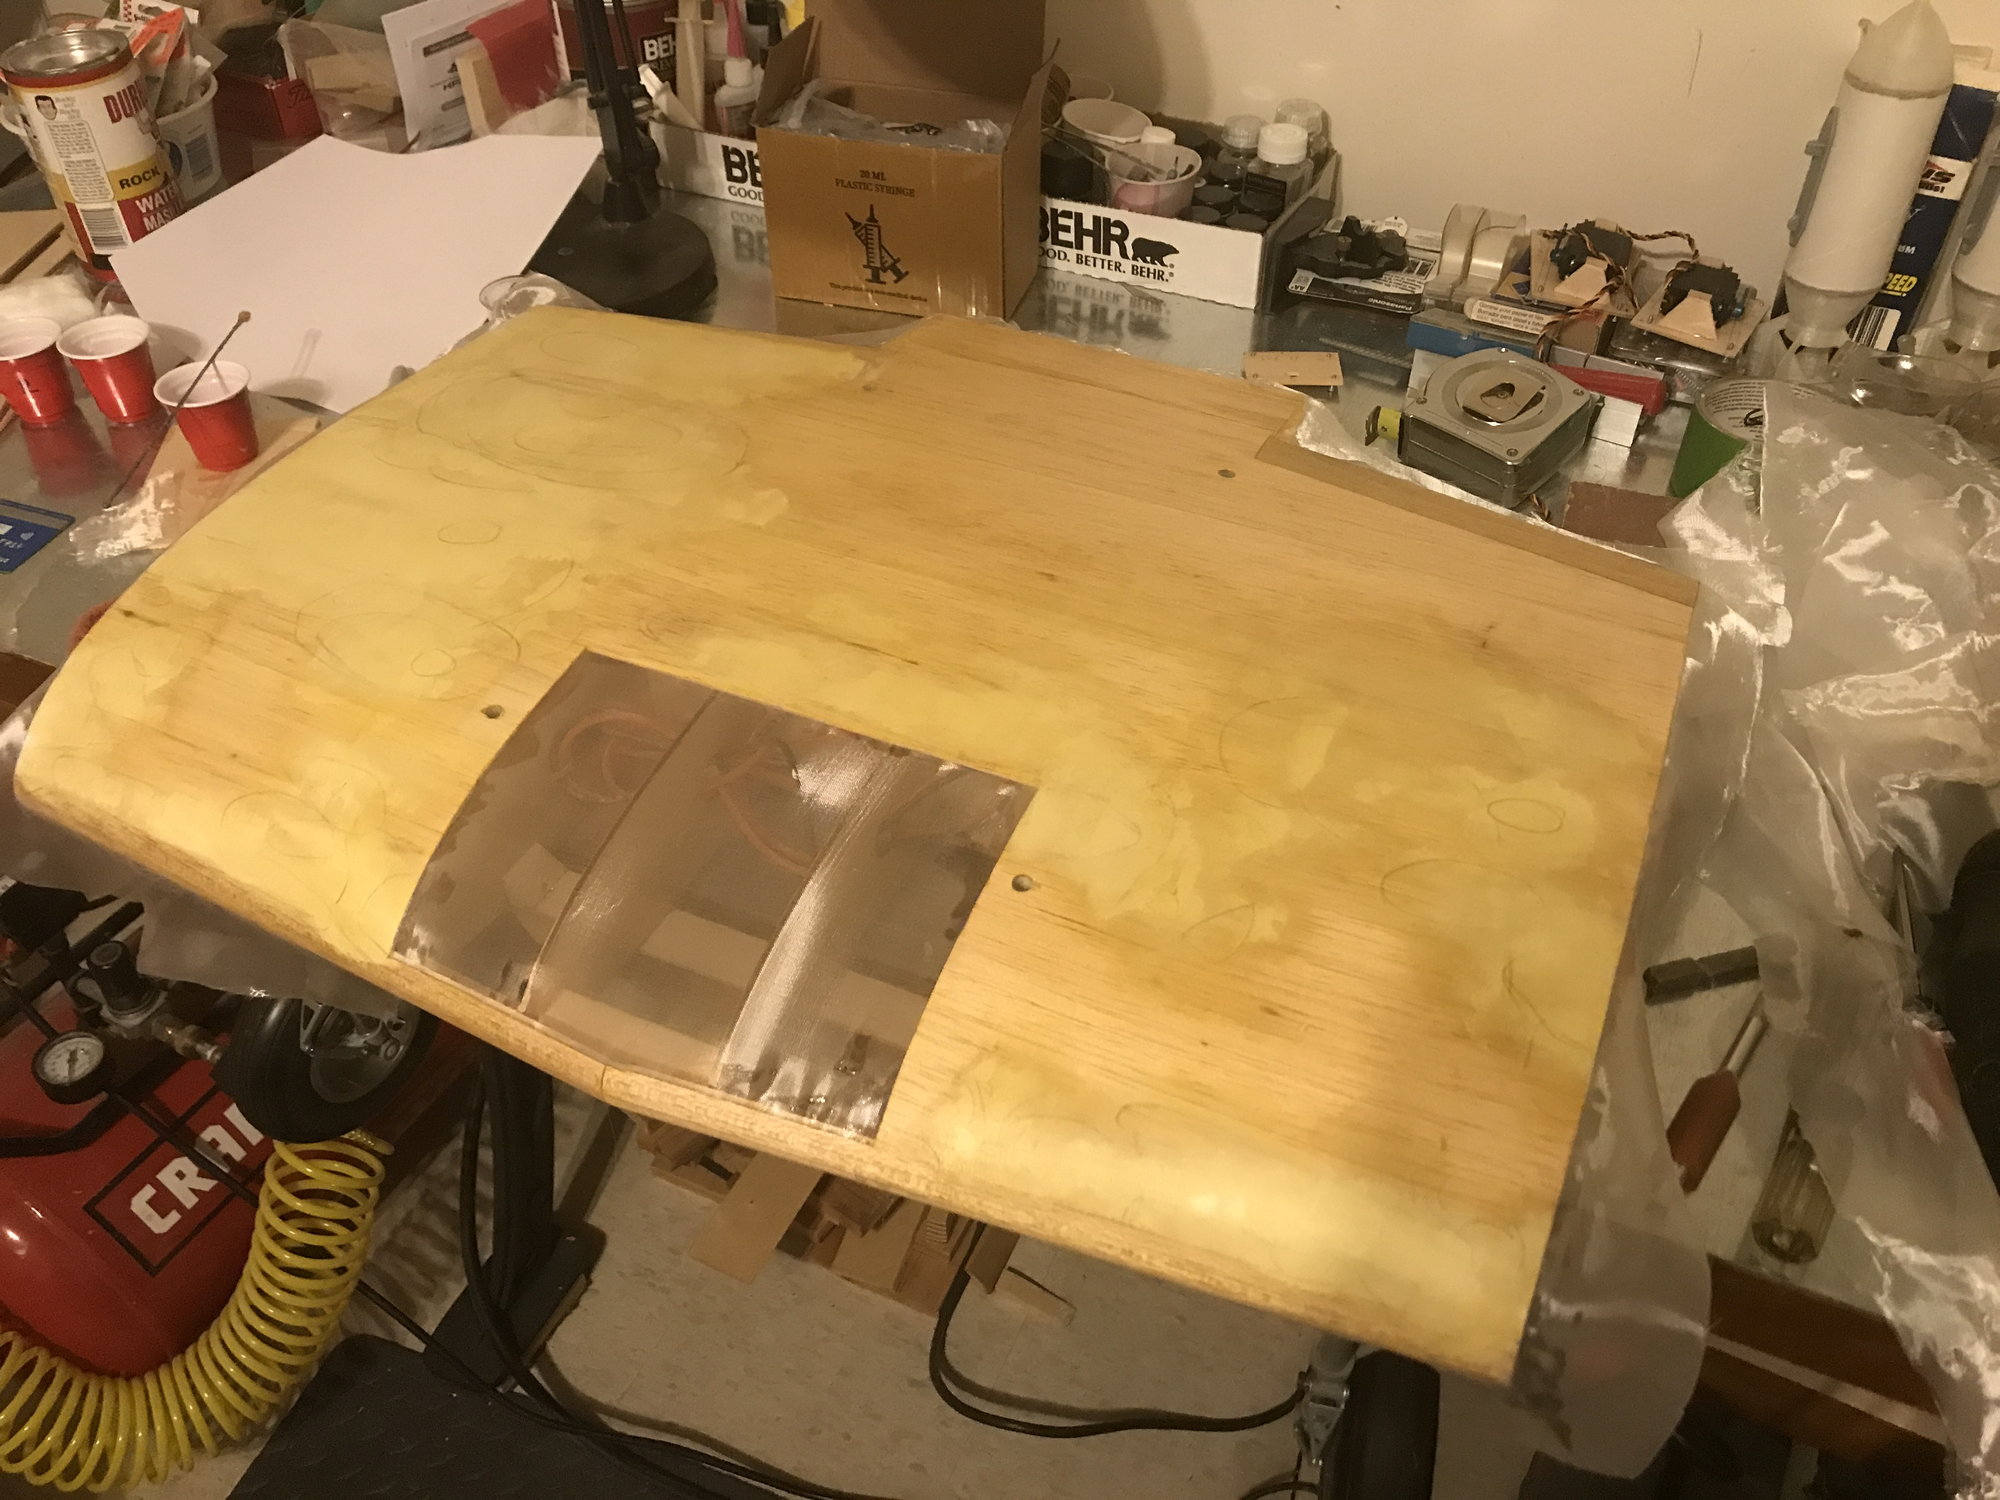
Wing center section. Example of filling, using 50/50 mixture of light spackling and Dunham's Water Putty.
I'm trying to find recent discussions on primers, paints. So far, I'm finding advice on products which are no longer available. I should have built faster!
Wing center section. Example of filling, using 50/50 mixture of light spackling and Dunham's Water Putty.
 05-01-2023, 08:40 AM
#306
Thread Starter
Something better? I'll listen!
Hitting the glass and prime/paint forums, now. It's been awhile since doing either, so looking for latest products. Would like to go all water based, if possible, as the other products end up giving my wife severe headaches, no matter what I do (perhaps send her on a trip while I'm painting? Too expensive!).
08-15-2023, 01:35 PM
#310
Thread Starter
Found I had some more filling and sanding to complete, then the house painting projects started...oh boy.
Fiberglass arrived. Resin Research finish epoxy is on order (Z-poxy and West Systems were out of stock, at least in my area and RC online sites). I saw many recommendations for Resin Research, so I'm probably not taking a risk. A club member recommended Bondo Grey Filler Primer to me, but I'm having trouble tracking down a supply. Found some about 20 miles away - won't ship and it's an unwelcoming drive through construction or back roads to get there. I don't see the product on the manufacturer's website, so perhaps they are no longer making it? Amazon, Walmart reporting out of stock with no idea if/when it will be back in stock.
I see several recommendations regarding generic automotive filler lacquers. Anyone have any specific brands, product numbers to recommend?
Plan is to get the fiberglass and primer work, including rivet/panel details, one before temps drop too far. Finish paint will be latex - I can do that indoors, without generating headaches. Then, a top finish of satin or semi-gloss in the Spring. Fly it in 2024. I shouldn't have anything left that will delay it further!
08-31-2023, 10:55 AM
#311
Thread Starter
Fiberglass is going on! I plan to get this done and then lacquer primed before the snow flies, hopefully with the panel lines and panel/rivet detail completed. That way, I can finish paint indoors with latex.
I have the top and bottom of the wing center section glassed. A second coat and some trimming required, before applying sandable filler lacquer. I'm using 1/2oz figerglass cloth and Resin Research Maker Pro finish epoxy. I saw and had been given recommendations for Zpoxy and Midwest Systems, but neither were in stock at the time of ordering. I had read good reviews on Resin Research's product, so ordered the 1.5qt kit with the "slow" hardener. They offer "fast" and "extra slow" hardeners in addition to the "slow" version.
So far, I'm very pleased with the product. My first two batches were done measuring roughly by eye. Measuring syringes arrived the next day. Either way, the material hardened equally well, so there appears to be a fair amount of forgiveness. No thinning was required. At room temp of 70Fdeg, the epoxy flowed easily, wetted through the fiberglass and into the underlying surface well, and remained workable longer than needed. It took me about 20 minutes to mix a batch and finish the application shown in the picture, below. The epoxy never felt like it was beginning to set up, so I never felt rushed. The epoxy is clear, no color, though that may not matter for our hobby as we prime and paint everything. I don't have an exact time for the epoxy to reach full hardness - leftover material is still tacky 6hrs later, and fully hard overnight, somewhere less than 12hrs. It's like a really thick taffy after 2hrs.
For me, this is perfect - I don't do this professionally so slow let's me go faster, by giving me the time to avoid mistakes!
Some sanding, a second coat and trimming/sanding of edges will finish the wing center section, making it ready for filler primer. Can't wait! Oh, but I must... :-)
If wondering, I left some of the interior without balsa sheeting in order to pass cables and lines through, and for later addition of a smoke oil tank and pump.
Center wing section glassed
09-27-2023, 11:45 AM
#313
Thread Starter
I just finished glassing the fuselage, this morning. Still happy with the Resin Research Maker Pro epoxy. I have a to make a couple sets of hatches and redo the covers I made for the landing gear mount bay. These, and the hatch cover for the control panel are the last bits needing any glass.
Primed, sanded and repeated on the belly pan and inboard flaps. I have some 3D printed parts where I'm filling either with epoxy, or epoxy and glass. Sanding alone was insufficient to getting an acceptable finish.
Also, I noted that the surfaces didn't mate well between the outer wing panels and the wing center section. Perhaps this build is just going to slow - thought I had these nicely mated at one point. I plan to fix this be joining the outer sections to the center section leaving say a 1/64 gap between them, so that I can get a blade or thin saw between them. Then, I plan to lay a strip of glass over the joint, with a 1" overlap on either side of the joint. I'll epoxy this in place and after curing, cut the glass down the joint. Some light filler, primer and sanding should correct the inconsistencies. Otherwise, better ideas welcomed!
I had hopes of getting all the priming and panel lines done outside before it gets to cold. We shall see. I want to have at least some pieces ready for final paint, something I can do indoors this winter. End of September, it's getting cold, quick.
Inboard flaps and belly pan are buttery smooth, ready for panel lines. The parts on the left, with 3D printed nose and fins, are partially glassed and filled, needing a lot more work to be reasonably displayable. Filling and sanding the fins, I don't know - the 3D layering there is so rough I'm not sure I have the patience to make them look perfect.
10-07-2023, 02:54 PM
#314
Thread Starter
Fuselage is glassed, primed and sanded. As a result, I've found a few areas needing a bit more filler than primer alone can fill. I'm using a mixture of the Resin Research epoxy (long working time), with some Durhams Water Putty (DWP) and micro-balloons. DWP sands well and, of course, micro-balloons lighten the filler - and also sand well.
A lot of work, but it's very satisfying when all the defects are corrected and the surfaces are glass smooth.
Temps are dropping. Will I get the whole aircraft primed, sanded and lined before winter? Will I need a garage heater in order to continue? We shall see...
I did find a new source (to me) for scale RC engines: Scale RC Engines I'm looking at their 1/6 R-2800, but I will need to make some checks on whether it will fit in the TF cowling, or not. I don't have an appropriate way to measure this up so I need to mount the engine and cut up some templates to see whether it will fit or not. A 1/6 R-2800 is 8.8" in diameter, which one would think would easily fit a 1/6 scale Hellcat. The 1/6 vacuum formed dummy engine that I have is about 7.6" in diameter. It fits, but isn't scale. And if the 1/6 scale TF cowling won't take a true 1/6 scale engine...? Seems like everyone has a different opinion on what 1/6 means!!! Well, Scale RC Engines has it correct - I found the dimensions of a full scale R-2800 and scaling these by 1/6 does result in an 8.8" diameter. I'll get this fit check done as soon as I'm done with the final prime/fill/sanding of the fuselage.
Looks nice glassed, IMO.

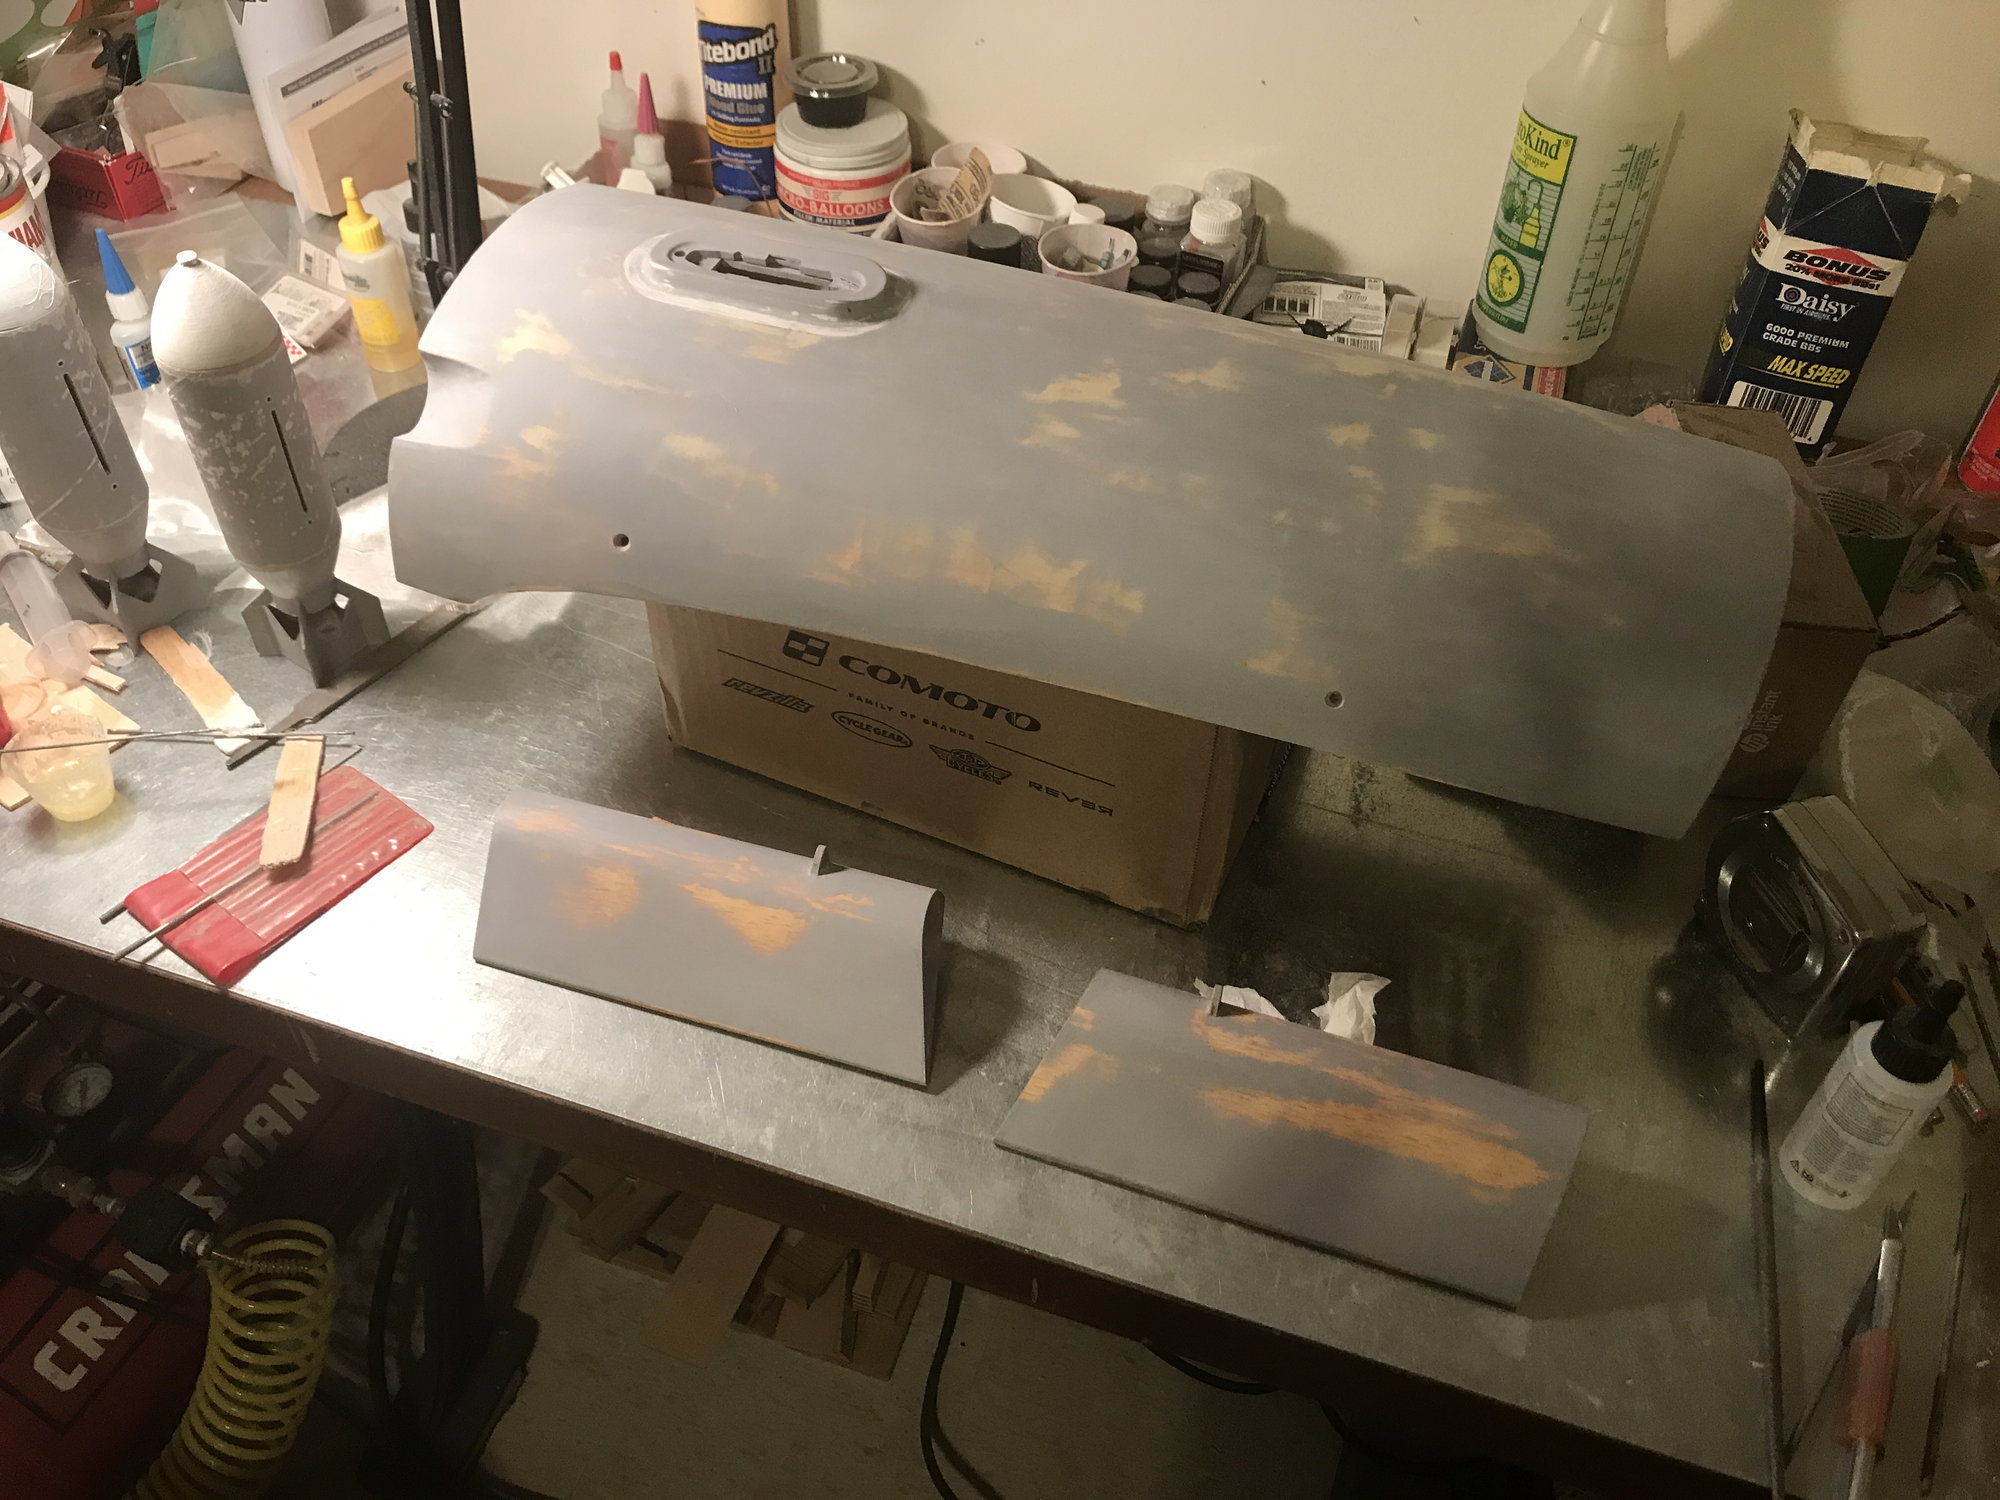
Filler primer applied!
Sanded and mostly filled with my DWP/RR-epoxy/micro-balloon mixture.
A lot of work, but it's very satisfying when all the defects are corrected and the surfaces are glass smooth.
Temps are dropping. Will I get the whole aircraft primed, sanded and lined before winter? Will I need a garage heater in order to continue? We shall see...
I did find a new source (to me) for scale RC engines: Scale RC Engines I'm looking at their 1/6 R-2800, but I will need to make some checks on whether it will fit in the TF cowling, or not. I don't have an appropriate way to measure this up so I need to mount the engine and cut up some templates to see whether it will fit or not. A 1/6 R-2800 is 8.8" in diameter, which one would think would easily fit a 1/6 scale Hellcat. The 1/6 vacuum formed dummy engine that I have is about 7.6" in diameter. It fits, but isn't scale. And if the 1/6 scale TF cowling won't take a true 1/6 scale engine...? Seems like everyone has a different opinion on what 1/6 means!!! Well, Scale RC Engines has it correct - I found the dimensions of a full scale R-2800 and scaling these by 1/6 does result in an 8.8" diameter. I'll get this fit check done as soon as I'm done with the final prime/fill/sanding of the fuselage.
Looks nice glassed, IMO.
Filler primer applied!
Sanded and mostly filled with my DWP/RR-epoxy/micro-balloon mixture.
10-12-2023, 12:34 PM
#315
Thread Starter
Outer wing panels to wing center section mismatch corrected! Well, the top half is done, both left and right sides. Now onto the bottom half, which will be easier, less work as there is much less mating edge work to fix due to the wheel well taking out a big section.
I watched a video yesterday on why the F8F Bearcat was so fast though it had the same engine as the F6F Hellcat. Part of the answer: No rivets or panel lines! Dang! I could have built a Bearcat and I'd be almost done at the point!
I believe the fuselage is done with priming/sanding - ready for a final wet sand and then creation of panel lines and application of Mirce's panel details. I need to learn/figure out how to vertical lines on the compound curves of the fuselage. The few videos I've seen on the subject typically demonstrate tracing out lines on a relatively easy surface to map out, such as a h-stab or wing. I guess the main thing to do is to find a way to trace both a vertical and horizontal reference line on each side of the fuse, then measure of these to get the placements of all the other lines. Perhaps a laser line/level tool would make this easier?
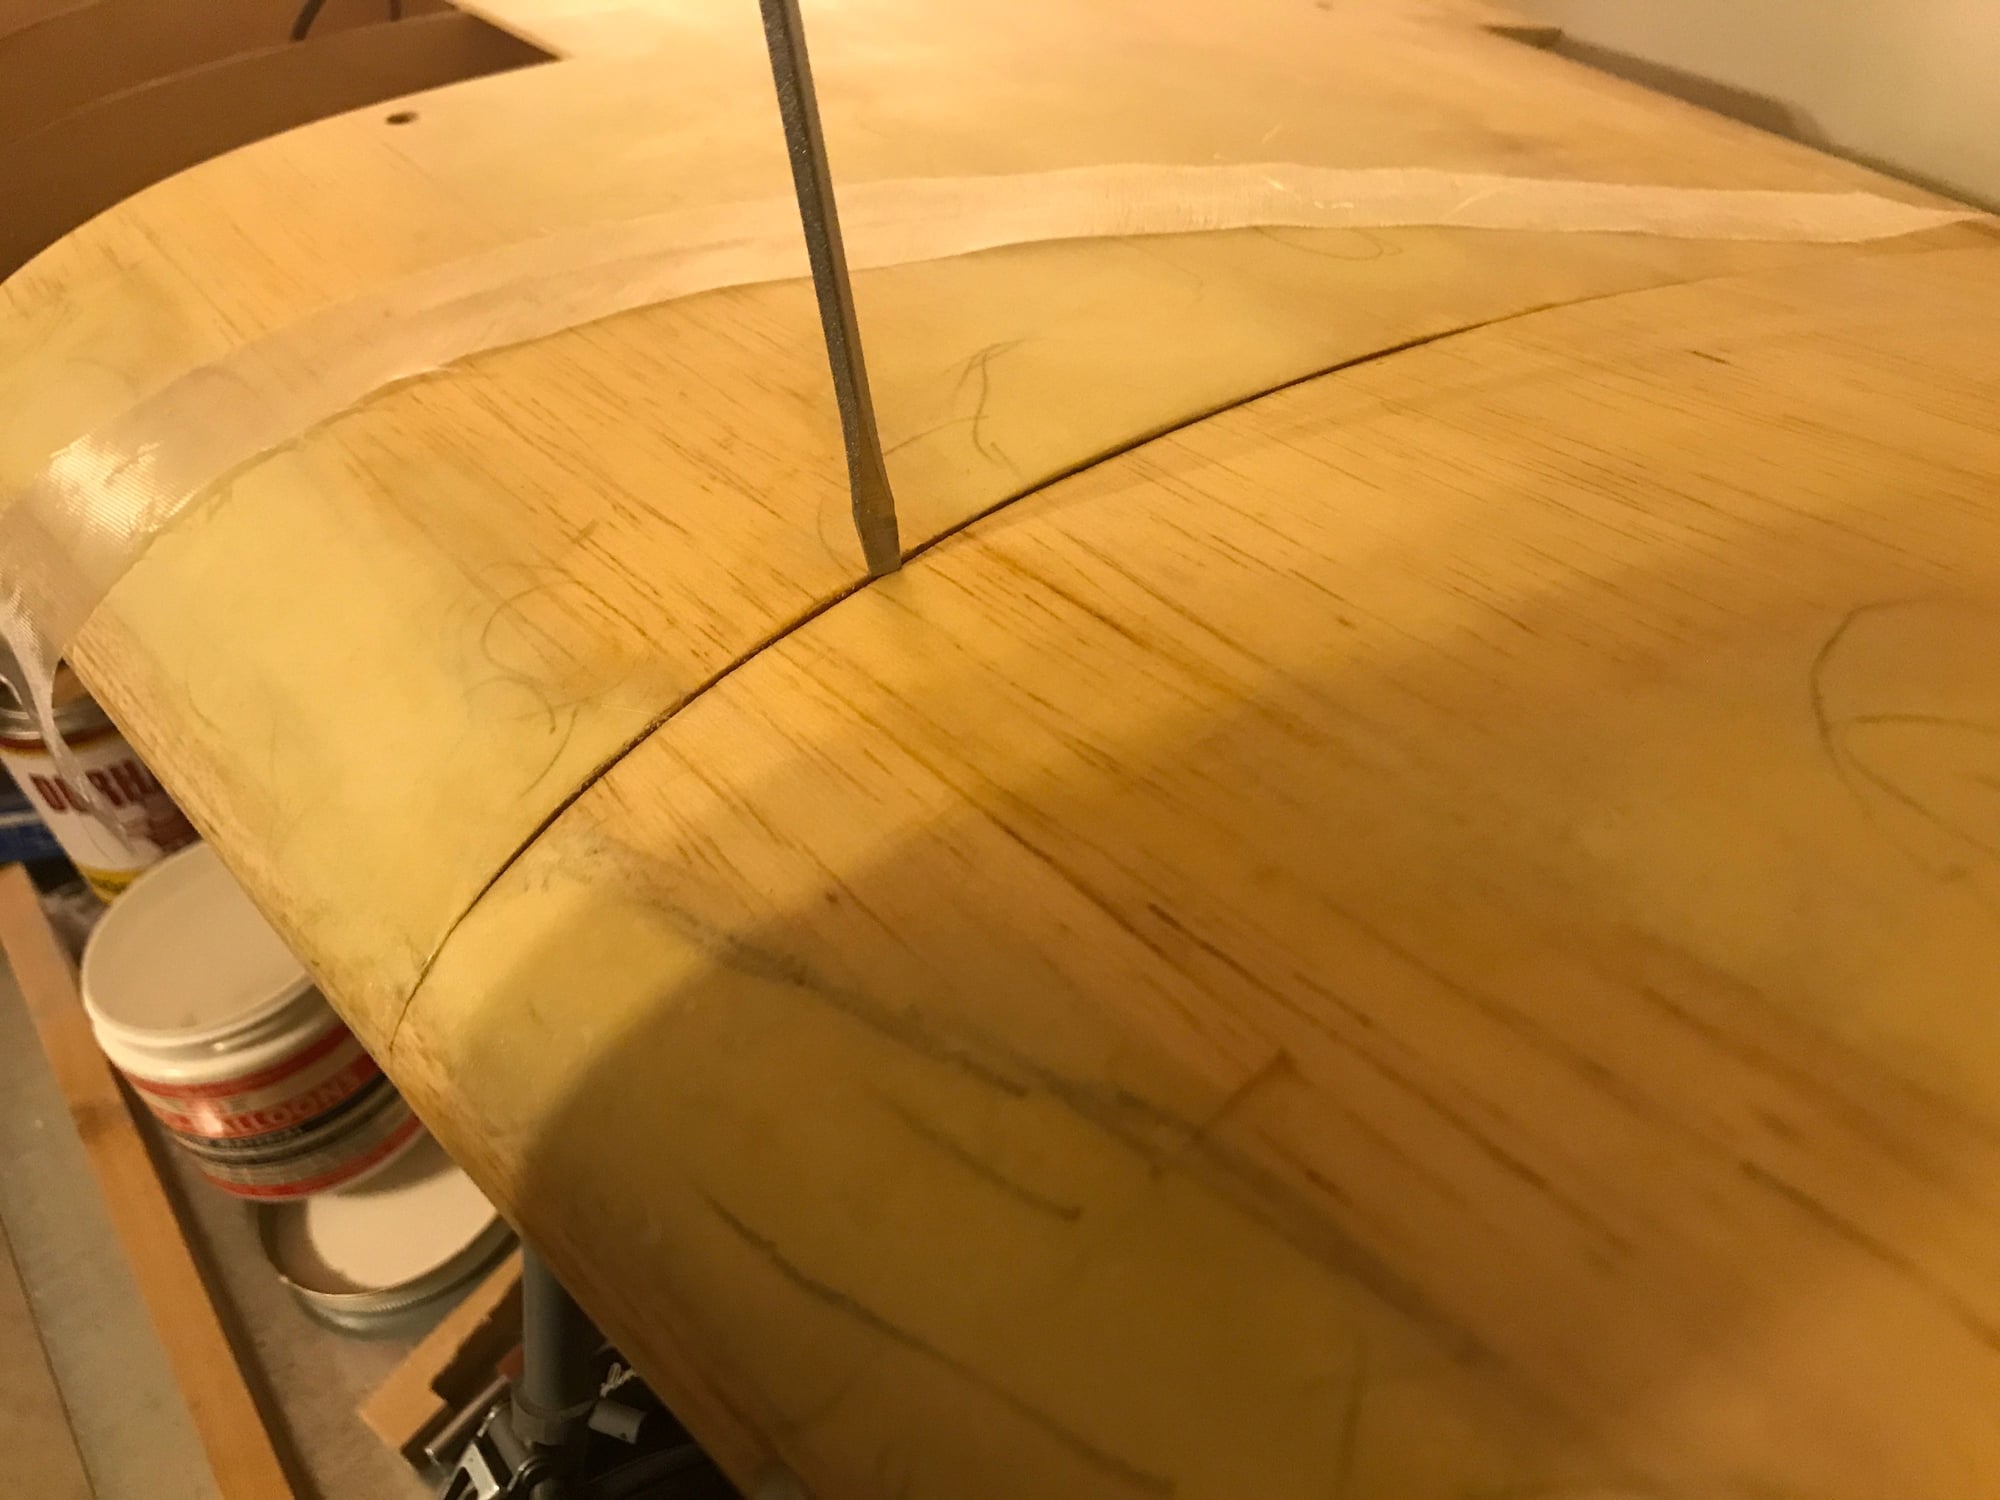
Indication of the mismatch between the right outer wing panel and the wing center section. How did I let this happen? Ugh!
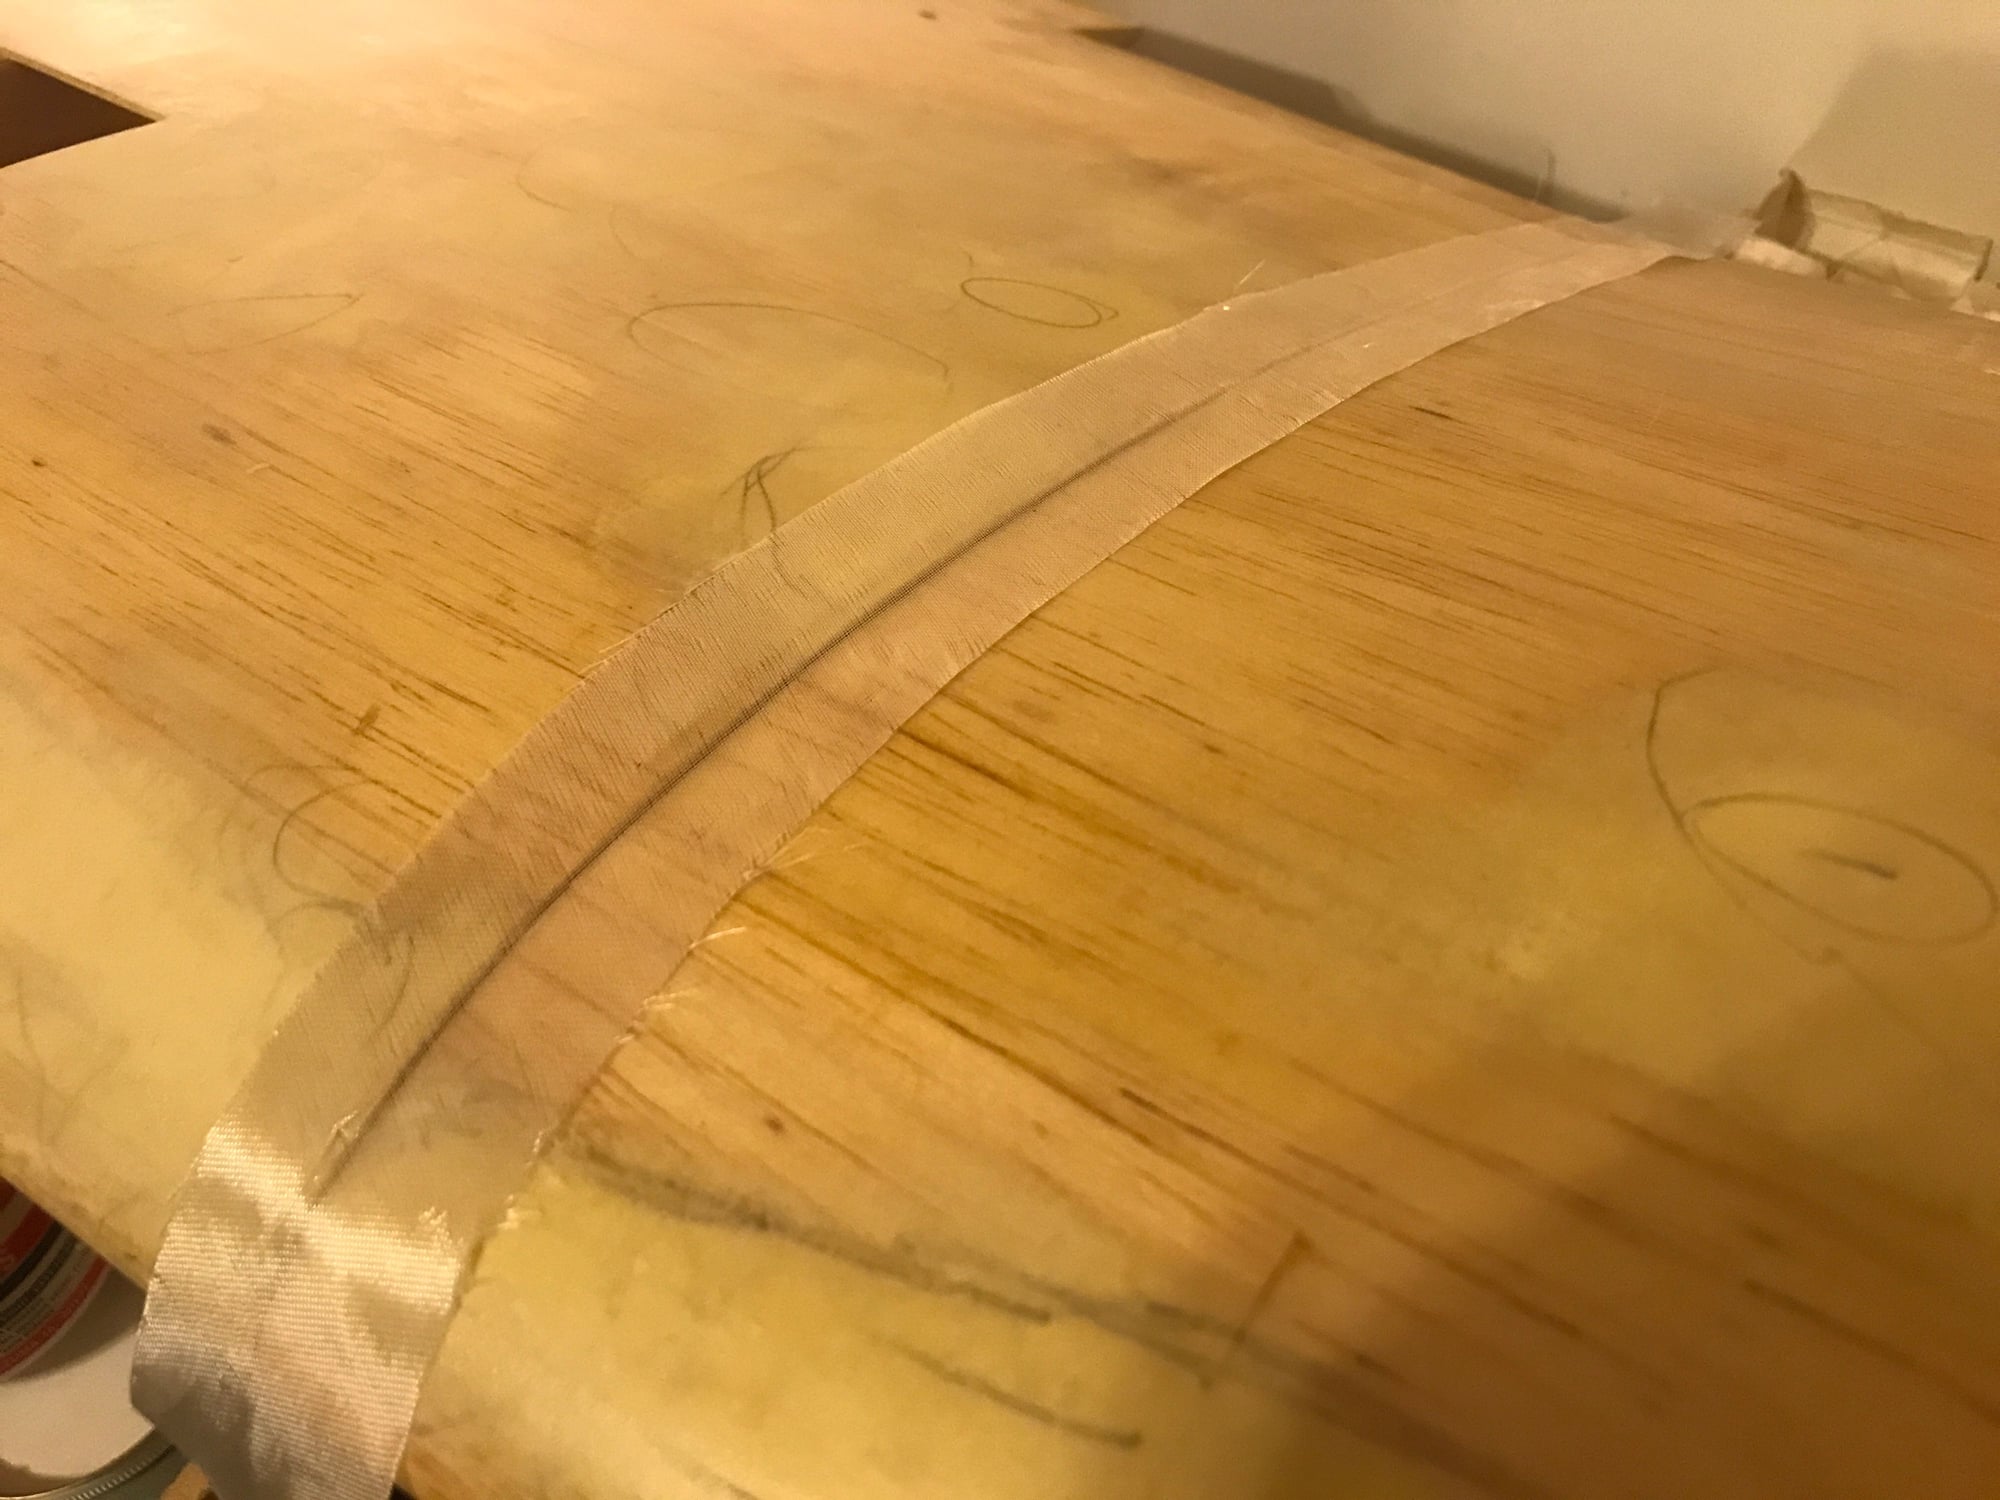
Plan: Leave a gap between the panels and epoxy a strip of 0.5 oz. glass over the gap.
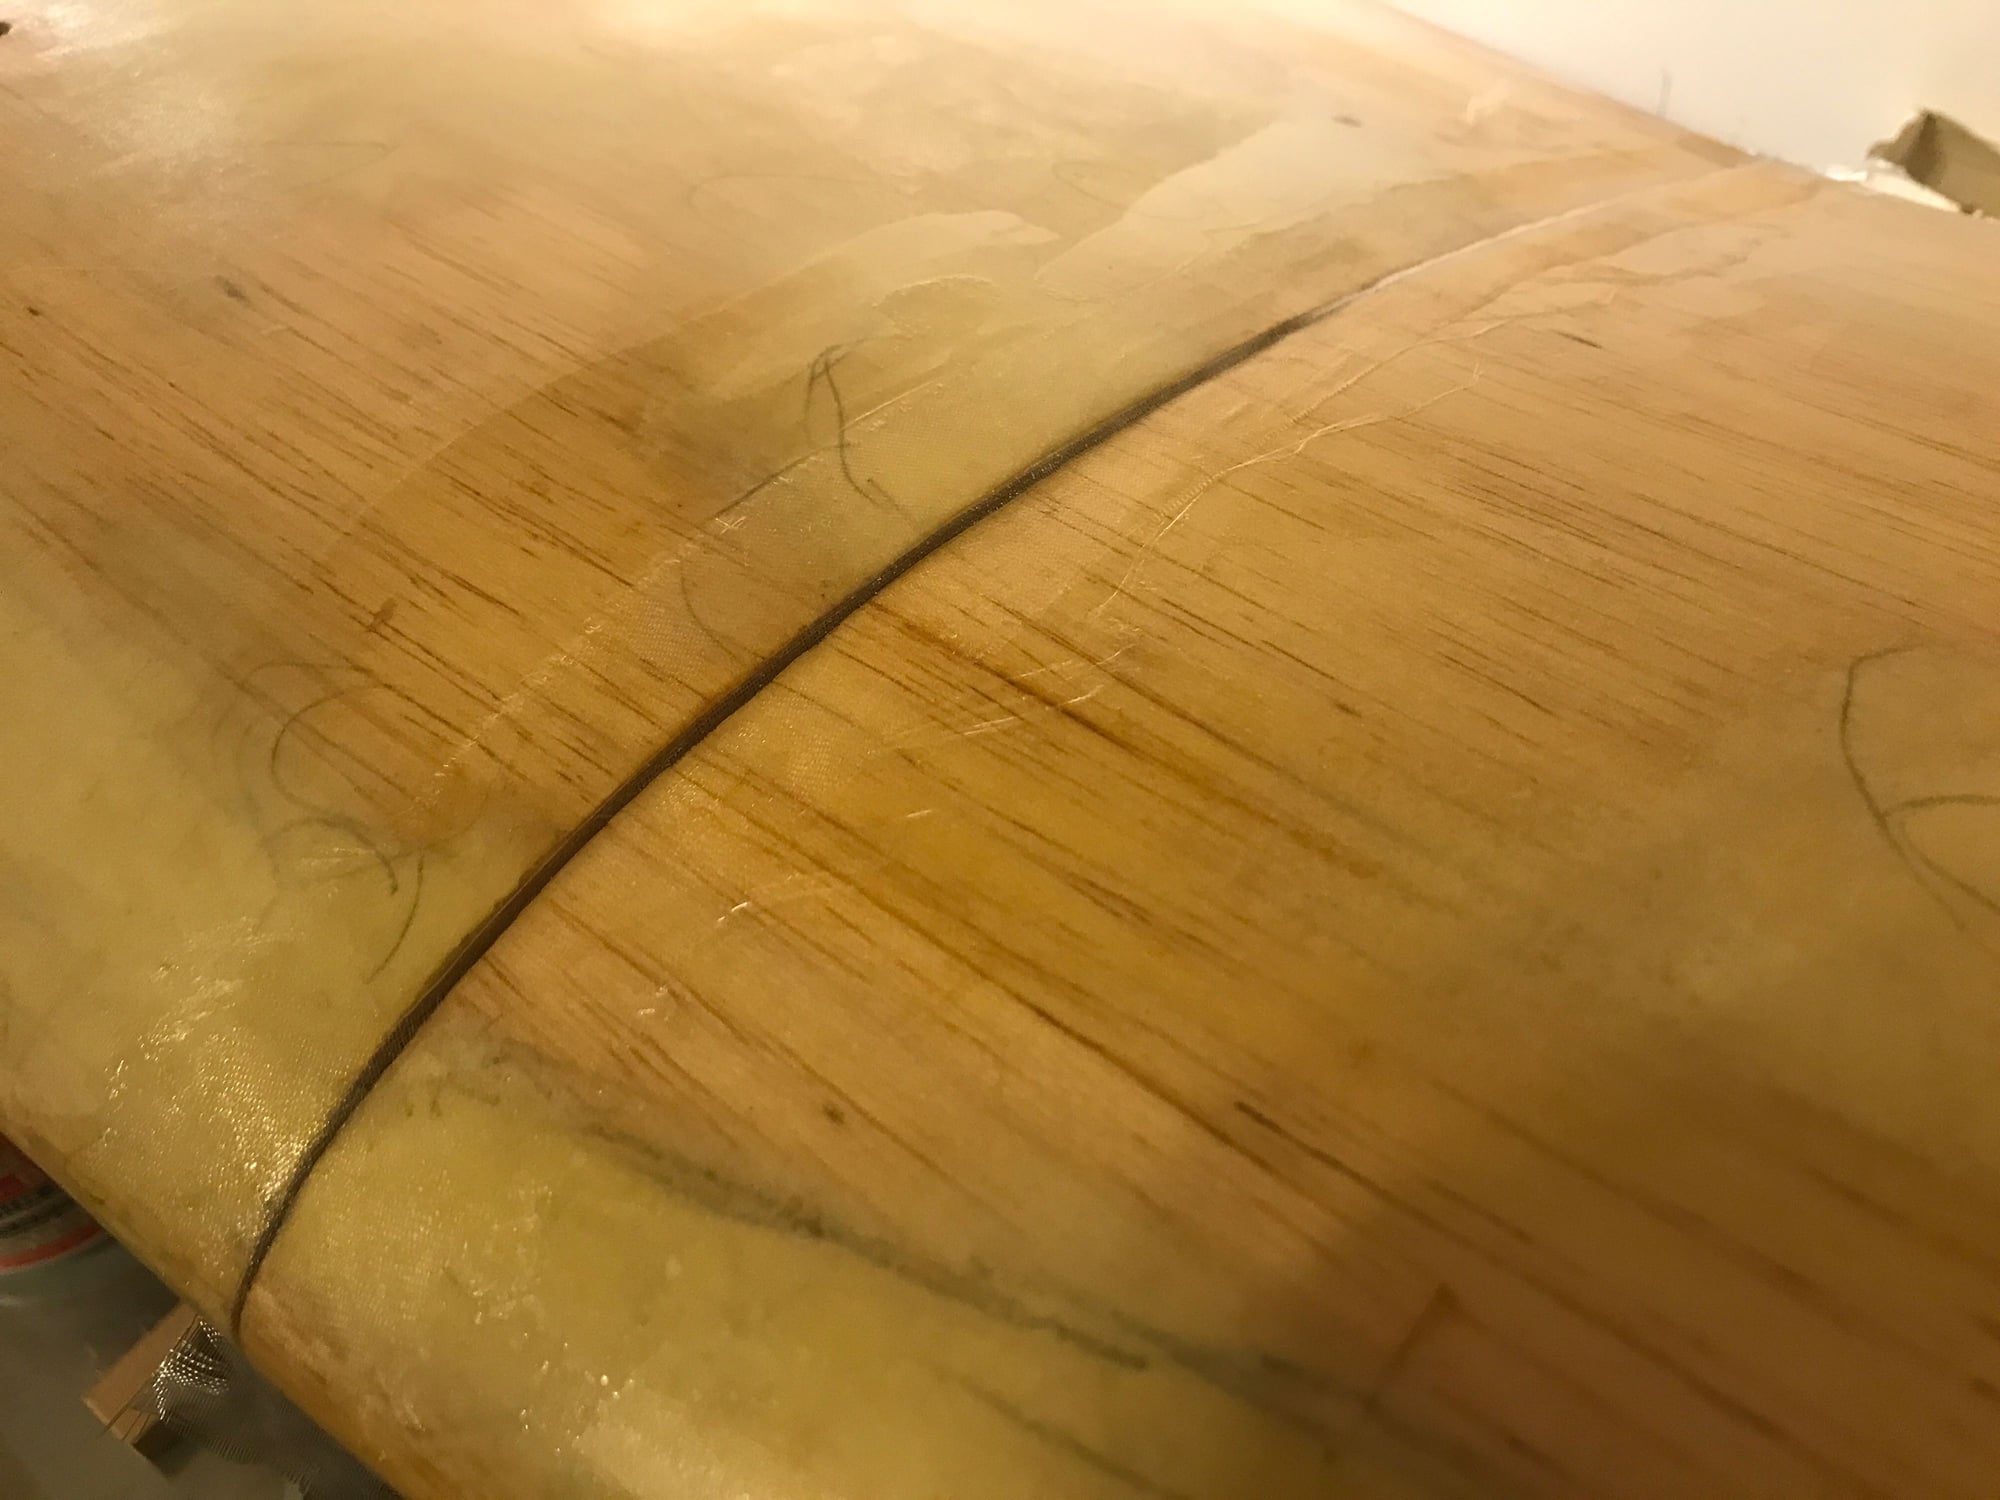
After epoxy/glass has set.
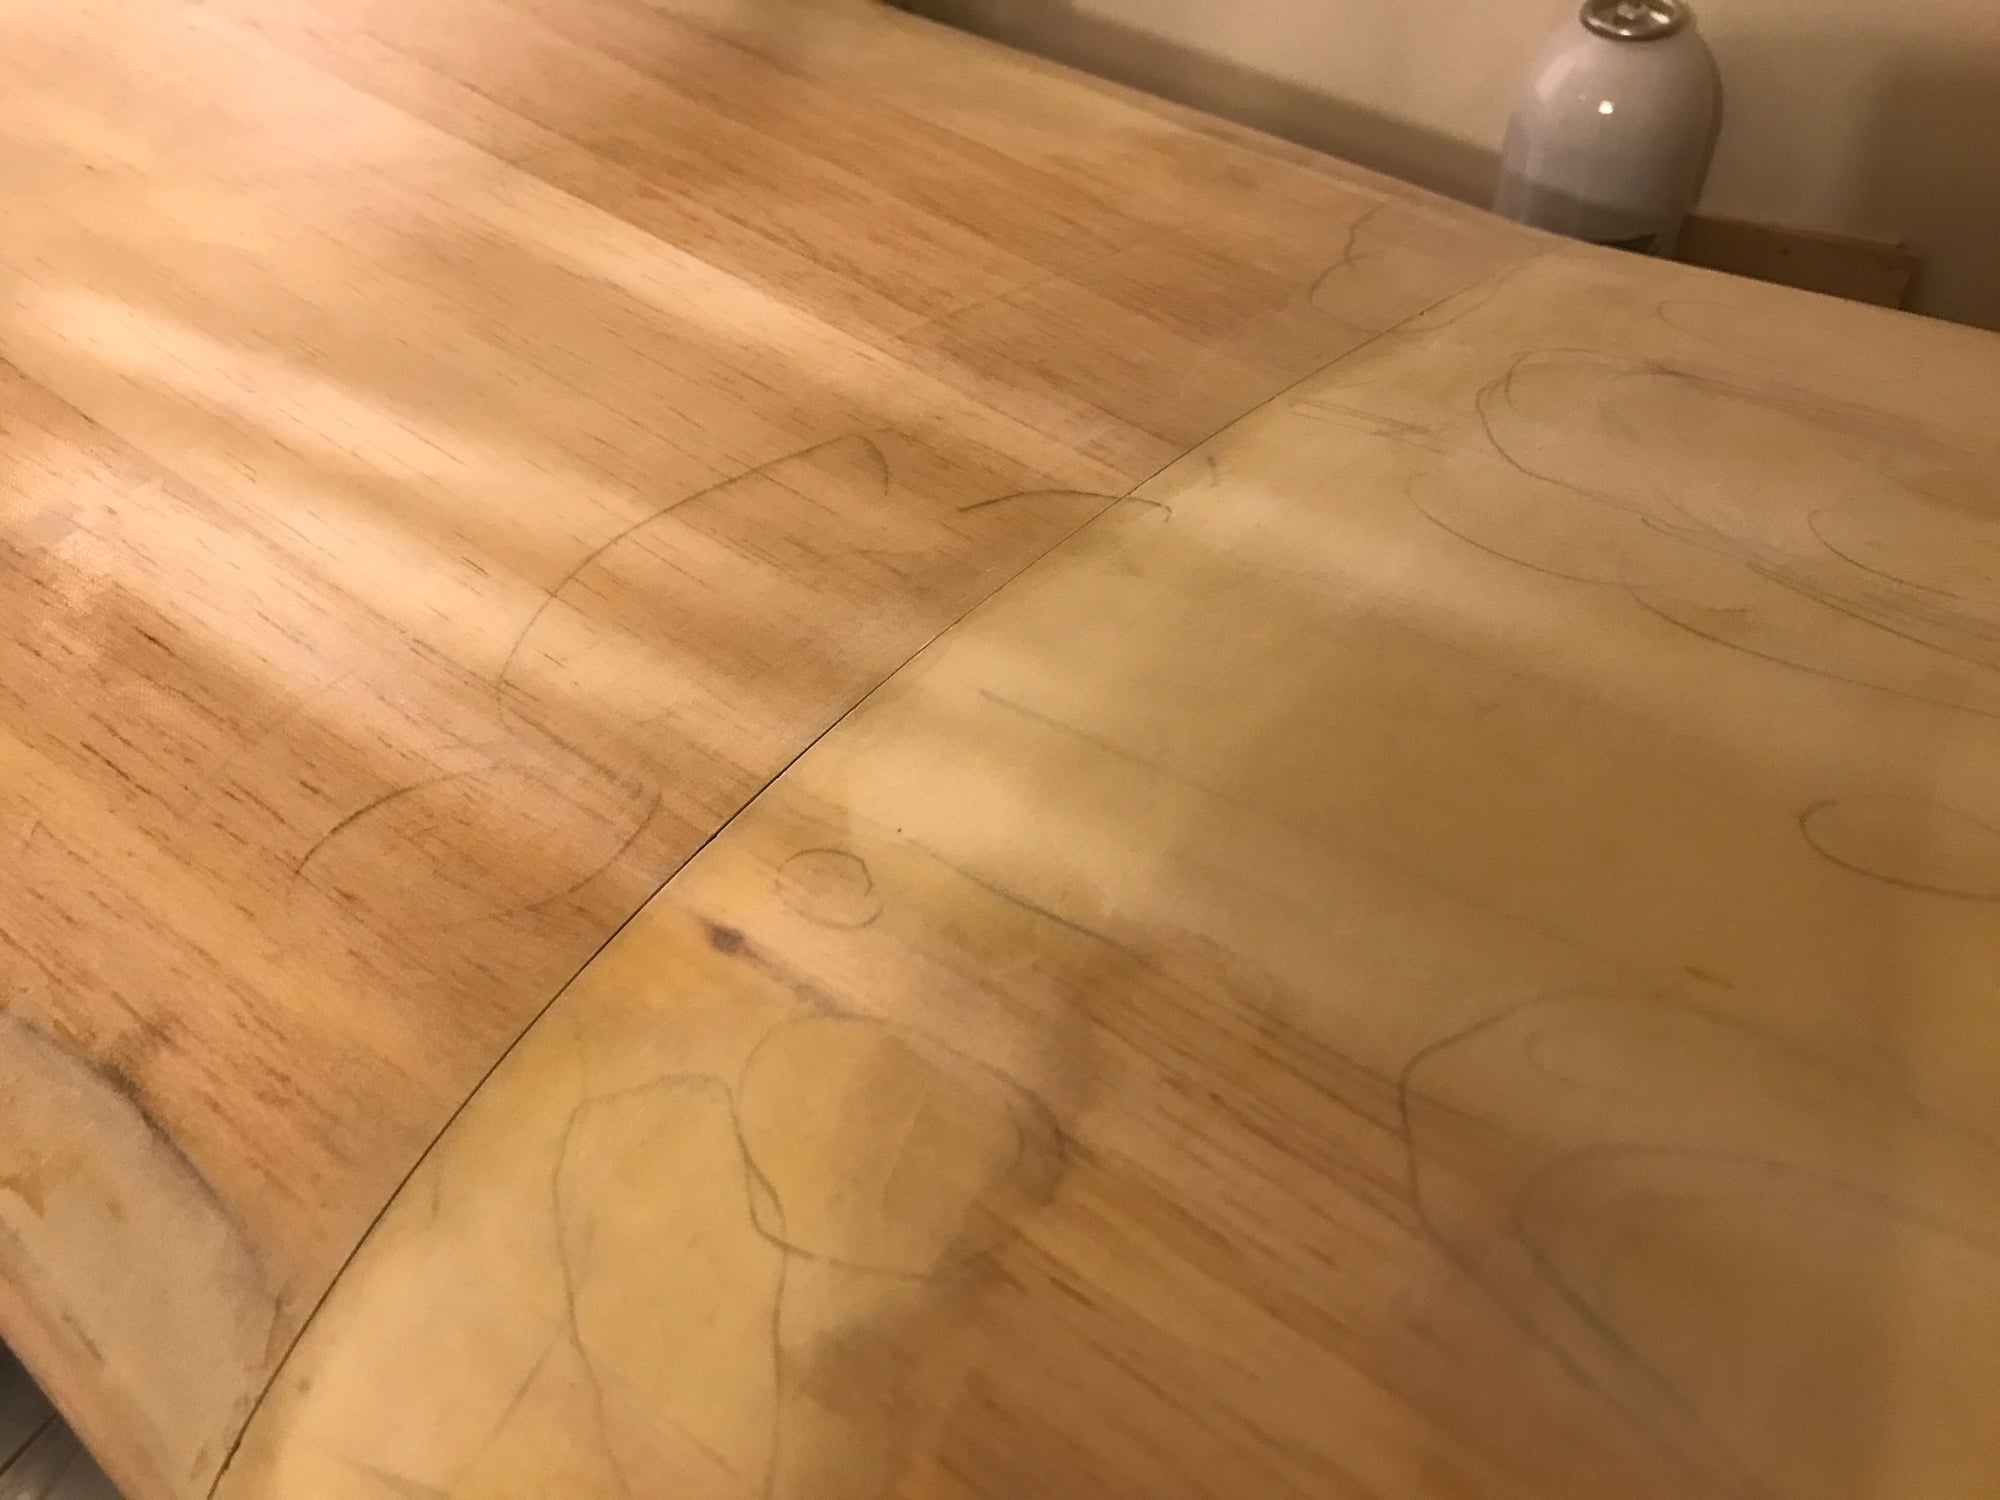
Success! After filling, sanding and separating the panels - as perfect as if I'd done it right the first time.
I watched a video yesterday on why the F8F Bearcat was so fast though it had the same engine as the F6F Hellcat. Part of the answer: No rivets or panel lines! Dang! I could have built a Bearcat and I'd be almost done at the point!
I believe the fuselage is done with priming/sanding - ready for a final wet sand and then creation of panel lines and application of Mirce's panel details. I need to learn/figure out how to vertical lines on the compound curves of the fuselage. The few videos I've seen on the subject typically demonstrate tracing out lines on a relatively easy surface to map out, such as a h-stab or wing. I guess the main thing to do is to find a way to trace both a vertical and horizontal reference line on each side of the fuse, then measure of these to get the placements of all the other lines. Perhaps a laser line/level tool would make this easier?
Indication of the mismatch between the right outer wing panel and the wing center section. How did I let this happen? Ugh!
Plan: Leave a gap between the panels and epoxy a strip of 0.5 oz. glass over the gap.
After epoxy/glass has set.
Success! After filling, sanding and separating the panels - as perfect as if I'd done it right the first time.
10-12-2023, 08:02 PM
#316

My Feedback: (60)
Join Date: Dec 2001
Location: Litchfield Park,
AZ
Posts: 7,677
Likes: 0
Received 25 Likes
on
23 Posts
A laser level works great for laying out panel lines on the fuselage. You just need to get a couple of the major panel lines on to use for reference and the rest can be figured out relatively easily. Good luck with it!
10-13-2023, 11:13 AM
#317
Thread Starter
10-14-2023, 01:38 PM
#318
Thread Starter
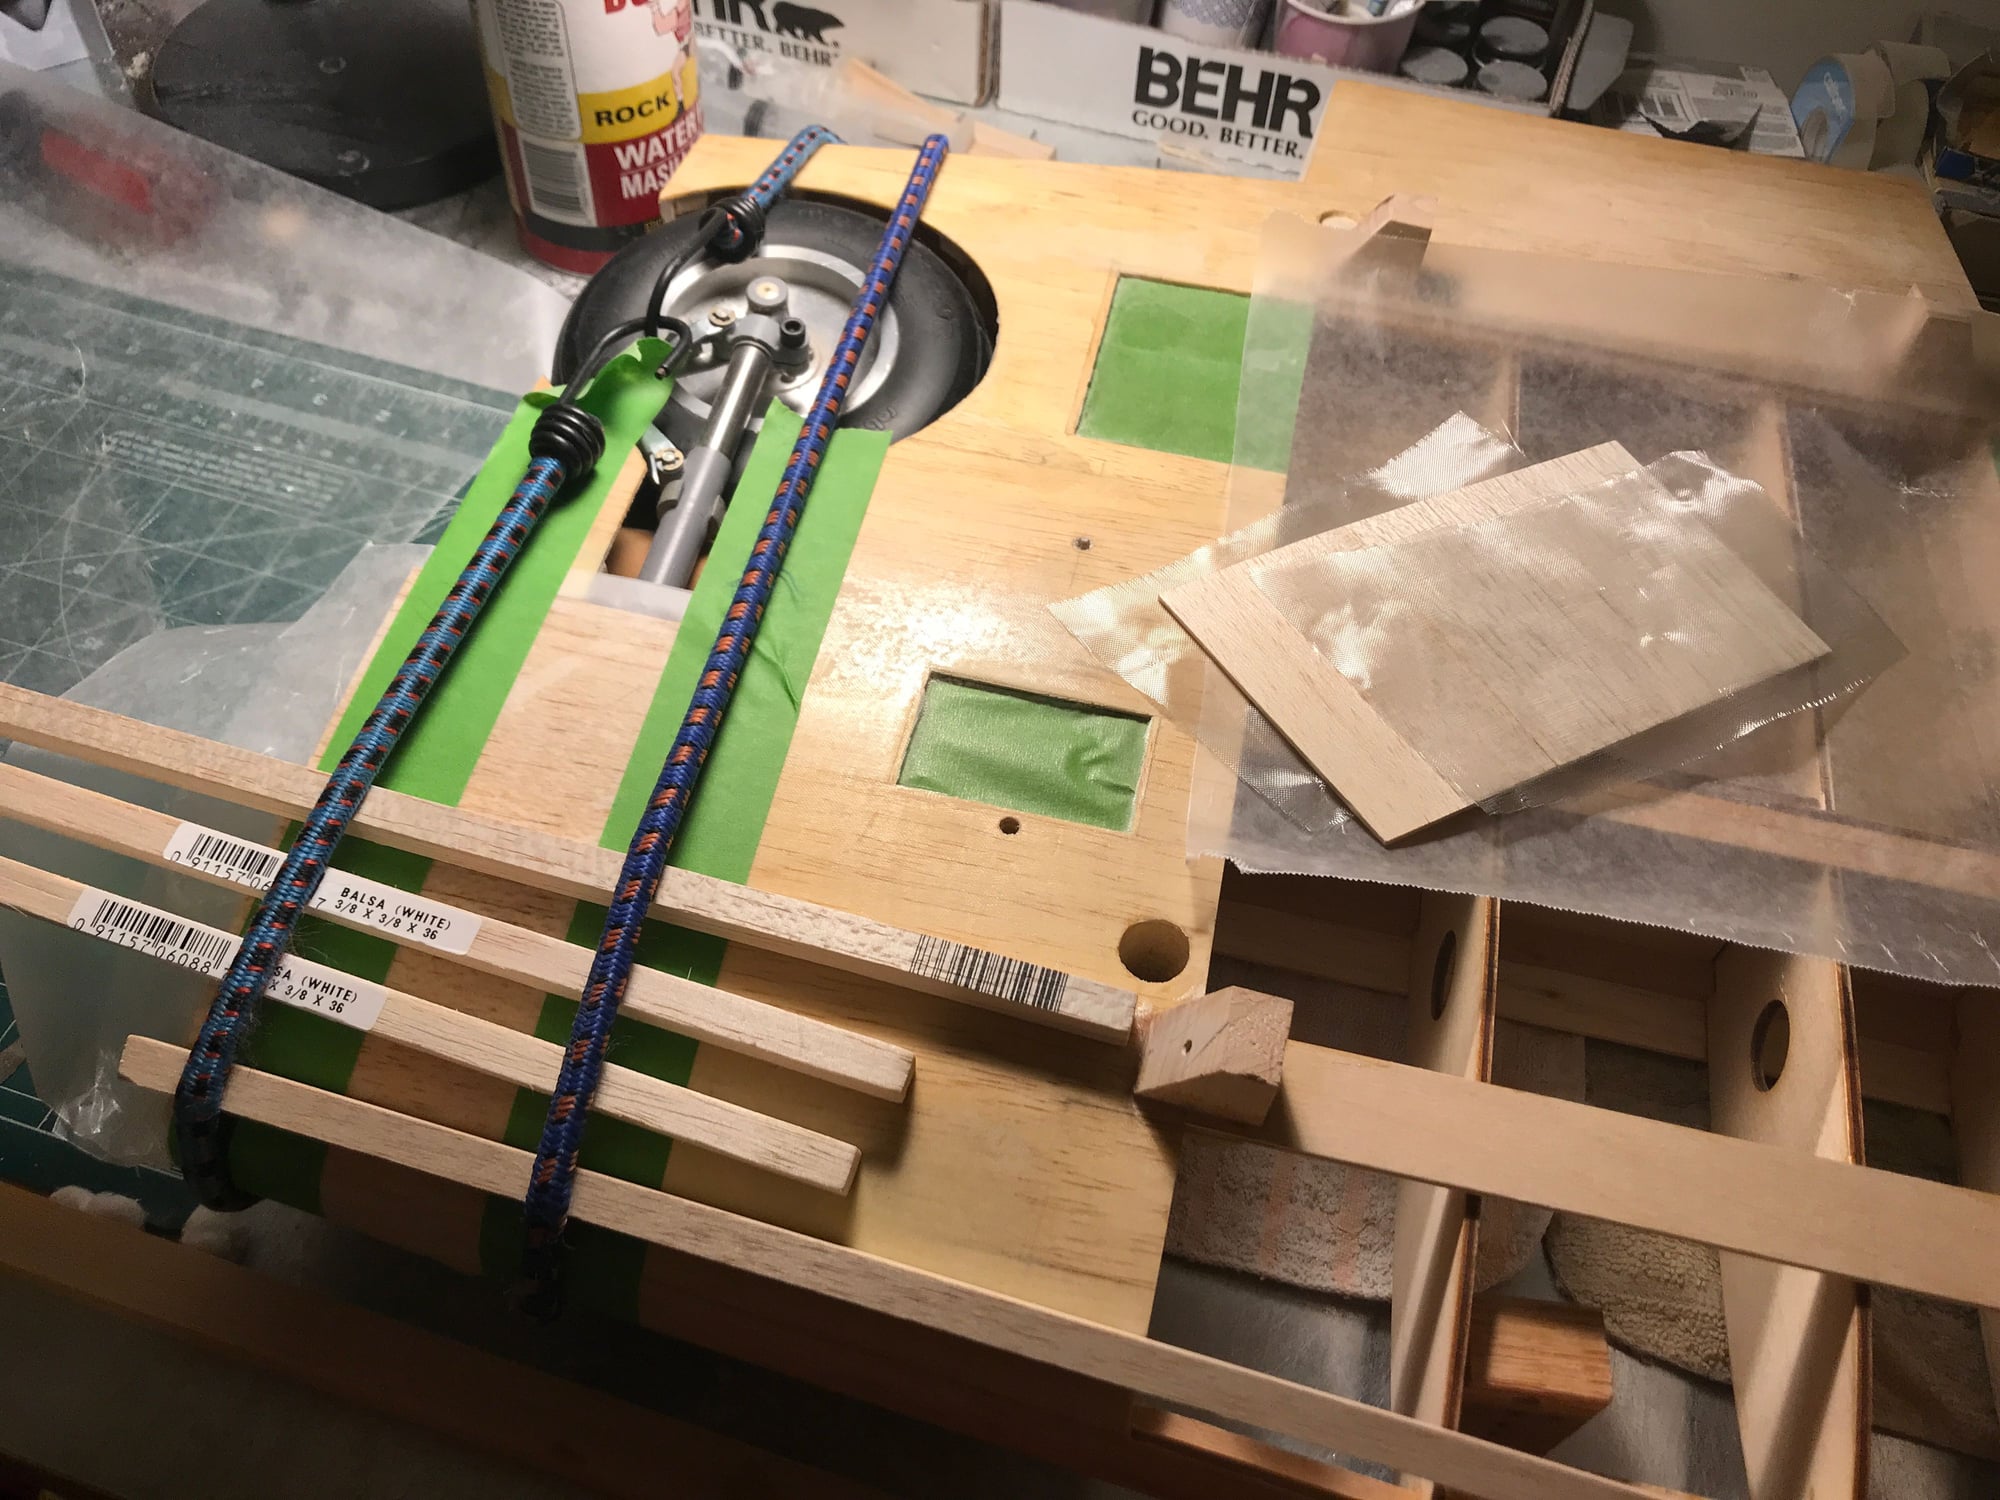
I've abandoned 2 designs for the main gear mounting well covers. The first I created from sheet balsa and the second from basswood sheet. I wasn't happy with either. With screws for attachment, they followed the curve of the wing ribs well until they neared the leading edge. With lessons learned from priming and sanding other parts, I knew this wasn't going to look good.
I started a third method, thinking of laminating some 1/64" ply with balsa, but quickly threw this out, too. I could see I was going to have the same issue with the ply, even though thin it wasn't going to maintain the shape of the wing - it would be "springy" at best.
So, onto my 4th idea: Balsa and glass lamination!
I expect this to be my last iteration! If these covers need reinforcing, I can add sections of thicker glass and/or add some stiffening ribs to the backside.
Once these are done, I can then finish correcting any outer-panel/center-wing section mismatches on the bottom of the wing, just as I corrected on the top side.
Weather is supposed to be warmer toward the end of the upcoming week. Perhaps I can get this all primed and sanded in the next week?
Regarding the scale dummy engine: A true 1/6 scale R-2800 at 8.8"dia. won't fit inside a TF 1/6 scale cowling with my PE 4.2 engine, at least as the engine is mounted/configured, today. I'd have to move the engine back a couple inches, and would likely then need a longer prop shaft. Worth doing? If I need a longer prop shaft, can I find one that meets my needs? More measurements to take...
Creating another iteration of gear mounting well covers
Not the scale location for the cylinder heads - needs to move rearward an inch or more to have any chance of fitting a true to scale dummy engine. This dummy 1/6 scale engine is undersized by about an inch in diameter.
I started a third method, thinking of laminating some 1/64" ply with balsa, but quickly threw this out, too. I could see I was going to have the same issue with the ply, even though thin it wasn't going to maintain the shape of the wing - it would be "springy" at best.
So, onto my 4th idea: Balsa and glass lamination!
- Back to balsa, but this time I made several cuts in the balsa, perpendicular to the ribs, from the leading edge back where most of the curvature needs to occur. This makes the balsa very easy to curve, fitting it to the wing.
- I then epoxied 0.5oz. fiberglass to each side of the cover.
- Wrapping this in wax paper, I laid the cover into position.
- I applied tape (green in picture, below. This helps hold the cover into shape as it cures - but not perfectly.
- I then wrapped the center section, outboard, with two bungee cords and placed square stock across the area having the most curvature - the bungee cords in this position create a bit of downward force on the cover, holding it to the curvature of the ribs.
I expect this to be my last iteration! If these covers need reinforcing, I can add sections of thicker glass and/or add some stiffening ribs to the backside.
Once these are done, I can then finish correcting any outer-panel/center-wing section mismatches on the bottom of the wing, just as I corrected on the top side.
Weather is supposed to be warmer toward the end of the upcoming week. Perhaps I can get this all primed and sanded in the next week?
Regarding the scale dummy engine: A true 1/6 scale R-2800 at 8.8"dia. won't fit inside a TF 1/6 scale cowling with my PE 4.2 engine, at least as the engine is mounted/configured, today. I'd have to move the engine back a couple inches, and would likely then need a longer prop shaft. Worth doing? If I need a longer prop shaft, can I find one that meets my needs? More measurements to take...
Creating another iteration of gear mounting well covers
Not the scale location for the cylinder heads - needs to move rearward an inch or more to have any chance of fitting a true to scale dummy engine. This dummy 1/6 scale engine is undersized by about an inch in diameter.
10-16-2023, 02:30 PM
#319
Thread Starter
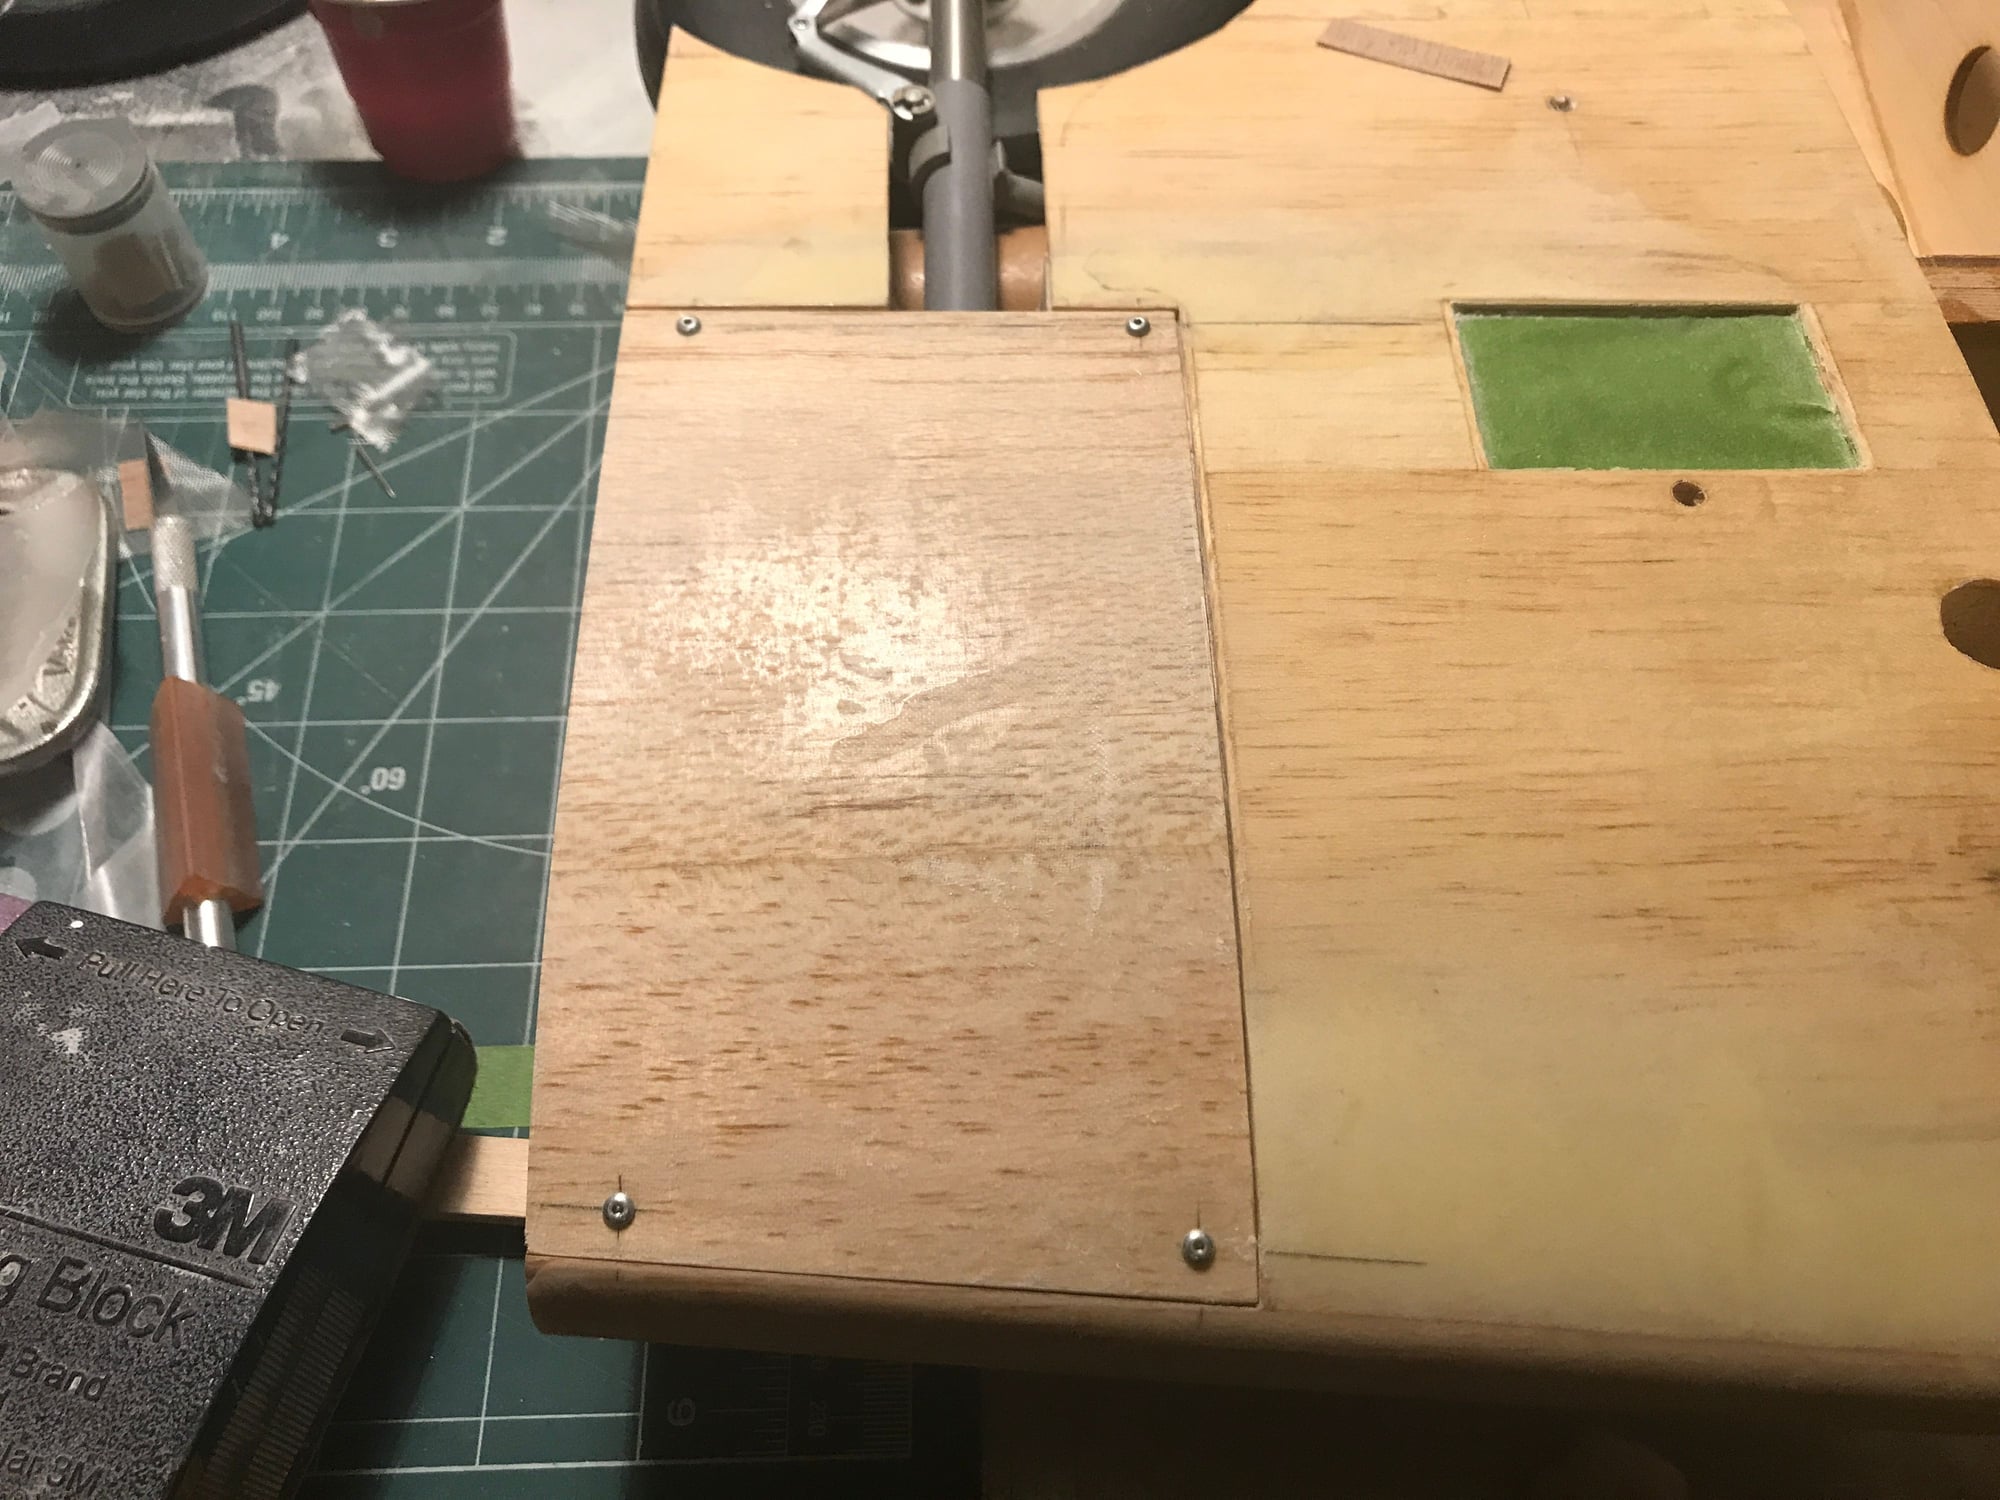
New landing gear mounting bay covers worked out well, I think. I still need to cutout a section to allow the gear to swing, but overall fit is good and the curvature of the piece matches the lower wing very well when screws are installed. Much better than previous attempts!
Matching the lower surfaces along the inner and outer wing panels is next, but there is less to do than on the top. Some of this can be corrected by cutting the sheeting loose and installing some shims - less weight than filler and quicker to complete.
I did recheck the inside diameter of the cowl vs. the dummy engine diameter. I really don't have any options other than going with a non-scale, smaller diameter dummy engine. The scale diameter of 8.8" would fit IFF I could move it back from it's current position about 1.7", which would also be closer to the position it should be in. However, there's too much non-scale RC engine stuff in the way, and moving the engine back is limited by the position of the exhaust. And lastly, a longer prop shaft would definitely be needed if I could move the engine back that far.
This is not a museum piece, so enough is enough. I may try to make what I have work, detailing the vacuum formed dummy engine myself to see how well I can make it look. After that, I can decide whether to buy a 3D printed version.
New LG mounting bay cover
10-26-2023, 09:47 AM
#320
Thread Starter
Priming and sanding...
Fuselage is ready for wet sanding. Wing panels need a few dings filled, a bit of primer in certain spots, a final dry sand and then a wet sanding. Seems like each time I prime a piece, the revelation of defects makes me wonder why I got into this! Then sanding erases almost all the defects and I think that I'll get through this successfully. Bondo brand primer had been recommended to me, but I saw that 3M no longer listed it on their product site, and most local sources either were out or only had a couple had 1 or 2 cans in stock. Thinking I might need more than a can or two, I went with the Rust-Oleum brand.
Running out of good weather up here. Looking into VOC air filters and garage heaters. At almost a grand for a good VOC filter, I think that option is out for me. And, I don't have 220/240 AC in the garage. Renting a propane heater from HD might be the way to go. If I can get all the line tape work in place and the lines drawn for the overlapping panels, basically pre-stage everything, then perhaps I can get the panel line painting done in the garage over a couple days. Or wait until Spring and work on other stuff in the meantime... Or, maybe there is a low/zero finishing primer that would work for panel lines? That would be perfect!
I did a quick search and I do see listings for low-VOC primers, but I'll have to see if any of these are appropriate for going over an oil based primer. As these low/zero-VOC primers appear to be water based, I expect they are fine for going under latex paint. Also, are they sandable (remove from tape by sanding before removing tape)?
I have found some interesting discussions on ANA and FS colors: Gloss Sea Blue - Which One? This and other sites indicate that the FS standard wasn't introduced until 1947 and that many of the matches made between the FS and ANA colors are, in fact, not matches. I'm now wondering what color was used on the F6F-5 at the AirZoo. As it had a grey interior, I'm now thinking that it was painted in a post-1947 Sea Blue, FS15042.
Picture of color scheme, below. Planning to use:
- ANA623 sea blue(gloss) for the fuse, wings (may use ANA606 sea blue(semi-gloss/satin) to represent a more weather worn finish)
- ANA608 intermediate blue(satin) for the rudder (per Kinzey's book, the rudder in his cover photo came from an F6F-3 tri-color, replacing a damaged rudder on the F6F-5)
- ANA511 insignia white(gloss) for markings (perhaps ANA601 insignia white(satin) if going for the weathered look)
Done and done, for today. Cheers.

Wing panels, getting there...

Paint scheme, planned
Fuselage is ready for wet sanding. Wing panels need a few dings filled, a bit of primer in certain spots, a final dry sand and then a wet sanding. Seems like each time I prime a piece, the revelation of defects makes me wonder why I got into this! Then sanding erases almost all the defects and I think that I'll get through this successfully. Bondo brand primer had been recommended to me, but I saw that 3M no longer listed it on their product site, and most local sources either were out or only had a couple had 1 or 2 cans in stock. Thinking I might need more than a can or two, I went with the Rust-Oleum brand.
Running out of good weather up here. Looking into VOC air filters and garage heaters. At almost a grand for a good VOC filter, I think that option is out for me. And, I don't have 220/240 AC in the garage. Renting a propane heater from HD might be the way to go. If I can get all the line tape work in place and the lines drawn for the overlapping panels, basically pre-stage everything, then perhaps I can get the panel line painting done in the garage over a couple days. Or wait until Spring and work on other stuff in the meantime... Or, maybe there is a low/zero finishing primer that would work for panel lines? That would be perfect!
I did a quick search and I do see listings for low-VOC primers, but I'll have to see if any of these are appropriate for going over an oil based primer. As these low/zero-VOC primers appear to be water based, I expect they are fine for going under latex paint. Also, are they sandable (remove from tape by sanding before removing tape)?
I have found some interesting discussions on ANA and FS colors: Gloss Sea Blue - Which One? This and other sites indicate that the FS standard wasn't introduced until 1947 and that many of the matches made between the FS and ANA colors are, in fact, not matches. I'm now wondering what color was used on the F6F-5 at the AirZoo. As it had a grey interior, I'm now thinking that it was painted in a post-1947 Sea Blue, FS15042.
Picture of color scheme, below. Planning to use:
- ANA623 sea blue(gloss) for the fuse, wings (may use ANA606 sea blue(semi-gloss/satin) to represent a more weather worn finish)
- ANA608 intermediate blue(satin) for the rudder (per Kinzey's book, the rudder in his cover photo came from an F6F-3 tri-color, replacing a damaged rudder on the F6F-5)
- ANA511 insignia white(gloss) for markings (perhaps ANA601 insignia white(satin) if going for the weathered look)
Done and done, for today. Cheers.
Wing panels, getting there...
Paint scheme, planned
11-06-2023, 08:37 AM
#321
Thread Starter
Priming is done!!! Took advantage of a few warm days not originally in the forecast. A light wet sanding and then panel line positions can be marked.
I switched to a 3M body filler for the remainder of the fill work, as it allowed me to perform the fill/sand process in 20 minutes, rather than 12 hours. The body filler went on much easier, smoothing out much easier than my epoxy based filler. Was this filler heavier than my epoxy mixture? I don't know. Most of it got sanded off, so any difference was likely very low. I'm just happy to be done with this stage.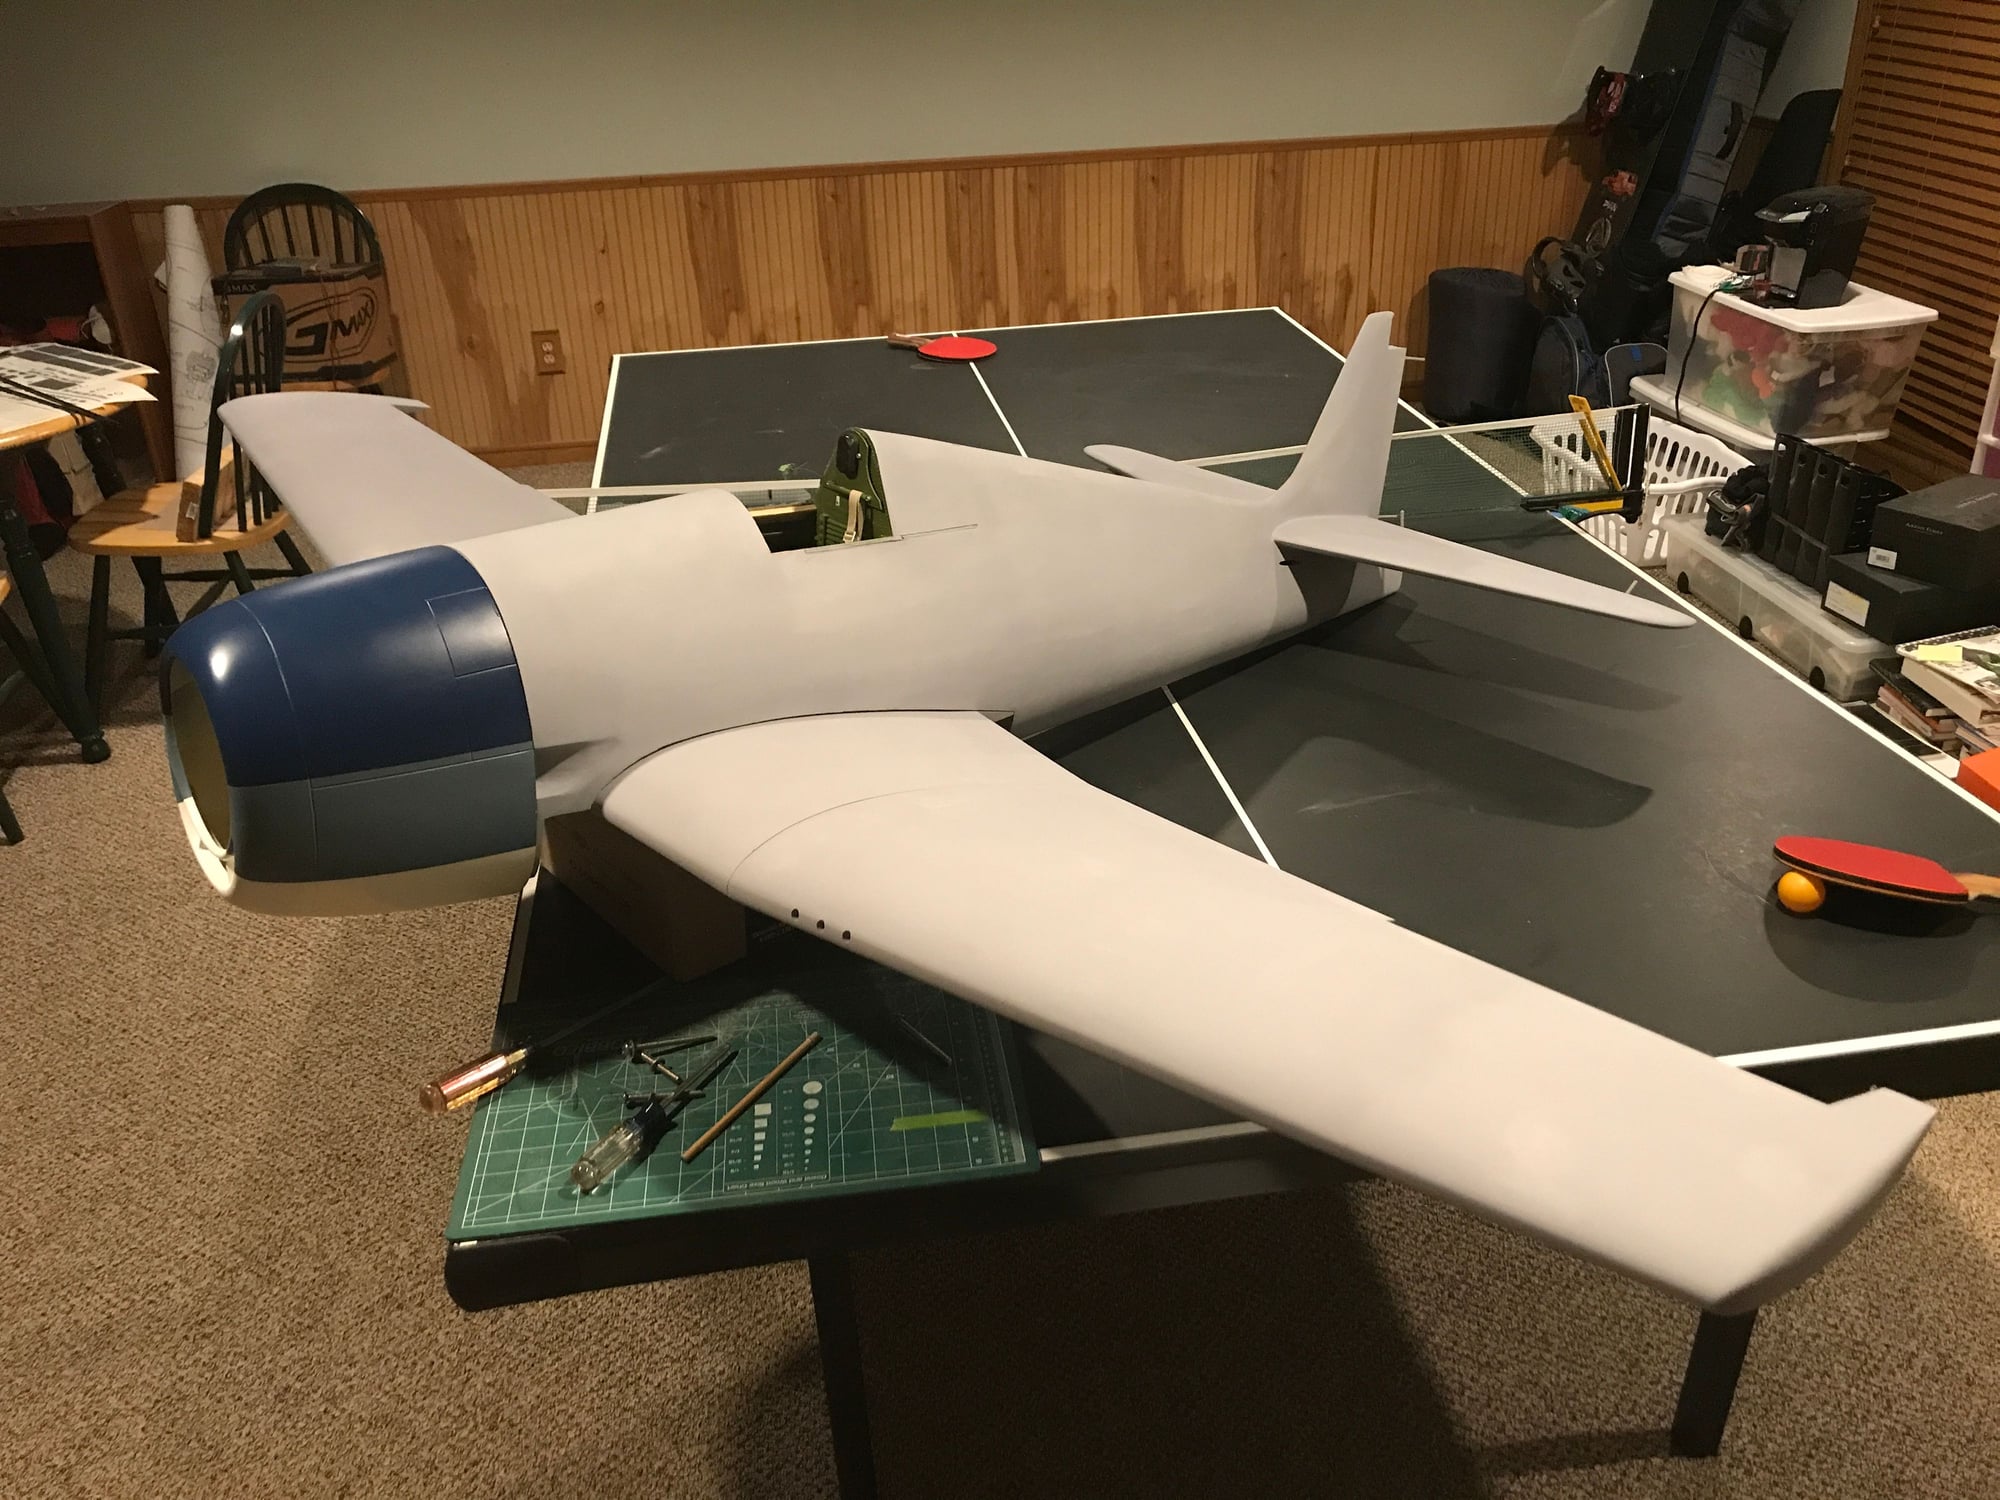
Primed!
11-07-2023, 06:50 AM
#323
Junior Member
Join Date: Oct 2023
Location: Devon, UK
Posts: 9
Likes: 0
Received 0 Likes
on
0 Posts
Hi. Firstly beautiful craftsmanship. The retractable tailwheel is obvously perfect for this buid. I wondered if you thought about any alternatives? To be honest I am new on here and do need to comment on things to be activated. I'm in the process of a build where I have been trying for a long time to souce a decent retactable T.W. as don't have much space. Thank you. Matt
11-07-2023, 06:53 AM
#324
Junior Member
Join Date: Oct 2023
Location: Devon, UK
Posts: 9
Likes: 0
Received 0 Likes
on
0 Posts
tail wheel. I guess I'm wondering if anyone makes something like the smaller 'scale' Robart one (platsic) but slightly heavier duty and with a nice fork like the dubro scale one? Thank you again.
11-08-2023, 01:56 PM
#325
Thread Starter
Hi. Firstly beautiful craftsmanship. The retractable tailwheel is obviously perfect for this build. I wondered if you thought about any alternatives? To be honest I am new on here and do need to comment on things to be activated. I'm in the process of a build where I have been trying for a long time to souce a decent retactable T.W. as don't have much space. Thank you. Matt
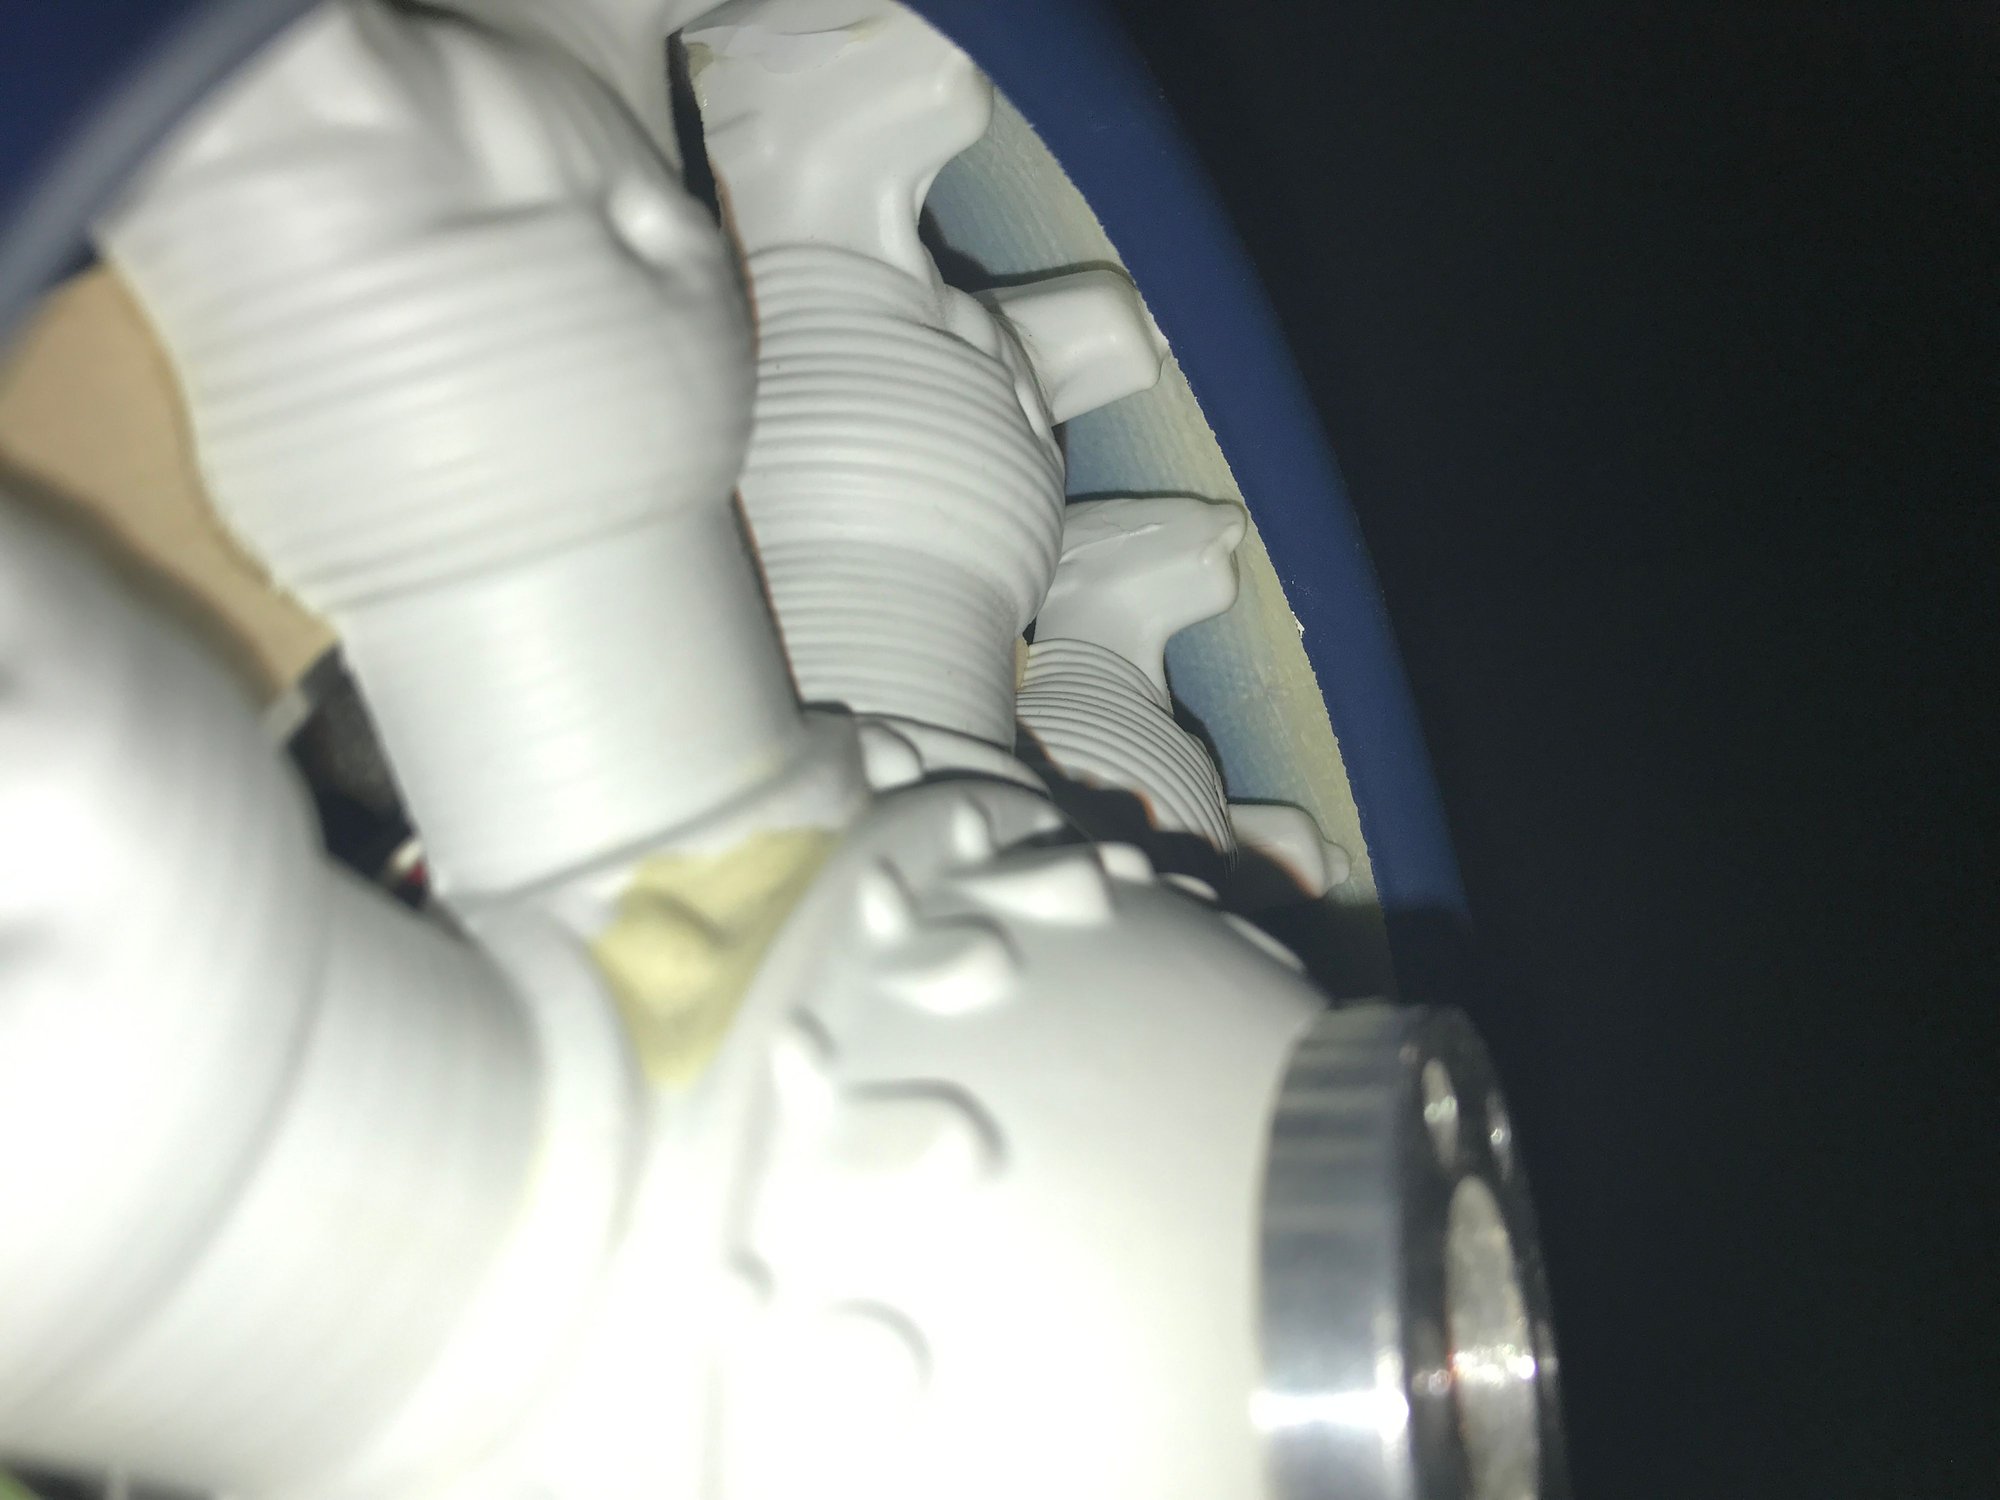
I'll be running a Robart 160WC tailwheel, pneumatically actuated. This just fits, by first disassembling the unit and then reassembling it inside the tailwheel well. I remove the wheel and attach the air lines prior to stuffing bits into the well. It's good to have a magnet handy when I've dropped a pin or cir-clip! The picture below doesn't show the air lines, as this is from early in the build and I've since removed the tailwheel in order to paint the well with primer. The lines will be there for final reassembly.
What are you building and what are the dimensions? This F6F is 1/6 scale with an 87" wingspan. The quoted Robart unit is often seen as for 1/5 scale, larger aircraft. But it can be made to work in a smaller airframe.
I hope this was helpful.
Dale
Tailwheel mounted