


Build thread: readying the Hanger 9 mustang 1/5th scale.
 02-05-2022, 08:33 AM
#126

A really very nice looking model that is quite worthy of all the effort you put into the build. Wishing you a successful maiden flight and many more enjoyable times flying her.
 02-16-2022, 01:46 PM
#128
Senior Member
Thread Starter
So, I'm itching to get home and get cracking to get the Mustang mostly done.
The next project is in the works and its gonna be a doosey. If you didn't see my post, Rumen of Fokkerc fame is doing up a 1/6 P38 lightning for me. Yep..a kit build. If ya gonna do it, jump on with your whole body...not just the feet, right?
The next project is in the works and its gonna be a doosey. If you didn't see my post, Rumen of Fokkerc fame is doing up a 1/6 P38 lightning for me. Yep..a kit build. If ya gonna do it, jump on with your whole body...not just the feet, right?
Last edited by Txmustangflyer; 02-16-2022 at 01:48 PM.
03-04-2022, 10:36 AM
#129
Senior Member
Thread Starter
I'll be back at it in about 4 days. The new retract controller and programmer is in so time to get going on getting them set up, and working on the doors
03-04-2022, 11:37 AM
#130
Senior Member
Thread Starter
Forgot all about it. The Spinner.
Origionally, was in discussion with tru turn on the spinner. Being about three hours away from them, and having other business in Houston next week, I was going to just run by with the engine and varioprop so they could take the measurements direct from it..it was then discovered that the only way their spinner would mount is with their 10mm prop bolt, which was 50 mm long...not long enough to bolt the varioprop, back plate, and prop washer to the prop hub..They didn't have a longer one (minimum 70 mm for full engagement into prop hub) That deep sixed a tru turn spinner.
Thanks to great rc hobbyists world wide, I found a perimeter mount spinner, made by Fighteraces over in the UK. Phil, (I think hes the owner) spotted my post in a group on FB related to rc, and said he could make EXACTLY what I needed and could notch it for the varioprop.
aluminum back plate, carbon fiber spinner. Looking at their site, they make aircraft specific spinners for the most popular warbirds, at multiple scales. He has been absolutely awesome in his customer service.
As my back plate has to be custom cut (standard is for 2 blade) turn around is going to be a few weeks, but, it is ordered, Phil has been paid, and hes on it like white on rice.
I've bookmarked his site, because as a result of his excellent service, to date, he will also get more of my money for the Lightning if he's willing to do them. He, currently, does not have P38 spinners listed, so that will be a discussion when that time gets closer.
Anyway, if you need a spinner and are needing one that is lighter than aluminum, perimeter mount, and top quality, consider Phil and www.fighteraces.co.uk. Even with shipping, cost is still slightly below a tru turn before shipping, and just as good.
Thanks bunches, Phil.
Spinner dilemma solved.
Last edited by Txmustangflyer; 03-04-2022 at 11:50 AM.
03-04-2022, 12:01 PM
#131
Senior Member
Thread Starter
Bisson will be making the exhaust. Some delays have happened due to current events, but Lance assures me it shouldn't be too much longer. I am having a slight modification done just to lift the muffler can up a bit from the engine box so the throttle and choke linkages will have room. Its a minor one, a simple clocking of the exhaust flange.
This is where excellent customer service and listening skills result in income. Yes, this post is a bit of a b***hfest.
Understand something, every plane I have built up to this one has flown with Jtec exhaust. They were and are top quality, but when over 40 emails back and forth over a simple modification (a simple square notch out if one corner, with specific measurements given) results in a response of basically "we don't want to do it..." that pisses me off. How hard is it to set an existing exhaust design on a table, outlets pointing towards the ceiling, header towards you, then measure 1.5 inches from right side of muffler and 1.5 inches from the side against the table, remove the resulting square section altogether, and wall it in. (Think firewall notch above)
Its not rocket science to figure that out. I won't name who I had been talking with, but to say they got told off a bit after six months of emails...yeah..it happened, and now Bisson has my money. Again, Lance has been awesome.
As a result, any plane I build from here out needing an aftermarket exhaust will be done by Bisson. One loyal Jtec customer lost.
Last edited by Txmustangflyer; 03-04-2022 at 12:03 PM.
03-05-2022, 03:27 PM
#132
Senior Member
Thread Starter
The horizontal stabs.
These are bugging me. I've done the mounting per the manual, but I hate it. To me how they mount is a weak link and I'm going to have to fix it if I'm going to fly it.
The antirotation tab, screw, and blindnut are predrilled and are fine.
Its the stab tube and how they have you do that that just irks me.
First you have to find, under a layer of ultrakote, a layer of sheeting, the center of a balsa block thats nowhere near where its supposed to be per the manual., Then, once you find it, drill a 2.8 mm hole (so screw fits tight) through the block and into the tube. The tube has a plastic lining on the interior diameter thats SUPPOSED to act like a lock nut.
The problem, the liner is about 1/32nd thick. The tube is 1/16th thick. You have to tap the hole in the tube for the screw..one slight overtorque...stripped. I can guarantee it. No, mine is not, but with enough wear and tear, flight time, etc, its going to get loose as a goose on thanksgiving.
Its gotta be fixed.
The plan: Remove a section of the bottom surface sheeting over the factory balsa block, remove the block. Measure space above tube to see what I got to work with below top surface, place a 1/8th ply section there with a blind nut inserted. Below the tube, place another 1/8th ply section, and, if there is room, use some 1/16th cf plate to insure the blind nut don't walk out of the ply.
Drilling the wood and cf prior to installing the blindnut, slide tube in position and drill through the tube for a proper length 3mm bolt (3x1) Check fitmet of stabs once both sides done, replace sheeting with a drilled piece for the bolts, and recover with ultrakote.
Result, no flutter, no wear worry, the stress is taken off the tube wall and placed back to ribs and spar where it should be.
If I don't fix it, I'll worry about flying it and the stabs fluttering and folding, especially with the upgraded power from the zenoah, and the varioprop at 14 inches pitch. That kind of speed at WOT, flutter would be very very catastrophic.
so..thats the plan..It will be done before maiden. But, for now, I want to get as much of the engine and wings buttoned up, fuel tank layout planned, telemetry sensor routing done, and build a proper engine run in stand so I can get the varioprop and engine combo dialed in as much as possible. Due to the Carburetor's position, trying to do a full tune would be...difficult. As I don't plan on flying it outside of Texas, needle adjustments won't be a big issue. When its time to recover the plane, I'll do a hatch in front if the canopy for proper access..
But, the stabs are on the priority to-do list. This round coming, its going to be all landing gear and gear doors, baby. The dreamworks rc retract programmer and controller are in.
Last edited by Txmustangflyer; 03-05-2022 at 03:44 PM.
03-10-2022, 03:15 PM
#133
Senior Member
Thread Starter
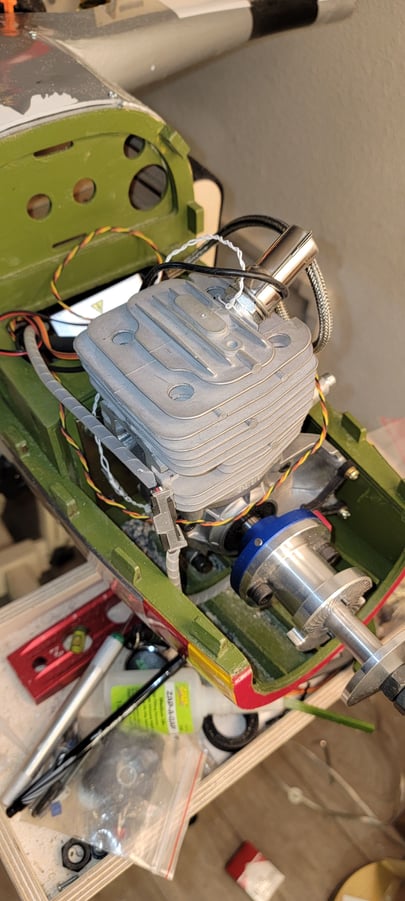
Been kind of bouncing around on the mustang. Better servo arms going in, and a thrash on the engine bay and firewall is ongoing. Plan is to have engine mounted tomorrow, get all the measurements Lance @Bisson needs to finalize exhaust plans. Start on setting up throttle and choke linkage and figuring out which of two fuel tanks is going to work the best.
Then its figuring out the mounting of ignition and ignition battery, the
fuel velocity sensor, etc. Then its gear doors...I'll have to recover bottom battery hatch. I used low taxk masking tape, despite that, it pelled the ultrakote right off..grrrr
Yes, touch ups planned just prior to final engine mounting.
Last edited by Txmustangflyer; 03-10-2022 at 03:18 PM.


 03-10-2022, 07:39 PM
#136
Senior Member
Thread Starter
I'll pull it in the am, seperate it from the steel mounting plate, get that mounted, and loctited, then refit engine to it..with engine mounted I can't get to the top bolts lol.
Also, seems like my firewall has a whole bunch of left thrust built in to it. Left side of firewall is a good half mm back. Some is good but dayum..engine mounted centered where they wanted it but that much has the prop hub off a bunch. So some shimming to center everything up is gonna be needed..For a first test fit..I'm good with that.
Also, seems like my firewall has a whole bunch of left thrust built in to it. Left side of firewall is a good half mm back. Some is good but dayum..engine mounted centered where they wanted it but that much has the prop hub off a bunch. So some shimming to center everything up is gonna be needed..For a first test fit..I'm good with that.
03-10-2022, 07:42 PM
#137
Senior Member
Thread Starter
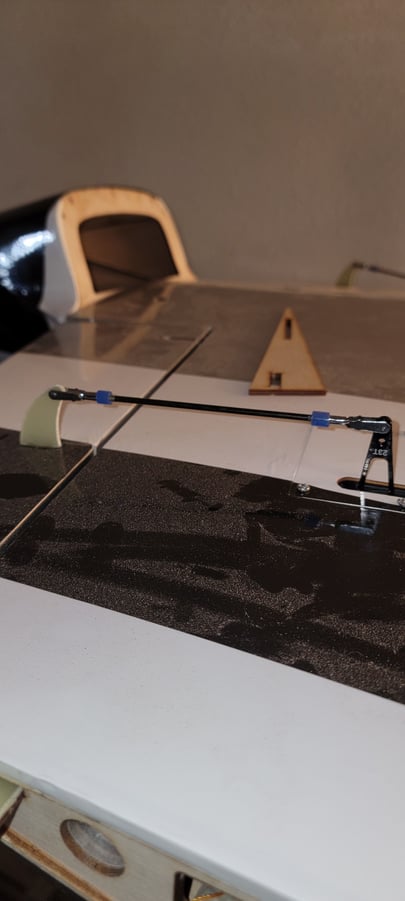
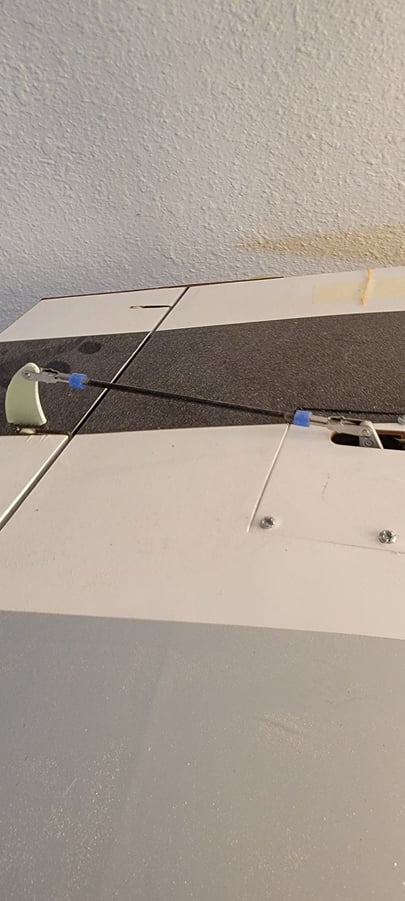
Also getting some proper length servo arms mounted, going to require some rethinking of control rod lengths and adusting them, but..flaps are much better than before
After
Before
After
Before
03-10-2022, 07:44 PM
#138
Senior Member
Thread Starter
I'll end up reshaping the horns some..and shortening them down...the new arms are about 1 mm longer than necessary, To compensate, the "hook" needs to come out of the horns and link point go down about 1.5 mm.
unexpected, but easily resolved.
unexpected, but easily resolved.
03-11-2022, 09:32 AM
#139
Senior Member
Thread Starter
Progress!
What I do know. Engine is going to need to move forward a touch. Spinner back plate will just rub the cowl opening as is right now. So a touch of adjustment there.
What I don't know..throttle linkage. Head scratching, at the moment on that one but a plan is forming.
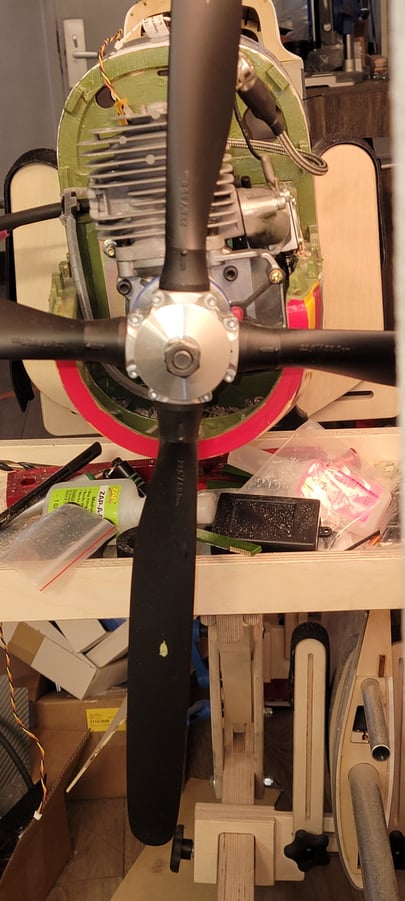
Plate solid mounted brought hub to center
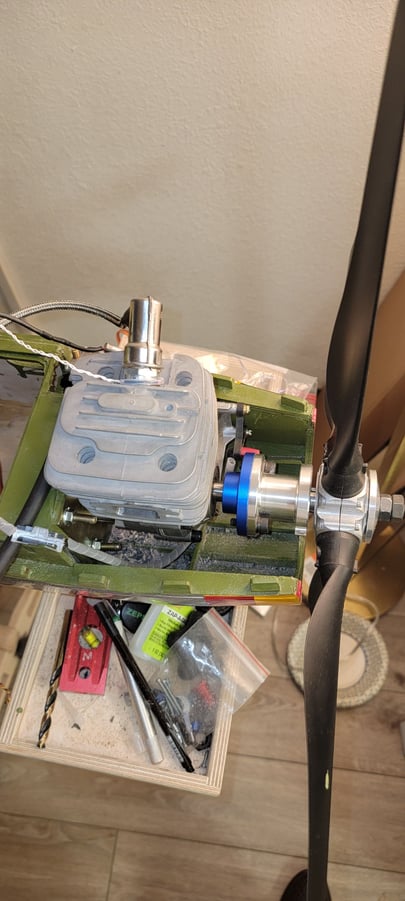
Cowl spacing is too close..shimming needed but all bolts line up, and good!
Next, popping it back out, trimming the firewall bolts, thread lock and leave steel plate mounted..vaccuum out the fuselage, shim and reinstall to check spacing.
What I do know. Engine is going to need to move forward a touch. Spinner back plate will just rub the cowl opening as is right now. So a touch of adjustment there.
What I don't know..throttle linkage. Head scratching, at the moment on that one but a plan is forming.
Plate solid mounted brought hub to center
Cowl spacing is too close..shimming needed but all bolts line up, and good!
Next, popping it back out, trimming the firewall bolts, thread lock and leave steel plate mounted..vaccuum out the fuselage, shim and reinstall to check spacing.
Last edited by Txmustangflyer; 03-11-2022 at 09:34 AM.
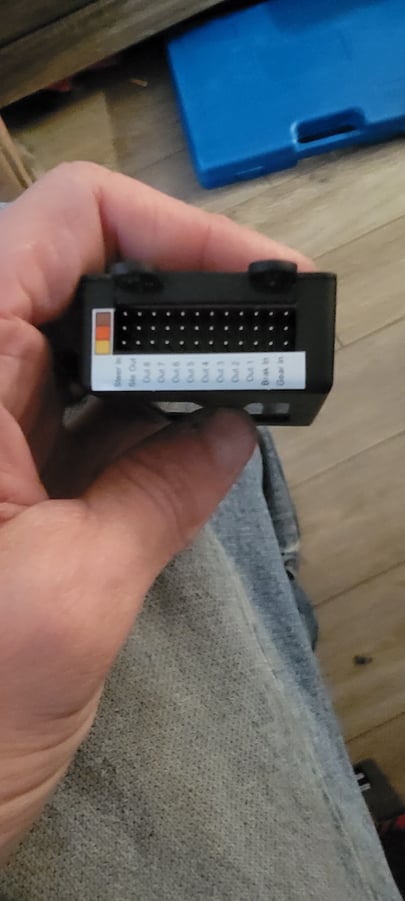
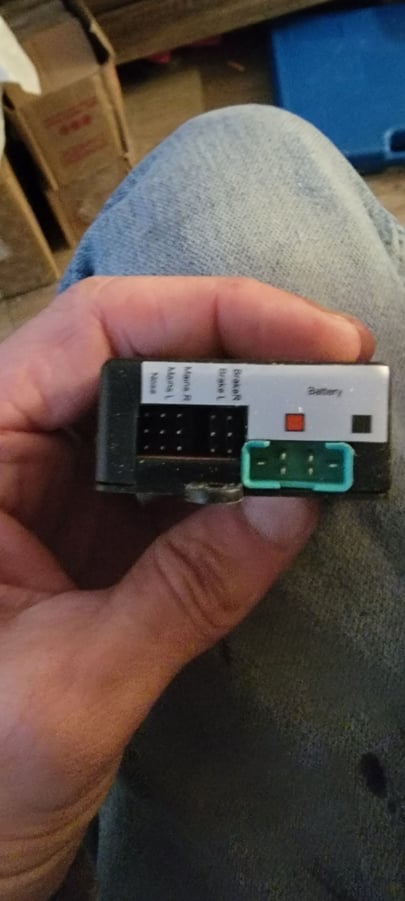 03-11-2022, 06:45 PM
#141
Senior Member
Thread Starter
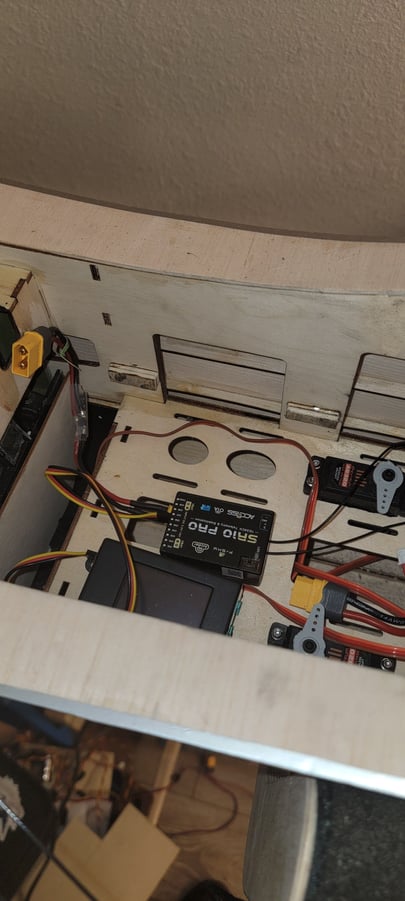
So..this little controller is its own sequencer/programmer. Handy...
Got some reading to do to get it set up for the e-flites.
The other issue I currently have...I put my tail wheel door springs someplace safe to keep them from getting lost...the problem is, I can't remember *** I put them. Anyone know where to get replacements?
Got some reading to do to get it set up for the e-flites.
The other issue I currently have...I put my tail wheel door springs someplace safe to keep them from getting lost...the problem is, I can't remember *** I put them. Anyone know where to get replacements?
03-12-2022, 06:53 AM
#142

Battery plug ID... "Multiplex" You'll need the female side for batteries.
Available from several suppliers. I've seen these used in FrSky onboard systems, as well as others, so you might start with your FrSky supplier.
Available from several suppliers. I've seen these used in FrSky onboard systems, as well as others, so you might start with your FrSky supplier.
Last edited by DGrant; 03-12-2022 at 06:57 AM.
03-12-2022, 07:35 AM
#143
Senior Member
Thread Starter
According to manual, has three different ways to power, but only talks about the multiplex. So tried an experiment last night. Had to move the pwer pin on the tail wheel (no biggy) and powered through the jr side. It powered, and cycled the tail wheel. Just got to figure out the gear doors now. Like an rx it can be powered via a channel.
03-13-2022, 11:43 AM
#145
Senior Member
Thread Starter
Yup, got a harness in the works.
Began the surgery on the horizontal stabs today. The "block" is missing in action.
No block was installed, merely doublers at a rib and its so narrow that unless you framed it, you'd never hit that.
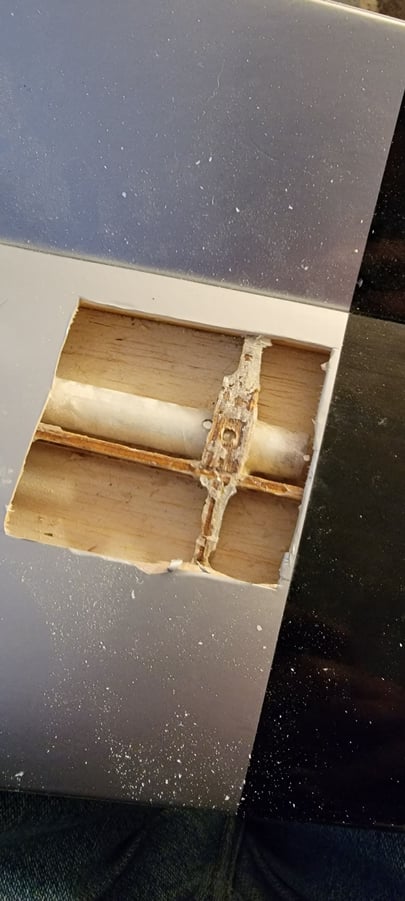
So, upon inspection I should be bale to get a formed set of blocks under the fiberglass tube liner, and above..a blind nut as I had hoped, I don't think will go. Just not enough space to pull that off except through the balsa skin of the upper surface of the stab..but, the blocks will give a solid enough mount...I hope.
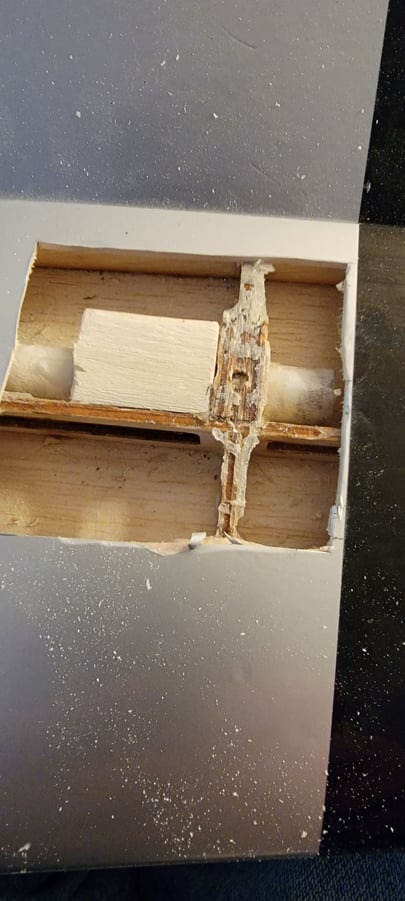
one above, one below takes away all movement of the stabs on the tube solid wood to put the screw into the tube.
Take note, H9. Something similar should have been done from the get go.
Began the surgery on the horizontal stabs today. The "block" is missing in action.
No block was installed, merely doublers at a rib and its so narrow that unless you framed it, you'd never hit that.
So, upon inspection I should be bale to get a formed set of blocks under the fiberglass tube liner, and above..a blind nut as I had hoped, I don't think will go. Just not enough space to pull that off except through the balsa skin of the upper surface of the stab..but, the blocks will give a solid enough mount...I hope.
one above, one below takes away all movement of the stabs on the tube solid wood to put the screw into the tube.
Take note, H9. Something similar should have been done from the get go.
03-13-2022, 05:36 PM
#146
Senior Member
Thread Starter
Surgery on stabs complete. No wiggle, screws are solid. I will have to mess with the antirotation tab on Port stab. Hole is out of alignment with the blind nut in the stab, to line it up, causes a gap between stab and fuselage.
03-14-2022, 02:36 PM
#147
Senior Member
Thread Starter
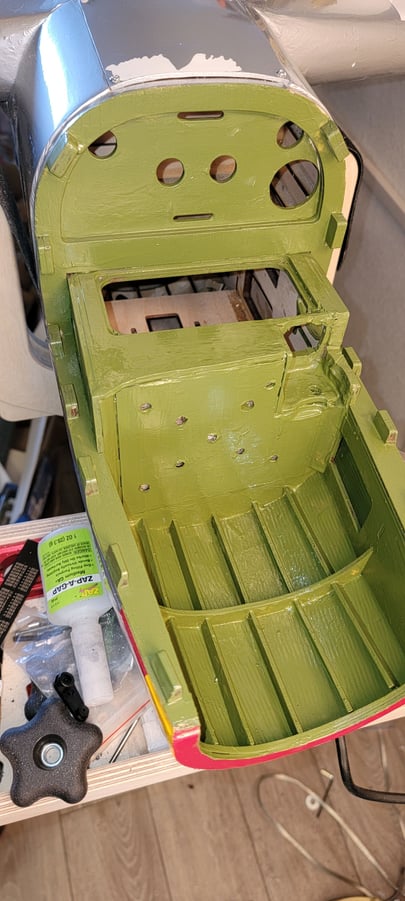
So,, the planning on electronics and fuel install has begun.
Wanting the fuel tank as close to cg as possible, I am fabricating a cf fuel tank tray that will mount in between the center wing and the electronics tray. There is just enough room to sling the tank under the tray, towards the center wing. This tray will be removable for access.
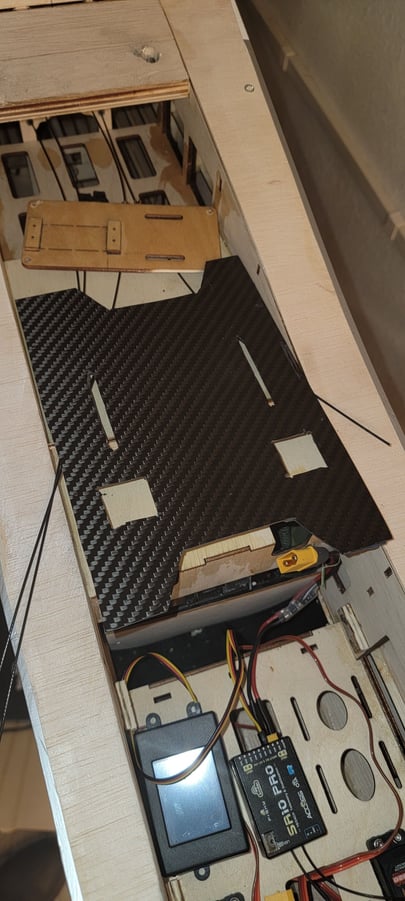

Batteries will be in the fuel tank's normal space, being a constant weight.
Wanting the fuel tank as close to cg as possible, I am fabricating a cf fuel tank tray that will mount in between the center wing and the electronics tray. There is just enough room to sling the tank under the tray, towards the center wing. This tray will be removable for access.
Batteries will be in the fuel tank's normal space, being a constant weight.
03-14-2022, 02:52 PM
#148
Senior Member
Thread Starter
Upon placement..I just realized I forgot on, crucial, thing..the inner gear door servos Tank can't go there, so am swapping things around. Luckily, nothing has been drilled or permanently placed yet.
 03-14-2022, 05:50 PM
#150
Senior Member
Thread Starter
Retract battery will go in between the servos or beside fuel tank. Underneath that hatch will be the ignition, ignition batter and telemetry brain.

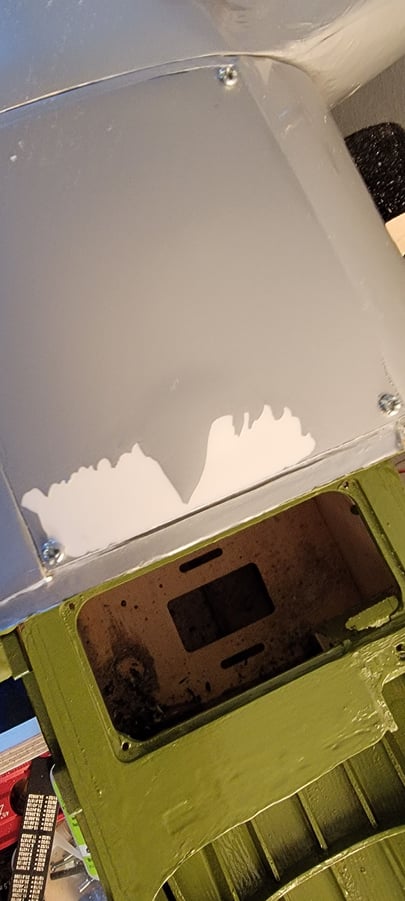
paint ordered to fix the hatch's paint job. It has no primer and was not scuffed.
paint ordered to fix the hatch's paint job. It has no primer and was not scuffed.
Last edited by Txmustangflyer; 03-14-2022 at 05:53 PM.