


Kyosho P-51D Mustang-Kitbash superdetail
 10-23-2007, 01:28 AM
#26
Senior Member
Thread Starter
My Feedback: (8)

Join Date: Dec 2002
Location: Saugus,
CA
Posts: 1,471
Likes: 0
Received 0 Likes
on
0 Posts
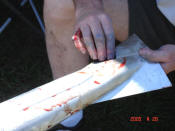
The landing gear is done now. I had to redo it after getting it almost done and set it down on the gear. it didn't look right. so I recut the Robostruts even shorter and rebuilt one of the wells. I decided to omit the inner doors and just make simple strut doors after the cranky mechanism that I had designed failed. maybe on a larger model! the struts come out of the wing too far back for scale, but there is no room to mount them anymore forward. so, I had to angle them forward just a bit more for a compromise. on to sheeting the top of the wing and flaps.
 10-23-2007, 01:58 AM
#27


Getting the gears close to scale on the Top Flite kit will be a challange. I can imagine the problems you're facing on this one.
Scott
Scott
11-22-2007, 01:18 PM
#28
Senior Member
Thread Starter
My Feedback: (8)
Join Date: Dec 2002
Location: Saugus,
CA
Posts: 1,471
Likes: 0
Received 0 Likes
on
0 Posts
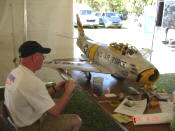
Progress! the top of the wing is sheeted and the flaps are almost done. here is a pic of the airframe as it is now. 3.5 pounds with engine.
12-25-2007, 09:45 PM
#29
Senior Member
Thread Starter
My Feedback: (8)
Join Date: Dec 2002
Location: Saugus,
CA
Posts: 1,471
Likes: 0
Received 0 Likes
on
0 Posts
I found a use for those old Vortac Bomb release mechanisms and bombs that I have been hording. they are cable operated with one servo in the center. I have scale drop tanks too that will be made to work with this setup.
Next step will be setting up the aileron servos and sheeting the bottom of the wing.
Next step will be setting up the aileron servos and sheeting the bottom of the wing.
01-16-2008, 12:33 AM
#30
Senior Member
Thread Starter
My Feedback: (8)
Join Date: Dec 2002
Location: Saugus,
CA
Posts: 1,471
Likes: 0
Received 0 Likes
on
0 Posts
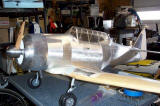
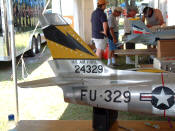
The wing is sheeted and fiberglassed, and primed and sanded. lots of sanding- glad that is over!
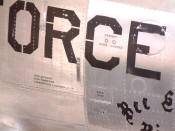
Next, FLITEMETAL! my first time using it.
Next, FLITEMETAL! my first time using it.
01-26-2008, 11:12 AM
#31
Member

Join Date: Dec 2002
Location: Houston,
TX
Posts: 78
Likes: 0
Received 0 Likes
on
0 Posts
Received a PM notice which includes the PM text when forwarded to your email
address. First time I have ever had a PM disappear in my RCU "in box" though.
Answering the question as broadly as possible to accommodate the desired detail: )
After having glassed your airframe with light weight glass cloth and epoxy, every
panel to be covered on your model is drawn on the model using "Sharpie" marker
and burnishing tool included in "K" prefixed packaged Flite-Metal products or the
application and finishing tools sold seperately.
For best results in "finishing" your Flite-Metal to "match" documentation follow the
directions within the instructions included with every shipment of Flite-Metal. They
include baseline suggestions to achieve the best results in the least amount of time
and energy.
There are three possibilities...
Directly Off The Roll:
Applying Flite-Metal directly off the roll without having to do anything may be
a good match to your documentation. All aluminum has "grain" or embedded
linear texture created by the calendaring processes used in its manufacturing.
These are parallel to the length on a roll of aluminum or plate in its "natural"
state.


Applied directly from its original packaging, Flite-Metal provides what looks like
an aged polished finish. This permits an ARF to be covered with minimum effort
and a decent level of authenticity. During the application process every other
panel is applied at right angles to the adjacent one to permit the dramatic grain
differential to be observed after application is completed.
Natural Aluminum Finish:
Our web site and the instructions accompanying each shipment describes how
to finish Flite-Metal to a more realistic finish either "on" or "off" the airframe. I'll
briefly describe the "off" the airframe process as it presents the fastest and the
most realistic natural finish.
Off the airframe:

After glassing and marking off the perimeter of every panel to be covered on
the model, you will prepare Flite-Metal to resemble a natural aluminum finish
to match documentation you have collected as references during replication.
Acquire a 1/4" thick flat plate of aluminum longer and wider than the longest
and widest panel on your model. Aluminum plate should be smooth and free
of nicks and gouges.
You will use the aluminum panel as a working surface in preparing a natural
finish to replicate your documentation. The surface of Flite-Metal is effected
during the processes to follow.
Tape head and tail end of a length of Flite-Metal larger and wider than panel
section of model...aluminum side up onto surface of the 1/4" aluminum plate
using painter's or regular masking tape. This is typically "blue" colored tape,
not 3M Fine Line mauve colored polypropylene tape used around perimeter
of each to be covered panel.
Now that the length of Flite-Metal is taped to the aluminum plate, wet sand it
with either 320 or 400 wet dry 3M brand garnet paper in a "single" direction
parallel to the longest side of the "to be applied" panel. This accomplishes a
grain density more scale than the off the roll appearance at the same time it
knocks down the surface sheen to that of a totally natural unpolished surface.
Some customers wet sand using a gradually increasing grit number sand paper
until their documentation is matched perfectly.
I heard you... "Ed, how long does that take?" The answer is totally up to your
pair of eyes. This process goes amazingly FAST. From only a few seconds to
only a few minutes to achieve the full range of natural aluminum with a grain
and patina or reflection value which matches your replication resouces.
I'll provide the typically required "yes that's true"
On the airframe:

This is also attainable "on the airframe" after Flite-Metal is already applied
to the surface. Perimeter of the already applied aluminum is simply masked off
along its edge using painter's or masking tape and wet sanded per the above
directions.


However, typically it is preferred to do this on the aluminum plate
then after it is applied you simply touch up the surface in seconds if application
process has altered the patina.
"Polished Aluminum Finish"


Work hardening of the aluminum surface during wet sanding compresses and
reduces the aluminum granular structure. In addition to dramatically increasing
the patina differential panel to panel in the applied natural finish state...it can be
easliy and more importantly...QUICKLY polished to a mirror or less than mirror
finish to replicate your documentation resources.
Typically, wet sanded Flite-Metal can be polished to a mirror finish in less than a
minute. Yes, less than a minute. This is best accomplished off the airframe on an
aluminum plate as described above.
High pumis content metal polishes will rapidly bring Flite-Metal to varying degrees
of polish to replicate your documentation resources. You should pay close attention
to replication resources because different grades and alloys of aluminum are used
on different sections of "all 1:1 airframes" . These have differing levels
of patina and lustre producing not only differences in reflection but actual color of
the aluminum.
Surface Patina & Finish Texture:
You have all seen machined swirl finishes on instrument panets, and cowlings. Within
our web site is a complete section showing how someone created the appearance on
a BUSA Taube. This is accomplished with or without a substrate like Styrene if the
surface is already glassed you cover without the Styrene.
3M Finishing Pad Use:
Sometimes I include one of 3M's Finishing Pads and sometimes I include a foam back
micro finishing pad. These are but one of many different grades and grit substances
which can be used to alter the surface of Flite-Metal's surface. Typically when using
these you either move the finishing pad across a single panel, but across that panel's
entire surface to create a consistant finish within the perimeter originally applied.
In doing this, you will have to mask off the perimeter of the individual panel to prevent
abrading adjacent panels in a manner which would render each exactly the same.


The reality of this post is for the most part, few people have an opportunity to see a
1:1 natural aluminum surface to establish a level of expectation. This is why it is so
important to acquire documentation and replication resources...at a minimum online.
There are literally hundreds of thousands of visual resources online. Each found in a
matter of minutes. http://www.scaleaero.com contains a section dedicated to it...
Doc-U-Link...
I included a few examples in this post to permit you the reader to see what can be
accomplished with a little fore-thought and practice to achieve a finish comparable to
our customers who've won the Toledo Show, AMA NATs, Scale Masters, Top Gun and
The World Jet Meet. It is they who contributed to the above explanation, and simple
processes to achieve the look of the "Real Thing".
I hope this serves to explain the how and share a little of the why without boring the
readers of this make-over thread. We have always supported customer and future
customer inquiries within RCU and other forums. And thanks for asking : ) In this
case I thought everyone would benefit from the answer...
Resource examples:
http://www.scaleaero.com/f100d.htm

http://www.scaleaero.com/scaleventsn..._Velez_P47.htm
http://www.scaleaero.com/scaleventsn.../McFarland.htm

http://www.rcuniverse.com/forum/m_23...tm.htm#2383762

http://004edc4.netsolhost.com/FliteM...es_gallery.htm
Thanks again for asking...
address. First time I have ever had a PM disappear in my RCU "in box" though.
Answering the question as broadly as possible to accommodate the desired detail: )
After having glassed your airframe with light weight glass cloth and epoxy, every
panel to be covered on your model is drawn on the model using "Sharpie" marker
and burnishing tool included in "K" prefixed packaged Flite-Metal products or the
application and finishing tools sold seperately.
For best results in "finishing" your Flite-Metal to "match" documentation follow the
directions within the instructions included with every shipment of Flite-Metal. They
include baseline suggestions to achieve the best results in the least amount of time
and energy.
There are three possibilities...
Directly Off The Roll:
Applying Flite-Metal directly off the roll without having to do anything may be
a good match to your documentation. All aluminum has "grain" or embedded
linear texture created by the calendaring processes used in its manufacturing.
These are parallel to the length on a roll of aluminum or plate in its "natural"
state.
Applied directly from its original packaging, Flite-Metal provides what looks like
an aged polished finish. This permits an ARF to be covered with minimum effort
and a decent level of authenticity. During the application process every other
panel is applied at right angles to the adjacent one to permit the dramatic grain
differential to be observed after application is completed.
Natural Aluminum Finish:
Our web site and the instructions accompanying each shipment describes how
to finish Flite-Metal to a more realistic finish either "on" or "off" the airframe. I'll
briefly describe the "off" the airframe process as it presents the fastest and the
most realistic natural finish.
Off the airframe:
After glassing and marking off the perimeter of every panel to be covered on
the model, you will prepare Flite-Metal to resemble a natural aluminum finish
to match documentation you have collected as references during replication.
Acquire a 1/4" thick flat plate of aluminum longer and wider than the longest
and widest panel on your model. Aluminum plate should be smooth and free
of nicks and gouges.
You will use the aluminum panel as a working surface in preparing a natural
finish to replicate your documentation. The surface of Flite-Metal is effected
during the processes to follow.
Tape head and tail end of a length of Flite-Metal larger and wider than panel
section of model...aluminum side up onto surface of the 1/4" aluminum plate
using painter's or regular masking tape. This is typically "blue" colored tape,
not 3M Fine Line mauve colored polypropylene tape used around perimeter
of each to be covered panel.
Now that the length of Flite-Metal is taped to the aluminum plate, wet sand it
with either 320 or 400 wet dry 3M brand garnet paper in a "single" direction
parallel to the longest side of the "to be applied" panel. This accomplishes a
grain density more scale than the off the roll appearance at the same time it
knocks down the surface sheen to that of a totally natural unpolished surface.
Some customers wet sand using a gradually increasing grit number sand paper
until their documentation is matched perfectly.
I heard you... "Ed, how long does that take?" The answer is totally up to your
pair of eyes. This process goes amazingly FAST. From only a few seconds to
only a few minutes to achieve the full range of natural aluminum with a grain
and patina or reflection value which matches your replication resouces.
I'll provide the typically required "yes that's true"
On the airframe:
This is also attainable "on the airframe" after Flite-Metal is already applied
to the surface. Perimeter of the already applied aluminum is simply masked off
along its edge using painter's or masking tape and wet sanded per the above
directions.
However, typically it is preferred to do this on the aluminum plate
then after it is applied you simply touch up the surface in seconds if application
process has altered the patina.
"Polished Aluminum Finish"
Work hardening of the aluminum surface during wet sanding compresses and
reduces the aluminum granular structure. In addition to dramatically increasing
the patina differential panel to panel in the applied natural finish state...it can be
easliy and more importantly...QUICKLY polished to a mirror or less than mirror
finish to replicate your documentation resources.
Typically, wet sanded Flite-Metal can be polished to a mirror finish in less than a
minute. Yes, less than a minute. This is best accomplished off the airframe on an
aluminum plate as described above.
High pumis content metal polishes will rapidly bring Flite-Metal to varying degrees
of polish to replicate your documentation resources. You should pay close attention
to replication resources because different grades and alloys of aluminum are used
on different sections of "all 1:1 airframes" . These have differing levels
of patina and lustre producing not only differences in reflection but actual color of
the aluminum.
Surface Patina & Finish Texture:
You have all seen machined swirl finishes on instrument panets, and cowlings. Within
our web site is a complete section showing how someone created the appearance on
a BUSA Taube. This is accomplished with or without a substrate like Styrene if the
surface is already glassed you cover without the Styrene.
3M Finishing Pad Use:
Sometimes I include one of 3M's Finishing Pads and sometimes I include a foam back
micro finishing pad. These are but one of many different grades and grit substances
which can be used to alter the surface of Flite-Metal's surface. Typically when using
these you either move the finishing pad across a single panel, but across that panel's
entire surface to create a consistant finish within the perimeter originally applied.
In doing this, you will have to mask off the perimeter of the individual panel to prevent
abrading adjacent panels in a manner which would render each exactly the same.
The reality of this post is for the most part, few people have an opportunity to see a
1:1 natural aluminum surface to establish a level of expectation. This is why it is so
important to acquire documentation and replication resources...at a minimum online.
There are literally hundreds of thousands of visual resources online. Each found in a
matter of minutes. http://www.scaleaero.com contains a section dedicated to it...
Doc-U-Link...
I included a few examples in this post to permit you the reader to see what can be
accomplished with a little fore-thought and practice to achieve a finish comparable to
our customers who've won the Toledo Show, AMA NATs, Scale Masters, Top Gun and
The World Jet Meet. It is they who contributed to the above explanation, and simple
processes to achieve the look of the "Real Thing".
I hope this serves to explain the how and share a little of the why without boring the
readers of this make-over thread. We have always supported customer and future
customer inquiries within RCU and other forums. And thanks for asking : ) In this
case I thought everyone would benefit from the answer...
Resource examples:
http://www.scaleaero.com/f100d.htm
http://www.scaleaero.com/scaleventsn..._Velez_P47.htm
http://www.scaleaero.com/scaleventsn.../McFarland.htm
http://www.rcuniverse.com/forum/m_23...tm.htm#2383762
http://004edc4.netsolhost.com/FliteM...es_gallery.htm
Thanks again for asking...
01-27-2008, 11:29 AM
#32
Senior Member
Thread Starter
My Feedback: (8)
Join Date: Dec 2002
Location: Saugus,
CA
Posts: 1,471
Likes: 0
Received 0 Likes
on
0 Posts
Wow! thanks Ed. Flitemetal does take some practice to get the desired result. I have already had to scrap some pieces of it.
02-17-2008, 01:42 AM
#35
Senior Member
Thread Starter
My Feedback: (8)
Join Date: Dec 2002
Location: Saugus,
CA
Posts: 1,471
Likes: 0
Received 0 Likes
on
0 Posts
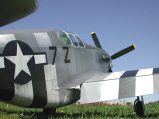
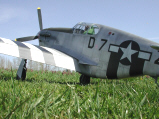
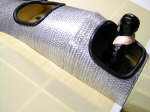
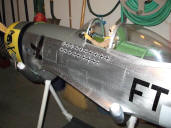
Well, the fuse is all glassed and sanded and primed and sanded. whew! lots of work! glad that is done.
I Flite Metaled the control surfaces. each surface was done with one piece. I experimented with some light sanding or brushing with it already applied. the next pieces on the horizontal and fin will be weathered before aplication.
This is all for now though because I am moving to detail cockpit!
I Flite Metaled the control surfaces. each surface was done with one piece. I experimented with some light sanding or brushing with it already applied. the next pieces on the horizontal and fin will be weathered before aplication.
This is all for now though because I am moving to detail cockpit!
03-10-2008, 07:36 PM
#36
Senior Member
Thread Starter
My Feedback: (8)
Join Date: Dec 2002
Location: Saugus,
CA
Posts: 1,471
Likes: 0
Received 0 Likes
on
0 Posts
I am working on the cockpit now. The pictures of P-51D's cockpits that I got were all different!! So I picked the one that I had the best picture of, and added some things from the others.
No one makes a cockpit kit for a .40 size P-51, so I had to make everything. except the instruments, thanks to JTEC!
Balsa and Plywood were used.
No one makes a cockpit kit for a .40 size P-51, so I had to make everything. except the instruments, thanks to JTEC!
Balsa and Plywood were used.
 03-12-2008, 01:05 AM
#39
Senior Member
Thread Starter
My Feedback: (8)
Join Date: Dec 2002
Location: Saugus,
CA
Posts: 1,471
Likes: 0
Received 0 Likes
on
0 Posts
More progress! I still have a little paint touch up to do- not enough light in the workshop. I need placards and am still working on the right side. then the floor and seat, radios, and pilot.
03-13-2008, 12:51 AM
#41
Senior Member
Thread Starter
My Feedback: (8)
Join Date: Dec 2002
Location: Saugus,
CA
Posts: 1,471
Likes: 0
Received 0 Likes
on
0 Posts
Thanks, I want this plane to be as nice as your Top Flite Spitfire even if it takes two years Scott!!
03-18-2008, 04:41 PM
#42
Senior Member
Thread Starter
My Feedback: (8)
Join Date: Dec 2002
Location: Saugus,
CA
Posts: 1,471
Likes: 0
Received 0 Likes
on
0 Posts
The left side of the cockpit is done now. The placards were difficult because on each one I forgot how I did it[:@]! then just gave up and painted some gibberish. most parts are carved balsawood.
03-18-2008, 05:14 PM
#43


Join Date: Mar 2008
Location: murrieta,
CA
Posts: 382
Likes: 0
Received 0 Likes
on
0 Posts
Hey Scale, will this stallion ever grow BIGGER!?,or is it already full grown?....ha ha.. Cockpit looks real good.Are you using Macro-setting on camera?......You know I KIDD ya.
03-19-2008, 02:23 AM
#44
Senior Member
Thread Starter
My Feedback: (8)
Join Date: Dec 2002
Location: Saugus,
CA
Posts: 1,471
Likes: 0
Received 0 Likes
on
0 Posts
I need Macro setting on my eyes! I need more light in my shop! One thing led to another on this stallion and here it is.
 04-09-2008, 10:43 AM
#50
Senior Member
My Feedback: (1)
Join Date: Mar 2003
Location: north of the basin,
CA
Posts: 1,276
Likes: 0
Received 0 Likes
on
0 Posts
i saw another p51B build (SIG 60 size with gas engine) where the guy built in a radiator door which opened down to expose the radiator when he closed the throttle. simply connected it up to the throttle control arm.
here's a video...
http://www.youtube.com/watch?v=hWeAaiIWWd4
here's the link:
http://www.rcuniverse.com/forum/m_69...NoFlaps/tm.htm
here's a video...
http://www.youtube.com/watch?v=hWeAaiIWWd4
here's the link:
http://www.rcuniverse.com/forum/m_69...NoFlaps/tm.htm