


Byron Mustang
 10-06-2009, 07:27 PM
#51

Thread Starter
My Feedback: (3)
Join Date: Dec 2007
Location: New York ,
NY
Posts: 252
Likes: 0
Received 0 Likes
on
0 Posts
Ed, thanks for the info...Id like to make them more defined..not sure how to do it without making it look unrelalistic..? I do have the faux hinges which I think help, but there is alot of daylight between them and the elevator on the real thing though..
Im considering after painting the elevators, using a wash or airbrushing in the accents..I can probaly make them look pretty good, but not like the real ones unless I cut them out..all along I thought the elevators were metal..
AT6..yes thats the VASA..see the link to the museum below..a really unbeleviable story..Its amazing how that thing remaind so preserved in the mud and silt and stuff..so much so they could reassemble it..
Id love to see the real thing one day..I still think there finding stuff down there..
http://www.vasamuseet.se/InEnglish/about.aspx
 10-06-2009, 09:10 PM
#52
Thread Starter
My Feedback: (3)
Join Date: Dec 2007
Location: New York ,
NY
Posts: 252
Likes: 0
Received 0 Likes
on
0 Posts
Theres one of these small inlets on each side..Im not to sure what they were ever for?
I think I have this one too far out..Im pretty sure Ill have to move it back to the first outer buldge..
I also need to cut some sort of inner semi circle for the front half..Whatever I do im sure Ill make it much more complicated then it ever had to be..then redo it because it isnt right.. [:@]
I think I have this one too far out..Im pretty sure Ill have to move it back to the first outer buldge..
I also need to cut some sort of inner semi circle for the front half..Whatever I do im sure Ill make it much more complicated then it ever had to be..then redo it because it isnt right.. [:@]
10-06-2009, 09:44 PM
#53

Pat,
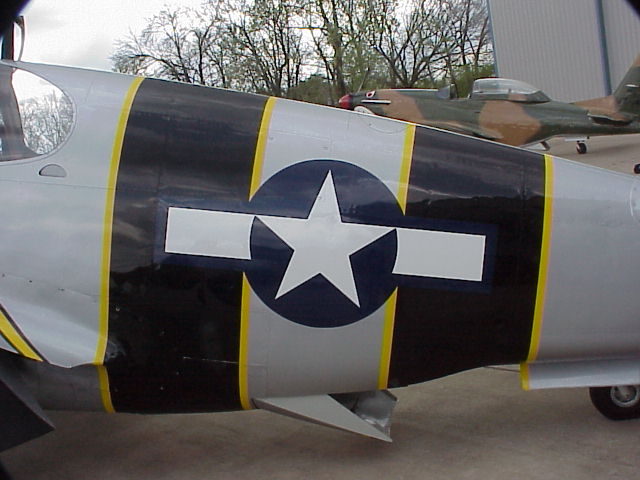
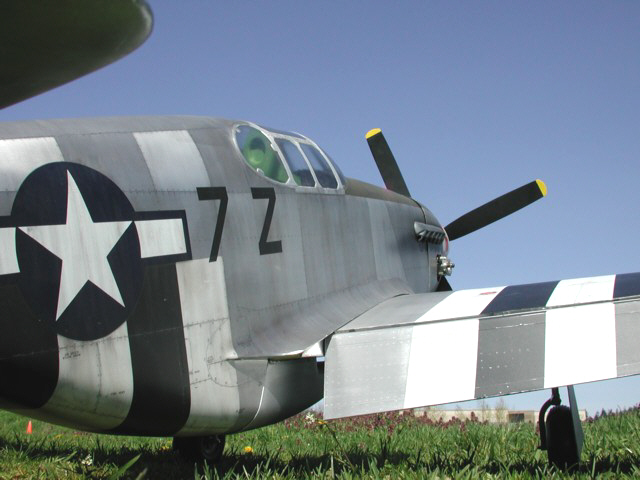
I guess before you go further you need to get your hands on a decent 3VU before
you remove something you'll regret later. That is the panel at the trailing edge of
the wing on both sides. It is squared on the front but the rear is a circle. There is
a bulge on the fuselage at that location on the C and D. Here are some references.
Its not as buldged on the A-36 Apache. The scoop on the 36 is narrower and bottom
of fuselage is not as wide.
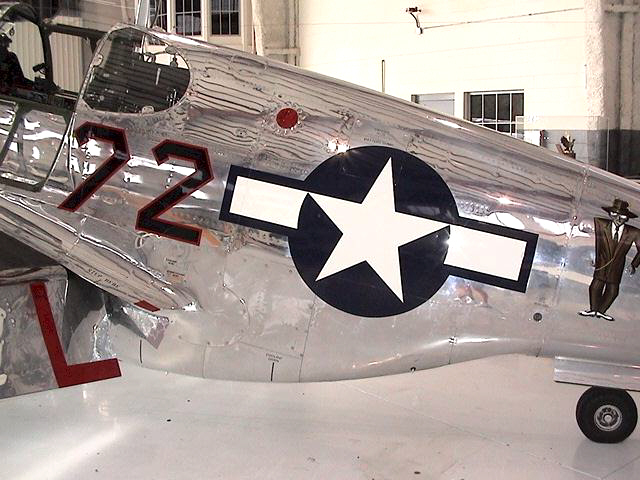
You can easily see in this shot the area of the panel in question is the widest point on
the fuselage.
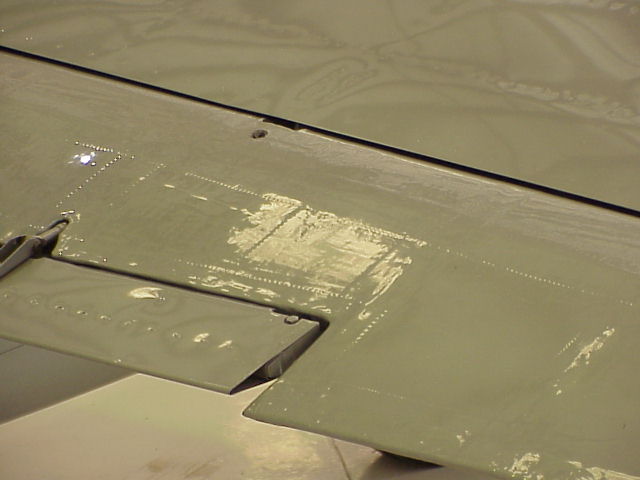
Here's a decent shot of the elevator with the boost tab and its connecting rod. Not the
leading edge of the boost tab is cuffed by the elevator... the rib stitch tape is easily
seen in this same photo. It has pinked edges.
Here are some clearer and larger images showing the panel in question.
[link=http://cdn-www.airliners.net/aviation-photos/photos/2/7/7/1566772.jpg]Large Painted Indonesian 51[/link]
[link=http://cdn-www.airliners.net/aviation-photos/photos/2/9/8/1565892.jpg]Closer large view[/link]
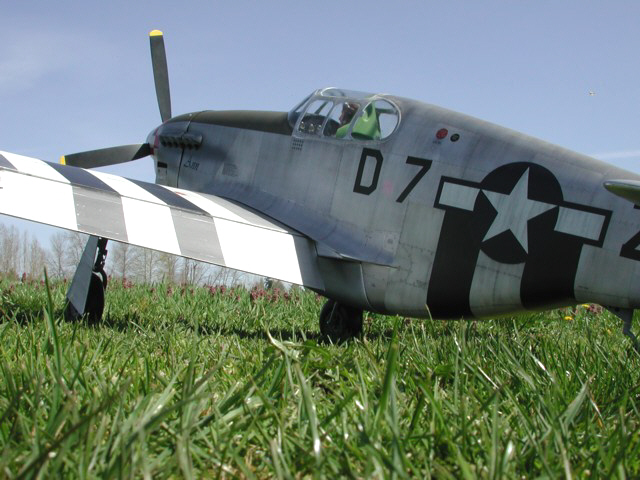
This image shows the polished fuselage is discolored by the high temperature of the
exhaust dow the side and the rounded panel with its up-turned top can be seen.
[link=http://cdn-www.airliners.net/aviation-photos/photos/4/1/5/1557514.jpg]Up close view of side[/link]
I guess before you go further you need to get your hands on a decent 3VU before
you remove something you'll regret later. That is the panel at the trailing edge of
the wing on both sides. It is squared on the front but the rear is a circle. There is
a bulge on the fuselage at that location on the C and D. Here are some references.
Its not as buldged on the A-36 Apache. The scoop on the 36 is narrower and bottom
of fuselage is not as wide.
You can easily see in this shot the area of the panel in question is the widest point on
the fuselage.
Here's a decent shot of the elevator with the boost tab and its connecting rod. Not the
leading edge of the boost tab is cuffed by the elevator... the rib stitch tape is easily
seen in this same photo. It has pinked edges.
Here are some clearer and larger images showing the panel in question.
[link=http://cdn-www.airliners.net/aviation-photos/photos/2/7/7/1566772.jpg]Large Painted Indonesian 51[/link]
[link=http://cdn-www.airliners.net/aviation-photos/photos/2/9/8/1565892.jpg]Closer large view[/link]
This image shows the polished fuselage is discolored by the high temperature of the
exhaust dow the side and the rounded panel with its up-turned top can be seen.
[link=http://cdn-www.airliners.net/aviation-photos/photos/4/1/5/1557514.jpg]Up close view of side[/link]
10-07-2009, 10:41 AM
#55
Here comes the wing root panel rear section. Then this leads to the cooling pathway and opening the front of the scoop to scavage the cool air beneath the hot from the engine compartment.
10-10-2009, 12:48 PM
#56
Thread Starter
My Feedback: (3)
Join Date: Dec 2007
Location: New York ,
NY
Posts: 252
Likes: 0
Received 0 Likes
on
0 Posts
I wanted to ask, do I need washers between the nut and bolt head? (this is for two pushrods/servos on the elevator linkage..I did them side by side as opposed to inline..)
I also was going to put epoxy on the tip of the threads once everything was installed so the nut couldnt back off..
Just wondering if its ok to go without washers between the nut and bolt heads?
I also was going to put epoxy on the tip of the threads once everything was installed so the nut couldnt back off..
Just wondering if its ok to go without washers between the nut and bolt heads?
10-10-2009, 01:11 PM
#57
Personally, I would place a second nut on the threads as a jam nut with application of Locktite
to assure it does not back off after tightening the two while holding each in a seperate wrench.
Do not simply tighten the outside to the inside without restraining the inside nut...
to assure it does not back off after tightening the two while holding each in a seperate wrench.
Do not simply tighten the outside to the inside without restraining the inside nut...
10-10-2009, 02:16 PM
#58
Thread Starter
My Feedback: (3)
Join Date: Dec 2007
Location: New York ,
NY
Posts: 252
Likes: 0
Received 0 Likes
on
0 Posts
Thanks Ed,
Thats the route Ill go..
Adding ribs to the rudder...Its pretty easy to wet sand on the electrical tape..Ill do it tomorrow when the filler is dry..
Ive done this type of stuff on plastic models and it works out pretty well..
Thats the route Ill go..
Adding ribs to the rudder...Its pretty easy to wet sand on the electrical tape..Ill do it tomorrow when the filler is dry..
Ive done this type of stuff on plastic models and it works out pretty well..
10-10-2009, 02:18 PM
#59
Thread Starter
My Feedback: (3)
Join Date: Dec 2007
Location: New York ,
NY
Posts: 252
Likes: 0
Received 0 Likes
on
0 Posts
I sprayed one of the elevators, and did some weathering..just break the routine a bit..
Ill do the other one a little differently and see which one I like better..
Ill do the other one a little differently and see which one I like better..
10-11-2009, 12:33 PM
#60
Thread Starter
My Feedback: (3)
Join Date: Dec 2007
Location: New York ,
NY
Posts: 252
Likes: 0
Received 0 Likes
on
0 Posts
I didnt use it when I did the mockup of the elevator, as Ive been unable to find it, but the link below has #926 Dull Aluminium..
Ive read on a few forums where this color has been used for several real life mustang restorations..I may try it, as im not really too happy with the look of the Tamyia aluminum I used..(not even after I dulcoated it..)
Ive looked for it online, but have been unable to find it, so Ill give them a call Monday and see where it can be purcahsed
http://www.orbindustries.com/files/o...olor-chart.pdf
10-11-2009, 03:03 PM
#61
I'm assuming you were discussing the paint on the elevator and the rudder...
Considering these don't match on any natural aluminum mustang any silver you use will work.
Most of them are more gray than silver but with your use of Flite-Metal silver will look brighter.
Any automotive silver will do the trick, then wet coat clear the fabric surfaces.
I don't know if you are going to vertical weather the airframe or not. If so there will be a wash
applied after you apply the Flite-Metal. IMHO you should simply finish this first warbird of yours
to a point then after you begin flying in you can add the weathering wash.
Ed
10-11-2009, 06:17 PM
#62
Thread Starter
My Feedback: (3)
Join Date: Dec 2007
Location: New York ,
NY
Posts: 252
Likes: 0
Received 0 Likes
on
0 Posts
Ive read that as well Ed, and the one I picked I didnt like..LOL
Sanded and removed the tape and have the rough rudder spars..did some damage too peeling the tape off..
Ill sand these down and round down the edges for subtle spars..
Im going the weather the whole thing, with my airbrush, pastels and a wash followed by a clear..Im pretty interested in seeing how the Flite Metal will look weathered..
10-11-2009, 06:19 PM
#63
Thread Starter
My Feedback: (3)
Join Date: Dec 2007
Location: New York ,
NY
Posts: 252
Likes: 0
Received 0 Likes
on
0 Posts
Installed the other Stabilizer..
Need to do some reinforcement where the spars go through the fuselage..the give in the fibreglass allows for more movement then Id like to see..Ill just epoxy some wood blocks to the spars and the fuselage, and it will eliminate the movement..
Need to do some reinforcement where the spars go through the fuselage..the give in the fibreglass allows for more movement then Id like to see..Ill just epoxy some wood blocks to the spars and the fuselage, and it will eliminate the movement..
10-11-2009, 06:33 PM
#64
ORIGINAL: SnakeBT6 Ive read that as well Ed, and the one I picked I didnt like..LOL Sanded and removed the tape and have the rough rudder spars..did some damage to peeling the tape off.. Ill sand these down and round down the edges for subtle spars.. Im going the weather the whole thing, with my airbrush, pastels and a wash followed by a clear..Im pretty interested in seeing how the Flite Metal will look weathered..

Dirty vertical and leading to trailing edge wash.
10-12-2009, 09:10 AM
#67
Senior Member
Join Date: Apr 2008
Location: Stockholm, SWEDEN
Posts: 1,024
Likes: 0
Received 0 Likes
on
0 Posts
ORIGINAL: SnakeBT6
AT6..yes thats the VASA..see the link to the museum below..a really unbeleviable story..Its amazing how that thing remaind so preserved in the mud and silt and stuff..so much so they could reassemble it..
Id love to see the real thing one day..I still think there finding stuff down there..
http://www.vasamuseet.se/InEnglish/about.aspx
10-12-2009, 08:01 PM
#68
Thread Starter
My Feedback: (3)
Join Date: Dec 2007
Location: New York ,
NY
Posts: 252
Likes: 0
Received 0 Likes
on
0 Posts
Nice Ed..I wish it was all like that..
I hesitate to show a mid progress shot like this because it looks like a train wreck..I scored the boost tab a bit..not sure if its going to be deep enough..(Ill pre shade it to help with the separation..)
Ill sand it tomorrow, tone down the ribs, and give it a shot of prime..I dont think I plan on anymore detail then this for the rudder..
10-13-2009, 08:52 AM
#69
Actually, I have never seen any harm come from simply cutting the boost tab's top
and bottom edge free from the rudder. A Zona saw is thick enough to provide the
proper space at 1/5th scale.
If done, and the underlying structure is EPS, expanded polystyrene, I recommend
you place a small amount of two part "epoxy" on all cut free and exposed edges of
the boost tab and the exposed rudder opposite the tab inner surfaces. This prevents
solvents from primer from melting the foam... ; ) minor detail.
Your project is moving along a lot faster than a typical one. Remember to look and
consider consequence twice before you do something...everything has consequence : )
10-19-2009, 06:21 PM
#70
Thread Starter
My Feedback: (3)
Join Date: Dec 2007
Location: New York ,
NY
Posts: 252
Likes: 0
Received 0 Likes
on
0 Posts
Been busy with work and a few things lately..
Finished the rudder..just a little fill to do around the rivets at the bottom on one side and some minor fill and sand on the front of the other..I also want to open up at the boost tab seems and add the boost tab control to the right side..
This is as far as im going to go with it otherwise..
Finished the rudder..just a little fill to do around the rivets at the bottom on one side and some minor fill and sand on the front of the other..I also want to open up at the boost tab seems and add the boost tab control to the right side..
This is as far as im going to go with it otherwise..
10-19-2009, 09:11 PM
#72
Thread Starter
My Feedback: (3)
Join Date: Dec 2007
Location: New York ,
NY
Posts: 252
Likes: 0
Received 0 Likes
on
0 Posts
Thanks for the compliments Ed..Appreciate it..
This is alot different then plastic models, and its taking me some time to figure out what to do to make things come out the way I want them, but thats part of the hobby for me..
Nothing sand paper cant fix..
Im starting to cleanup/repair around the back..as well Im going to reinforce the spars with wood and 30min epoxy where it goes through the fuselage..
Im going to use Evercoat Poly Flex to do the patching of those big nasty cracks and openings..
http://www.evercoat.com/productDetail.aspx?pID=8
10-24-2009, 03:20 PM
#73
Thread Starter
My Feedback: (3)
Join Date: Dec 2007
Location: New York ,
NY
Posts: 252
Likes: 0
Received 0 Likes
on
0 Posts
Fred I took your advice and installed the CF pushrods..(I had to modify the servo mounts a bit)
I also after talking to the guy from Central Hobbies, I decided to ditch the nylon all together and went with a Kevlar pull/pull setup for the rudder..
I also after talking to the guy from Central Hobbies, I decided to ditch the nylon all together and went with a Kevlar pull/pull setup for the rudder..
10-25-2009, 08:36 PM
#75
Thread Starter
My Feedback: (3)
Join Date: Dec 2007
Location: New York ,
NY
Posts: 252
Likes: 0
Received 0 Likes
on
0 Posts
I wanted to ask if anyone could recommend a type and size of hinge to be used for the airelons, elevator and rudder..
Also I see some fuel systems with filters..do I need something like this? Is there any particular size fuel line that should be used? (I already have a 24oz Dubro Tank with a gas stopper conversion..)
Any advice is appreciated..
Also I see some fuel systems with filters..do I need something like this? Is there any particular size fuel line that should be used? (I already have a 24oz Dubro Tank with a gas stopper conversion..)
Any advice is appreciated..