


Pacific Ace 74 inch
 12-28-2019, 08:32 PM
#1

Thread Starter

Crashed a trainer last month. My fault before I even started the engine. Was using my old Futaba 7uaf on 72 mhz as I was out of 2.4ghz receivers.
The plane was a pretty touchy on the controls last time out. So I added some expo while waiting in the pitts. Unfortunately I added + expo, not -. What a wild ride to I finally found the ground. And that was that for that bird.
I haven't' had much opportunity to fly since around 1997. To say I am rusty would be an understatement. I have been blessed to find great club about 45 minutes away that caters to vets. 40$ dues, 7000 feet of runway (yep SEVEN THOUSAND). It's an abandoned military runway. But it is the opposite pattern to what I learned and did probably 95% of my flying in. So I do need to build my skills again and get lots of practice with this counter clockwise pattern.
So I wanted a replacement Trainer. And it was just something I sort of just threw together. But I did not want to just build a new version of the one I had crashed. The wife liked the transparent orange I had covered the wing with (what I had on hand). So the replacement seemed it should likewise have transparent covering. So my thoughts turned to Pacific Ace.
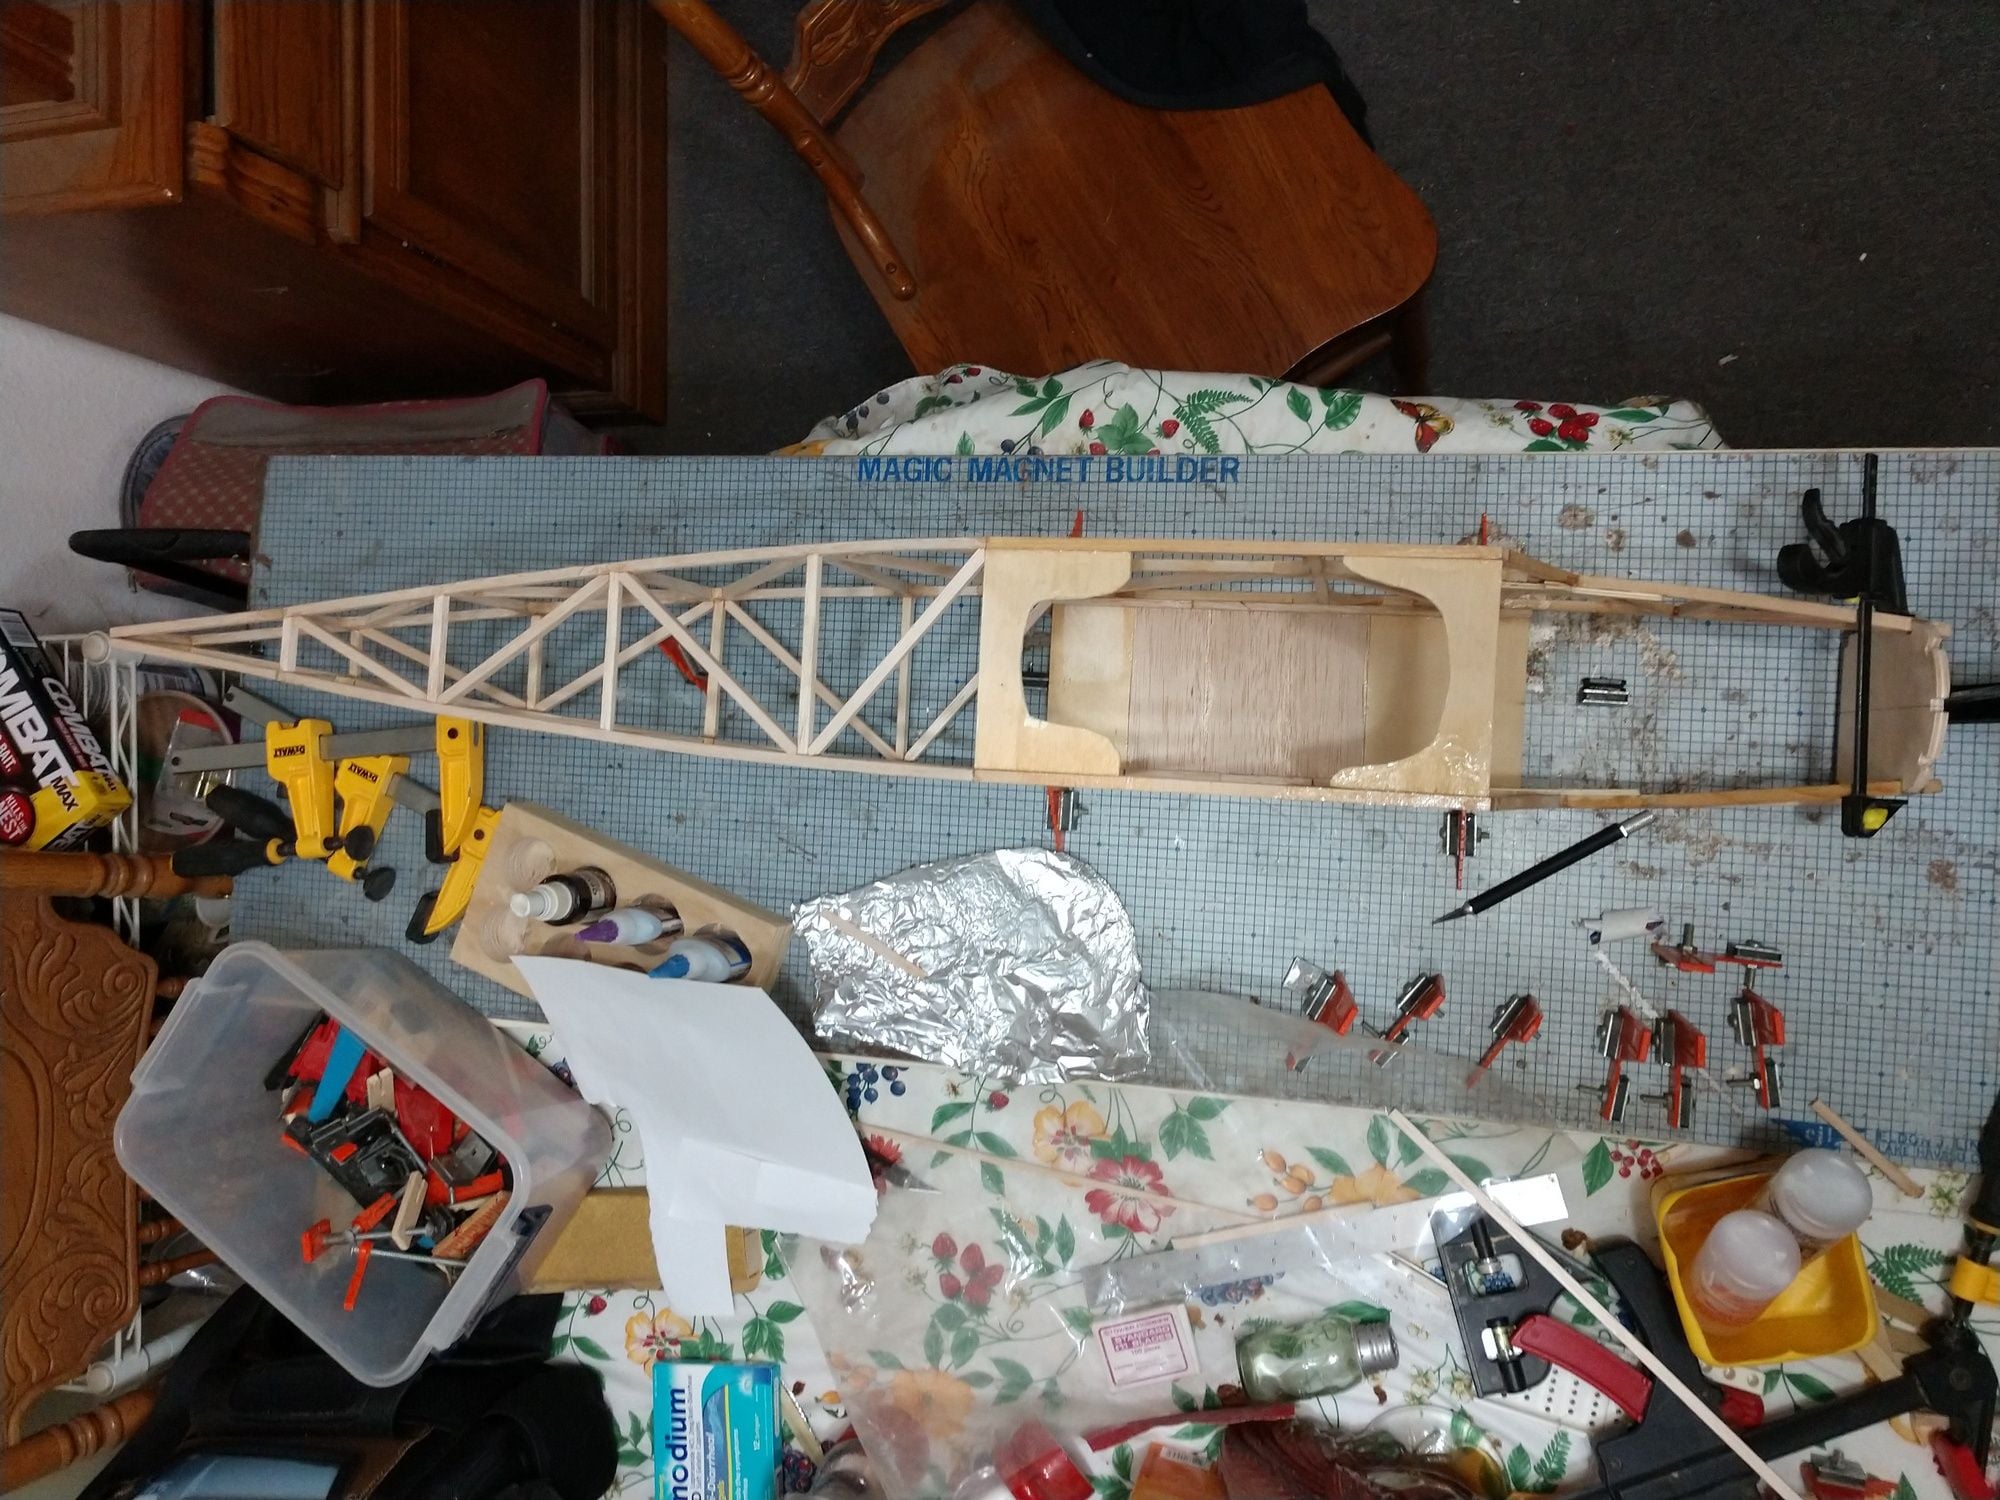
I built Pacific Ace 74 inch once before while my ship was swinging on the hook off the coast of Kuwait during the first gulf war (mine clearing). Well I got all the framing done anyway. And then finished it when I finally got home. Learned to fly on it. Did some thermal soaring with it when the engine died. Some fairly long flights.
When the wing survived beyond the fuse I used it for slop soaring. Had some great flights when the wind and slope lift died and was thermalling. Got lots of comments from my buds on the slope.
So I showed my wife the pics I had scanned of the my old Pacific Ace. Showed her the original planes I still have (yellowed and fragile). She loved it. But she loves stick construction anyway.
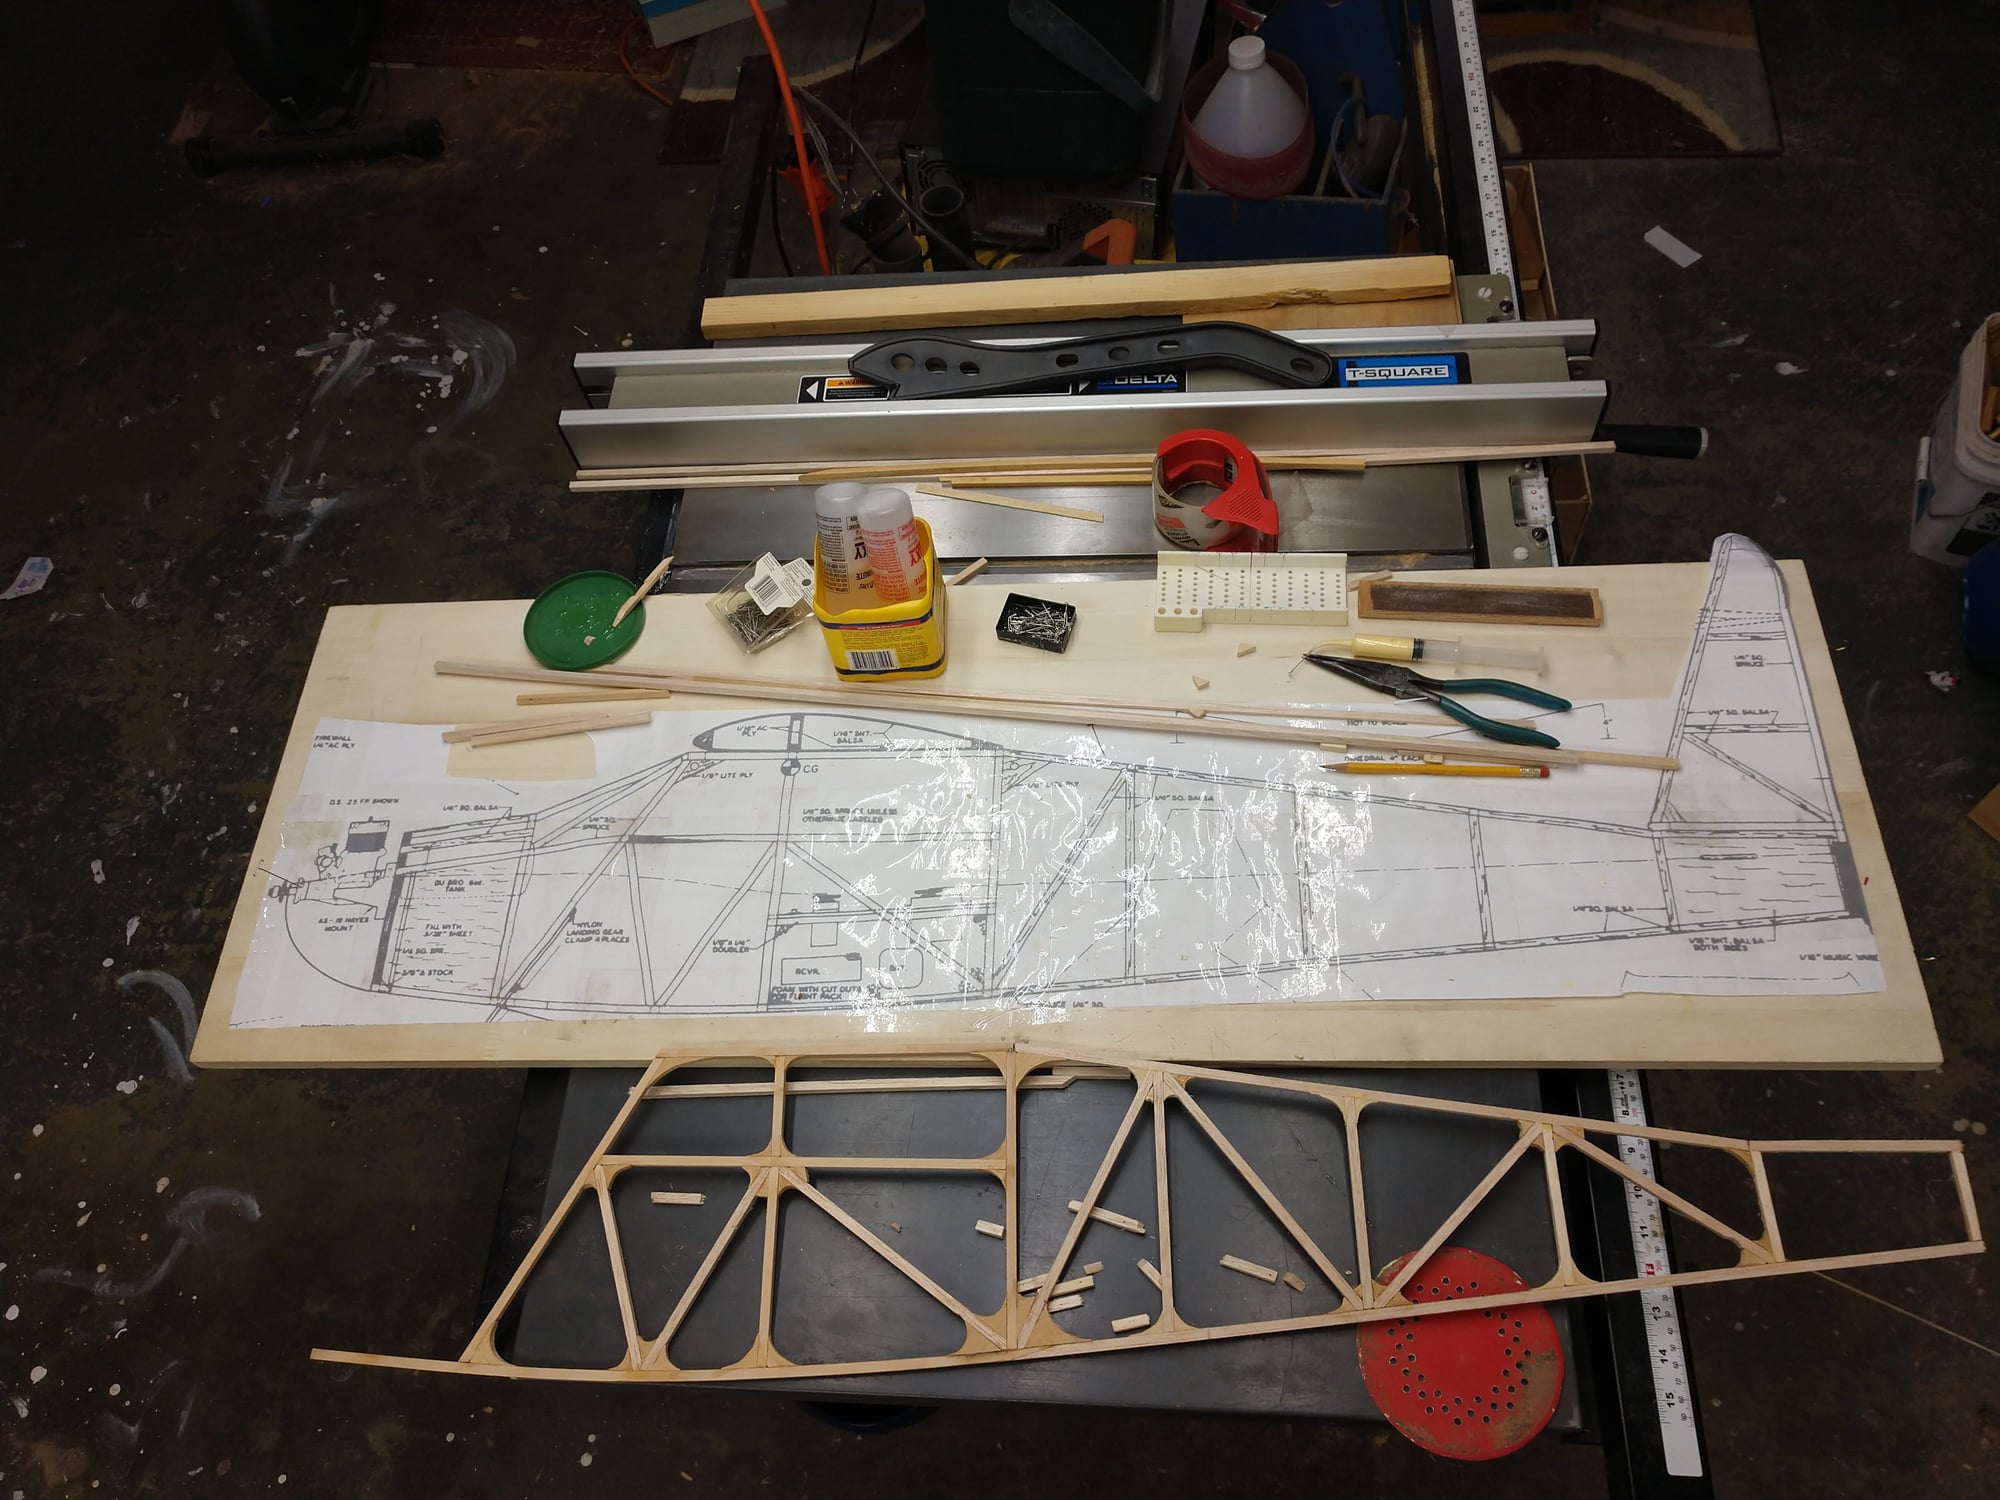
So that settled it was time to get ready to build a new one. I also just happen to have the plans scanned as well. I tile printed those out and slowly over several days taped them together, but just sections. The Wing the fuse, tail feathers. Much easier to work with.
I hit the hobby shop for some lumber (OUCH$$$) Christmas eve.
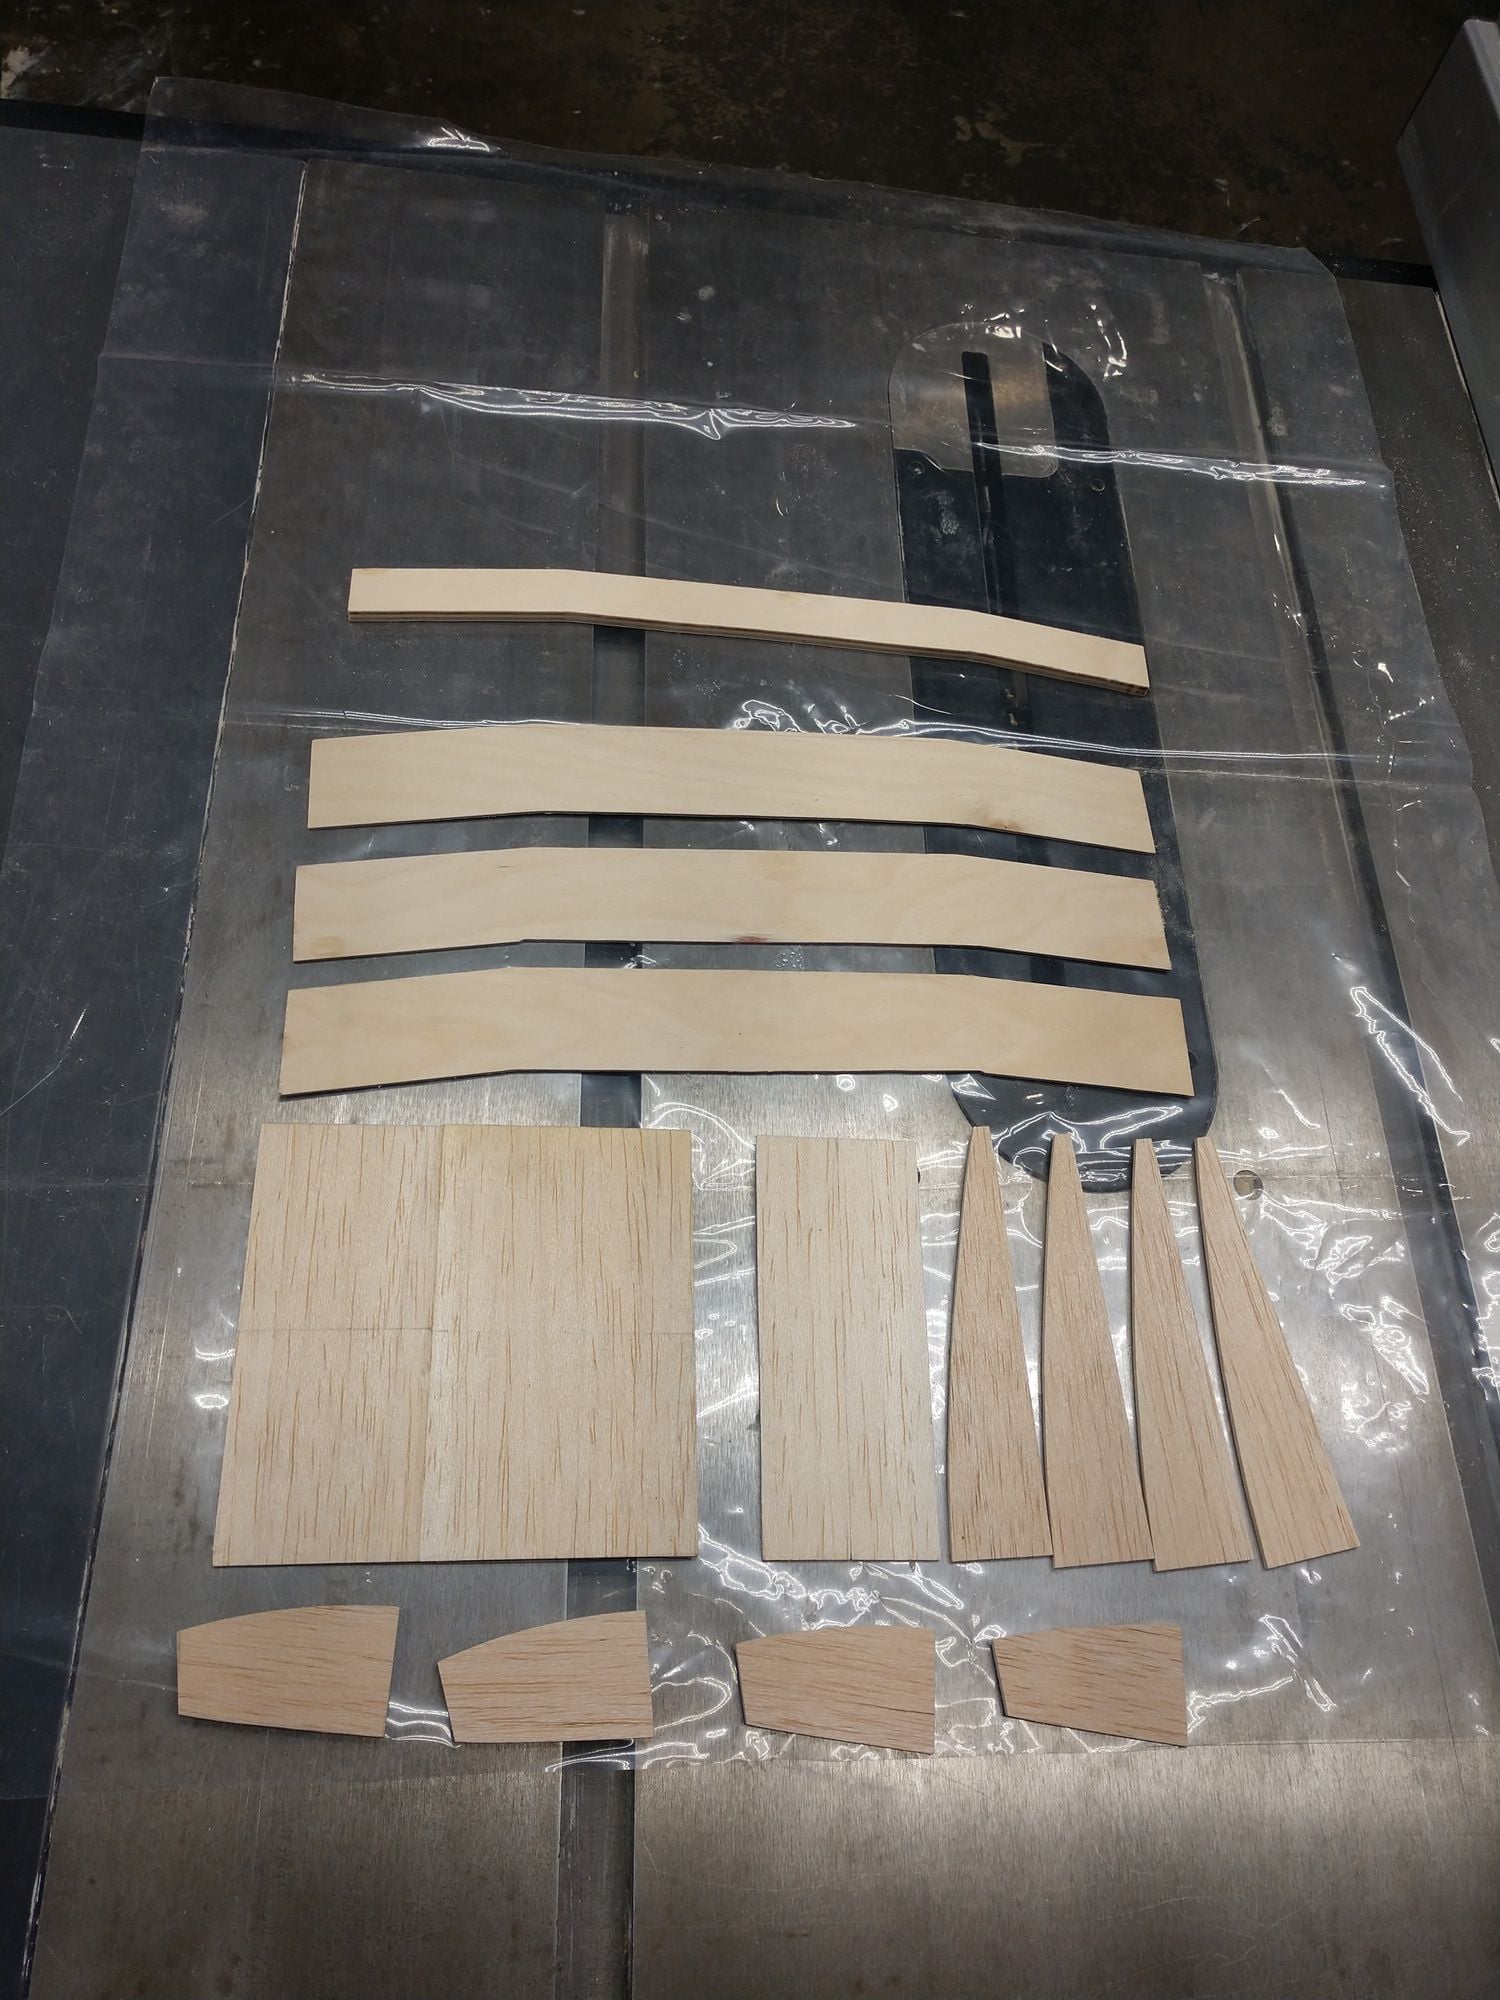
Had to make a number of substitutions buying wood, as they did not have what I needed. Bought 1/4" sheets instead of 1/4sqr stick and 6" sheets of 3/32" instead of the 2" sheets I had wanted to buy. But I am blessed with a real nice table saw ) A Delta 5000 series). So I installed my finest blade and went to rip city. Made lots of 1/4sqr sticks and 2" sheets of 3/32" for wing ribs. I then cross cut the 2" pieces into rib blanks. I will stack shape them in one or two stacks later.
I started building with the fuse sides. I did the first one sitting on the recliner sofa with my wife While streaming The New Yankee Workshop. I have a 4' balsa building board. Tools sitting on my laptop next to me. Dog booted from between mama's legs so I got room for the board. Wife's (Windy) tablet on her opposite leg.
So that got one side completely framed up, But that was not going to work beyond that. The second side was pinned right over the first half. Wide transparent tape was put over all of the joints so as not to end up with one double thick side. So for that I worked in the garage. Took a hour for my propane radiant heater to get the garage comfortable enough to work in.
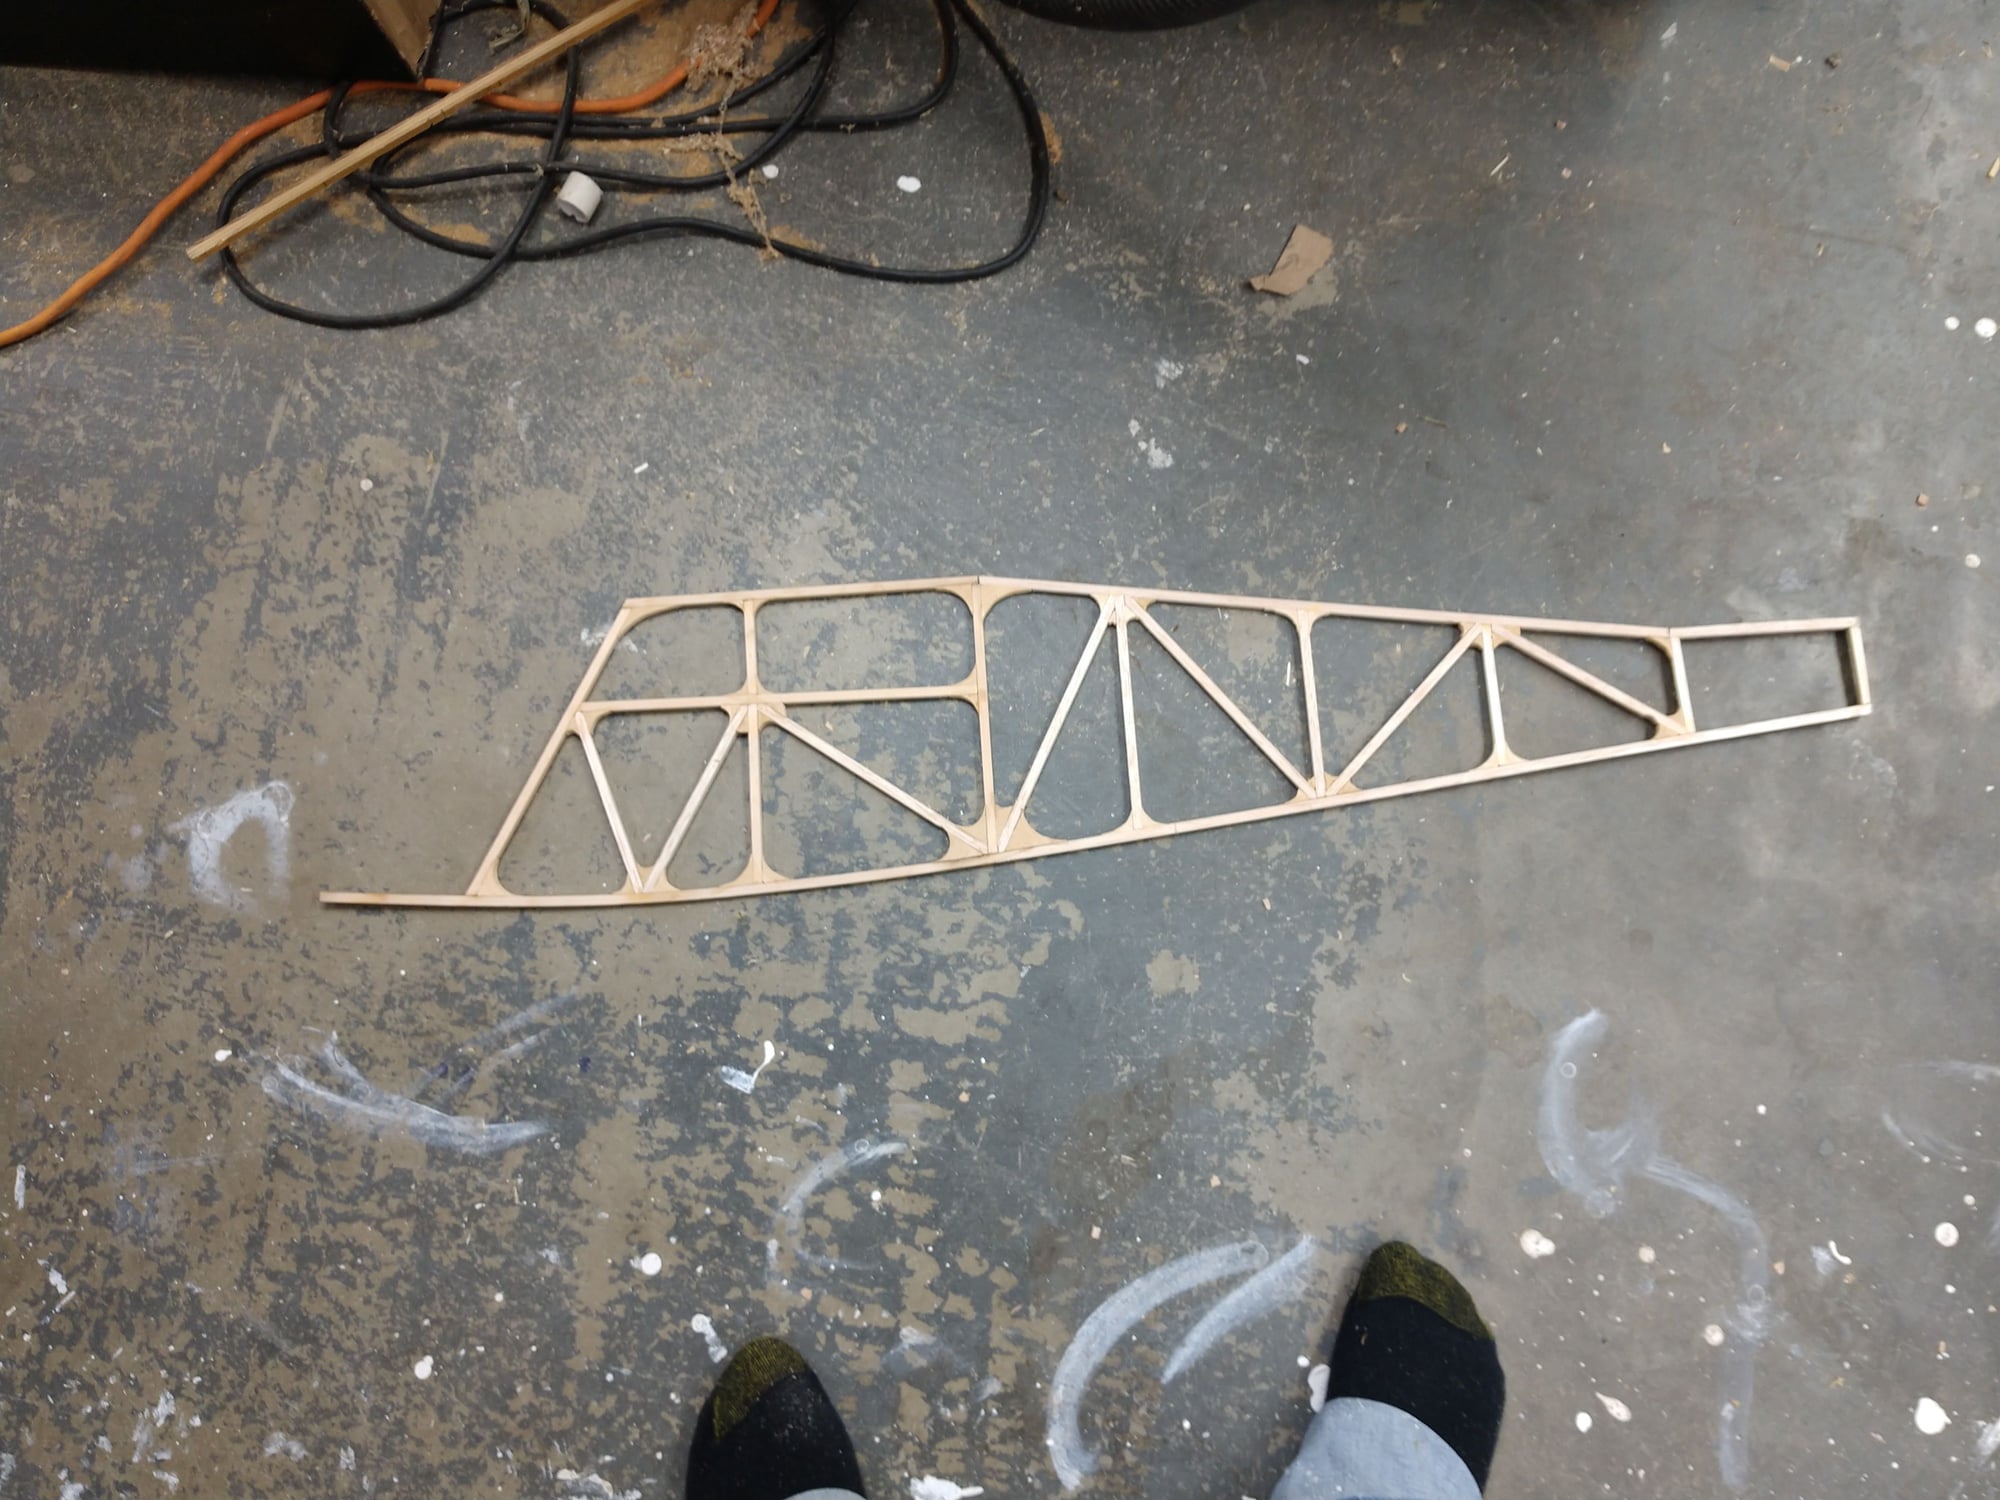
Much of the forward section is spruce. There was no way the bottom spruce stick was going to make the curve. It got soaked in hot water. Then bent and left to dry before gluing. It goes from the firewall to the trailing edge of the wing, and the a 60 degree scarf joint to the balsa back half (epoxied). I found it was easier to over bend the hot wet spruce and let it dry that way. It then sprung back to very close to what I wanted. I was just guessing on how much to over bend it, but i got lucking first try, it really was close. Maybe just a bit over curve. But the vertical and diagonal sticks took care of that.
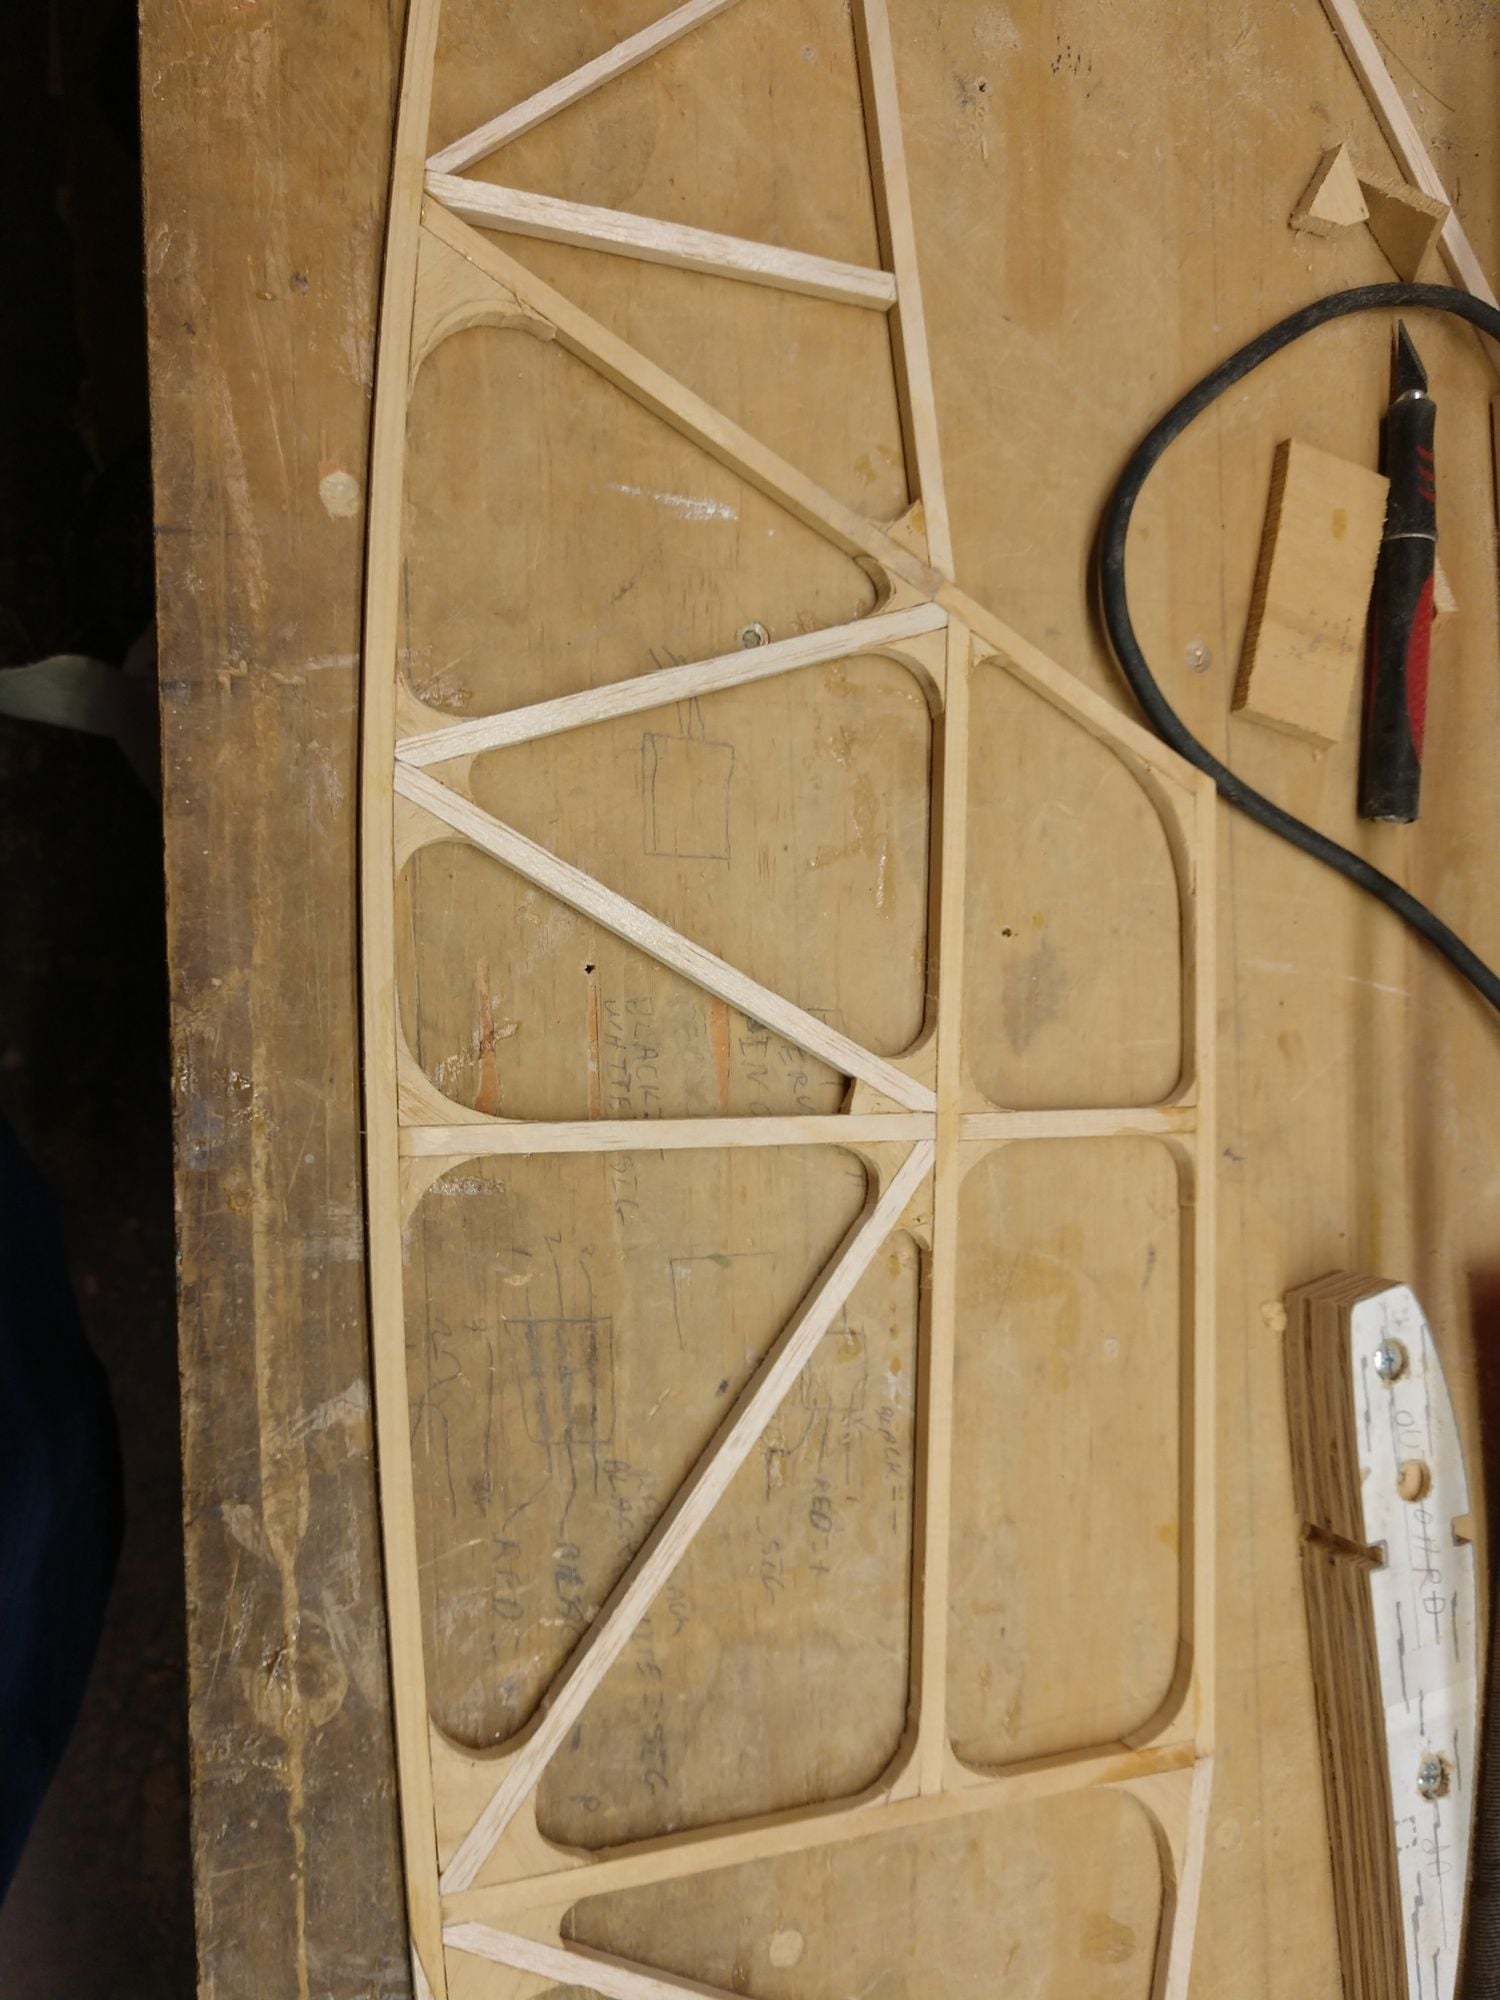
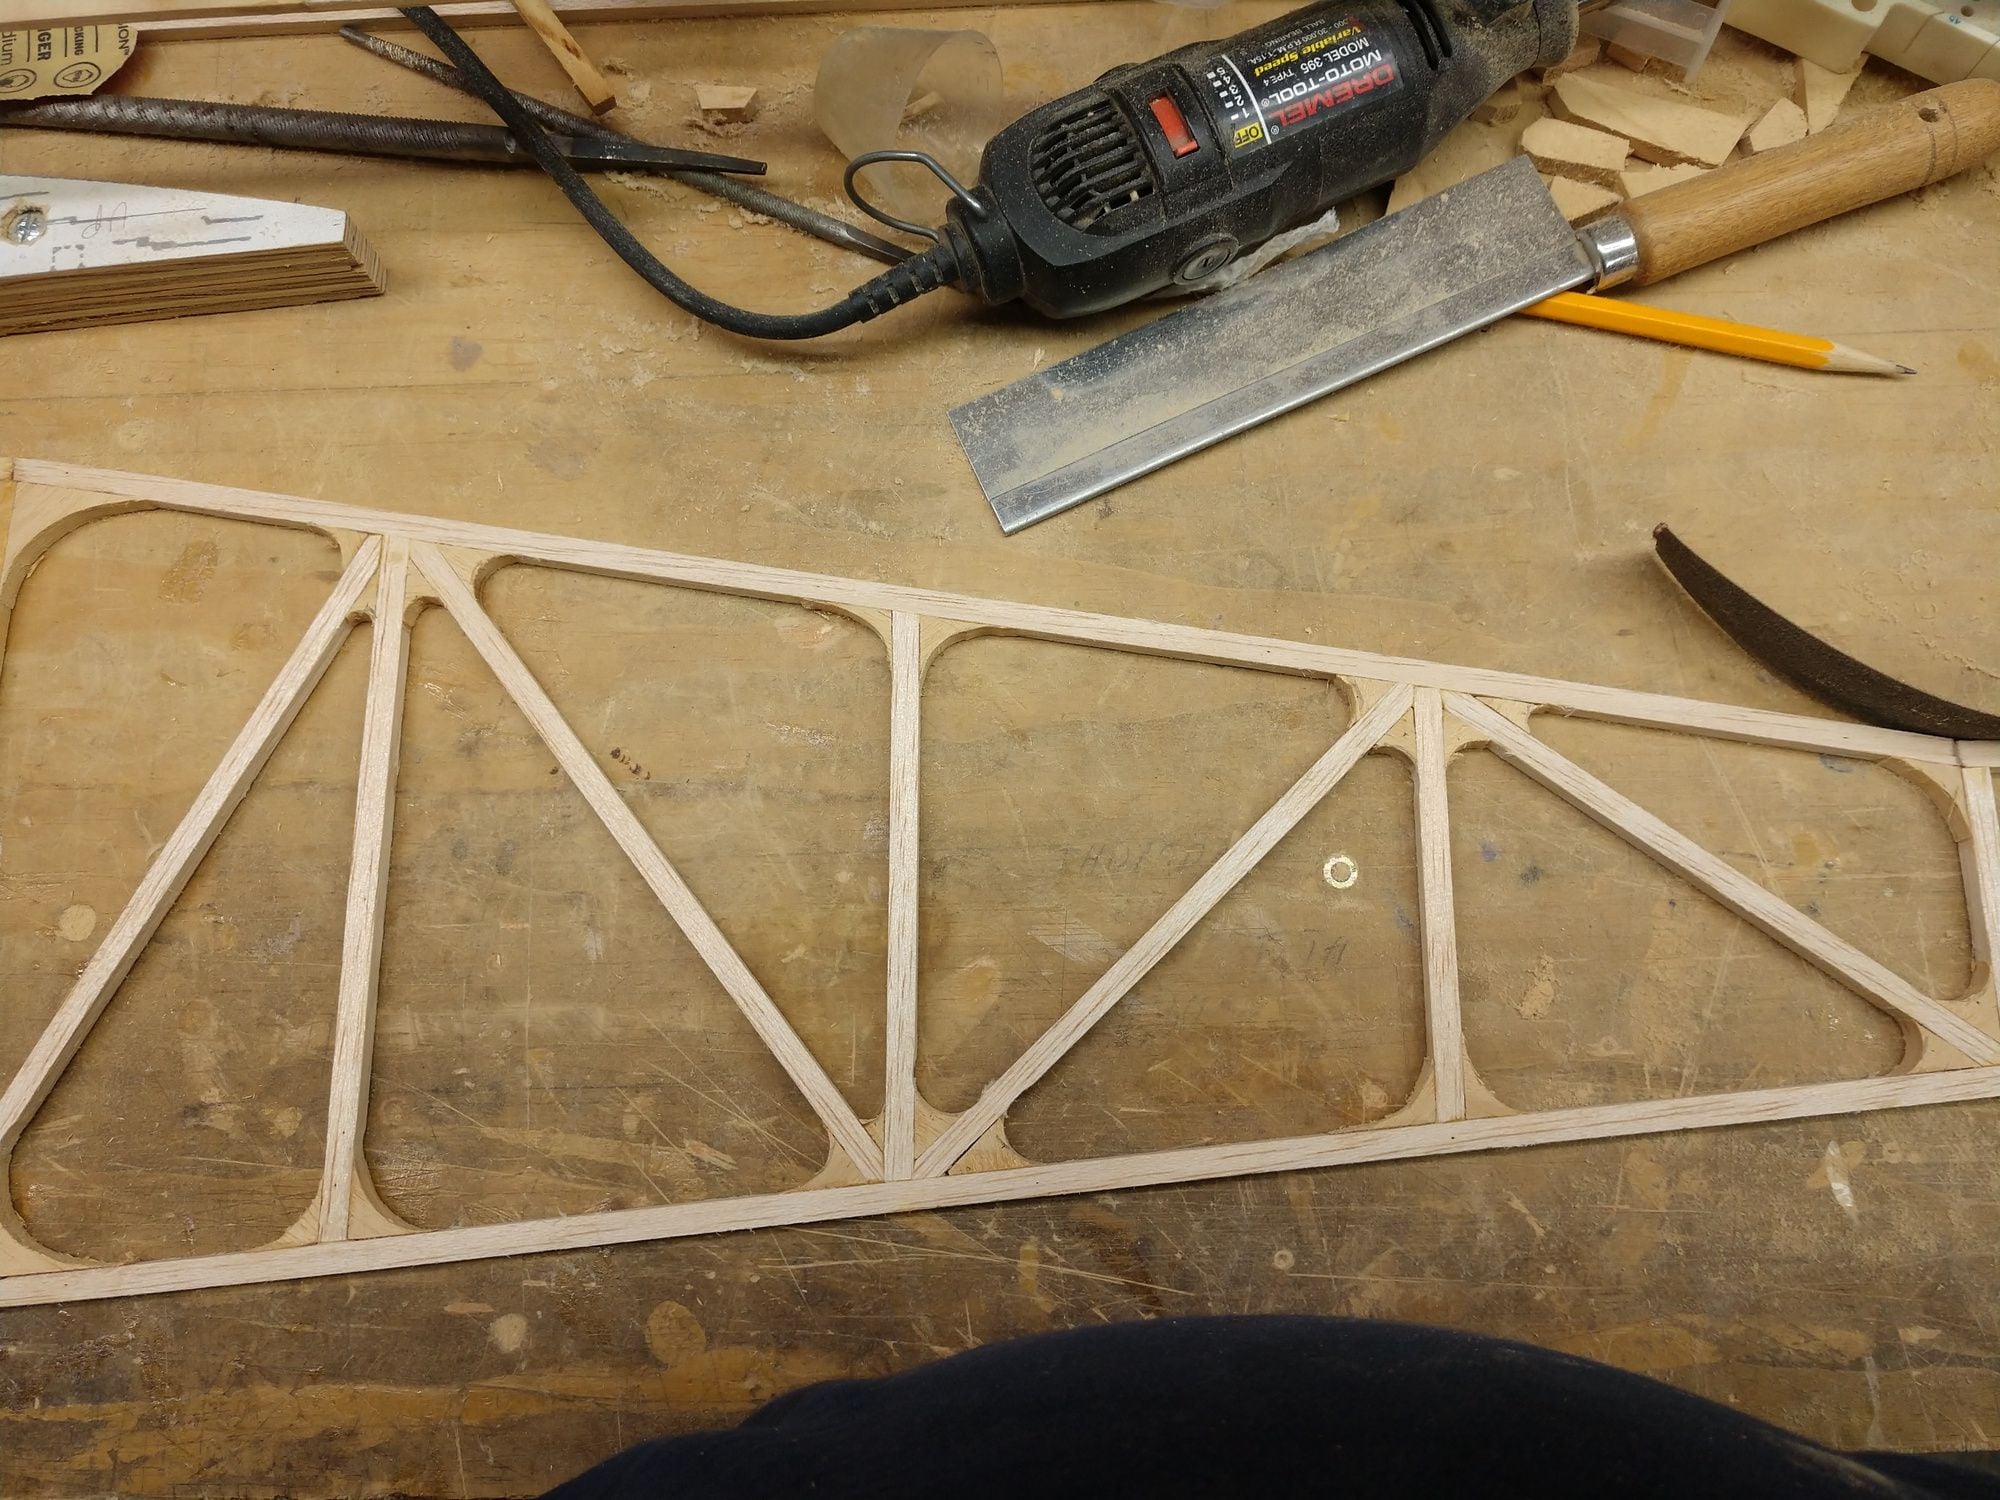
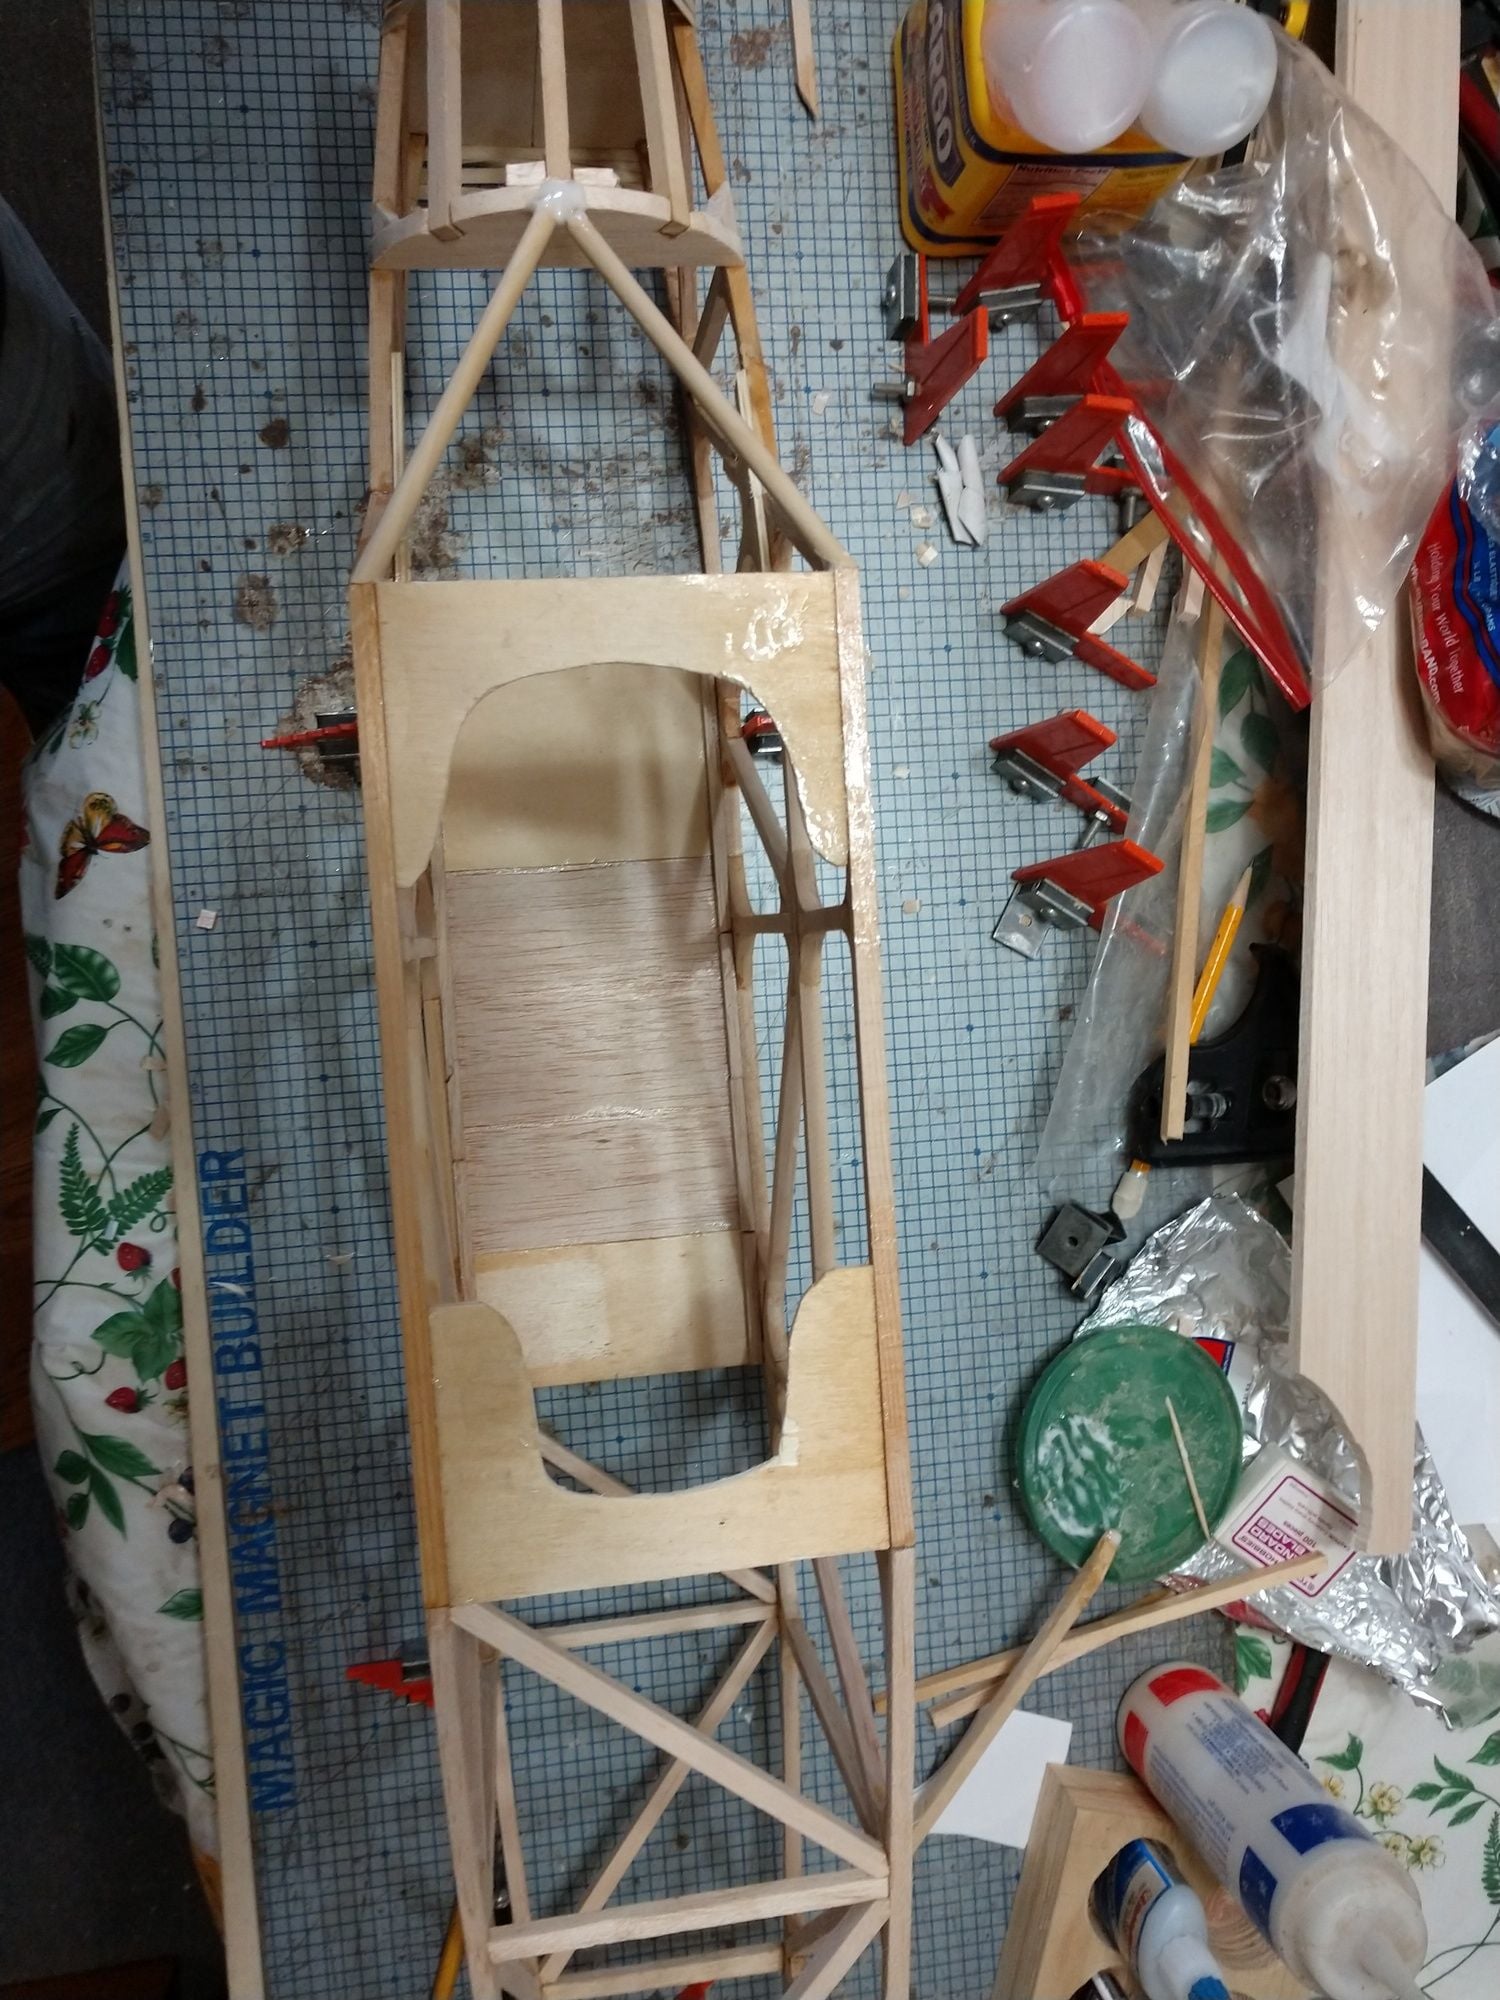
I, have made some so far minor changes to the structure. I added diagonals every vertical. All of the diagonals are mitered to the vertical and to the top and bottom longerons (correct term?). So there are two miters on each end of the diagonals. Tedious would be an understatement. The plans don't call for that many diagonals. And also I added gussets to every joint, even in between the diagonals. Even more gain tedious.
The gussets have been rounded out. I doubt it saves much weight but it sure does look way better, and they will be visible (transparent covering). Used my dremel tool with a sanding drum for that and a pair of rat tail rasps.
All the vertical spruce joints and the scarf joints are epoxied, the vertical balsa joints are Tightbond 2, and the diagonals are medium ca. All of the diagonals are balsa.
So far that is 4 build sessions. First session with my wife on the sofa, and the rest in the garage. Windy would have been out there with me if we could leave mom unattended for even a few minutes. But mom is 92, senile, virtually deaf and blind, and extremely frail now.
I moved my small disc sander right next to me in the garage. Sure made it a lot easier to fit the parts. And I am real fussy on how tight all of the joints are. Sometimes when the fit was just almost there but not exact, I spun the disc by hand vice turn the switch on so as to take an almost imperceptible amount off a gusset or vertical or the mitered diagonals. Maybe that is a bit anal. But i do believe that it does improve joint strength and beside all of the joints are going to be visible.
Ken
The plane was a pretty touchy on the controls last time out. So I added some expo while waiting in the pitts. Unfortunately I added + expo, not -. What a wild ride to I finally found the ground. And that was that for that bird.
I haven't' had much opportunity to fly since around 1997. To say I am rusty would be an understatement. I have been blessed to find great club about 45 minutes away that caters to vets. 40$ dues, 7000 feet of runway (yep SEVEN THOUSAND). It's an abandoned military runway. But it is the opposite pattern to what I learned and did probably 95% of my flying in. So I do need to build my skills again and get lots of practice with this counter clockwise pattern.
So I wanted a replacement Trainer. And it was just something I sort of just threw together. But I did not want to just build a new version of the one I had crashed. The wife liked the transparent orange I had covered the wing with (what I had on hand). So the replacement seemed it should likewise have transparent covering. So my thoughts turned to Pacific Ace.
I built Pacific Ace 74 inch once before while my ship was swinging on the hook off the coast of Kuwait during the first gulf war (mine clearing). Well I got all the framing done anyway. And then finished it when I finally got home. Learned to fly on it. Did some thermal soaring with it when the engine died. Some fairly long flights.
When the wing survived beyond the fuse I used it for slop soaring. Had some great flights when the wind and slope lift died and was thermalling. Got lots of comments from my buds on the slope.
So I showed my wife the pics I had scanned of the my old Pacific Ace. Showed her the original planes I still have (yellowed and fragile). She loved it. But she loves stick construction anyway.
So that settled it was time to get ready to build a new one. I also just happen to have the plans scanned as well. I tile printed those out and slowly over several days taped them together, but just sections. The Wing the fuse, tail feathers. Much easier to work with.
I hit the hobby shop for some lumber (OUCH$$$) Christmas eve.
Had to make a number of substitutions buying wood, as they did not have what I needed. Bought 1/4" sheets instead of 1/4sqr stick and 6" sheets of 3/32" instead of the 2" sheets I had wanted to buy. But I am blessed with a real nice table saw ) A Delta 5000 series). So I installed my finest blade and went to rip city. Made lots of 1/4sqr sticks and 2" sheets of 3/32" for wing ribs. I then cross cut the 2" pieces into rib blanks. I will stack shape them in one or two stacks later.
I started building with the fuse sides. I did the first one sitting on the recliner sofa with my wife While streaming The New Yankee Workshop. I have a 4' balsa building board. Tools sitting on my laptop next to me. Dog booted from between mama's legs so I got room for the board. Wife's (Windy) tablet on her opposite leg.
So that got one side completely framed up, But that was not going to work beyond that. The second side was pinned right over the first half. Wide transparent tape was put over all of the joints so as not to end up with one double thick side. So for that I worked in the garage. Took a hour for my propane radiant heater to get the garage comfortable enough to work in.
Much of the forward section is spruce. There was no way the bottom spruce stick was going to make the curve. It got soaked in hot water. Then bent and left to dry before gluing. It goes from the firewall to the trailing edge of the wing, and the a 60 degree scarf joint to the balsa back half (epoxied). I found it was easier to over bend the hot wet spruce and let it dry that way. It then sprung back to very close to what I wanted. I was just guessing on how much to over bend it, but i got lucking first try, it really was close. Maybe just a bit over curve. But the vertical and diagonal sticks took care of that.
I, have made some so far minor changes to the structure. I added diagonals every vertical. All of the diagonals are mitered to the vertical and to the top and bottom longerons (correct term?). So there are two miters on each end of the diagonals. Tedious would be an understatement. The plans don't call for that many diagonals. And also I added gussets to every joint, even in between the diagonals. Even more gain tedious.
The gussets have been rounded out. I doubt it saves much weight but it sure does look way better, and they will be visible (transparent covering). Used my dremel tool with a sanding drum for that and a pair of rat tail rasps.
All the vertical spruce joints and the scarf joints are epoxied, the vertical balsa joints are Tightbond 2, and the diagonals are medium ca. All of the diagonals are balsa.
So far that is 4 build sessions. First session with my wife on the sofa, and the rest in the garage. Windy would have been out there with me if we could leave mom unattended for even a few minutes. But mom is 92, senile, virtually deaf and blind, and extremely frail now.
I moved my small disc sander right next to me in the garage. Sure made it a lot easier to fit the parts. And I am real fussy on how tight all of the joints are. Sometimes when the fit was just almost there but not exact, I spun the disc by hand vice turn the switch on so as to take an almost imperceptible amount off a gusset or vertical or the mitered diagonals. Maybe that is a bit anal. But i do believe that it does improve joint strength and beside all of the joints are going to be visible.
Ken
 12-28-2019, 08:39 PM
#2
Thread Starter
Now for some pictures.
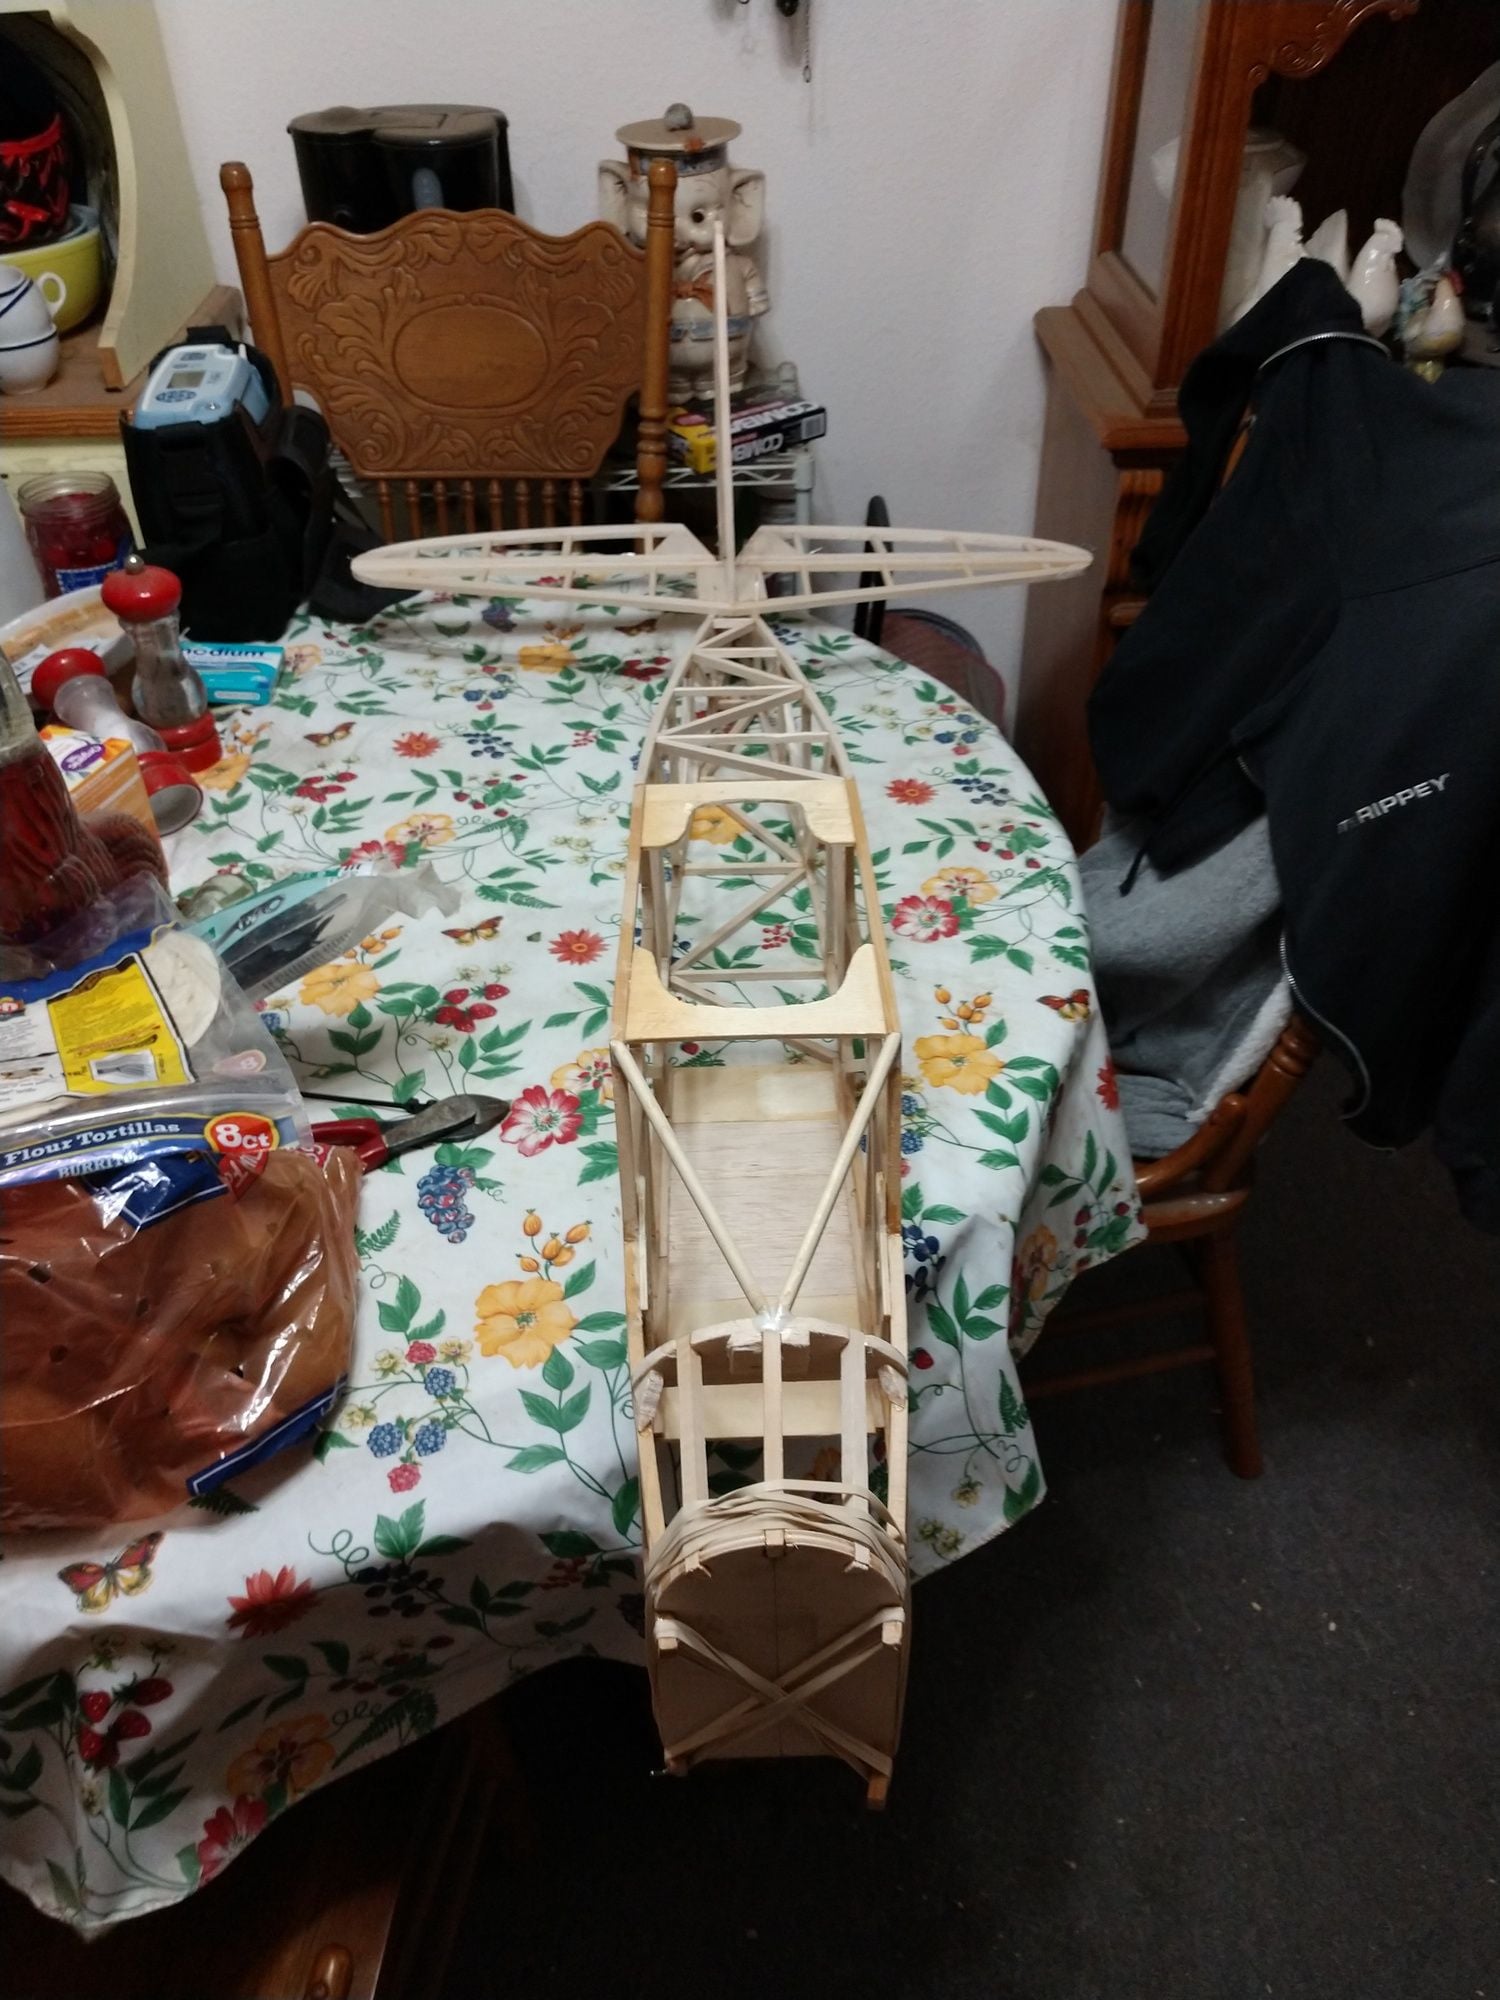
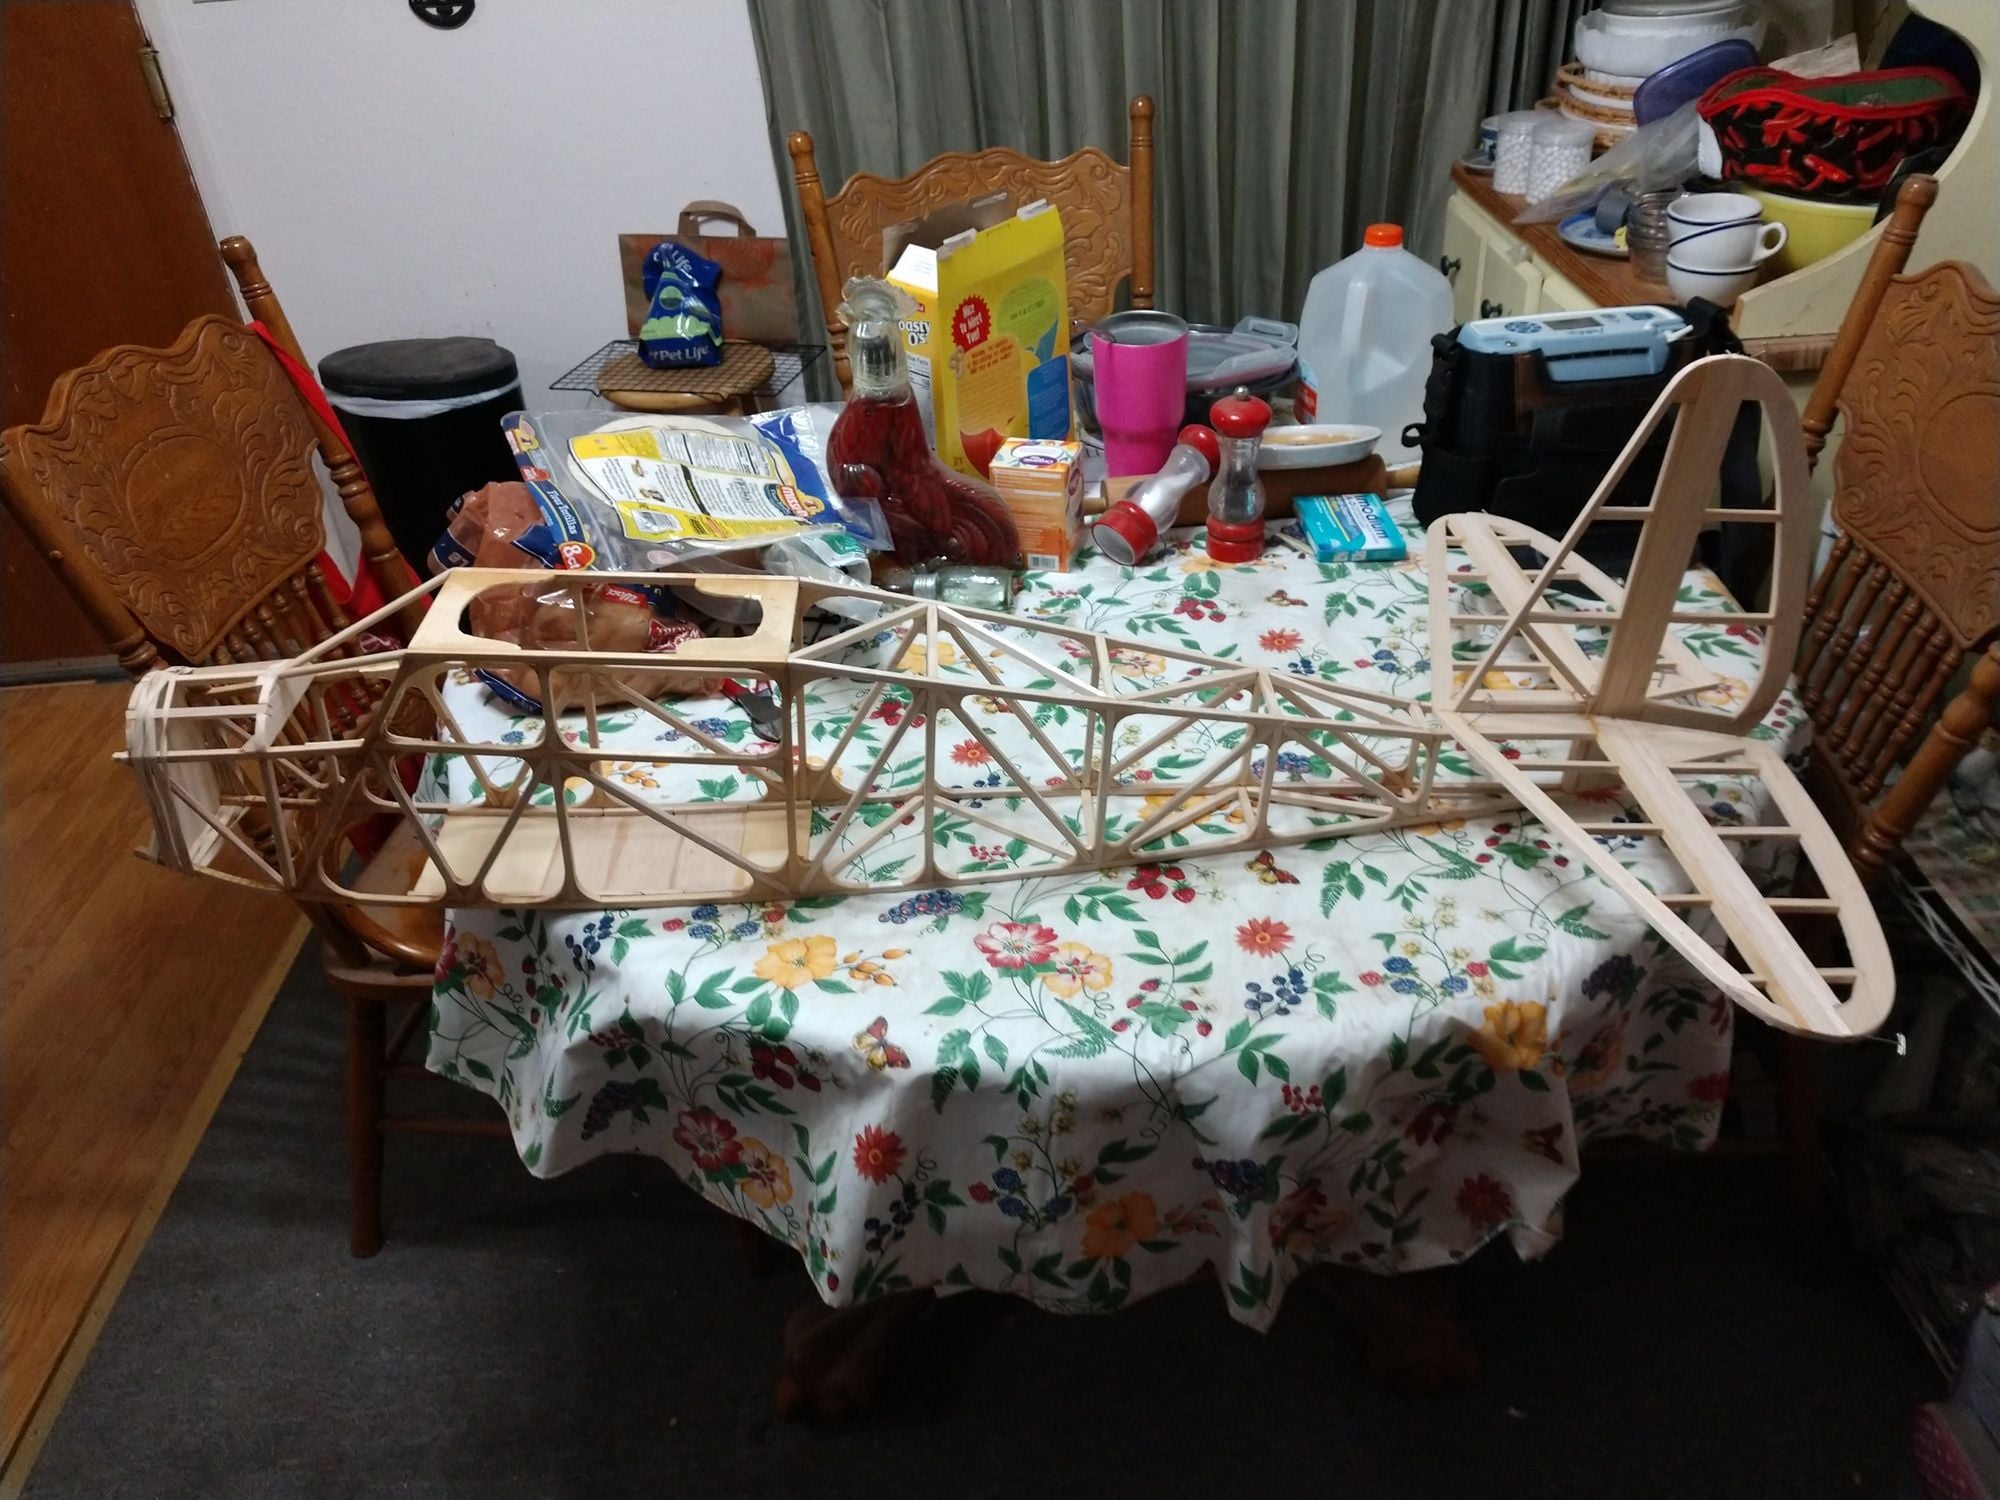
First my original Pacific Ace
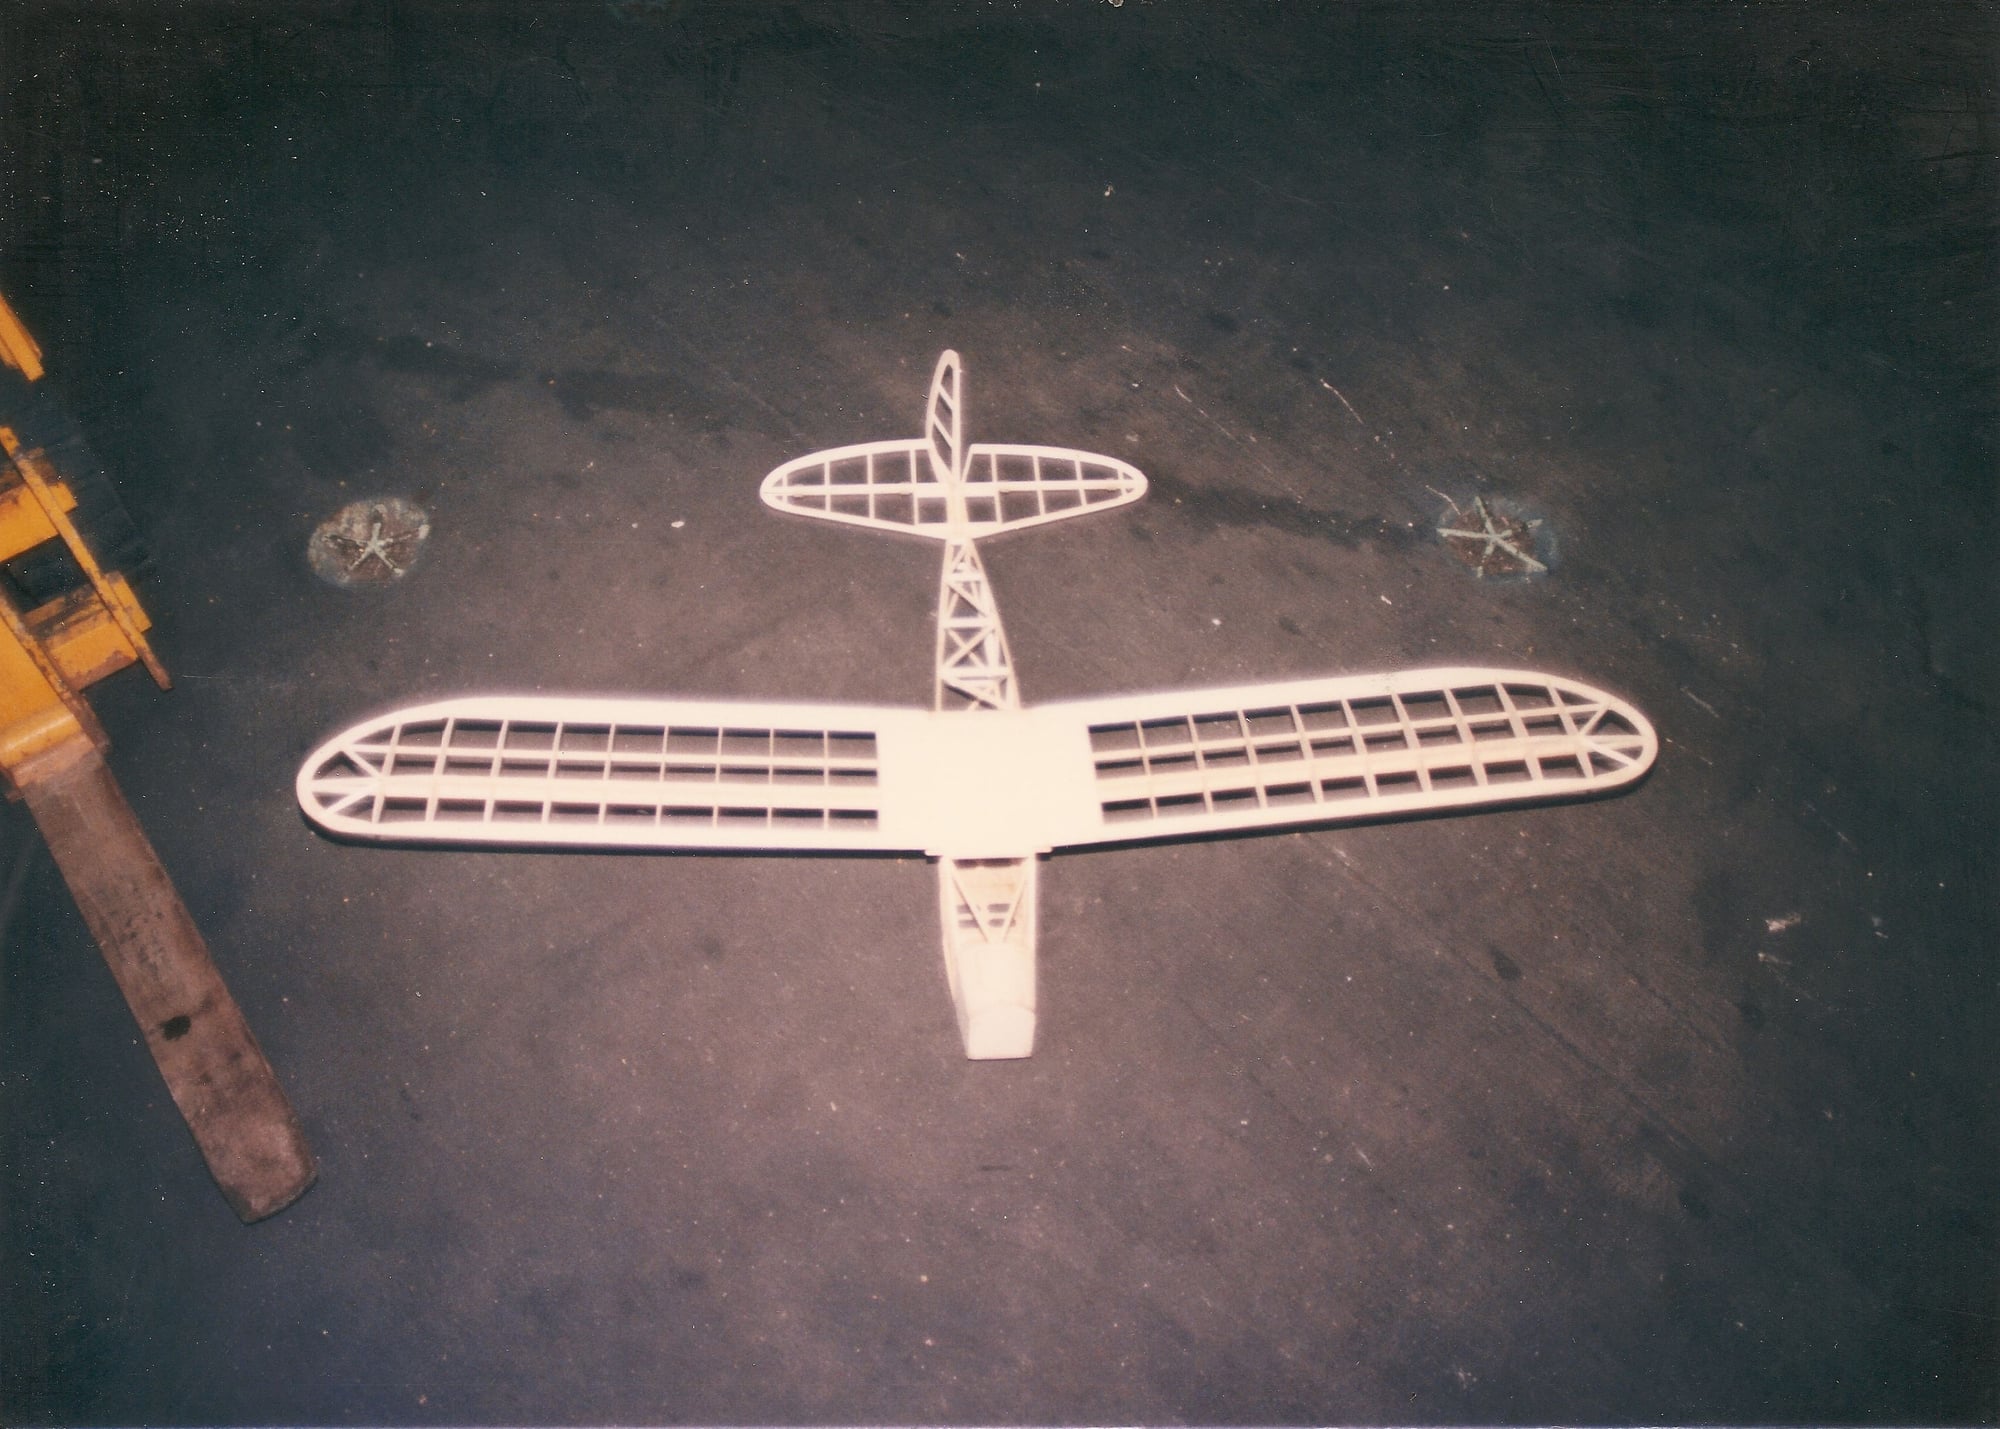
Assembled to this point swinging on the hook
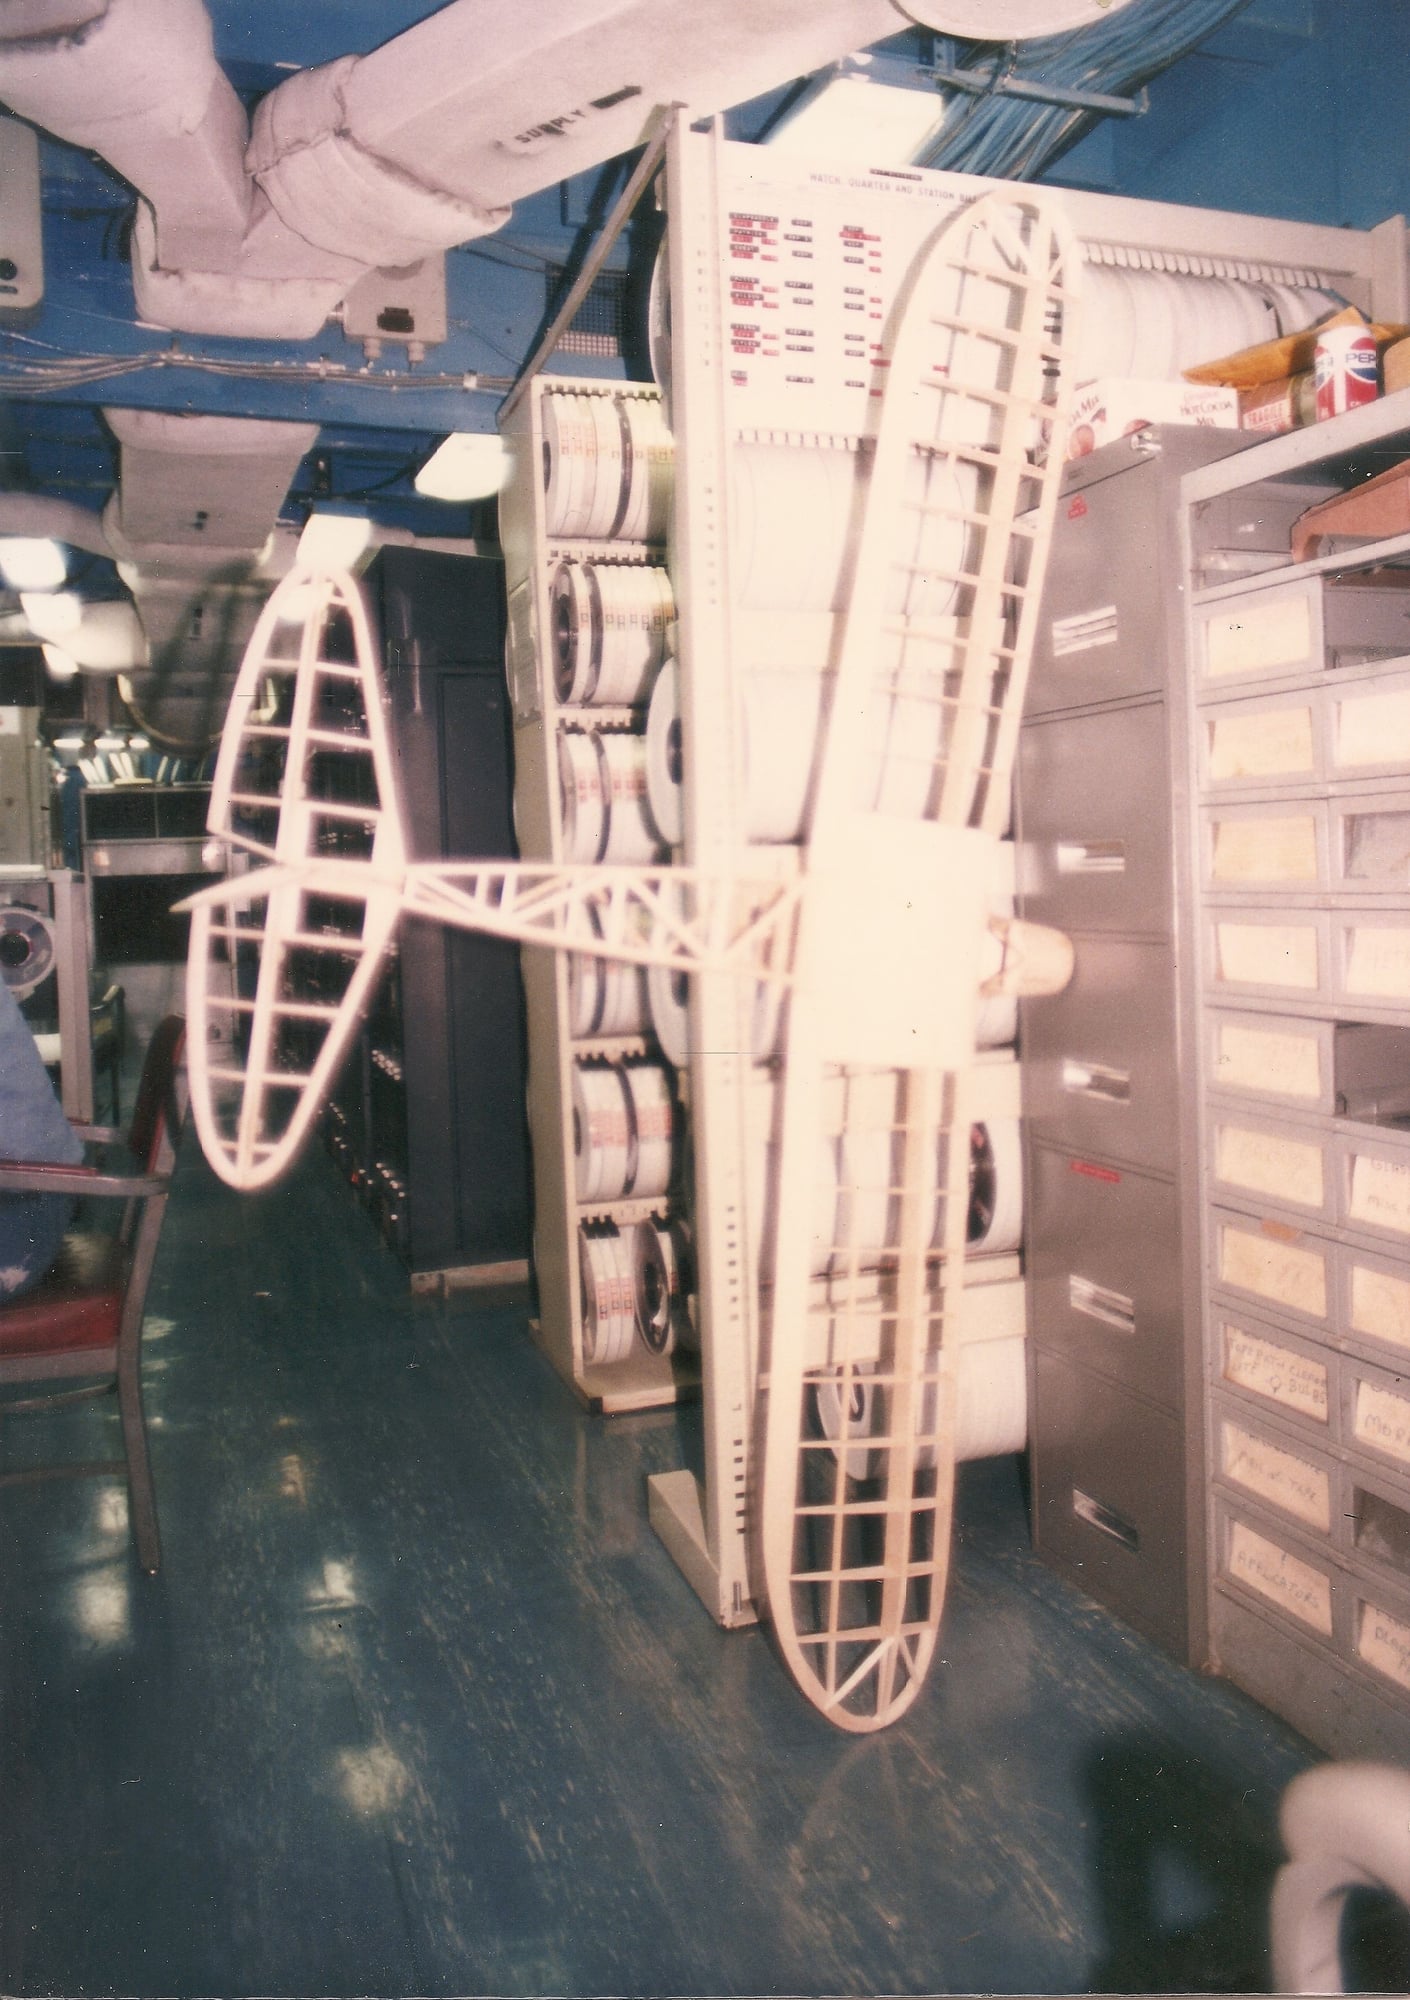
Assembled to this point swinging on the hook
Assembled to this point swinging on the hook
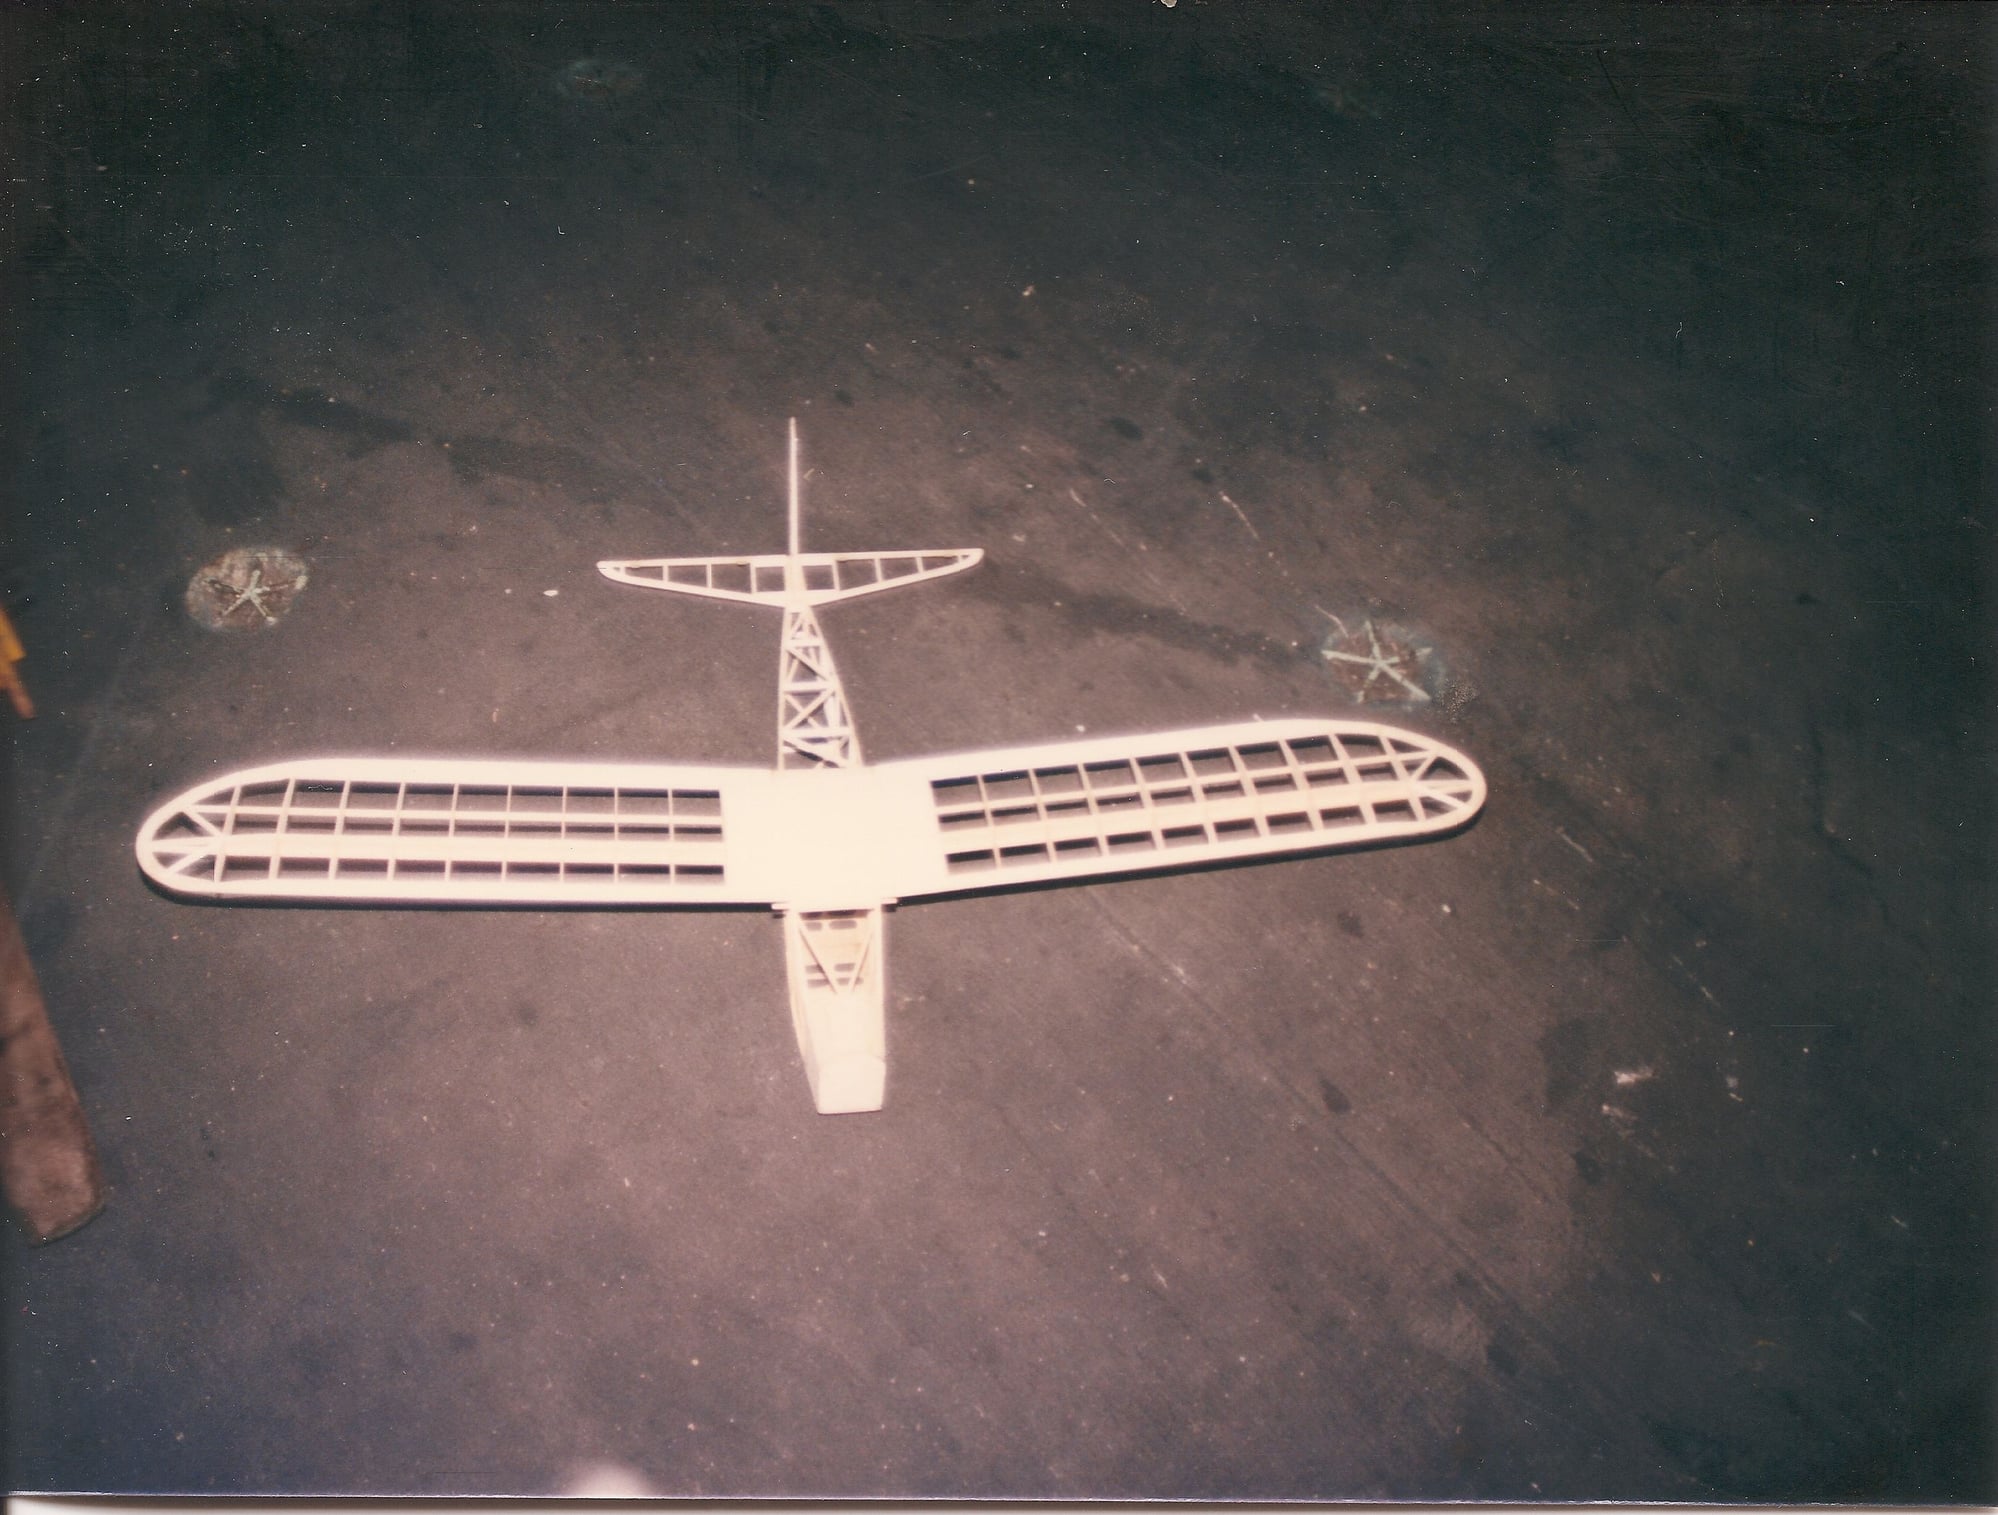
Finished at home in San Diego

Finished at home in San Diego
First my original Pacific Ace
Assembled to this point swinging on the hook
Assembled to this point swinging on the hook
Assembled to this point swinging on the hook
Finished at home in San Diego
Finished at home in San Diego

 12-28-2019, 08:52 PM
#4
Thread Starter
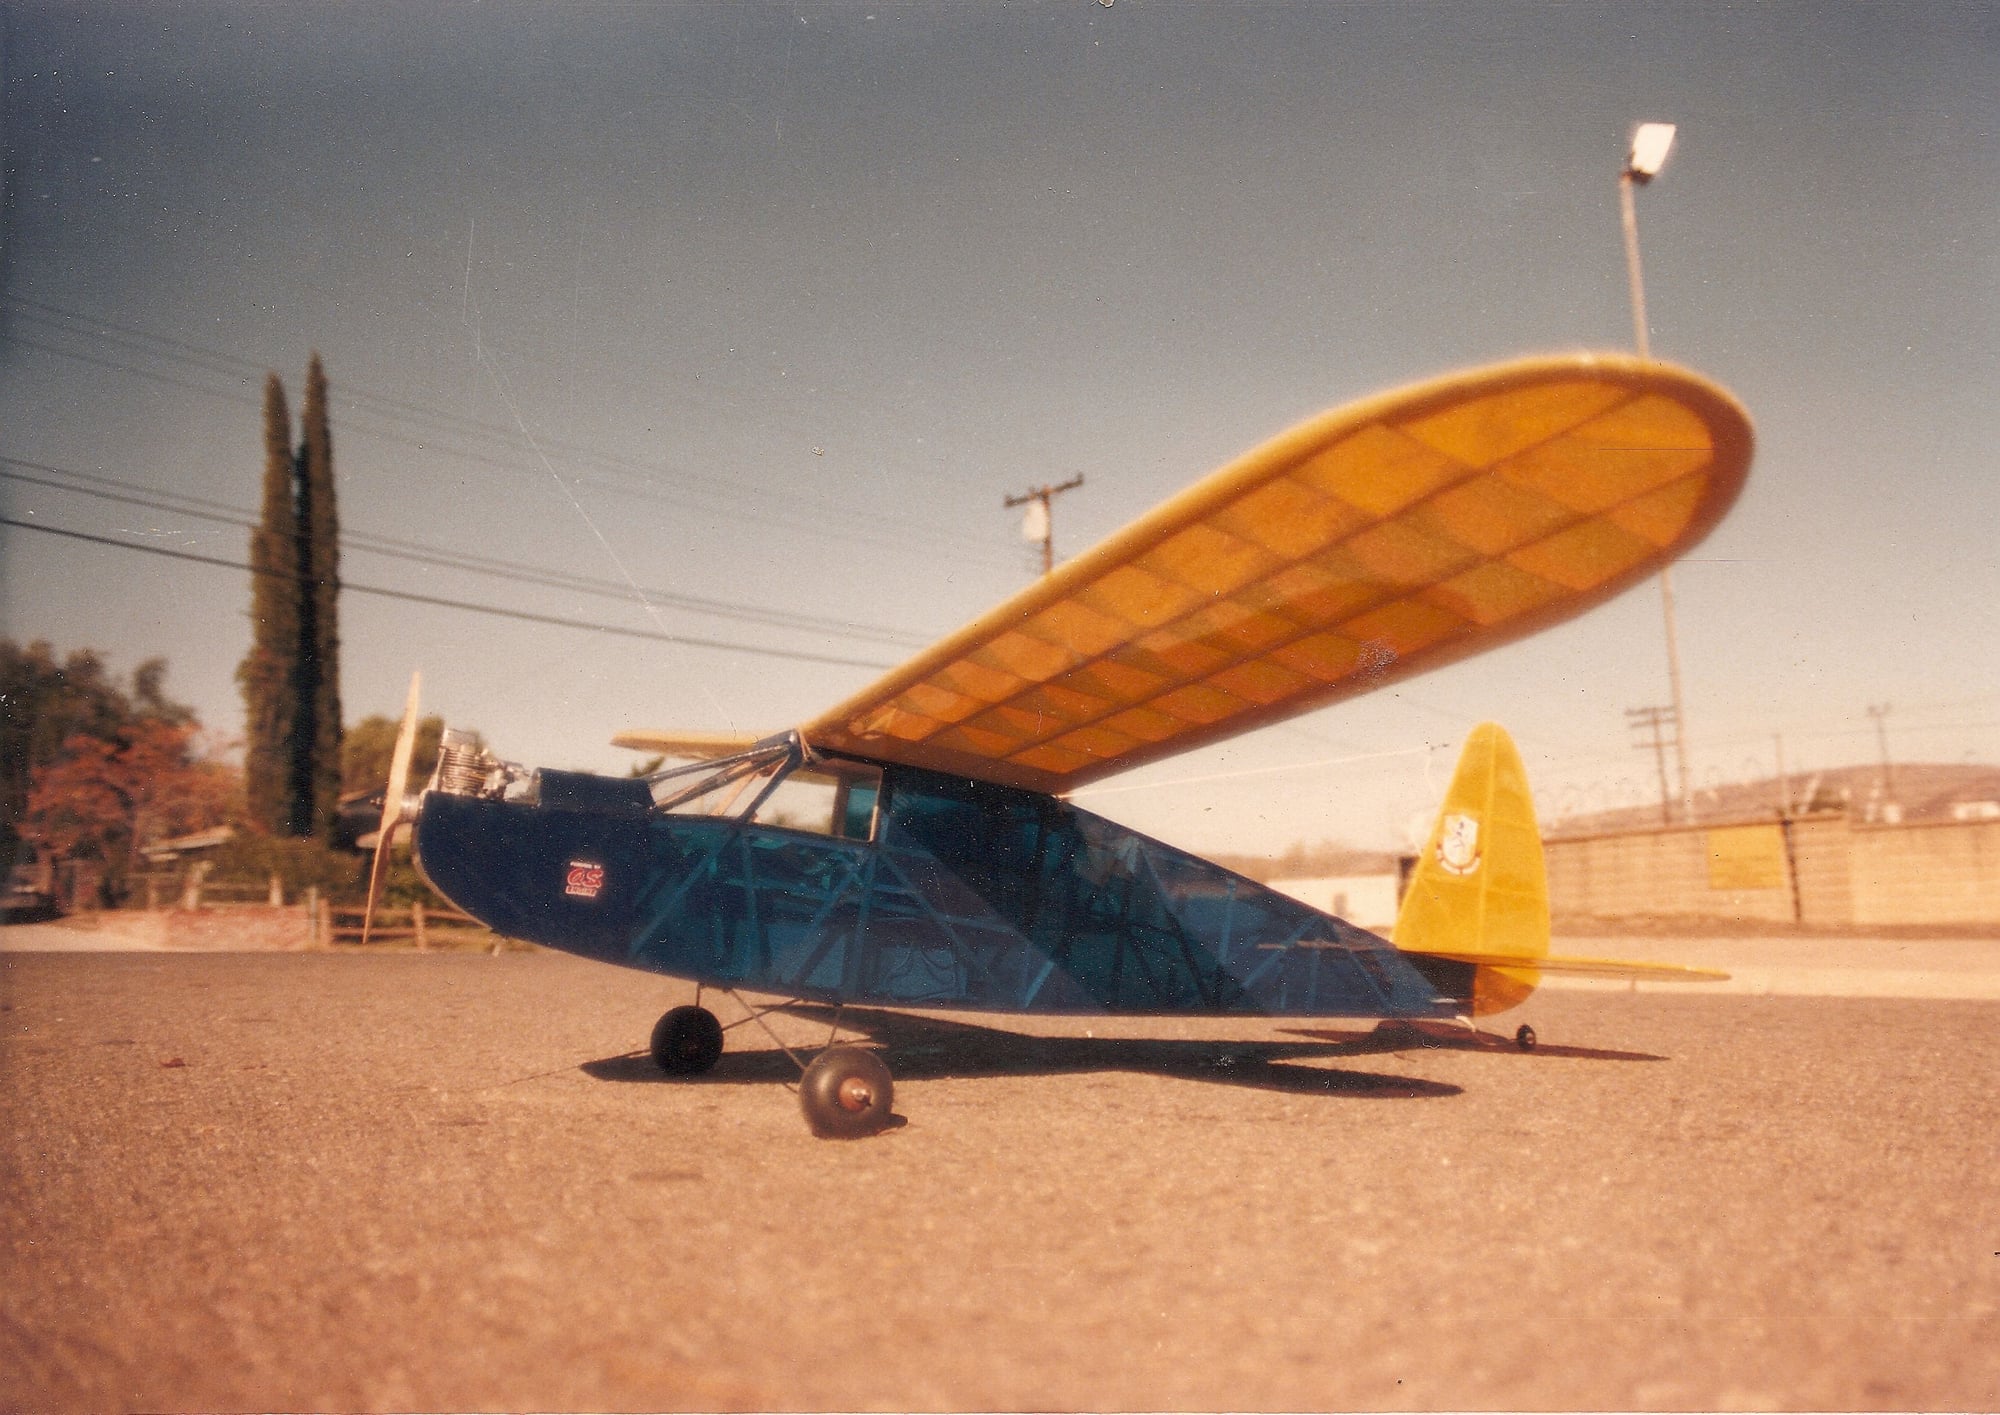
Forgot to mention power plants.
The original was powered with an os .20 four stroke. Really was a cute thing. Enough power to cruise at about 75% throttle.
The current build will use the engine from the plane I crashed. It is an os .25sf.
Ken
The original was powered with an os .20 four stroke. Really was a cute thing. Enough power to cruise at about 75% throttle.
The current build will use the engine from the plane I crashed. It is an os .25sf.
Ken
01-01-2020, 03:52 PM
#5
Thread Starter
Got some work time in today. Fair progress.
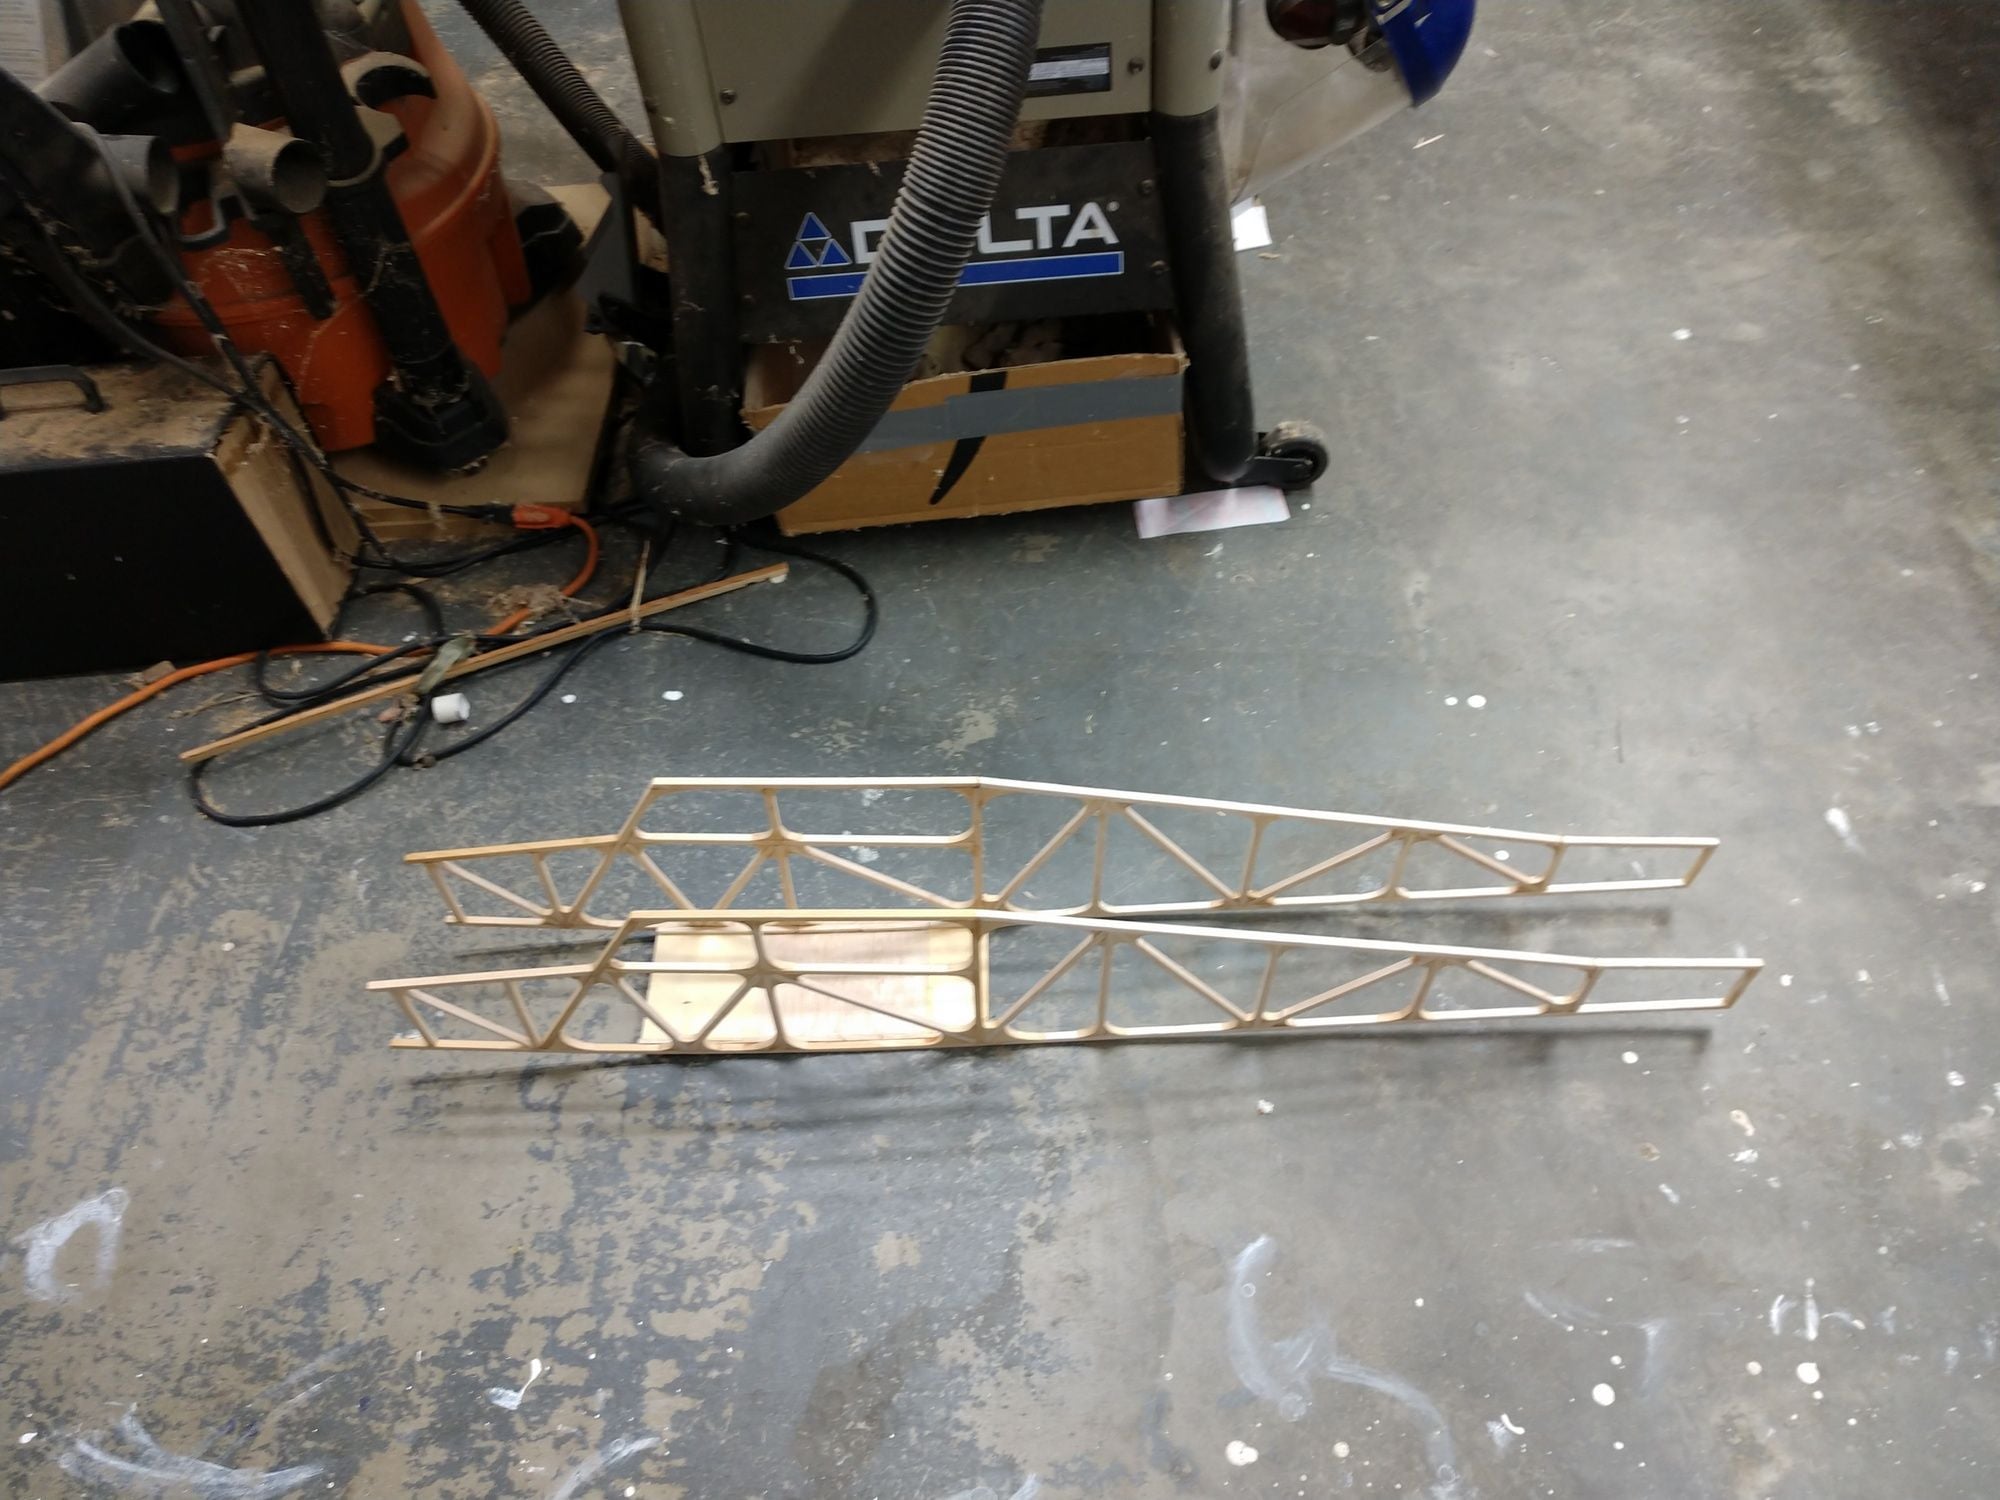
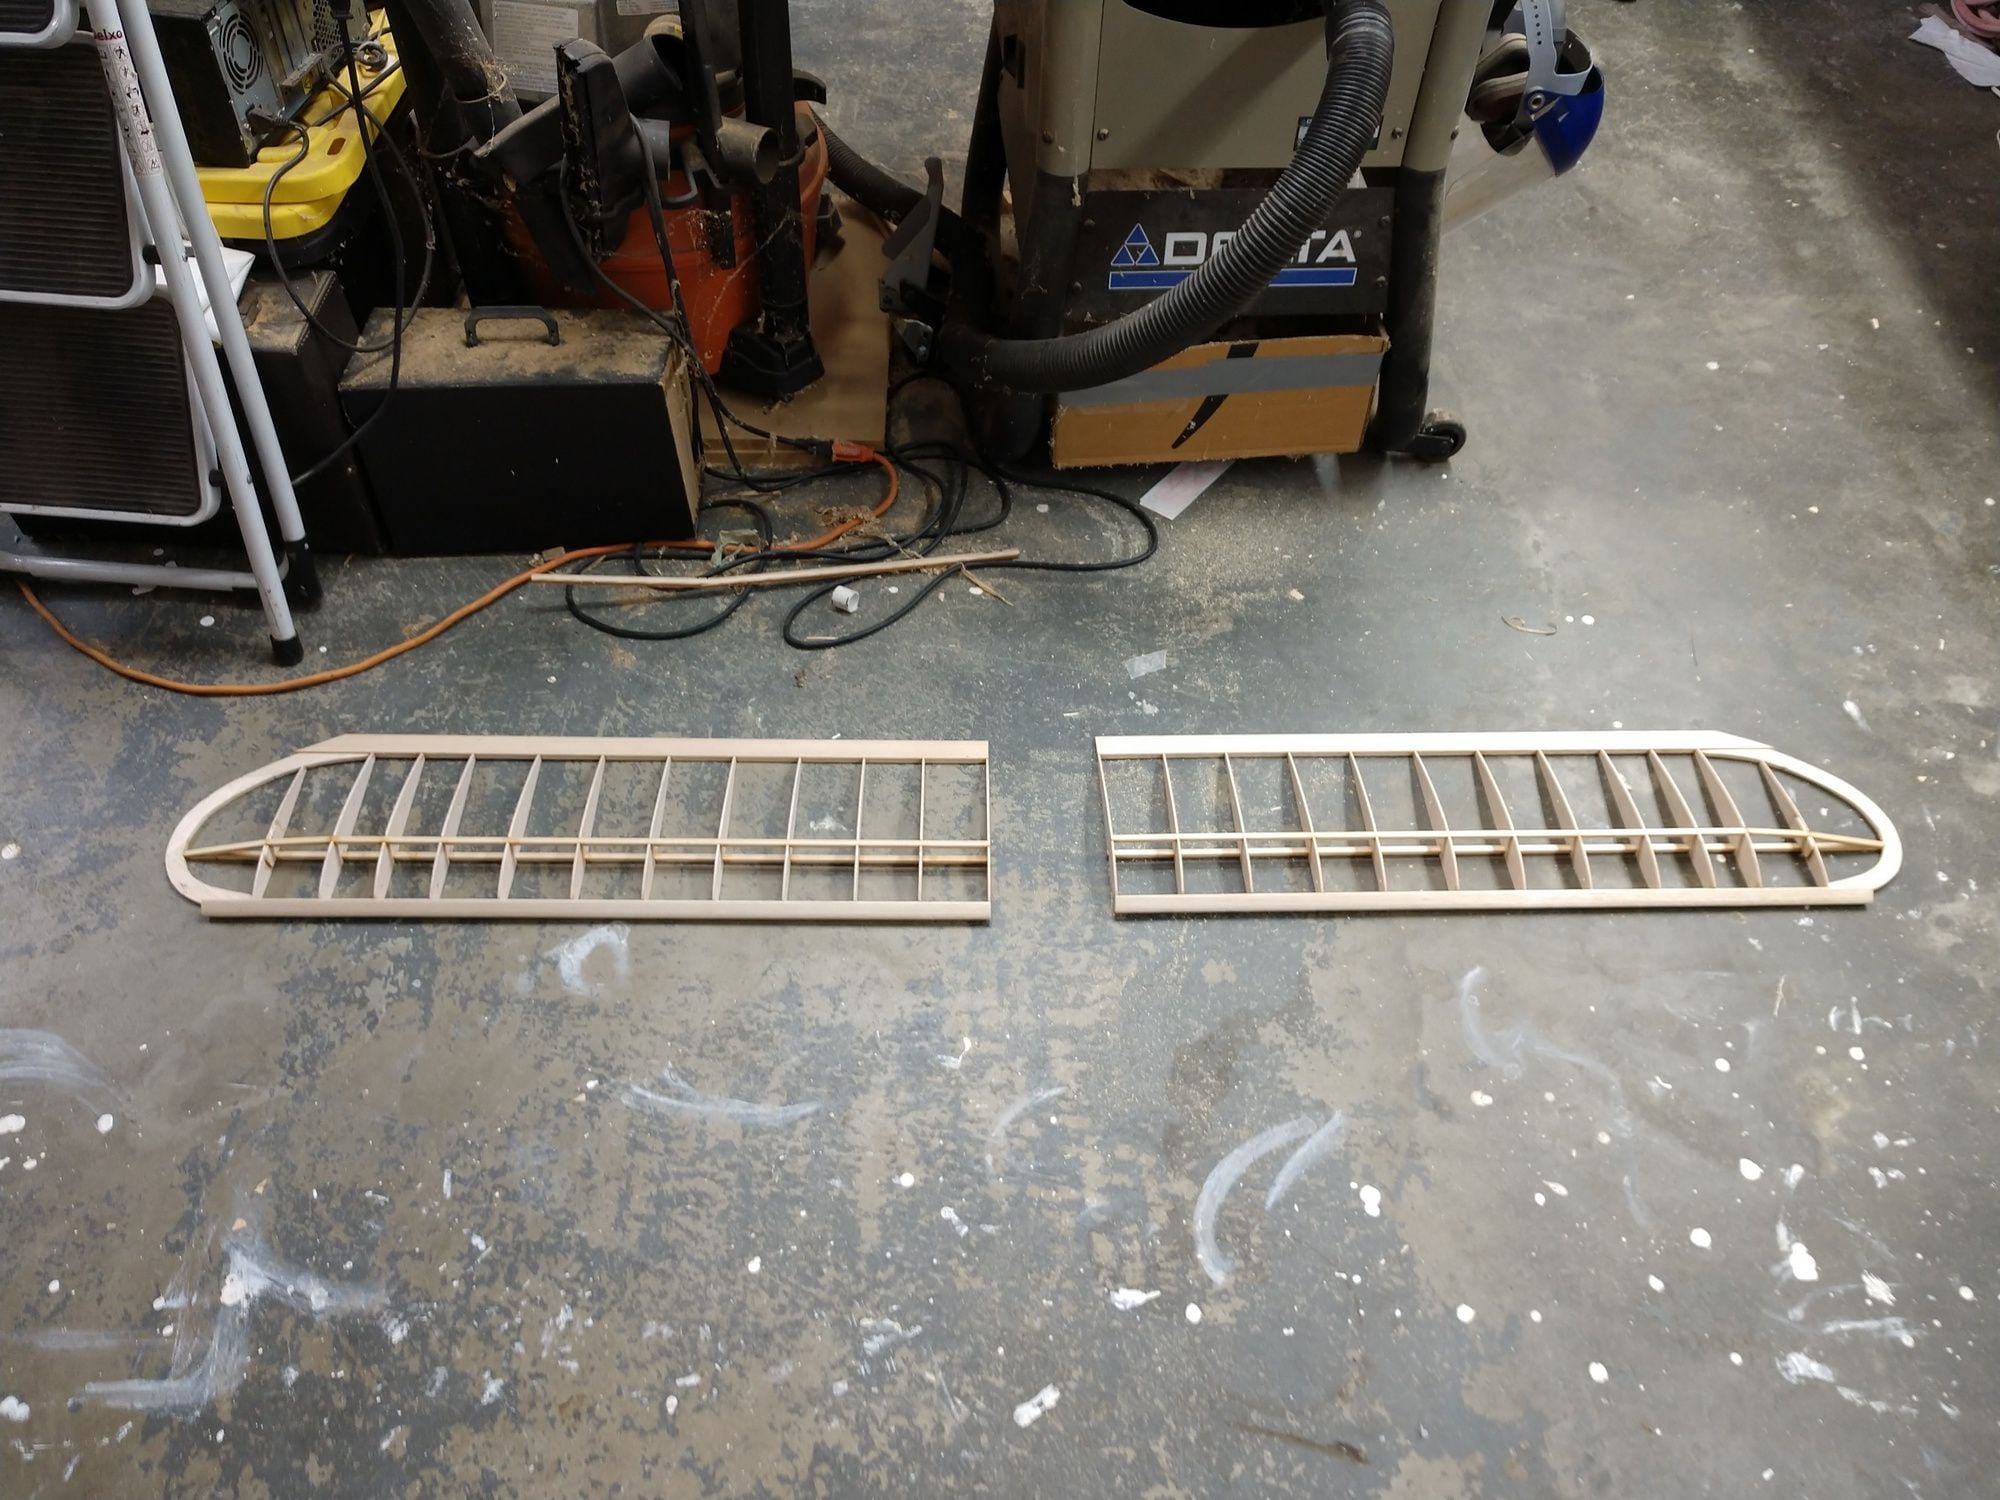
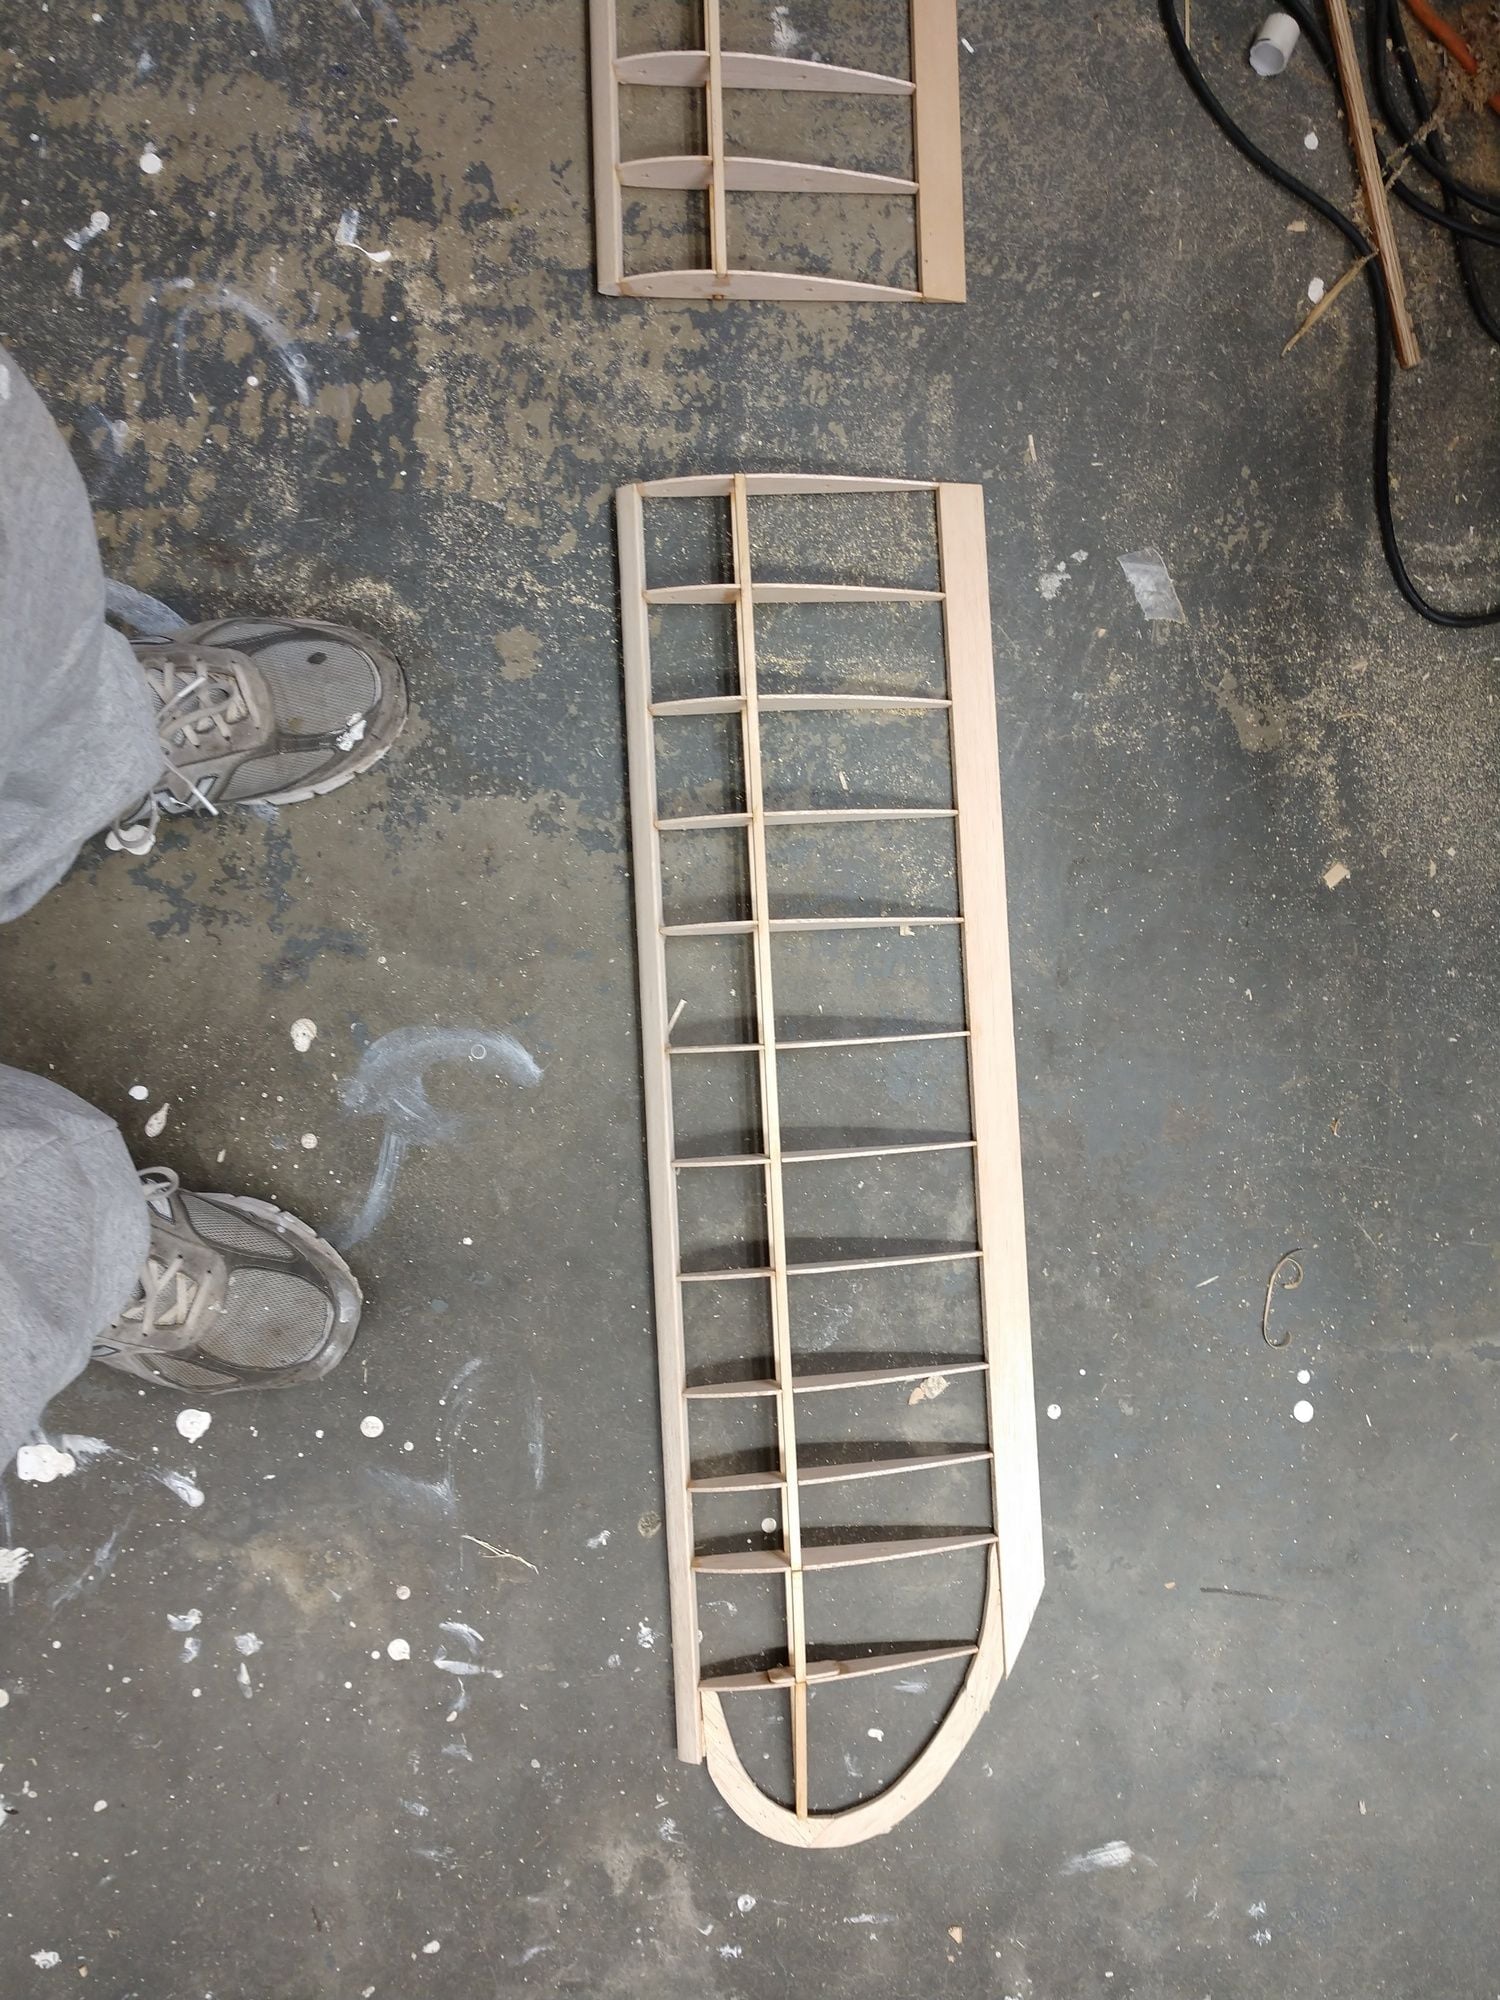
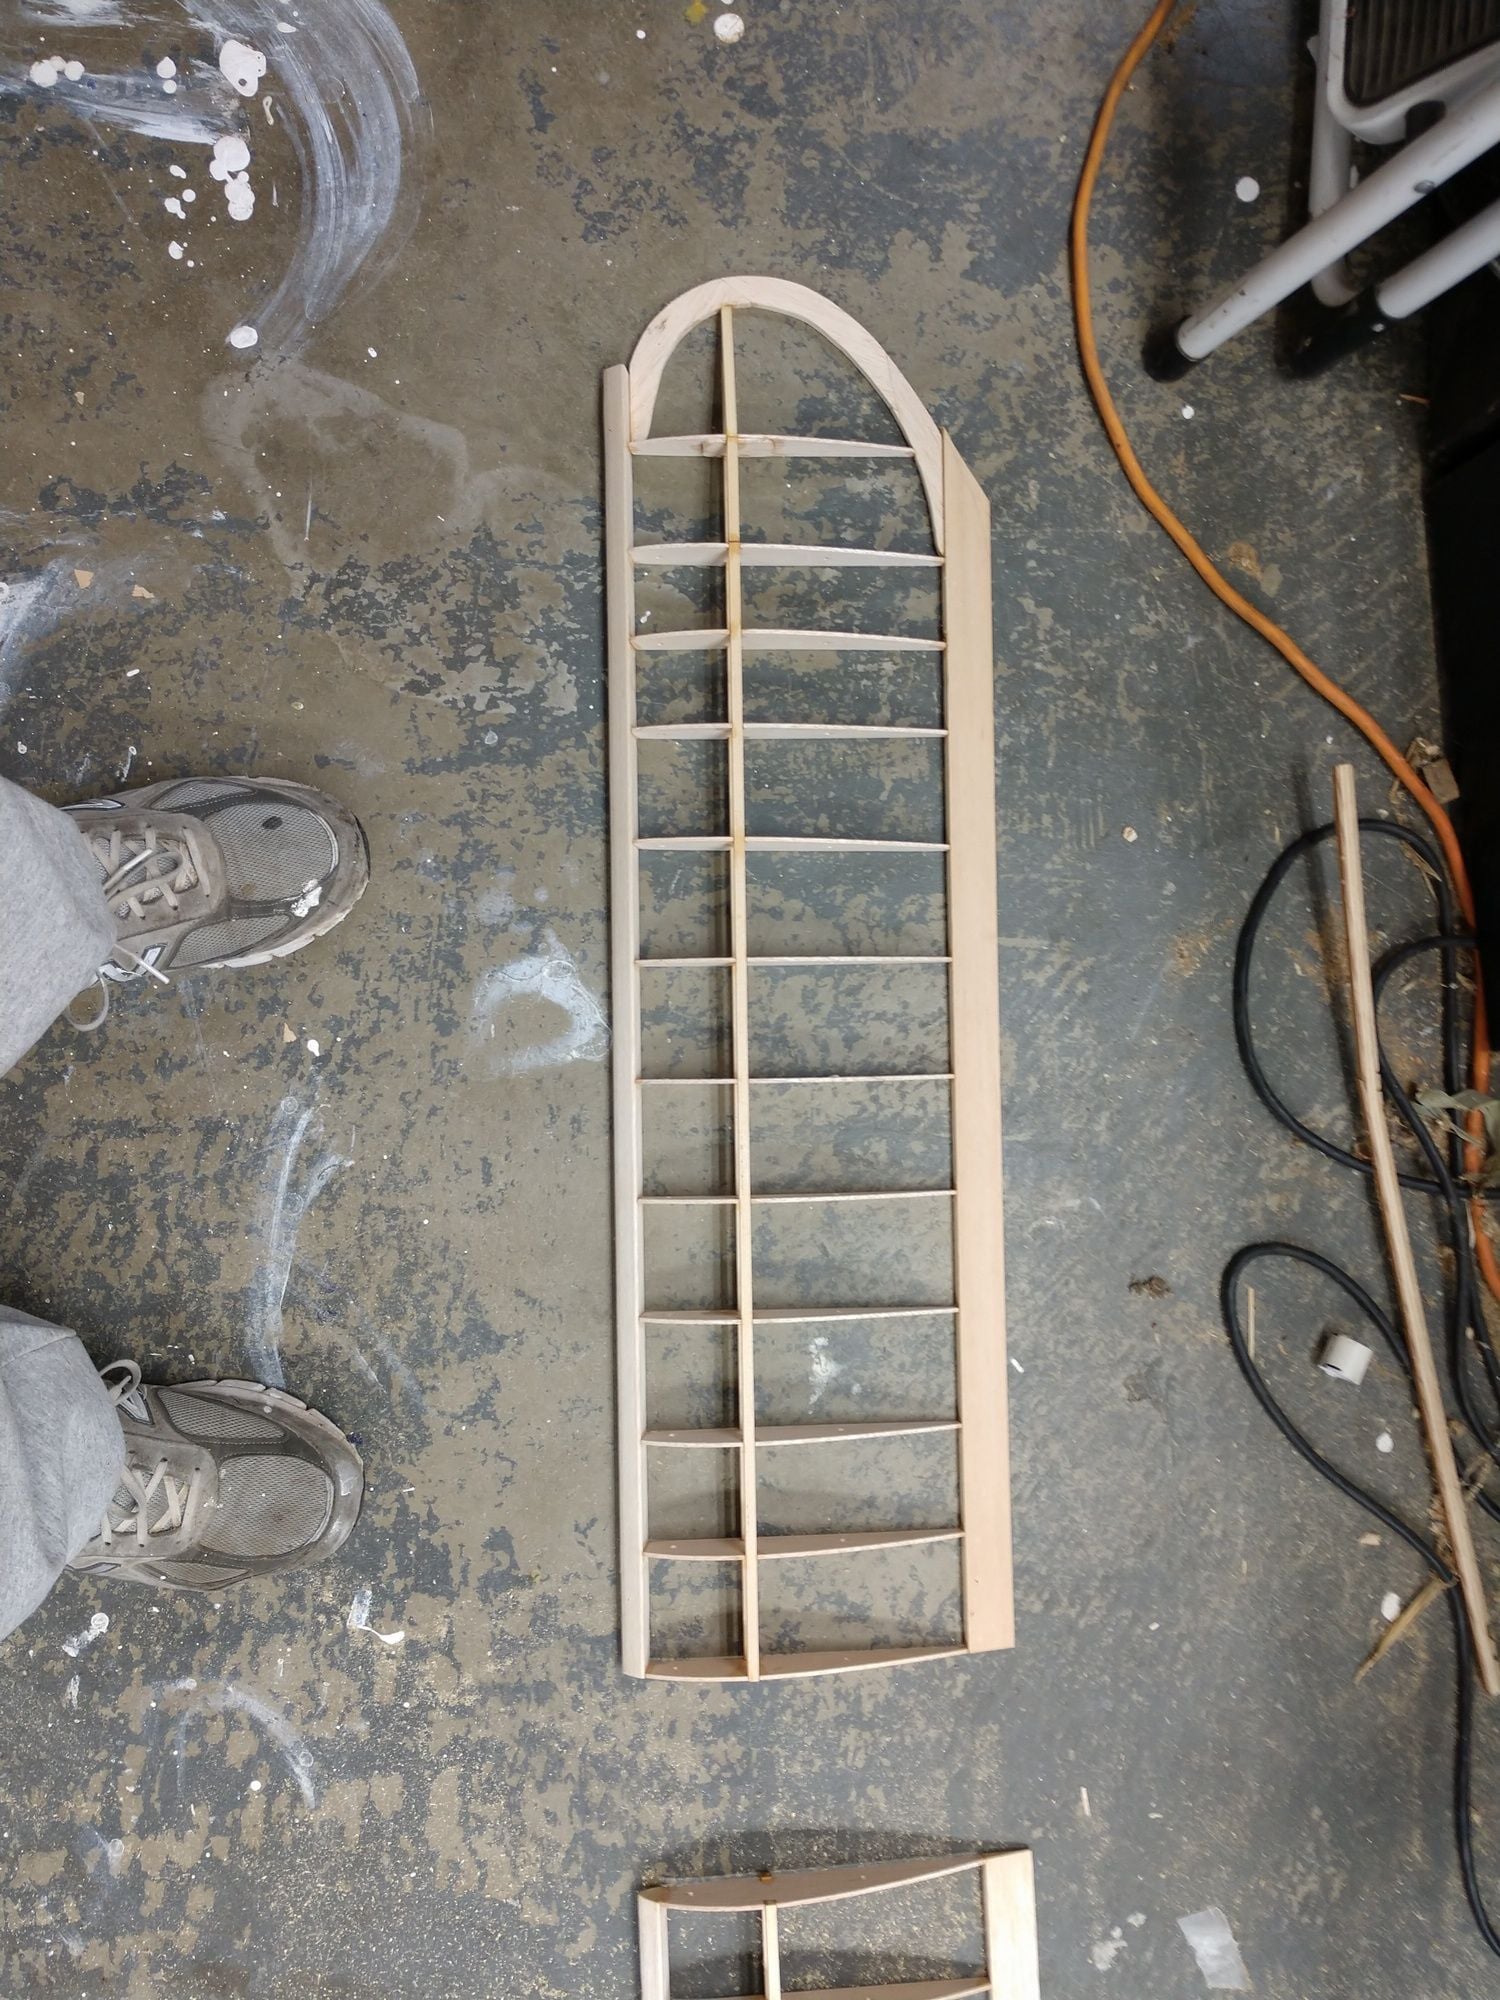
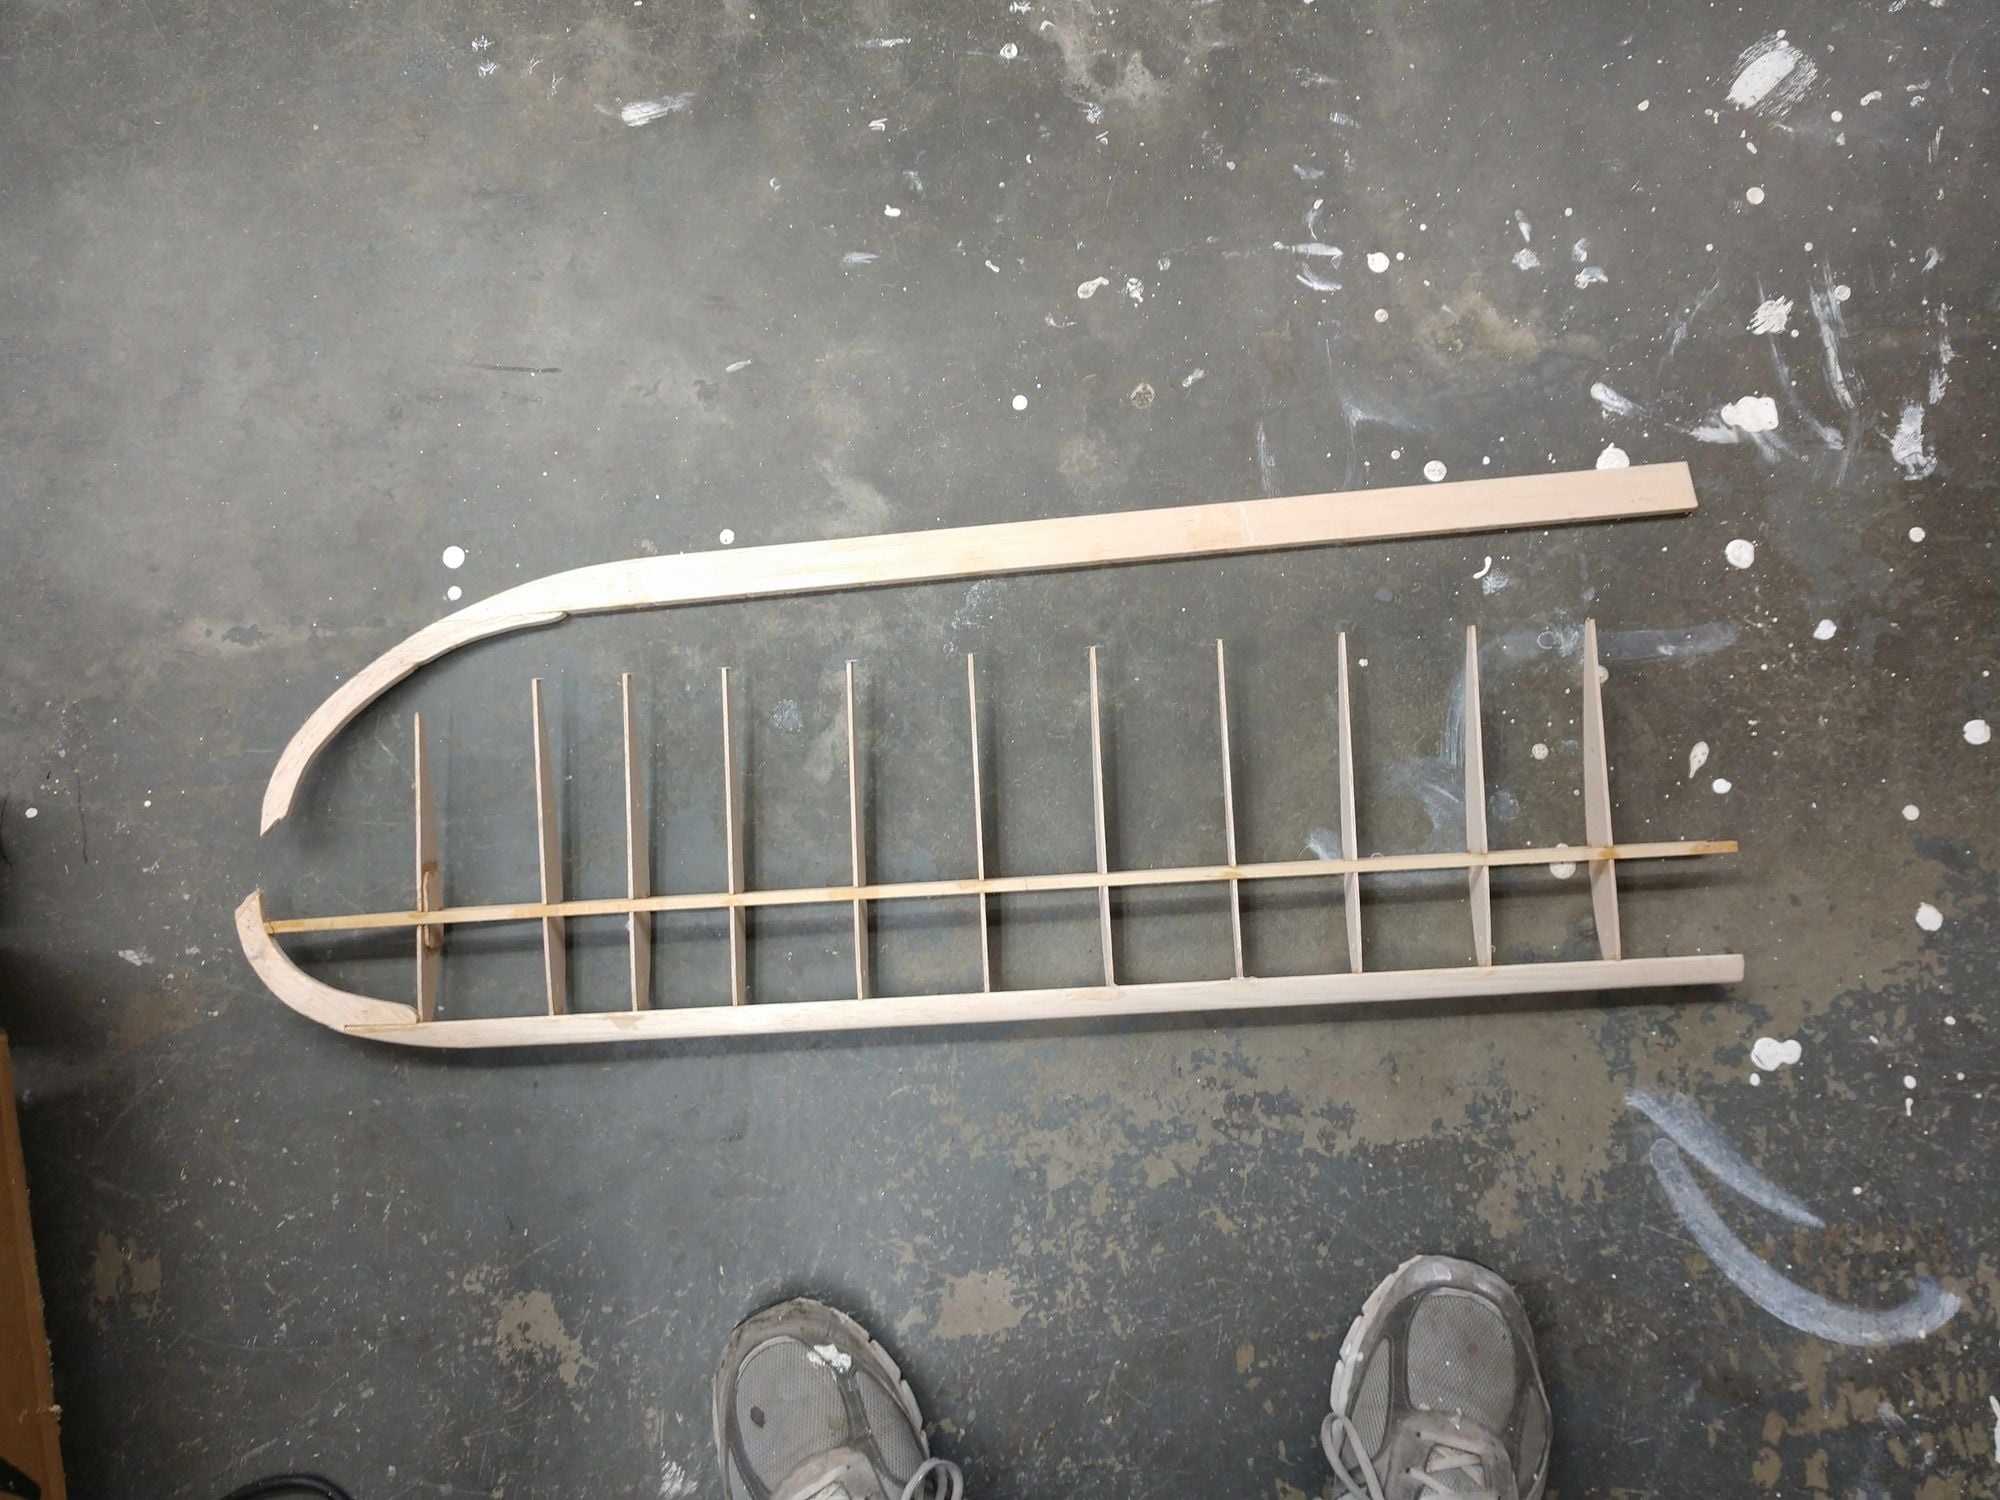
All the tail feathers are framed up.
Major task ahead are Building the wing tip bows, framing up the wings, and joining the fuse sides. I will frame up the wing panels on the table saw bed. Nice and true. But only 24" long, so will have to do in sections.
I have been back and forth in my head weather to laminate up the tip bows from thin stock or from sections of 1/4" like I did the tail feathers. to build up the tips I will have to make another 20 minute trip for wood. I will spend more on fuel driving for the wood than the dang wood cost. I drive a F250 diesel pick up. Paying 3.79$ a gallon. Dang me I knew I should have bought one more sheet
Ken.
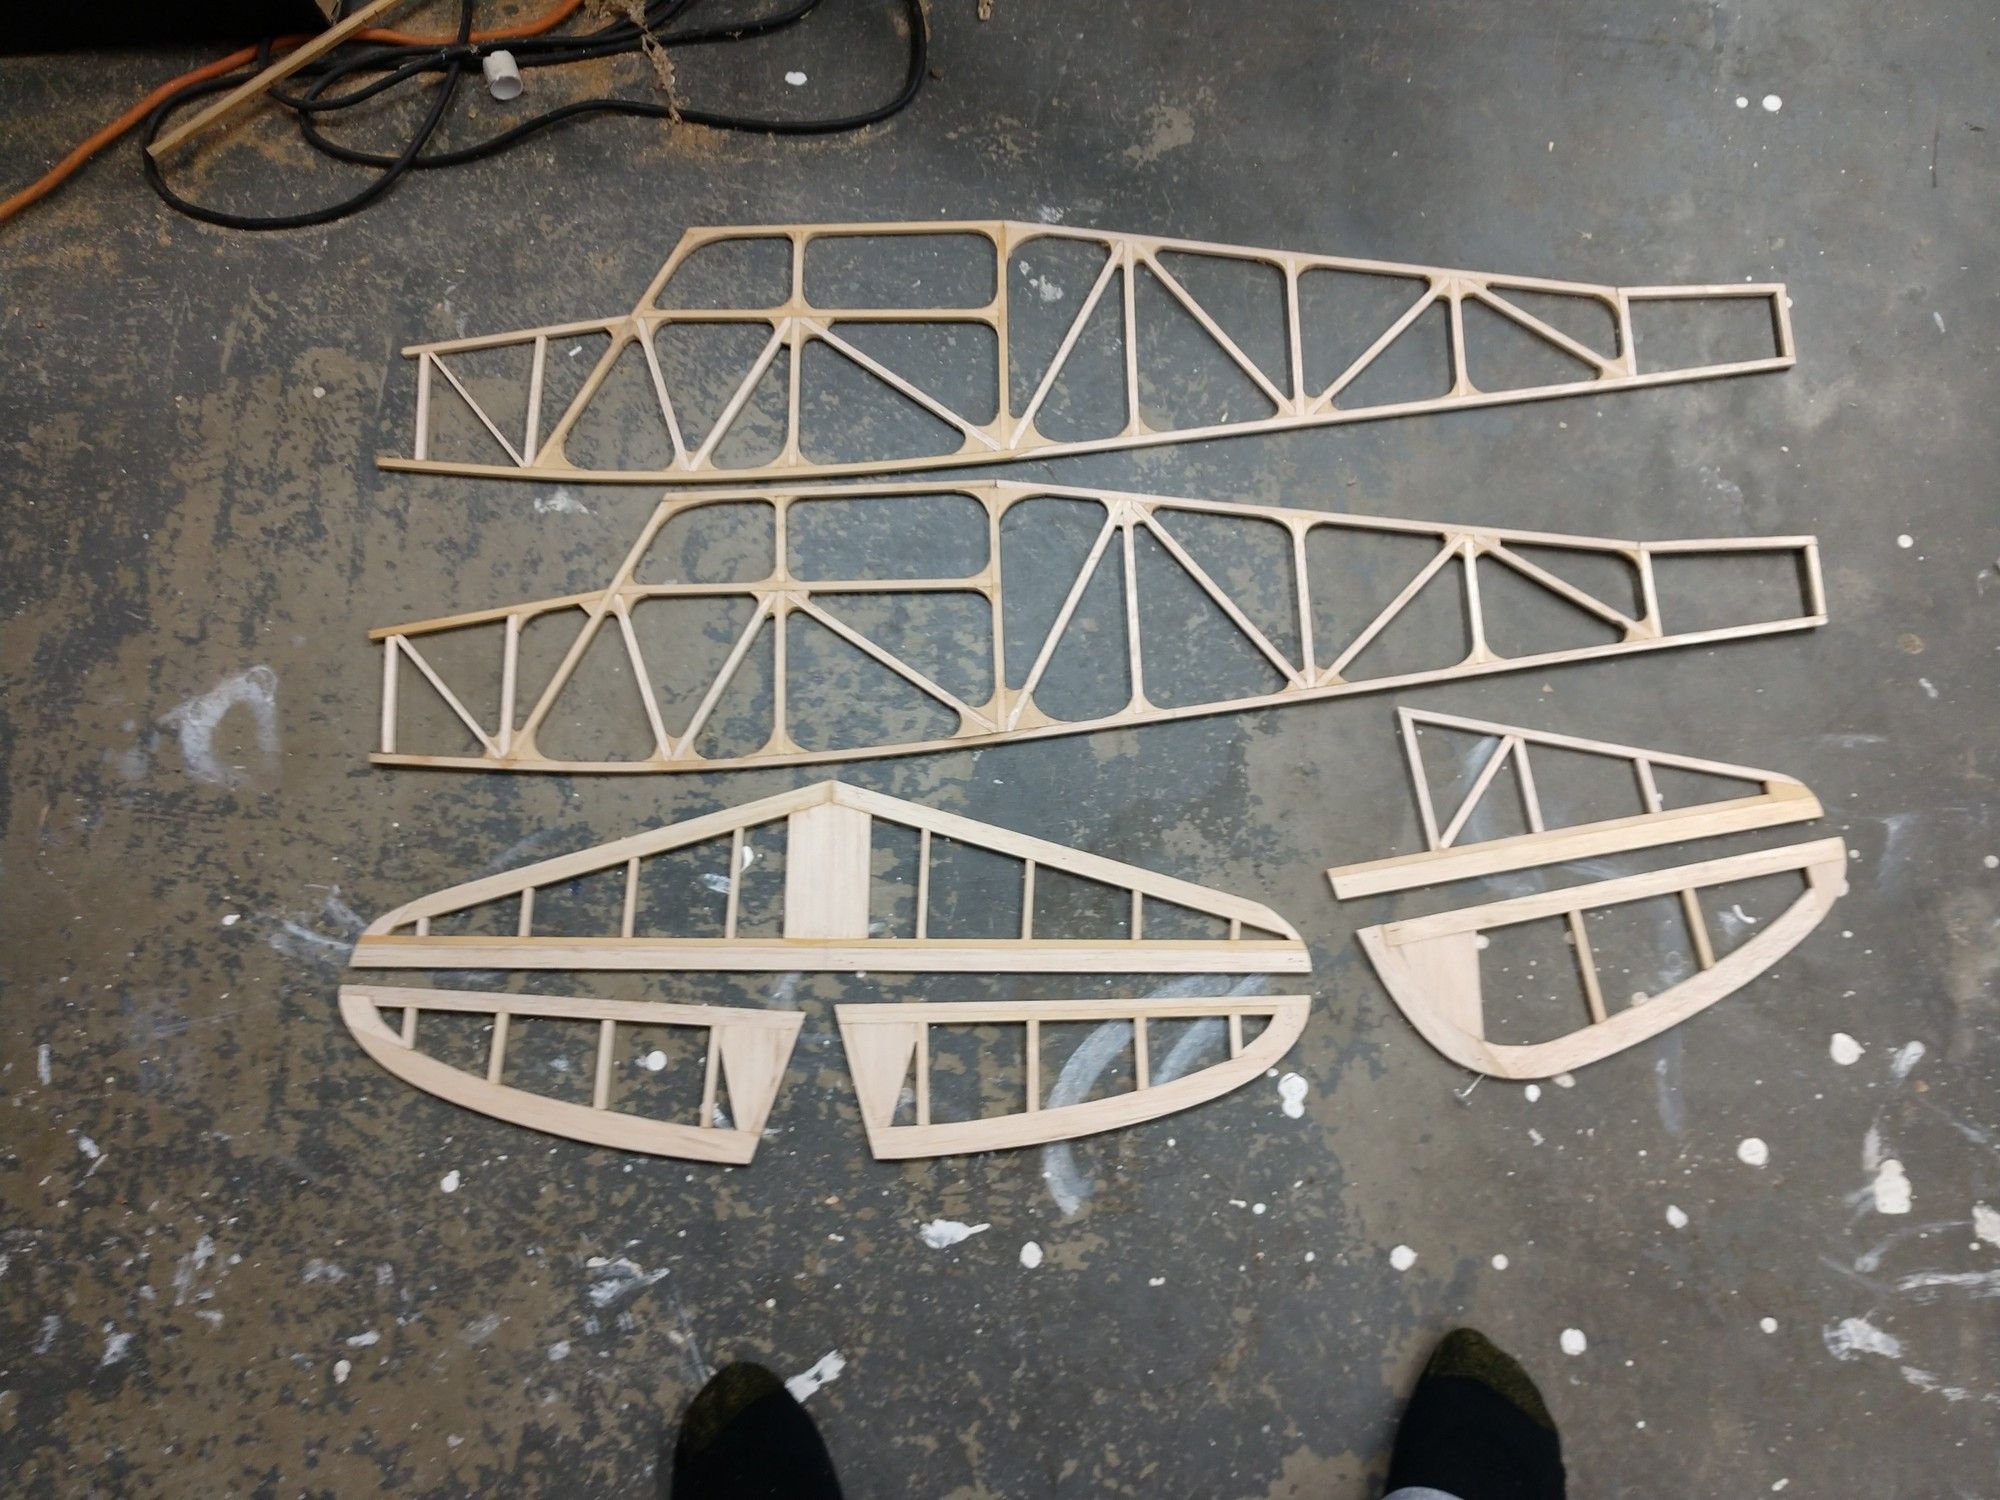
01-05-2020, 03:07 PM
#8
Thread Starter

Well here is today's progress. Not much, but my left hand is still very tender and weak. Wife said no more today.
Well the procedure went fine Friday. My hand actually stopped aching like it had received a hammer blow a few hours before. I asked that they not touch my left hand or even arm. The saw how swollen my hand was and hung a big re sign on my i.v. to the that effect. I thought all was cool at that point. Then they wheeled me into the room for the procedure, And the male nurse reached across me from my right side and grappled my left hand. I screamed it hurt so bad. Then a few minutes later the female nurse on the left reached for my left hand and actually took it by my thumb. Another pain scream and I buried my head while tears I had no control over flowed. She wiped my face and rubbed my cheek. The Dr Order everybody in their to not touch me on the left and to support my left hand on pillow with another blocking it. The Gave me a dose of pain med thru my i.v. Asked how that was, I told him it still was not helping, then gave some more and let's just say I was a very happy camper at that point.
But JEEZE, can you believe just how dense they 2 nurses were? I hope after I was out of the room the DR tore them a new one, but good. No excuse for that.
They DR. said I would need to wait another day before restarting my anti inflammatory again.
So swelling is down. But hand is still not real useful other than as a fancy paper wight. So that is all that will get done for a bit.
So next I have to make the center section ribs that will get the center section sheeting, and the 2 tip ribs.
Then joining the fuse half's and building the wing panels.
Ken
01-08-2020, 06:32 PM
#9
Thread Starter
My hand is doing good now, Almost back to the same condition as before.
Wanted to work on the bird yesterday but the day was tied up with Dr apps. for both me and my wife. And since she doesn't drive if she has something, then I got something.
So I got some time on the Pacific Ace today.
Took 2 hours for my heater to get the garage comfortable to work in. Fogy for half the day.
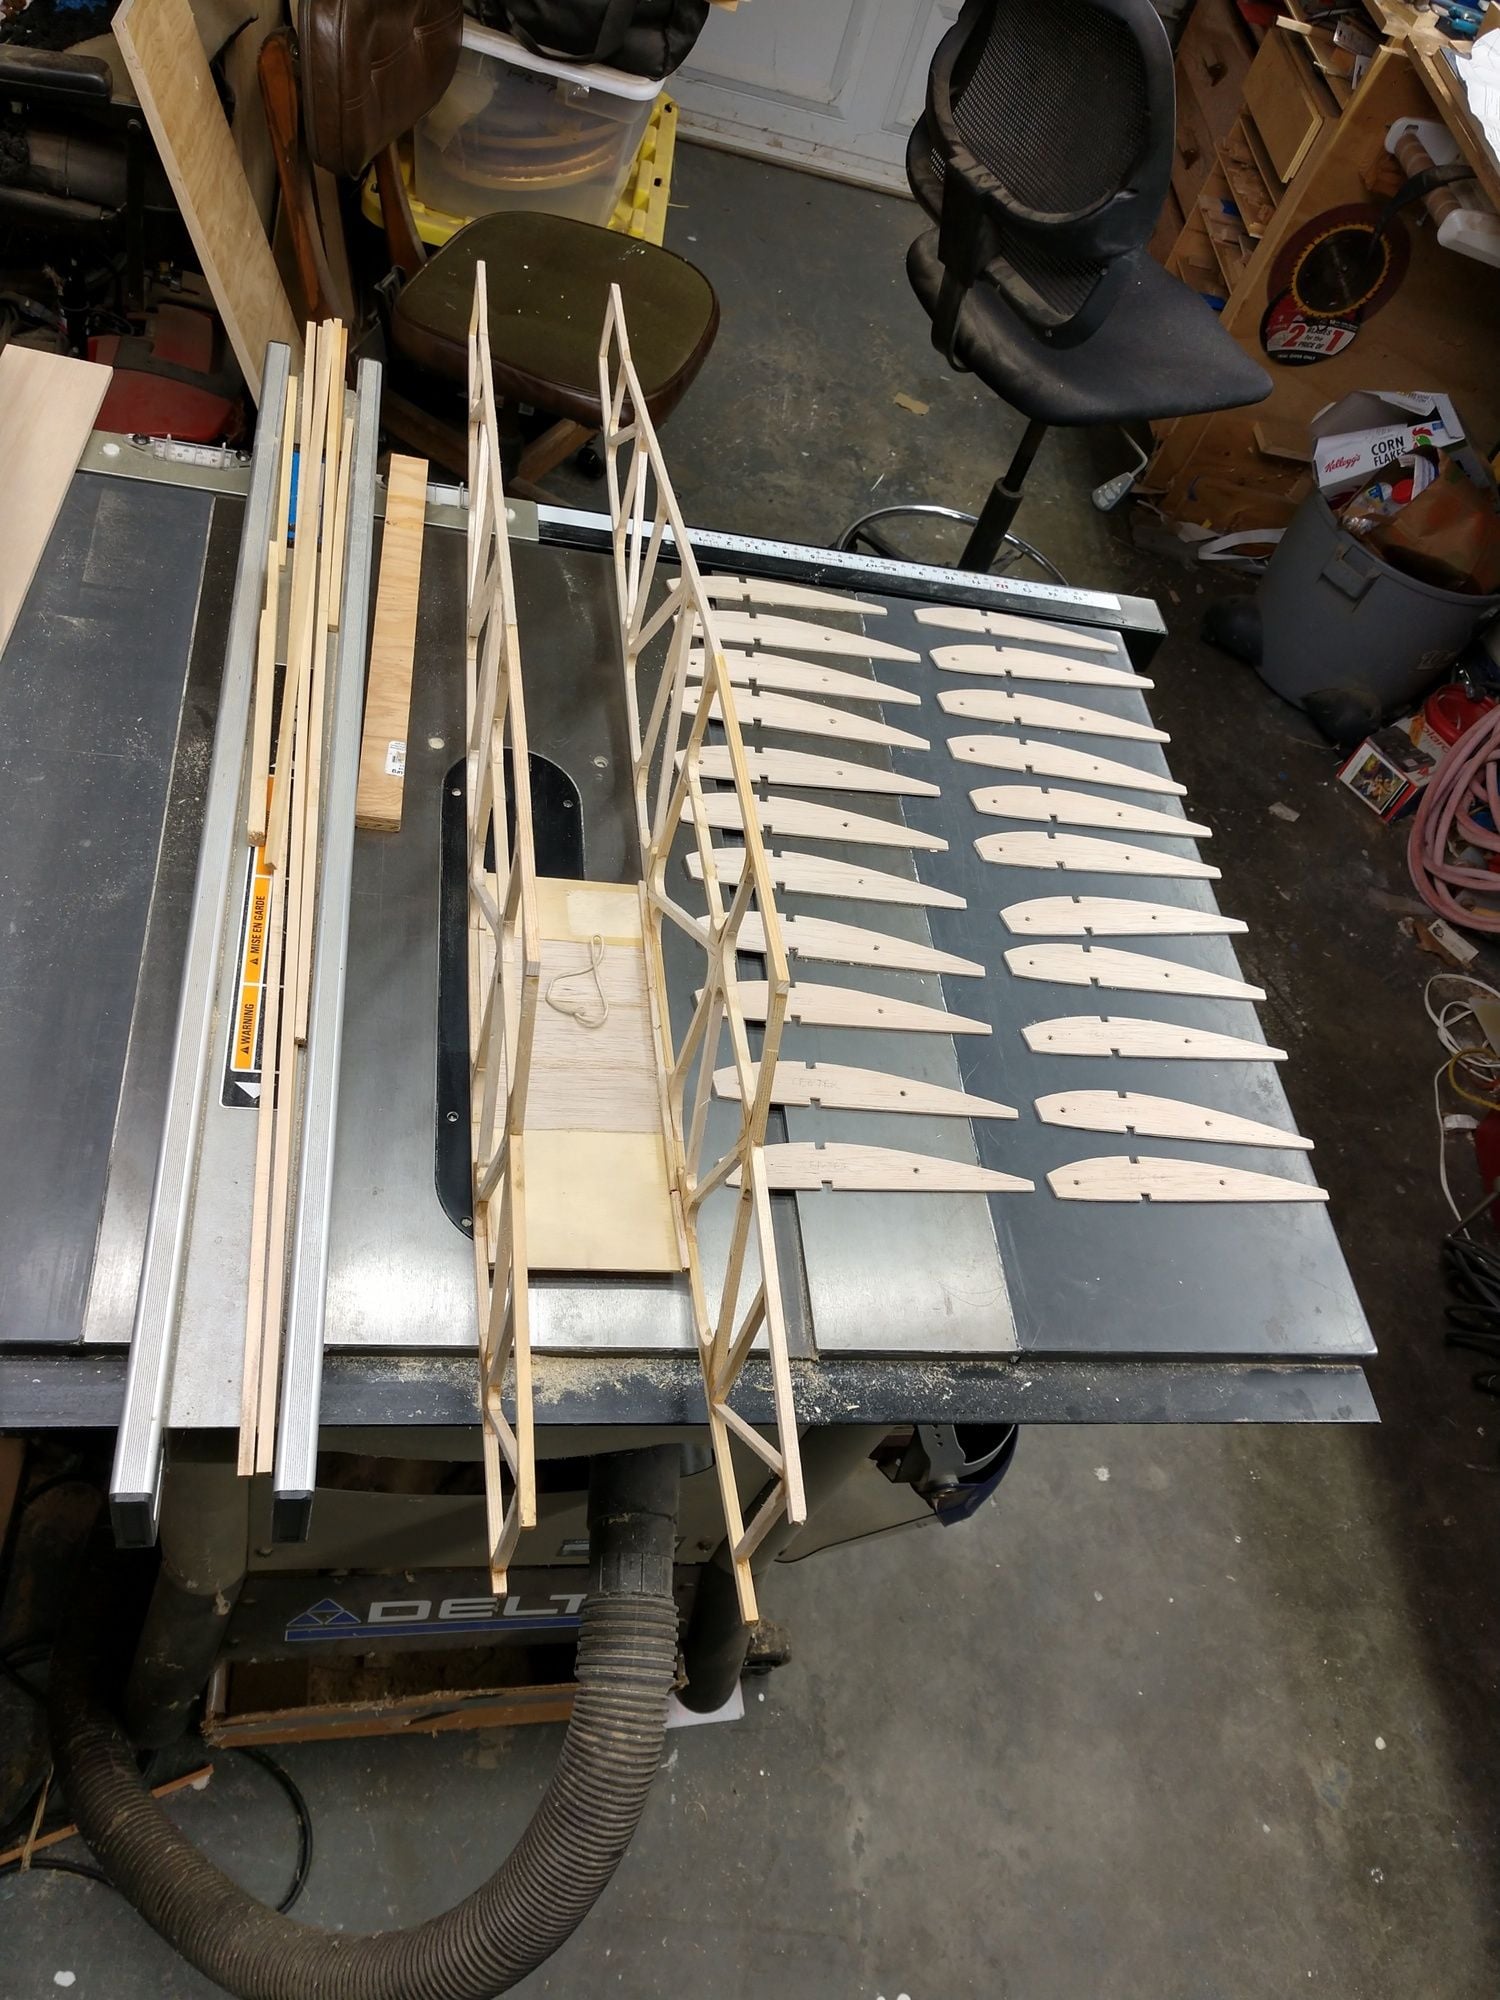
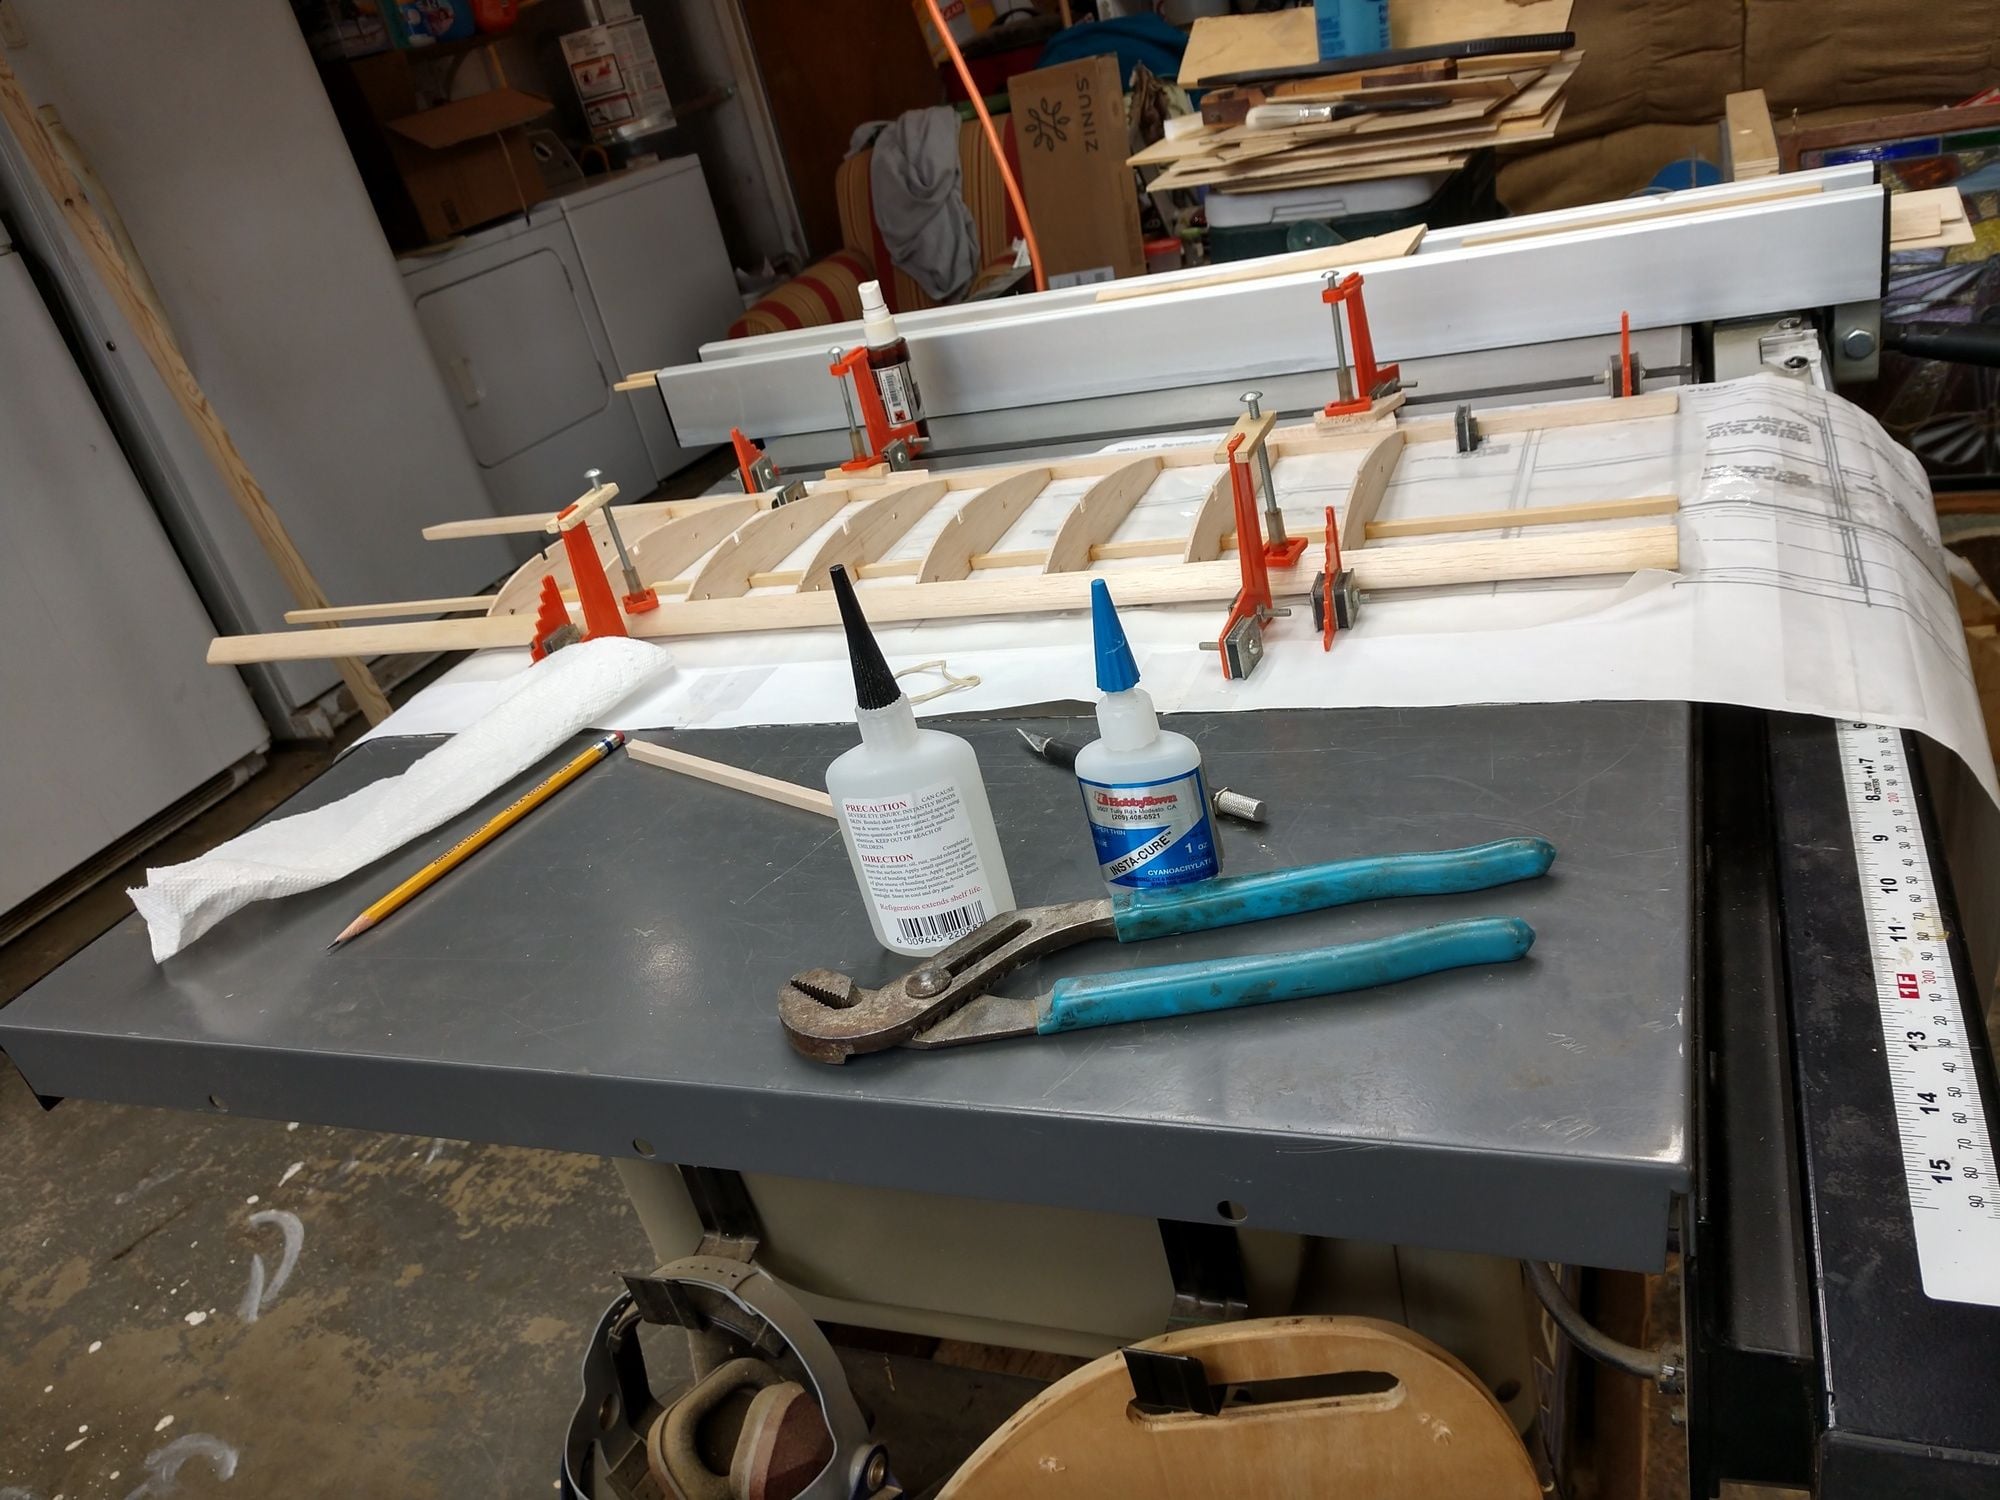
Made the rest of the wing rips. I cut down by 1/16 inch 6 rips for the center section that gets sheeted. Also made the 2 end rips that fit into the wing bows at the ends of the wing.
Then it was time to start joining the fuse sides. Wanted to get the side at least partly joined before starting wing panels in case I needed to use the table saw for something fuse related. The bottom of the fuse center section got a plate I made up from 1/8" lite ply and some 1/32" sheet balsa. Mad a bit over wide and then use the table saw to square off the side that glue to the fuse half's. Used the chop saw to square off the ends. Those tools may be over kill, but man they make some jobs so much easier. Got 'em may as well use them.
So after I had my bottom plate I put the top view on my magnetic board and fitted the sides. Ran into a problem I did not expect. The plans have wide scotch tape over them so glue won't stick. Well turns out my magnet pieces don't stick good to that either. Slide like they were greased. Solved that by just lining up the plans to the reference lines on the board and then the fuse side the same thing.
So anyway the fuse side joins is started.
The back half's will bend to join at the tail easily. Now bending the front half to the fire wall is going to be the challenging part. I might soak the front half in hot water. Only concern their is the glue joints could fail. Could also just wet the front stringers and the hit them with a hot iron. Well just have to play with it to see what works.
Ken

Wanted to work on the bird yesterday but the day was tied up with Dr apps. for both me and my wife. And since she doesn't drive if she has something, then I got something.
So I got some time on the Pacific Ace today.
Took 2 hours for my heater to get the garage comfortable to work in. Fogy for half the day.
Made the rest of the wing rips. I cut down by 1/16 inch 6 rips for the center section that gets sheeted. Also made the 2 end rips that fit into the wing bows at the ends of the wing.
Then it was time to start joining the fuse sides. Wanted to get the side at least partly joined before starting wing panels in case I needed to use the table saw for something fuse related. The bottom of the fuse center section got a plate I made up from 1/8" lite ply and some 1/32" sheet balsa. Mad a bit over wide and then use the table saw to square off the side that glue to the fuse half's. Used the chop saw to square off the ends. Those tools may be over kill, but man they make some jobs so much easier. Got 'em may as well use them.
So after I had my bottom plate I put the top view on my magnetic board and fitted the sides. Ran into a problem I did not expect. The plans have wide scotch tape over them so glue won't stick. Well turns out my magnet pieces don't stick good to that either. Slide like they were greased. Solved that by just lining up the plans to the reference lines on the board and then the fuse side the same thing.
So anyway the fuse side joins is started.
The back half's will bend to join at the tail easily. Now bending the front half to the fire wall is going to be the challenging part. I might soak the front half in hot water. Only concern their is the glue joints could fail. Could also just wet the front stringers and the hit them with a hot iron. Well just have to play with it to see what works.
Ken
01-09-2020, 08:25 PM
#10
Thread Starter
Got in a little more time today on the build.
My propane heater bottle went dry so the danged garage was really cold. It was one of the those cold rainy drizzle days. So work in the garage until I just got to cold. Had some unexpected expenses come up, so I will have to wait til the end of the month to refill the propane bottle.
I will still get some work in by wear sweat pants and shirt.
But in the meantime Windy told me to clear off some room on the dinning room table and see what I could do in the WARM house. So that is what I did. The table already has protection on. So i placed my balsa building board on it and the magnetic board on top of that. I really love the magnetic building board way of doing things.
I installed all of the top and bottom cross stringers and diagonals. Not adding gussets just yet. It really is easier with my disc sander sitting next to me on the work bench. My work bench is a massive torsion box unit. It sets on brackets of each of the inside sides of the cabinets. The bench has 5 leveling screws supporting it. I estimate it weighs around 399 lbs. It is really close to dead true. But I don't consider it close enough for wings.
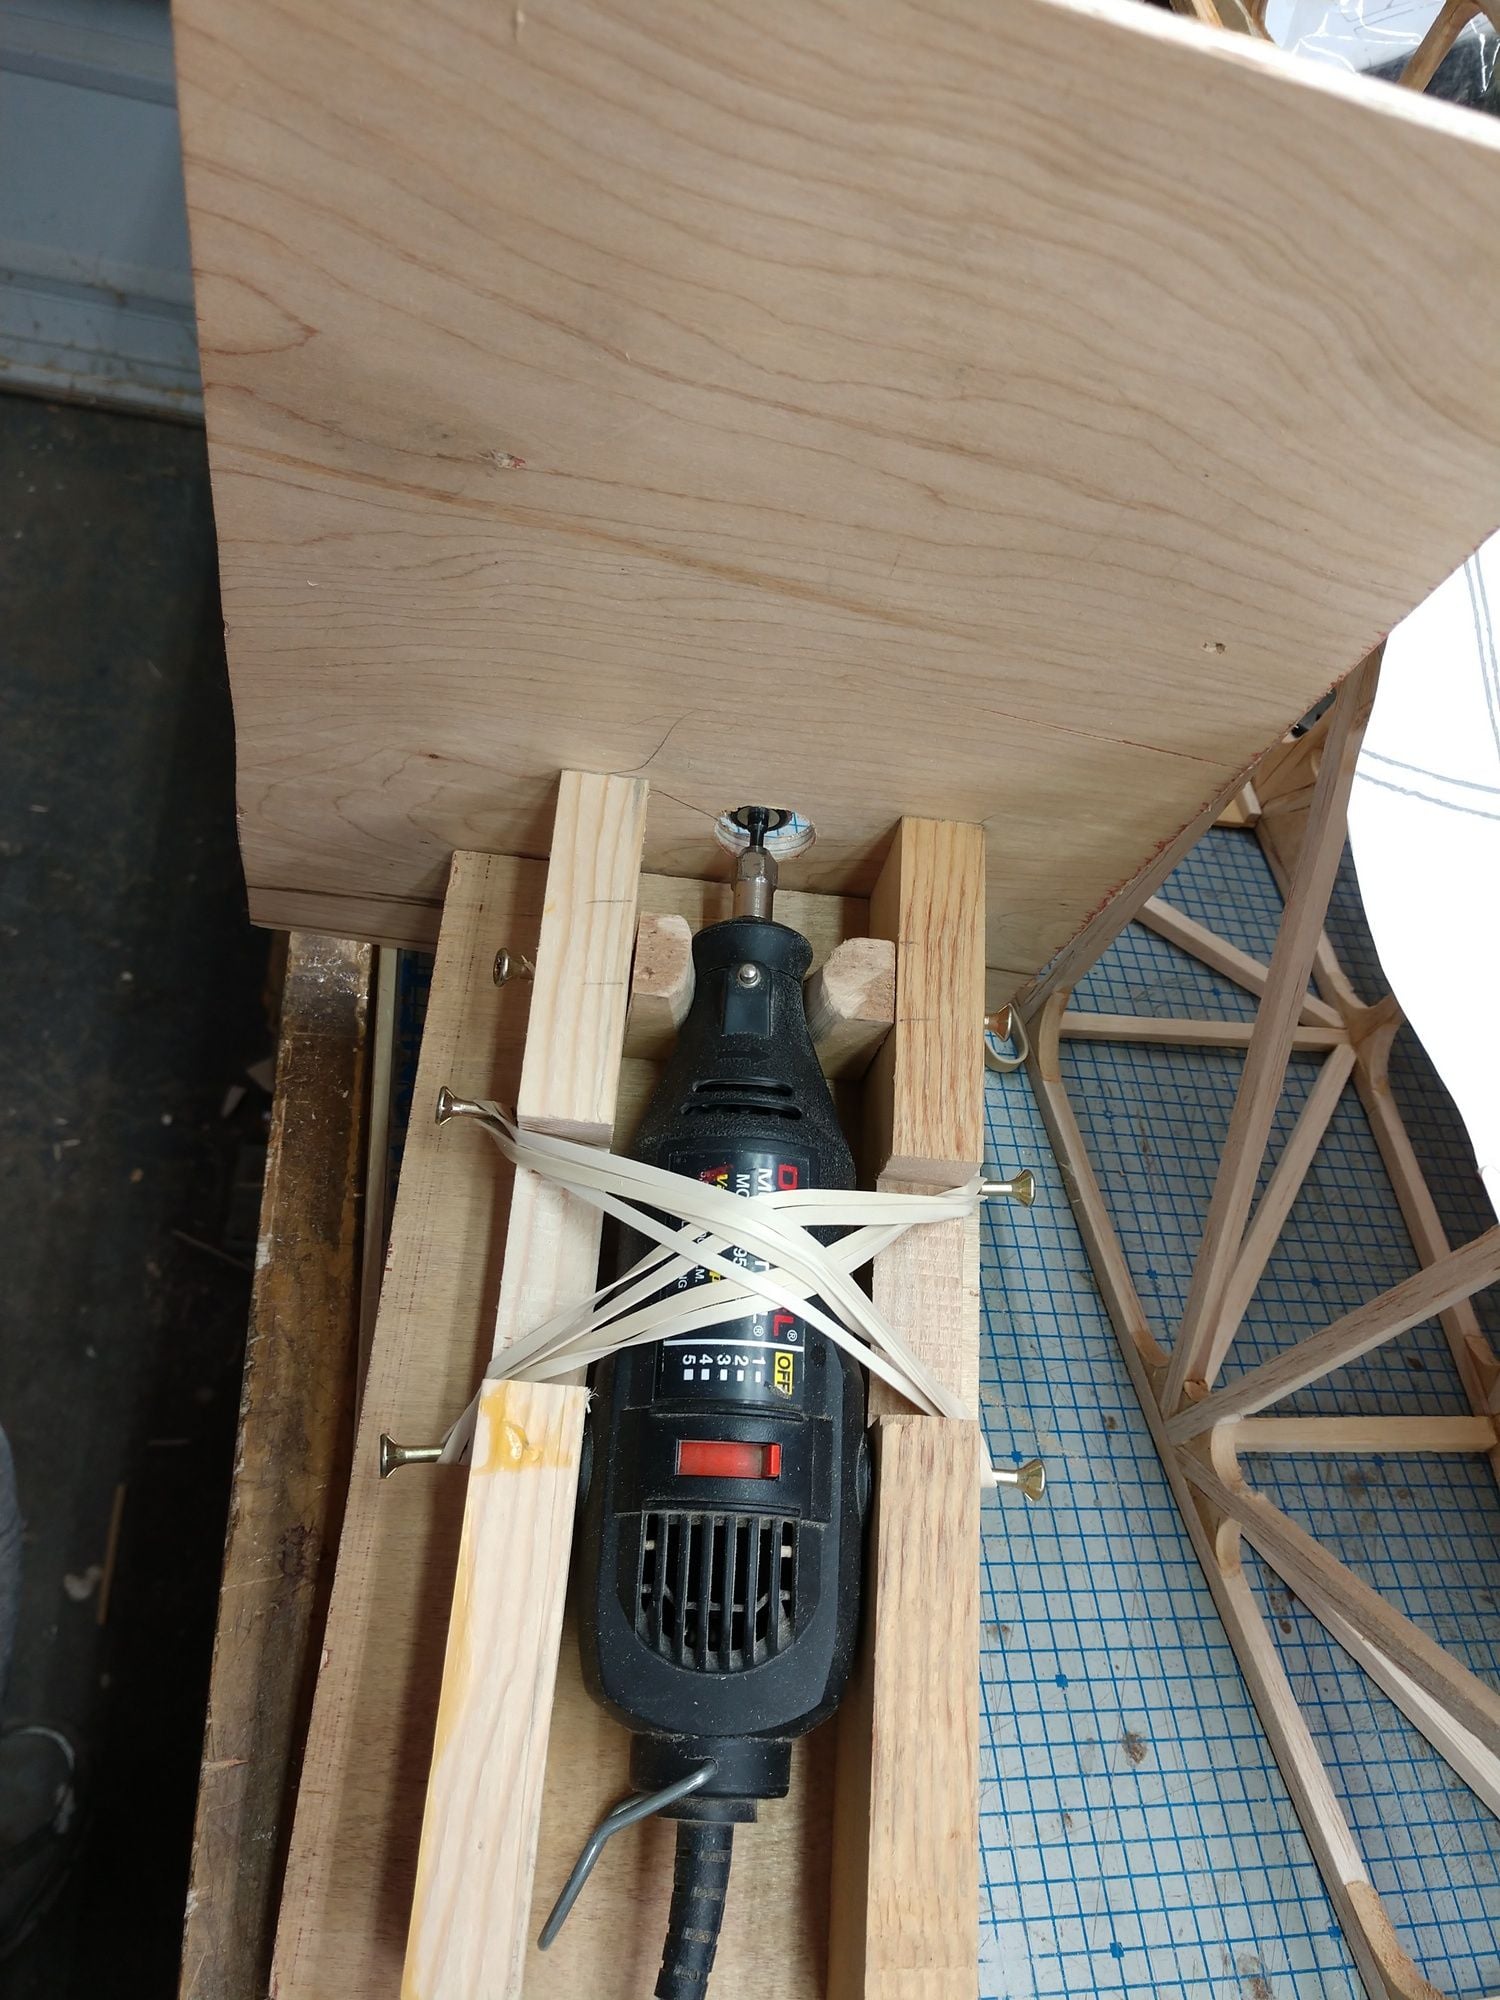
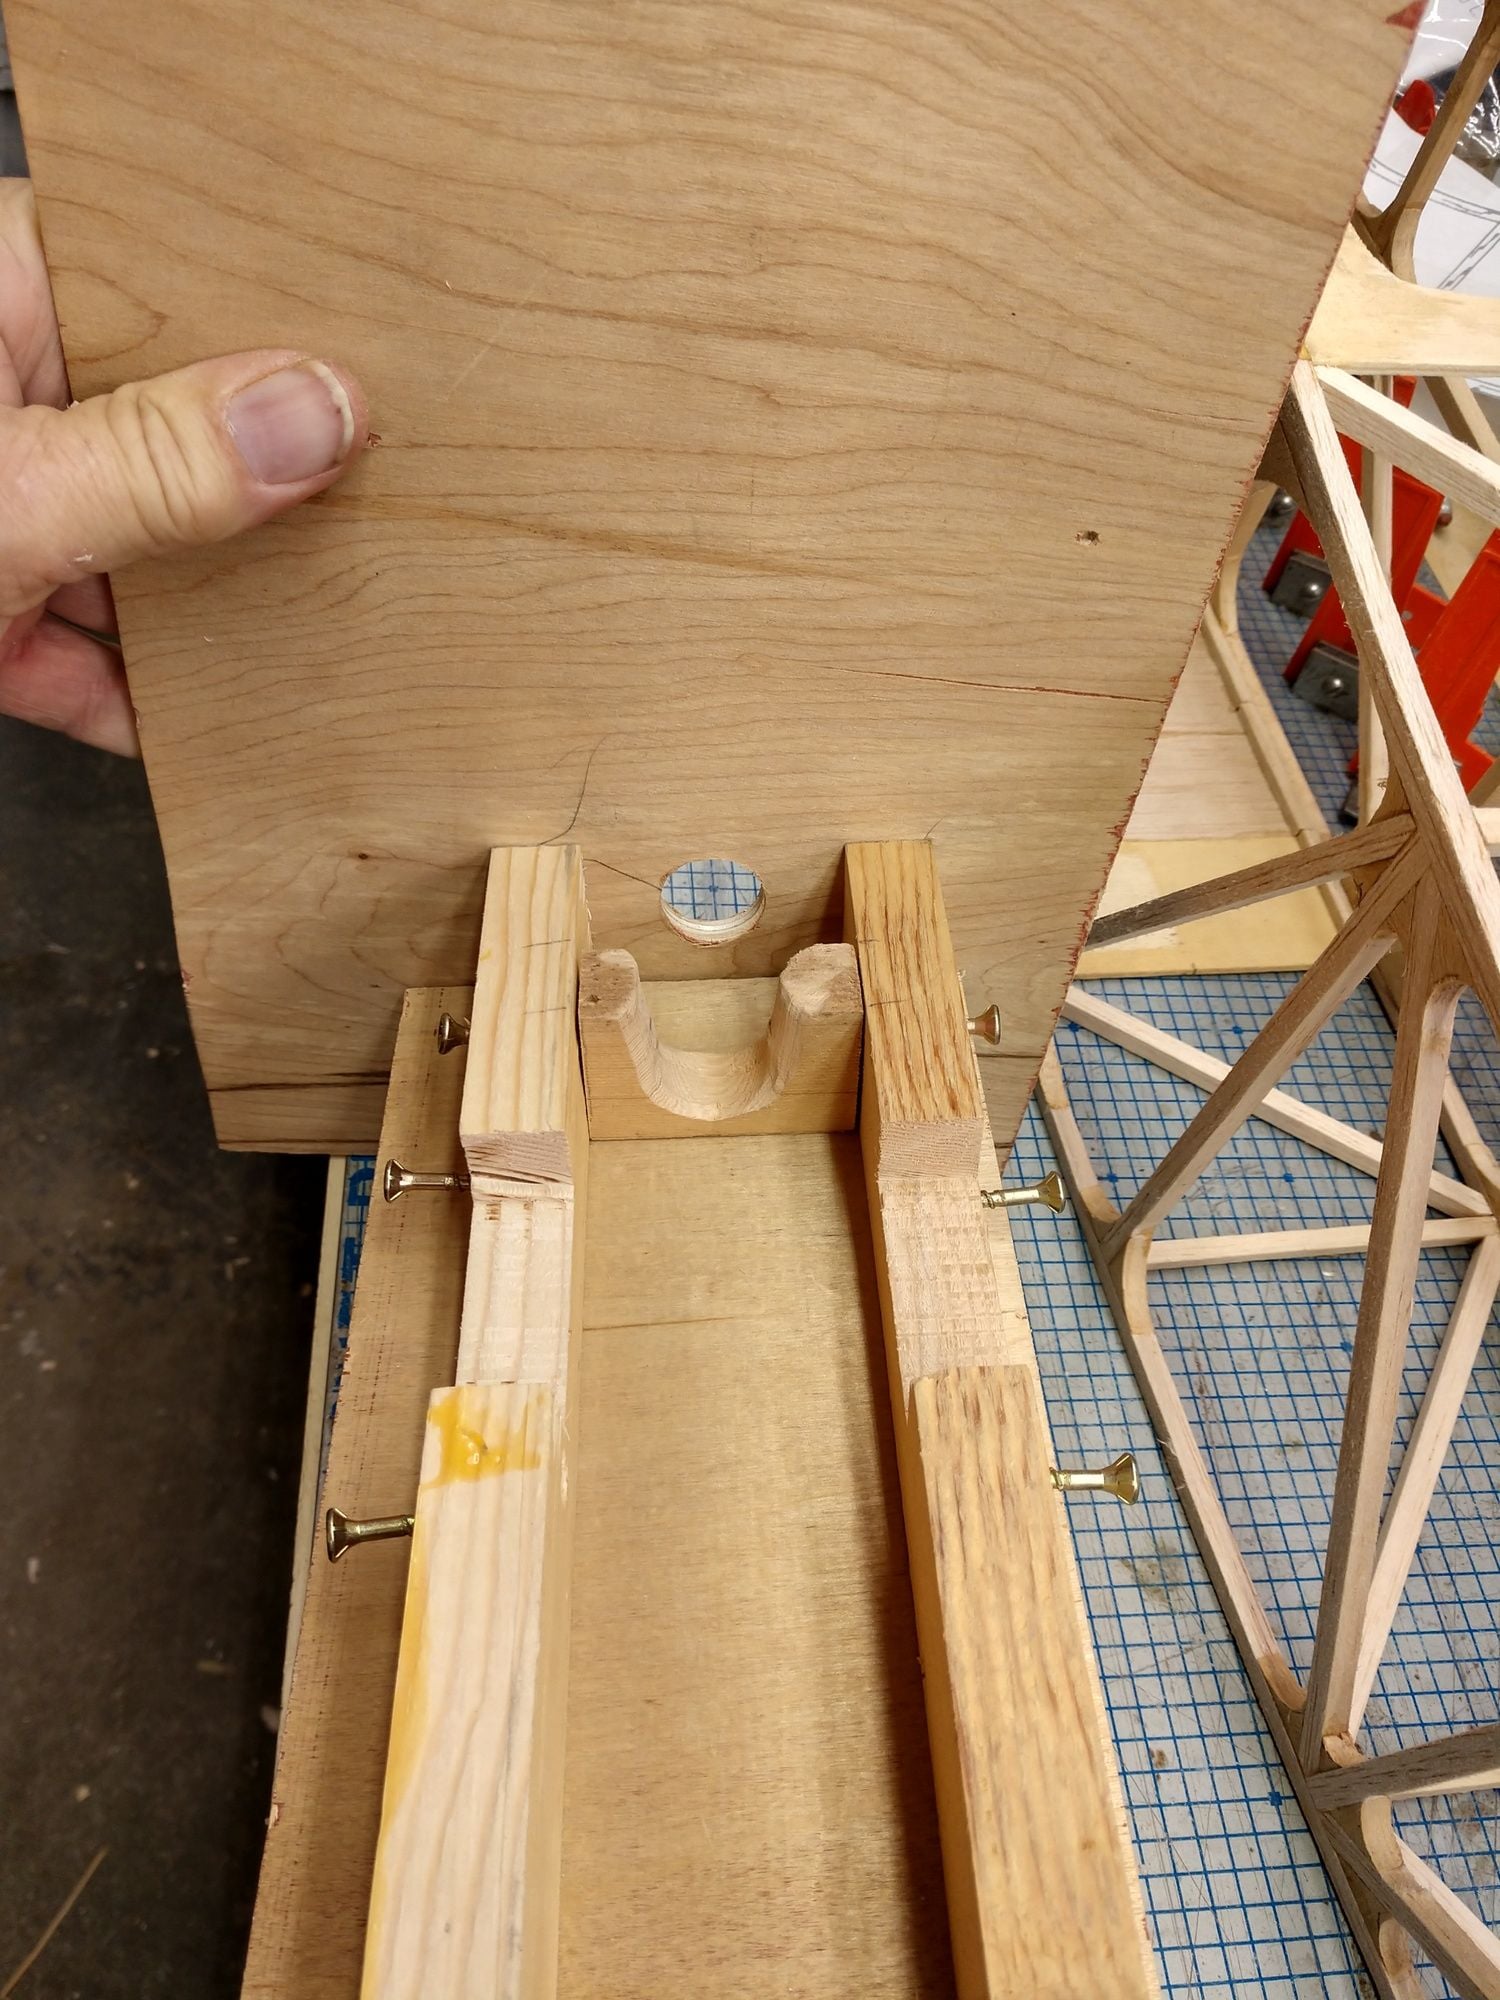
The main reason for not installing the gussets yet is that I still need to build A under bench mount for the dremel tool.Should not take but 30-45 minutes to make. Then I can use the little drum sander mounted and stable, unlike when I did the 1st set of gussets.
So once all the top and bottom cross pieces were done I added a lite ply doubler to the joint that is at f1. Dose not seem like a lot of strength there, even with the gussets.
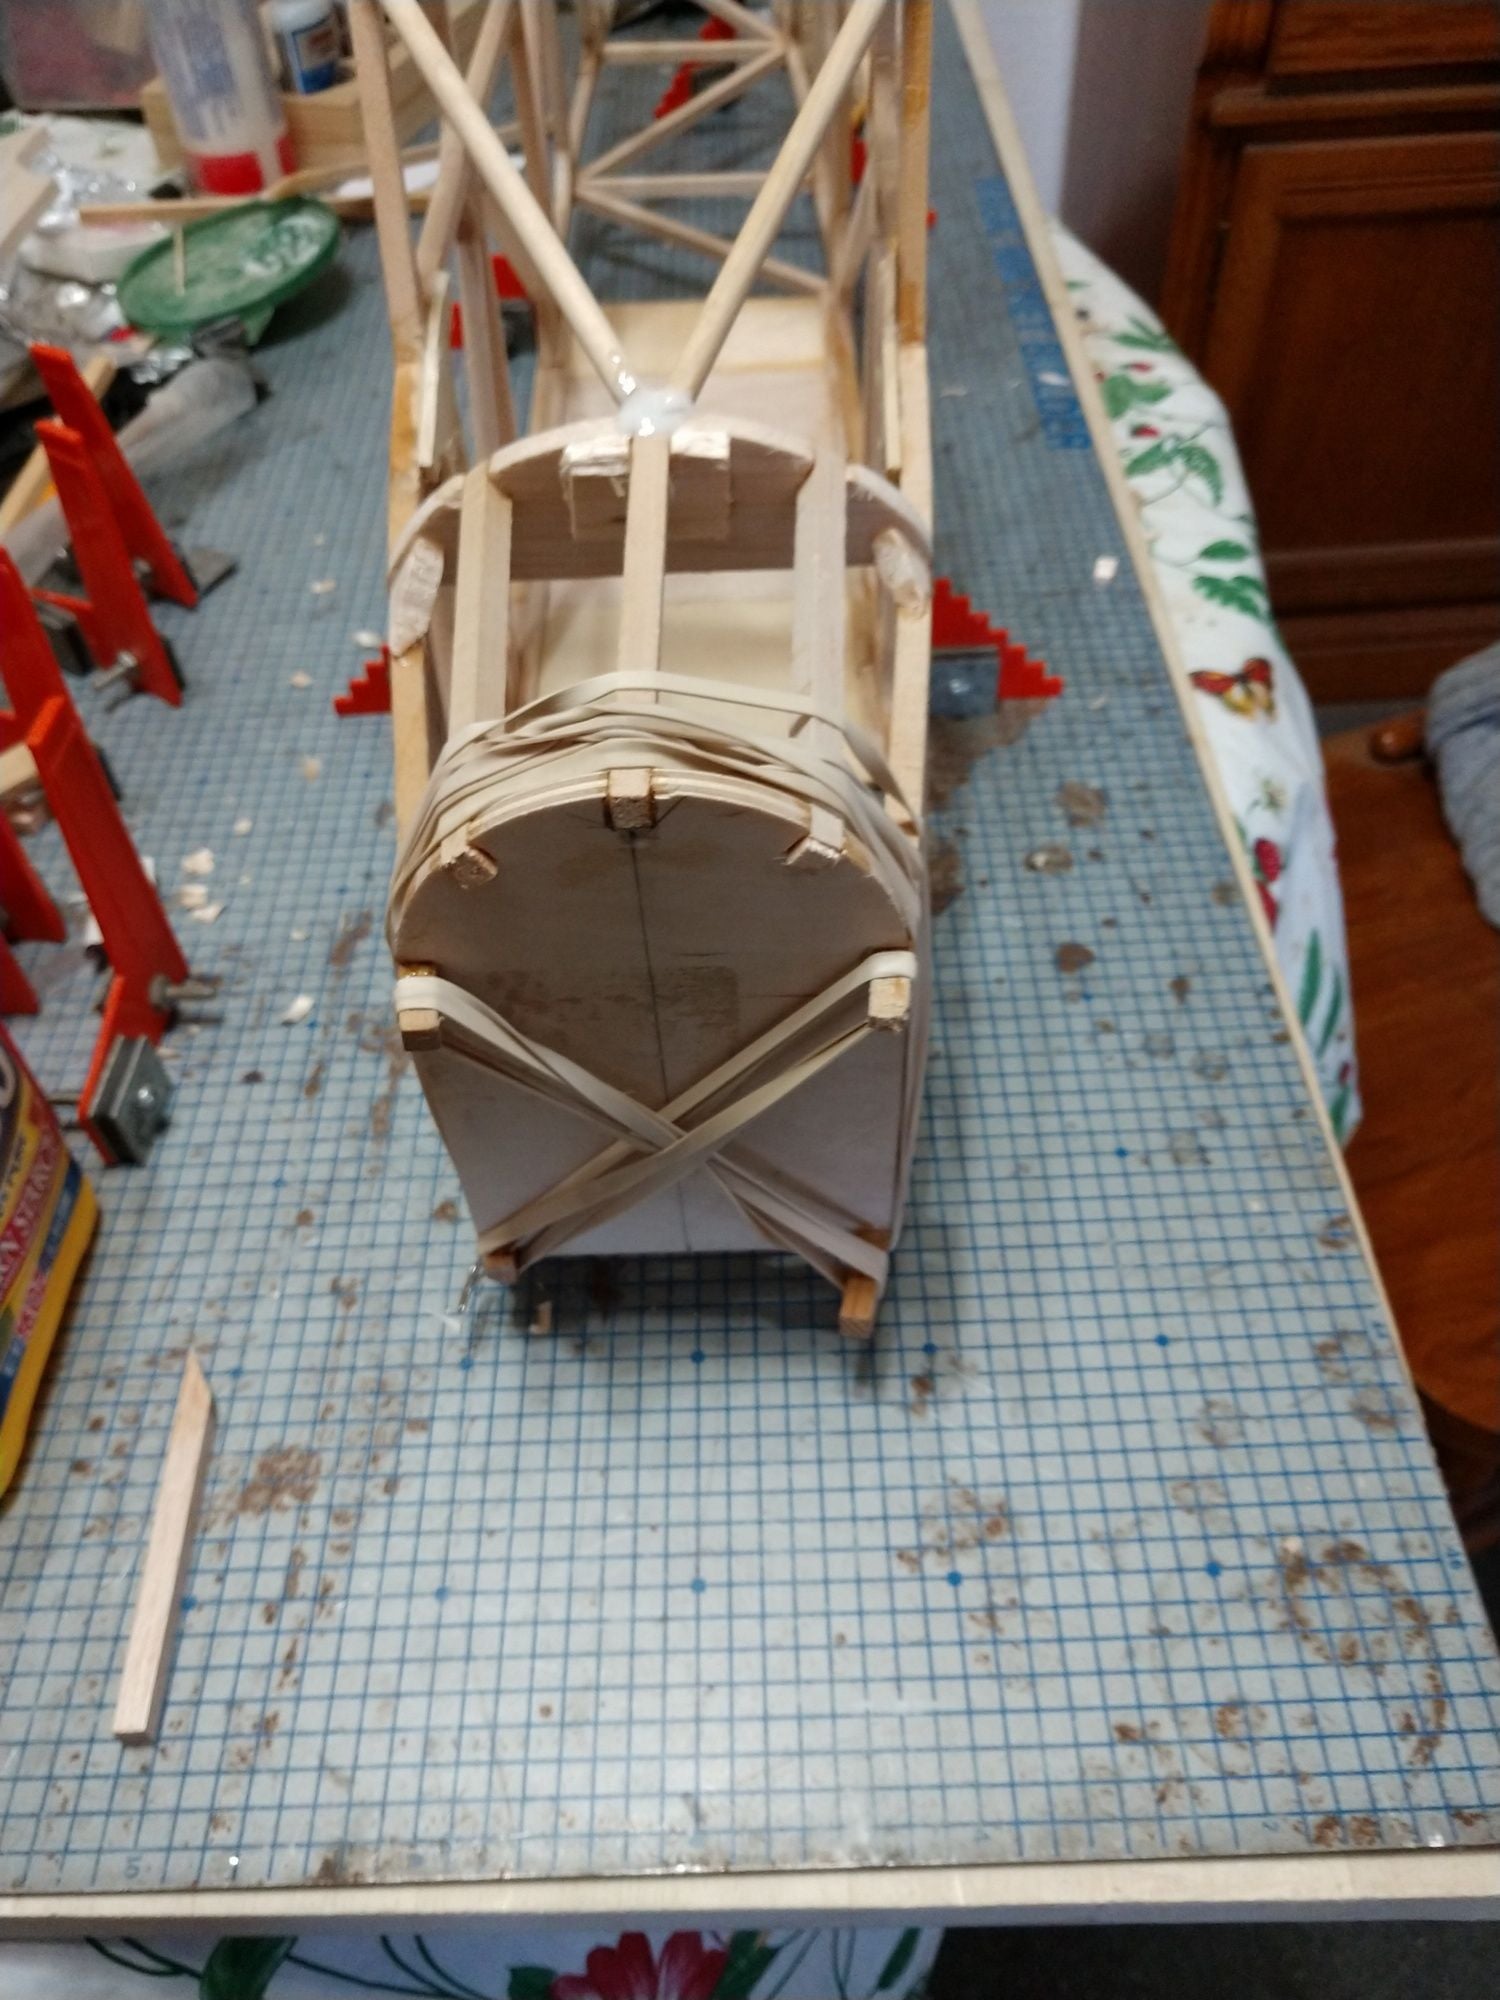
Then it was time to get to the part I was not looking forward to. Bending the the 4 spruce sticks that go to the firewall. I went over all the forward joints with some thin super glue and the struck the fuse nose in a pot of boiling water. Got a very energetic reaction with the boiling water. The boiling jumped up and started to spray out. I pulled the fuse hot real fast and jumped back. Next try I very slowly inserted the fuse into the boiling water. Still energetic but under control. I left the foward fuse in the water about 30 minutes.
The 4 spruce stick would with clamps on them. So I left them clamp and bent for about 6 hours. Still want to spring away from were they need to be, but with less force now. So I decided to do the thing in steps. I epoxied the 2 upper spruce stringers to the fire wall, and will let that set up over night. Then the bottom strings. The bottom strings have to bend in 2 directions at once so are much more resistant.
The slots in the fire wall are fairly snug So when I mounted the fire wall to them I naturally had some down thrust. Works for me and looks to be just about the right amount. I will use washers for the side thrust. It is always annoying when you have to add both down and right thrust with washers at the same time.
And that is a rap for today.
Ken
My propane heater bottle went dry so the danged garage was really cold. It was one of the those cold rainy drizzle days. So work in the garage until I just got to cold. Had some unexpected expenses come up, so I will have to wait til the end of the month to refill the propane bottle.
I will still get some work in by wear sweat pants and shirt.
But in the meantime Windy told me to clear off some room on the dinning room table and see what I could do in the WARM house. So that is what I did. The table already has protection on. So i placed my balsa building board on it and the magnetic board on top of that. I really love the magnetic building board way of doing things.
I installed all of the top and bottom cross stringers and diagonals. Not adding gussets just yet. It really is easier with my disc sander sitting next to me on the work bench. My work bench is a massive torsion box unit. It sets on brackets of each of the inside sides of the cabinets. The bench has 5 leveling screws supporting it. I estimate it weighs around 399 lbs. It is really close to dead true. But I don't consider it close enough for wings.
The main reason for not installing the gussets yet is that I still need to build A under bench mount for the dremel tool.Should not take but 30-45 minutes to make. Then I can use the little drum sander mounted and stable, unlike when I did the 1st set of gussets.
So once all the top and bottom cross pieces were done I added a lite ply doubler to the joint that is at f1. Dose not seem like a lot of strength there, even with the gussets.
Then it was time to get to the part I was not looking forward to. Bending the the 4 spruce sticks that go to the firewall. I went over all the forward joints with some thin super glue and the struck the fuse nose in a pot of boiling water. Got a very energetic reaction with the boiling water. The boiling jumped up and started to spray out. I pulled the fuse hot real fast and jumped back. Next try I very slowly inserted the fuse into the boiling water. Still energetic but under control. I left the foward fuse in the water about 30 minutes.
The 4 spruce stick would with clamps on them. So I left them clamp and bent for about 6 hours. Still want to spring away from were they need to be, but with less force now. So I decided to do the thing in steps. I epoxied the 2 upper spruce stringers to the fire wall, and will let that set up over night. Then the bottom strings. The bottom strings have to bend in 2 directions at once so are much more resistant.
The slots in the fire wall are fairly snug So when I mounted the fire wall to them I naturally had some down thrust. Works for me and looks to be just about the right amount. I will use washers for the side thrust. It is always annoying when you have to add both down and right thrust with washers at the same time.
And that is a rap for today.
Ken
01-10-2020, 01:16 PM
#11
Thread Starter
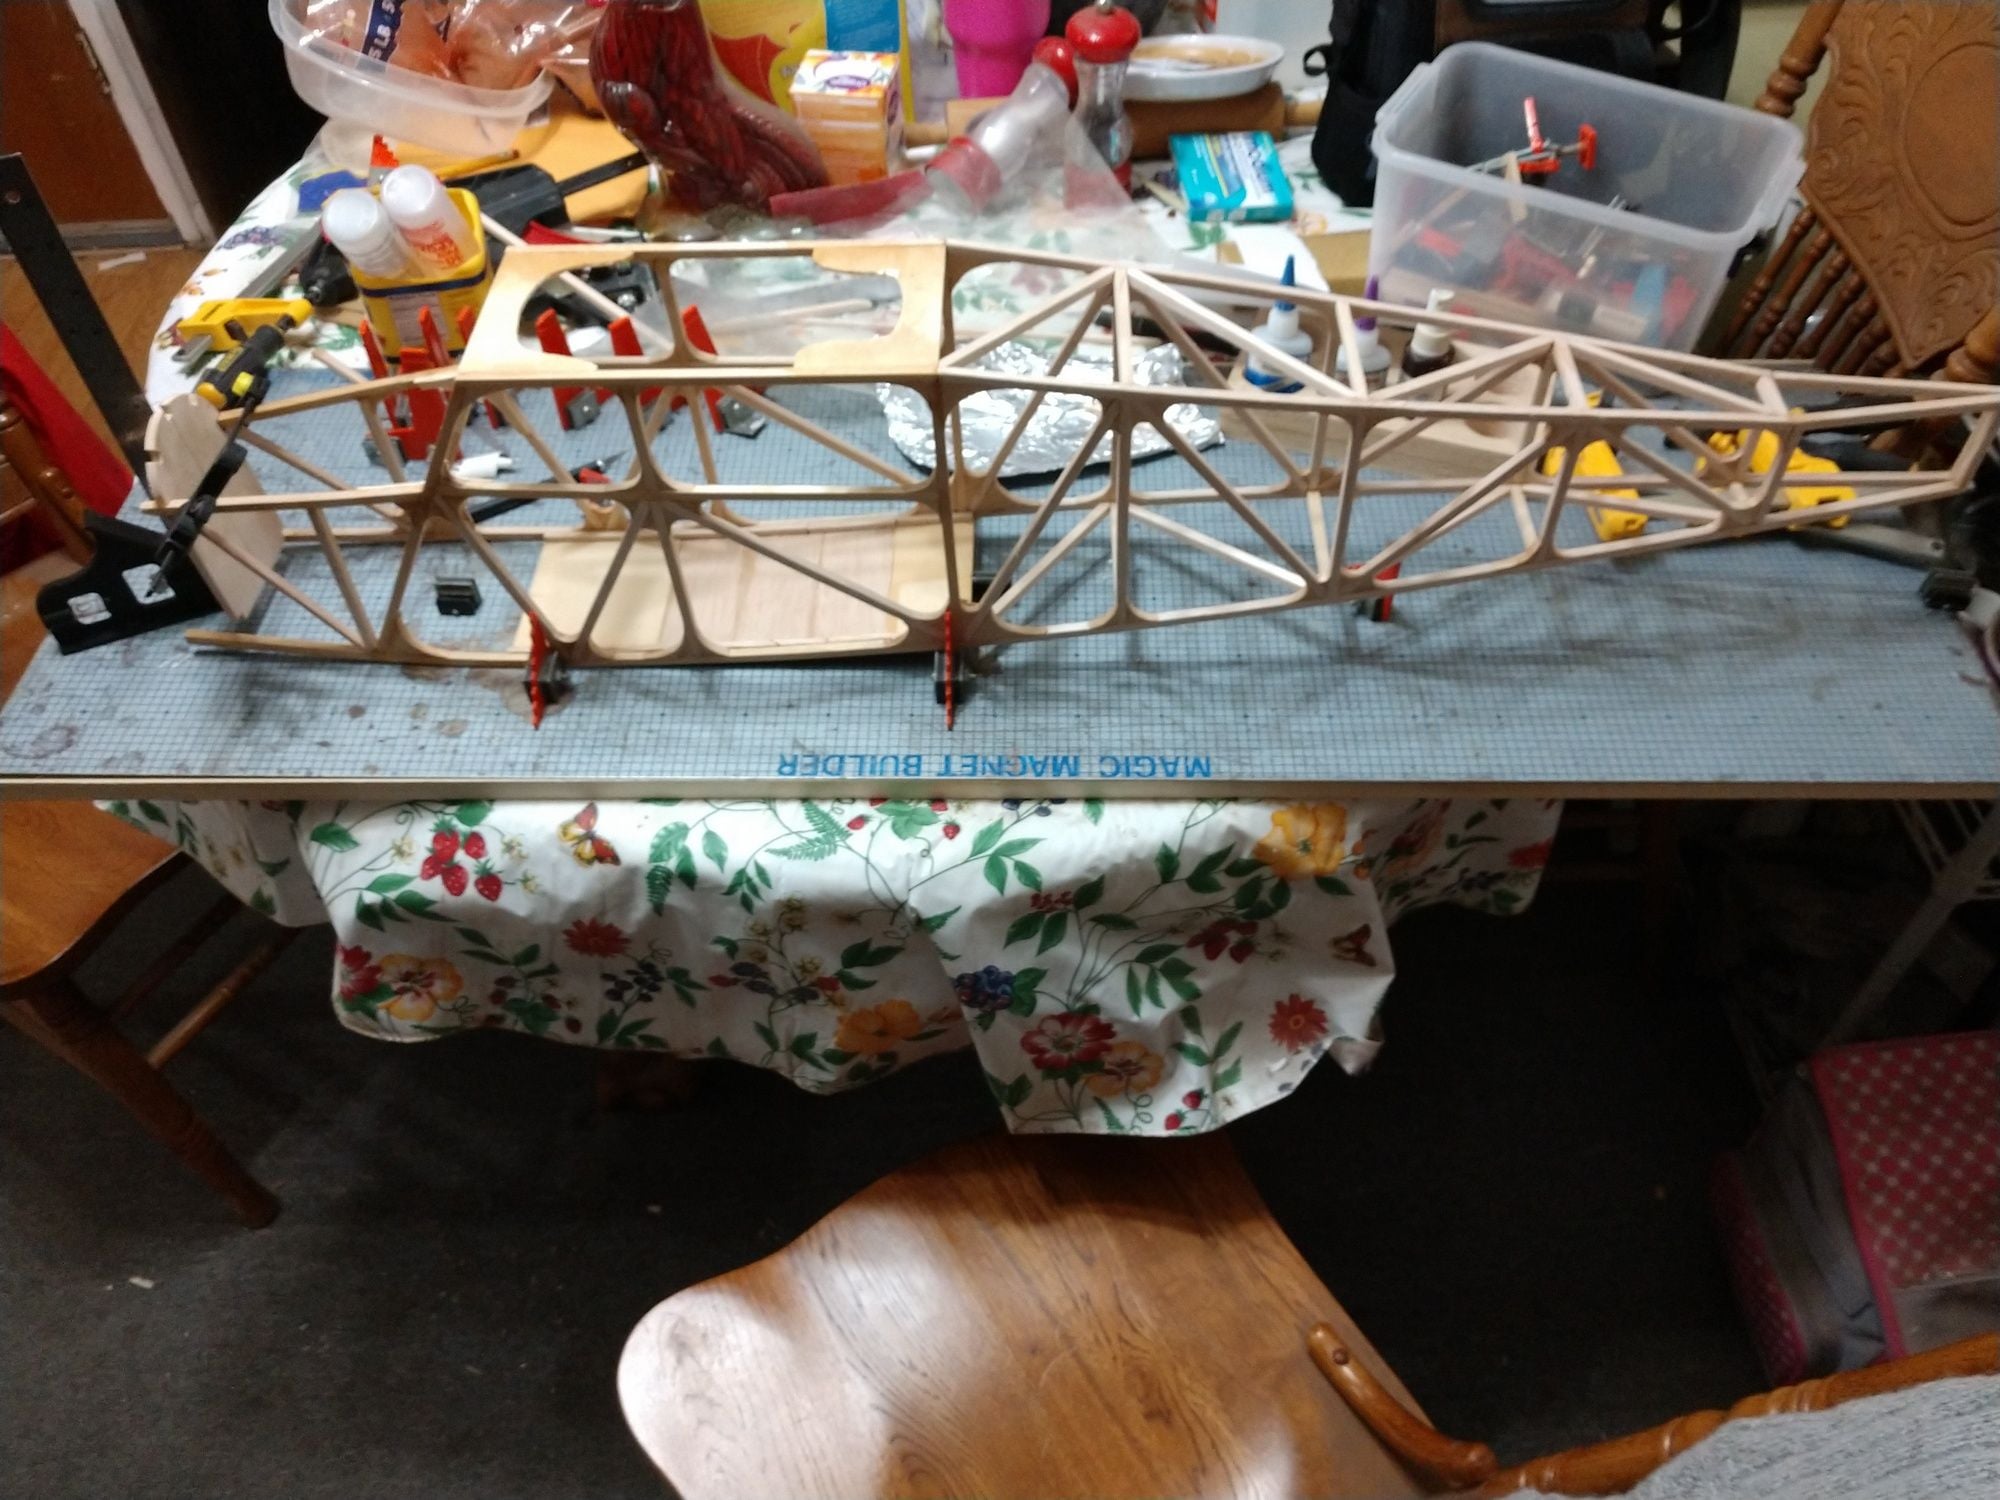
Only just a little past noon and I have made a fair amount of progress on the fuse.
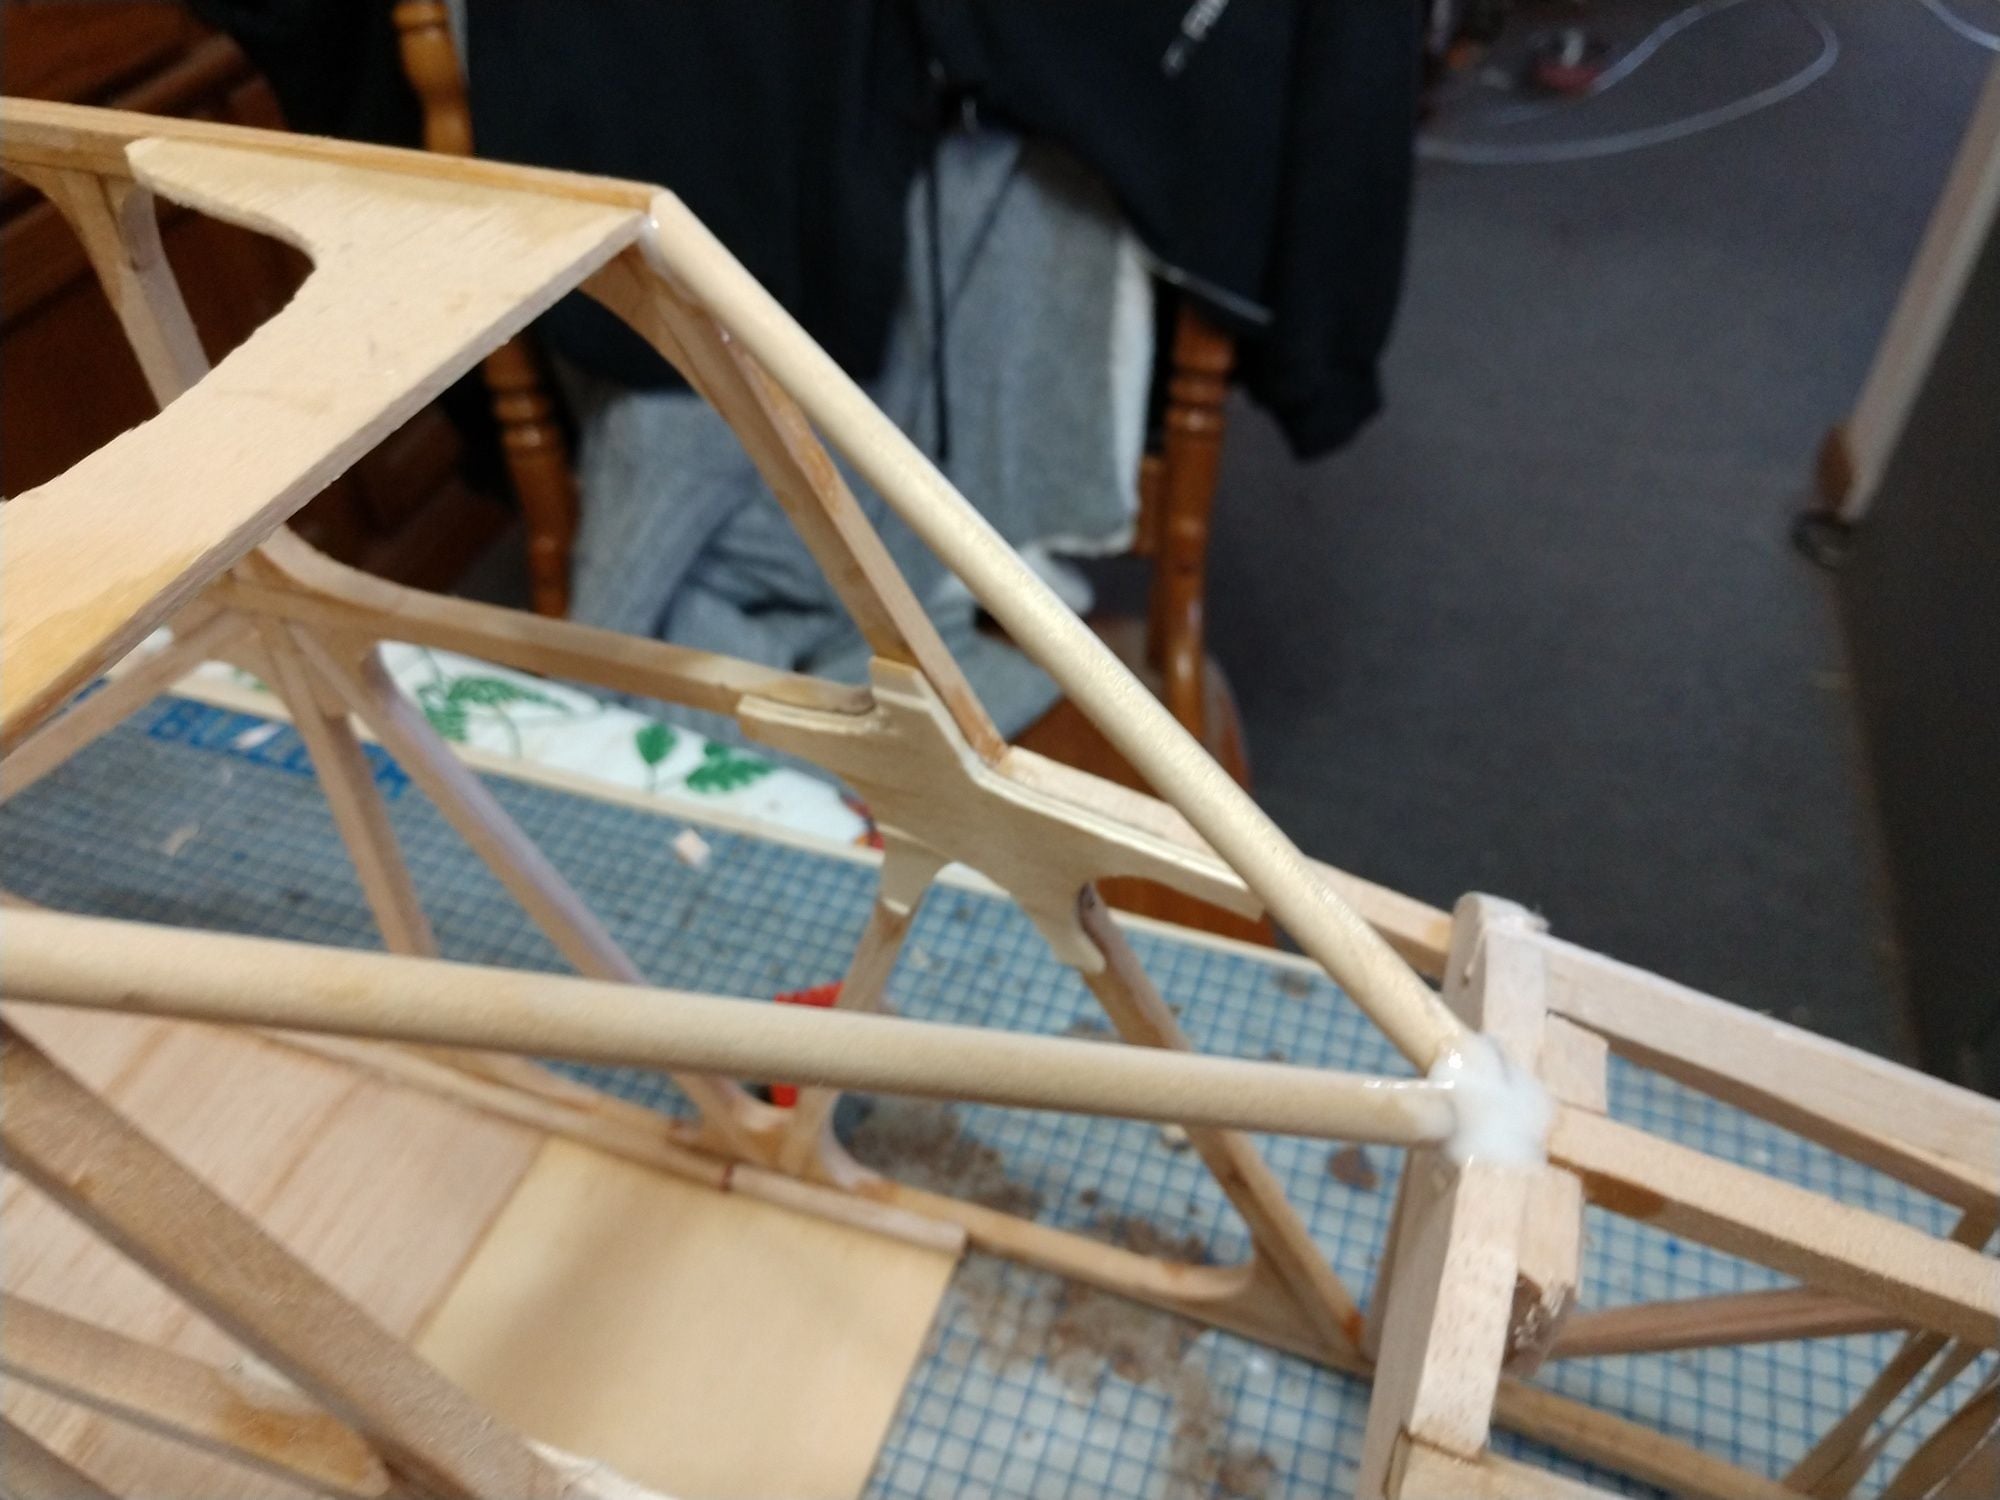
Added the instrument panel former. The added the 1/4" stringers from it to the fire wall, I used bass.
Then I added the 1/4" dowel stringers from the top front corners of the fuse (at wing L.E.). They were frustrating to make. funny angles. I'd get one end correct and then working on the other end I'd end up with the whole piece to short. But I finally got the close enough in length and angles. filled the gaps with epoxy and micro balloons.
The fire wall was rock solid stable at this point so time to tackle the 2 bottom stringers join to the fire wall. The 2 stringers were still very stiff, but would bend up into the notches on the bottom of the fire wall. Just took a lot of force. Did not seem like the joints could be depended upon. Tried to steam them, no improvement.
OK last resort, kerf cuts. About every 3/8" I made kerf cuts at 45 degrees in the stringers. That doesen't quite explain the cuts I know. I cut from the top outer corner to the bottom inner corner of the stringers. Bent real easy then. Epoxied the stringers to the fire wall and wrapped the nose with rubber bands plus rubber bands on the stringer exposed ends to what ever would hold the other end. I will saturate the stringers with thin super glue plus add some 1/4" stock to the stringers to recover some of the strength the kerf cuts took away. Hey Iv'e watched them use kerf cuts on This Old House plenty of times to make tight bends.
Well the epoxy needs to be allowed to cure. I will give it till tomorrow before touching the fuse any more.
Might be time to haul my mess back out to the garage, and get the wing panels started. Oh yeah 1 task before tying up the table saw, build a mount for the dremel tool so I can use hands free much like a router base would be.
We do have sun today, garage although cold ain't real cold. Put on sweats and get 'er done.
Ken
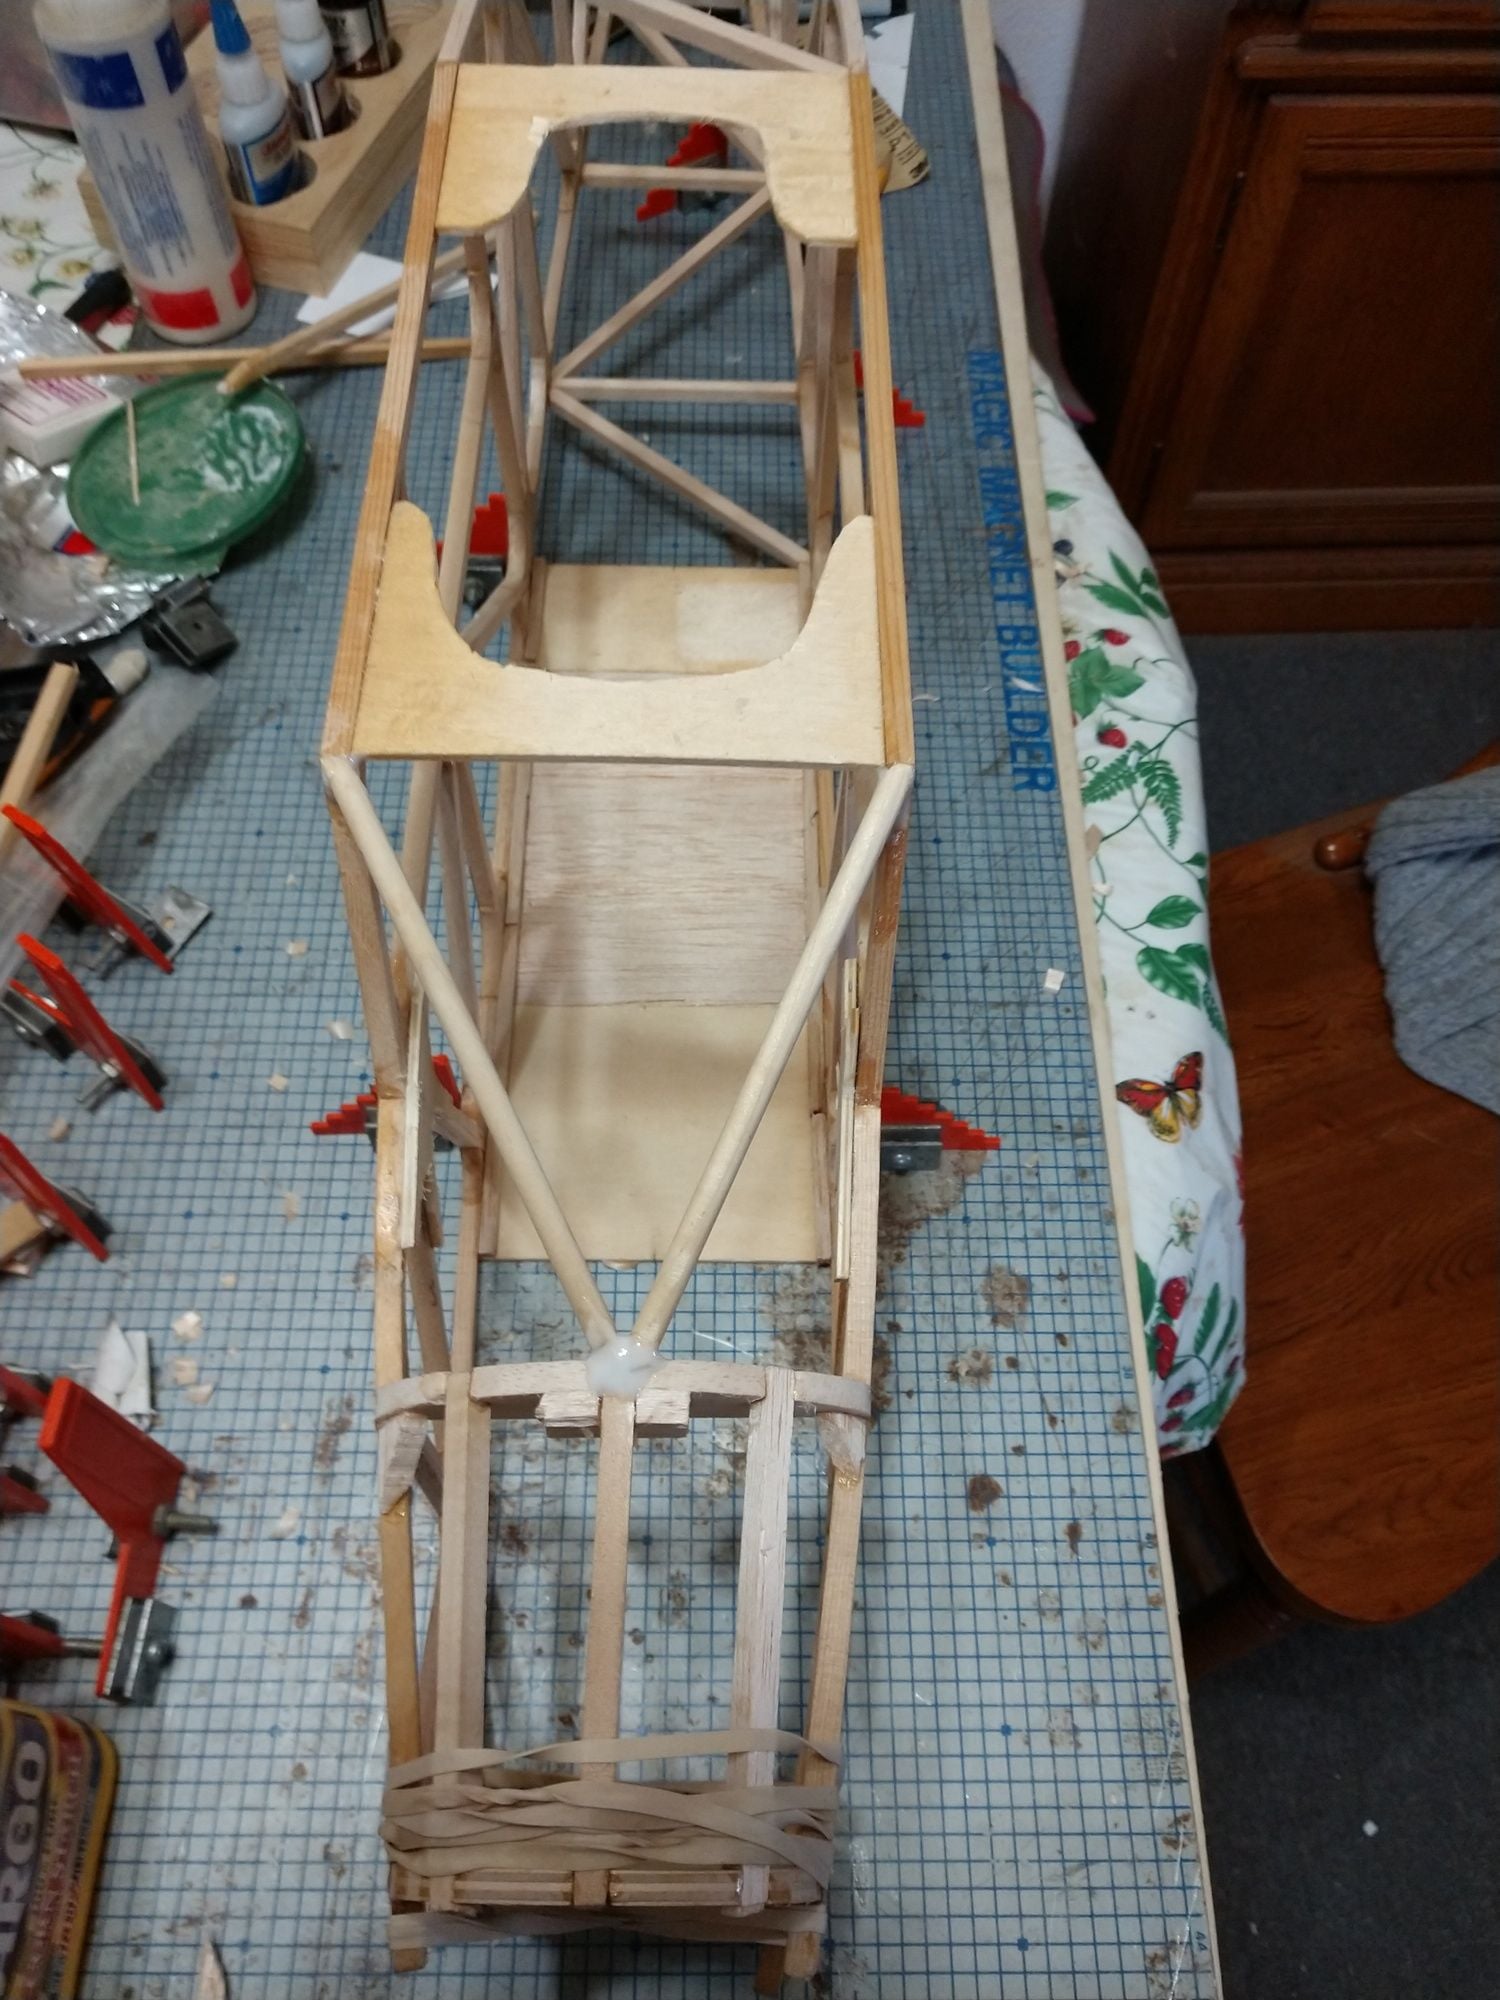

My intent is not to mount the wing with rubber bands, but to bolt it on with 1/4 20 nylon bolts in the back and 2 dowels in front. That is why thees strange shaped pieces of light ply
Added the instrument panel former. The added the 1/4" stringers from it to the fire wall, I used bass.
Then I added the 1/4" dowel stringers from the top front corners of the fuse (at wing L.E.). They were frustrating to make. funny angles. I'd get one end correct and then working on the other end I'd end up with the whole piece to short. But I finally got the close enough in length and angles. filled the gaps with epoxy and micro balloons.
The fire wall was rock solid stable at this point so time to tackle the 2 bottom stringers join to the fire wall. The 2 stringers were still very stiff, but would bend up into the notches on the bottom of the fire wall. Just took a lot of force. Did not seem like the joints could be depended upon. Tried to steam them, no improvement.
OK last resort, kerf cuts. About every 3/8" I made kerf cuts at 45 degrees in the stringers. That doesen't quite explain the cuts I know. I cut from the top outer corner to the bottom inner corner of the stringers. Bent real easy then. Epoxied the stringers to the fire wall and wrapped the nose with rubber bands plus rubber bands on the stringer exposed ends to what ever would hold the other end. I will saturate the stringers with thin super glue plus add some 1/4" stock to the stringers to recover some of the strength the kerf cuts took away. Hey Iv'e watched them use kerf cuts on This Old House plenty of times to make tight bends.
Well the epoxy needs to be allowed to cure. I will give it till tomorrow before touching the fuse any more.
Might be time to haul my mess back out to the garage, and get the wing panels started. Oh yeah 1 task before tying up the table saw, build a mount for the dremel tool so I can use hands free much like a router base would be.
We do have sun today, garage although cold ain't real cold. Put on sweats and get 'er done.
Ken
My intent is not to mount the wing with rubber bands, but to bolt it on with 1/4 20 nylon bolts in the back and 2 dowels in front. That is why thees strange shaped pieces of light ply
01-10-2020, 04:17 PM
#12
Thread Starter
Hauled my mess outside before I wore out my welcome with my wife, even though it was her suggestion to bring the bird inside to work on.
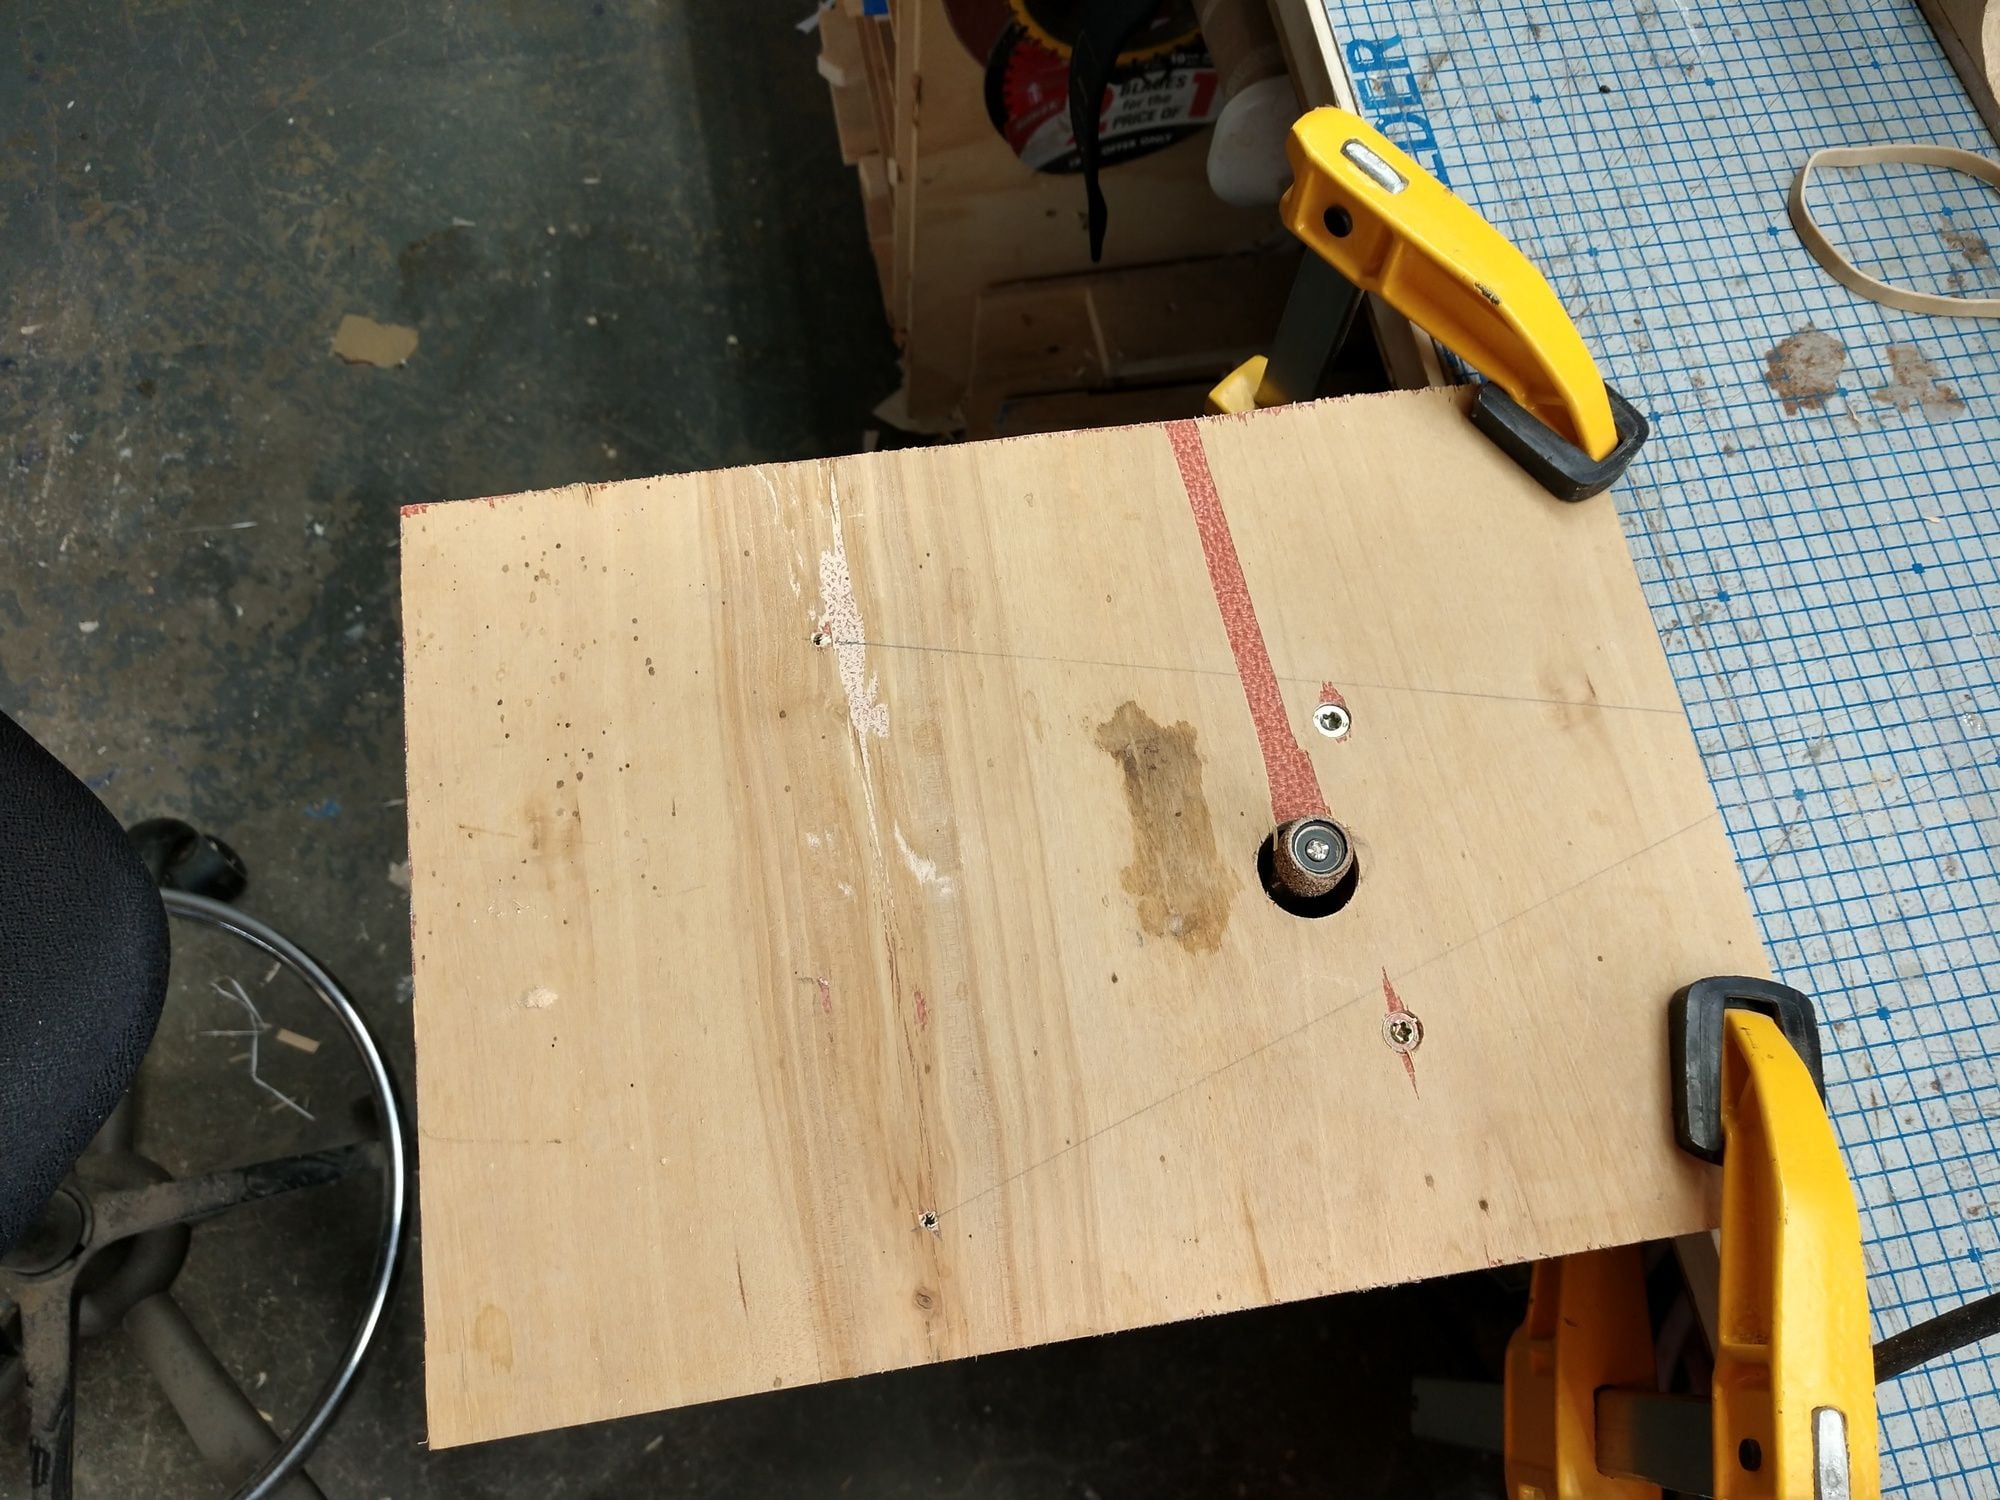
Put on my sweats and started work in the garage. First thing was to build a base unit for my dremel. It was all straight forward and only took 45-60 minutes. When I add gussets to the top and bottom of the fuse, the mount will get it's use.
Then I set up for the wing on the table saw. I know the cast iron bed is dead on true, although only 24" deep. This will be the second wing Iv'e built on it. Got to find a better solution. Preferably about 6' long. A hollow core door on top of a 1/4" foam bed is my mostly likely solution. Iv'e used on before with great success. But a door that uses luan skins, not that dang card stock so many are made with now. A solid door works to. Do got to confirm that the door is dead on true though before parting with your coin.
At one point I had to remove my sweat shirt, it was pretty decent this afternoon.
Ken
01-10-2020, 05:44 PM
#13
Thread Starter
Decided it would be best to bring the fuse back inside to warmth so the epoxy could cure better. That the led to pinning the tail on the donkey, oops I mean fuse.
When I made the tail feather parts I did it right on the plans, so every thing matches. But I am making a change in how or where the vertical fin mounts. I am running the spruce rear member flush down the back of the fuse with out any breaks. Also the spruce rear member of the stab will not have any breaks. This should make those parts much stiffer and stronger.On the plans those 2 spruce members line up with each other. So I am having to offset something 1/4". Also I move the spruce members forward 1/2" and back filled with soft balsa to facilitate hinges.
So the bottom of the vert fin does not line up the front edge of the stab. I will just add some soft balsa to the front of the vert fine so the bottom of it lines up with the l.e. of the stab.
Ken
01-12-2020, 05:20 PM
#14
Thread Starter
Went out to work on the bird yesterday, and just had no motivation. I hope I would do better Sunday.
Sunday
I was into it today.
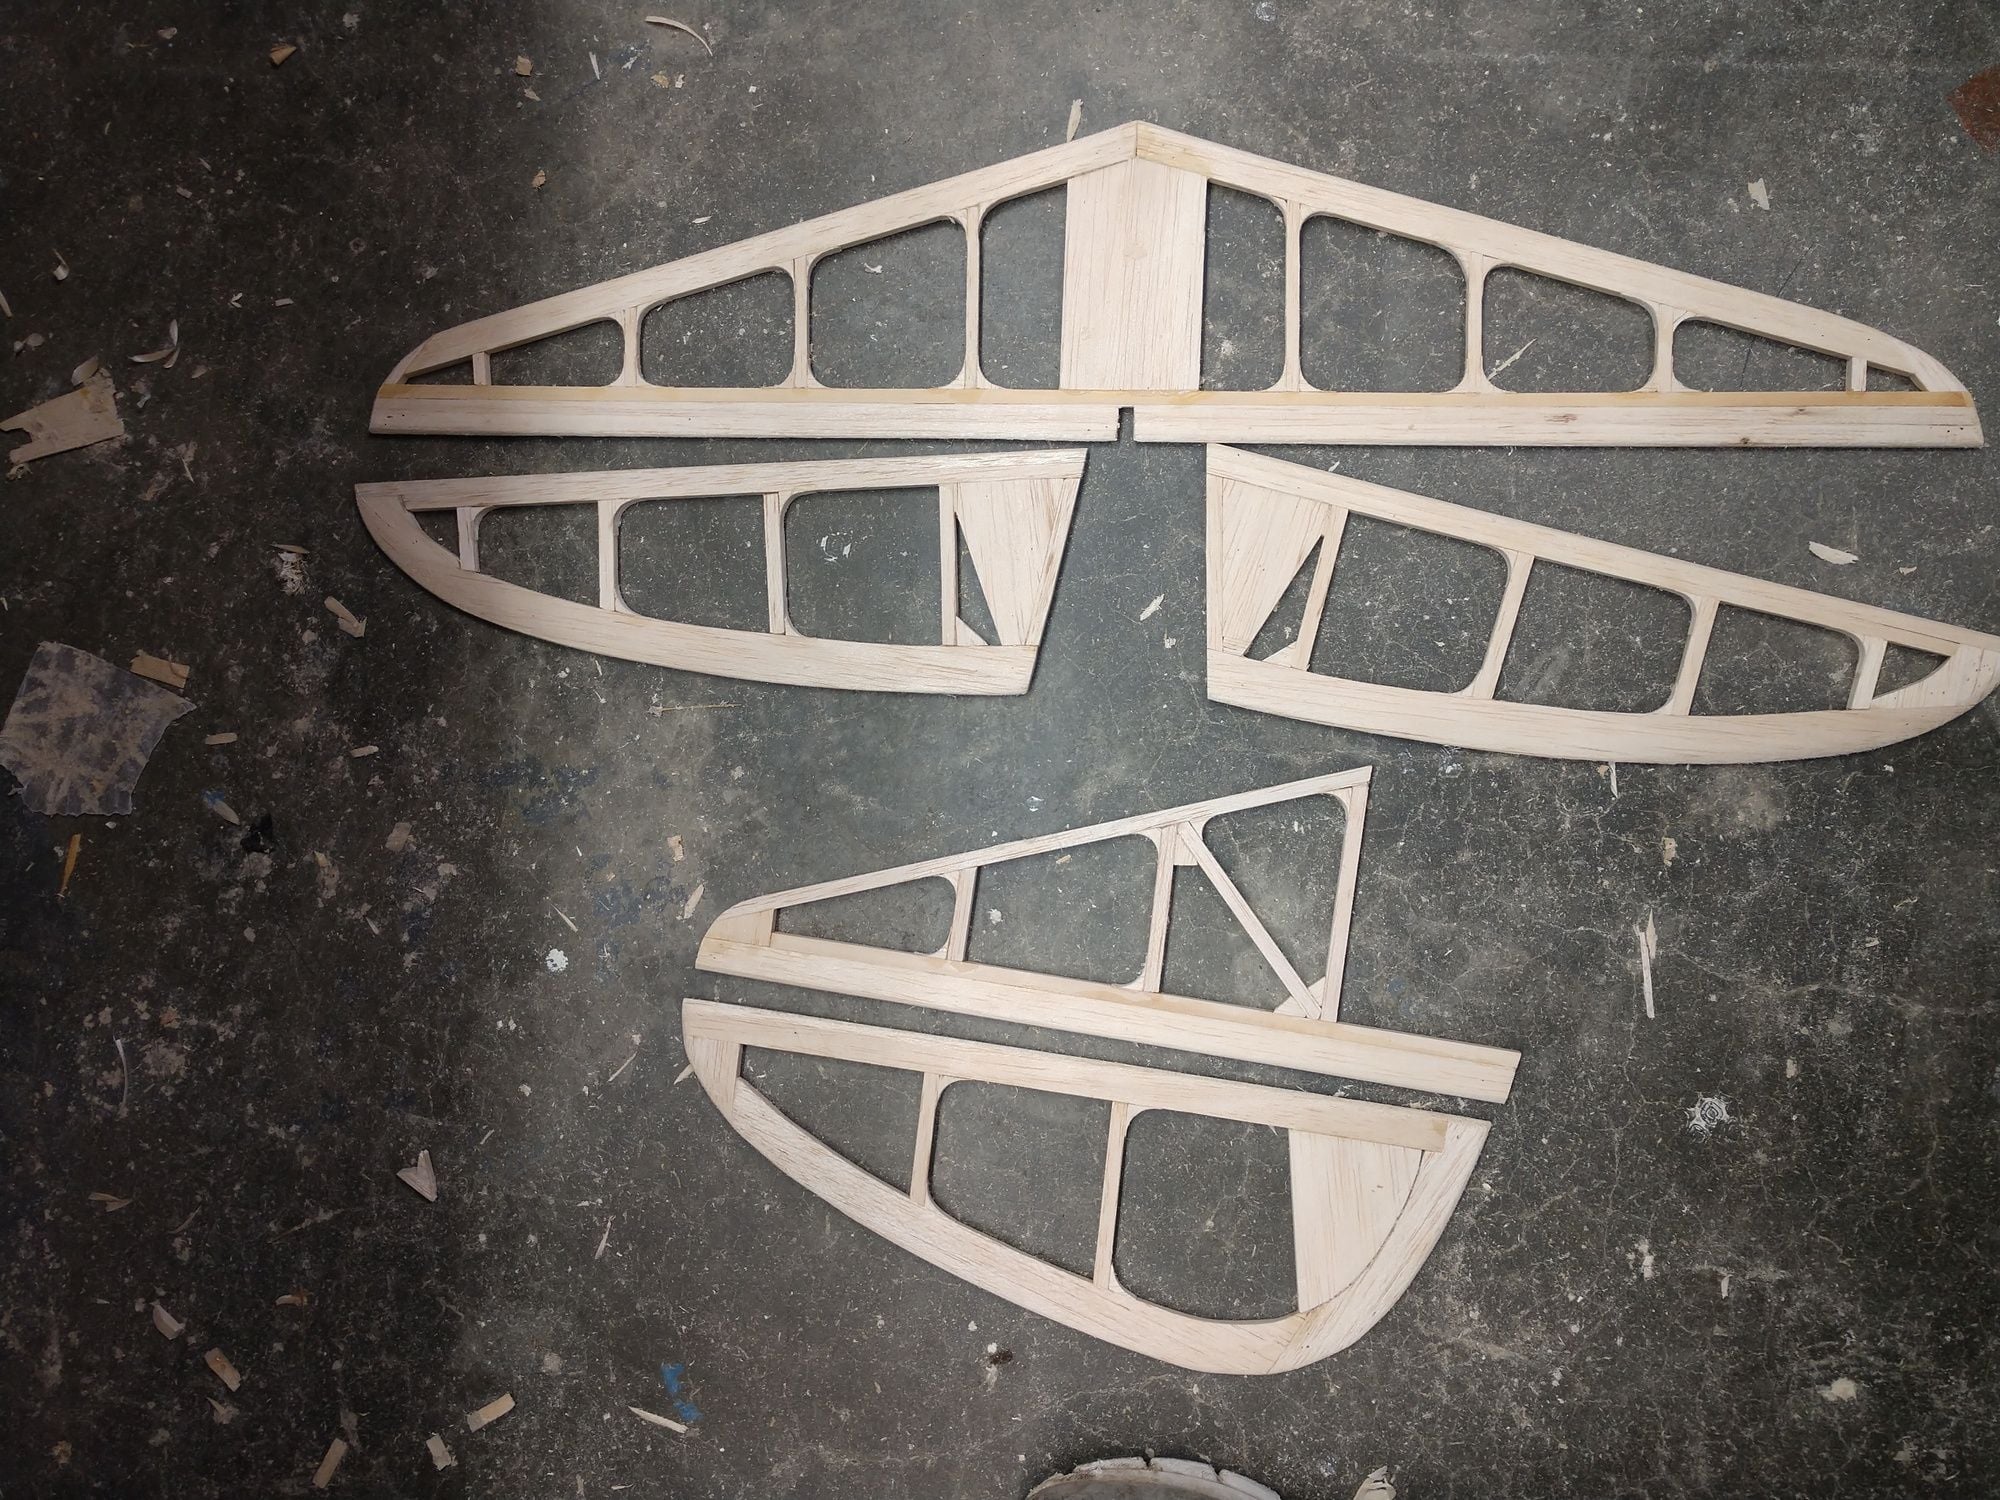
Framed up both wing panels. Have not yet add the shear webbing between the spars. Still have to frame up the center section. This wing does not use a common dihedral break in the middle. instead the cent is flat to a little beyond the fuse sides. So before I start the center I have to cut out the dihedral braces.
This is the very last wing I frame up on the table saw. just to short a work area. I will get myself a solid door or frame up a building board from C channel steel or aluminum, and melamine. I had a 48" building board once and lost it in a move. As long as the C channel is dead straight it works a charm. Just bolt the melamine to the C channel length wise and 2 cross pieces it forces the melamine true. And since the frame that carries the melamine is metal it stays true. My work bench is close, real close, but not good enough for wing framing. It is a torsion box.
I failed to rip enough bass, I used what I had already ripped for other parts of the build. So I ripped 3 more 1/4" bass sparing.
I do unplug the saw when using it to build on, plus when changing the blade. I much rather turn on the switch and find the saw is unplugged than to turn the saw on at a rather bad time.
Ken
Sunday
I was into it today.
Framed up both wing panels. Have not yet add the shear webbing between the spars. Still have to frame up the center section. This wing does not use a common dihedral break in the middle. instead the cent is flat to a little beyond the fuse sides. So before I start the center I have to cut out the dihedral braces.
This is the very last wing I frame up on the table saw. just to short a work area. I will get myself a solid door or frame up a building board from C channel steel or aluminum, and melamine. I had a 48" building board once and lost it in a move. As long as the C channel is dead straight it works a charm. Just bolt the melamine to the C channel length wise and 2 cross pieces it forces the melamine true. And since the frame that carries the melamine is metal it stays true. My work bench is close, real close, but not good enough for wing framing. It is a torsion box.
I failed to rip enough bass, I used what I had already ripped for other parts of the build. So I ripped 3 more 1/4" bass sparing.
I do unplug the saw when using it to build on, plus when changing the blade. I much rather turn on the switch and find the saw is unplugged than to turn the saw on at a rather bad time.
Ken
01-12-2020, 05:43 PM
#15
Thread Starter
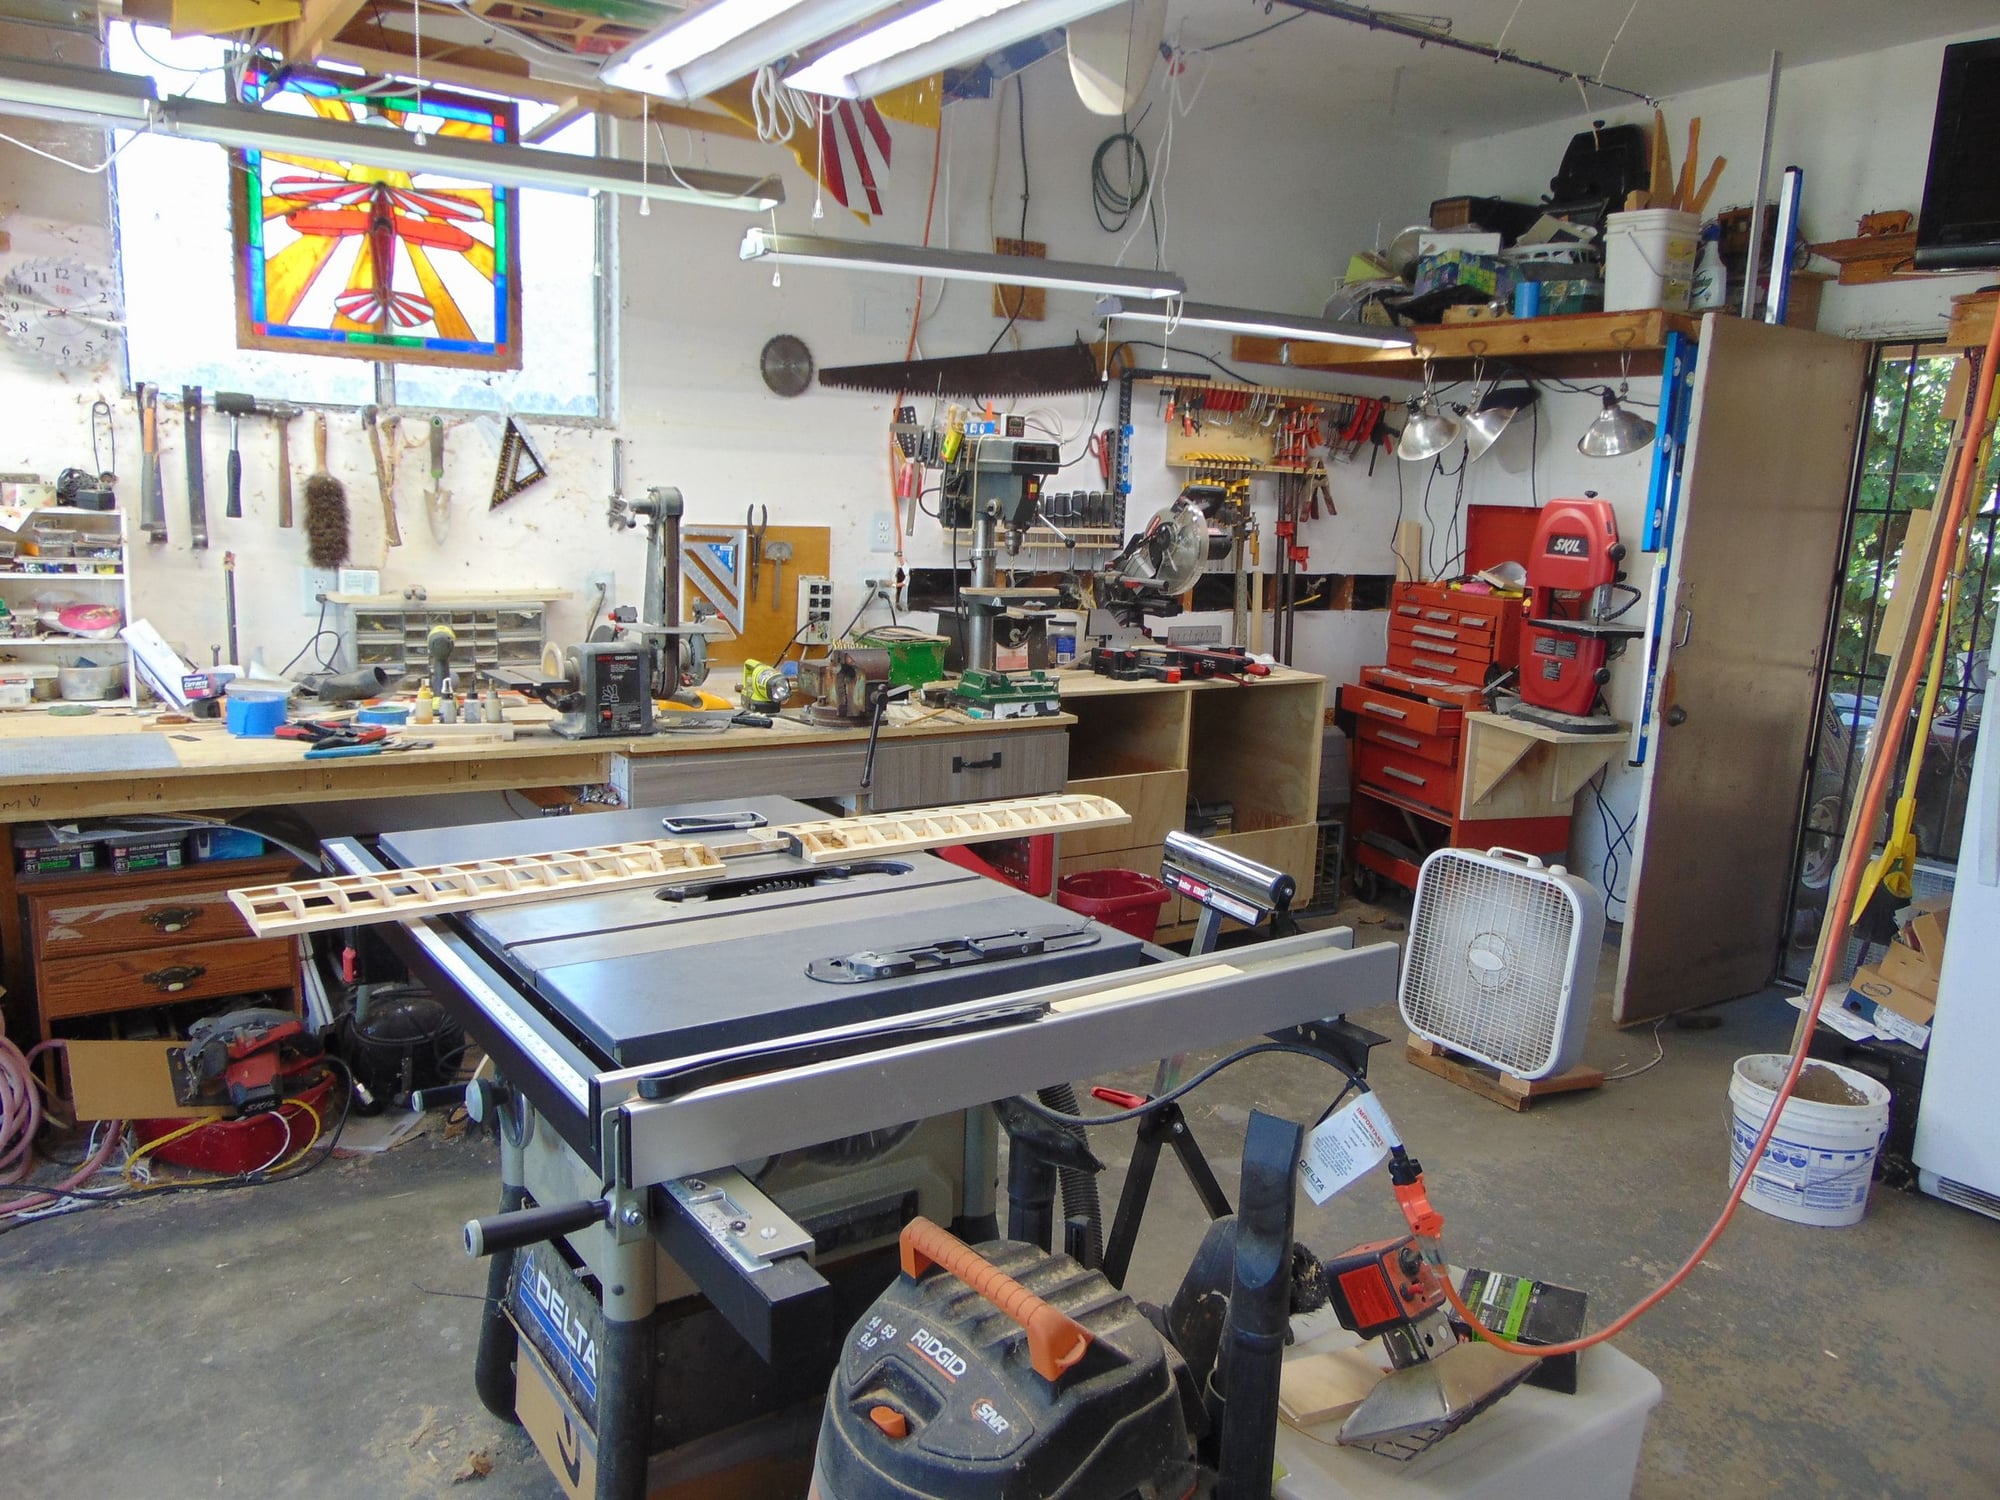
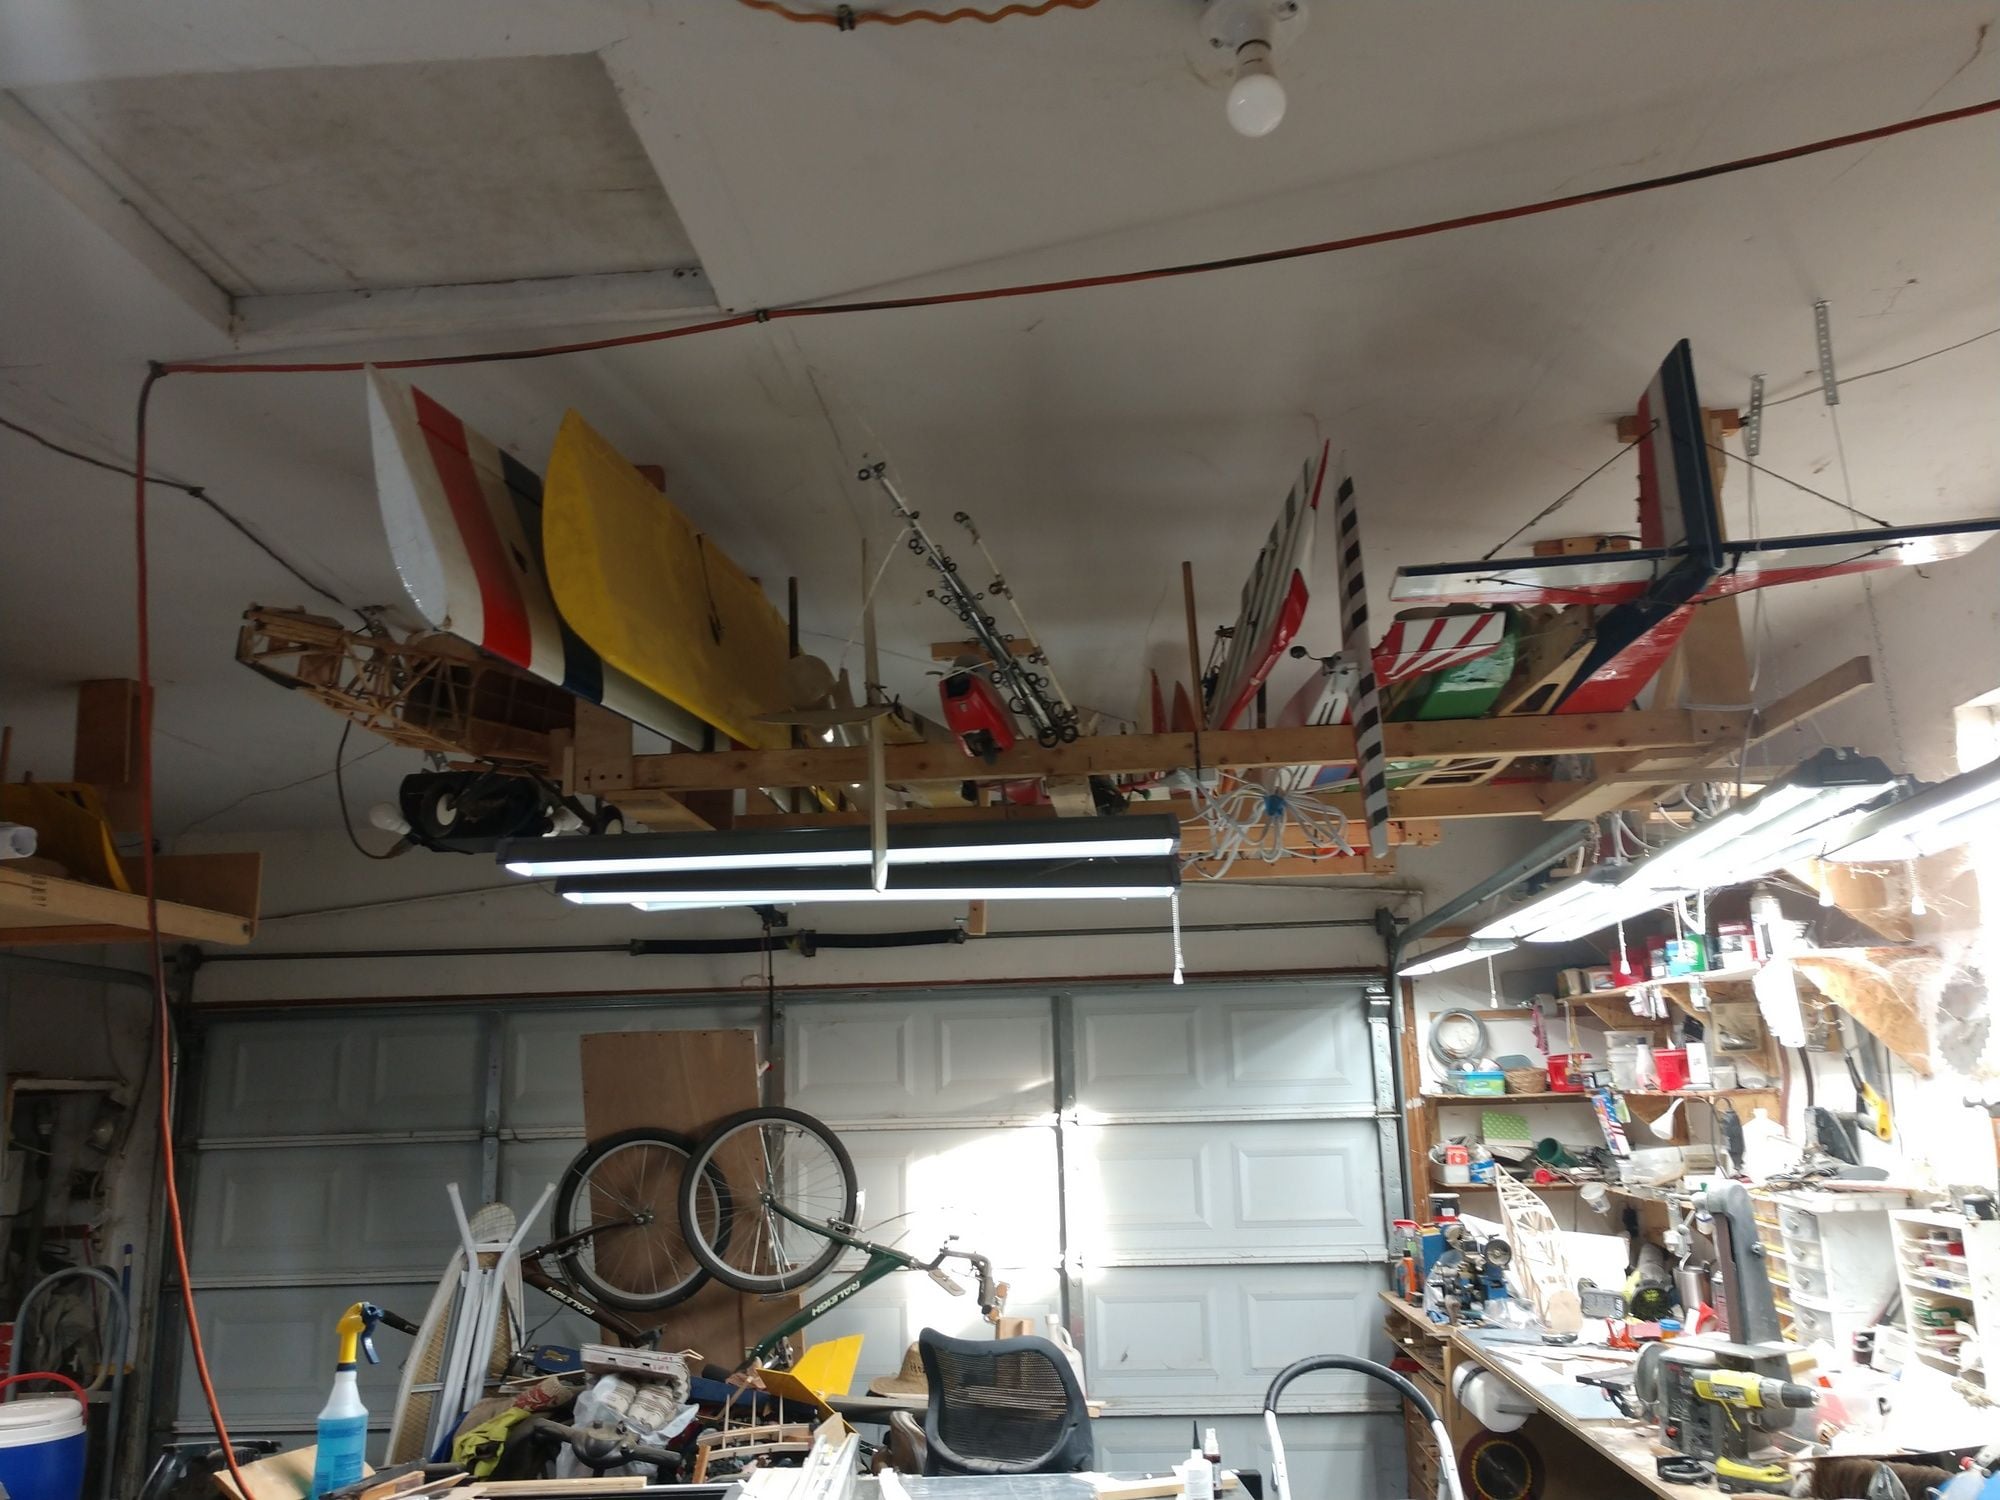
Iv'e mentioned my work bench a couple of times.
So here it is.
A wing from another smaller build is on the saw.
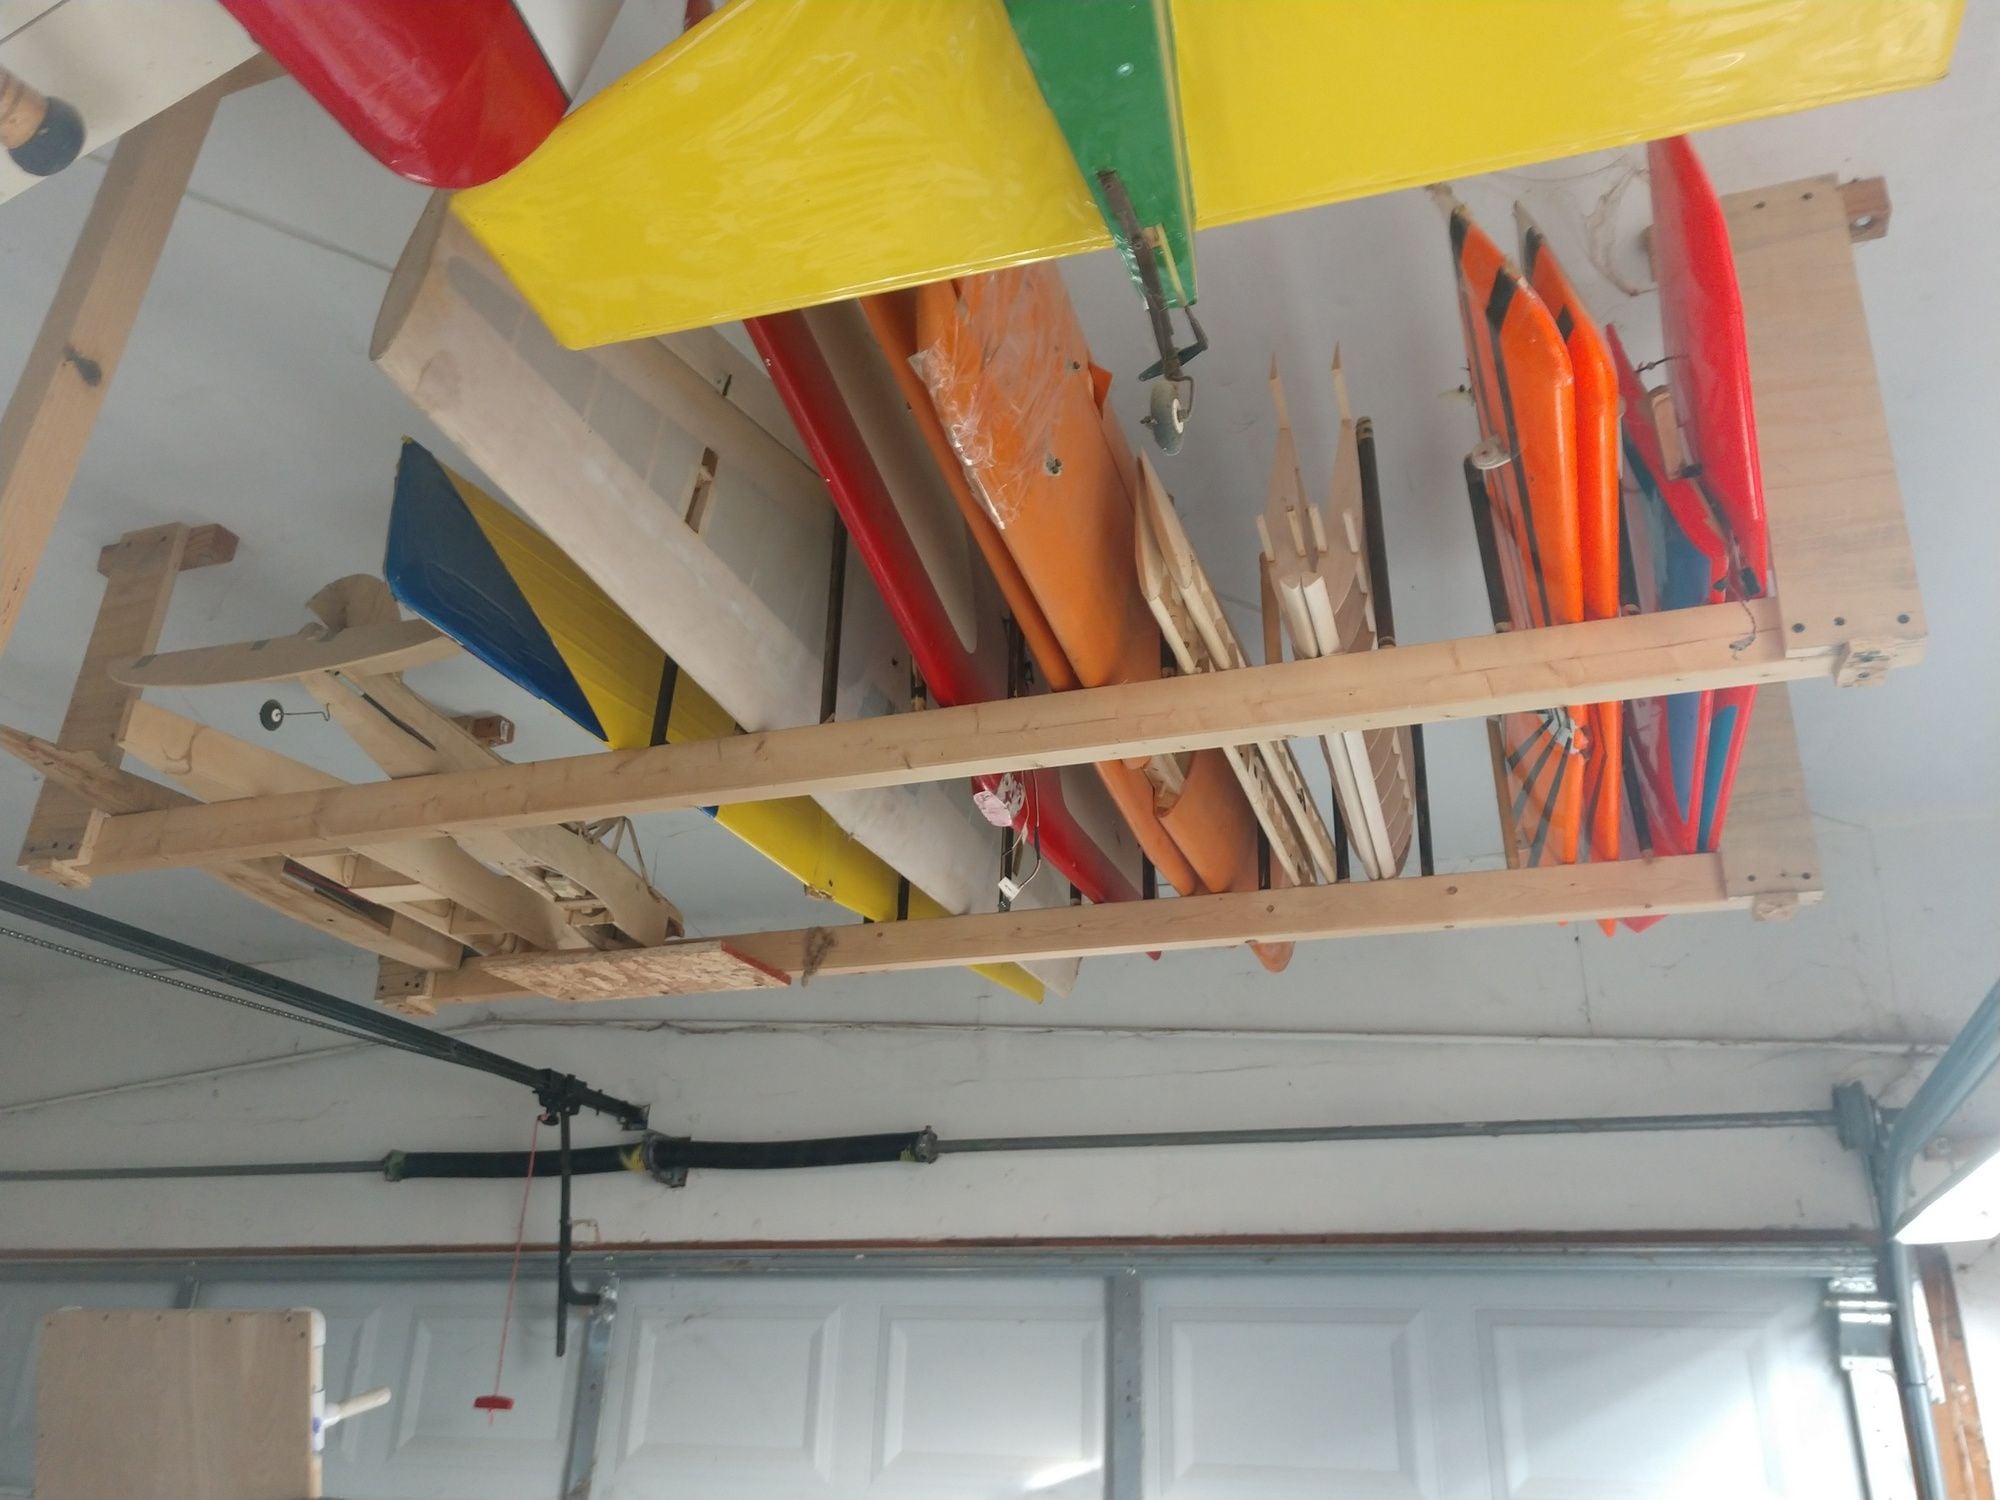
I have one other (lite) wood storage that is 4' by 8". Hangs under an airplane rack that is suspended from the ceiling.
Ken
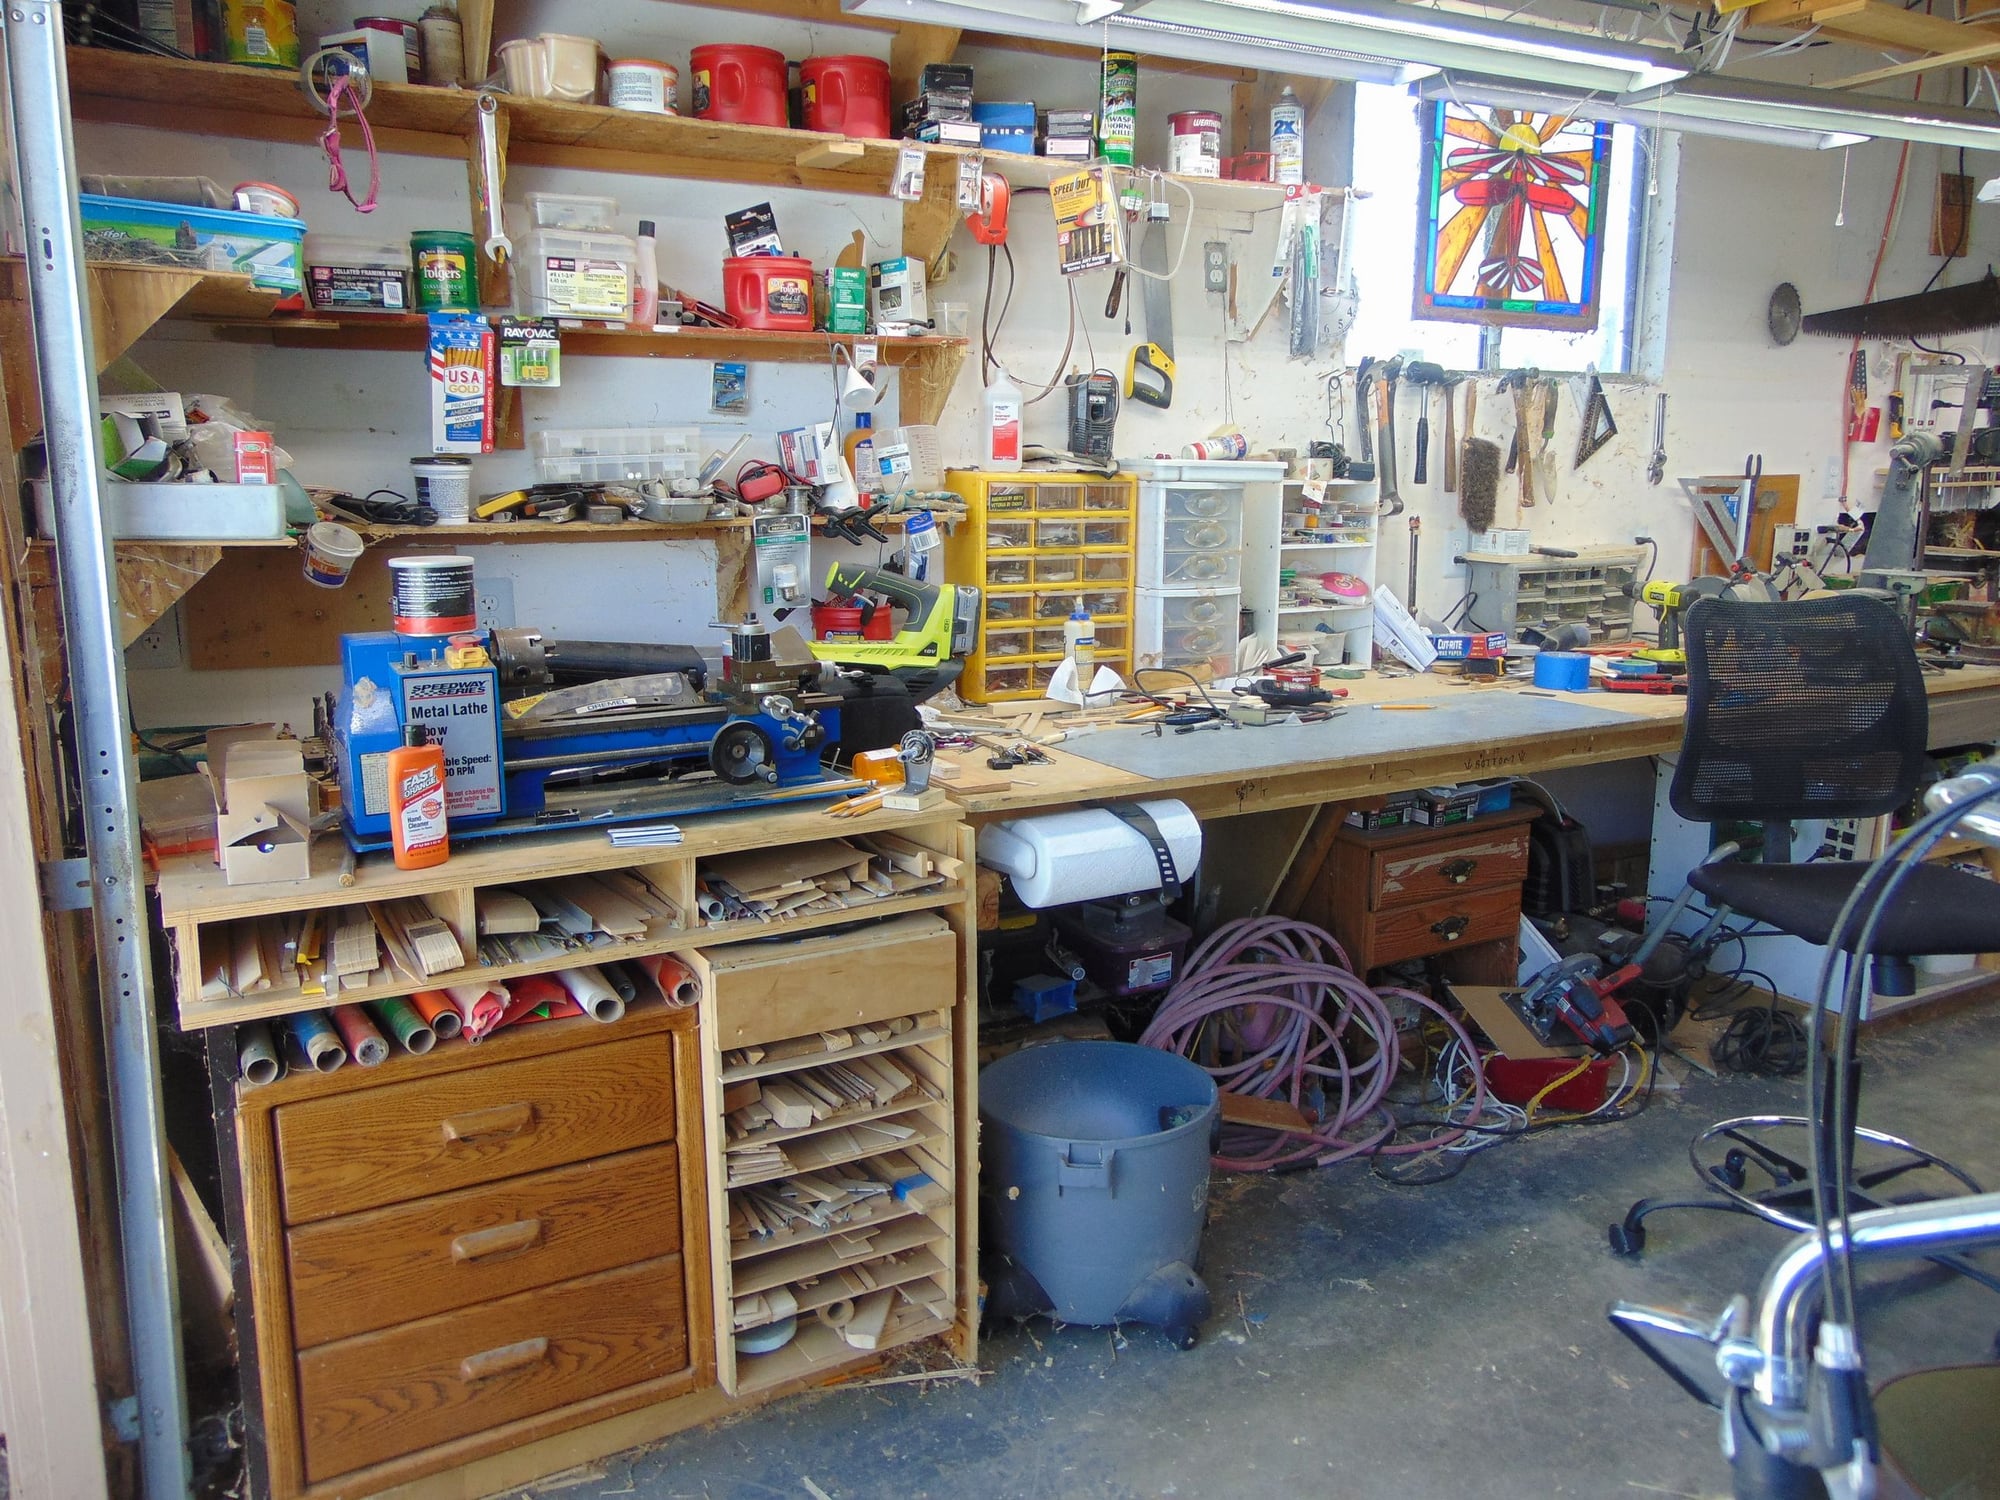
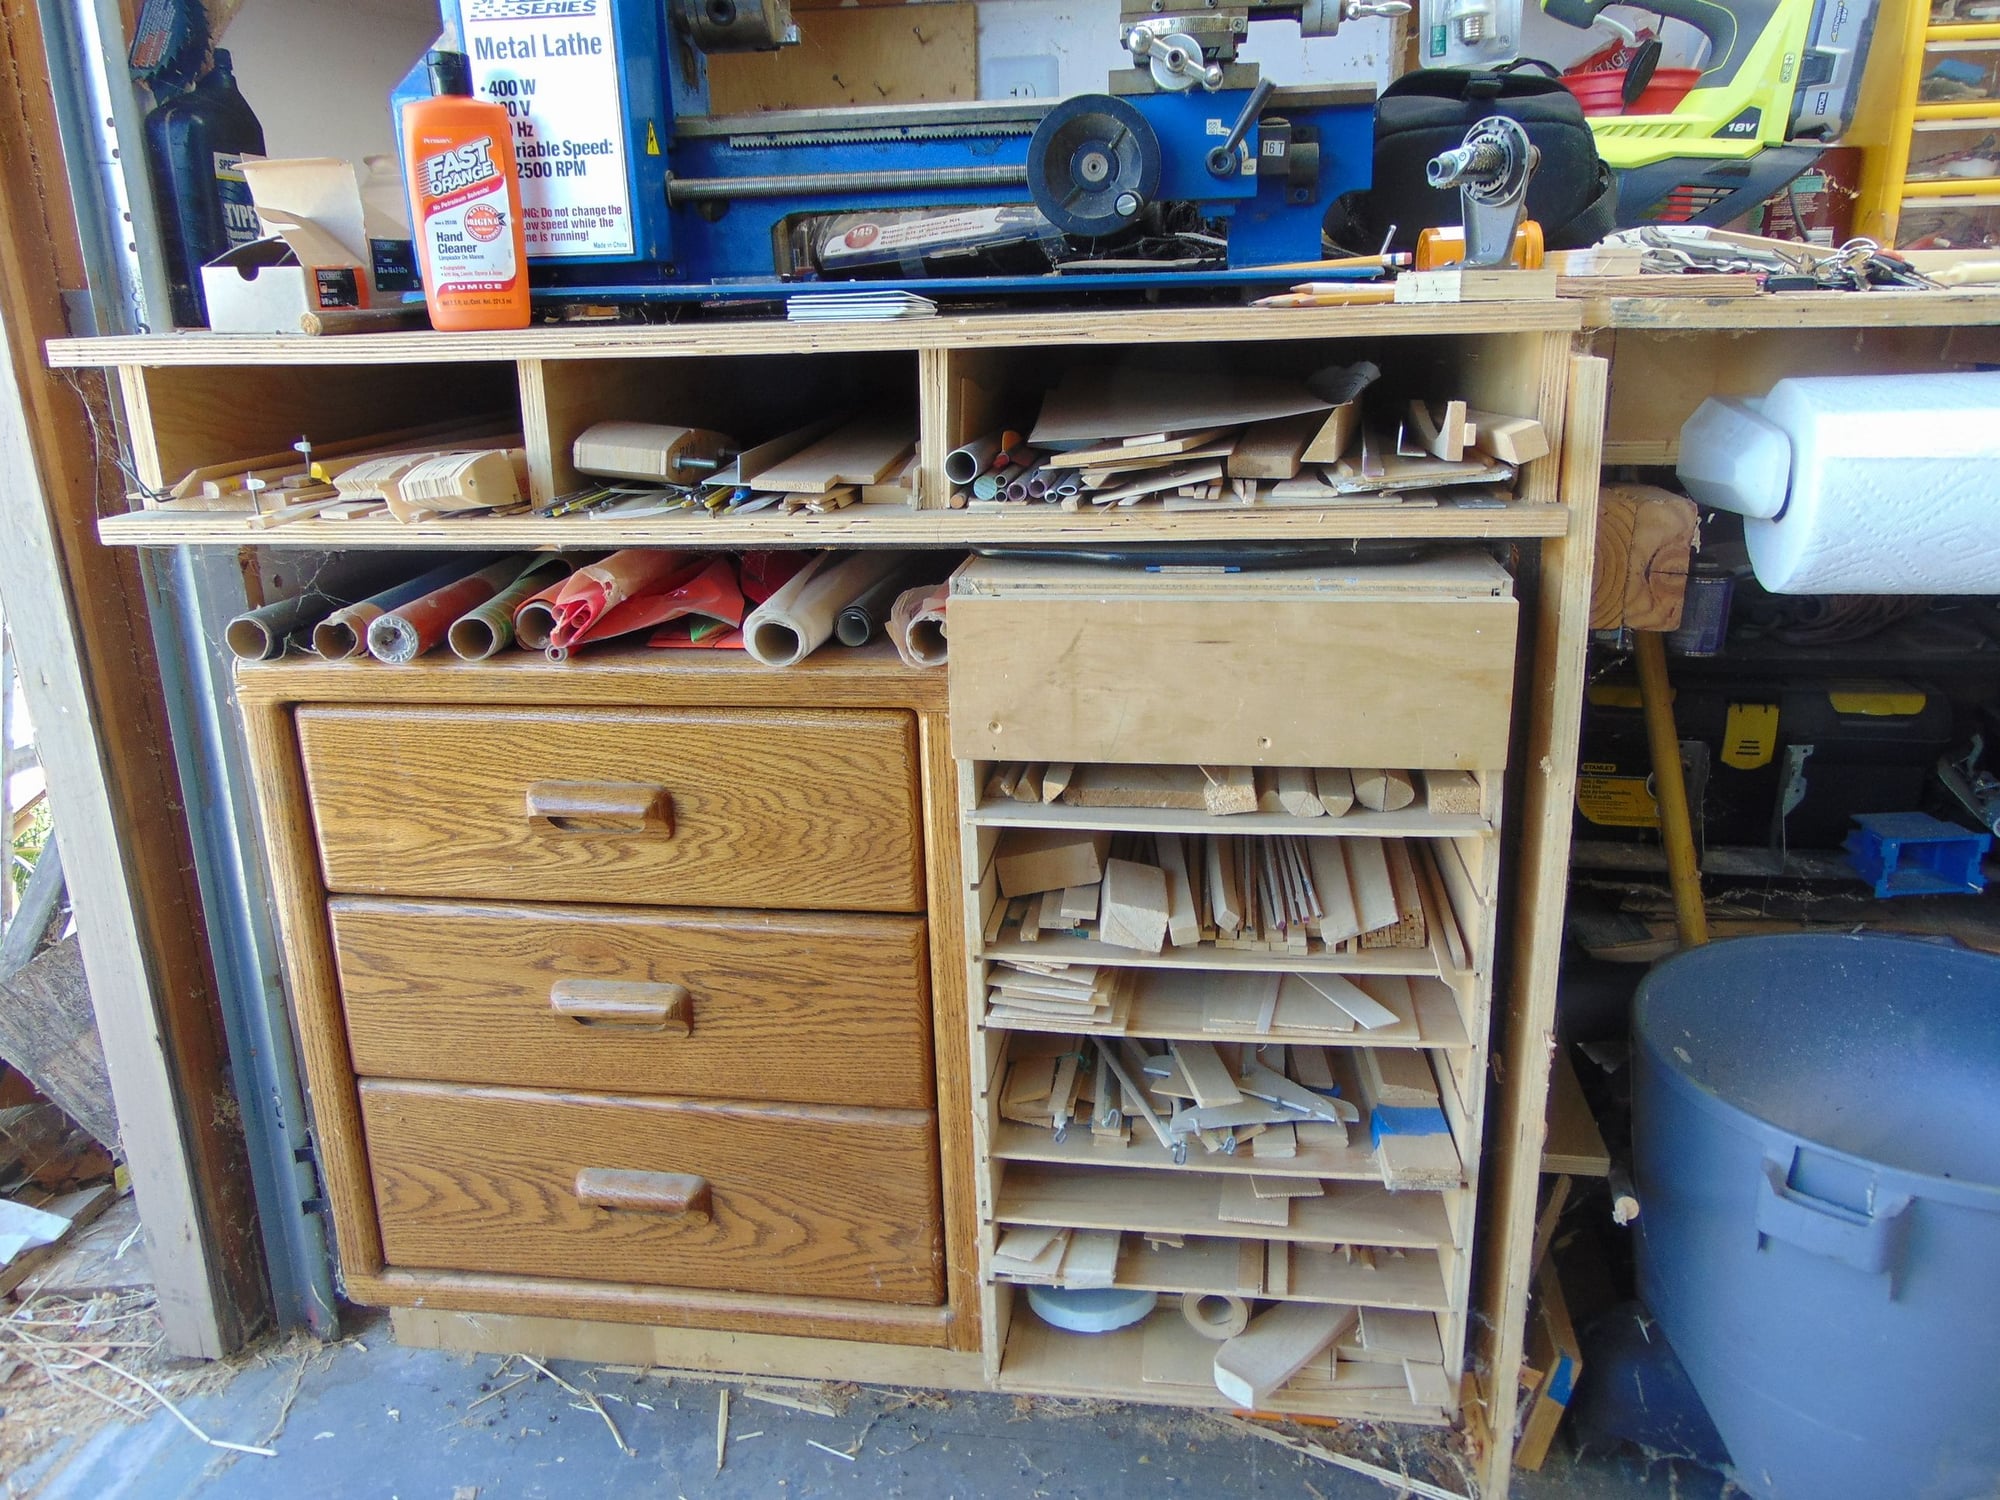
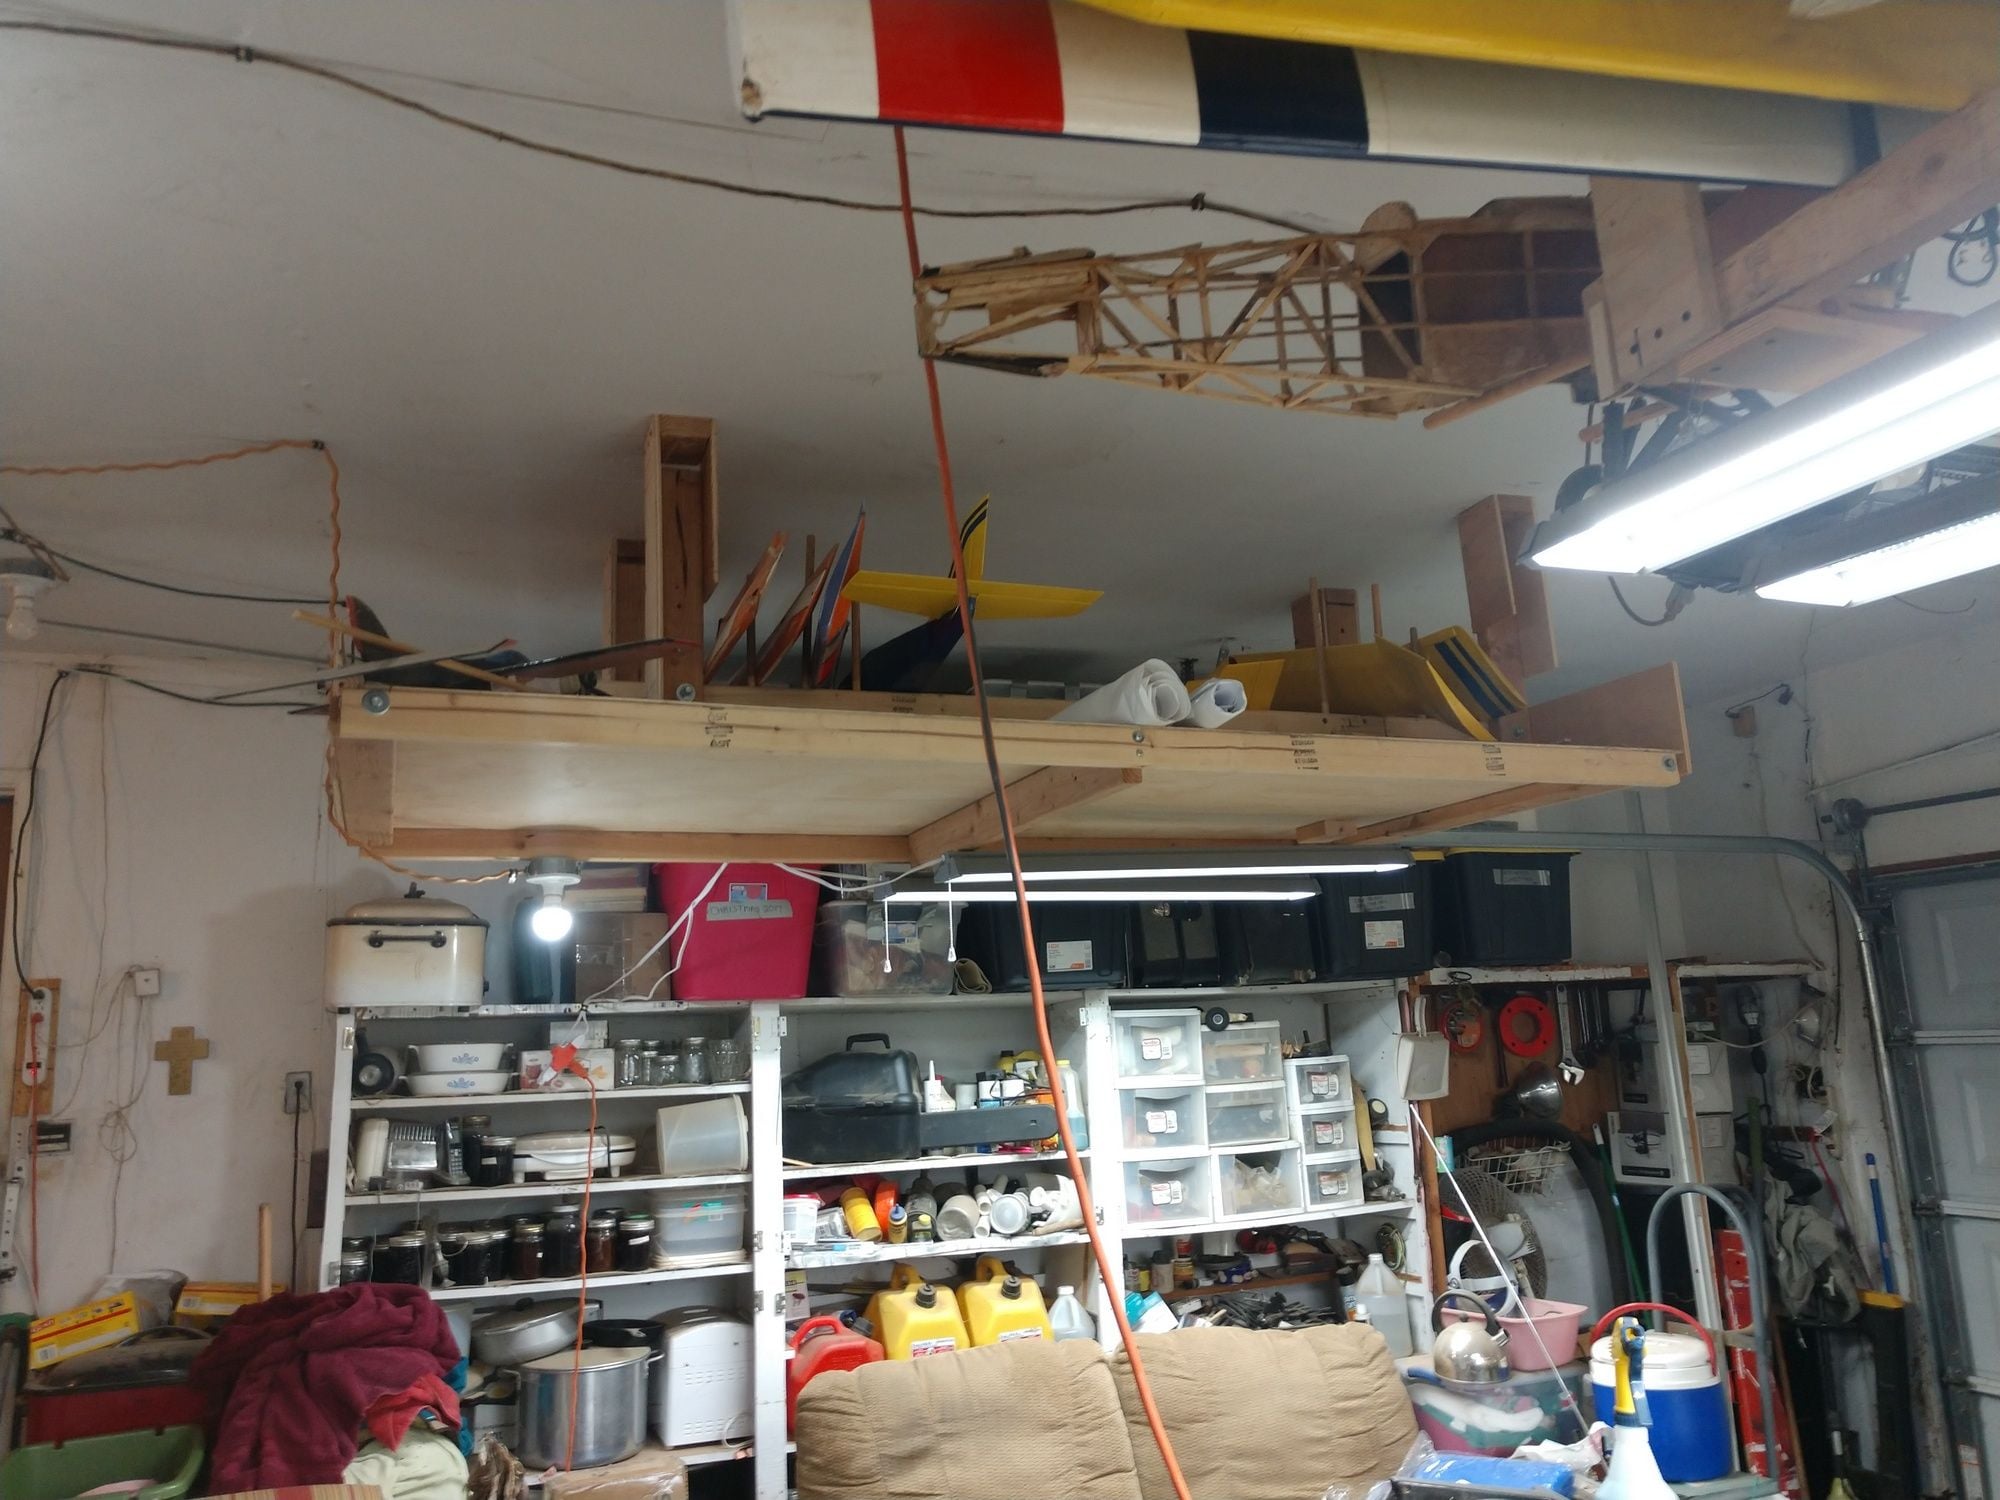
I salvaged an old computer desk for its draws. The draws and film covering section are 24" deep. The rest is 36" deep. The wood shelf's slide in dadoes. This was an upper kitchen cabinet. The cabinet on the other end was a bottom unit. Can't see it well in these pictures.

So here it is.
A wing from another smaller build is on the saw.
I have one other (lite) wood storage that is 4' by 8". Hangs under an airplane rack that is suspended from the ceiling.
Ken
I salvaged an old computer desk for its draws. The draws and film covering section are 24" deep. The rest is 36" deep. The wood shelf's slide in dadoes. This was an upper kitchen cabinet. The cabinet on the other end was a bottom unit. Can't see it well in these pictures.
01-14-2020, 05:31 PM
#16
Thread Starter
Managed some work time on the build.
Doesn't seem like I got much done, but any forward progress is good, I reckon.
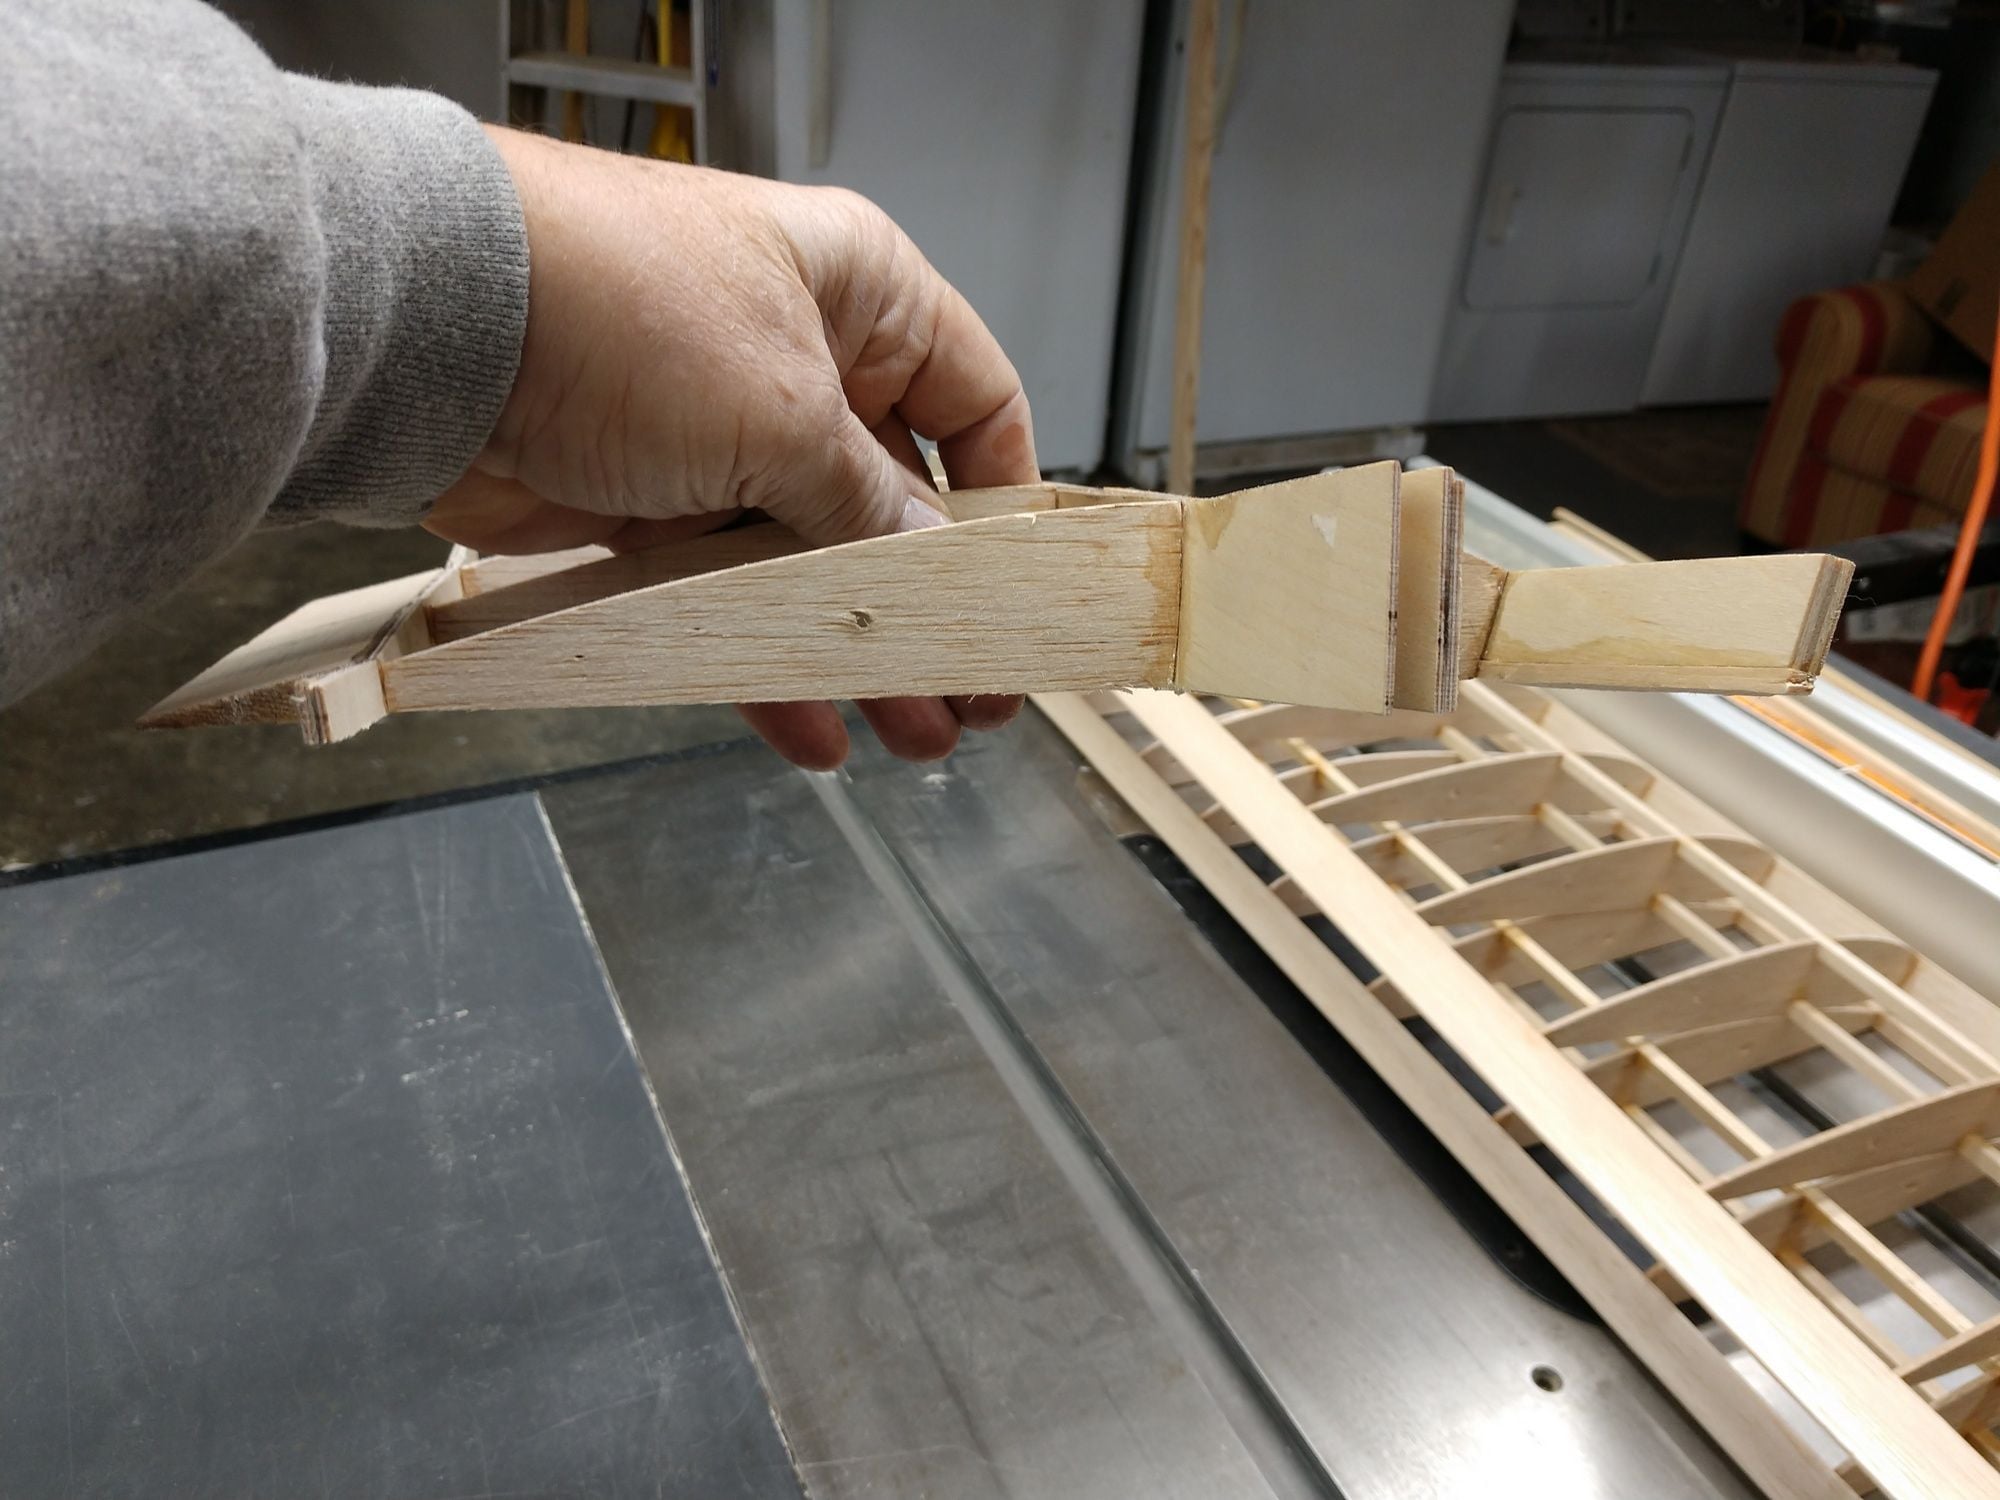
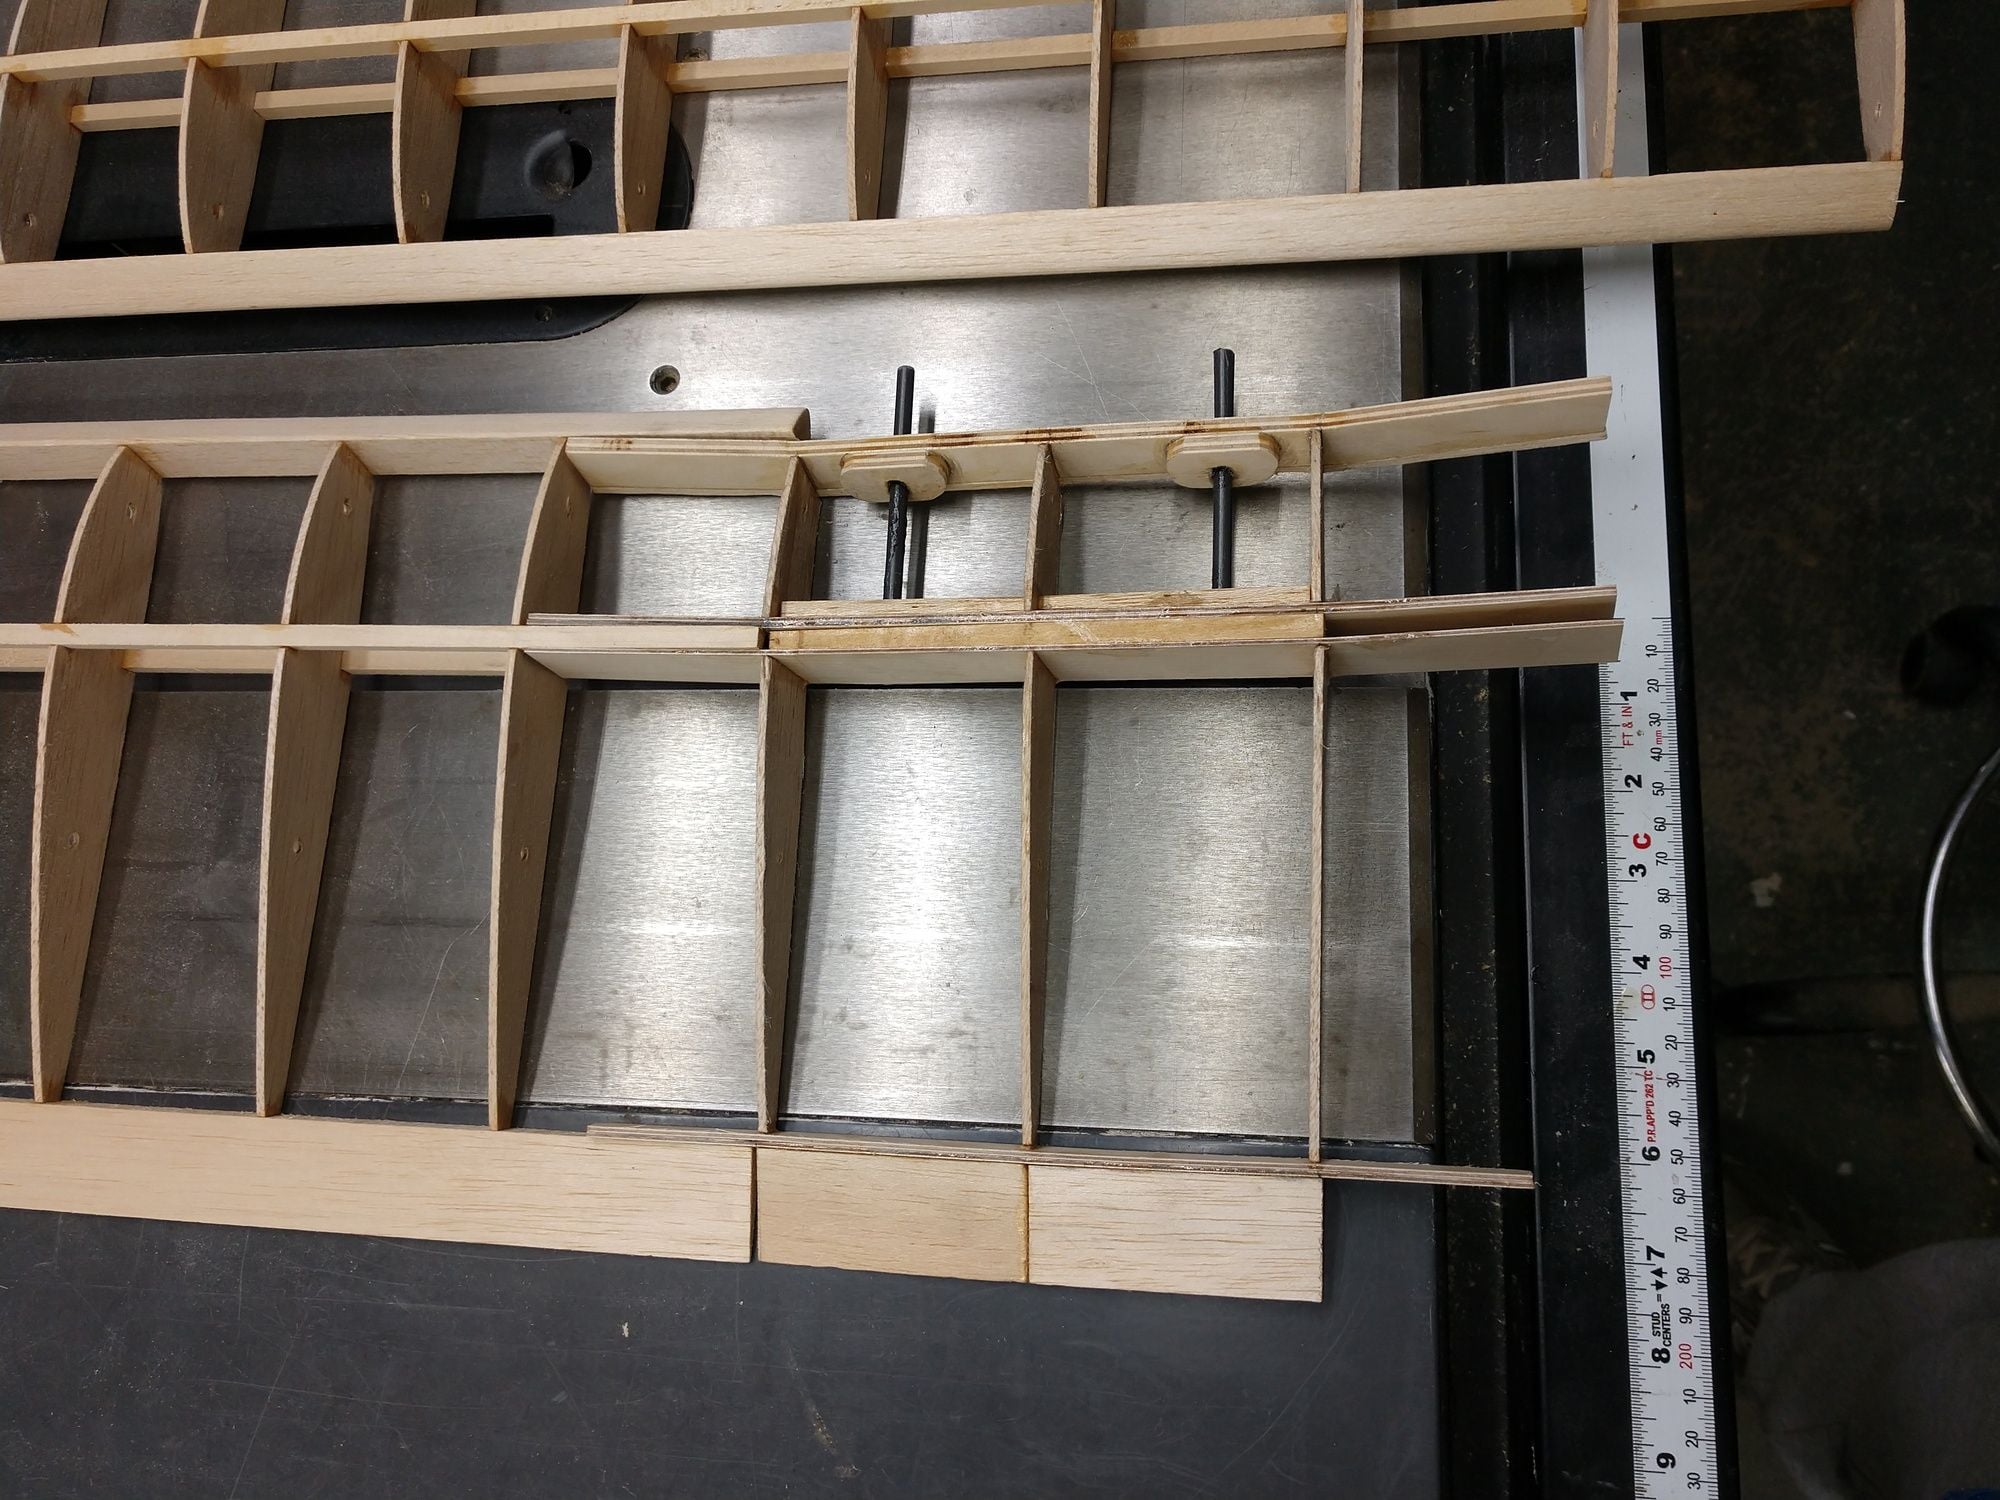
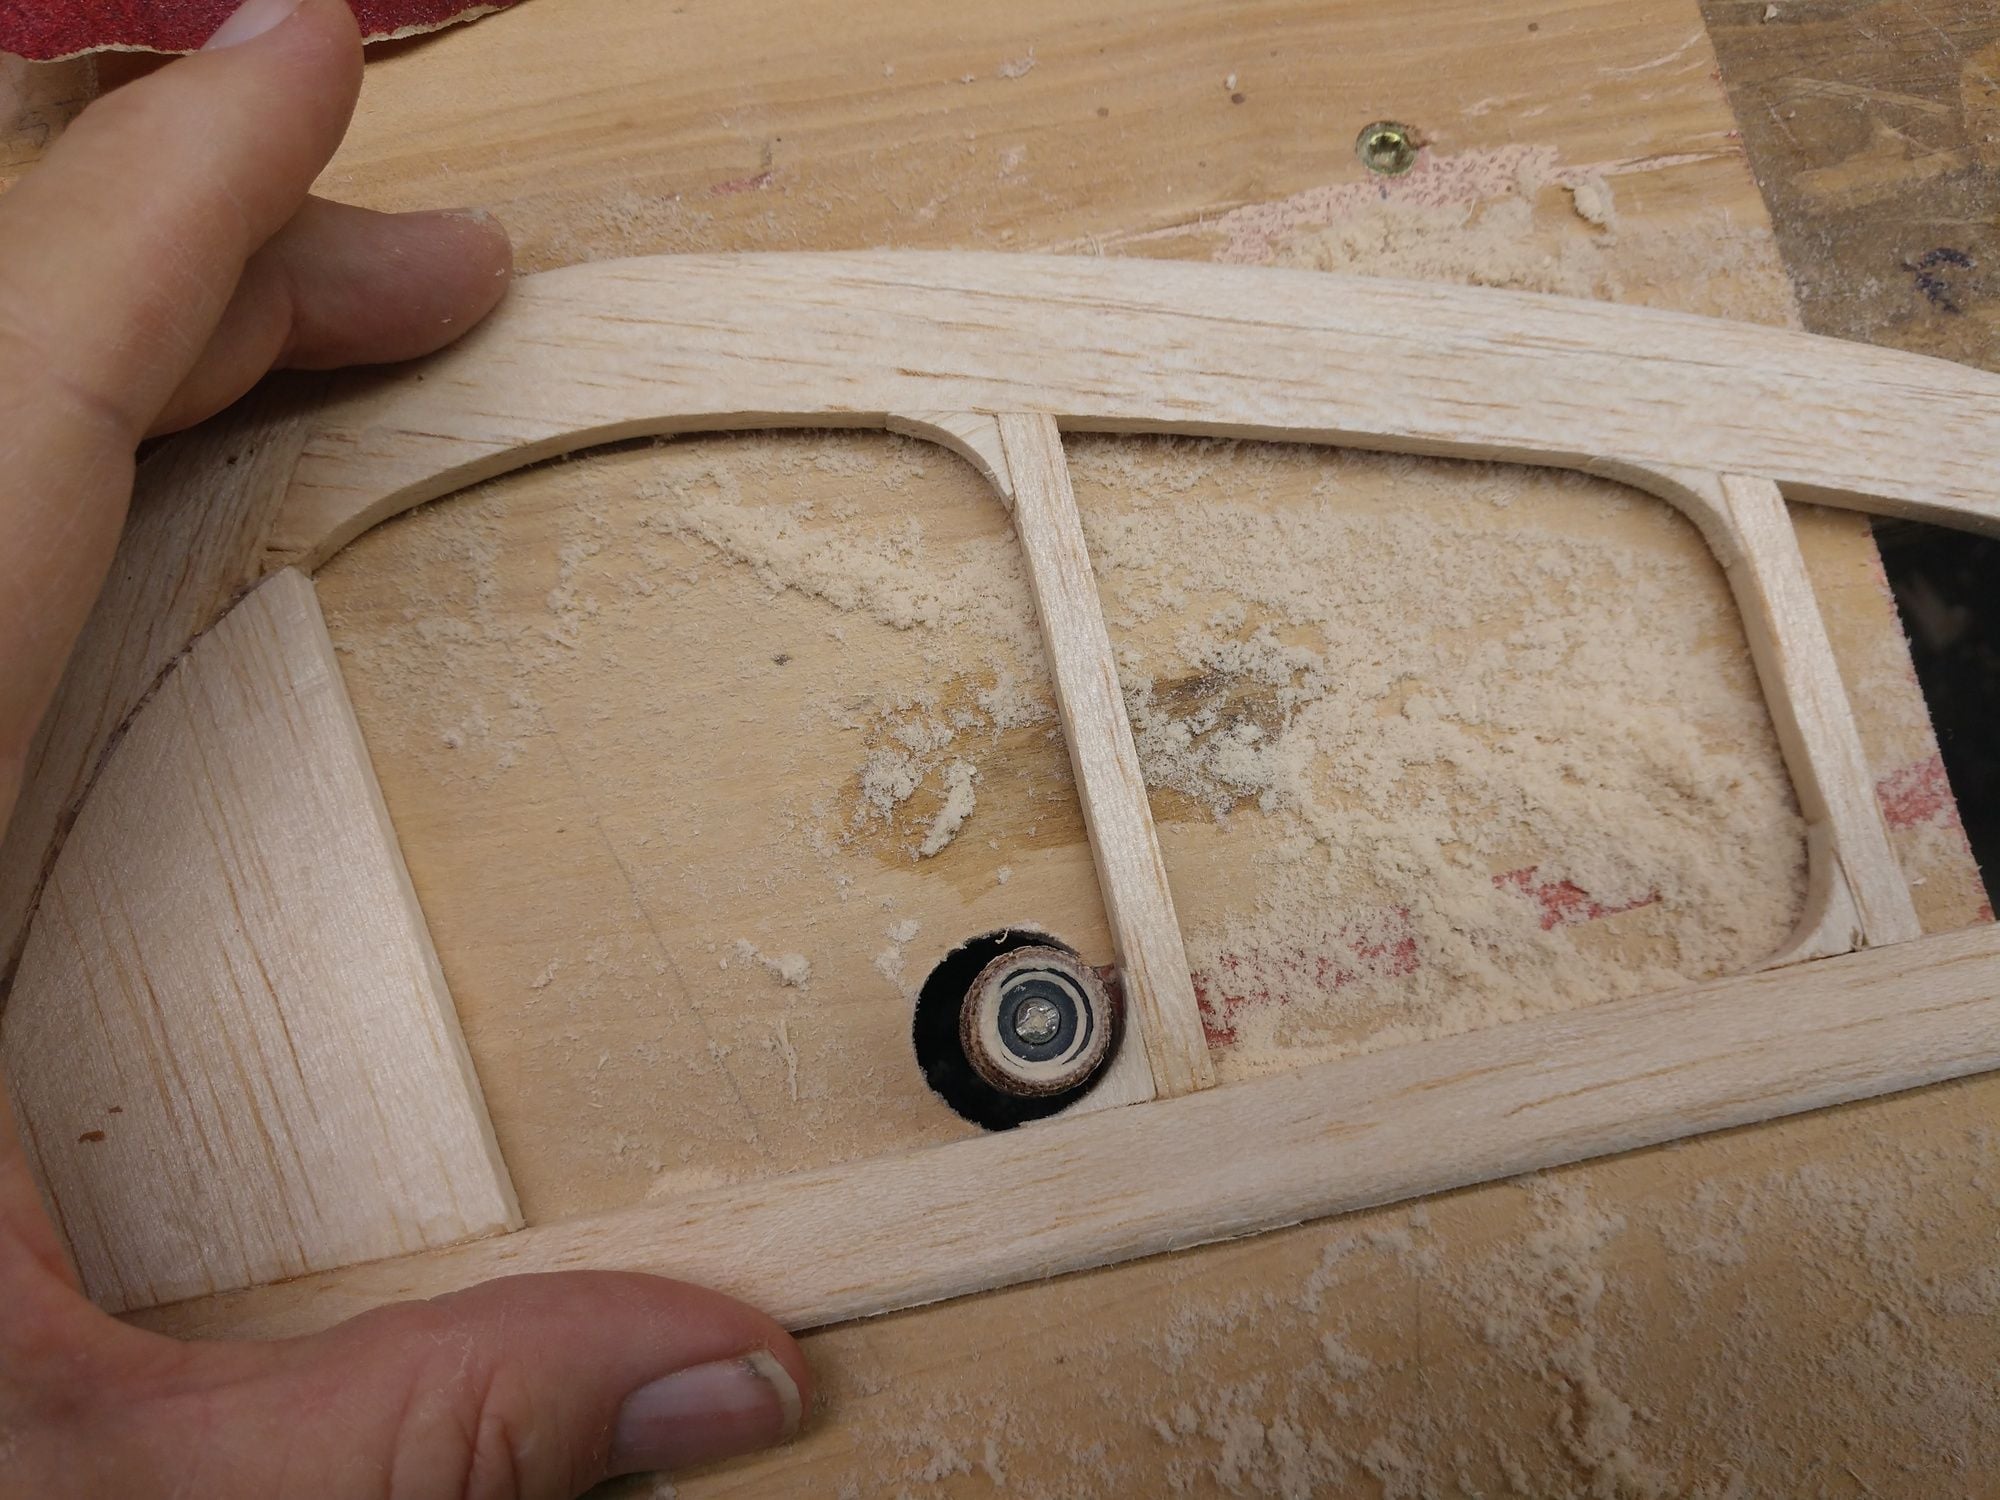
Working on the wing center section with all of the ply dihedral doubles. What I have is not necessarily by t he plans at this point. I am not going to rubber band the wing on, but rather 2 1/4" 20 nylon bolts at the trailing edge, and 2 dowels at the front. The back is easy, and will only be marginally visible after covering., if at all, other than the bolt heads on the top. But the front is were it is much harder to hide the works. The front cockpit area is clear plastic a course. So anything protruding down into the cockpit will be visible. I have been round and round in my head how to do this. Normally the dowels would just stick into the the bulkhead at the wing LE, but that obviously will not work this time. Any structure or hardware below the fuse top stringer will will be visible. So I am stuck with the dowels and the receiving structure has to be above the top fuse stringer.
So actually, I am back to one of my early ideas, go figure. I am taking a clue from one of my biplanes lower wing. The leading edge is notched back, and the LE position former is set back to were the LE would normally be. So what I am going to do is have the Wing's center LE as part of the fuse, and some birch ply as part of it with holes to recieve the 2 wing dowels. The wing LE dihedral doubler will be set back slightly. The wing will simply slide into place, the dowels engaging, and the back bolt down.
Not at all confident that my explanation is very clear. Mud might be mere clear. But this is the best I can translate the picture in my head. I should be more clear in a few days to you, I hope.
I have to get more 1/4" ply before continuing on the wing center section forward the dihedral doubler and the fuse dowel receiver. Tomorrow.
So on the wing center sections TE has a 1/8" dihedral doubler. The doubler on the back of the spars is 1/16", with 1/8" ion the front of the spars. The wings LE doubler will be 1/4" as well as the the part that is epoxied to the top front of the fuse wing saddle.
Ken
Doesn't seem like I got much done, but any forward progress is good, I reckon.
Working on the wing center section with all of the ply dihedral doubles. What I have is not necessarily by t he plans at this point. I am not going to rubber band the wing on, but rather 2 1/4" 20 nylon bolts at the trailing edge, and 2 dowels at the front. The back is easy, and will only be marginally visible after covering., if at all, other than the bolt heads on the top. But the front is were it is much harder to hide the works. The front cockpit area is clear plastic a course. So anything protruding down into the cockpit will be visible. I have been round and round in my head how to do this. Normally the dowels would just stick into the the bulkhead at the wing LE, but that obviously will not work this time. Any structure or hardware below the fuse top stringer will will be visible. So I am stuck with the dowels and the receiving structure has to be above the top fuse stringer.
So actually, I am back to one of my early ideas, go figure. I am taking a clue from one of my biplanes lower wing. The leading edge is notched back, and the LE position former is set back to were the LE would normally be. So what I am going to do is have the Wing's center LE as part of the fuse, and some birch ply as part of it with holes to recieve the 2 wing dowels. The wing LE dihedral doubler will be set back slightly. The wing will simply slide into place, the dowels engaging, and the back bolt down.
Not at all confident that my explanation is very clear. Mud might be mere clear. But this is the best I can translate the picture in my head. I should be more clear in a few days to you, I hope.
I have to get more 1/4" ply before continuing on the wing center section forward the dihedral doubler and the fuse dowel receiver. Tomorrow.
So on the wing center sections TE has a 1/8" dihedral doubler. The doubler on the back of the spars is 1/16", with 1/8" ion the front of the spars. The wings LE doubler will be 1/4" as well as the the part that is epoxied to the top front of the fuse wing saddle.
Ken
01-15-2020, 04:58 PM
#17
Thread Starter
I had to buy a little more 1/4" Ply. What I had left was to short to make the front dihedral double. I spent a whopping $2.50. To continue on with the wing.
So once I got the forward doubler made I had to trim the front of the ribs back so the double would line up with the outer wing panels. Looks like I took off maybe a 1/15" to much. I will just use thin fill stock. The T.E. and spar doublers match up.
I think all of the testing and adjusting fit was the biggest part of job building the center section.
The T.E. doubler is 2 layers of 1/16" ply because I did not have any 1/8" ply on hand. The same thing for the spar front doubler. The spar rear double is just 1/16" ply. The L.E. doubler is 1/4" ply.
I will sheet the center section and one rib beyond, then fiberglass with on layer of 4 ounce fiberglass. Probably will add one extra strip 1 or 2" wide right at the joints where the sections join.
The front hold down dowels are pieces of a carbon fiber rod I had on hand. didn't check the size. the dowels will mate into a built up area on front top of the wing saddle. Then 2 1/4 20 nylon bolts will hold the back of the wing to the fuse.
After I cut and sanded to final shape the L.E. dihedral brace I fused around with placement of the dowels and the had to drill the holes. Wanted them straight so over to the drill press. And no joy. The spindle and chuck weren't turning and it was making a rather ugly sound. So stop and fix the drill press. I had recently had it apart to replace the motor bearings. it had started howling. Only spent $15 dollars for the bearings once I found them. A electric motor repair shop nearby that I worked at in 1977 wanted $90 for shop time plus $30 for the bearings. No darn way. I had to buy a cheap bearing puller and grind down the back of the jaws so it would fit. Probably spent a total of 2 hours, but a pretty cheap deal and Iv'e added on more tool to my collection for future use. Well I need to fire the repair tech who worked on the drill press, call him some unflattering names first. The set screw for the motor drive pulley needed to be tighten down more. Might need some lock tight on the threads. Now the drill press sounds like the day I got it. I had priced out a replacement and squired away the first hundred bucks. So I can apply the money towards a jointer.
After I resolved the drilling issue I fussed around with jigging the dowels to be straight and level when glued in.
The outer wing panels inner 1st rib have to be temporally removed for the ply dihedral doublers to fit in. But it looks like this is going to work out.
Ken
01-16-2020, 01:57 PM
#19
Thread Starter
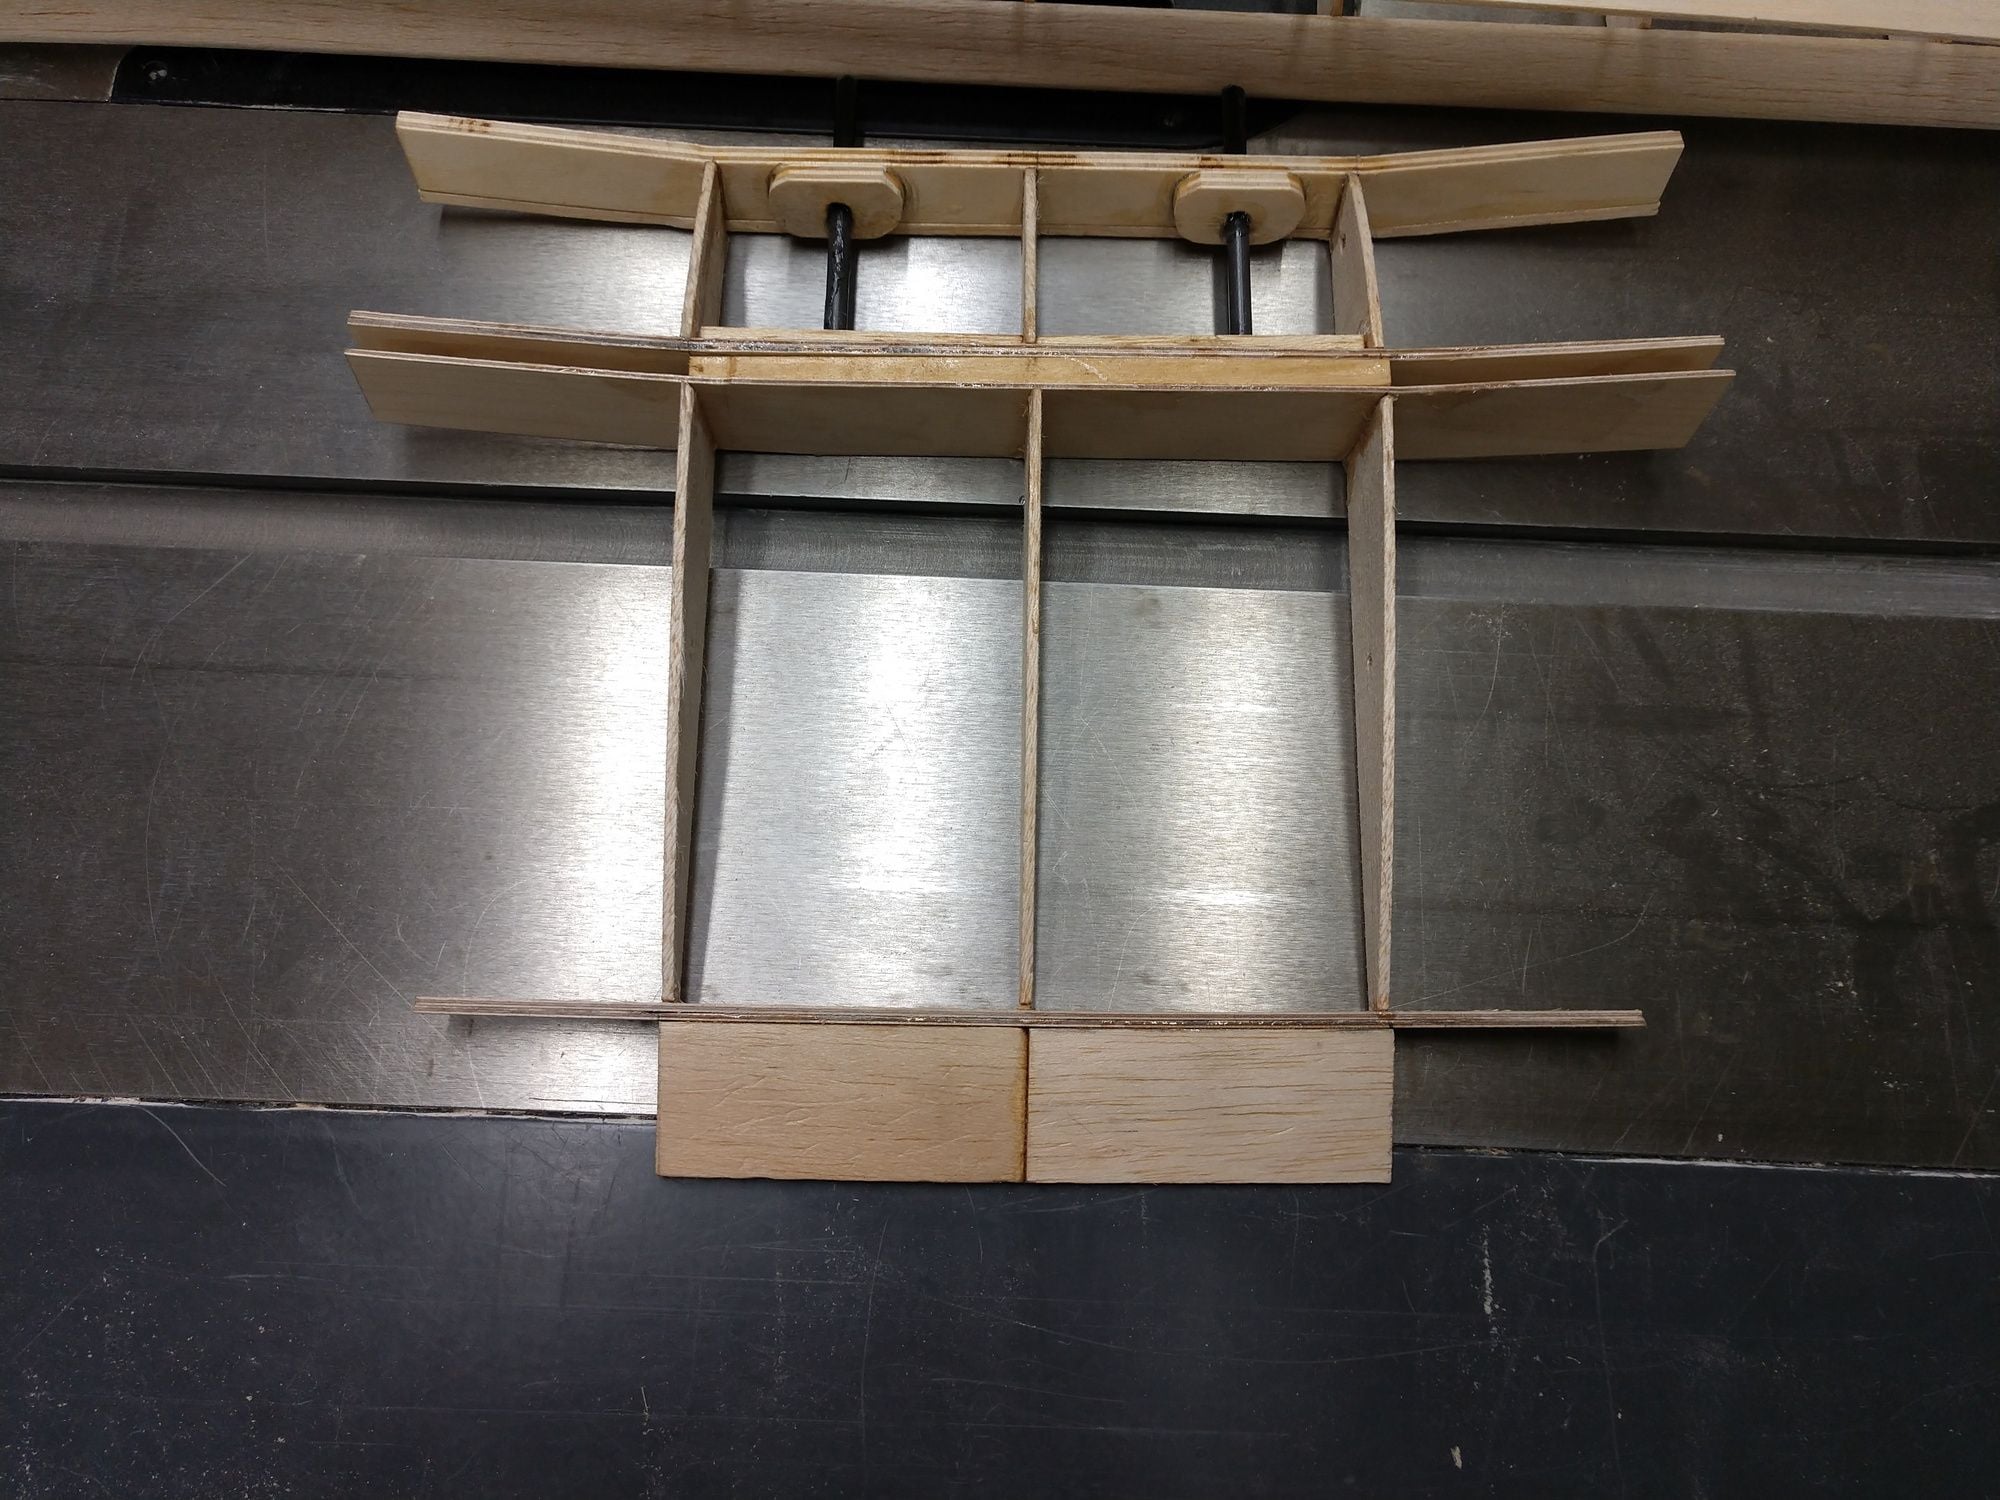
Dang it! my center section is not true. Not sure exactly where it is off at, but doesn't really matter. I will make a new one. I have all the stock I need. Will approach it in a different fashion.
I will make 3 new ribs and new dihedral doublers. This time I will stack all of the doubler ply and shape them at the same time. And maybe make a new ply blank for the ribs , and then I can cut it up into the front rib and back rib section.
Today a cold rain has moved in. The garage is stinking COLD. Iv'e spent maybe 1 hour out there in 2 or 3 short sessions, and that with sweats on. I don't know how long this cold is supposed to last. Wednesday I can purchase more propane, Then I will have heat. Got 3 tanks to fill. 2 off of the travel trailer (7.5 gallons) and on off the BBQ (5 gallons). I tend to use the bigger tanks in the garage. There is no insulation in the garage. Who ever sheet rocked it with out but a blanket of fiber glass insulation in first. needed to be kicked soundly in the rear.
Maybe I'll work on the top and bottom gussets, before I forget. Don't want to get the tail feathers on before I do the gussets and round the out. I mean I could but it would be awkward work.
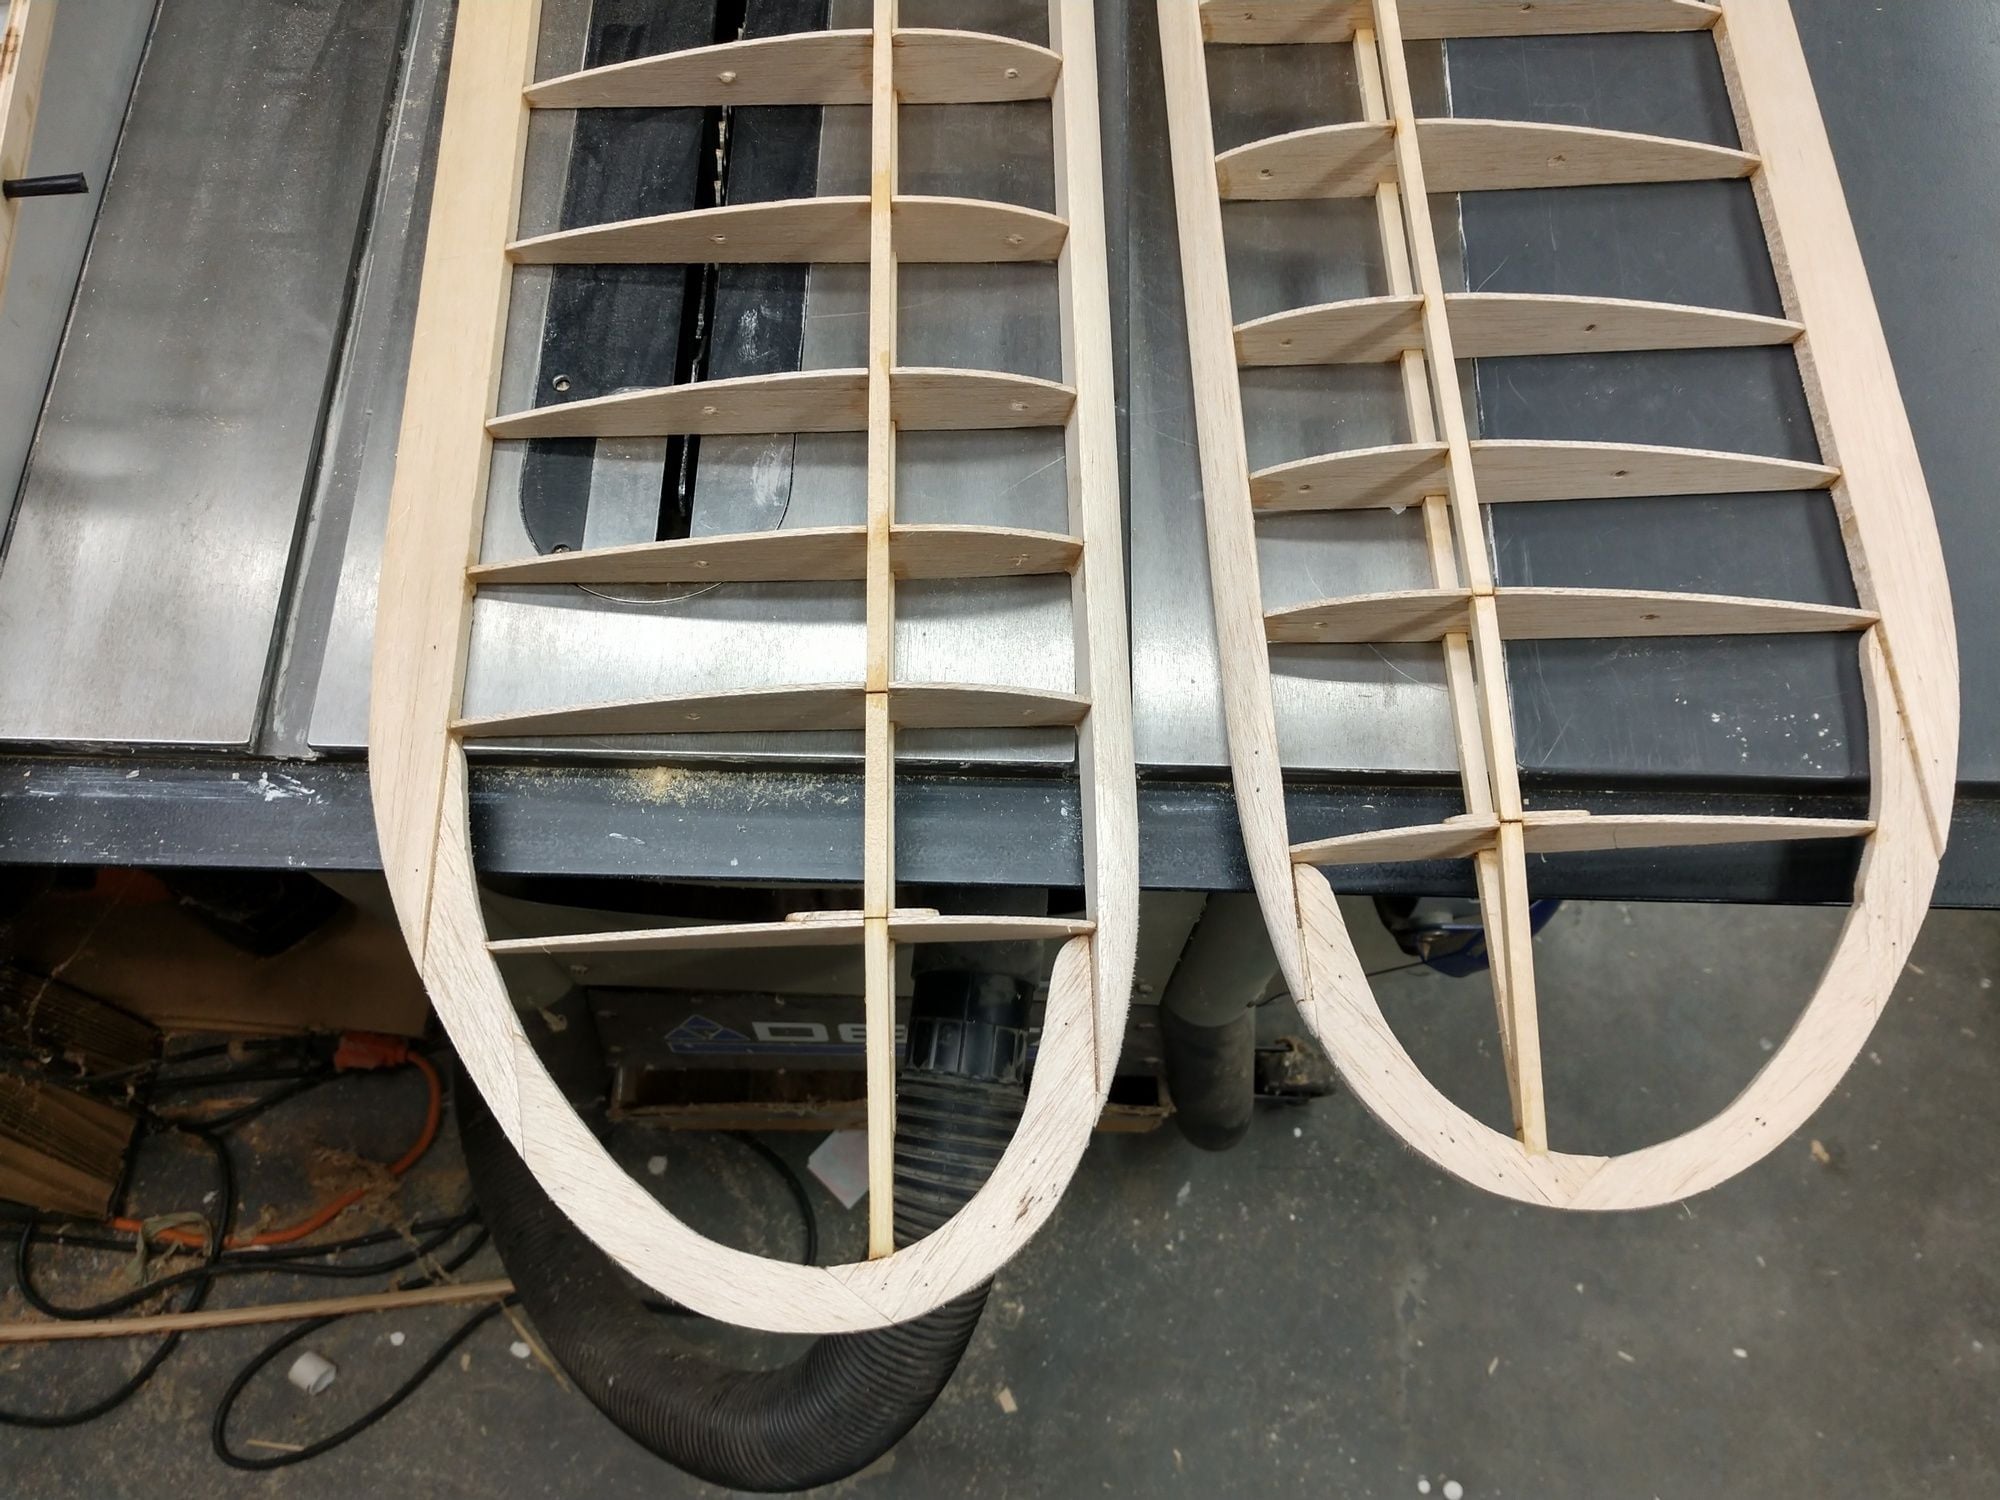
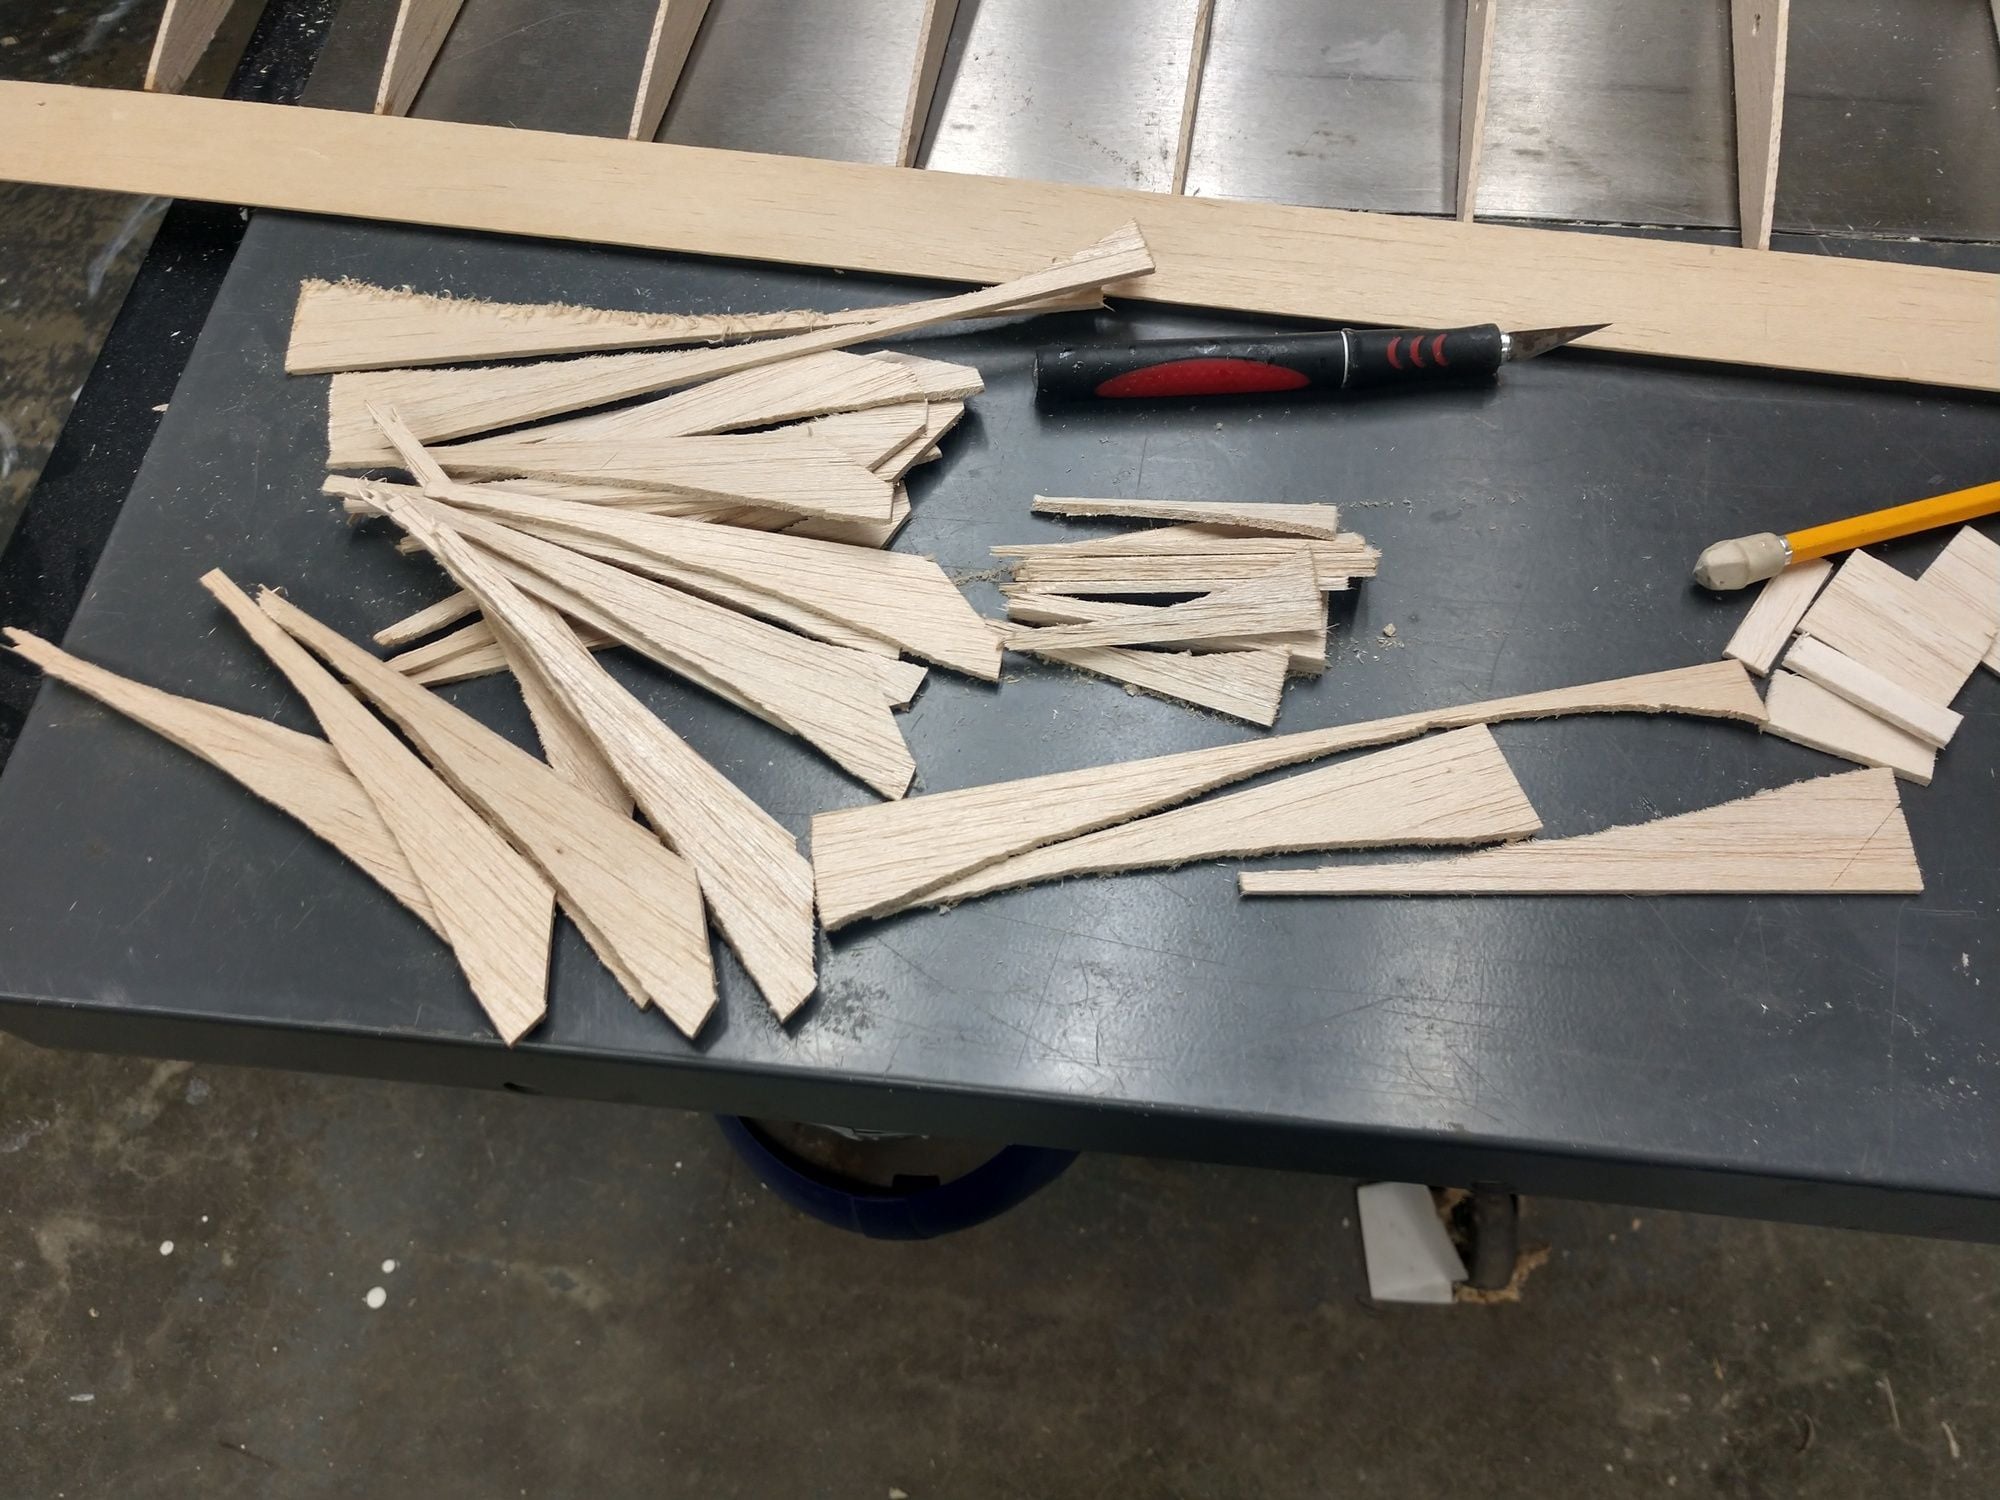
I did work on the wing tips. They are mostly shaped now. I got tired of looking at those rough ends.
I will make 3 new ribs and new dihedral doublers. This time I will stack all of the doubler ply and shape them at the same time. And maybe make a new ply blank for the ribs , and then I can cut it up into the front rib and back rib section.
Today a cold rain has moved in. The garage is stinking COLD. Iv'e spent maybe 1 hour out there in 2 or 3 short sessions, and that with sweats on. I don't know how long this cold is supposed to last. Wednesday I can purchase more propane, Then I will have heat. Got 3 tanks to fill. 2 off of the travel trailer (7.5 gallons) and on off the BBQ (5 gallons). I tend to use the bigger tanks in the garage. There is no insulation in the garage. Who ever sheet rocked it with out but a blanket of fiber glass insulation in first. needed to be kicked soundly in the rear.
Maybe I'll work on the top and bottom gussets, before I forget. Don't want to get the tail feathers on before I do the gussets and round the out. I mean I could but it would be awkward work.
I did work on the wing tips. They are mostly shaped now. I got tired of looking at those rough ends.
01-17-2020, 05:51 PM
#20
Thread Starter
It warmed up about mid day. Sun came out, and the garage became comfortable with sweats on.
So back to the build.
Put some southern gospel on the stereo. i use my wife's old lap top I that I put a small solid state drive in and run Linux on. I had to install a Blue tooth dongle and Use another blue tooth unit jacked into the stereo to bale music using Spotify. Cheap set up but plenty of recycled parts saved a chunk of change. The darn display on the stereo has gone out so I have to find the correct input by just listening for sound to come out of the stereo. It works. Got enough watts to blast the neighborhood out if I was so minded. I don't.
I decided this time to make new templates for the wing center section 3 ribs, made 4.
Also made new dihedral doublers. Gang shaped the. Some strategic drops of medium CA. held the stack together. After the first a temp of a stack came apart I placed my drops of CA and the lightly spritzed the opposite blank and pressed them all together in my vice. That locked them up. Shaped the and then Split them apart with a #10 exacto blade. Came apart clean and none of my blood spilled. I keep forgetting to wear my Kevlar glove on the opposite hand.
While test fitting the rib half's with the dihedral doublers in position, I bumped and wing panel and it went off the back side of the table saw. It hit on it's end and the tip broke as well as the T.E. separated from all the ribs. Mildly P.O.ed. Went inside the house to tell my wife (Windy) and I guess I worded things badly at first. She thought I broke the table saw. That freaked her out out. It cost us $1000. So yeah that would freak me out also. I then stated it was a wing panel. That calmed her. I have not yet installed the gussets the plans show. But I will.
I also cut the bottom center sheeting to size.
Got in about 3 hours of work. Tomorrow I will start the center section glue up.
By then I was starting to cool off. Also for safety of the wing panels I stored the wing panels in one of the 3 over head racks that are suspended from the ceiling. Need to put the fuse up there as well, but forgot it.
Will have to bring a wing panel back down to check fit while I glue up the new center section.
Almost all of the wings I have built have just had 2 wing sections glued to each other and then the center section sheet added. Way easy when using cap strips. Building a separate center section for me is rare. Heck I have been known to build both wing half's together as on unit, and the cut them apart with my saw, followed by a second pass with the saw blade angled to the proper dihedral angle Or some times the wing jigged to the correct angle. Had a buddy that spent a lot of time with me in the garage and the first couple of times I did that he about freaked. Go slow and use a at least a 60 tooth blade, 80 better.
Ken
01-17-2020, 06:34 PM
#21
Thread Starter
Here are my over head airplane racks. the first 2 racks were built several years ago when we moved every thing out of a storage rental. I had blown up my knee again. was getting around with a cane. So our assistant pastor had some young men come over and install them for me. I had the parts already made up. So all of my planes went into them. One was over the garage door when it was opened. I sized the depth to provide 1" of clearance. Worked well. The second one was made deep enough to store my biggest plane. It has an 18" wing cord. The 3rd one I built last year as the other 2 racks were crammed full, and to get one plane I had to take others down to have the needed clearance. So the 3rd rack decongests the other racks plus it has a 4' by 8' storage shelf under it. The shelf was intended for the storage of balsa etc that is more than 36" long. It has 1" of clearance from the end of the garage door when it is opened. I put a pair of led shop light under it for Windy to do needle work when she is in the garage with me. We have our old recliner sofa sitting under it.
Ken


Ken
01-18-2020, 03:13 PM
#22
Thread Starter
Clear off the front of my work bench.
Used my battery powered blow to blow some of the dust out and more importantly blow the floor clear. I work mostly from my rolling shop chair except at power tools. Scooting around and one of the wheels catch on a piece of floor trash could by rather unpleasant. I don't need any falls, thank you kindly.
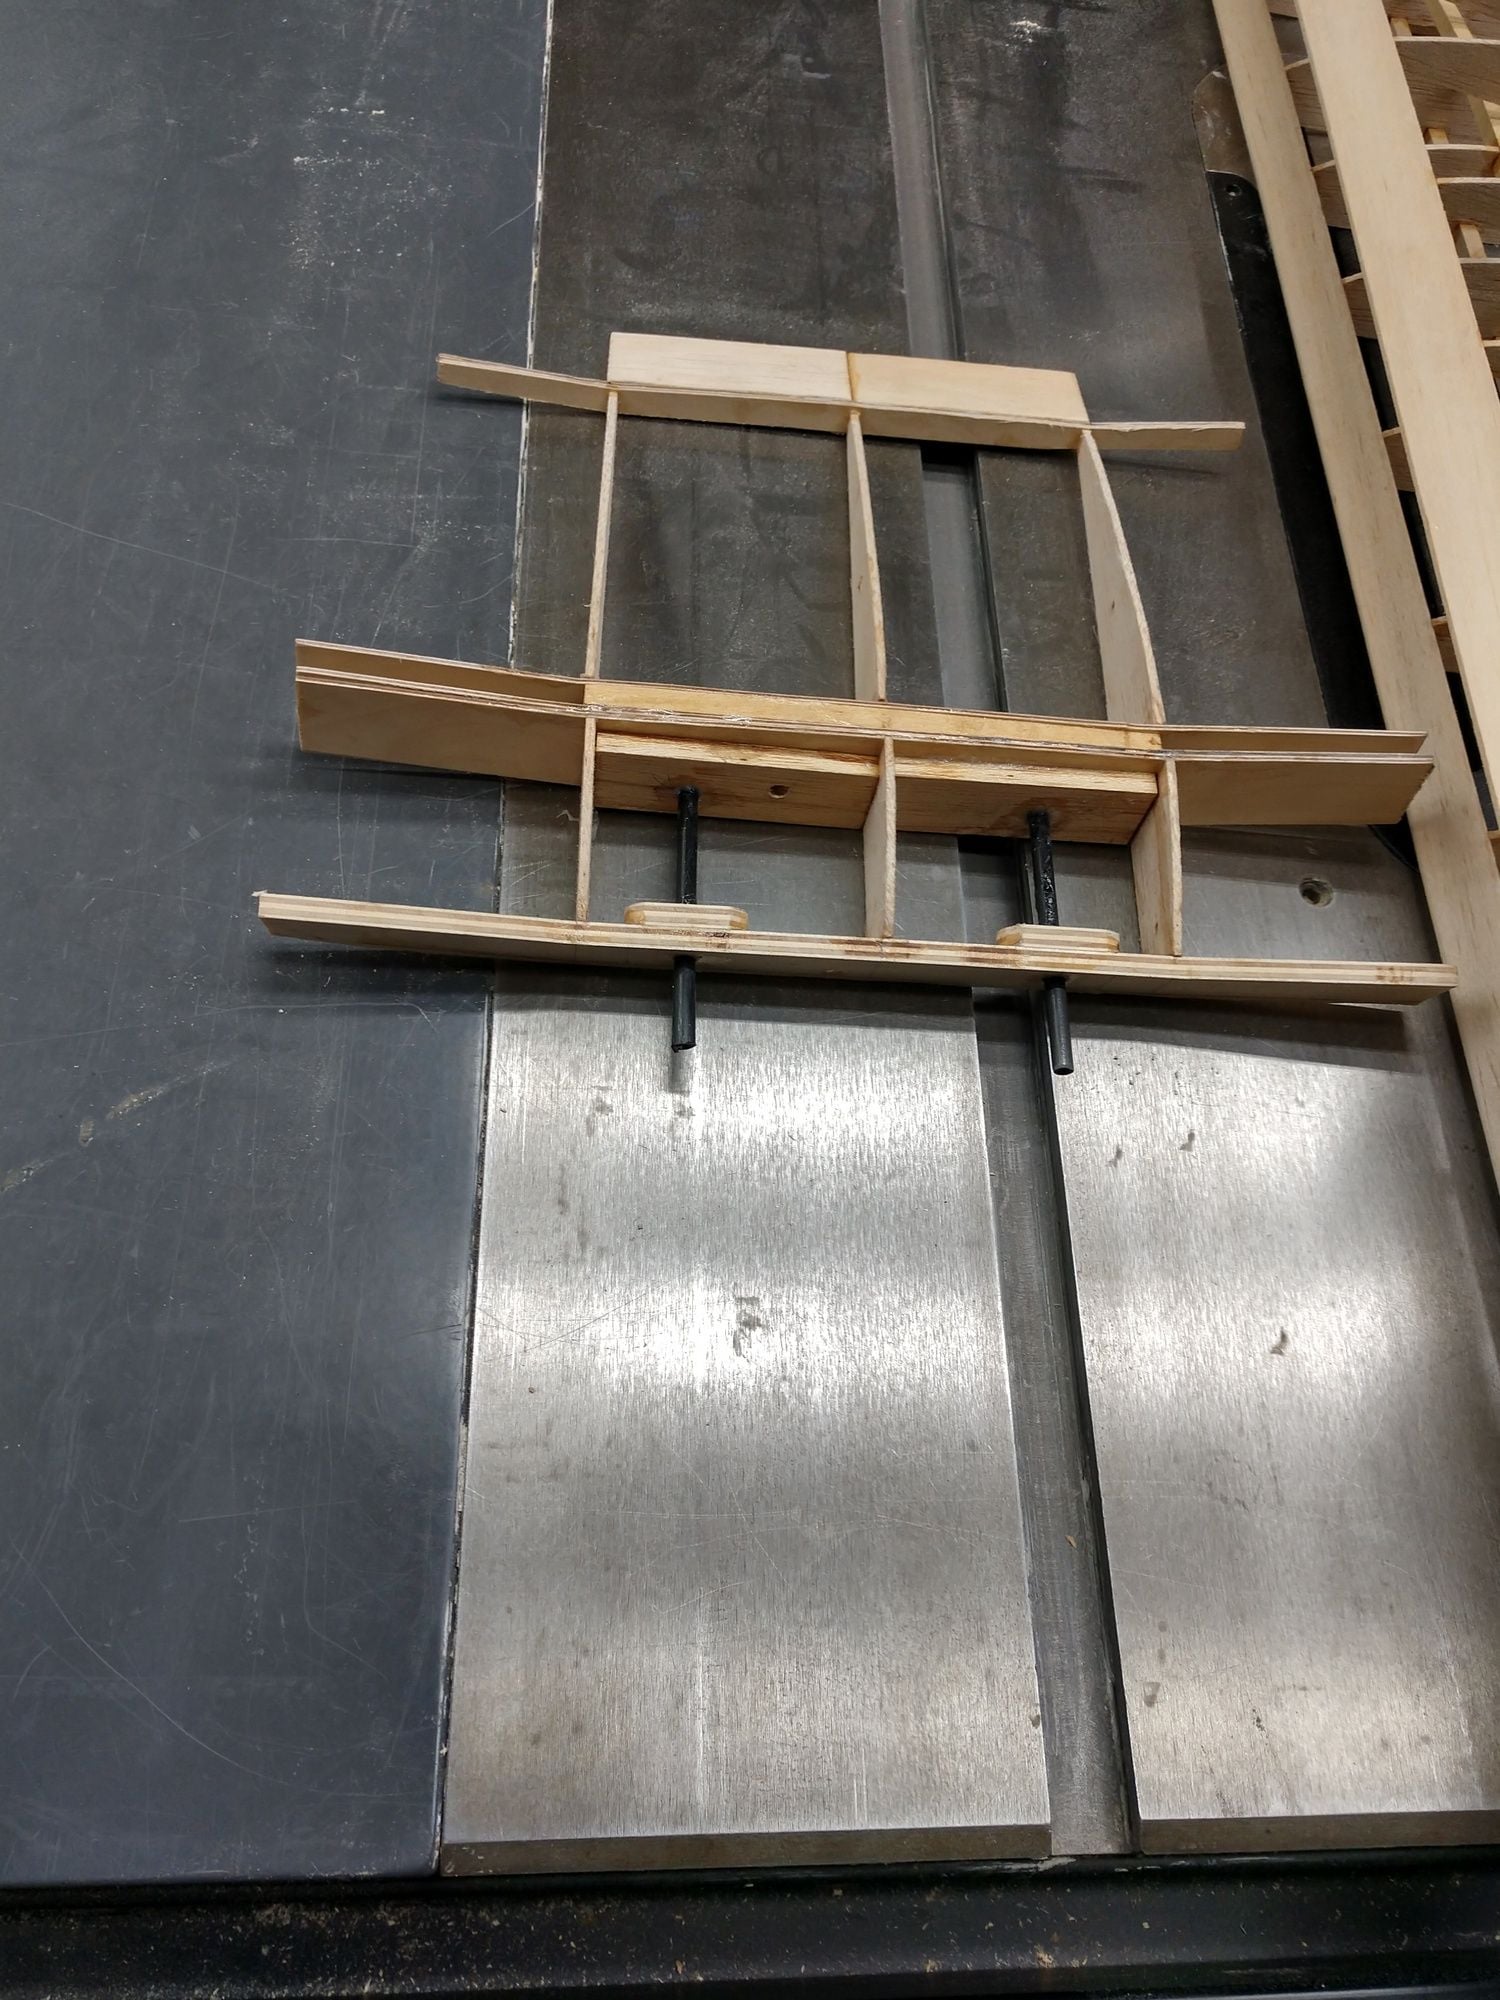
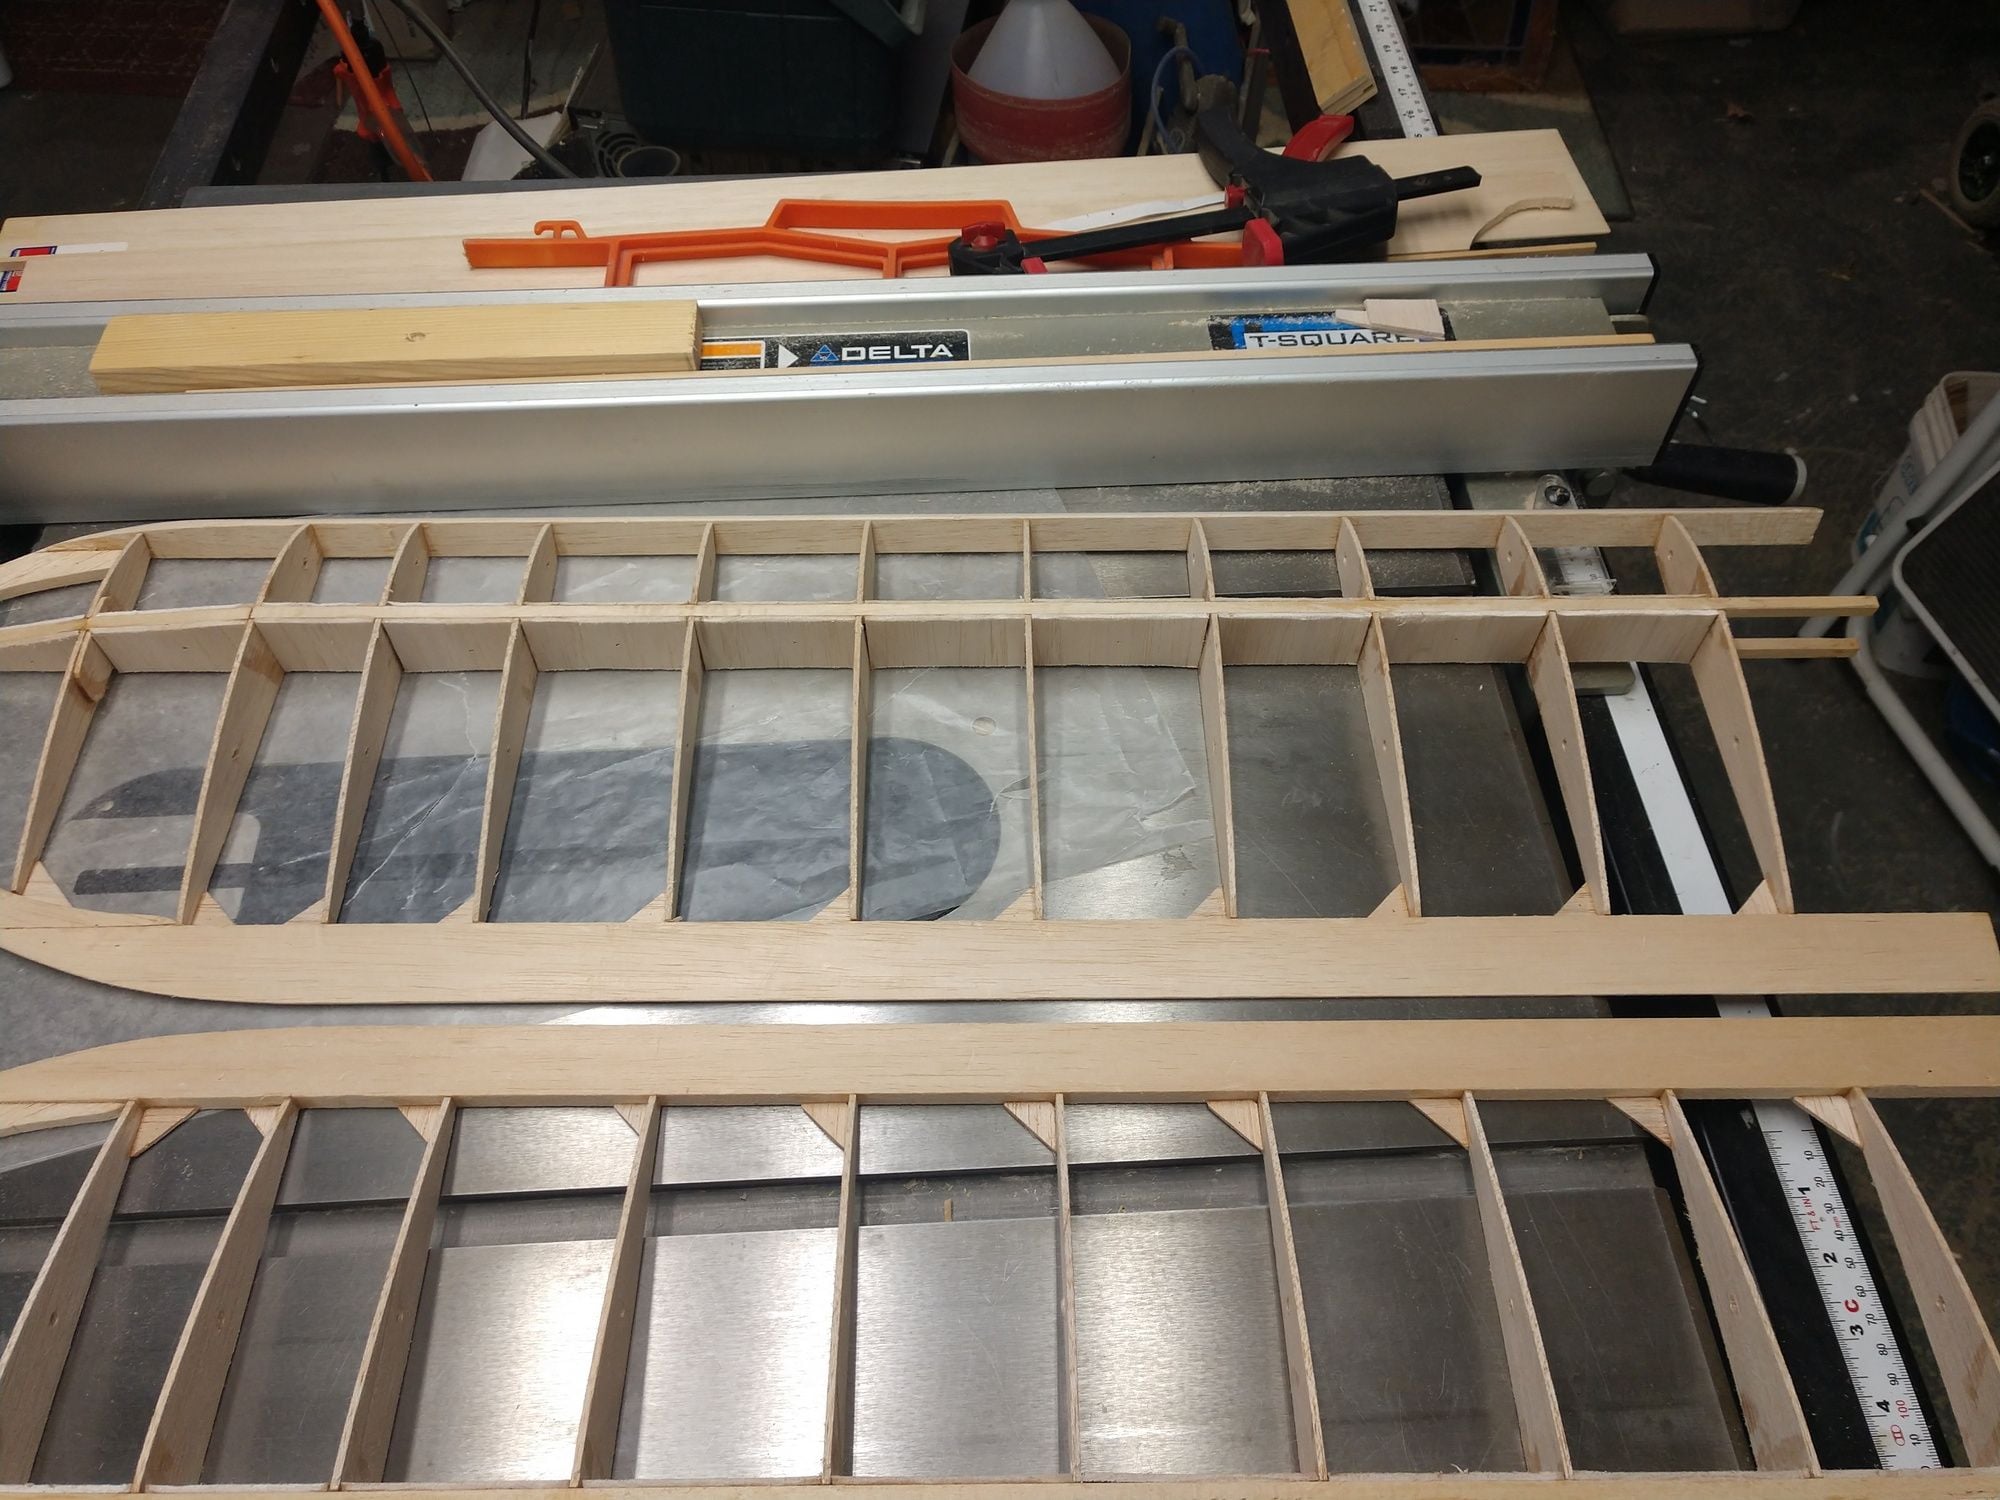
Put both wing panels on the magnetic building board. That sits on top of my balsa building board. perfect match. Made a jig brace to set both wing panels to the proper dihedral angle. Still fussing with the wing panel jigs. Once every thing is exactly proper then I will join the panels with the dihedral doublers and build the middle up right between the 2 panels.
Then it got to cold, so gave it up for today.
Ken
Used my battery powered blow to blow some of the dust out and more importantly blow the floor clear. I work mostly from my rolling shop chair except at power tools. Scooting around and one of the wheels catch on a piece of floor trash could by rather unpleasant. I don't need any falls, thank you kindly.
Put both wing panels on the magnetic building board. That sits on top of my balsa building board. perfect match. Made a jig brace to set both wing panels to the proper dihedral angle. Still fussing with the wing panel jigs. Once every thing is exactly proper then I will join the panels with the dihedral doublers and build the middle up right between the 2 panels.
Then it got to cold, so gave it up for today.
Ken
01-19-2020, 06:33 PM
#23
Thread Starter
It was a cold day today, and I won't have propane for my heater till Wednesday. But I still managed some progress. I just put sweats over what I was already wearing and a jacket with a hood. I was actually reasonably comfortable that way. Hands were a bit cold, and man touching the cast iron of the table saw was a bit of a chiller.
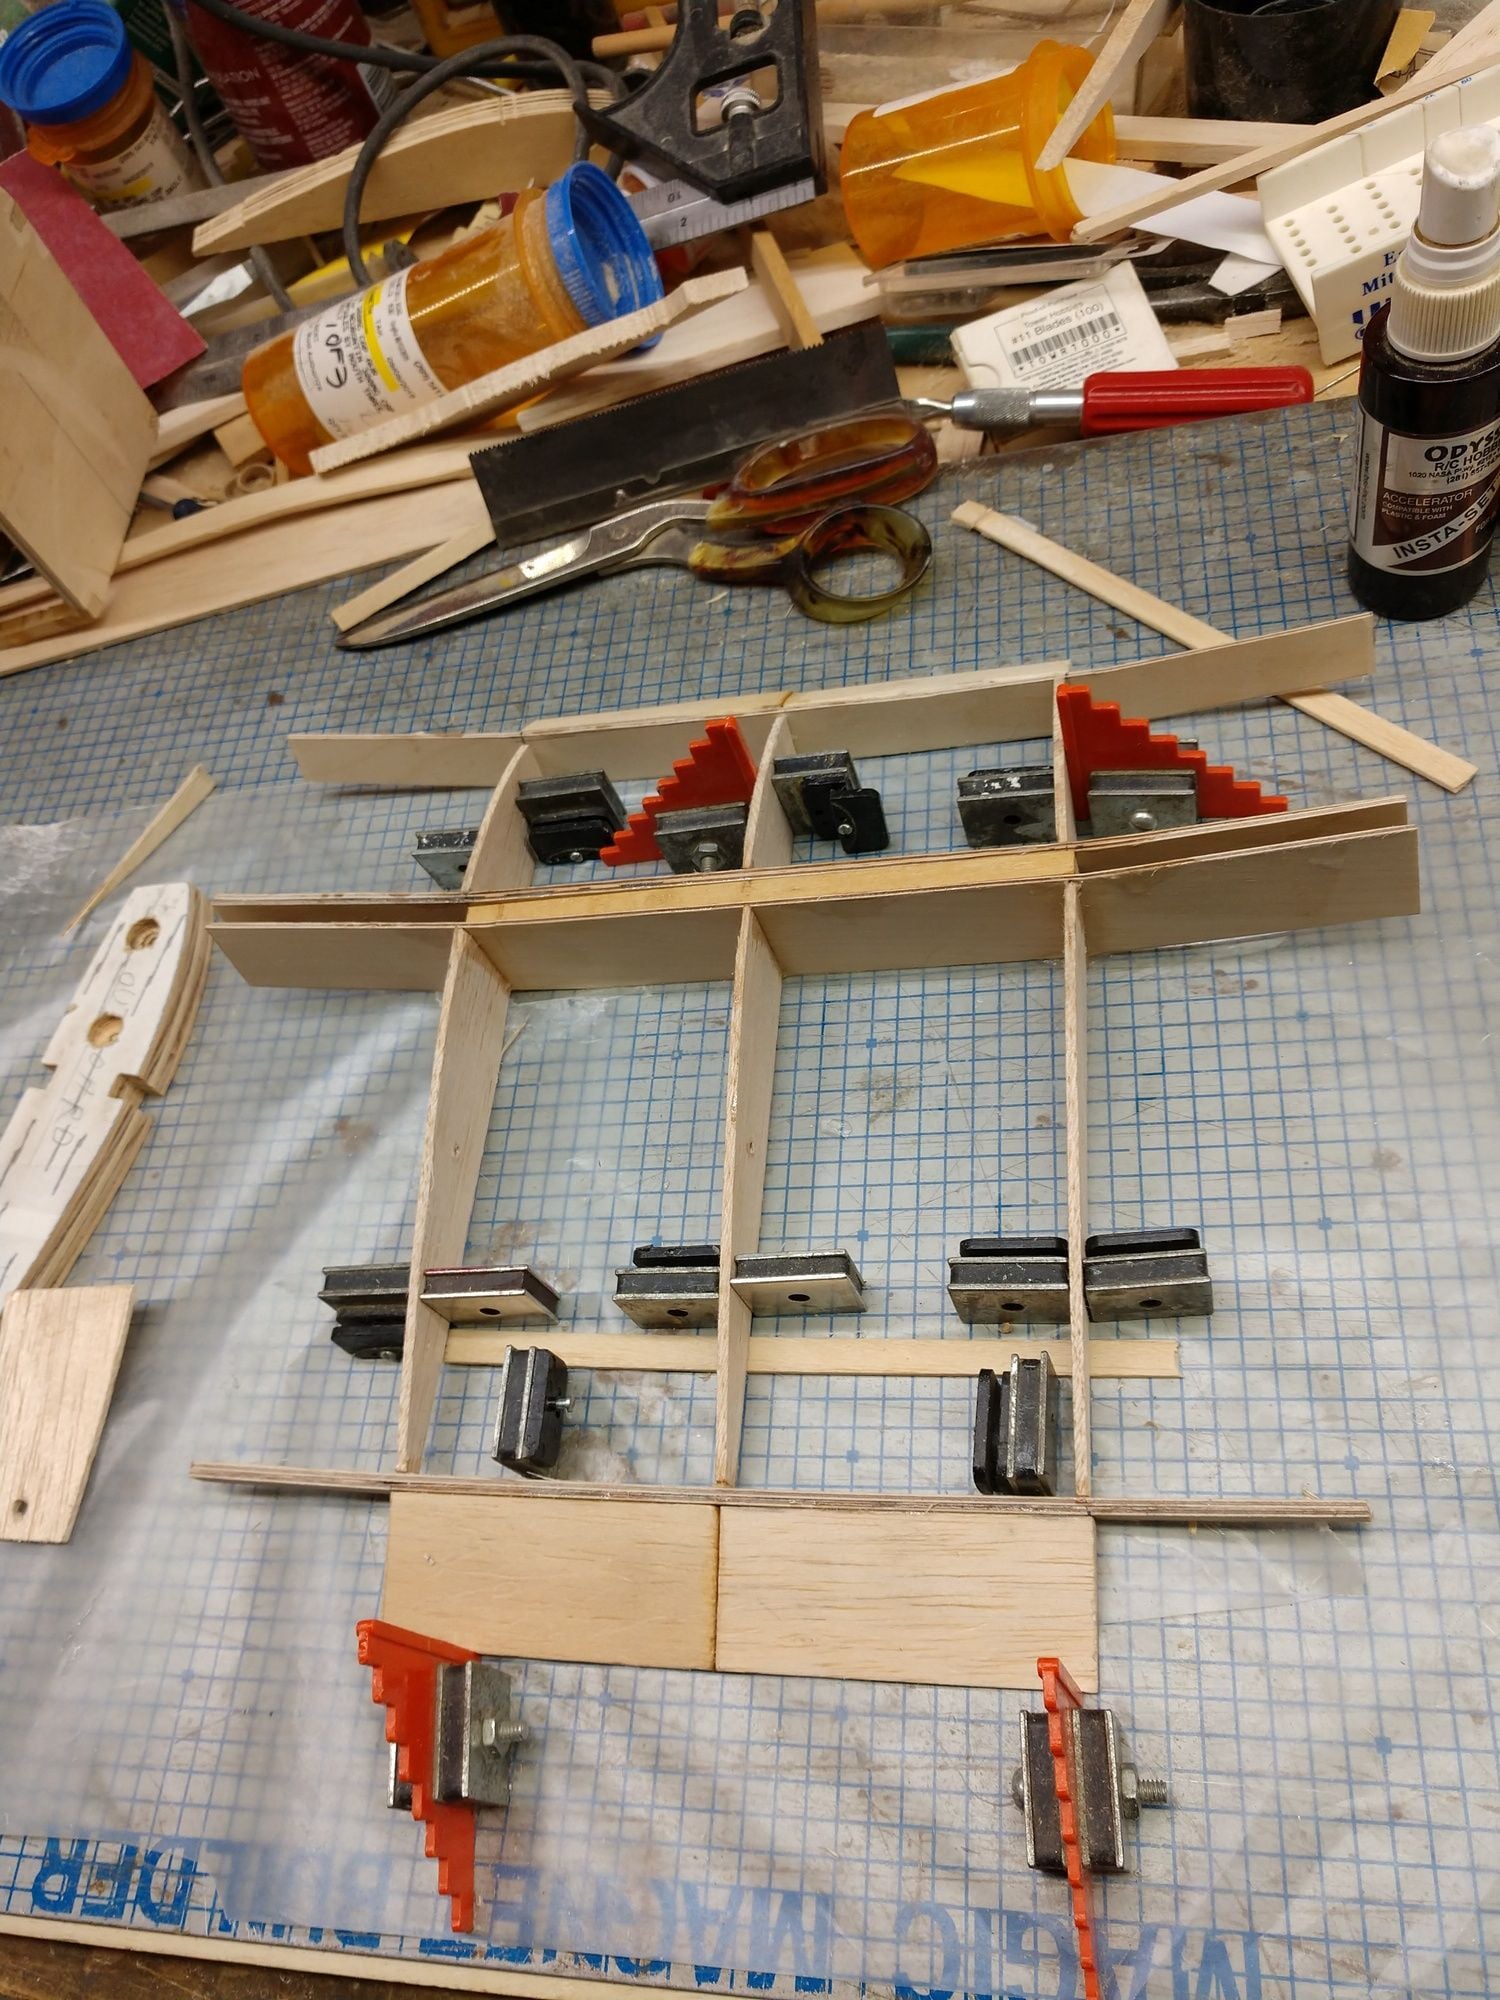
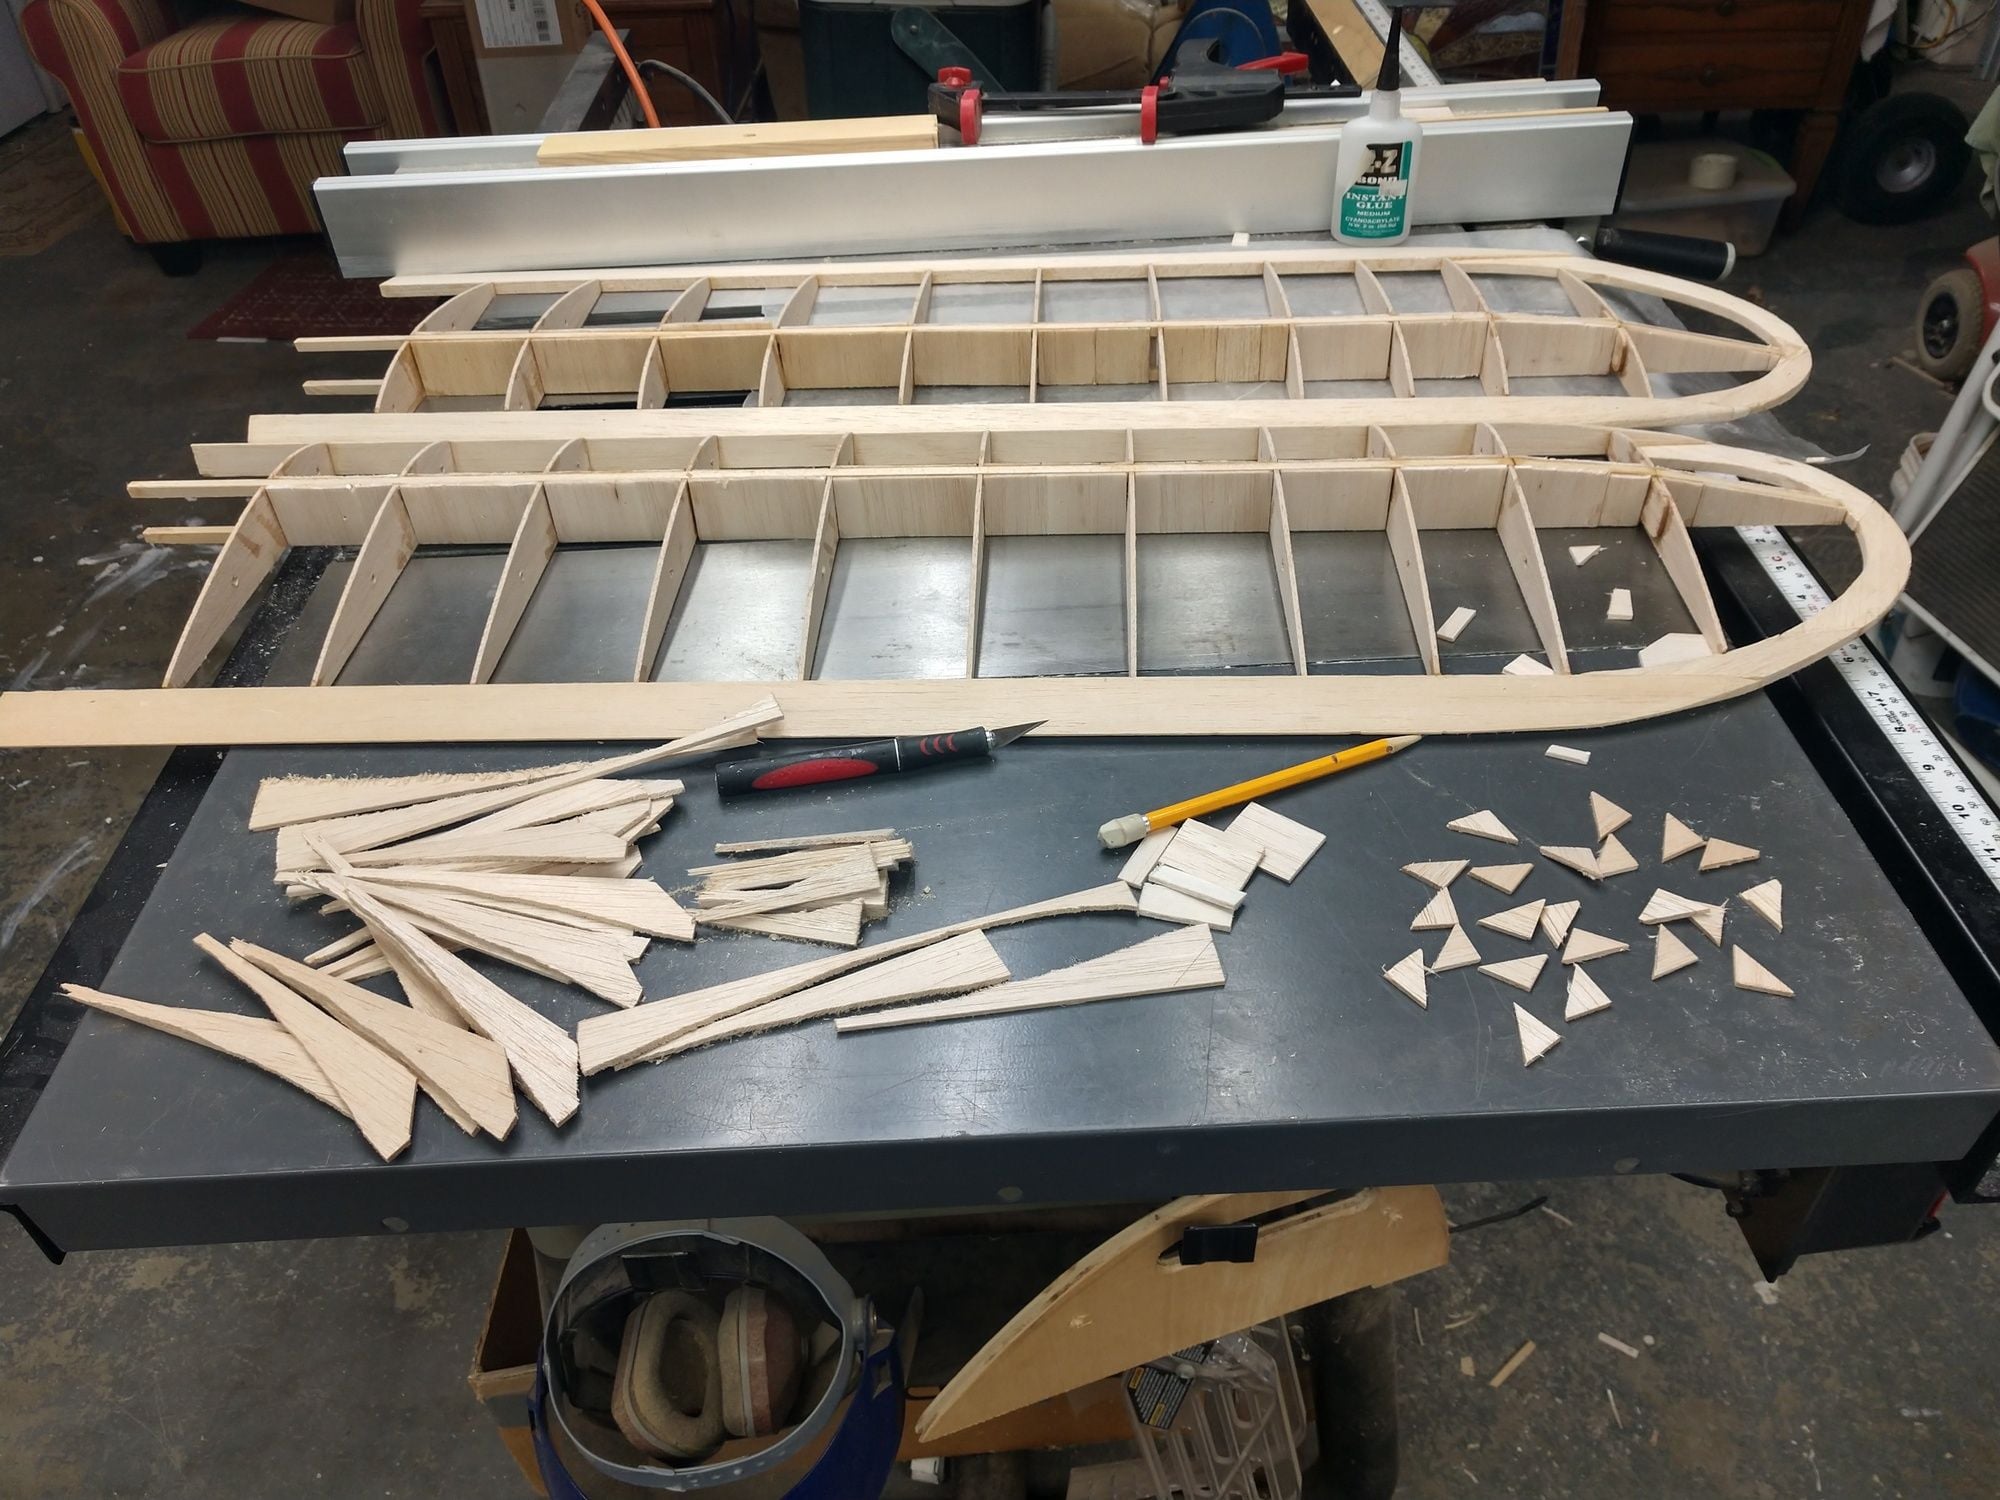
I almost put the cart before the horse yesterday. I realized it before I went to bed, and was hoping I would remember. I did. What I needed to do was install the shear web to the spars, and the gussets at the back of the wing ribs. Both much easier before join the wing panels. Could do them afterwards, but just much easier before.
I had a partial sheet of 3/32" that was a little more dense than the wood I used for the wing ribs. So I used it up first and spit evenly between both wing panels. I need more wood for the shear webs, and the only thing I had on hand was a 6" wide sheet that was fairly light. But it was either use that or wait till Wednesday. So I used it. I added shear webs to both sides of the spars , and all the way out to the tip. I have some trimming and sanding to get a perfect flush fit. By the time the shear webs were done it was getting a bit uncomfortable in the garage. Still had not installed the T.E. to wing ribs gussets. Used a piece of scrap to make a test piece.
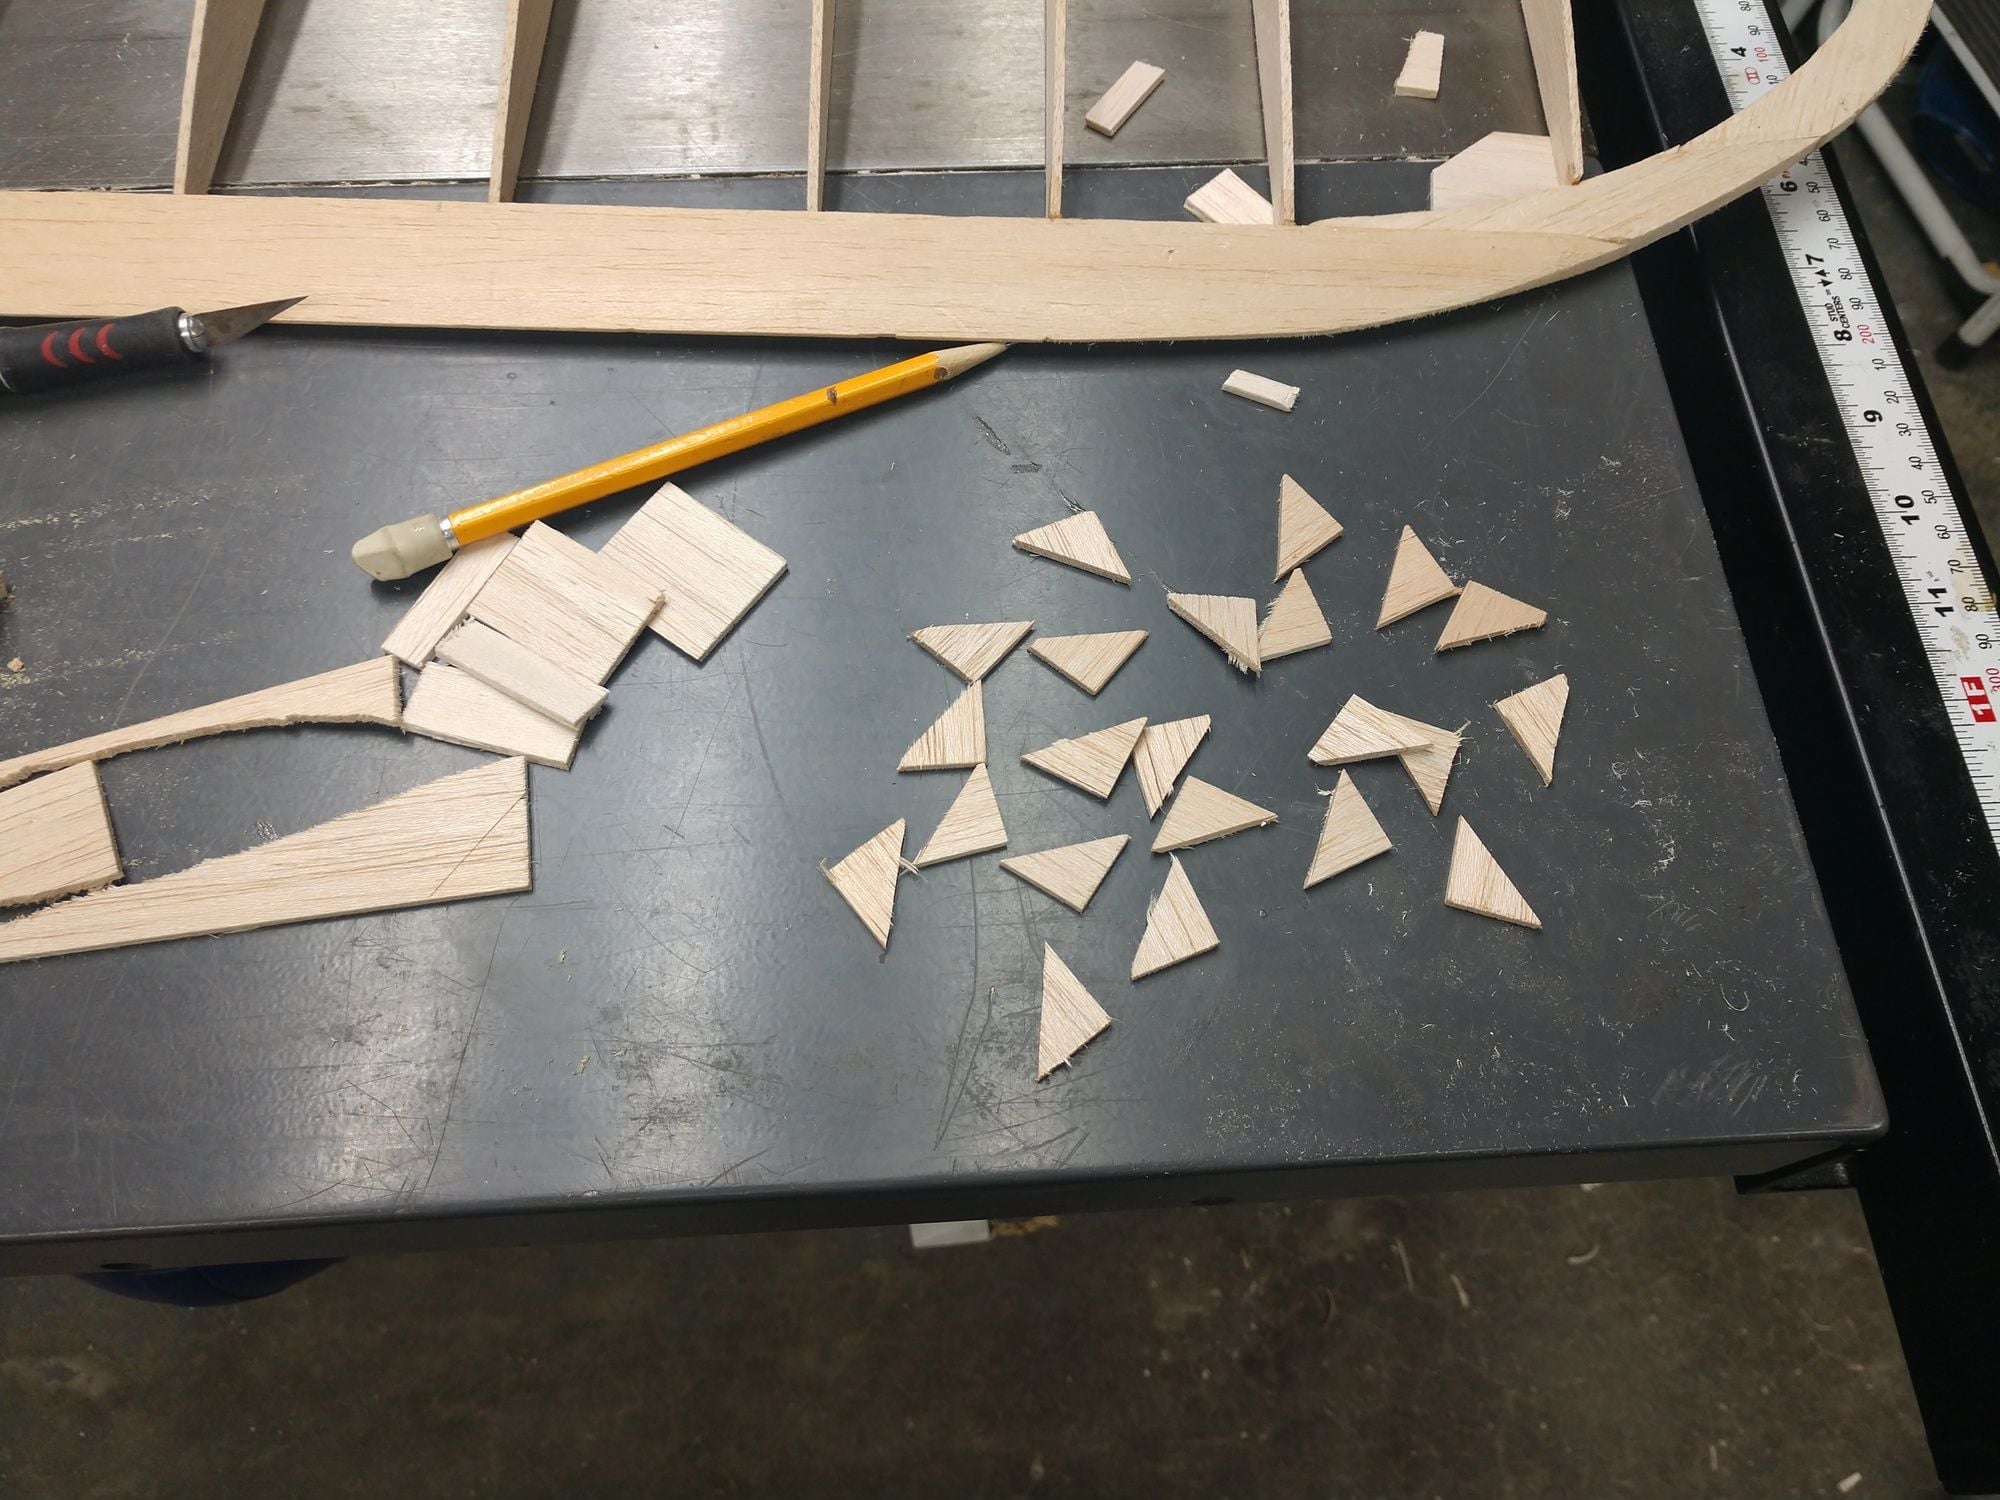
I saved all of the waste from band sawing out the wing rib stacks. I was thinking at that time that the scrap just might work out for the wing gussets. Set a mark on my combo square with masking tape and brought into the house the necessary supplies to make a bunch of gussets. So now I have all of the gussets needed. Will work on that tomorrow. After that then sanding and it is wing panel joining time. Followed by the top and bottom fuse gussets. That then should bring me to installing tail feathers time.
Been thinking about the main landing gear. I have the wheels. I have a fair amount of music wire. I have in the past just chucked the wire up in a vice (had a smaller vice then) and just started bending and adding a bit extra persuasion with a hammer to bend as close as I could. Sometimes it took several tries. I would the wrap with copper wire and solder. Time to rethink my methodology.
I may make a poor mans H frame hydraulic press. My bottle jack and some 2x4s and bolts with a bit of angle iron just might be a due experiment. Sounds over kill for this plane but I have a future 1/3 scale Pitts that has some rather heavy music wire in it's gear. Iv'e also have studying up a bit on making carbon fiber gear.
I am going to deviate from the plans on the landing gear. I am not installing the bulk head that the plans show the wire gear fastened to. I am going to bolt it to the belly of the plane. So that will need the main gear leg and a trailing wire fastened to the bottom of the main wire. That is what did on the first Pacific Ace I built. It shows up in the 4th picture of this build thread. One more change is the position of the landing gear. The first Pacific Ace had the gear in the position shown on the plans. I found that the plane was a total squirrel on the ground because the gear was so far forward. I am going to relocate the gear to just forward of the wing L.E. I find that is a decent position for a tail dagger's main gear for ground handling.
Ken
I almost put the cart before the horse yesterday. I realized it before I went to bed, and was hoping I would remember. I did. What I needed to do was install the shear web to the spars, and the gussets at the back of the wing ribs. Both much easier before join the wing panels. Could do them afterwards, but just much easier before.
I had a partial sheet of 3/32" that was a little more dense than the wood I used for the wing ribs. So I used it up first and spit evenly between both wing panels. I need more wood for the shear webs, and the only thing I had on hand was a 6" wide sheet that was fairly light. But it was either use that or wait till Wednesday. So I used it. I added shear webs to both sides of the spars , and all the way out to the tip. I have some trimming and sanding to get a perfect flush fit. By the time the shear webs were done it was getting a bit uncomfortable in the garage. Still had not installed the T.E. to wing ribs gussets. Used a piece of scrap to make a test piece.
I saved all of the waste from band sawing out the wing rib stacks. I was thinking at that time that the scrap just might work out for the wing gussets. Set a mark on my combo square with masking tape and brought into the house the necessary supplies to make a bunch of gussets. So now I have all of the gussets needed. Will work on that tomorrow. After that then sanding and it is wing panel joining time. Followed by the top and bottom fuse gussets. That then should bring me to installing tail feathers time.
Been thinking about the main landing gear. I have the wheels. I have a fair amount of music wire. I have in the past just chucked the wire up in a vice (had a smaller vice then) and just started bending and adding a bit extra persuasion with a hammer to bend as close as I could. Sometimes it took several tries. I would the wrap with copper wire and solder. Time to rethink my methodology.
I may make a poor mans H frame hydraulic press. My bottle jack and some 2x4s and bolts with a bit of angle iron just might be a due experiment. Sounds over kill for this plane but I have a future 1/3 scale Pitts that has some rather heavy music wire in it's gear. Iv'e also have studying up a bit on making carbon fiber gear.
I am going to deviate from the plans on the landing gear. I am not installing the bulk head that the plans show the wire gear fastened to. I am going to bolt it to the belly of the plane. So that will need the main gear leg and a trailing wire fastened to the bottom of the main wire. That is what did on the first Pacific Ace I built. It shows up in the 4th picture of this build thread. One more change is the position of the landing gear. The first Pacific Ace had the gear in the position shown on the plans. I found that the plane was a total squirrel on the ground because the gear was so far forward. I am going to relocate the gear to just forward of the wing L.E. I find that is a decent position for a tail dagger's main gear for ground handling.
Ken
Last edited by flyingagin; 01-19-2020 at 06:40 PM. Reason: were the heck did my text go????????
01-20-2020, 04:09 PM
#24
Thread Starter
When I first went into the garage today my reaction was dang but it is cold out here. But put sweats on over every thing else and a jacket with a hood, and glued in the corner gussets at the trailing edge of the wing. Then got into some serious sanding on the wing panels. Did the tips while I was at it. Figure it was much easier to sand everything now than than after the wing panels were joined, much less awkward. Then while I was at it went to work on the tail feathers and got those all sanded. The sanding that is now left is after I add the top and bottom fuse gussets. That sanding not only kept me warm but my arm feels like it is going to drop off. Just wanted to do the big sanding while it was easier. I did taper the t.e. of the control surfaces, but did make sure the trailing edges weren't to sharp, but blunted off a bit.
I built 2 airplanes back in the distant past that I sanded the trailing edges to a fine edge. I had severe flutter issue with those to birds. I ended up using mass dampers to control the flutter.
If i were to fly this plane fast enough to encounter flutter, then I'm not flying it correct. Most likely 1/2 throttle or even less. I find it fun to see how little throttle I ca fly on.
Ken
01-21-2020, 05:21 PM
#25
Thread Starter
Spent part of the day working on the kitchen plumbing. I can't even begin to express how much I hate do plumbing. But I can usually get the job done. Just takes me forever and multiple trips to the hardware store. But this time it has me. I am going to have to relent and call a pro.
I had to push myself to work on the bird after all the frustration.
So I ended up doing more gusset work. Gussets are probably among my least enjoyable parts of this build. but the tail feathers now have their gussets. Still have to do the fuse top and bottom gussets.
The dremel tool holder worked out like a champ for me. I zoomed thru rounding the gussets out, and I think I was able to do a better job. I have a couple of gusset that have so little spare room I will just use a rat tail rasp.
Not sure if I will get any build time tomorrow, what with dealing with a plumber.
Ken