


Pilatus PC9 1/3 scale
 05-24-2011, 12:53 PM
#126

Thread Starter

Join Date: Aug 2009
Location: Paris, FRANCE
Posts: 143
Likes: 0
Received 0 Likes
on
0 Posts

Realization of the reinforcement of the windscreen.
Cut with the CNC.

Another view of the reinforcement, with the angle as on the real.

The real one.

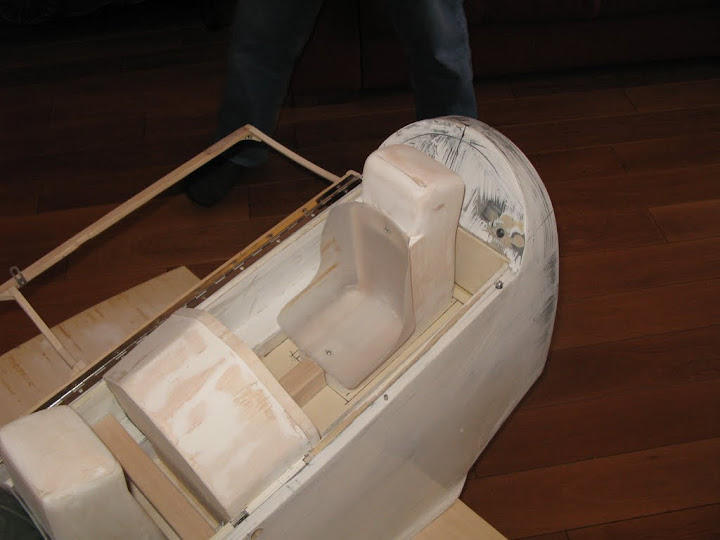
Here it is the reinforcement of cockpit is in place. And it looks pretty good I think.

Another view, note the fixations front and rear of the windscreen.Another view of the reinforcement, with the angle as on the real.
The real one.
Here it is the reinforcement of cockpit is in place. And it looks pretty good I think.

Once opened. I put a third rear center because the windscreen may suck a lot during the flight.
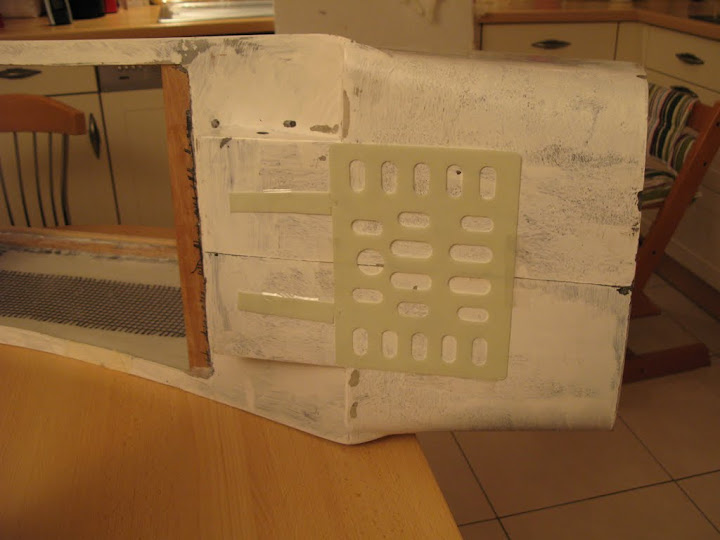
The airbrake in place.

The nose gear doors are cut.


For fun the first assembly of all possible parts of my plane.

This lack of perspective to see the airplane as a whole.

In the kitchen the plane touches down at the front and the rear.

 05-25-2011, 10:57 AM
#127
Thread Starter
Join Date: Aug 2009
Location: Paris, FRANCE
Posts: 143
Likes: 0
Received 0 Likes
on
0 Posts
We are going now on the build of Henri's fuselage.

The plate installed in the fuselage that allows Henri to stiffen the central part.

The setting of Henri's airbrake.
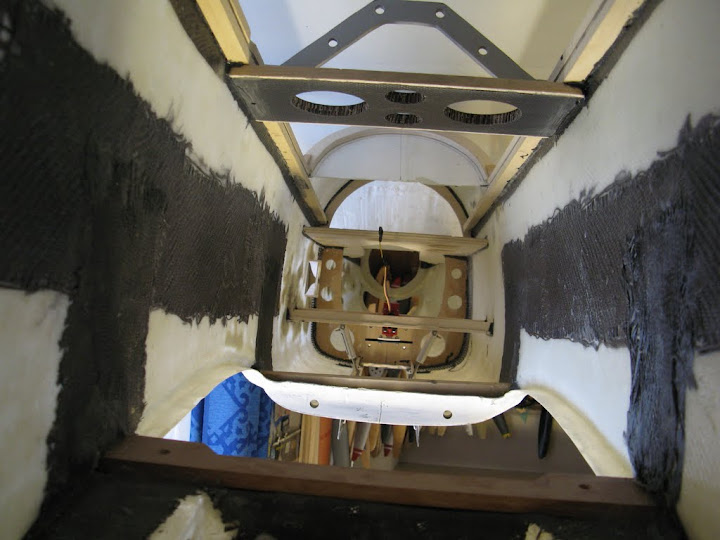
Viewed from inside the front fuselage, we can see at the back the engine plate and the cylinders of nose gear doors.

The NACA type air intake under the fuselage.

Under the front hatches the steering servo nosewheel.

The bottom air intake to feed the engine, shows us the engine plate in place.

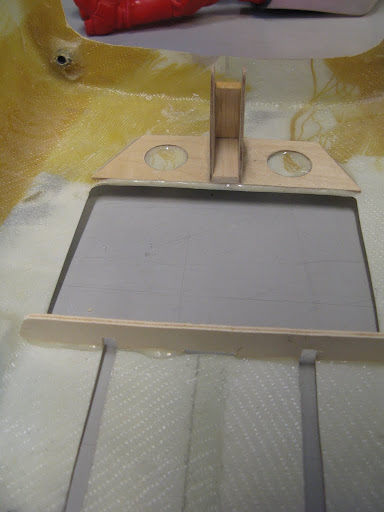
Another view of the NACA air intake, especially to copy the dimensions of the central core.

The engine compartment, the door is cut open and the system is functional.

The other Naca type air input on the flank of the fuselage.

The engine plate with the good angles.
Other espionage, fixing the airbrake actuators.

Here the airbrake axe.

Here the cutting of the engine hatch.
The plate installed in the fuselage that allows Henri to stiffen the central part.
The setting of Henri's airbrake.
Viewed from inside the front fuselage, we can see at the back the engine plate and the cylinders of nose gear doors.
The NACA type air intake under the fuselage.
Under the front hatches the steering servo nosewheel.
The bottom air intake to feed the engine, shows us the engine plate in place.
Another view of the NACA air intake, especially to copy the dimensions of the central core.
The engine compartment, the door is cut open and the system is functional.
The other Naca type air input on the flank of the fuselage.
The engine plate with the good angles.
Other espionage, fixing the airbrake actuators.
Here the airbrake axe.
Here the cutting of the engine hatch.
07-05-2011, 11:27 PM
#129
Thread Starter
Join Date: Aug 2009
Location: Paris, FRANCE
Posts: 143
Likes: 0
Received 0 Likes
on
0 Posts
Christian's fuselage progressing well.

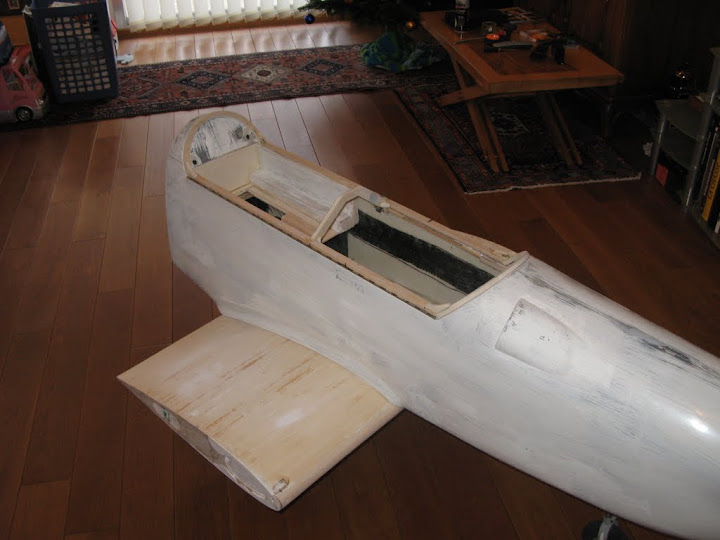
Interior view, the airbrake is in place, and there are lot of space.

Under the pilot the two 1.5-liter tanks, this is too short for the engine that will be 5 liters total when flying.

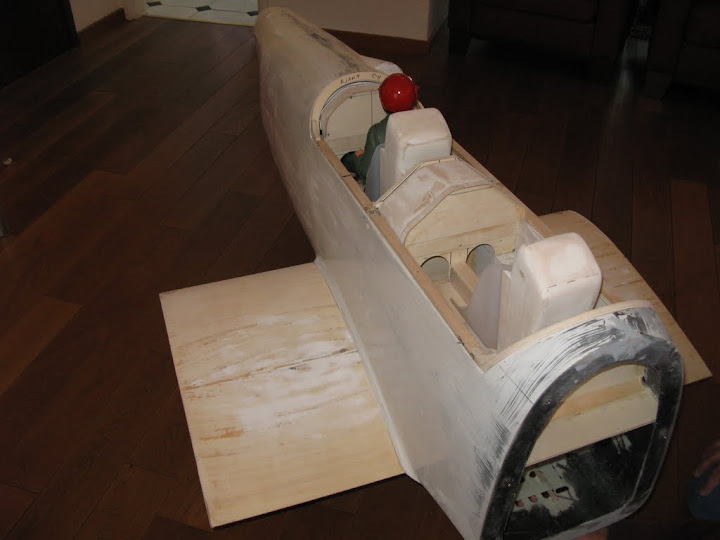
Christian with his work, the front cockpit.

Setting up the front cockpit.


Back view.

Filling the cockpit.

With the front dashboard in place.

Side view with the pilot and his seat.

The pilot on his seat there is plenty of room.

Christian presnting the instructor's seat.
The back seat in place hiding the rear access door.

The pilot in place, the cockpit is filled like this.

Other side view.

The airbrake going outside.

Back view. Too bad the back plate was mounted sideways ...
Front view of the airbrake deployed.


Once mounted the airplane looks well. Christian spent the finish on the back.

Side view, left airbrake.

Same with the left exterior flaps.

View from the back seat.

view of the access hatch that give access to the rear fuselage screews.

Back dashboard.
 07-07-2011, 01:47 AM
#130
Big,
How do you Post large photos like that one under the other?
I've seen every room in your house. I feel like we are neighbors.
Are those Trophys from bowling?
Talented, for sure!!
How do you Post large photos like that one under the other?
I've seen every room in your house. I feel like we are neighbors.
Are those Trophys from bowling?
Talented, for sure!!
01-13-2013, 09:28 AM
#132

Join Date: Feb 2005
Location: Georgetown, KY
Posts: 819
Likes: 0
Received 0 Likes
on
0 Posts
I'm so glad I stumbled onto this thread. I love what you're doing.
I suppose you deploy your airbrake when you're preparing to land. I need one of those on my Seagull 1.20 sized PC-9. Would assign it to Ch. 6 with the round knob control just like flaps, which I don't have on my PC-9.
Oops, just noticed the date....your last post was 18 months ago. How are you progressing with your PC-9?
01-13-2013, 11:53 PM
#134
Thread Starter
Join Date: Aug 2009
Location: Paris, FRANCE
Posts: 143
Likes: 0
Received 0 Likes
on
0 Posts
ORIGINAL: DVM100
If you search Youtube for 1/3 scale PC9 you will see the finished product
If you search Youtube for 1/3 scale PC9 you will see the finished product
And we also broke one engine.As it is not the season to fly the two planes are sleeping in the workshop, working on other project now.
I will let you some other news later on.
Stephane.
12-11-2016, 04:28 PM
#135
Junior Member
Join Date: Oct 2010
Location: Istanbul, TURKEY
Posts: 5
Likes: 0
Received 0 Likes
on
0 Posts
No replies untill 2013.
This was a perfect build thread.
I always check this thread and re-read.
Best regards
This was a perfect build thread.
I always check this thread and re-read.
Best regards
12-12-2016, 01:05 AM
#136
Thread Starter
Join Date: Aug 2009
Location: Paris, FRANCE
Posts: 143
Likes: 0
Received 0 Likes
on
0 Posts
Sorry for this long period of time without any news.
The three birds are all finished, and one crashed on a braking wing. The two others have been reinforced then.
The planes are flying like a dream, meanwhile they are complex because of all the stuff in the plane that makes you concentrate on flying.
We had some engine issues and hope they are behind us. The engine and the plane are really matching, and the realism is just unbelivable, the sound of the engine make it so real, and the power is really here.
I will soon post some photos of the finished planes and linky to the flying video.
Best regards.
12-12-2016, 01:41 AM
#137
Thread Starter
Join Date: Aug 2009
Location: Paris, FRANCE
Posts: 143
Likes: 0
Received 0 Likes
on
0 Posts
Here is my old plane that I give to Christian as he lost his plane and as I stop (for a moment) building and flying.

Another view

As you can see, Christian added some details like the antena under the fuselage, they can be unmounted for transportation.

The cockpit view with a lot of details that makes her real.

Another view of it.

Good front view, as you can see the pilot's head is just above the fuselage, like the real one.

Another detail that makes it real, the "remove before fly" flag in the exhaust pipe, in the background, an other "small" Pilatus who said we didn't like them?
Another view
As you can see, Christian added some details like the antena under the fuselage, they can be unmounted for transportation.
The cockpit view with a lot of details that makes her real.
Another view of it.
Good front view, as you can see the pilot's head is just above the fuselage, like the real one.
Another detail that makes it real, the "remove before fly" flag in the exhaust pipe, in the background, an other "small" Pilatus who said we didn't like them?
12-12-2016, 01:56 AM
#138
Junior Member
Join Date: Oct 2010
Location: Istanbul, TURKEY
Posts: 5
Likes: 0
Received 0 Likes
on
0 Posts
Thank s with the photos and updates,
BigP38Lightning,
I hope you fly them for long years.
That inspired me to build a PC-21 with similar methods of you.
I hope ı can manage the time.
Greets to Mulhouse...
I hope you fly them for long years.
That inspired me to build a PC-21 with similar methods of you.
I hope ı can manage the time.
Greets to Mulhouse...
12-12-2016, 03:05 AM
#139
Hello Stephane
I have a few questions if you don't mind.
1. Do you have engine side thrust on your model? I noticed in the SKYMASTER PC-21 there is a lot of engine side thrust (see photo). How much side thrust are you using?
2. Are the retracts HAWE retracts ?
3. Have you experienced any problems with ventilation (or cooling system)?
Thank you
Reuben
12-12-2016, 03:23 AM
#140
Thread Starter
Join Date: Aug 2009
Location: Paris, FRANCE
Posts: 143
Likes: 0
Received 0 Likes
on
0 Posts
Hello Reuben,
1 Yes we put some side thrust on the engine, we put 2� down and 2� on the right.
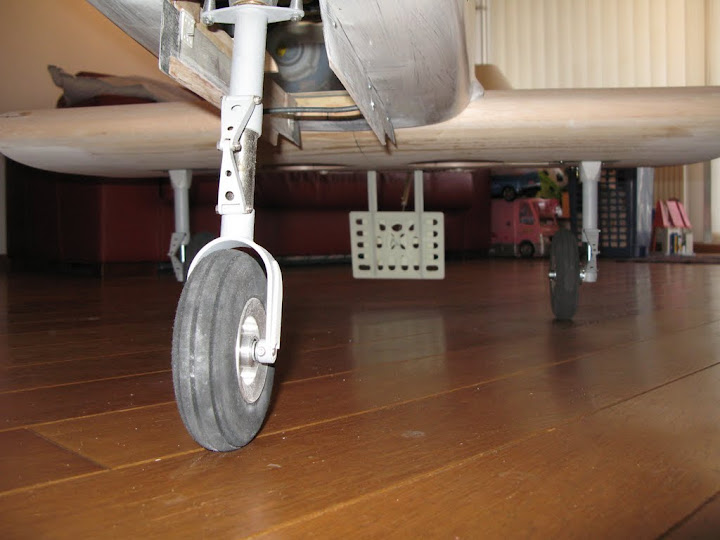
2 Yes sir they are HAWE retracts and they are strong enough for her.
3 Yes we did, we opened everything that was possible (all NACA entry as the real one, the bump on the right side of the fuselage), and still think that we could do better, the engine give a lot of temperature that need to be extracted, at the end we dismount the front gear doors to make the engine get more fresh air, in order to cool the engine a little bit more it is not reallistic nor very aerodynamic, but sometimes we need to be pragmatic. We tough to ventilate the engine compartment with an electric turbine which as not been done yet.
Stephane.
1 Yes we put some side thrust on the engine, we put 2� down and 2� on the right.
2 Yes sir they are HAWE retracts and they are strong enough for her.
3 Yes we did, we opened everything that was possible (all NACA entry as the real one, the bump on the right side of the fuselage), and still think that we could do better, the engine give a lot of temperature that need to be extracted, at the end we dismount the front gear doors to make the engine get more fresh air, in order to cool the engine a little bit more it is not reallistic nor very aerodynamic, but sometimes we need to be pragmatic. We tough to ventilate the engine compartment with an electric turbine which as not been done yet.
Stephane.
Last edited by BigP38Lightning; 12-12-2016 at 04:09 AM.
12-12-2016, 04:37 AM
#141
Thanks for your reply. The PC-21 modelers are using BVM Heat Shield paint and when it is tacky they place on it a thin fire blanket or something similar so that when the paint dries they have both two layer of protection. Perhaps a possible solution.
Anyway, thanks again for the reply.
Reuben
Anyway, thanks again for the reply.
Reuben
12-12-2016, 07:29 AM
#143
Thread Starter
Join Date: Aug 2009
Location: Paris, FRANCE
Posts: 143
Likes: 0
Received 0 Likes
on
0 Posts
We put a heat shield also to protect the fiberglass and the paint also, and it works well, we have no deformation on that part.
I forgot to mention, that the PC9 as well as the PC21 have a big lips under the cone, which help to get fresh air, this need to be open of course.
I forgot to mention, that the PC9 as well as the PC21 have a big lips under the cone, which help to get fresh air, this need to be open of course.
12-12-2016, 01:07 PM
#144
Yes the intake may not be that much of a problem. Its the heat flowing out that could be a problem. I prefer the earlier version of the PC-9 rather than the M version. Stephane, have you thought of making the wings also in fiberglass too?
Reuben
Reuben
12-13-2016, 02:23 AM
#145
Thread Starter
Join Date: Aug 2009
Location: Paris, FRANCE
Posts: 143
Likes: 0
Received 0 Likes
on
0 Posts
No we didn't because it was too much work and cost.
We were wondering just for the center section of the wing but we finally didn't make it and we stopped here.
We were wondering just for the center section of the wing but we finally didn't make it and we stopped here.
03-02-2021, 10:29 AM
#146
Join Date: Jul 2009
Location: , SOUTH AFRICA
Posts: 10
Likes: 0
Received 0 Likes
on
0 Posts
Incredible vision and execution, I won't lie, I was a little disappointed by the livery decision, it's almost impossible to find a scale model of the PC-7/9 in anything other than RAAF Roulettes colours when in fact there are dozens of stunning schemes to choose from, the SAAF Silver Falcons scheme for example is really complementary to the lines as are the Pilatus Demonstrator schemes...but I understand the personal choice and respect it.
I proudly claim to be the biggest Pilatus fan in the world, literally my top 3 favorite aircraft of all time are all Pilatus! There are many attempts at replicating the graceful, utilitarian Pilatus machines from all over the world, so many of them just fall short of capturing the essence of the designs but yours is definitely one of the few I have seen that absolutely nail it - I just wish you went with a SAAF or Demo scheme lol.
I am actually at an impasse on my PC-21 project, I cannot find the appropriately shaped spinner for the latest generation which is very long in proportion and is key to the appearance and am not finding any fool-proof methods of fabricating a safe, balanced spinner that will fit over the 5 blade prop at the perfect size for m`y scratch build project. . Your method obviously works well, do you have any more info or photos of the process of specifically making up the spinner from scratch? I am thinking of turning one in balsa and foam and then glassing it and melting out the foam core (lost foam technique) but to get consistency in the thickness and strength is proving a challenge.
03-02-2021, 12:30 PM
#147
You have a number of options namely either use a lathe to turn on a wooden replica, finish and make one in carbon fiber and balance. Alternatively, create a 3d file for processing on a 3d printer. Then sand and smooth and make a mold. Again make one in carbon fiber. Easier said than done but you have a choice at least.
Reuben
Reuben
