


We Are Ninja's HPI RS4 MT Build Thread...
 10-25-2009 | 04:53 PM
#1

Thread Starter

Joined: Jul 2009
Posts: 64
Likes: 0
Received 0 Likes
on
0 Posts
From: Dallas, TX
The RS4 MT was the first RC I ever built. I bought it new and despite it's relatively simplicity, it took me days (a week plus...) to finish it. The whole 4WD stadium/monster truck is an excellent premise, especially eleven years ago when it debuted, but it had issues that needed addressing...
I scored a NIB RS4 MT on Ebay for $97 back in August. I intend to build a new RS4 MT using the experience and knowledge I've gained after ten years in (and out) of the hobby and address each and every shortcoming. To that end, I spent the following months on an LHS world tour digging through parts bins and scouring the internet parts and for hop-ups. Not "bling", but stuff that the truck actually needs.
The kit:


The hop-ups.
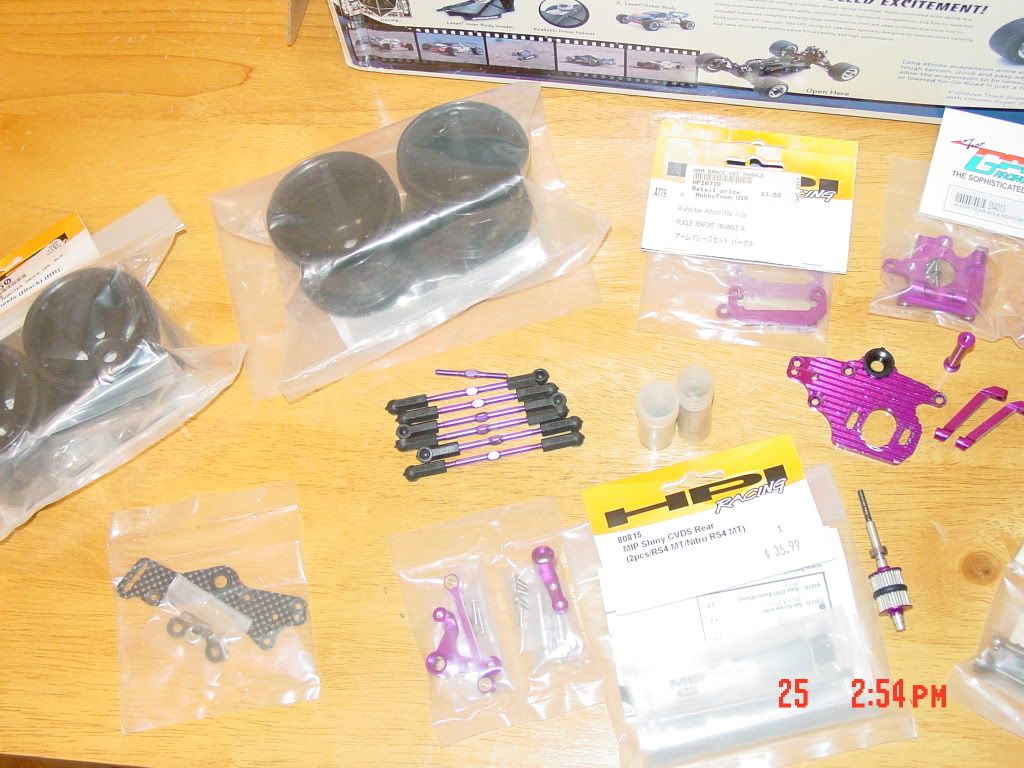

I scored a NIB RS4 MT on Ebay for $97 back in August. I intend to build a new RS4 MT using the experience and knowledge I've gained after ten years in (and out) of the hobby and address each and every shortcoming. To that end, I spent the following months on an LHS world tour digging through parts bins and scouring the internet parts and for hop-ups. Not "bling", but stuff that the truck actually needs.
The kit:
The hop-ups.
 10-25-2009 | 05:31 PM
#2
Senior Member
Joined: Jan 2009
Posts: 333
Likes: 0
Received 0 Likes
on
0 Posts
From: niagara falls, NY
the 2 different bodies is cool, and so is the purple anodized. will be a fun build to follow. good luck. btw, wht year is that kit?
10-25-2009 | 06:49 PM
#3
My Feedback: (26)
Joined: Feb 2009
Posts: 82
Likes: 0
Received 0 Likes
on
0 Posts
From: Raleigh, NC
I'll be watching. I just got one of these off the local craigslist for $35! It still has the rare inner body and mine is the baja beetle version. I cleaned it up and it looks almost new. I've got to order an axle and pick a good motor for it. I couldn't find alot of info on these and am interested to see your hop ups and find ot about it's weak spots.
It still has the rare inner body and mine is the baja beetle version. I cleaned it up and it looks almost new. I've got to order an axle and pick a good motor for it. I couldn't find alot of info on these and am interested to see your hop ups and find ot about it's weak spots.

 I had a stampede though
10-26-2009 | 08:36 AM
I had a stampede though
10-26-2009 | 08:36 AM
#5
Thread Starter
Joined: Jul 2009
Posts: 64
Likes: 0
Received 0 Likes
on
0 Posts
From: Dallas, TX
ORIGINAL: evader8
the 2 different bodies is cool, and so is the purple anodized. will be a fun build to follow. good luck. btw, wht year is that kit?
the 2 different bodies is cool, and so is the purple anodized. will be a fun build to follow. good luck. btw, wht year is that kit?
Igot started last night; Ihope to have more pics up shortly.
 10-26-2009 | 12:25 PM
#7
Thread Starter
Joined: Jul 2009
Posts: 64
Likes: 0
Received 0 Likes
on
0 Posts
From: Dallas, TX
^ Hard onroad tires with NO INSERTS... Outside of concourse, they're pretty worthless. The Baja Bug kit did come with off-road tires, but it wasn't released until later.
10-27-2009 | 09:12 AM
#9
Thread Starter
Joined: Jul 2009
Posts: 64
Likes: 0
Received 0 Likes
on
0 Posts
From: Dallas, TX
^ Yah, that's exactly what it is. It's for the Nitro MT. It works well in the elec MT, but requires some modification to get it to work. The aluminum Sprint steering setup bolts right in with no modification. The weak link in the MT's stock setup is that metal rod that connect the steering arms. A turnbuckle/threaded rod with ballcups will get rid of most of the slop. The all-aluminum setup in the picture gets rid of ALL of it.
10-27-2009 | 08:59 PM
#12
Thread Starter
Joined: Jul 2009
Posts: 64
Likes: 0
Received 0 Likes
on
0 Posts
From: Dallas, TX
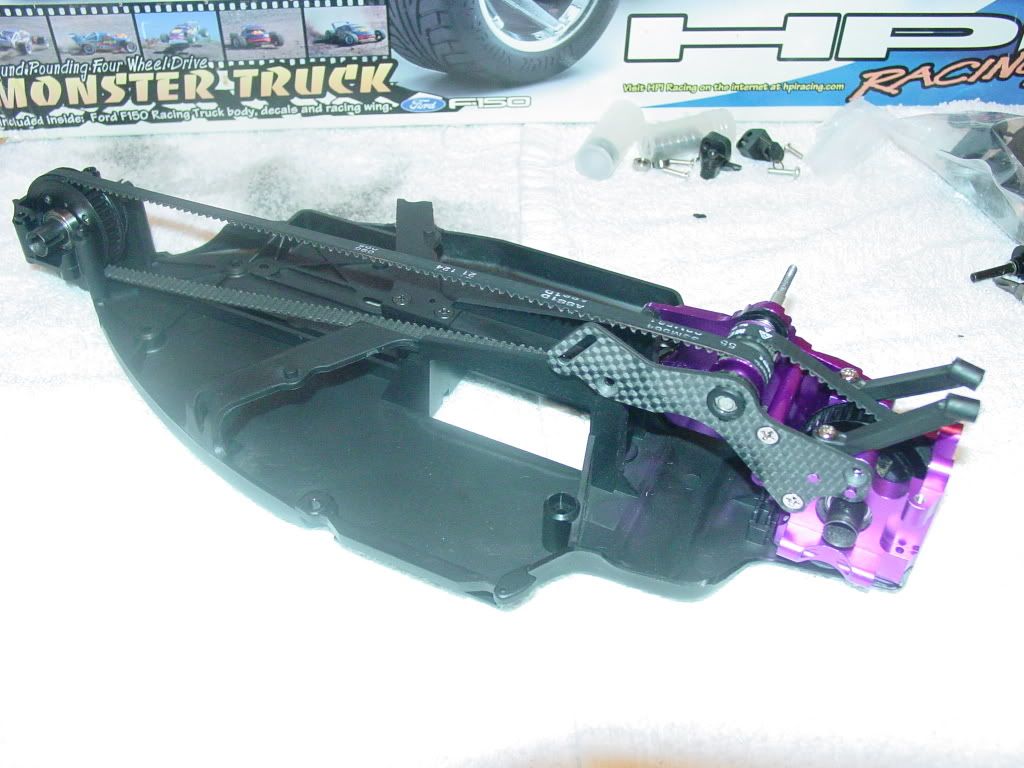
So, I started the build...
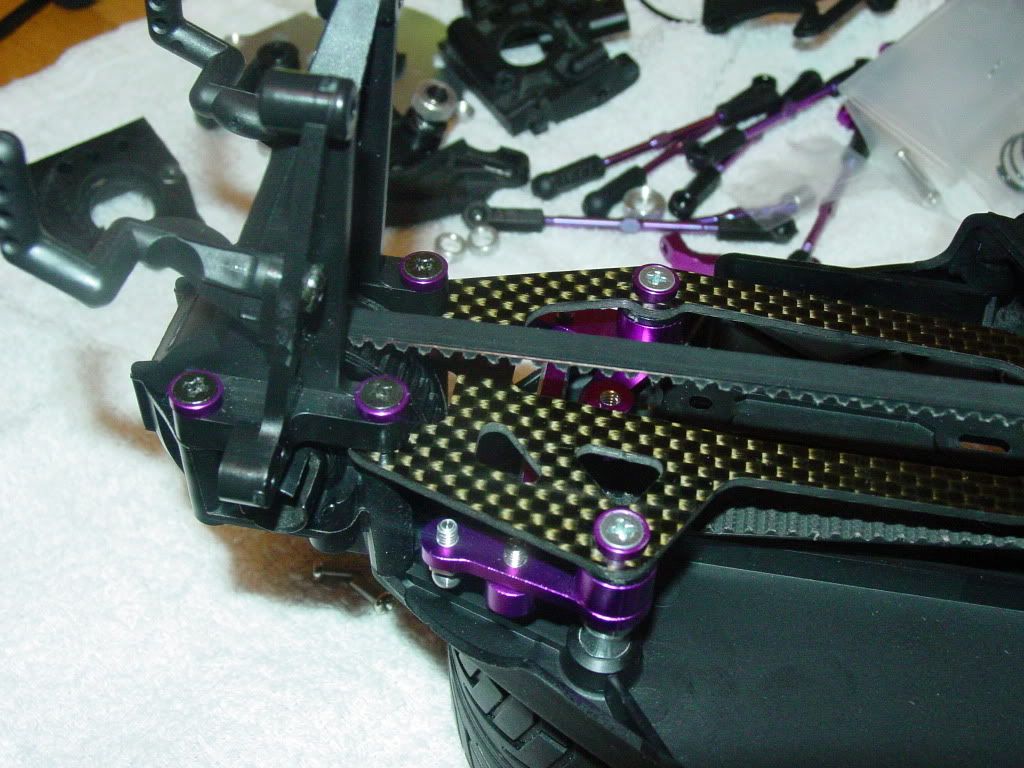
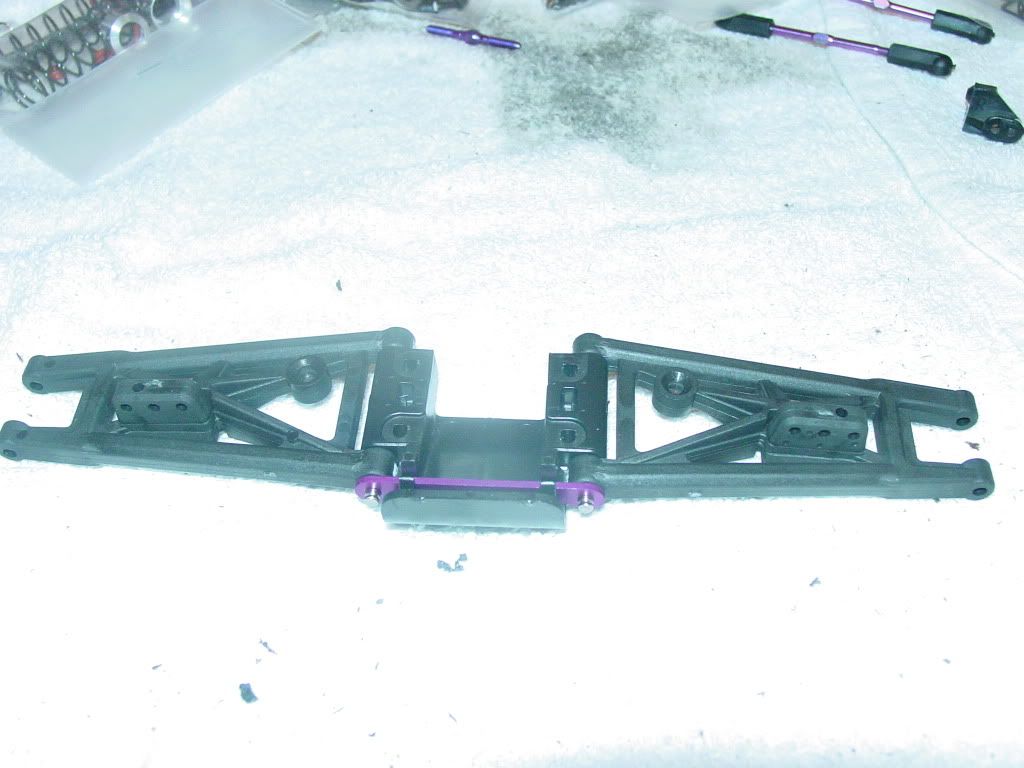
First up is the rear bulkhead. I replaced the stock plastic bulkhead with a nice purple aluminum one.

A little bling-y yes, but it's rigid and it's metal so it should stiffen the chassis as well as help further dissipate heat heat when attached to the purple finned motor mount:
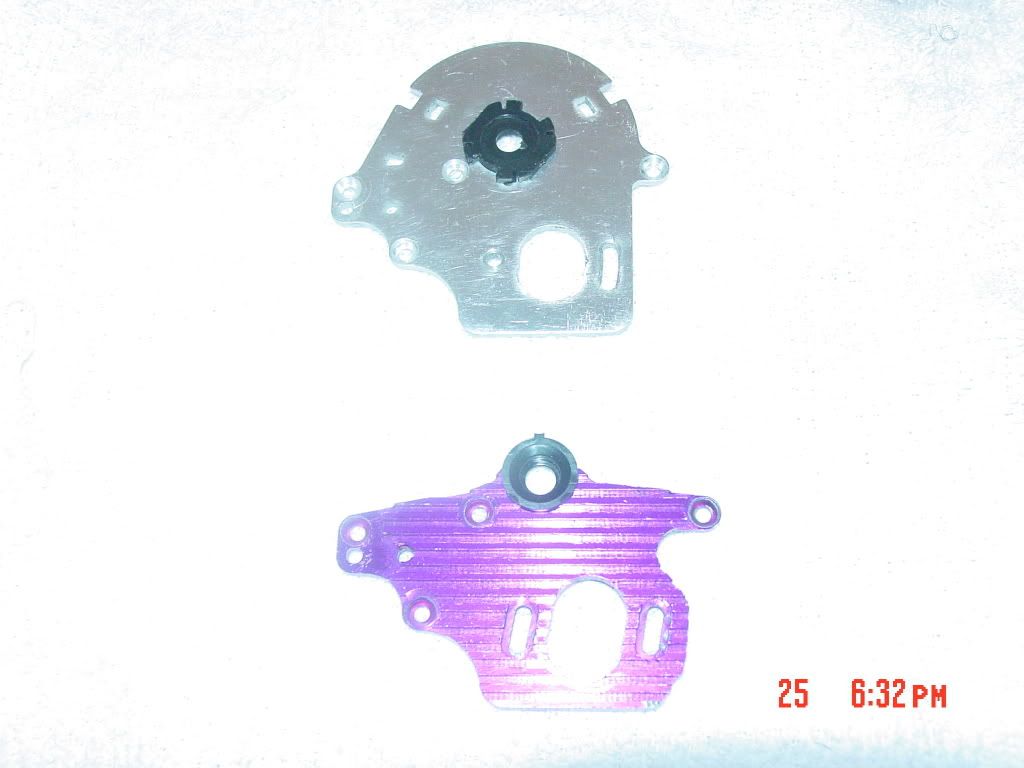
Now the motor mount is a little harder to justify as a performance mod as it has less surface area than the stocker. But, it's thicker and it's finned. The fact that it's shorter could lend to a lower center of gravity, mebbe? :sweat:
That particular motor mount was destined for a Pro2. I actually had it a while; it was from an old build. The marks around the pinion opening are from when I hit the throttle, but hadn't screwed in the motor well... :sweat:
I had to file off the lower screw hole as it wouldn't fit on the MT chassis with it on there.
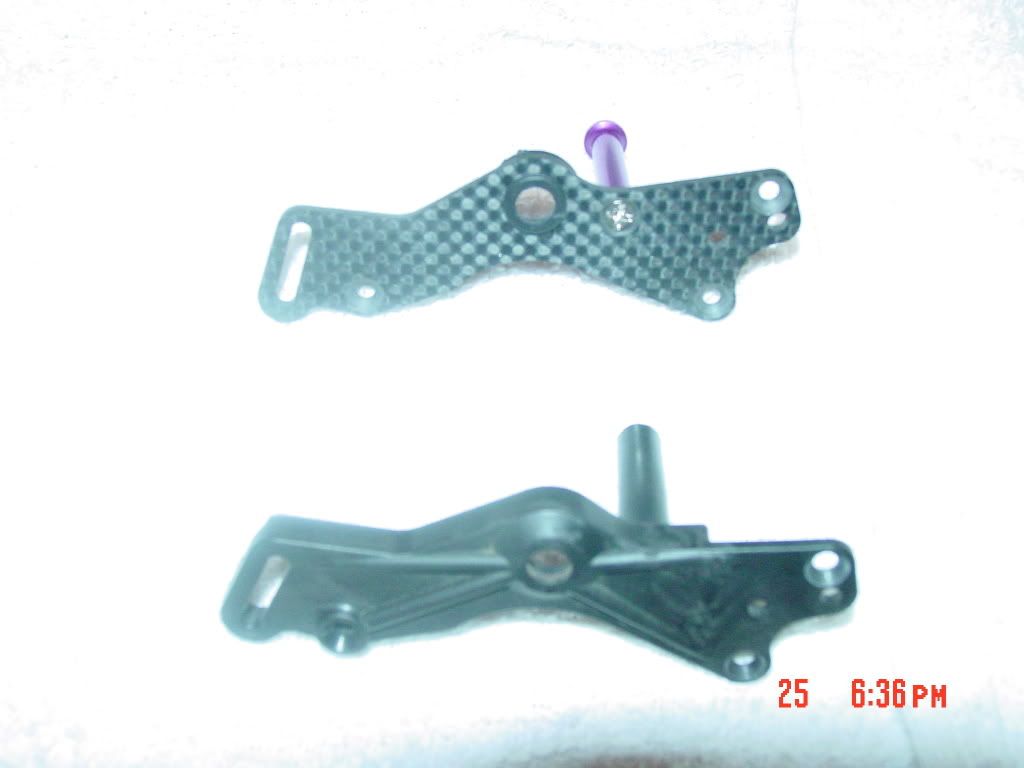
Next is the belt tensioner. Aside from looking awesome, the stocker was plastic and the actual tensioner portion would wear over time and and not hold the belt very tight over time.
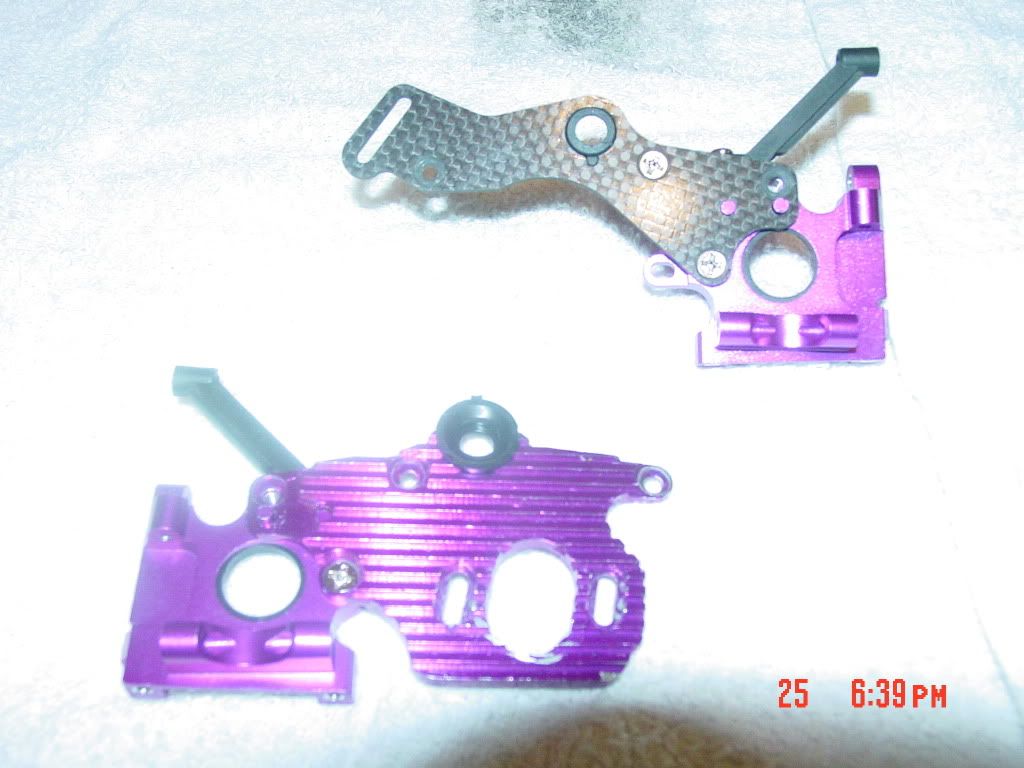
And the completed halves of the rear bulkhead:
First up is the rear bulkhead. I replaced the stock plastic bulkhead with a nice purple aluminum one.
A little bling-y yes, but it's rigid and it's metal so it should stiffen the chassis as well as help further dissipate heat heat when attached to the purple finned motor mount:
Now the motor mount is a little harder to justify as a performance mod as it has less surface area than the stocker. But, it's thicker and it's finned. The fact that it's shorter could lend to a lower center of gravity, mebbe? :sweat:
That particular motor mount was destined for a Pro2. I actually had it a while; it was from an old build. The marks around the pinion opening are from when I hit the throttle, but hadn't screwed in the motor well... :sweat:
I had to file off the lower screw hole as it wouldn't fit on the MT chassis with it on there.
Next is the belt tensioner. Aside from looking awesome, the stocker was plastic and the actual tensioner portion would wear over time and and not hold the belt very tight over time.
And the completed halves of the rear bulkhead:
10-28-2009 | 07:30 PM
#15
Thread Starter
Joined: Jul 2009
Posts: 64
Likes: 0
Received 0 Likes
on
0 Posts
From: Dallas, TX
Back at it.
Assembled the gear diffs. They're functional, but I fully intend to look into a substantially thicker grease (or the optional ball diffs) to keep both wheels moving.
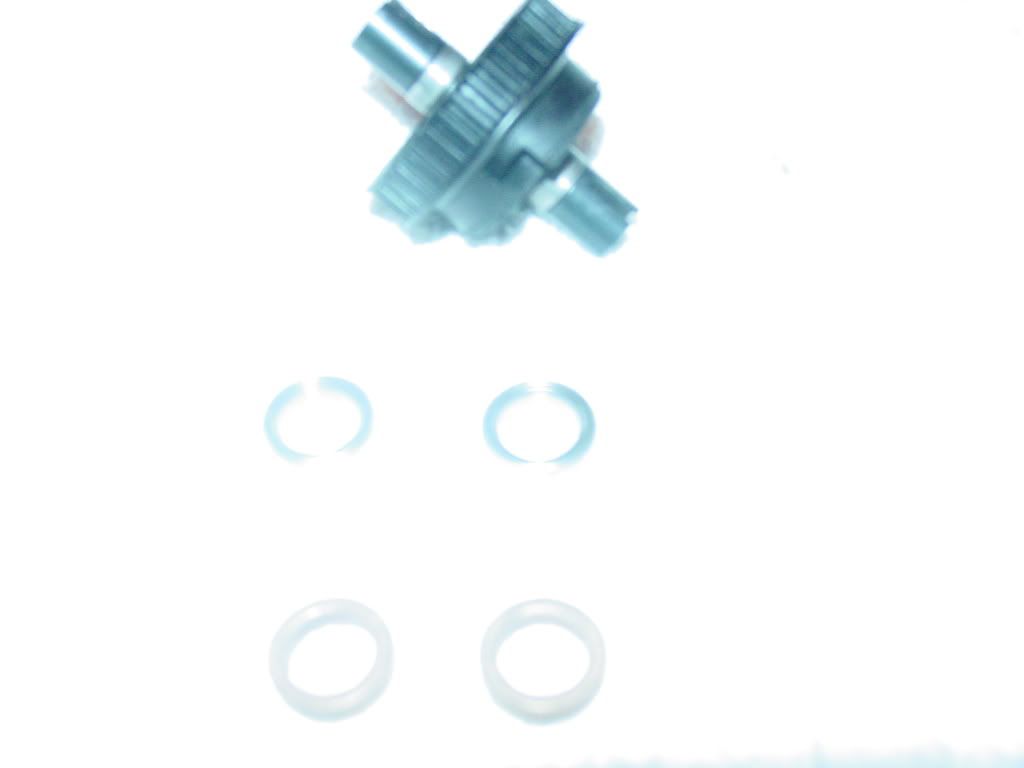
This would be a good time to point out that the kit comes with a bag full of bushings. They're all over the place. Anything that spins spins on bushings. Ugly, crunchy, power-robbing bushings... The first mod for this truck has to be a set of bearings. Before you upgrade anything else, get bearings. Seriously.
I bought a full set of bearings before I even opened the box. $8 on eBay.
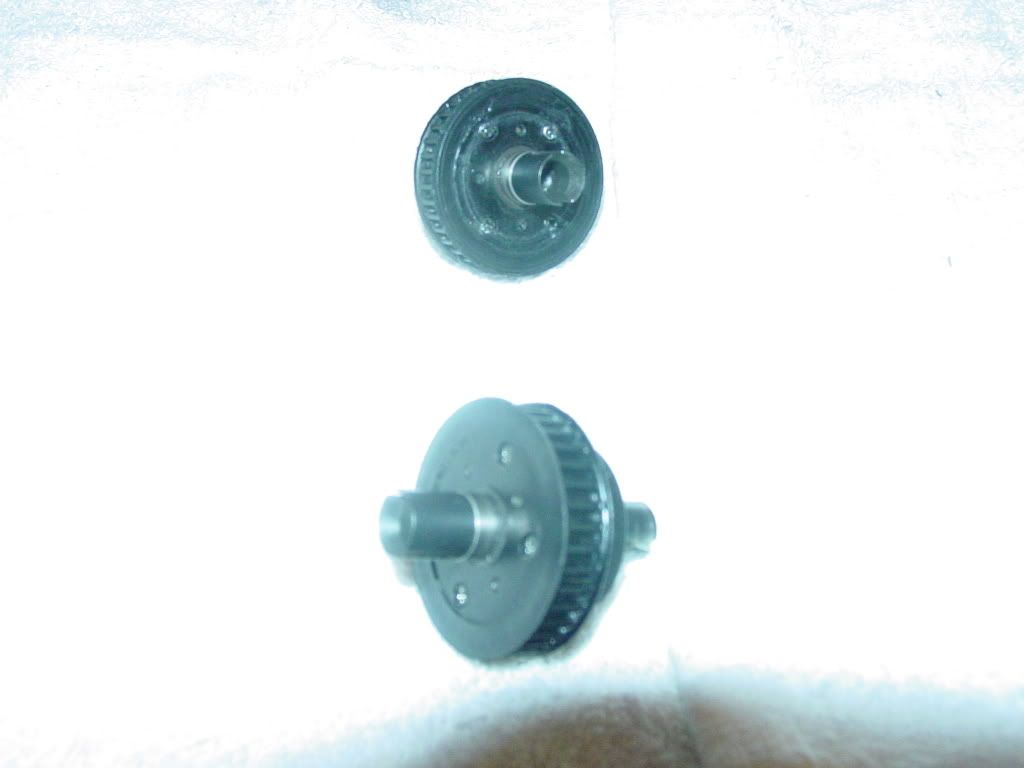
Next up is the top shaft. On the stock [black] shaft has the belt-spinny things are held in place by hingepins. These shear off under load. You'll be having fun and the next thing you know, the truck is FWD. Theoretically, loosening the slipper would alleviate the problem. But if you're running on-road and not running a slipper... Or you hate the truck and want to destroy the drivetrain and you're running off-road without a slipper...
I had a RRP topshaft in my parts boxes. Good thing, too; they're nearly impossible to find now.
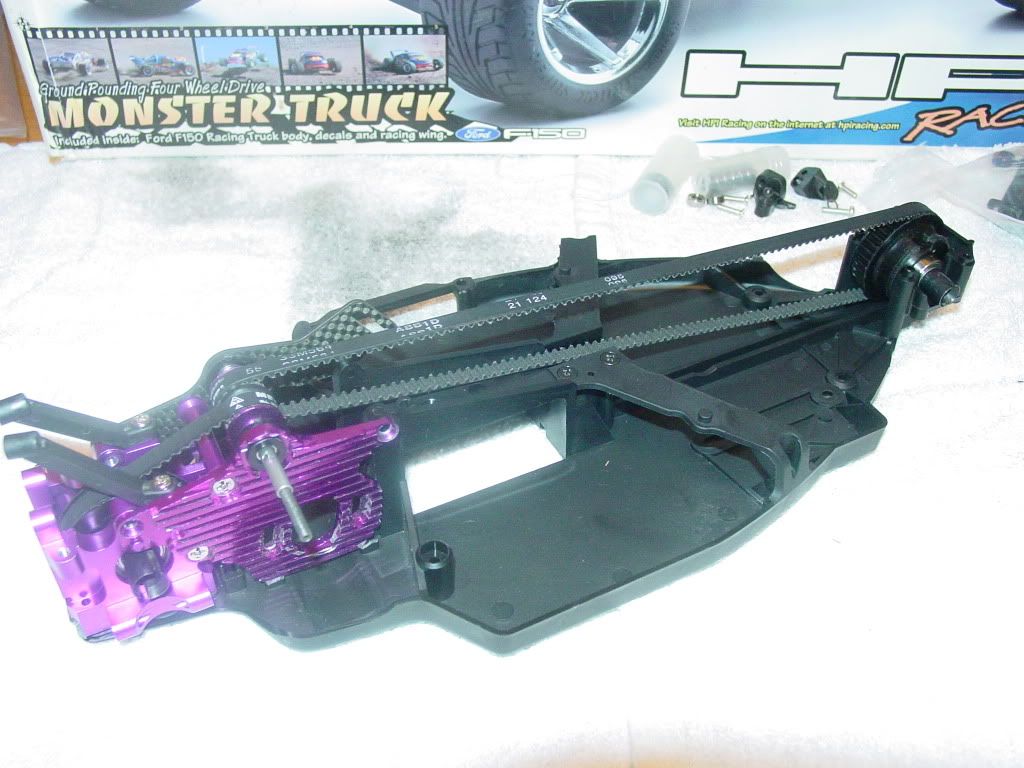
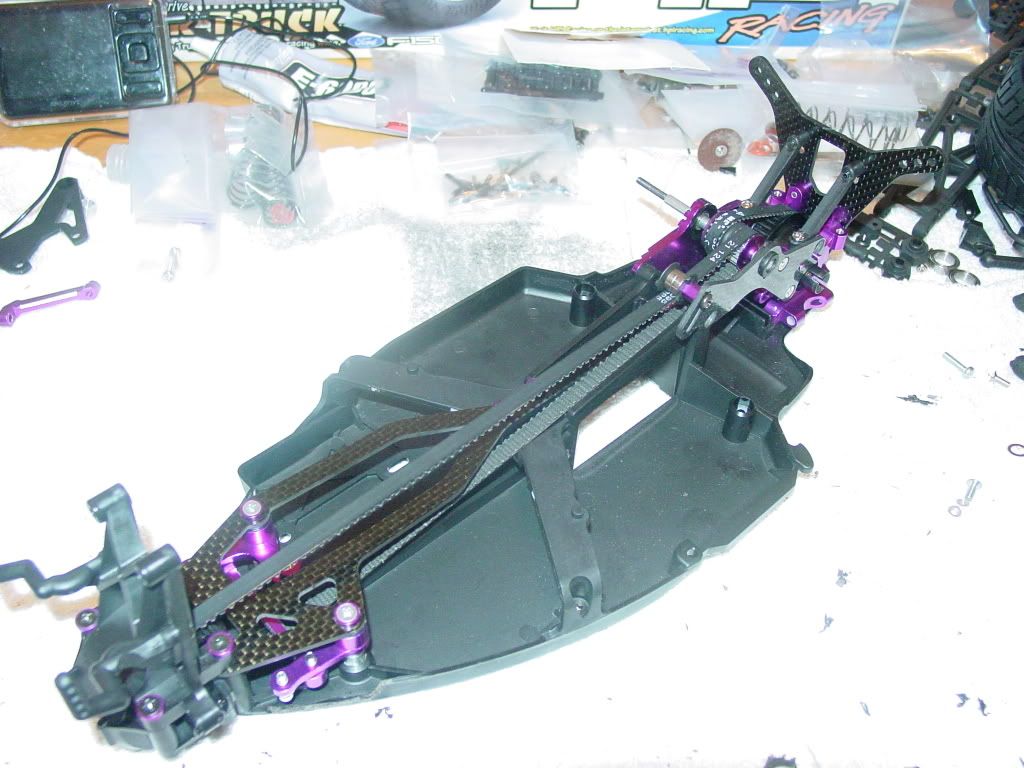
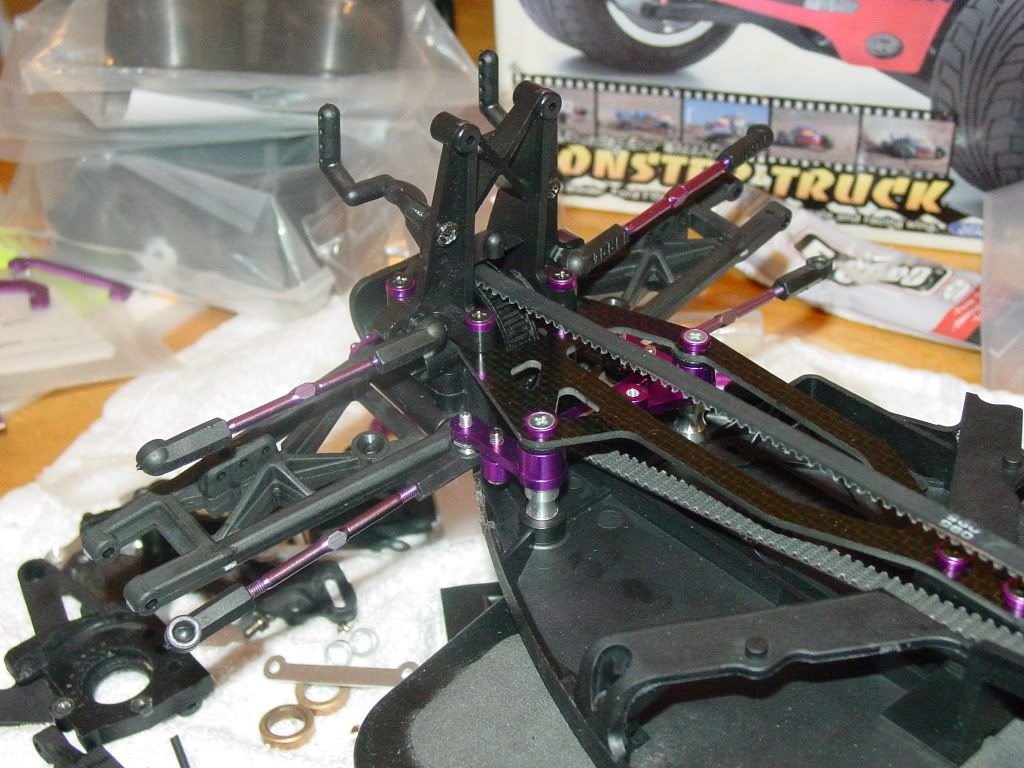
After bolting everything together per the instructions, it was time to attach the rear bulkhead assembly to the chassis.
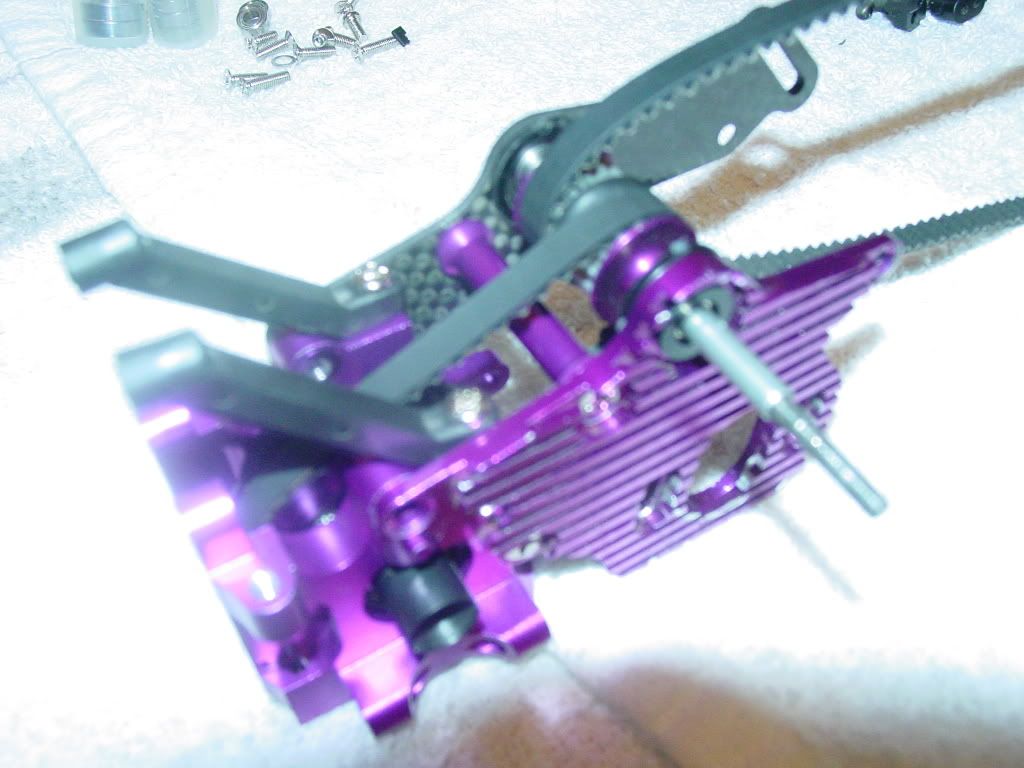
It's best to unscrew the shaft that connects the two halves a bit as the holes are difficult to line up with the chassis with that shaft fully tightened. It took me a while to figure that out... Once attached, it finally begins to look like an RC car.
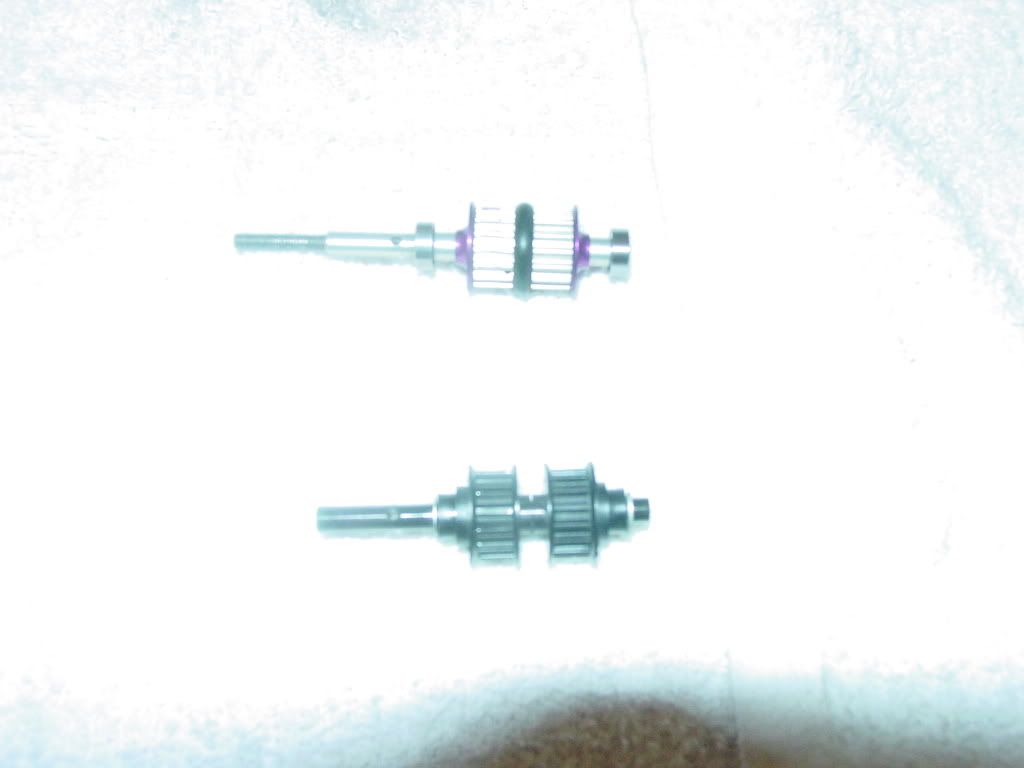
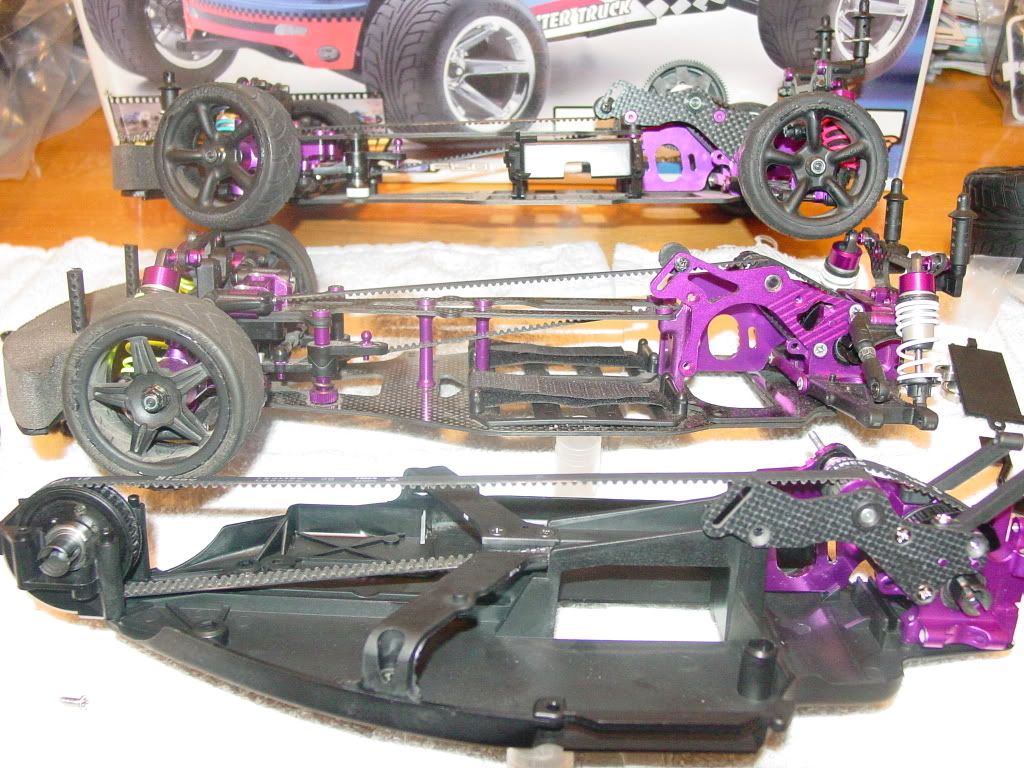
At this stage of the build, the RS4 family resemblance really shows. At the top of the pic is an original RS4 Pro. In the middle is an Pro2 And at the bottom is the RS4 MT.
Assembled the gear diffs. They're functional, but I fully intend to look into a substantially thicker grease (or the optional ball diffs) to keep both wheels moving.
This would be a good time to point out that the kit comes with a bag full of bushings. They're all over the place. Anything that spins spins on bushings. Ugly, crunchy, power-robbing bushings... The first mod for this truck has to be a set of bearings. Before you upgrade anything else, get bearings. Seriously.
I bought a full set of bearings before I even opened the box. $8 on eBay.
Next up is the top shaft. On the stock [black] shaft has the belt-spinny things are held in place by hingepins. These shear off under load. You'll be having fun and the next thing you know, the truck is FWD. Theoretically, loosening the slipper would alleviate the problem. But if you're running on-road and not running a slipper...
Or you hate the truck and want to destroy the drivetrain and you're running off-road without a slipper...I had a RRP topshaft in my parts boxes. Good thing, too; they're nearly impossible to find now.
After bolting everything together per the instructions, it was time to attach the rear bulkhead assembly to the chassis.
It's best to unscrew the shaft that connects the two halves a bit as the holes are difficult to line up with the chassis with that shaft fully tightened. It took me a while to figure that out... Once attached, it finally begins to look like an RC car.
At this stage of the build, the RS4 family resemblance really shows. At the top of the pic is an original RS4 Pro. In the middle is an Pro2 And at the bottom is the RS4 MT.
10-28-2009 | 08:41 PM
#16
Senior Member
Joined: Jan 2005
Posts: 174
Likes: 0
Received 0 Likes
on
0 Posts
From: Provincetown,
MA
When I used to stare at my older brothers Tower Hobbies catalogs for hours before I could afford an actual truck of my own. That was my dream truck. It's cool to see one coming together as if I were back 10 years ago. That and a Team Associated T3... Awesome build.
10-29-2009 | 08:40 PM
#17

Joined: May 2008
Posts: 1,324
Likes: 0
Received 0 Likes
on
0 Posts
From: Seattle,
WA
Looks nice. Glad to see you have a reason for buying aluminum/carbon fiber. For me building/tuning/fixing is almost as fun as driving (especially building a new kit). Just wondering, does your camera have a macro mode? Some of those close-up pictures look a little blury. If it does, it will probably look like a picture of a little flower.
Funny to see a monster truck with low profile road tires...
Funny to see a monster truck with low profile road tires...
10-29-2009 | 09:08 PM
#18

My Feedback: (10)
Did it come with more than one set of tires/wheels? I seem to recall somewhere reading that it came with onroad and off road tires. I got mine used so I have no first hand with what the new in the box kit came with. I run wheely king tires and wheels on mine, gives it an extra monster truck look.
10-30-2009 | 10:51 AM
#19
Thread Starter
Joined: Jul 2009
Posts: 64
Likes: 0
Received 0 Likes
on
0 Posts
From: Dallas, TX
ORIGINAL: traxxaspede
Looks nice. Glad to see you have a reason for buying aluminum/carbon fiber. For me building/tuning/fixing is almost as fun as driving (especially building a new kit). Just wondering, does your camera have a macro mode? Some of those close-up pictures look a little blury. If it does, it will probably look like a picture of a little flower.
Funny to see a monster truck with low profile road tires...
Yah; Ithink it came with on-road tires to emphasize the fact that it can be "switched" to on-road mode by moving the rear shock tower. In practice, though. They are terrible...
@hpibasher2: I was stoked when I found it; it was exactly like ten years ago.
@kistner:As far as I know,it only comes with one set. Street tires for the Ram/F150 kits; Dirt Hawgs for the Baja Bug kit IIRC...
11-03-2009 | 10:03 AM
#22
Thread Starter
Joined: Jul 2009
Posts: 64
Likes: 0
Received 0 Likes
on
0 Posts
From: Dallas, TX
Quick update... I'm having trouble with the front CVD's I ordered. One of th epackets of something, I'm not sure which, punctured causing one of the axles to develop a light coat of rust. I'd like to get it off if I can, otherwise I'll just go through the hassle of returning them. I'm currently looking for a good rust remover...
11-03-2009 | 10:27 PM
#23

Senior Member
My Feedback: (1)
Joined: Apr 2008
Posts: 5,877
Likes: 0
Received 0 Likes
on
0 Posts
From: Hinsburg ,
VT
i've taken some off with wd 40 sprayed on a paper towel, in used the paper towel and stuck the ball in there and wiggled it about
btw anyone know why this class never took off, it looks like soo much fun i wish i had one of these
the lug
btw anyone know why this class never took off, it looks like soo much fun i wish i had one of these
the lug
11-03-2009 | 11:21 PM
#24
Thread Starter
Joined: Jul 2009
Posts: 64
Likes: 0
Received 0 Likes
on
0 Posts
From: Dallas, TX
^ I've had it soaking in WD-40 for a day or so, so I'll give that a try later on. Thanks for the tip. 
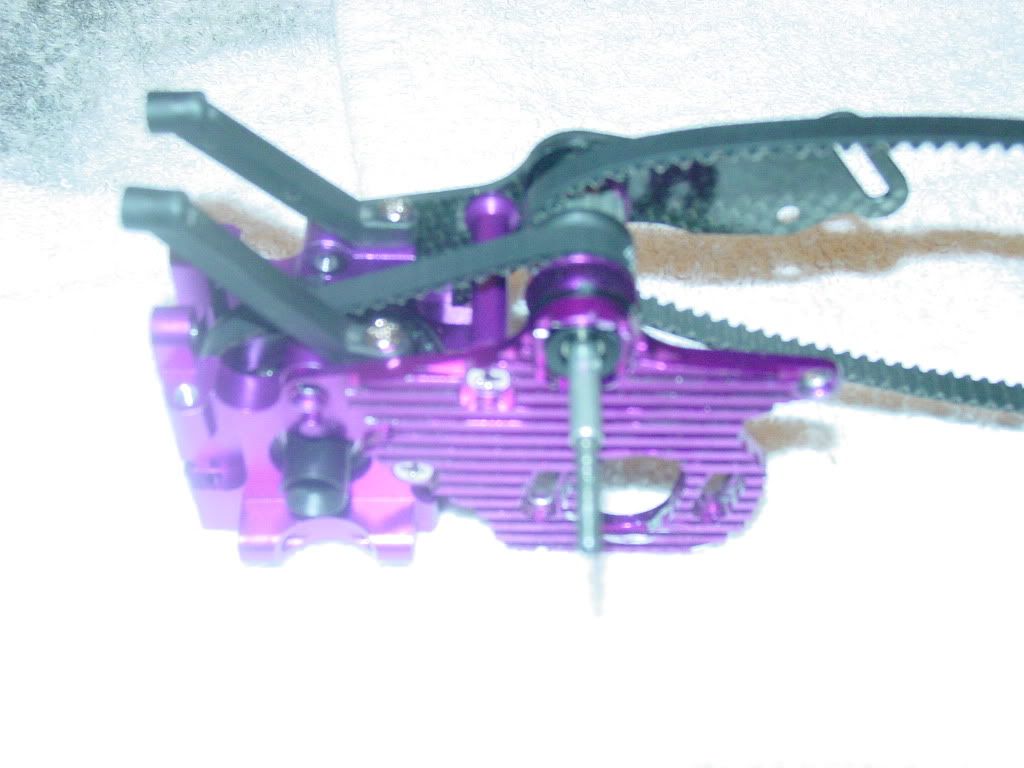
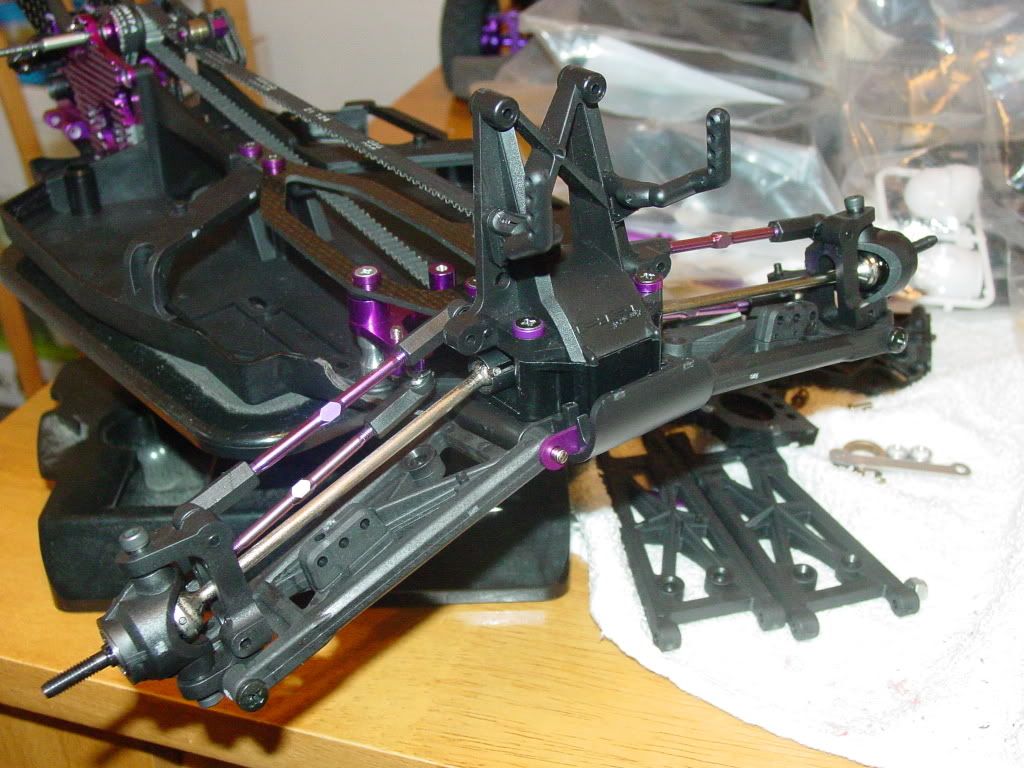
I got a little more wrench time in. I finally tackled my least favorite part of the build: modifying the Nitro MT steering assembly to fit. Lots of filing, cutting, grinding and cursing. Oh and burnt fingers...
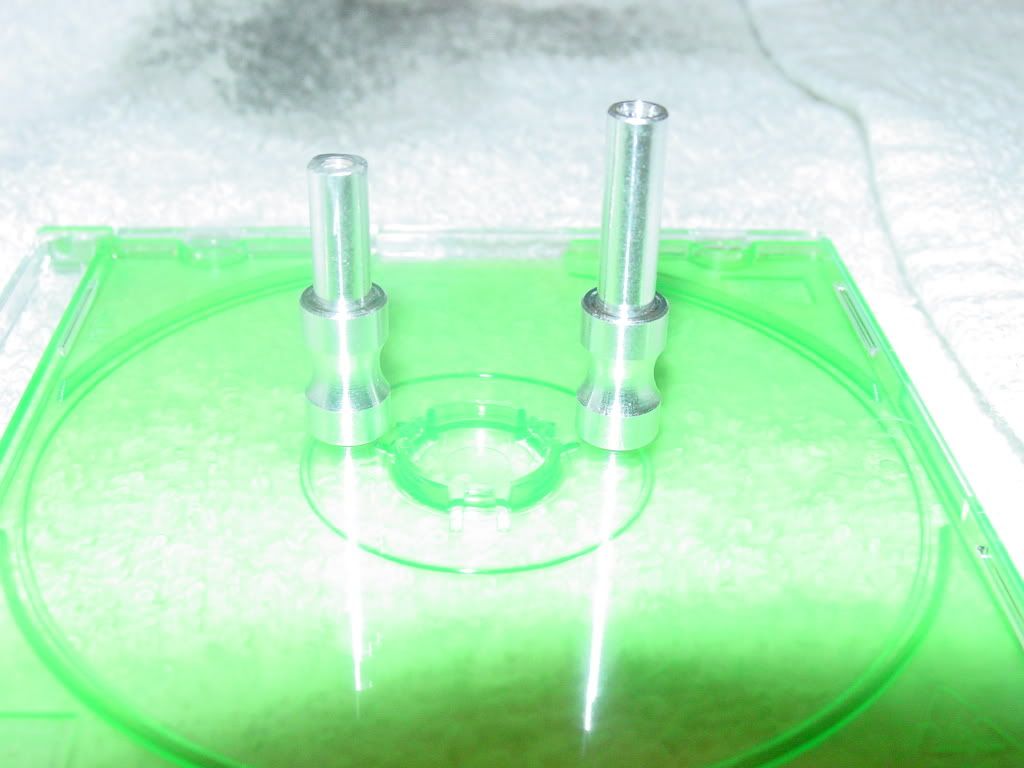
Let the modding begin. On the left is the "modded post", on the left is the original size. I had to cut the smaller one to fit just below the front brace. The, cut the other one to match it so that they were the same distance from the brace. THEN, cut the bottom of the 2nd one since bottom of the chassis raised beneath the left post:
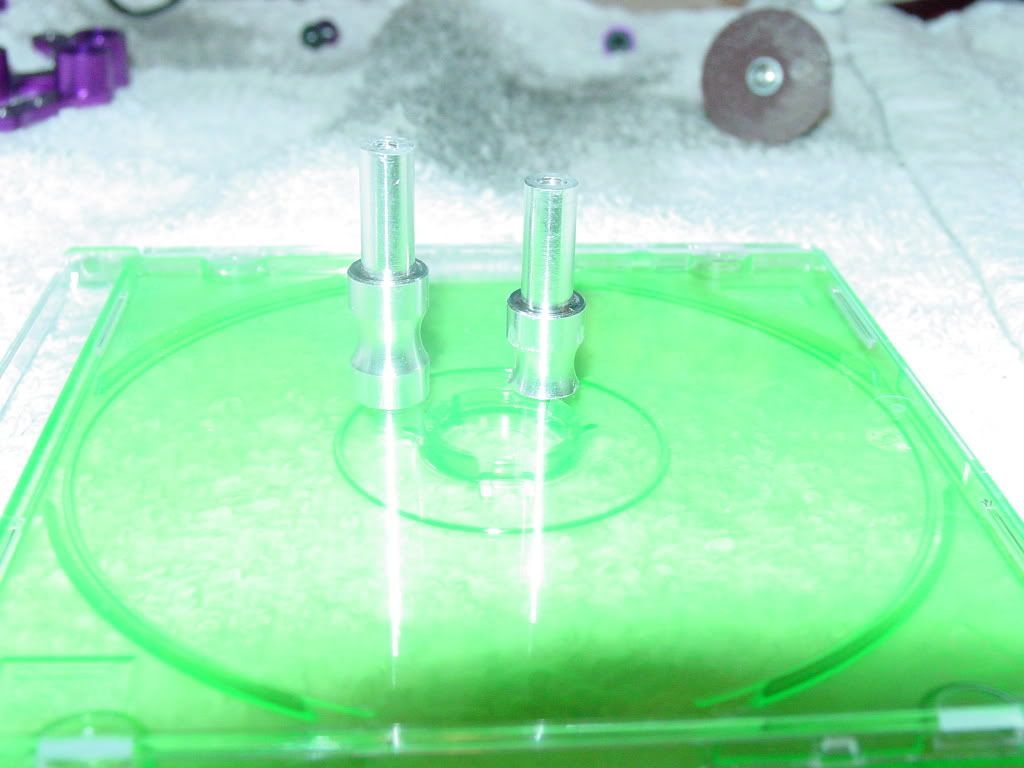
^See? Much shorter... When cutting and grinding on such a small piece of metal, it gets very, very, very, very hot...
With the cutting done, the Nitro MT steering assembly is ready to be installed. On the left is the original steering assembly. That metal link thing in the middle leads to all kinds of steering slop. So much so, that you don't so much steer the truck, as give suggestions. Whatever that little bar decides to do may or may not correspond to your inputs. A turnbuckle or threaded rod attached to two ballcups works, but it limits steering throw... Captain Aluminum to the rescue:
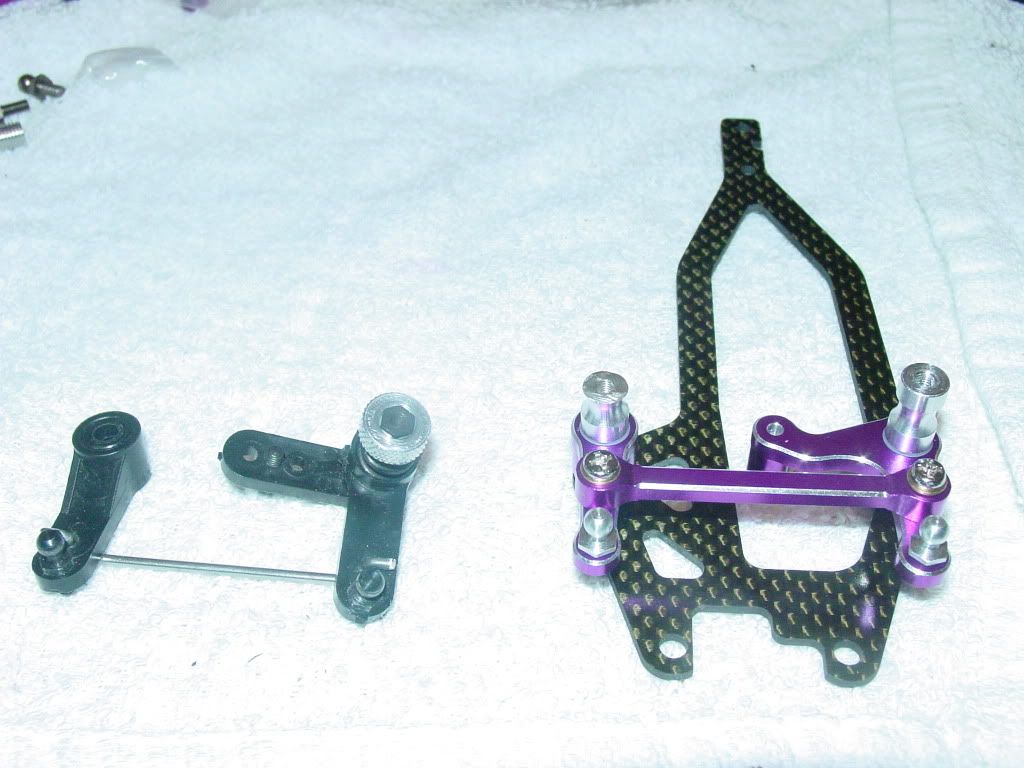
^The aluminum setup (shown attached to the front chassis brace) eliminates ALL steering slop. It's just a pain to actually get it to work... The metal bar is supposed to sit above the arms, but it severely limits steering. Since I filed the steering posts from the top down, effectively raising them, I was able to mount the bar beneath the arms and still have them clear the belt. w007.
In regards to the brace, this is the stock piece minus the steering assembly:
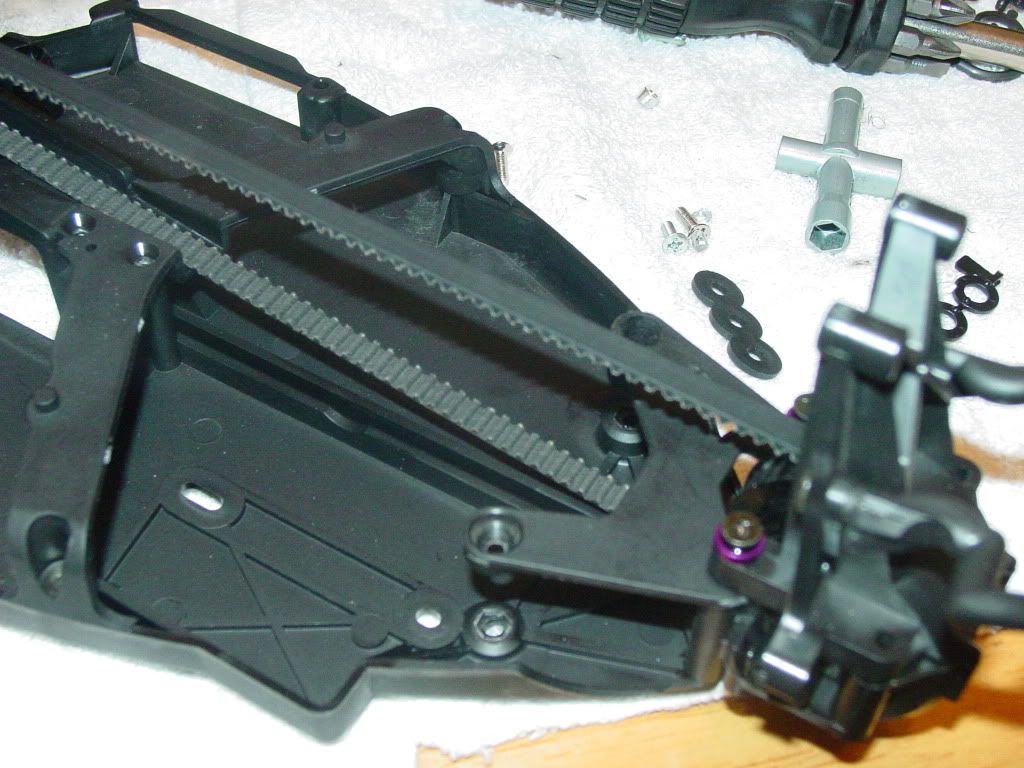
The chassis is as stiff as a wet noodle in stock form. With the HPI chassis brace, it's as stiff as a board:
Now, to get this CVD rust thing sorted out... :sweat:
I got a little more wrench time in. I finally tackled my least favorite part of the build: modifying the Nitro MT steering assembly to fit. Lots of filing, cutting, grinding and cursing. Oh and burnt fingers...
Let the modding begin. On the left is the "modded post", on the left is the original size. I had to cut the smaller one to fit just below the front brace. The, cut the other one to match it so that they were the same distance from the brace. THEN, cut the bottom of the 2nd one since bottom of the chassis raised beneath the left post:
^See? Much shorter... When cutting and grinding on such a small piece of metal, it gets very, very, very, very hot...
With the cutting done, the Nitro MT steering assembly is ready to be installed. On the left is the original steering assembly. That metal link thing in the middle leads to all kinds of steering slop. So much so, that you don't so much steer the truck, as give suggestions. Whatever that little bar decides to do may or may not correspond to your inputs. A turnbuckle or threaded rod attached to two ballcups works, but it limits steering throw... Captain Aluminum to the rescue:
^The aluminum setup (shown attached to the front chassis brace) eliminates ALL steering slop. It's just a pain to actually get it to work... The metal bar is supposed to sit above the arms, but it severely limits steering. Since I filed the steering posts from the top down, effectively raising them, I was able to mount the bar beneath the arms and still have them clear the belt. w007.
In regards to the brace, this is the stock piece minus the steering assembly:
The chassis is as stiff as a wet noodle in stock form. With the HPI chassis brace, it's as stiff as a board:
Now, to get this CVD rust thing sorted out... :sweat:
11-08-2009 | 08:18 PM
#25
Thread Starter
Joined: Jul 2009
Posts: 64
Likes: 0
Received 0 Likes
on
0 Posts
From: Dallas, TX
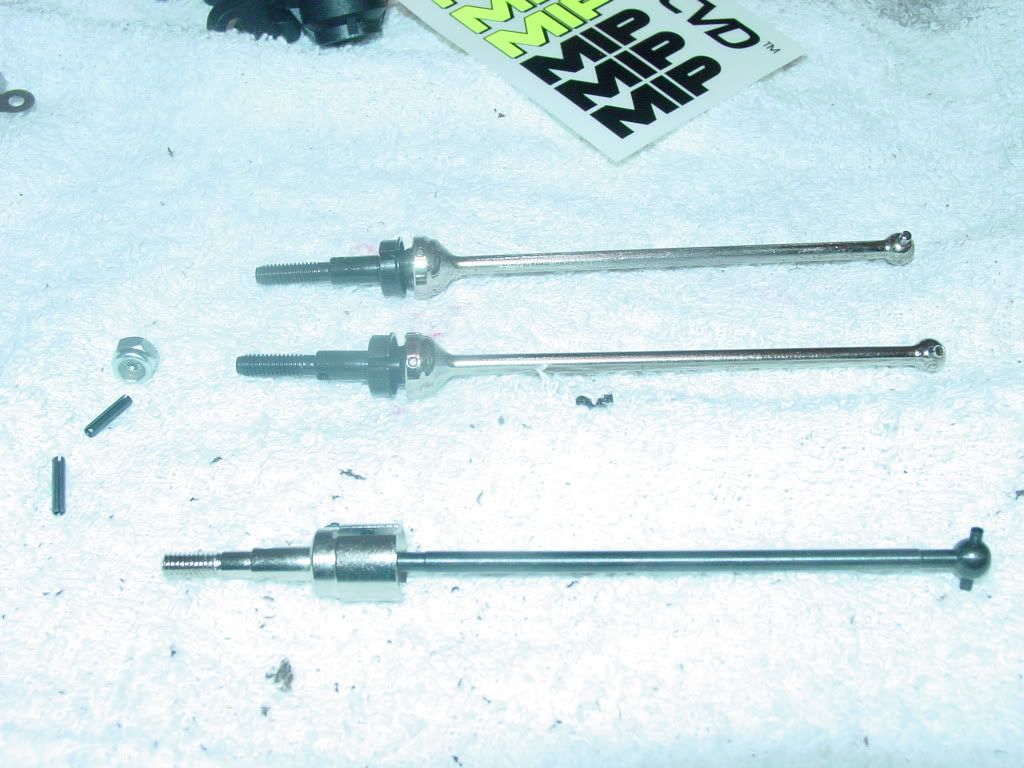
Got the rust off the CVD's...
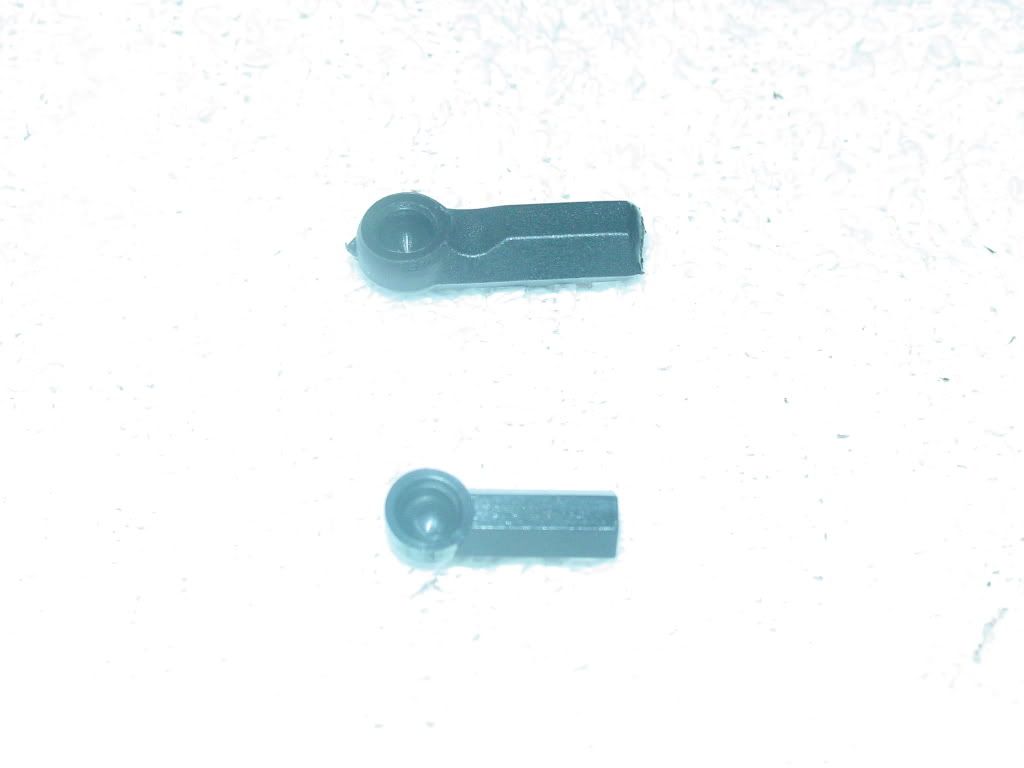
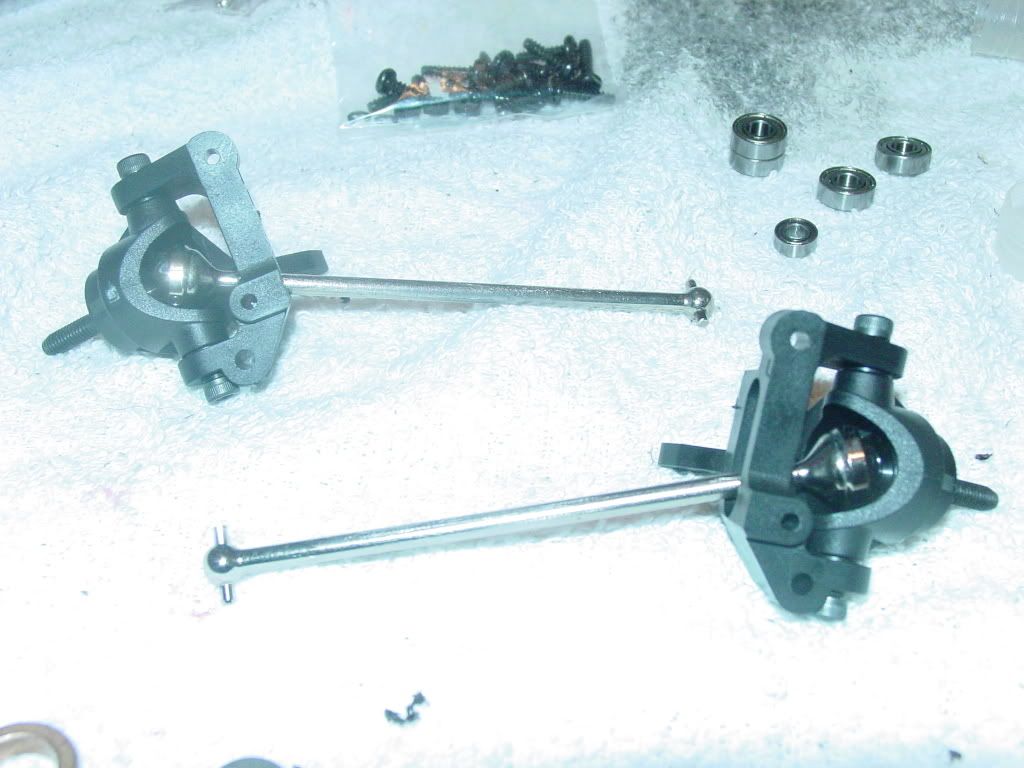
Ballcups. RPM knows how to make them. HPI does not. The ones pictured at the bottom are from HPI. They function for the most part... As long as the truck doesn't hit anything. Anything at all. Otherwise, they pop right off. Curbs, pylons, rocks, tall grass... The ones on top are the much more robust RPM ballcups:
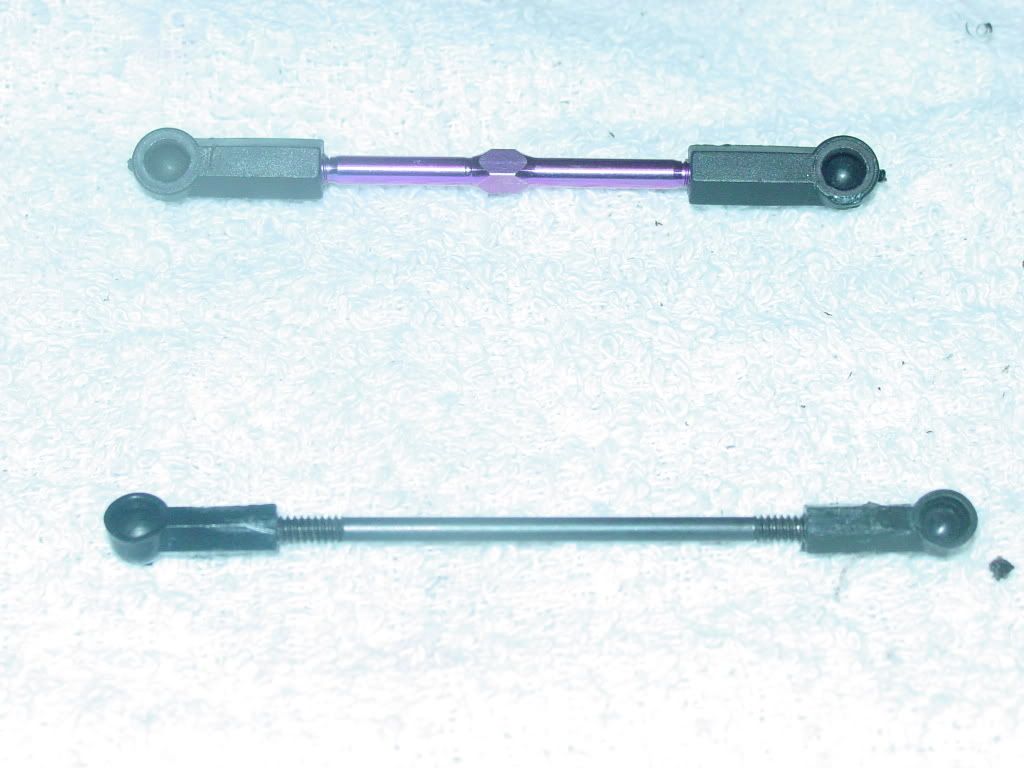
Now, it's a good time to address the MT's threaded rods. Like the stock ballcups, they work, but you have to disconnect at least on end to lenghten or shorten them with the ballcups attached... HPI's titanium turnbuckles are a very worthwhile upgrade:
Next up is the attachment of the front lower bulkhead assembly:
So about the rusty CVD's... Good as new.. They're a major imporvement over the the noisy, rattly stock dogbones at the bottom. Much smoother and much quieter.
The completed knuckles and carriers with CVD's installed:
And the completed front end:
Ballcups. RPM knows how to make them. HPI does not. The ones pictured at the bottom are from HPI. They function for the most part... As long as the truck doesn't hit anything. Anything at all. Otherwise, they pop right off. Curbs, pylons, rocks, tall grass... The ones on top are the much more robust RPM ballcups:
Now, it's a good time to address the MT's threaded rods. Like the stock ballcups, they work, but you have to disconnect at least on end to lenghten or shorten them with the ballcups attached... HPI's titanium turnbuckles are a very worthwhile upgrade:
Next up is the attachment of the front lower bulkhead assembly:
So about the rusty CVD's... Good as new.
. They're a major imporvement over the the noisy, rattly stock dogbones at the bottom. Much smoother and much quieter.The completed knuckles and carriers with CVD's installed:
And the completed front end:

