


Twin Pocket - 72" DIY Cat
 08-10-2012, 12:03 AM
#1

Thread Starter
Join Date: Apr 2008
Location: warwick, UNITED KINGDOM
Posts: 48
Likes: 0
Received 0 Likes
on
0 Posts
Part 36 – Engine mounts/ Rudder/ Carb Mod
Hi guys, it’s probably been over year since my last post, and this project still kicking around in my shed. My last post I got the hull wet and ducked it in the canal to take a look at how it would sit in the water, my next step is to trial fitting up the rudder hardware I knocked up out of some stock ali (considerable while back!)
I am pleased with the fit, I am no machinist so the finish is not mint, the best I can do with just some hand tools.
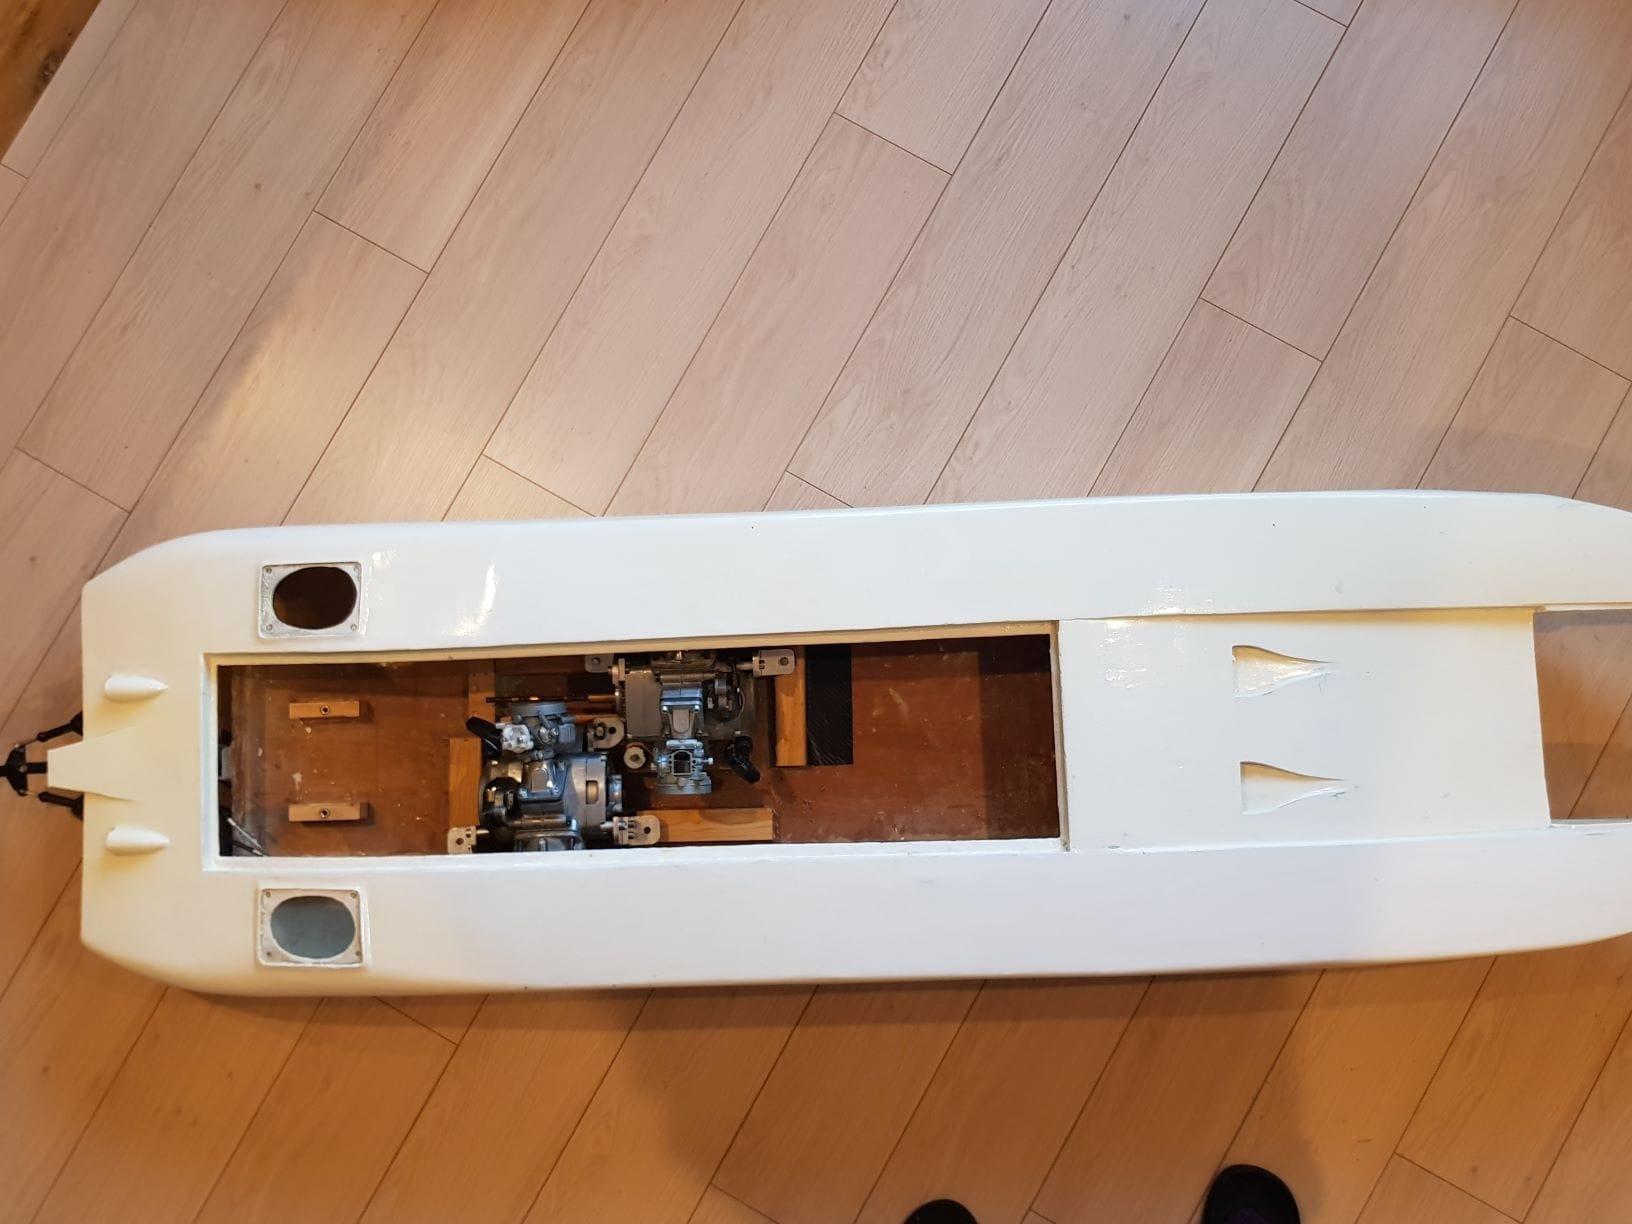
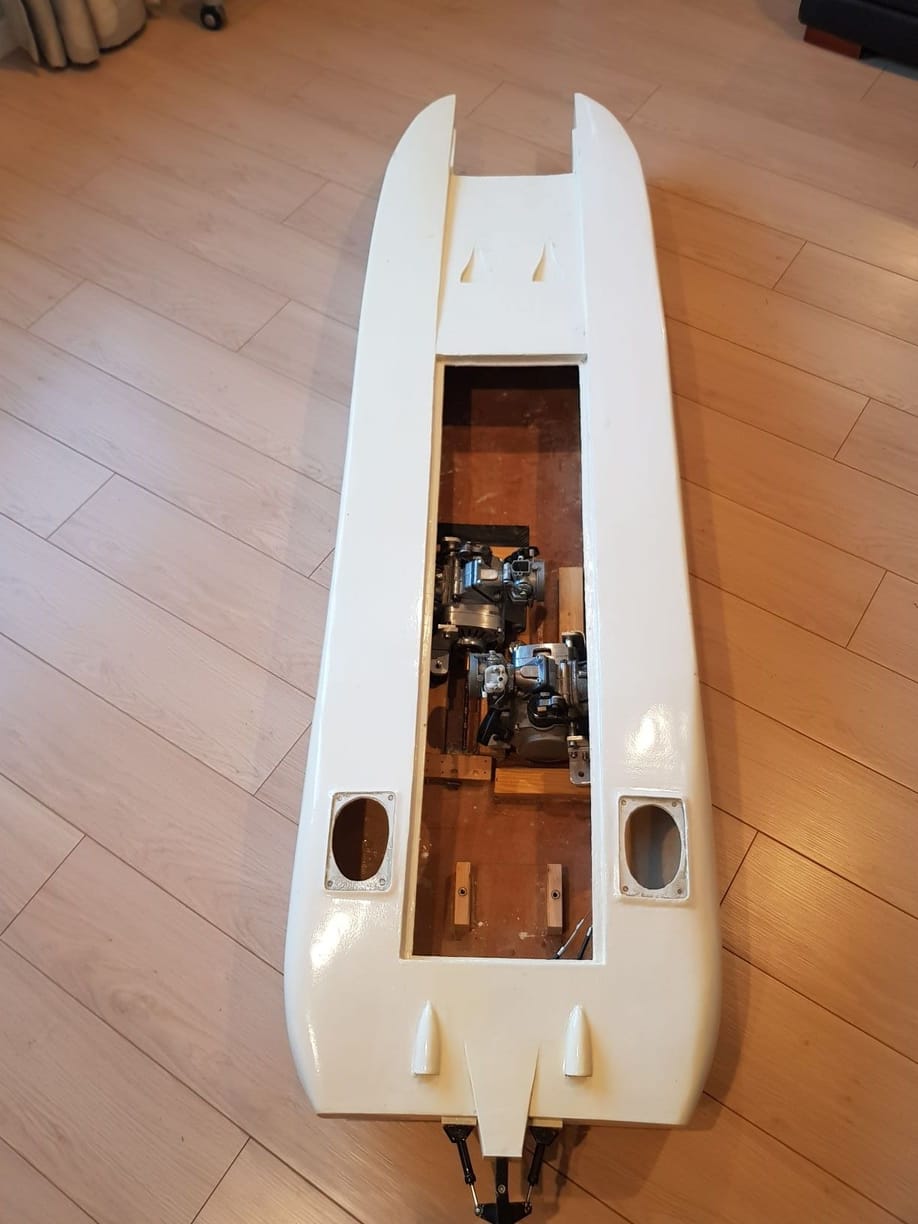
Engine mounts done,
I knocked up some engine mounts with some ¼” ali angle. Using the existing engine mount points on the carb side, and on the other side replacing the pullstart and clutch mounting screws with some longer socket screws through the mounts.
Blind nuts go through some spruce I have glassed onto the tunnel. The engine is a tight fit with about 5mm clearance on the spark plug. The down sides is with arrangement I would have to pull the engine to change the plug. (thinking of maybe a small access panel to the plug)
Carb mods,
The polini rep engine comes with a SHA14 carb. The return spring is too big for the servo to pull. I have removed the slider spring and plan on using a cable push/pull to the servo.
I have got some more photos I will upload of some more progress in a bit.
Hi guys, it’s probably been over year since my last post, and this project still kicking around in my shed. My last post I got the hull wet and ducked it in the canal to take a look at how it would sit in the water, my next step is to trial fitting up the rudder hardware I knocked up out of some stock ali (considerable while back!)
I am pleased with the fit, I am no machinist so the finish is not mint, the best I can do with just some hand tools.
Engine mounts done,
I knocked up some engine mounts with some ¼” ali angle. Using the existing engine mount points on the carb side, and on the other side replacing the pullstart and clutch mounting screws with some longer socket screws through the mounts.
Blind nuts go through some spruce I have glassed onto the tunnel. The engine is a tight fit with about 5mm clearance on the spark plug. The down sides is with arrangement I would have to pull the engine to change the plug. (thinking of maybe a small access panel to the plug)
Carb mods,
The polini rep engine comes with a SHA14 carb. The return spring is too big for the servo to pull. I have removed the slider spring and plan on using a cable push/pull to the servo.
I have got some more photos I will upload of some more progress in a bit.

 08-13-2012, 04:21 AM
#3
Thread Starter
Join Date: Apr 2008
Location: warwick, UNITED KINGDOM
Posts: 48
Likes: 0
Received 0 Likes
on
0 Posts
Part37 – Servo Tray
A few more updates. Knocked together a servo tray out of a length of some ali channel I found in a skip. x2 servos throttle, x1 MG995 steering. Having installed the mg995 it disappears into a hull this size. The mg995 servo spec states 13kg, I am not sure if I have made a good choice here? on previous builds I have always used ¼ scale. The servo just appears dwarfed in this build!
To attached the pull cables to the servo arm I added my own arm with support bracket. Just made from some ¼” thick bar, two small off cuts of ali plate, small 4mm Id brass tube and 4mm stainless rod. The brass tube is for bushing for the rod connectors and centre support. I should be able to tighten the nuts on the back of the push rod links to take the slack up in the cable.
I have attached some pics of the installation so far. As you can see I have not fitted the other engine yet, it will sit between the servo tray and existing install.
The output will face forward and the drive will be brought back down to the transom (counter rotating)
Hi BigT,
You are right carbs are float bowl gravity fed, so would need a fuel pump. To overcome installing complicated pumping systems I will feed them using 2 iv bags. The bags are mounted between 2 flat plates and simply elastic bands contract the bags and the pressure fuels the carbs. I have not field tested this yet but ran a couple of bags through on the bench outside. Seemed ok. How this will work in the field maybe /maybe not.
Thanks
Adam
02-28-2013, 04:54 AM
#4
Thread Starter
Join Date: Apr 2008
Location: warwick, UNITED KINGDOM
Posts: 48
Likes: 0
Received 0 Likes
on
0 Posts
Part38 – Drive Fabrication
It’s been a few months since the last post, but managed to get my drive finished. I could buy 2 drives, but wanted to give it a go making your own stuff, and want to keep it to a DIY budget build.
My aim was to try and make a scale looking annerson type drive, in the end I would like to fit a 5 blader prop (for no other reason than looks), but for first testing I am putting an old 3 blade on. (As it may end up decorating the bottom of the pond)
It was put together from a £4 garlic press, and some ali stock. 6” Stainless steel shaft running 2 teflon buses fore/aft with thrust washers also either end. Shaft connects to cable with a square end ferrule tucked up inside the tube.
It is height adjustable with 2 hex screws holding the s/s centre shaft, although I don’t plan on moving it once you found optimal set position.
Probably all in I spent £15, just hope it does not cost me my £30 prop lol.
05-28-2020, 11:50 AM
#7
Thread Starter
Join Date: Apr 2008
Location: warwick, UNITED KINGDOM
Posts: 48
Likes: 0
Received 0 Likes
on
0 Posts
Hi,
Been about 7 years since I was last here, family divorce got the tshirt. Finding some fun in my old hobby. Anyhow had this half finished project kicking around in the garage still. Plan was to install 2 polini rep engines, and needs total fit out. Big question a lot of time has gone by and electric has got a lot cheaper. Do I persist with the rep fit out or just ditch them as too much headache and go for much simpler medium end electric fit?
I know nothing on the electric world, what twin motor esc and batery combos would be a good starter to look at? I know you can sink $$$$ into electrics but want to keep it tame. 6-10S ? I would be happy with 30-40mph. or just fit out the polini clones? I just figured electrics are going to be a quicker fit to get me some play time.
Appreciate advice.
06-02-2020, 01:52 PM
#8

Changing out the gassers for electrics won't take too much. You'll be looking at removing the engines and mounts and replacing them with the appropriate motor mount(s), installing the ESC(s) instead of throttle servos and replacing fuel tanks with battery pack mounts. Everything else will still work. Cooling lines will probably be needed for the ESC(s) and motor(s) so that can stay, the rest of the drive train won't need to be replaced, just adapted to the motor output shaft(s) which would probably be a smaller size. The only problem you will have is what to do with the two removed gas engines after the fact?
edit
Something I just thought about is that, with an electric drive, you will be able to run more places than you could with the gas motors. Many lakes and ponds won't allow a fuel powered boat on it while an electric is fine. It comes down to noise in many cases as the people that live on those lakes and ponds like the quiet. Others won't allow fuel powered boats do to the perceived pollution issues. This would require the use of a water resistant grease on the drive shaft(s) rather than a constant feed oil lubrication system to prevent oil from showing up on the water after you finish running
Last edited by Hydro Junkie; 06-02-2020 at 01:59 PM.
