


GR130
 06-22-2013, 07:04 AM
#76

Thread Starter

I went yesterday to Dieter Albisser, and he balanced my turbine...
So I'm ready for a new trestle to mount my stand and then Accelerate to 123K
Regards Lukacs
So I'm ready for a new trestle to mount my stand and then Accelerate to 123K
Regards Lukacs
 06-25-2013, 12:54 PM
#79
Join Date: Mar 2004
Location: ferrara, ITALY
Posts: 1,567
Likes: 0
Received 0 Likes
on
0 Posts
ORIGINAL: athome
Hi Chrigui
It's an original Schenck! No Chinese rubish
Just a few Milligramm...don't know exactly how much...
regards Lukacs
Hi Chrigui
It's an original Schenck! No Chinese rubish
Just a few Milligramm...don't know exactly how much...
regards Lukacs
many thx .... chinese people are teacher to copy all things....their machine is exactly the same
07-09-2013, 02:17 PM
#81

There is not very much action on the GTBA forum, but I think it is worth the price just to acsess all the archived information.
Lars, member #851
Lars, member #851
ORIGINAL: athome
Hi all
Are you member of the GTBA. Would you recommend it?
Regards Lukacs
Hi all
Are you member of the GTBA. Would you recommend it?
Regards Lukacs
07-10-2013, 12:21 AM
#82

Same for me, been member for a while but forum is used by only a few people. There's load's of information though from the past which can be very helpful.
Best regards,
Gerald
Best regards,
Gerald
02-16-2014, 11:48 PM
#83
Junior Member
Join Date: Feb 2014
Posts: 1
Likes: 0
Received 0 Likes
on
0 Posts
Hello!
I am new in this forum. I wrote several posts about turbine nuilding in the german forum but there ist not so much going on there right now. I found out that on rcgroups there is so much knowledge so i like to take part.
Like Lukacs i come from switzerland and i am building my first turbine (UT-160)
This is my first post here but I read and learned a lot on rcuniverse.
Last edited by surfdom; 02-17-2014 at 12:19 AM.
06-06-2017, 07:31 AM
#85
Thread Starter
Hi guys
The project is not dead! Just combined for the first time the gasgenrator with the 2nd stage! Amazing.
Still some problems to fix, but happy so far!
Here a video (sorry it's in german)
regards Lukacs
The project is not dead! Just combined for the first time the gasgenrator with the 2nd stage! Amazing.
Still some problems to fix, but happy so far!
Here a video (sorry it's in german)
10-16-2017, 04:27 AM
#86
I have jetcat p120 compressor wheel which is i m planning to use in making GR130.. My concern is, the outee dia of comp wheel is 68mm insteed of 70mm as in Gerald switzer wheel. Now m wondering how the diffuser angle will change here. Cause if u still go with the same plan.. The gap between comp wheel and diffuser inlet vane woukd increase to 4mm..in gr130 it is 2mm.. This may change the flow dynamics. Need your suggestions guys because the wheel gerald use is no longer available here.
12-25-2017, 03:21 AM
#87
Thread Starter
You can just try it with same angle! It would be it less effective. And therefore you may not have so much pressure, But it will help prevent surging!
Regards Lukacs
Regards Lukacs
11-04-2018, 12:04 PM
#88
My Feedback: (5)
Join Date: Jan 2004
Location: Algard, NORWAY
Posts: 111
Likes: 0
Received 0 Likes
on
0 Posts
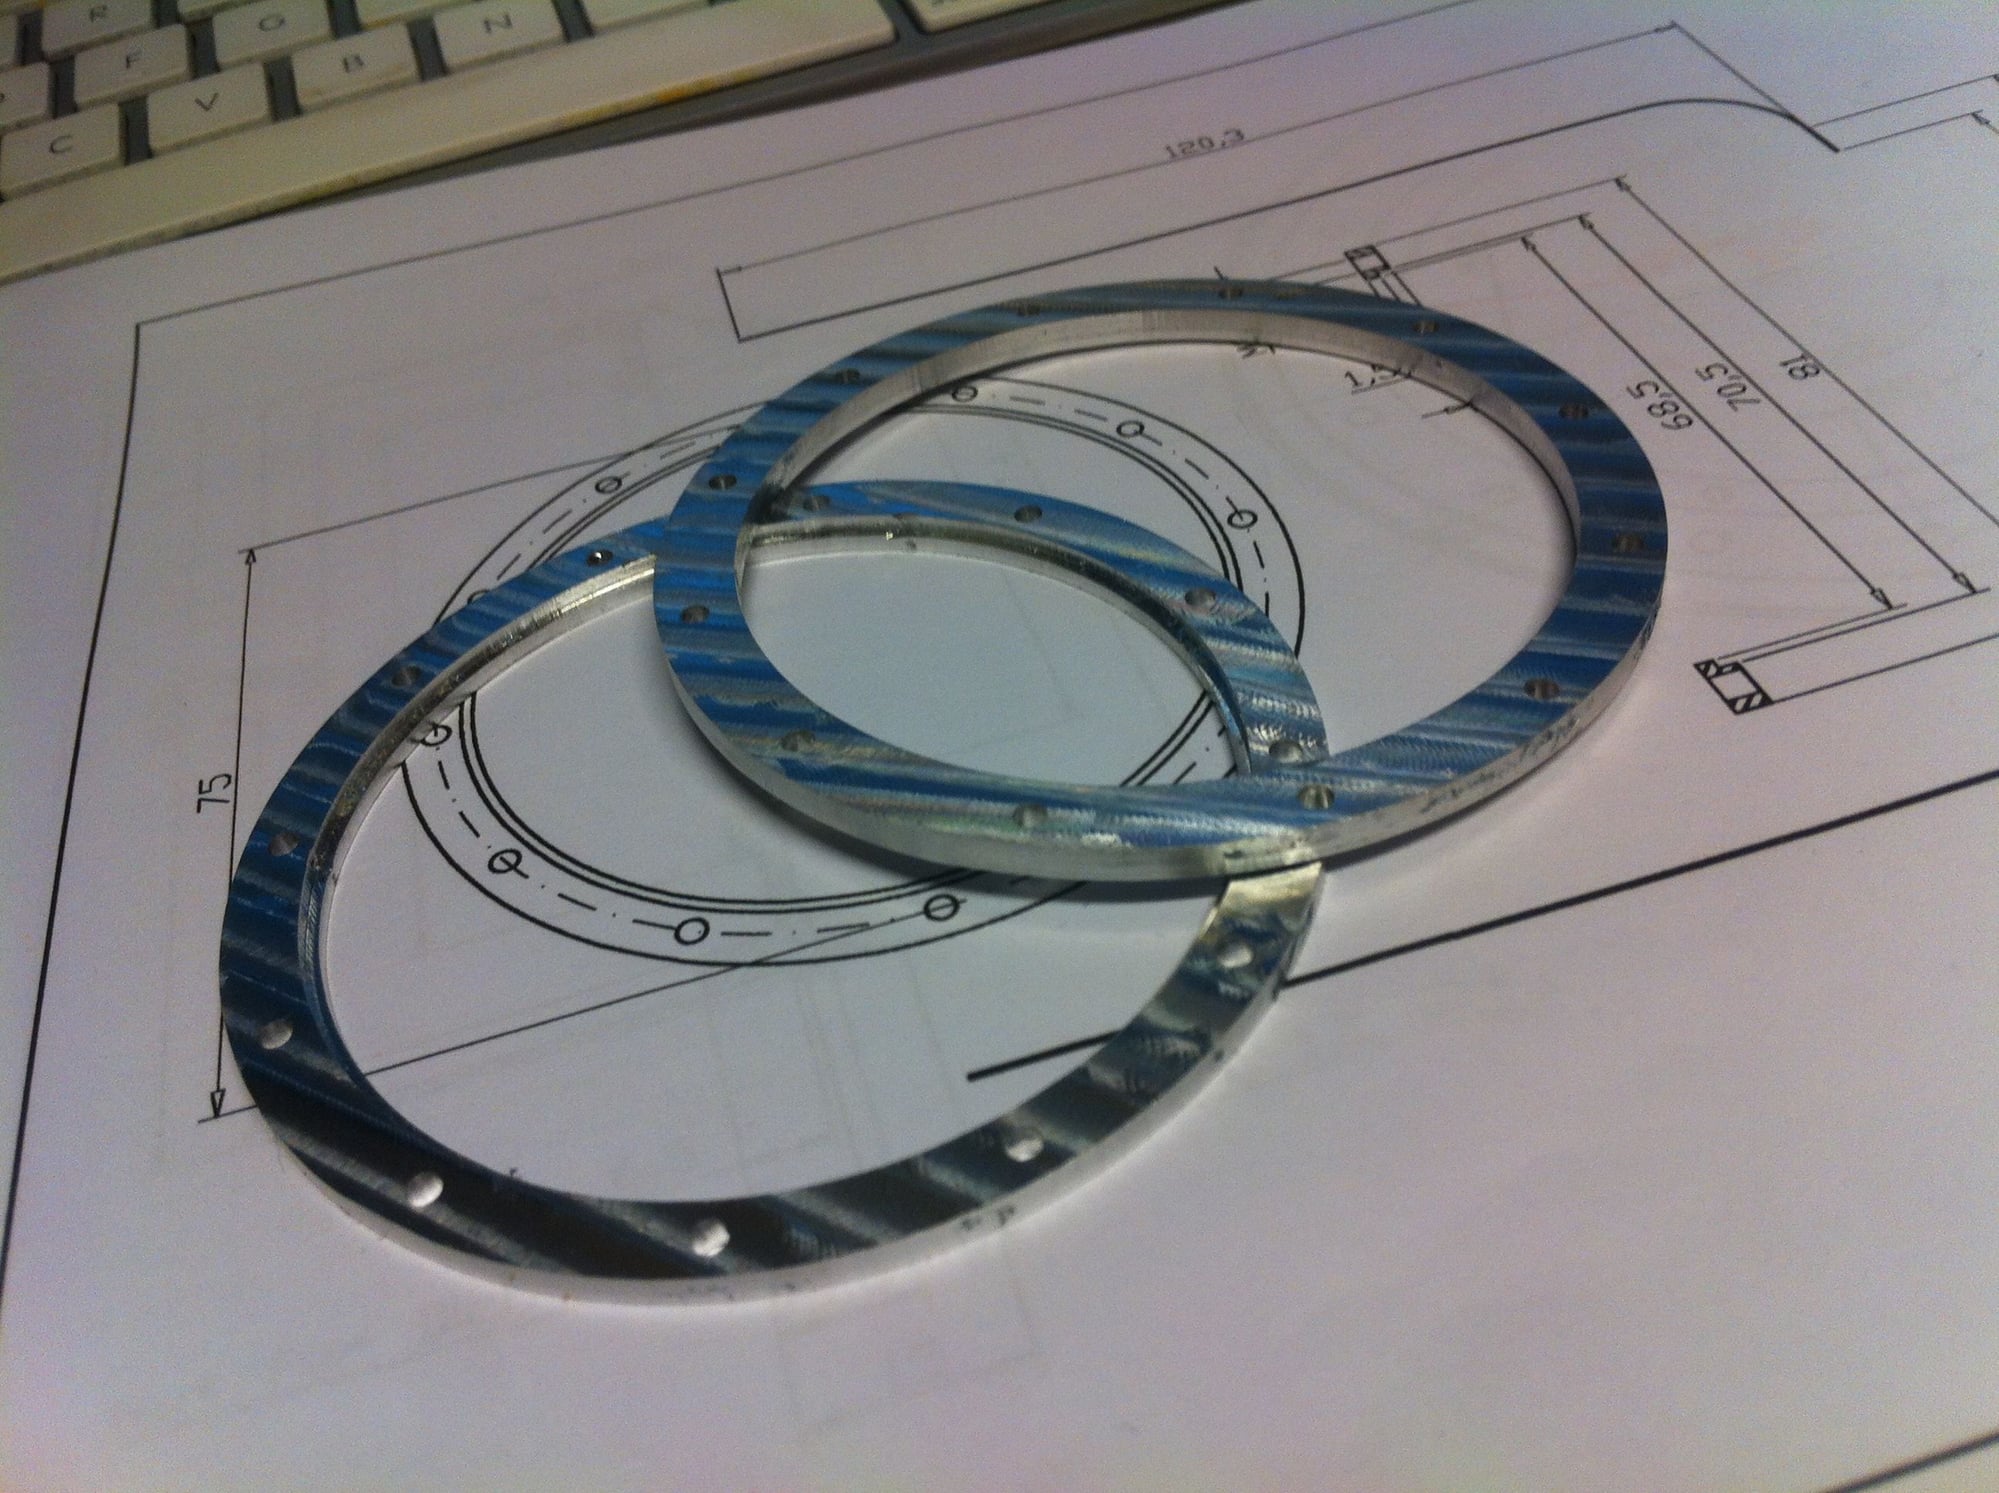
Rings for clamping the rear housing to NGV.
Joining this thread as I am in the progress of making the parts for my own GR130. Actually have been for a while but its a steep learning curve, not only the engine but tools and everything.
Have a CNC at home so this have been used for making the combustion chamber parts and the rear clamping rings. Have made a diffusor earlier but it isn't true so I will need to make it again.
Dont have a lathe though which would be ideal for the turning of the front parts, in combination with CNC to make bolt holes etc. But might outsource some of this part, the fun part i making it yourself
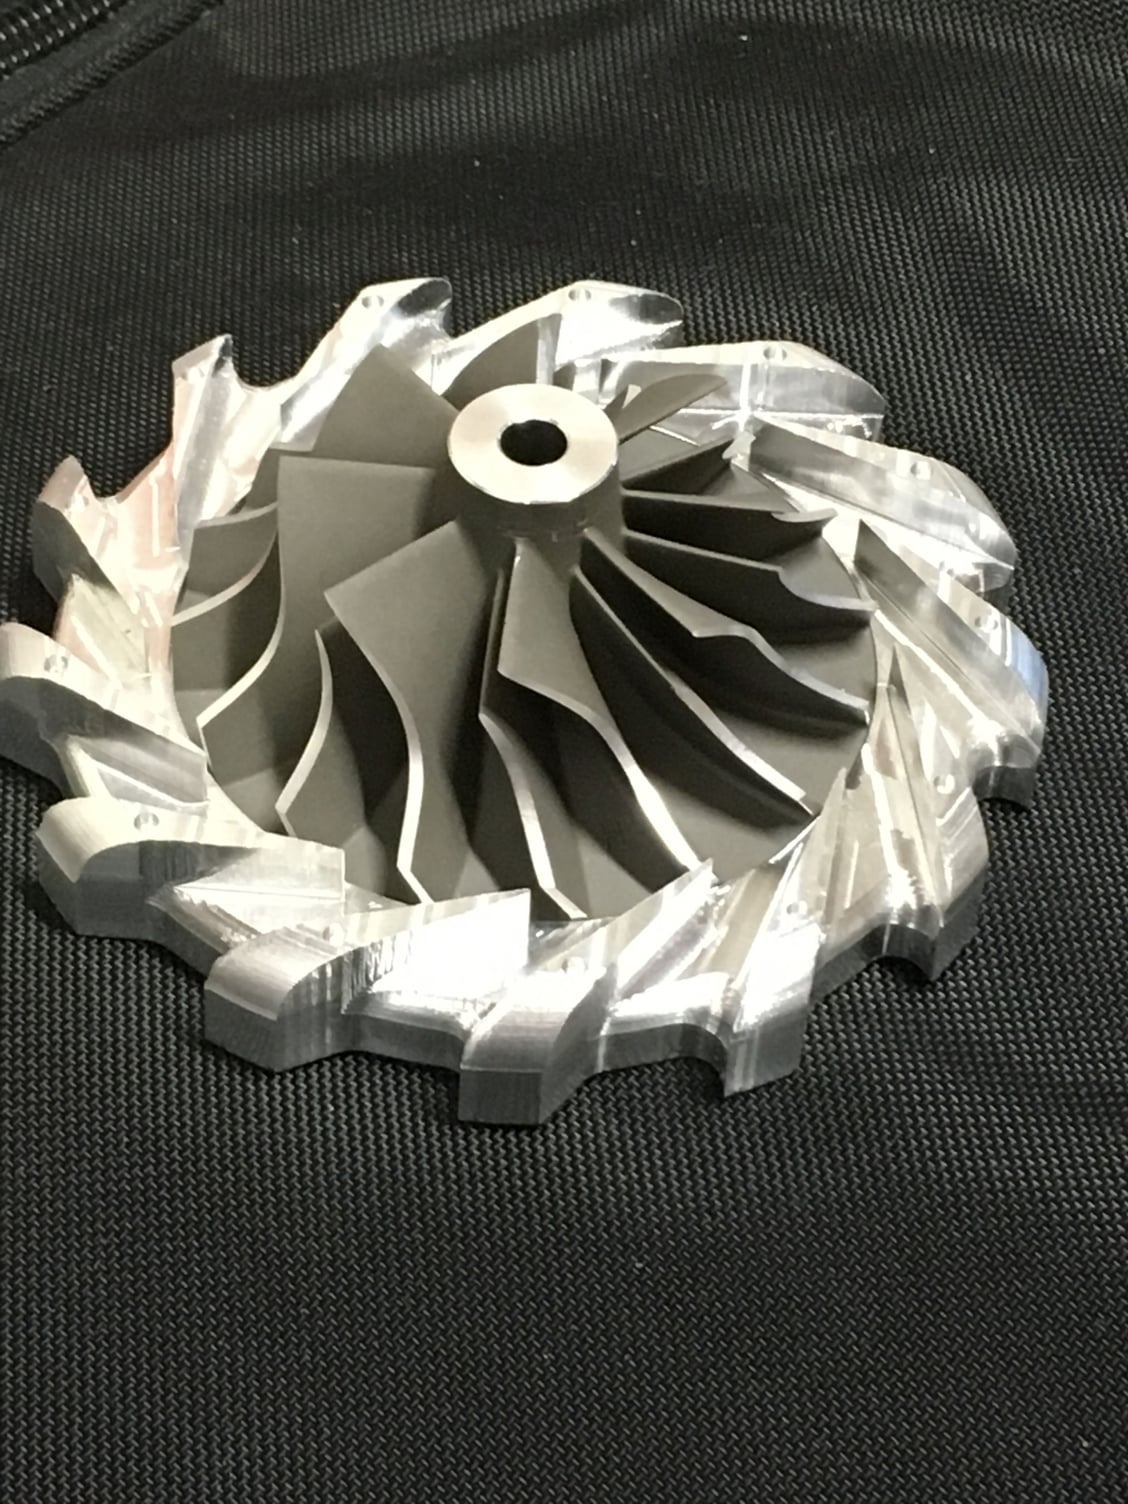
I will need to outsource for sure the tunnel, shaft and get my hands on premade NGV/turbine wheel, dont think I have the skills or tolerances to mfgr them myself...The Garrett part I purchased for is which I hope will work:
TO4B 8 blade
409179-0018
Why the GR130 and not the GR180?
Should I ever get it to work I can keep the plane to a manageable size

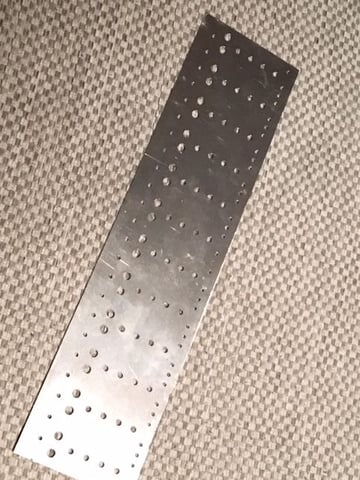
Stainless steel plate, 0.5mm CNC�d with a 2mm Tungsten Carbide bit. A lot cleaner and more precise than I could have done by hand!
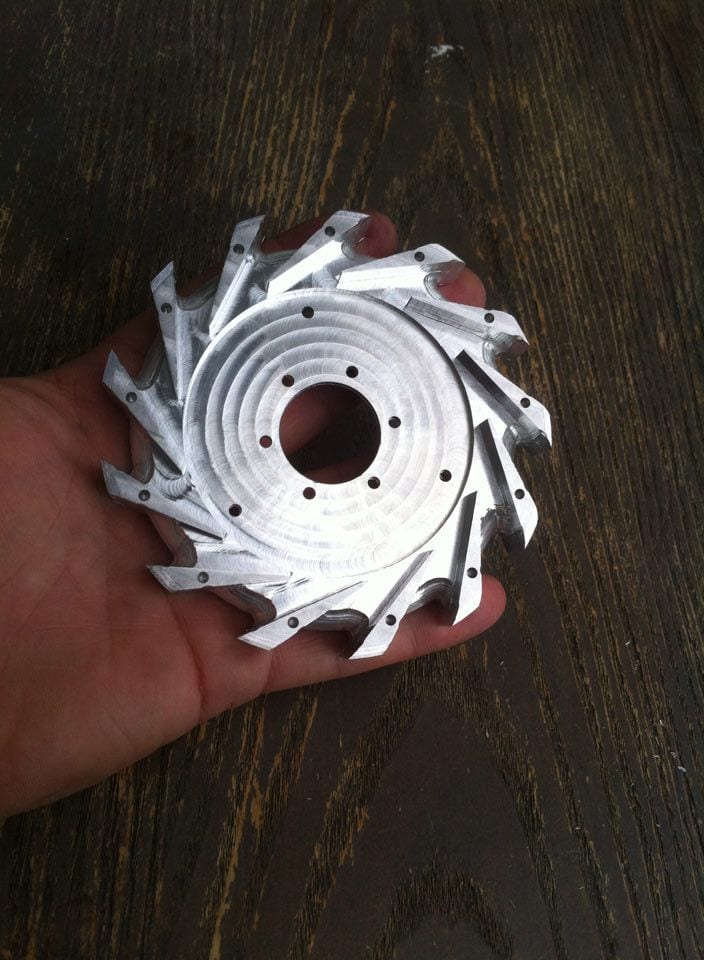
Diffusor mk1, with errors. Learning experience.
11-28-2018, 10:33 AM
#89
Thread Starter
Hey cool. Keep posting. We all have to learn. I always built 2 or 3 parts of the same stage and finaly only one was usable :-)
If you need a spare compressor which works, I bought a few when they where available! so drop me a line
Regards Lukacs
If you need a spare compressor which works, I bought a few when they where available! so drop me a line
Regards Lukacs
11-30-2018, 04:48 AM
#90
My Feedback: (5)
Join Date: Jan 2004
Location: Algard, NORWAY
Posts: 111
Likes: 0
Received 0 Likes
on
0 Posts
Hi Lukacs and thanks for the reply
Good work on your GR130, I have browsed everything I could find regarding the GR130/G180 for details and relevant information for my build.
At the moment progress is slow and restricted to the CC, the inner & outer rings are spot welded and next job is to turn the flanges for the front/rear CC rings. Evaporator tubes need to be sourced too.
Brass tubing is on hand.
My main obstacle at the moment is lack of a lathe and €600 to spend on NGV, shaft, tunnel and turbine wheel (Dieter Albisser likely scenario when its time).
You wouldnt have a spare shaft, tunnel would you? Dont have to pass QC but need to be dimensionally true so I can basically complete assembly while I build up funds for the pricey parts
Last edited by Haldor; 11-30-2018 at 04:58 AM.
12-01-2018, 01:12 AM
#91
My Feedback: (5)
Join Date: Jan 2004
Location: Algard, NORWAY
Posts: 111
Likes: 0
Received 0 Likes
on
0 Posts
Minor update.
After waiting for a new tungsten carbide end mill I was finally able to cut out the front/rear CC walls.
Turned the front wall flanges down by hand using two stacked layers of 19mm MDF rings with the steel plate sandwiched in-between. The MDF rings were CNC�d to correct dimension and I used blue masking tape / CA to bond the steel plate centred between the two.
Using a hammer and going slowly/light I was able to achieve a nice flange Repeated for the inside but since the hole is only about 42mm wide there isn't much room for hammering
So I used a round bar as a rolling pin and slowly the right opening diameter was achieved.
This is my first attempt at metalworking so quite pleased with the outcome
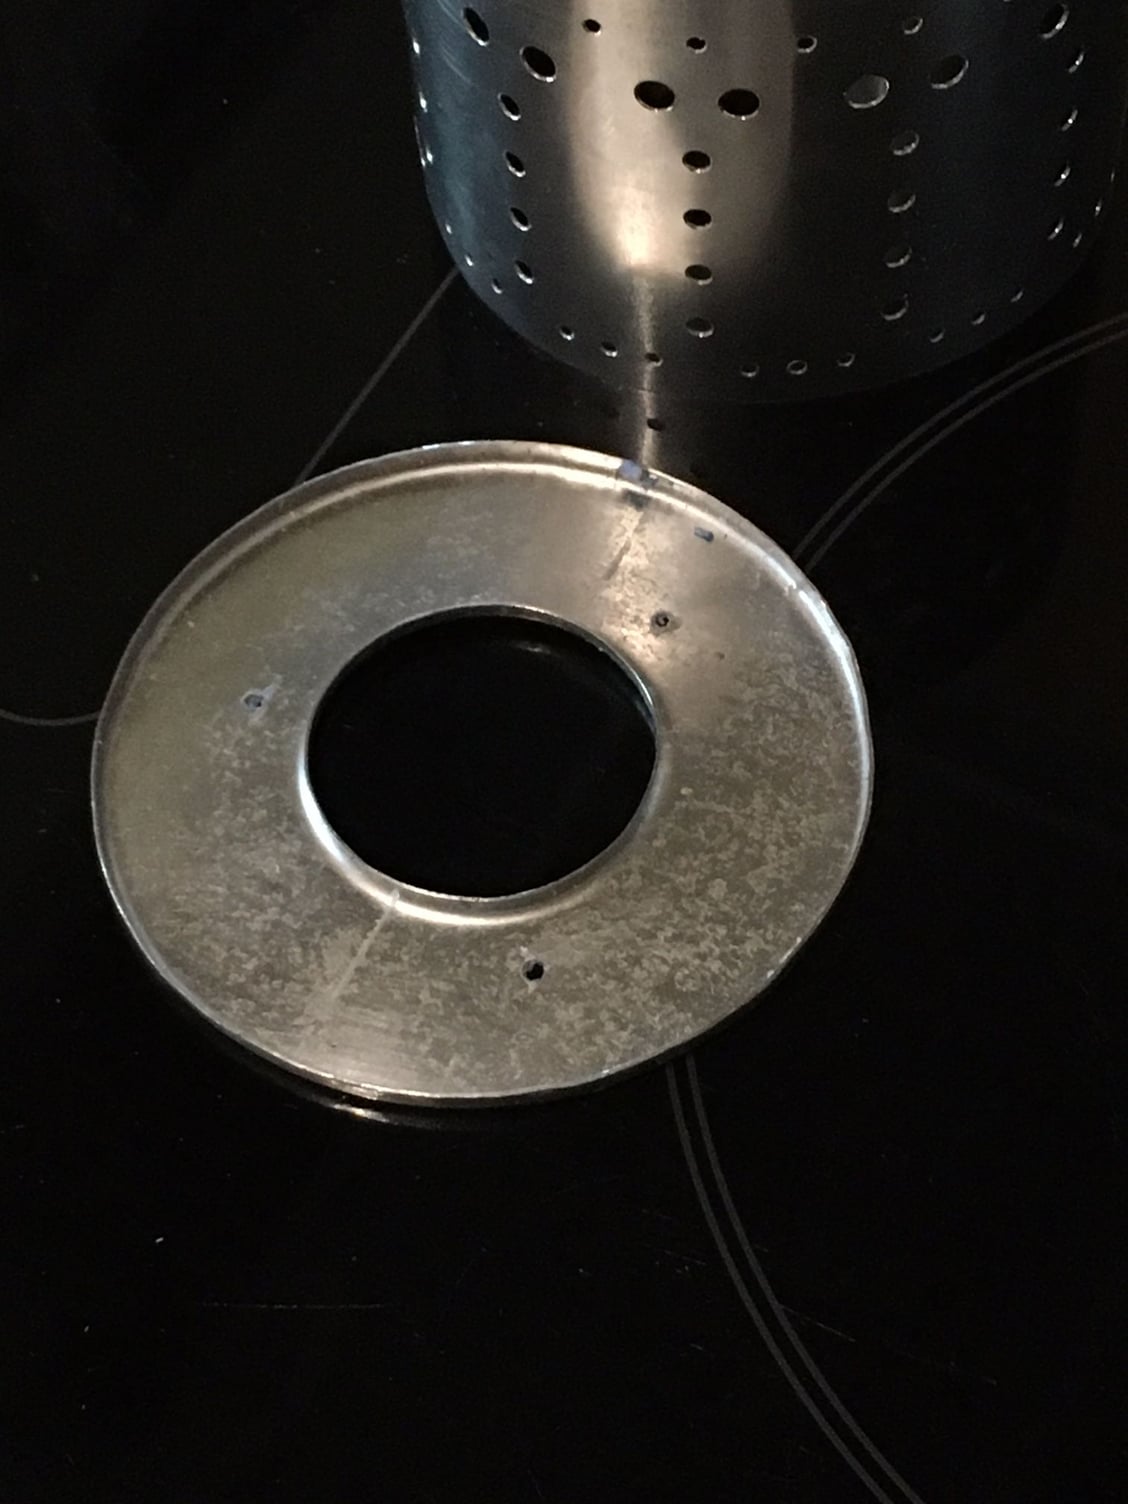
As I dont have a NGV on hand I will CNC a disk blank I can use as guide when spot welding the inner CC tube exit side to exact diameter.
...slow and steady...
After waiting for a new tungsten carbide end mill I was finally able to cut out the front/rear CC walls.
Turned the front wall flanges down by hand using two stacked layers of 19mm MDF rings with the steel plate sandwiched in-between. The MDF rings were CNC�d to correct dimension and I used blue masking tape / CA to bond the steel plate centred between the two.
Using a hammer and going slowly/light I was able to achieve a nice flange
Repeated for the inside but since the hole is only about 42mm wide there isn't much room for hammering So I used a round bar as a rolling pin and slowly the right opening diameter was achieved.
This is my first attempt at metalworking so quite pleased with the outcome
As I dont have a NGV on hand I will CNC a disk blank I can use as guide when spot welding the inner CC tube exit side to exact diameter.
...slow and steady...
12-01-2018, 07:43 AM
#92
Thread Starter
Looks promising! I think yo have to buy a lathe before you continue. It�s essentiell. Also I think the budget is more than optimistic. If money is your argument for building a DIY Turbine than it�s better to buy a used one!
just my two cents
regards Lukacs
just my two cents
regards Lukacs
12-01-2018, 09:00 AM
#93
My Feedback: (5)
Join Date: Jan 2004
Location: Algard, NORWAY
Posts: 111
Likes: 0
Received 0 Likes
on
0 Posts
No-no, the number mentioned isn't for the whole build, it will be somewhere around that for NGV/exhaust wheel/shaft/tunnel alone once I get to that stage.
Bearings aren't cheap either, I am well aware of that. ECU of some sort will be required too, may use an Arduino to host one.. but that is a different project ha!
My objective is to build the motor and hopefully be able to run it, not to save cash If that was the case a 2nd hand unit is the way to go for sure
I have a wife that is starting up her business so spending money for the time being is limited, thats all.
Bearings aren't cheap either, I am well aware of that. ECU of some sort will be required too, may use an Arduino to host one.. but that is a different project ha!
My objective is to build the motor and hopefully be able to run it, not to save cash
If that was the case a 2nd hand unit is the way to go for sure I have a wife that is starting up her business so spending money for the time being is limited, thats all.
12-02-2018, 01:43 AM
#94
Thread Starter
Just found your other postings on other forums like: https://discuss.inventables.com/t/ha...og-diary/51869
and https://www.rcgroups.com/forums/show...n-GR130-design
Cool! *thumbup*
regards Lukacs
and https://www.rcgroups.com/forums/show...n-GR130-design
Cool! *thumbup*
regards Lukacs
12-02-2018, 01:46 PM
#95
My Feedback: (5)
Join Date: Jan 2004
Location: Algard, NORWAY
Posts: 111
Likes: 0
Received 0 Likes
on
0 Posts
Thanks Lukacs - it will be needed
I knew from the beginning that the GR130 is a experimental design, upgraded/modernized version of the KJ66.
Gerard quickly moved up to the GR180/220 which suited his purposed better
I dont need that power, it isn't required nor the goal - turbines are simply sexy (dont mind the smell either...!) and I always wanted one since JPX did their propane version in the mid 90�s IIRC.
Adding to that I am a DIY kinda guy and I am not fearful of the deep end of the pool... I am not without fear, but I take it slow.
For my GR130 build I have been "forced" to made some modifications as the housing canister is ID105mm only, not 107.3
Another factor is the compressor which is marginally different than the "original". So minor changes to the drawings have been made.
Since my intent isn't to get maximum power with minimum effort I am not worried, I enjoy the challenge and learn a TON while working on this
At the moment the bulk of my efforts have been made towards the CC and my next move must be to source some evaporator sticks. These need to be complete and welded to the stick ring prior to closing of the complete CC.
Parallell to that I will make an attempt to CNC a new diffusor and diffusor cover with the correct OD.
The inlet bell/compressor cover will follow at a later date since I have many steps to complete before those are required.
Will update with more pictures soon
I knew from the beginning that the GR130 is a experimental design, upgraded/modernized version of the KJ66.
Gerard quickly moved up to the GR180/220 which suited his purposed better
I dont need that power, it isn't required nor the goal - turbines are simply sexy (dont mind the smell either...!) and I always wanted one since JPX did their propane version in the mid 90�s IIRC.
Adding to that I am a DIY kinda guy and I am not fearful of the deep end of the pool...
I am not without fear, but I take it slow.For my GR130 build I have been "forced" to made some modifications as the housing canister is ID105mm only, not 107.3
Another factor is the compressor which is marginally different than the "original". So minor changes to the drawings have been made.
Since my intent isn't to get maximum power with minimum effort I am not worried, I enjoy the challenge and learn a TON while working on this
At the moment the bulk of my efforts have been made towards the CC and my next move must be to source some evaporator sticks. These need to be complete and welded to the stick ring prior to closing of the complete CC.
Parallell to that I will make an attempt to CNC a new diffusor and diffusor cover with the correct OD.
The inlet bell/compressor cover will follow at a later date since I have many steps to complete before those are required.
Will update with more pictures soon
12-04-2018, 09:50 PM
#96
My Feedback: (5)
Join Date: Jan 2004
Location: Algard, NORWAY
Posts: 111
Likes: 0
Received 0 Likes
on
0 Posts
New diffusor done except for the rear side which I will machine out later.
Came out half decent, hopefully a viable part. Was plagued with CNC gremlins and had several interrupts
Diffusor mk.2
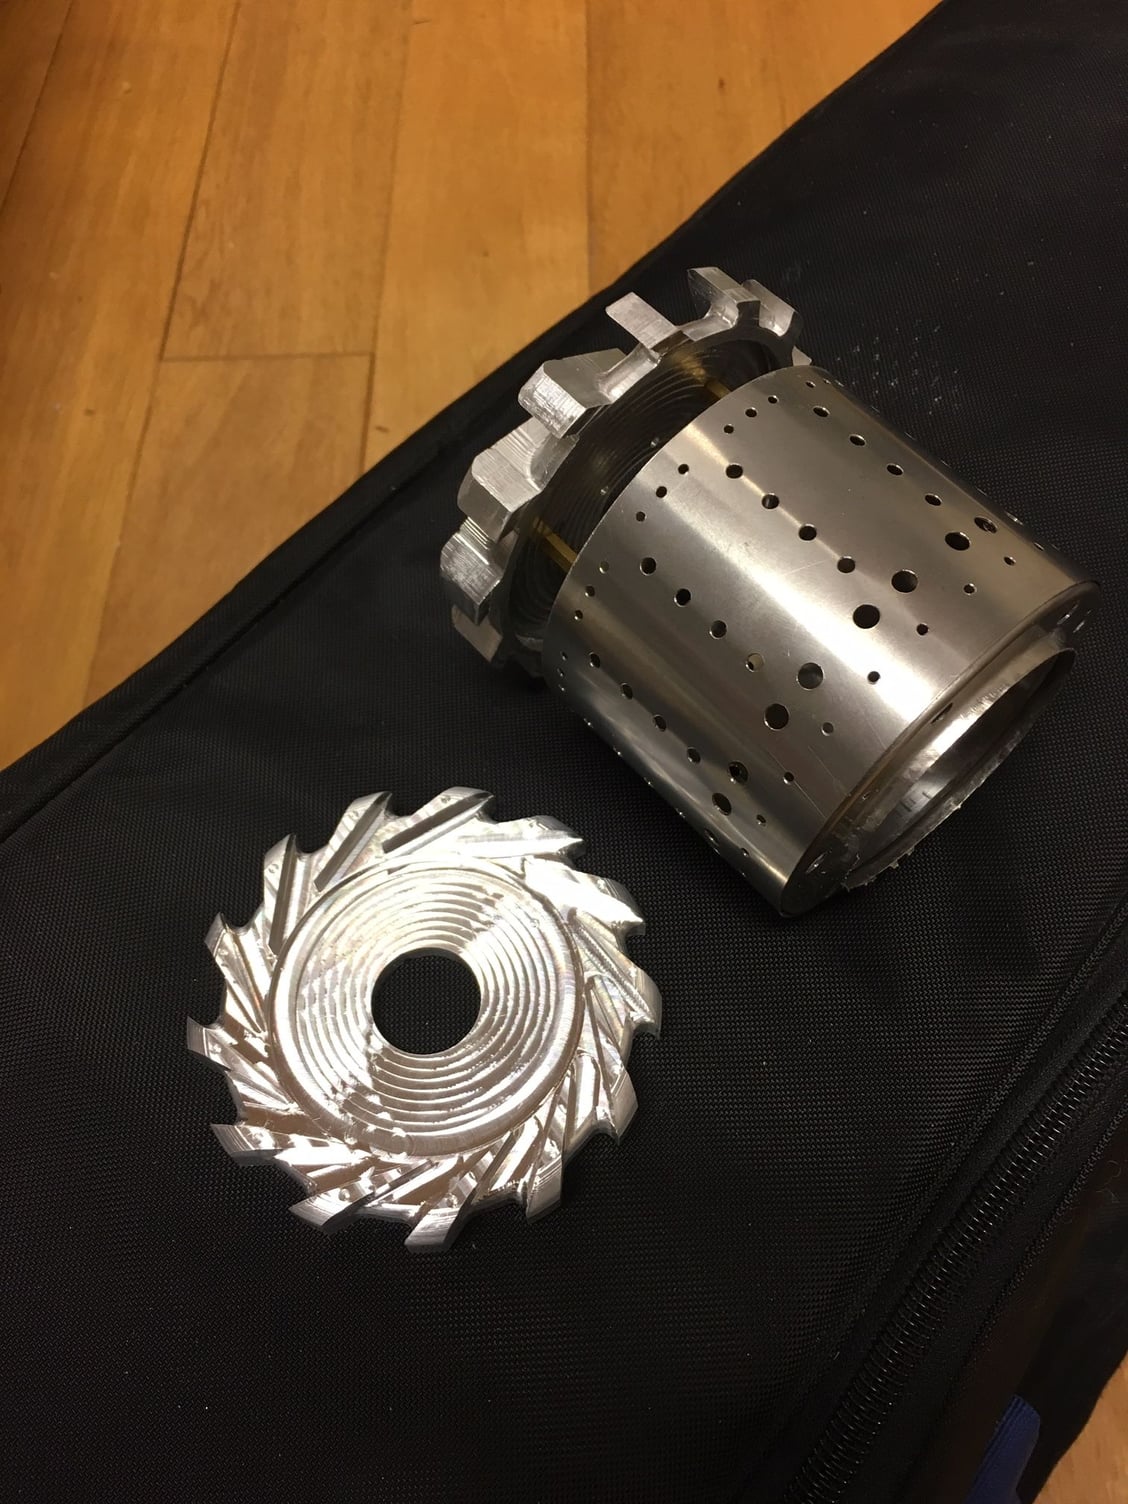
Trial fitting and builder satisfaction, trial fitting of the mk1 diffusor and CC.
Came out half decent, hopefully a viable part. Was plagued with CNC gremlins and had several interrupts
Diffusor mk.2
Trial fitting and builder satisfaction, trial fitting of the mk1 diffusor and CC.
12-14-2018, 02:31 PM
#98
My Feedback: (5)
Join Date: Jan 2004
Location: Algard, NORWAY
Posts: 111
Likes: 0
Received 0 Likes
on
0 Posts
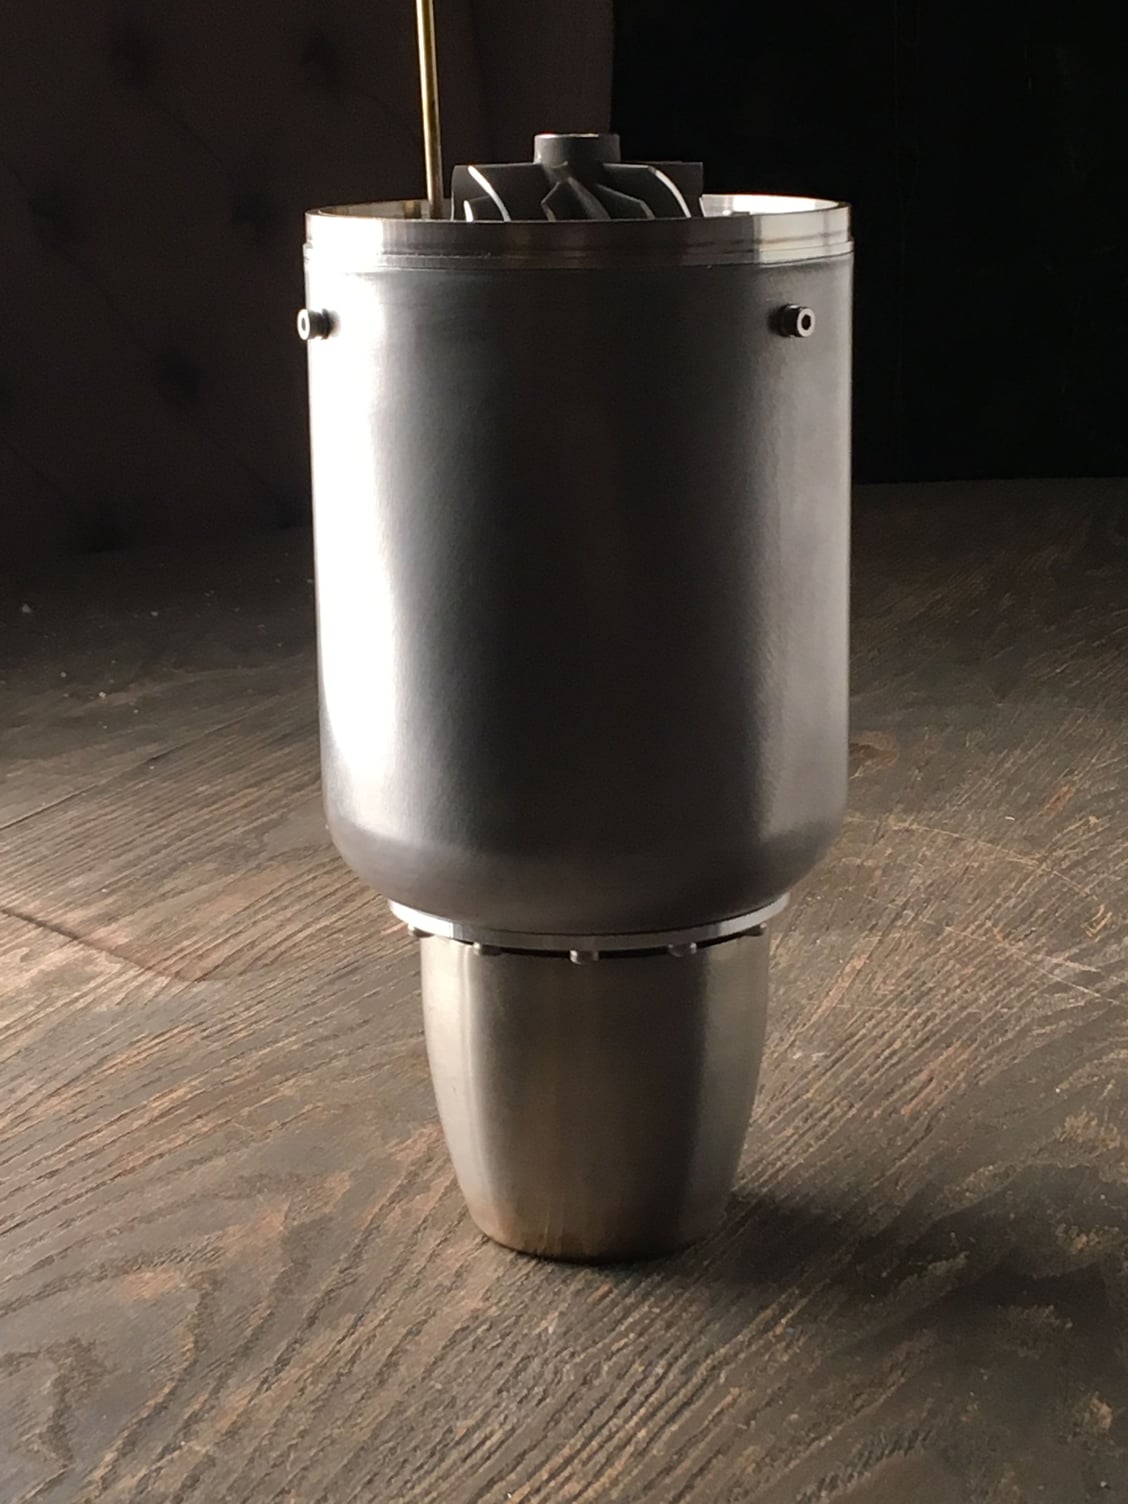
Minor update on my engine, diffusor and diffusor cover done and tapped for M3 screws.
Fit seem very good and the housing is real tight hugging the diff.cover
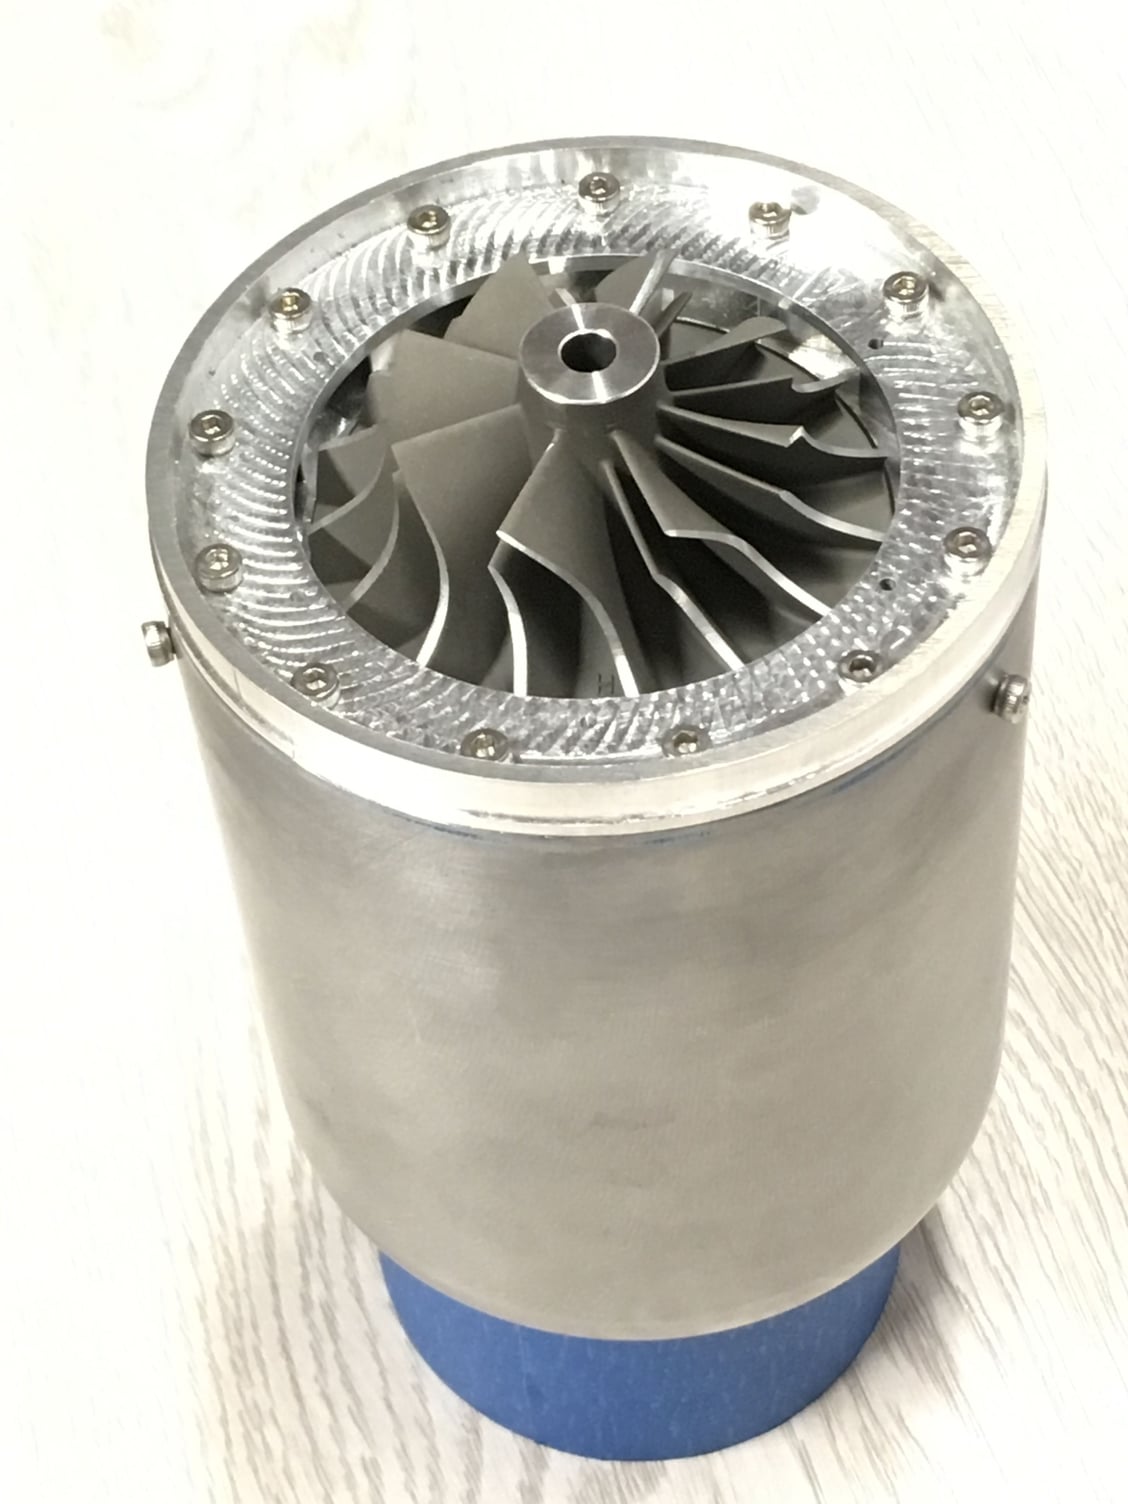
Starting to look like an engine, still lacking the shaft & shaft tunnel though
Inlet bell is next
Fit seem very good and the housing is real tight hugging the diff.cover
Starting to look like an engine, still lacking the shaft & shaft tunnel though
Inlet bell is next
Last edited by Haldor; 12-14-2018 at 02:33 PM.
12-15-2018, 03:15 PM
#99
My Feedback: (5)
Join Date: Jan 2004
Location: Algard, NORWAY
Posts: 111
Likes: 0
Received 0 Likes
on
0 Posts
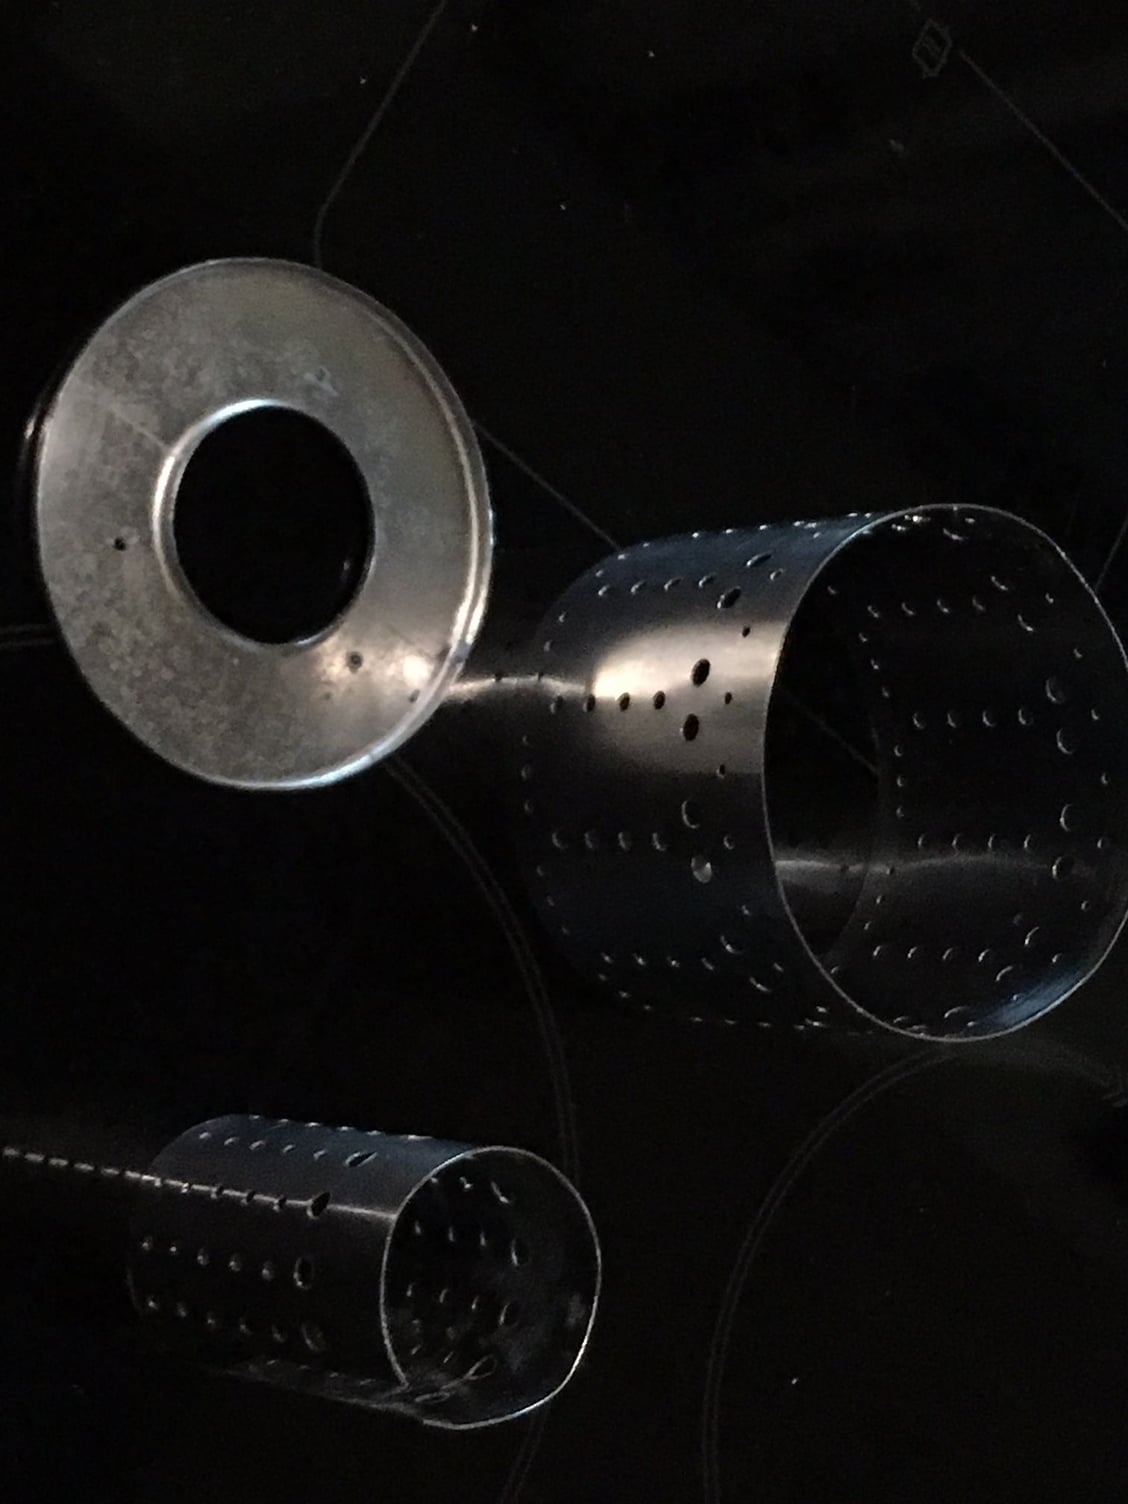
Wife is out of town (kids are not) so I didn't get to spend a lot of time with the CNC today so opted to begin some of the more tedious tasks like opening the rear end of the canister and starting the fuel delivery system.
First the brass 6mm and 3mm rods were annealed and formed quite nicely to a decent shape. I will braze these during work hours the coming week hopefully. I also found a cup from an old thermos bottle with OD70mm which neck down to 48mm, perfect exhaust cone
Sight for sore eyes, at least to me!
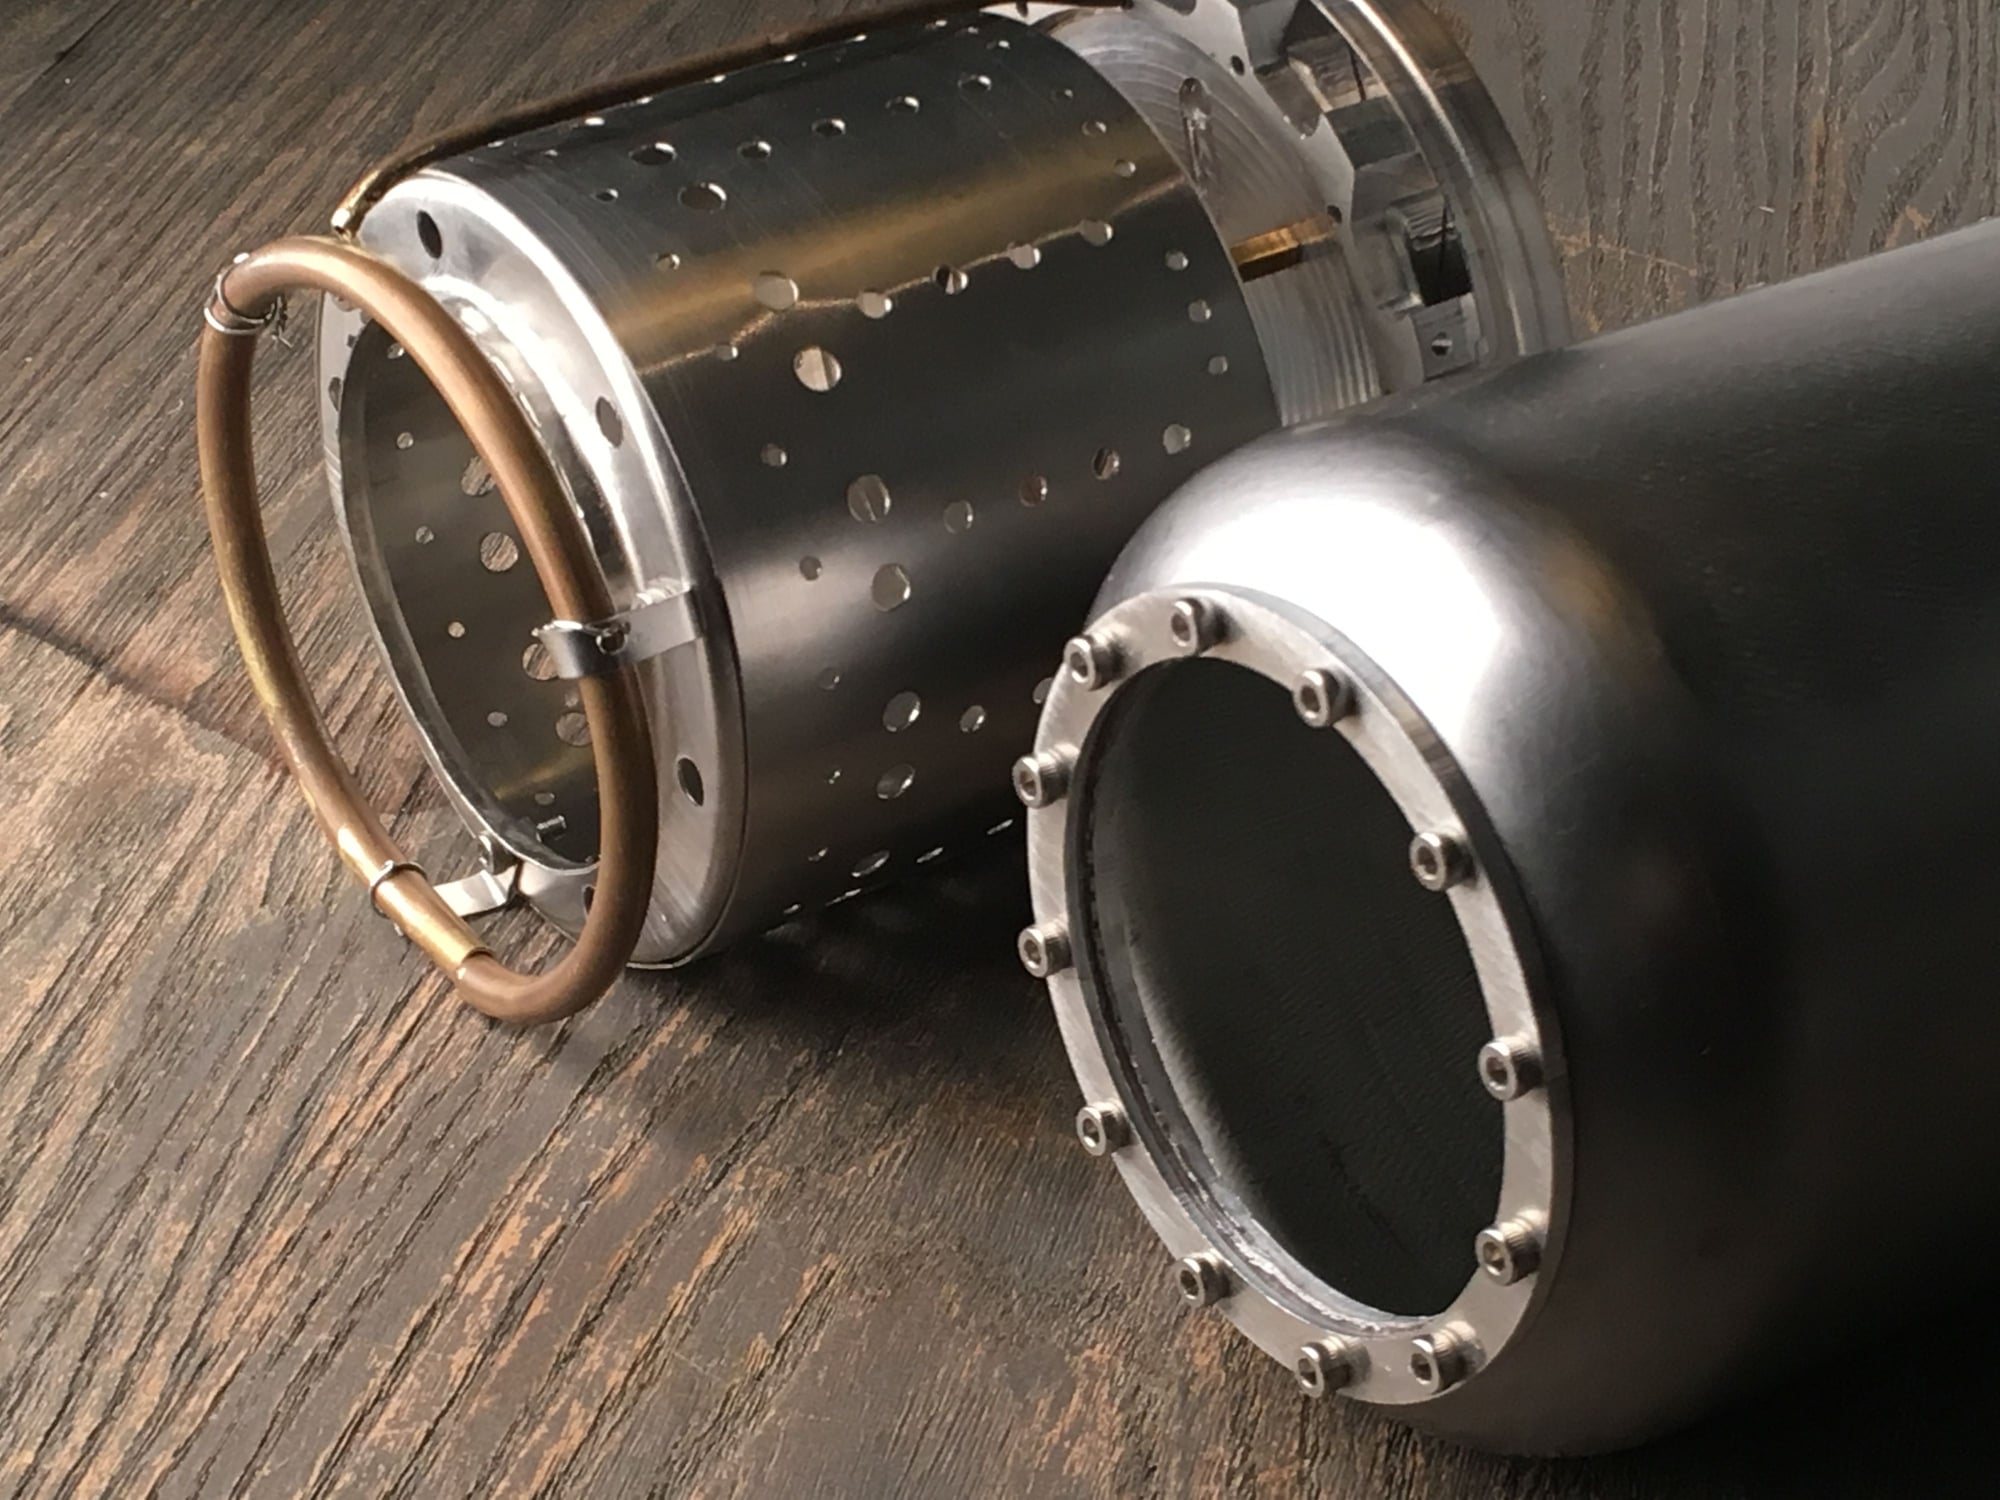
Rear end opened up and brass tubing for the fuel system shaped up.
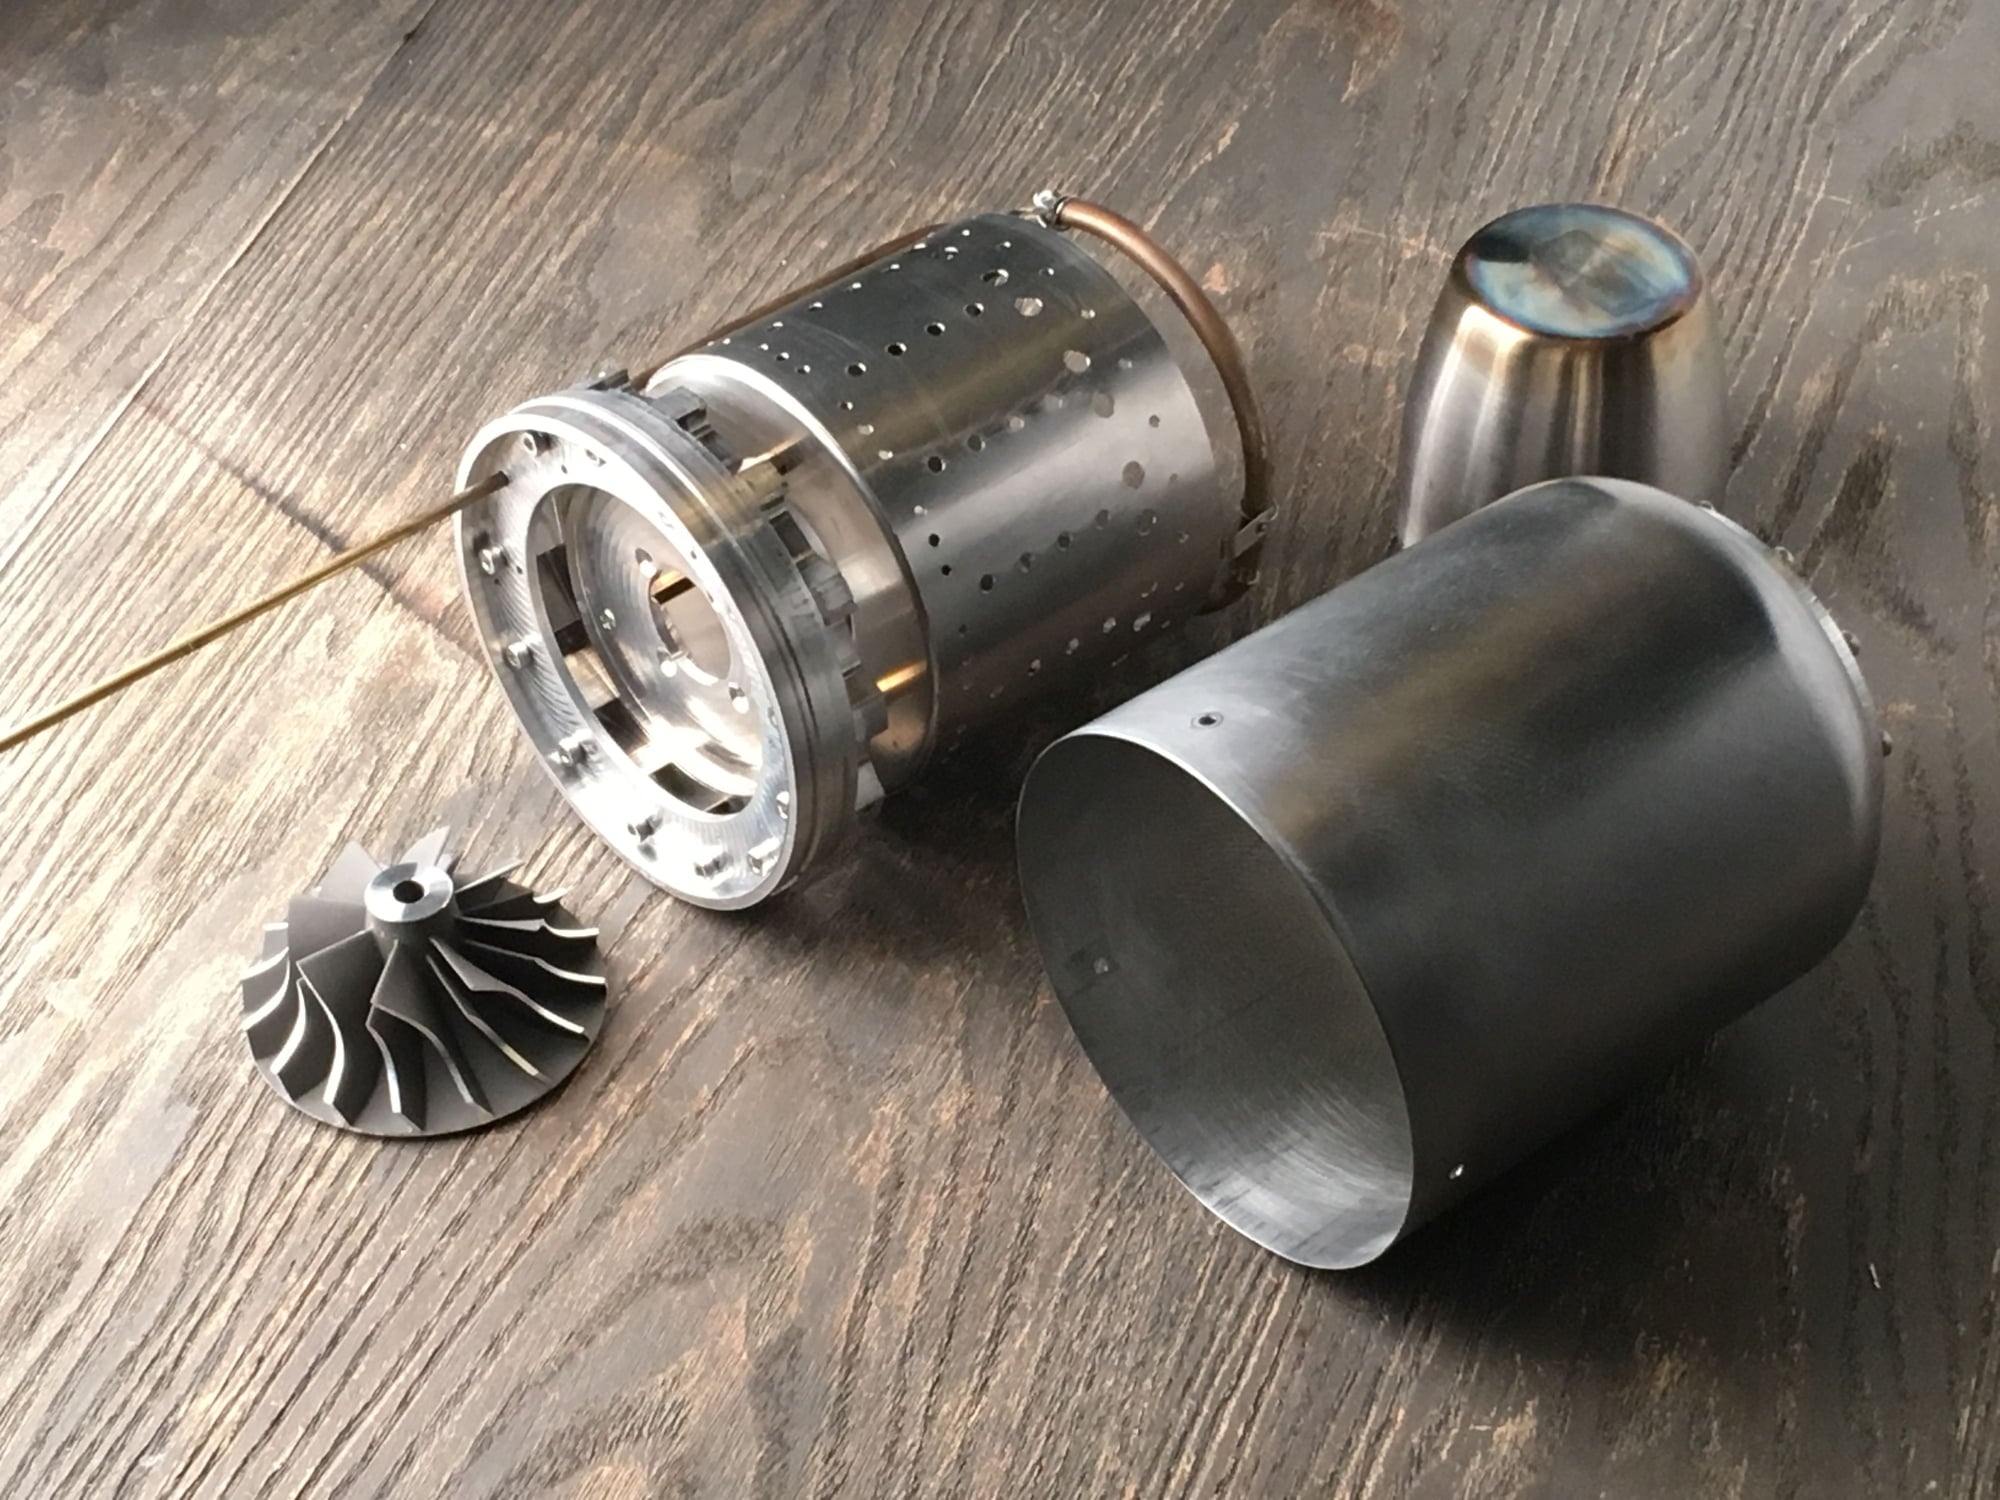
Component overview
First the brass 6mm and 3mm rods were annealed and formed quite nicely to a decent shape. I will braze these during work hours the coming week hopefully. I also found a cup from an old thermos bottle with OD70mm which neck down to 48mm, perfect exhaust cone
Sight for sore eyes, at least to me!
Rear end opened up and brass tubing for the fuel system shaped up.
Component overview