


1/8th Scale Hydroplane Build
 07-23-2013, 09:32 AM
#1

Thread Starter

Rather than deal with nine pages of mixed info and stuff, since I'm getting back into building, I figured it's time to start a new thread. I've decided that, to prevent confusion, I would concentrate on one boat rather than two or three. My subject for this thread will be the 1973 Pay'N Pak. I know building jigs, tools and several other subjects were discussed in the other thread so I won't get back into those subjects unless someone has a question. That being said, time to get back to the build.
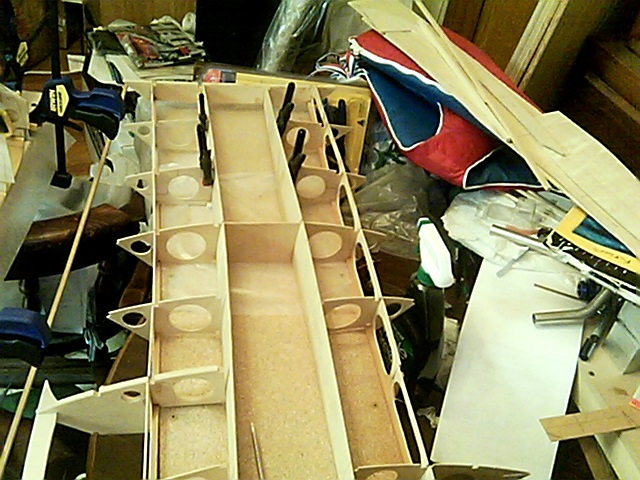
So far, I've laid out all the internal framing onto a combination of 1/16, 1/8 and 1/4 inch thick aircraft grade plywood and have cut out most of the parts. I've tack-glued 1/4" stringers to the sponson insides where the hull bottom will be attached and along the bottom edge of the sponson as can be seen in the first picture The Pak is shown on the left side of the picture, the 1972 Notre Dame is in the center while the 2009 Oberto is shown on the right. . All tack-glued parts are attached with 15 second gap filling CA/super glue to speed up the process of attaching them.
So far, I've laid out all the internal framing onto a combination of 1/16, 1/8 and 1/4 inch thick aircraft grade plywood and have cut out most of the parts. I've tack-glued 1/4" stringers to the sponson insides where the hull bottom will be attached and along the bottom edge of the sponson as can be seen in the first picture The Pak is shown on the left side of the picture, the 1972 Notre Dame is in the center while the 2009 Oberto is shown on the right. . All tack-glued parts are attached with 15 second gap filling CA/super glue to speed up the process of attaching them.
 07-23-2013, 09:38 AM
#2
Thread Starter
After doing some final finish work on the framing, I epoxied the right sponson transom to the right sponson inside and the sponson insides to the transom. For the boat to perform properly, THESE JOINTS MUST BE SQUARE. I next dryfitted the engine bay walls and cross frames into the sponson insides to verify the fit. This is a must as Newton plans were all hand drawn and do contain errors. It's better to find and fix errors now, before the glue is applied, than after and have to dig out the ill-fitting parts

 07-26-2013, 05:05 AM
#8
Thread Starter
Not much going on update wise until Sunday. With the Columbia Cup starting today with qualifying and the "Dash for Cash as well as R/C Unlimiteds race tomorrow(and yes, my Elam will be running) I won't get to do anything on the boat builds until after I get home on Sunday evening. I do have the engine bay walls and the aft two sets of cross frames ready to epoxy in so, I'll see what I can do about posting a picture or two Sunday evening
08-15-2013, 03:35 AM
#10
Thread Starter
Sorry all that I haven't got to post any updates, just haven't had the chance to work on the boats.
Axsissti, build it the way it is or a wider version if you don't plan on racing. To go narrower will give you nothing but problems on the water, been there done that
Axsissti, build it the way it is or a wider version if you don't plan on racing. To go narrower will give you nothing but problems on the water, been there done that
09-06-2013, 07:05 AM
#13
Thread Starter
Trust me, that's going to be a futile exercise. For the jet drive to work, the back end of the boat MUST STAY IN THE WATER. For a hydroplane to work properly, the back end of the boat MUST FLY ABOVE THE WATER!!!!!!!!!!!!!! Just so you know, all of the full sized hydroplanes built since 1949, starting with the Slo-Mo-Shun III & IV, have been prop riders. This means the rear of the boat is supported by a combination of air going under the hull and the prop.
Now, getting back to my build, I found a couple of issues with some of the parts so I've been fixing them as well as working on my scale Elam Plus trying to solve some radio issues. If all goes well, I'll have pictures posted this weekend
Now, getting back to my build, I found a couple of issues with some of the parts so I've been fixing them as well as working on my scale Elam Plus trying to solve some radio issues. If all goes well, I'll have pictures posted this weekend
Last edited by Hydro Junkie; 09-06-2013 at 07:08 AM.
09-06-2013, 08:40 AM
#14
Senior Member
Join Date: Feb 2008
Location: Canandaigua, NY
Posts: 1,754
Likes: 0
Received 0 Likes
on
0 Posts
Trust me, that's going to be a futile exercise. For the jet drive to work, the back end of the boat MUST STAY IN THE WATER. For a hydroplane to work properly, the back end of the boat MUST FLY ABOVE THE WATER!!!!!!!!!!!!!! Just so you know, all of the full sized hydroplanes built since 1949, starting with the Slo-Mo-Shun III & IV, have been prop riders. This means the rear of the boat is supported by a combination of air going under the hull and the prop.
Now, getting back to my build, I found a couple of issues with some of the parts so I've been fixing them as well as working on my scale Elam Plus trying to solve some radio issues. If all goes well, I'll have pictures posted this weekend
Now, getting back to my build, I found a couple of issues with some of the parts so I've been fixing them as well as working on my scale Elam Plus trying to solve some radio issues. If all goes well, I'll have pictures posted this weekend
The Ottawa Valley Racers had a great 1/8 scale (Sport 60) turnout at their 2013 Thunder in the Valley. It was listed as Sport 60, but all the boats looked like scale boats to me. And there was a concours trophy awarded! Good job O.V.R.!!
09-07-2013, 09:09 PM
#15
Junior Member
Join Date: Aug 2013
Posts: 16
Likes: 0
Received 0 Likes
on
0 Posts
thats why im building 2 i like being different just want to see how it will run it will be my water toy, depends on how it runs i might take them out and pun both in a deep v and keep the other hydro to scale
08-16-2015, 04:14 PM
#17
Thread Starter
Okay, it's time to resurrect this thread. Now that things are starting to slow down a bit, meaning I have a chance to actually stay home for the rest of the year, I finally am getting time to work on the boats. As for the radio issue on the Elam, I ordered a new radio system for it and have had no issues with it since. From what I can tell, the old rreceiver was getting hot and would shut down. Another problem was the rudder servo's I was using worked fine, that is until I got over half throttle. At that point they stalled and wouldn't turn the boat. A high torque digital took care of that so now my Elam turns like it's on rails. Let me rephrase that, it did until I ran through some milfoil at the Columbia Cup last month. The rudder linkage now needs repairing and the flex shaft tube needs to be replace after being torn out of the boat and snapped in two
As for the three builds, some things have changed. The Notre Dame has been shelved for a while and replaced with a 1985 Executone. This boat was the sister to the Atlas that Chip Hanouer drove in 1982-83. I've managed to get the sponson insides epoxied to the transom and done some work on the right sponson framing. The Oberto hasn't been touched due to some redesign work I've found it needed after doing some serious examining of the full sized boat. All the left side frames have to be redone to correct a major issue. I've started working on a replacement hull for the Elam, have part of the framing done on both sponsons on it. That brings me to the Pak. I've managed to get the engine bay walls installed and epoxied frames 2 and 3 into place. This was followed by gluing in the 1/4" stringers to the bottom of the engine bay walls and then epoxying on the rear bottom panel. Today's work has been to glue together the framing for the right sponson. Once again, I found issues with the frames so there will be some modifying involved before I can attach the sponson side and bottom. I'll try to get some shots uploaded tomorrow showing what's been done
As for the three builds, some things have changed. The Notre Dame has been shelved for a while and replaced with a 1985 Executone. This boat was the sister to the Atlas that Chip Hanouer drove in 1982-83. I've managed to get the sponson insides epoxied to the transom and done some work on the right sponson framing. The Oberto hasn't been touched due to some redesign work I've found it needed after doing some serious examining of the full sized boat. All the left side frames have to be redone to correct a major issue. I've started working on a replacement hull for the Elam, have part of the framing done on both sponsons on it. That brings me to the Pak. I've managed to get the engine bay walls installed and epoxied frames 2 and 3 into place. This was followed by gluing in the 1/4" stringers to the bottom of the engine bay walls and then epoxying on the rear bottom panel. Today's work has been to glue together the framing for the right sponson. Once again, I found issues with the frames so there will be some modifying involved before I can attach the sponson side and bottom. I'll try to get some shots uploaded tomorrow showing what's been done
Last edited by Hydro Junkie; 08-16-2015 at 04:17 PM.
08-18-2015, 08:16 AM
#18
Thread Starter
Sorry, didn't get to take any pictures yesterday, getting ready for yet another pair of weekend roadtrips. It also looks like I've got a time limit to meet. Since the Northwest Scale Championships are scheduled for October 10-11, I'd like to have one one of the boats on the water during the open test session on the 9th, along with having the damaged Elam back on the water for a joint R/C Unlimiteds-Unlimiteds Northwest race weekend in mid-September. That means I have 51 calendar days to get one into running condition. The bad part is I lose two full days this weekend, three next weekend and three next month. That gives me a whopping 43 days to get one on the water. Here's hoping for the best, pictures to come
08-19-2015, 06:50 PM
#19
Thread Starter
Okay, I finally got to post some pictures.
The first one shows the Pak when I was gluing the rear framing together.
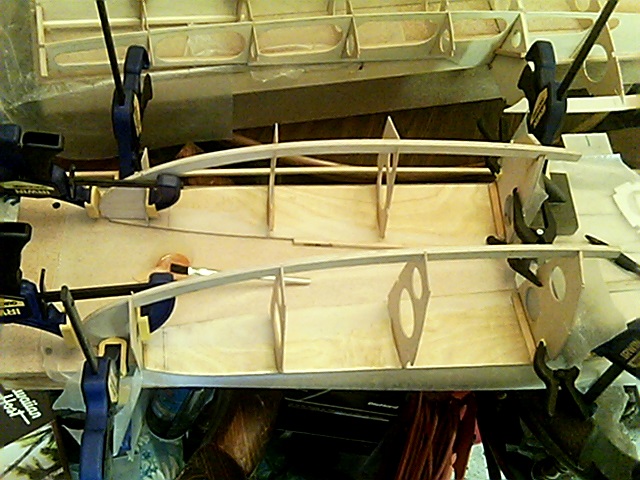
The second shows the framing glued in up to the middle crossframe. The right sponson is also all glued to the sponson inside. The glued on rear bottom is also visible under the clamps.
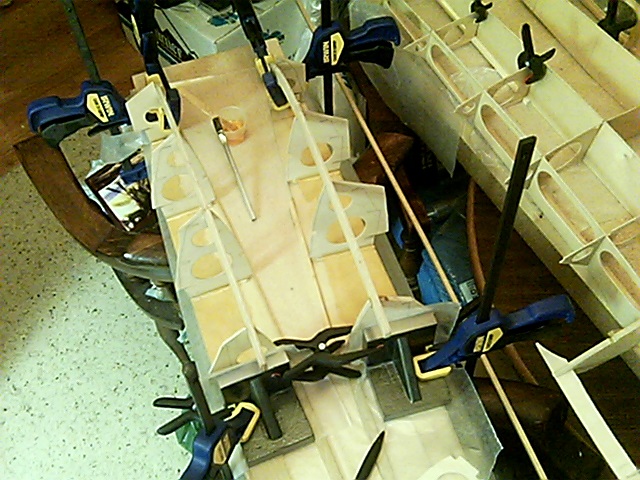
The third and fourth show the sponson cross frames installed onto the sponson insides to my replacement 2000 Elam hull. I now need to get the lengthwise frames fitted and installed so that I can start adding skin.
I didn't take any shots of the Executone this time since I haven't done anything to it in several months
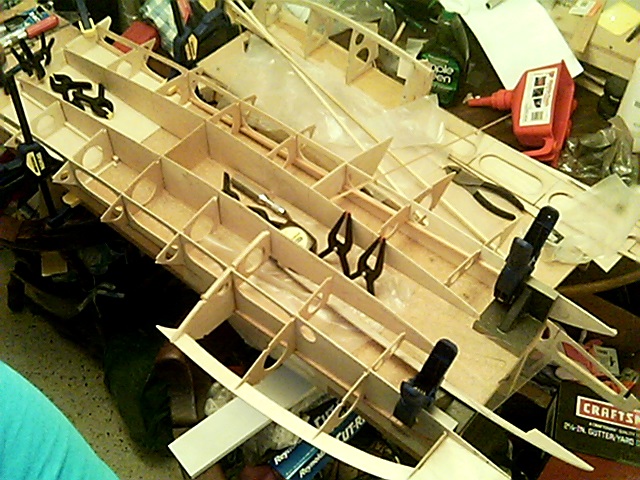
The first one shows the Pak when I was gluing the rear framing together.
The second shows the framing glued in up to the middle crossframe. The right sponson is also all glued to the sponson inside. The glued on rear bottom is also visible under the clamps.
The third and fourth show the sponson cross frames installed onto the sponson insides to my replacement 2000 Elam hull. I now need to get the lengthwise frames fitted and installed so that I can start adding skin.
I didn't take any shots of the Executone this time since I haven't done anything to it in several months
Last edited by Hydro Junkie; 08-19-2015 at 06:53 PM.
08-26-2015, 06:43 PM
#20
Thread Starter
Time for an update:
Went camping last weekend and thought "I'll take the boat with me so I can work on it a bit". Needless to say, it took some major damage on the trip so I've spent two of the last three days repairing the damage. Yesterday was spent at the Hydroplane & Raceboat Museum on a research run. Since I'm building the 1973 Pay'N Pak and the full sized boat is being restored there, it was kind of a no-brainer. I found out a few things yesterday:
1) The plans I am building from have some serious issues when it comes to the top layout and the location of the center cross frame. Everything is roughly a foot to 18 inches too far aft. Needless to say, this can and will affect the boat's balance. Correction of this may result in a boat that won't need as much balancing weight to run properly. Time will tell")
2) I hadn't gone so far with the build that correction of these errors wasn't an option.
3) The crew working on the full sized boat has done some fantastic work repairing or recreating areas of the boat
After I get a bit further, I'll post a few more pictures to show my progress
Went camping last weekend and thought "I'll take the boat with me so I can work on it a bit". Needless to say, it took some major damage on the trip so I've spent two of the last three days repairing the damage. Yesterday was spent at the Hydroplane & Raceboat Museum on a research run. Since I'm building the 1973 Pay'N Pak and the full sized boat is being restored there, it was kind of a no-brainer. I found out a few things yesterday:
1) The plans I am building from have some serious issues when it comes to the top layout and the location of the center cross frame. Everything is roughly a foot to 18 inches too far aft. Needless to say, this can and will affect the boat's balance. Correction of this may result in a boat that won't need as much balancing weight to run properly. Time will tell
2) I hadn't gone so far with the build that correction of these errors wasn't an option.
3) The crew working on the full sized boat has done some fantastic work repairing or recreating areas of the boat
After I get a bit further, I'll post a few more pictures to show my progress
09-08-2015, 07:56 PM
#21
Thread Starter
And, once again, it was HARM time. Spent another hour or two getting dimensions off the Pak before getting in some serious cut and glue time tomorrow. Since my last update, I received my dummy motor and cockpit kits from Larry Kraemer, fantastic quality as always. Since I now have pretty much all the dimensions I need, save three, it's now time to start installing skin and systems. I had planned to take some pictures of the full sized boat but, due to having to go to work after being at the HARM and the fact that cameras are not allowed at work, had to pass on the pictures until later. If all goes well, I'll try and have some updated pictures in a couple of days
09-12-2015, 05:05 PM
#22
Senior Member
Join Date: Mar 2005
Location: sydney, AUSTRALIA
Posts: 181
Likes: 0
Received 0 Likes
on
0 Posts
Just letting you know you have the front of the centre section completely wrong there. Im building the 92 tide also and what you have looks nothing like the real boat.
09-12-2015, 07:49 PM
#23
Thread Starter
Oz, you're referring to Axsissti's build, I assume.
As for mine, I have all the stringers in except the left upper engine bay wall and the nontrips. Had to break away from it for the day so that I could repair my 2000 Elam so I can race it tomorrow. Had the the rudder pushrod and flex cable tube get ripped out and snapped in half by weeds back in July, haven't had the chance to touch it since. Just a matter now of resoldering the pushrod and I'm good to go
As for mine, I have all the stringers in except the left upper engine bay wall and the nontrips. Had to break away from it for the day so that I could repair my 2000 Elam so I can race it tomorrow. Had the the rudder pushrod and flex cable tube get ripped out and snapped in half by weeds back in July, haven't had the chance to touch it since. Just a matter now of resoldering the pushrod and I'm good to go
09-28-2015, 07:23 AM
#24
Thread Starter
FINALLY!!!!!!!!!!!! THE ELAM IS REPAIRED!!!!!!!!!!!!!!
Now I can get back to working on the Pak. Unfortunately, I won't be able to meet my goal of being runable by next Friday but that's how it goes. I'll be working on the Pak later today and will try to have pictures to post at that time
Now I can get back to working on the Pak. Unfortunately, I won't be able to meet my goal of being runable by next Friday but that's how it goes. I'll be working on the Pak later today and will try to have pictures to post at that time
Last edited by Hydro Junkie; 09-28-2015 at 07:41 AM.
01-05-2016, 09:57 PM
#25
Join Date: Dec 2015
Location: Sullivan Maine
Posts: 13
Likes: 0
Received 0 Likes
on
0 Posts
Hi Hydro Junkie
I am starting to build a Pay' N Pack I have a ML Boatworks 108-D kit. I build a 20 size Pak in 1980. I have no instruction to go by to build the new boat. I do have Newton blueprints. My question is I need a jig to build on. I know you went over this some time ago. But could you give me some freash info or pic on this ?
Thanks
Ray
new Guy.