


***CUB BROTHERHOOD***


 08-01-2018, 03:06 PM
#4230

Join Date: Sep 2016
Location: Akron, Ohio
Posts: 113
Likes: 0
Received 0 Likes
on
0 Posts
It's been a while since I posted here...got divorced and moved back to Ohio. The good news is I'm back with my old friends from the Alliance and Goodyear Clubs. This past weekend was the Cub Fly-in at Alliance. I brought my 1:1 Cub over for display. Rick and Dave were kind enough to let me fly their 1/3 and 1/4 scale Cubs as well. It was really great event and being around old friends really does the soul good.
Jim
by https://www.flickr.com/photos/105474195@N05/, on Flickr
by https://www.flickr.com/photos/105474195@N05/, on Flickr
by https://www.flickr.com/photos/105474195@N05/, on Flickr
by https://www.flickr.com/photos/105474195@N05/, on Flickr
by https://www.flickr.com/photos/105474195@N05/, on Flickr
Jim
Last edited by jimharley; 08-01-2018 at 05:38 PM.
 08-02-2018, 11:00 AM
#4233
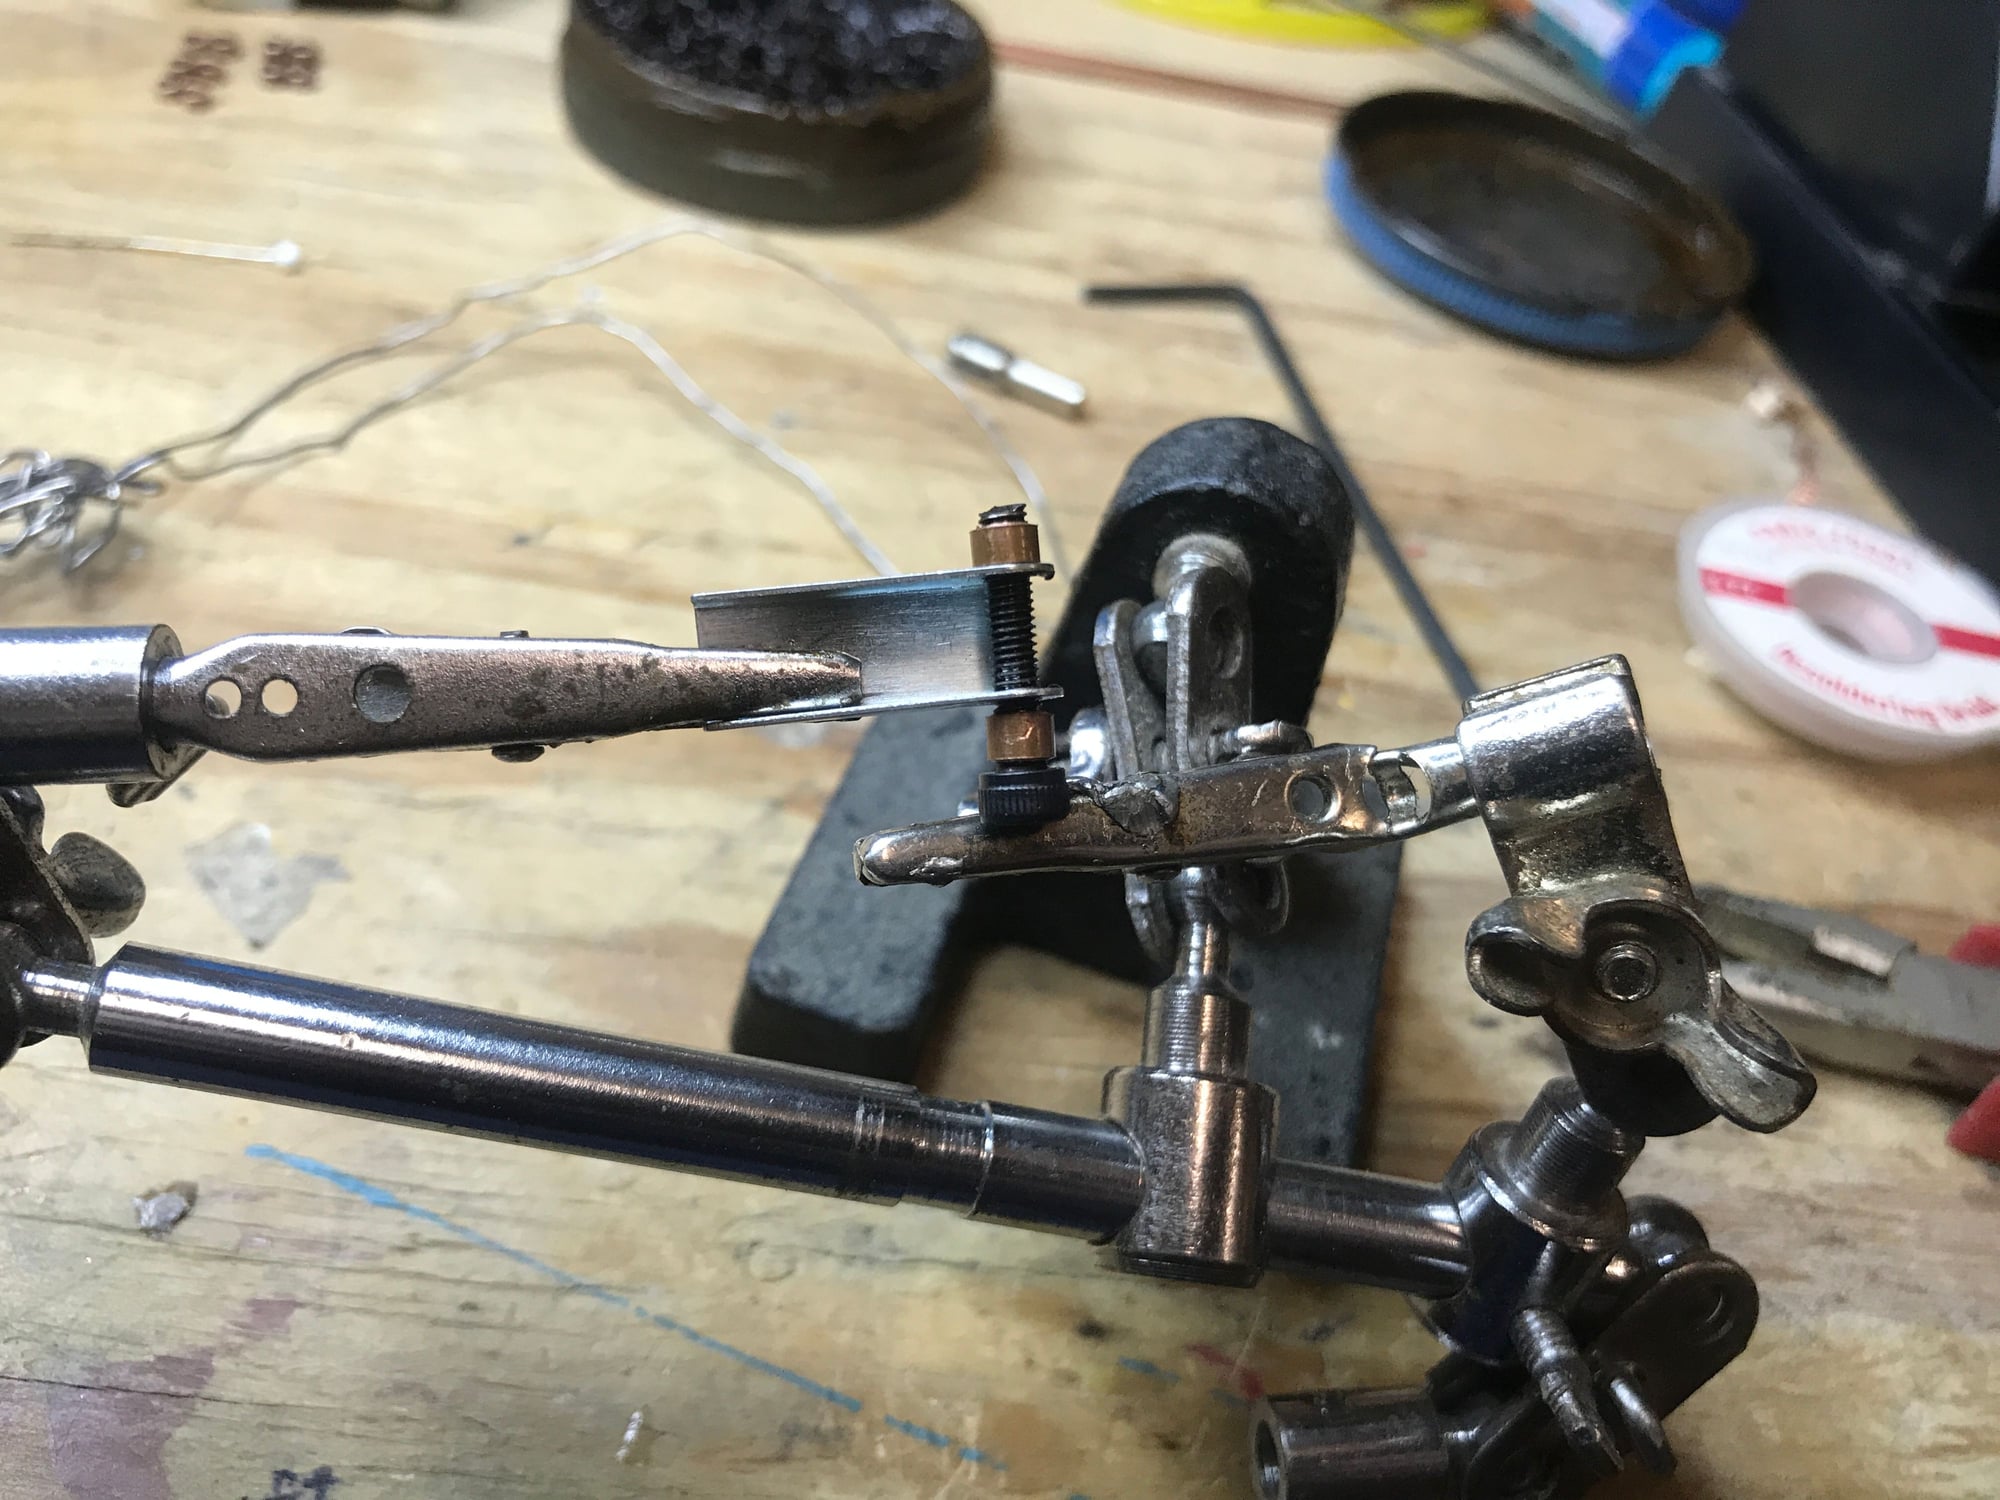
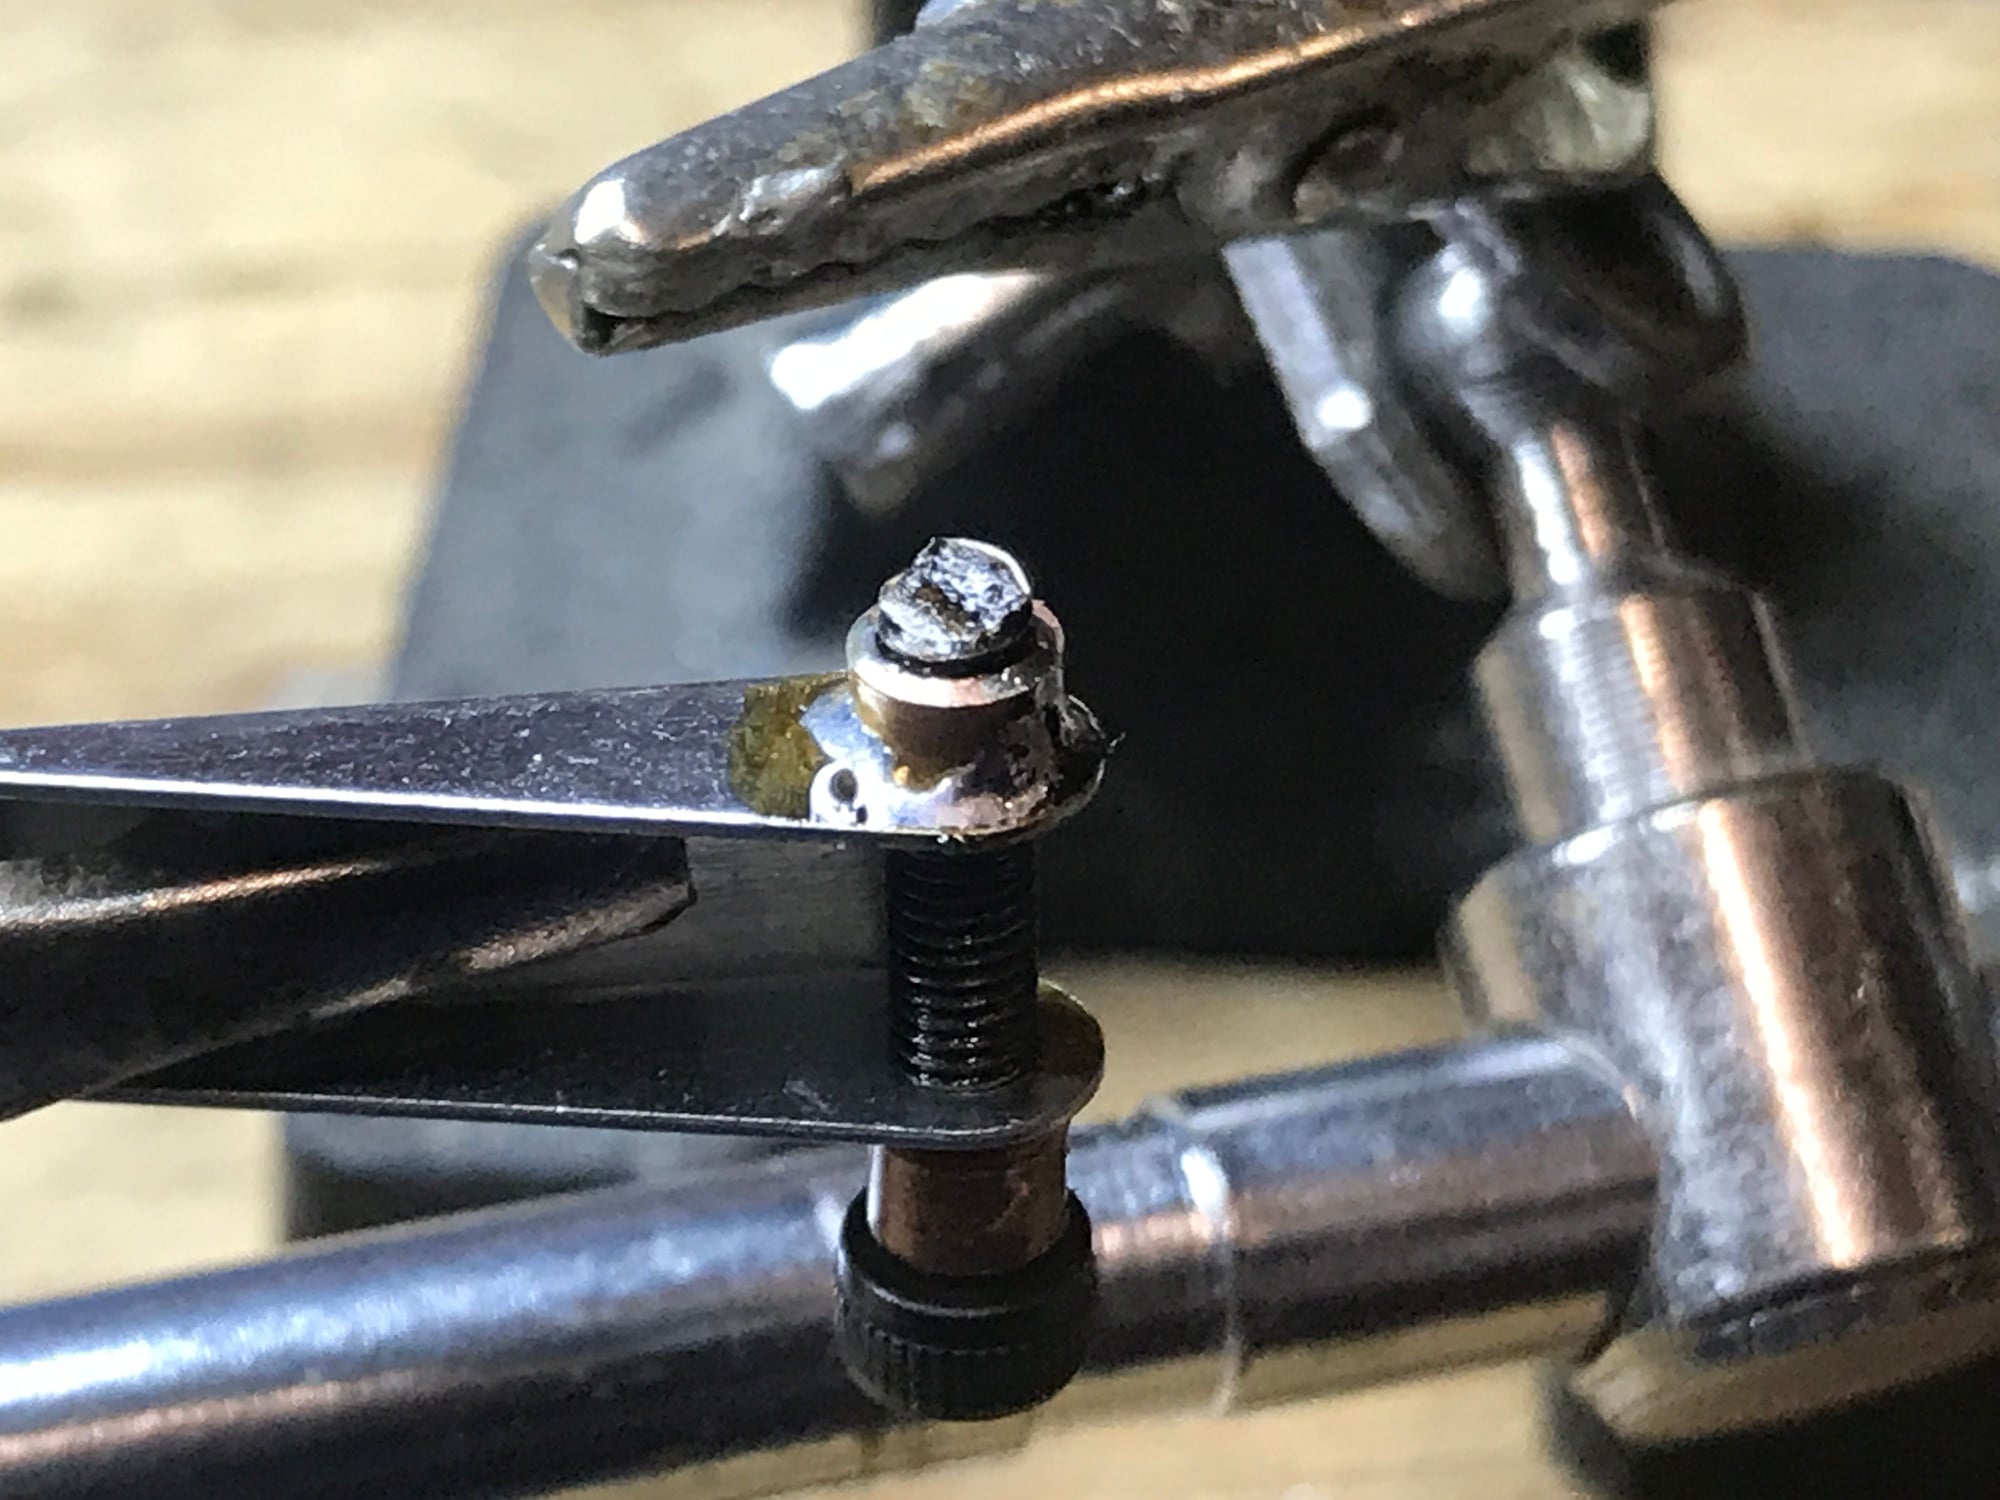
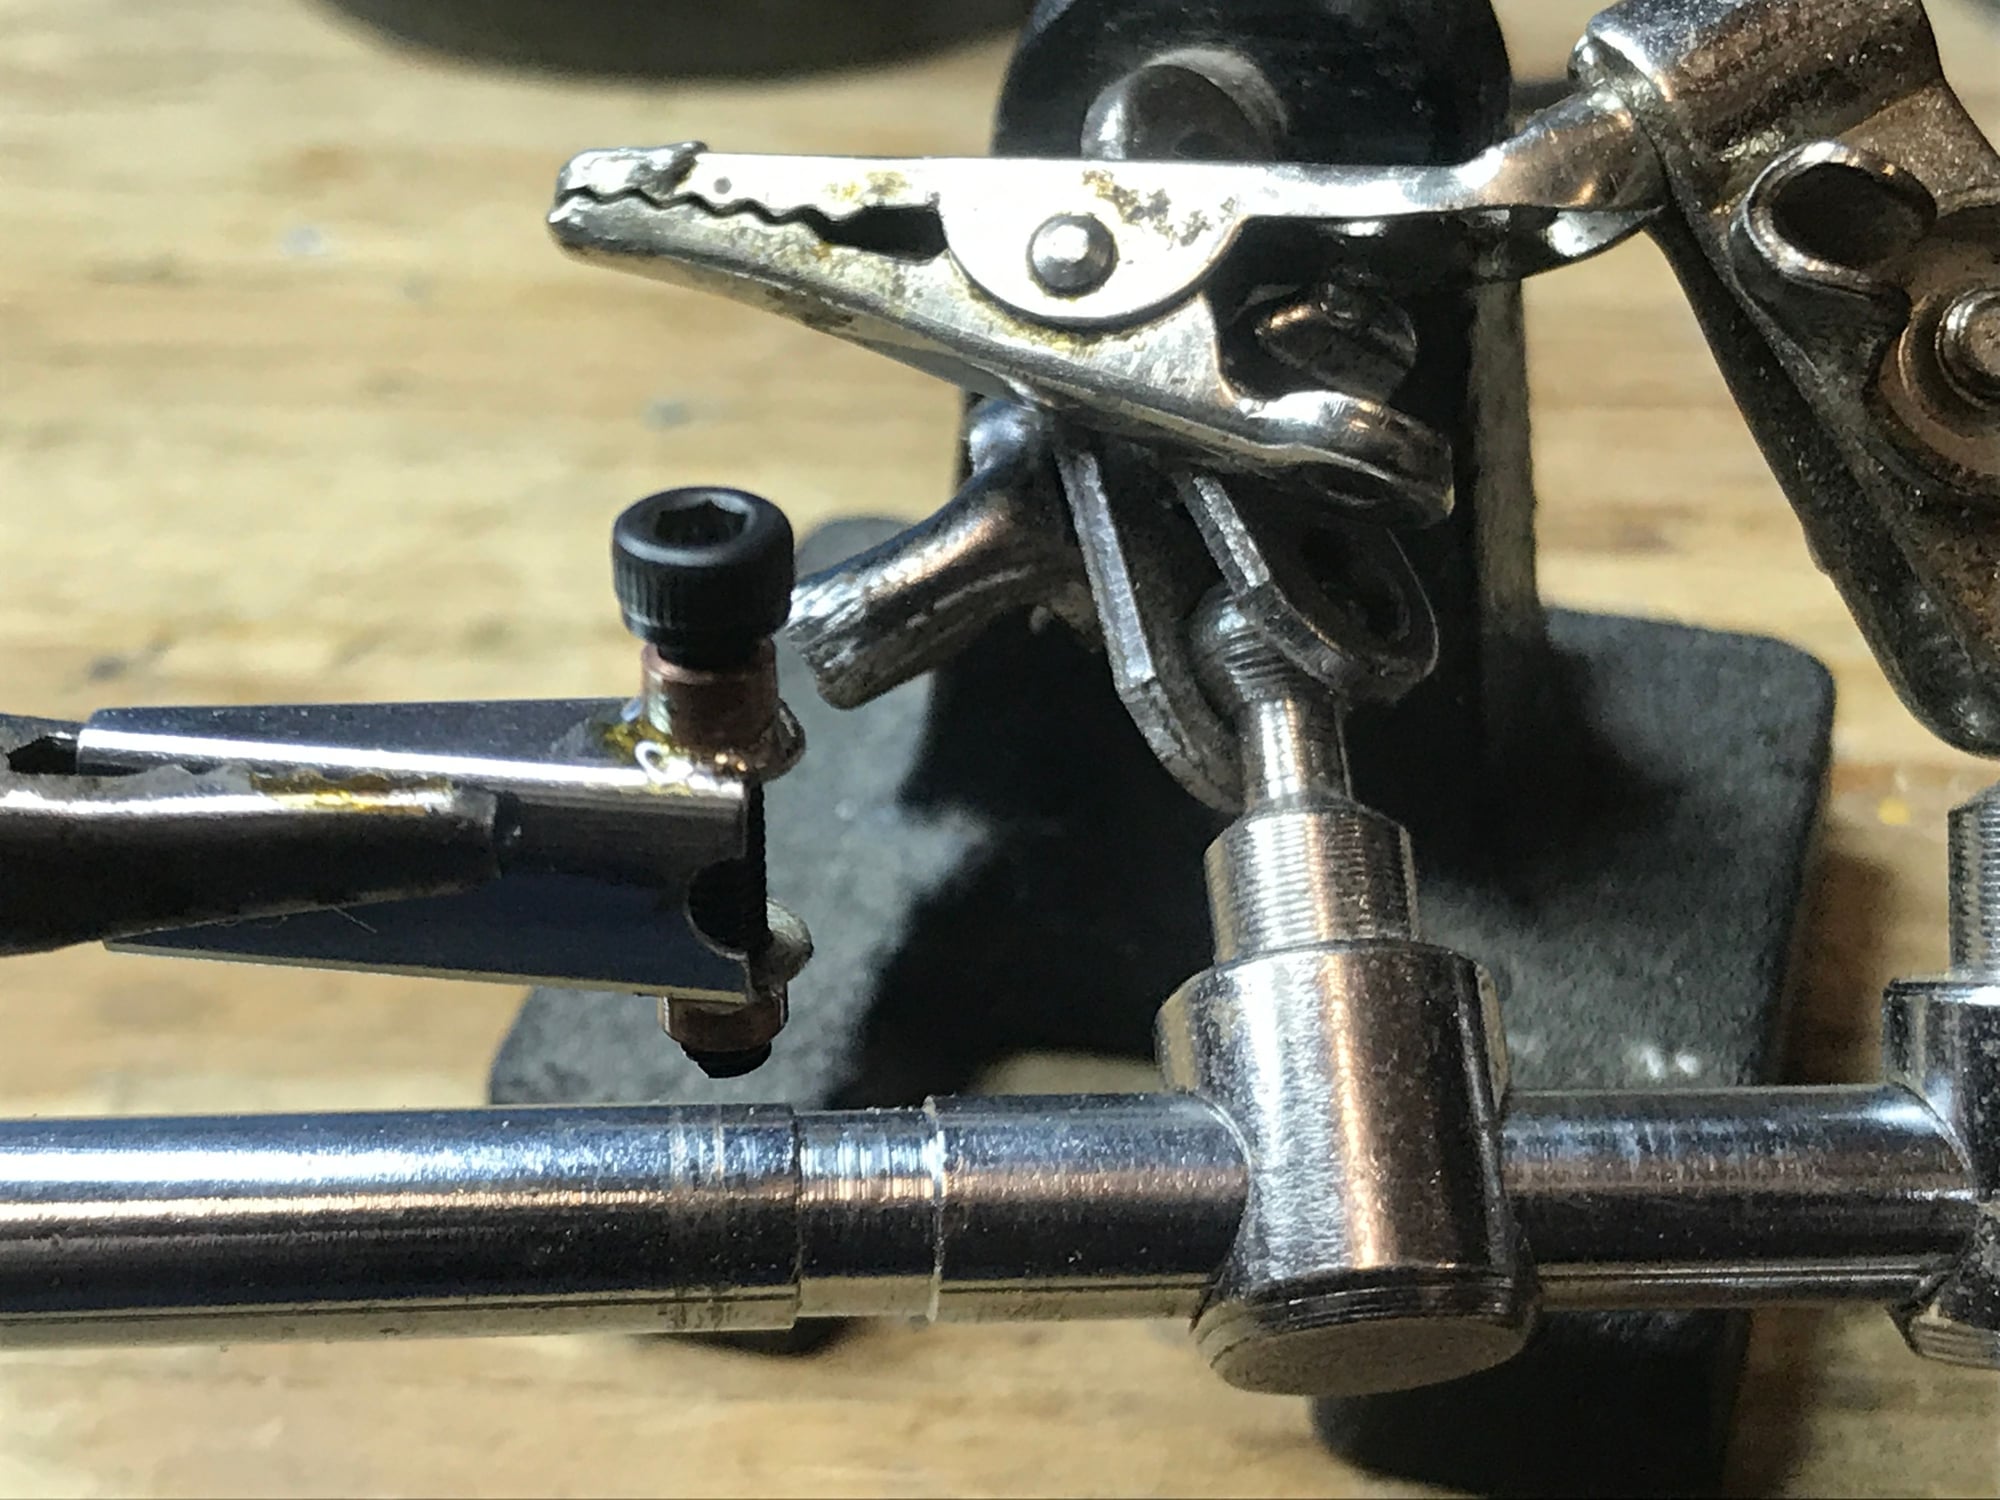
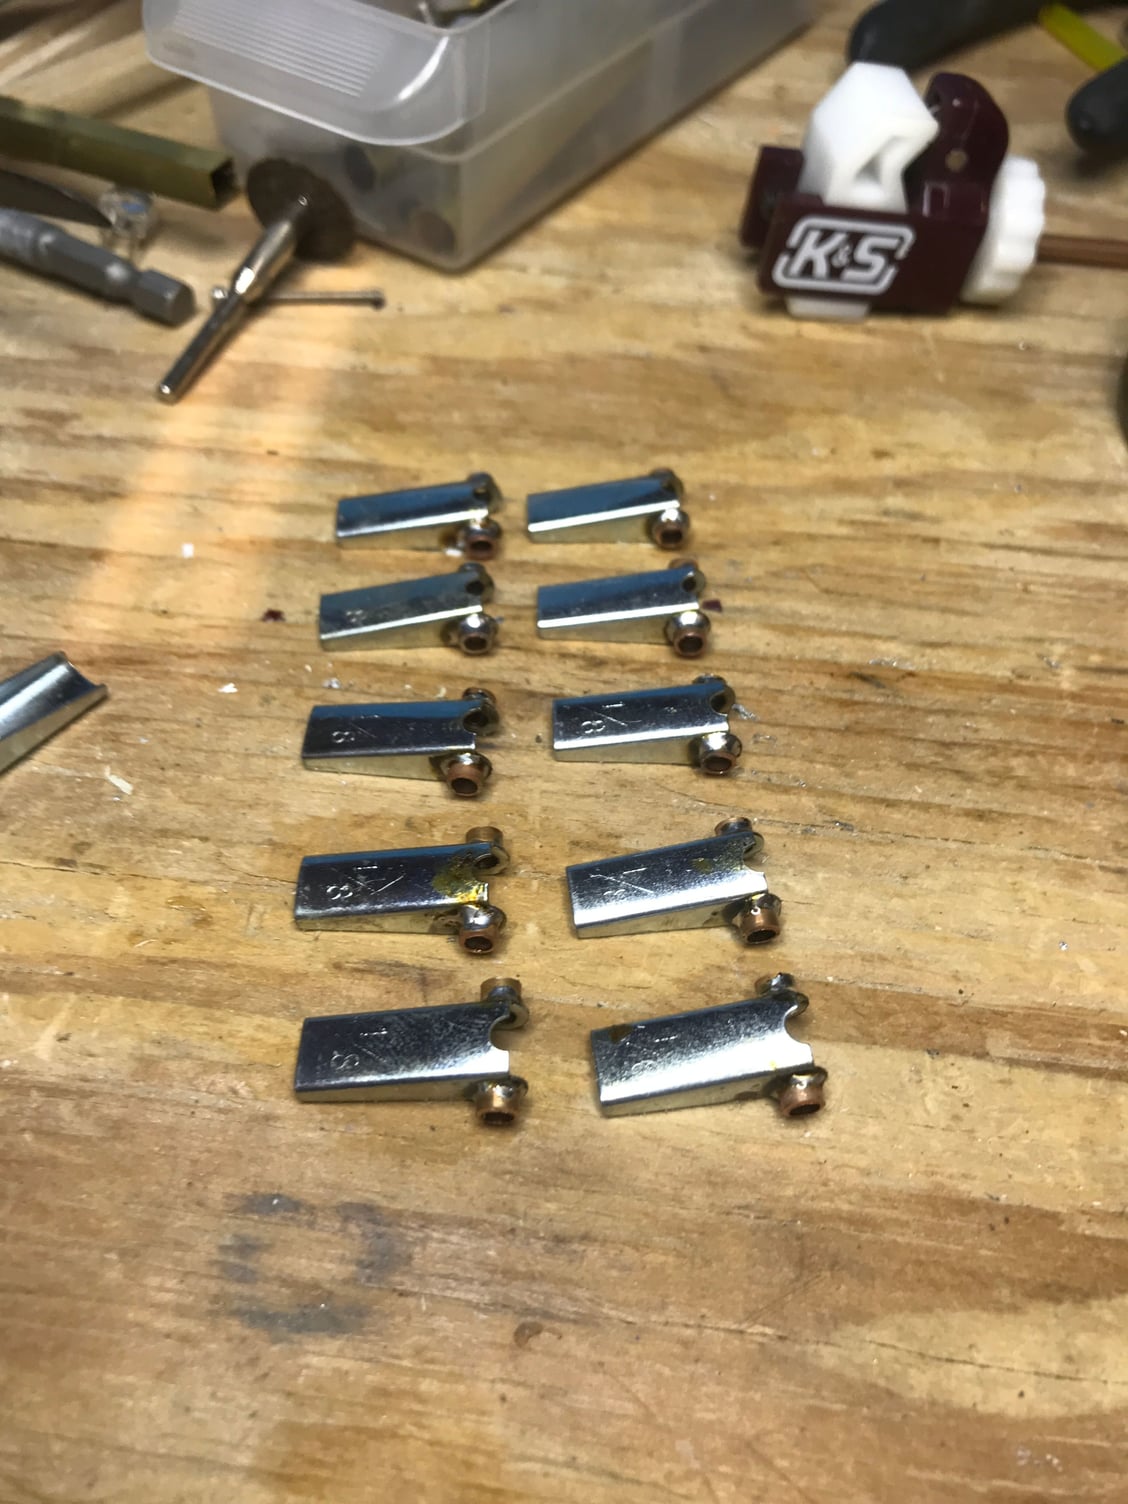
What do you think of my hinges I'm working on for my 1/3 scale super cub. 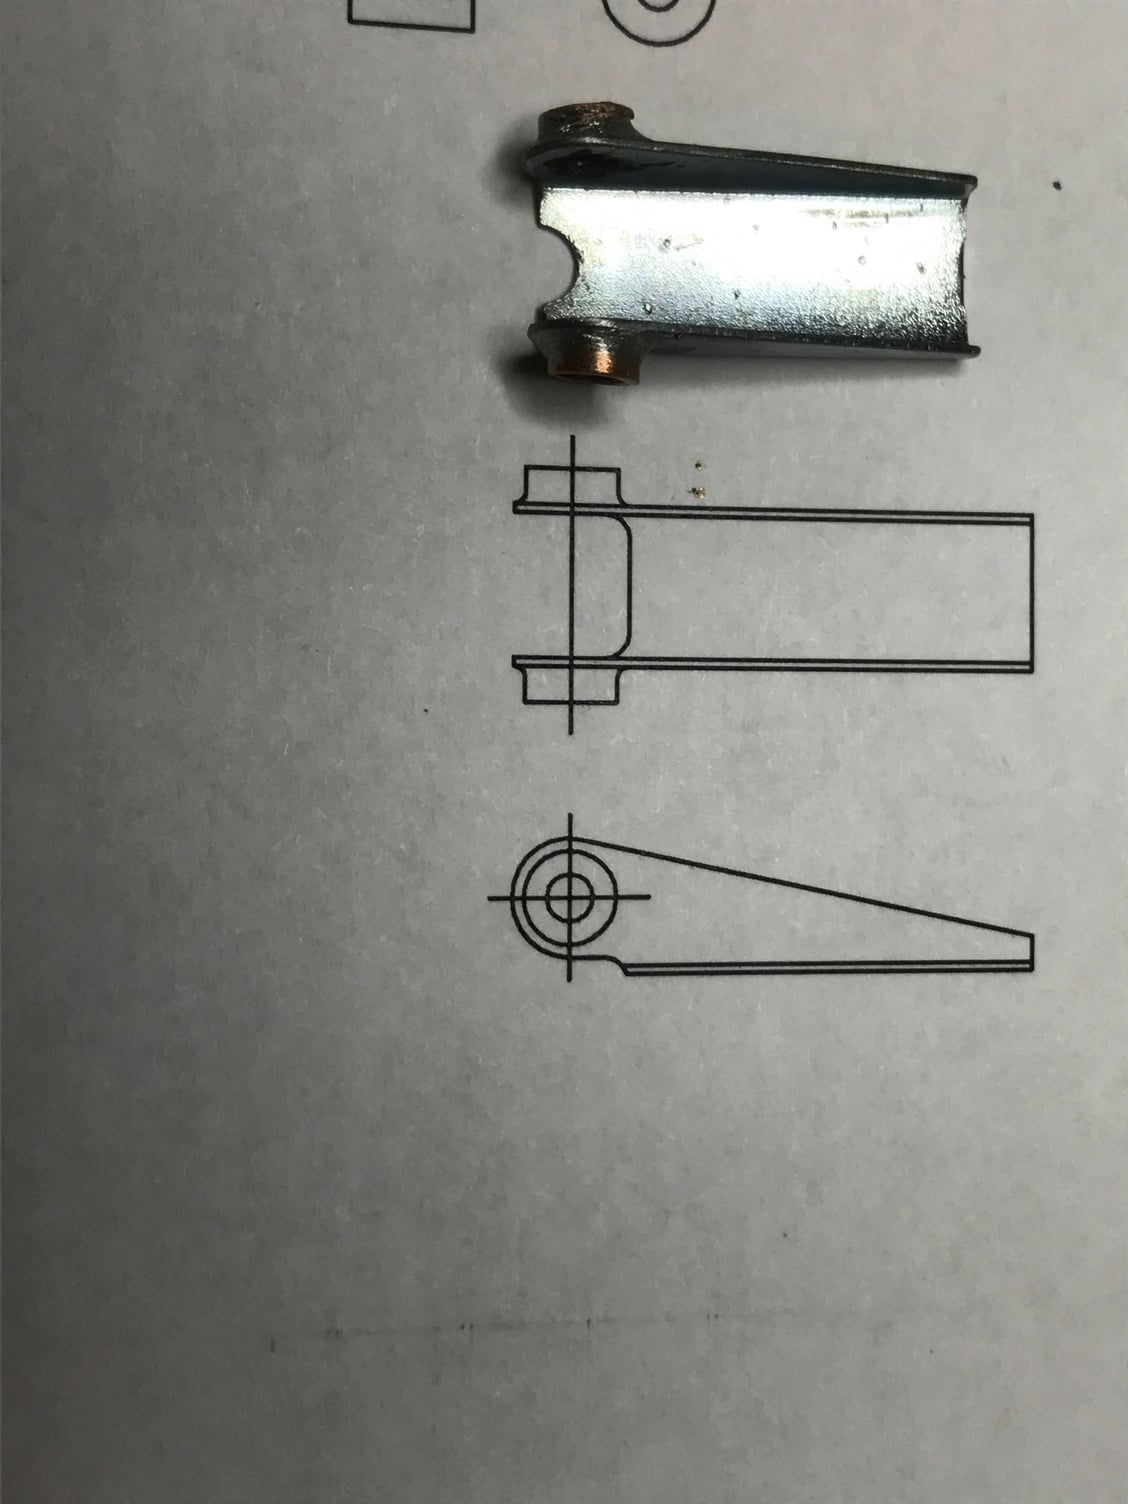
This is the top view of the hinge. ITs a little wider then the full scale.
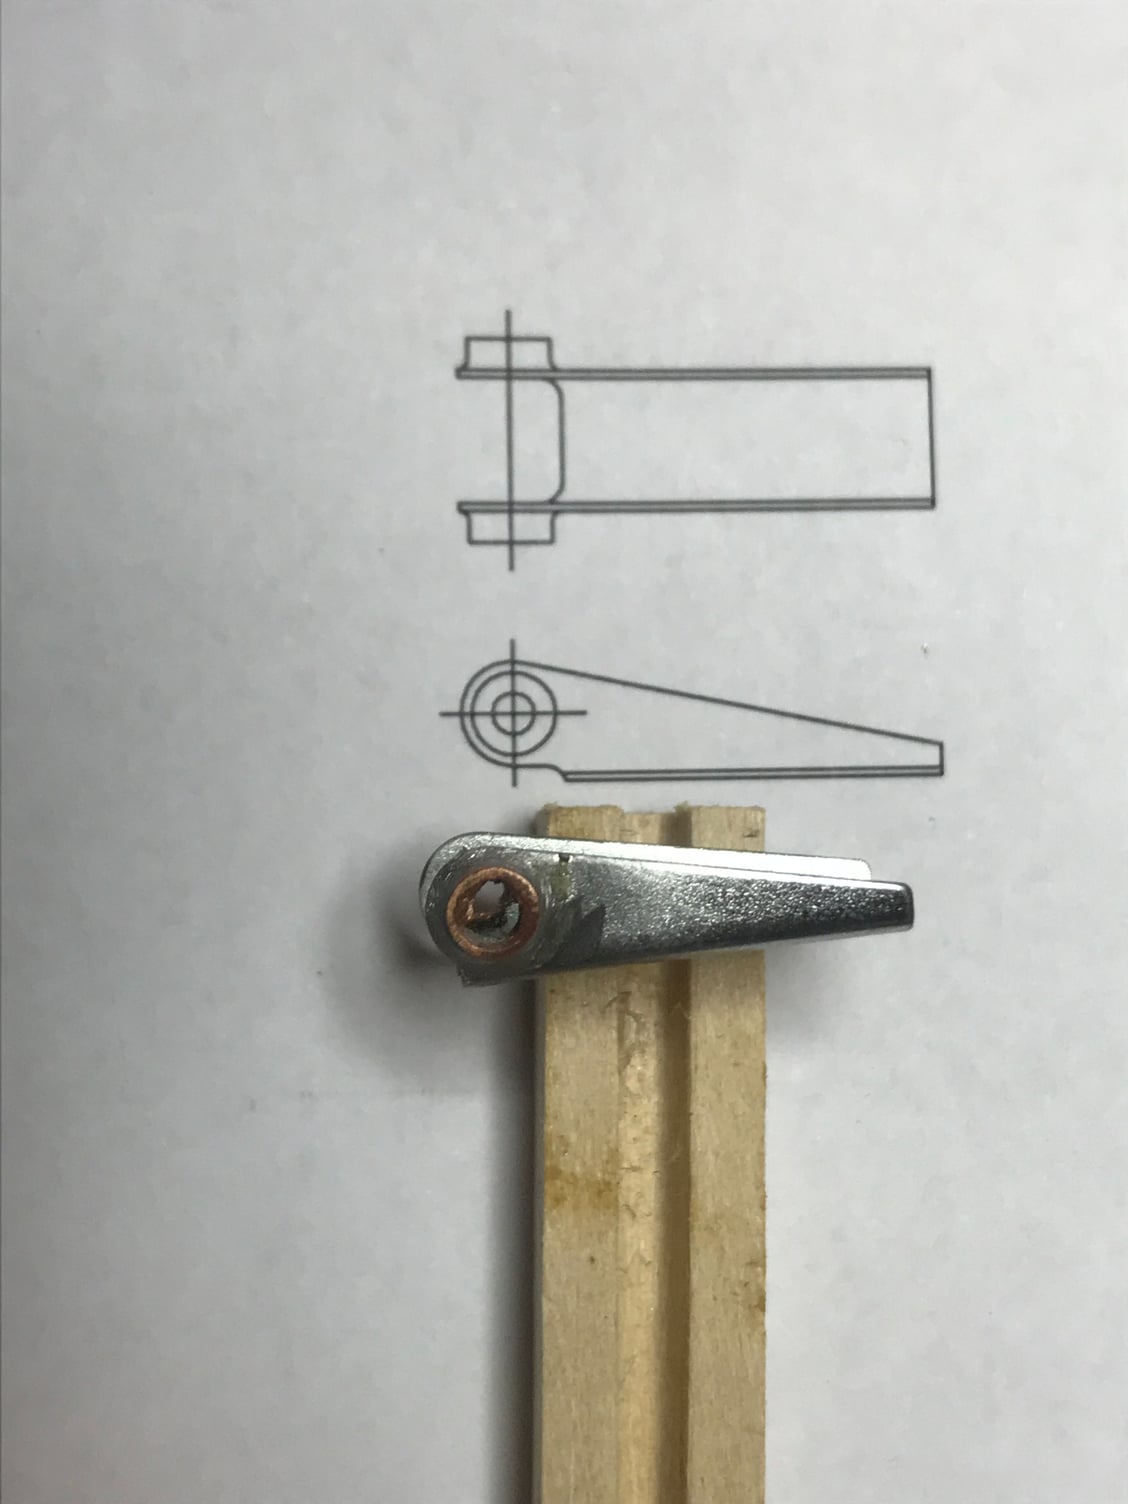
Side view is almost dead on
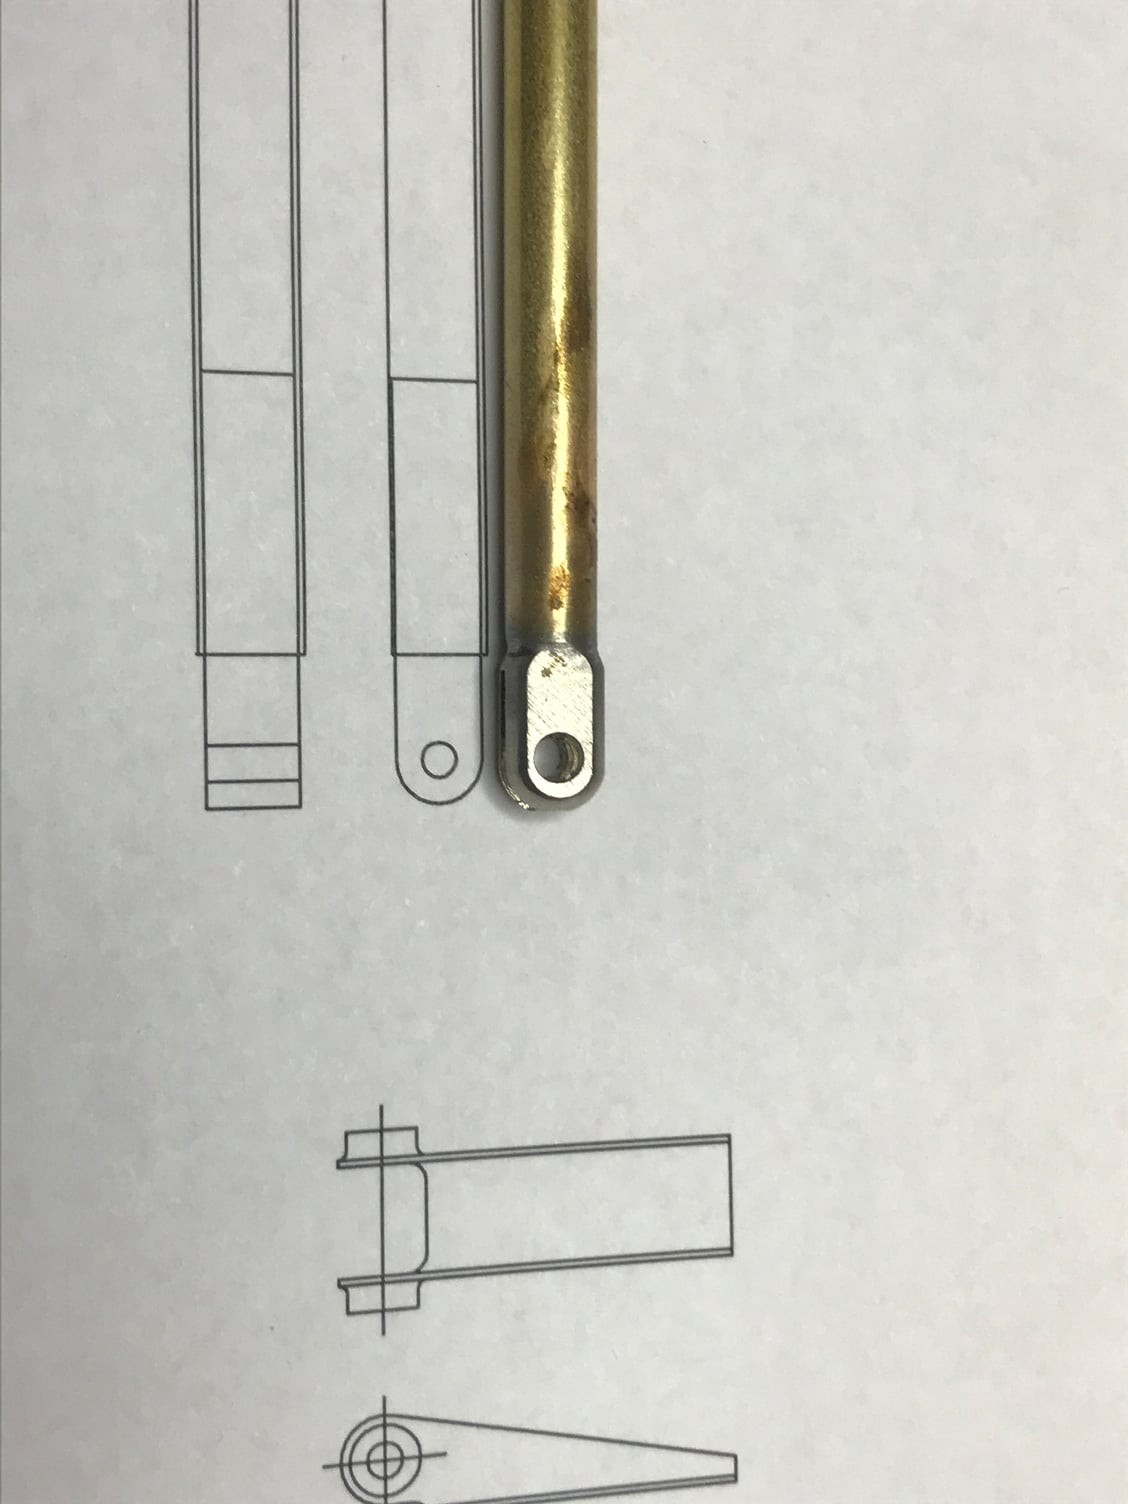
Hinge pin from the wing side. Still have my 1/4 square tube to put over the round tube.

other view of the hinge pin. Needs to be wider.
This is the top view of the hinge. ITs a little wider then the full scale.
Side view is almost dead on
Hinge pin from the wing side. Still have my 1/4 square tube to put over the round tube.
other view of the hinge pin. Needs to be wider.
08-28-2018, 03:34 AM
#4235

Join Date: Jan 2004
Location: dover, kent, UNITED KINGDOM
Posts: 93
Likes: 0
Received 0 Likes
on
0 Posts
Hi Guys, haven't looked in since page 60 but there's been a lot of water under the bridge, the following cubs have come and gone, a model tech one with an OS 26 Surpass, a Kyosho clipped wing 1/6 with an OS 46 fx, Goldberg anniversary with an OS 80 4 stroke, Modeltech 1/5 with a laser 80, World Models with the same laser 80. I took a break then.
The kyosho one is in my loft and I sold the modeltech 1/5 to a clubmate the others have gone to the big toothpick factory in the sky!
I bought and flew (once) a maxford cub with an OS 40 surpass up front and it ended up in the top of a very high tree where it stayed for two months until it eventually landed with just about every glue joint dissolved and all the wooden bits swollen and discolored. Now I've got a clipped wing sig.
this is my sig 1/5 with a laser 70 not a 120 as the cameraman says, it is overpowered but flies so well. I have just picked up a 1/4 scale to refurb and it's got a laser 100 up front and should fly in the next week or so.
The kyosho one is in my loft and I sold the modeltech 1/5 to a clubmate the others have gone to the big toothpick factory in the sky!
I bought and flew (once) a maxford cub with an OS 40 surpass up front and it ended up in the top of a very high tree where it stayed for two months until it eventually landed with just about every glue joint dissolved and all the wooden bits swollen and discolored. Now I've got a clipped wing sig.
08-31-2018, 08:32 AM
#4236
Labor Day Sale
At Light'm up LED's we are having a Labor Day sale on all LED's, Wire, Connectors, and cables. Excludes plans, covers and RCModler issues.
From today thru Monday 3th take %15 off all orders of LED's wire and connectors. . Just go to Light M up LEDs and The Cub Den Store , One stop shop for LEDs, Scale details and more and use code labor day when you checkout.
Use code labor day build to take %5 off of our plans.
09-10-2018, 08:06 PM
#4237

Hello guys, I need a little help and I'm hoping you guys might be able to access me . I have misplaced the windshield pattern to my Sig 1/4 scale J3 Cub that's on my plans. The plans have been cut up, so the section that has the windshield pattern on it is missing. If anyone has that section of the plans, I would be happy to pay for it or a copy. If you can mail it to me, I can pay using PayPal. I never throw any of my plans away until the plane is crashed and gone, but still it's missing, I may have accidentally thrown it out. If anyone can help me, please let me know, I would greatly appreciate it.
Thanks you
Gerry
Thanks you
Gerry
09-11-2018, 05:59 AM
#4239
Join Date: May 2002
Location: Edmonton, AB, CANADA
Posts: 499
Likes: 0
Received 0 Likes
on
0 Posts
Here's a few hints I learned when installing my windshield on my 1/4 scale Cub.
Before you cut plastic make a Bristol Board pattern and do all your trimming on it. It's easier to cut and cheaper than acetate. You can get it at your local Dollar Store. If you screw up throw it away and start over. I found that the plan template wasn't perfect either.
Using a eraseable marker or a sharpie will do if you don't go overboard, mark a centerline on the fuselage on the area at the base of the windshield and at the top of the windshield. Draw a center line as well as on the template and the windshield just in the area where it contacts the fuselage when you are happy with it. Use masking tape to hold the windshield in place while you are doing the final fitting. Be sure the centerlines match and the outside of the windshield is still outside. When all looks well you may finally attach it. I did'nt use glue but I used very small wood screws, 5 down each side evenly spaced and 3 across the top. A strip of tape along the bottom finishes it off. I'm very happy with mine and have received many compliments on the installation.
Peter
Cub Brother #220
09-11-2018, 01:06 PM
#4240
Here's a few hints I learned when installing my windshield on my 1/4 scale Cub.
Before you cut plastic make a Bristol Board pattern and do all your trimming on it. It's easier to cut and cheaper than acetate. You can get it at your local Dollar Store. If you screw up throw it away and start over. I found that the plan template wasn't perfect either.
Using a eraseable marker or a sharpie will do if you don't go overboard, mark a centerline on the fuselage on the area at the base of the windshield and at the top of the windshield. Draw a center line as well as on the template and the windshield just in the area where it contacts the fuselage when you are happy with it. Use masking tape to hold the windshield in place while you are doing the final fitting. Be sure the centerlines match and the outside of the windshield is still outside. When all looks well you may finally attach it. I did'nt use glue but I used very small wood screws, 5 down each side evenly spaced and 3 across the top. A strip of tape along the bottom finishes it off. I'm very happy with mine and have received many compliments on the installation.
Peter
Cub Brother #220
Before you cut plastic make a Bristol Board pattern and do all your trimming on it. It's easier to cut and cheaper than acetate. You can get it at your local Dollar Store. If you screw up throw it away and start over. I found that the plan template wasn't perfect either.
Using a eraseable marker or a sharpie will do if you don't go overboard, mark a centerline on the fuselage on the area at the base of the windshield and at the top of the windshield. Draw a center line as well as on the template and the windshield just in the area where it contacts the fuselage when you are happy with it. Use masking tape to hold the windshield in place while you are doing the final fitting. Be sure the centerlines match and the outside of the windshield is still outside. When all looks well you may finally attach it. I did'nt use glue but I used very small wood screws, 5 down each side evenly spaced and 3 across the top. A strip of tape along the bottom finishes it off. I'm very happy with mine and have received many compliments on the installation.
Peter
Cub Brother #220
11-20-2018, 11:45 AM
#4241
My Feedback: (2)
I need some help, please, with a Carl Goldberg Anniversary Cub that was just gifted to me in the bones. It is about 75% complete, and the workmanship is very skillfully done. But still needs bottom sheeting and formers for the stringers that run aft of the cabin down to the tail, so I need patterns for those.
I would also be in the market for an uncut cowl and windshield pattern & side windows, but I can also get those from Fiberglass Specialties Inc. I can cobble up the landing gear on my own.
First things first, though... can anyone possibly help me out with the plans? Does anyone have a spare set, a copy, or a digital file of the CG Anniversary Cub plans that I could buy/borrow/rent? I found a copy of the manual on line but a hard copy would be nice but not necessary.
It would be much appreciated.... Thanks!!
Bob
Last edited by N1EDM; 11-20-2018 at 11:53 AM.
11-20-2018, 04:03 PM
#4242
Hello again. I didn't get any response on the Sig 1/4 scale J3 Cub on the "after thought" of installing the "door & window" question. I could use some help & thoughts on the install. The door & window is already cut out, built & installed. You know in adding a door & window on the Sig 1/4 scale J3 Cub, the areas cut out has to be reinforced because of cutting out Formers F5 & F6, has anyone added the door & window after the fuselage has been built?
My question is: Has anyone done the reinforcement like what's in the article/website below. I haven't worked on my cub for awhile, but getting ready to start again, first have to reinforce the area where I cut the door out. Looks like I'll be using 5/32 piano wire along the top of the window and down along the side of the cabin brace.
John M wrote the thread below. I'm glad I found it, I was hoping to hear from him.
Please let me know what you think and if anyone had done this. What I had done, looks good and the door & window fits good. But it's not reinforced, please help me out here. I have posted pictures with my notes, but had no responses. I'm sure someone has been where I'm at.
Any help would be greatly appreciated! Please check out the Sig Cub kit upgrade below.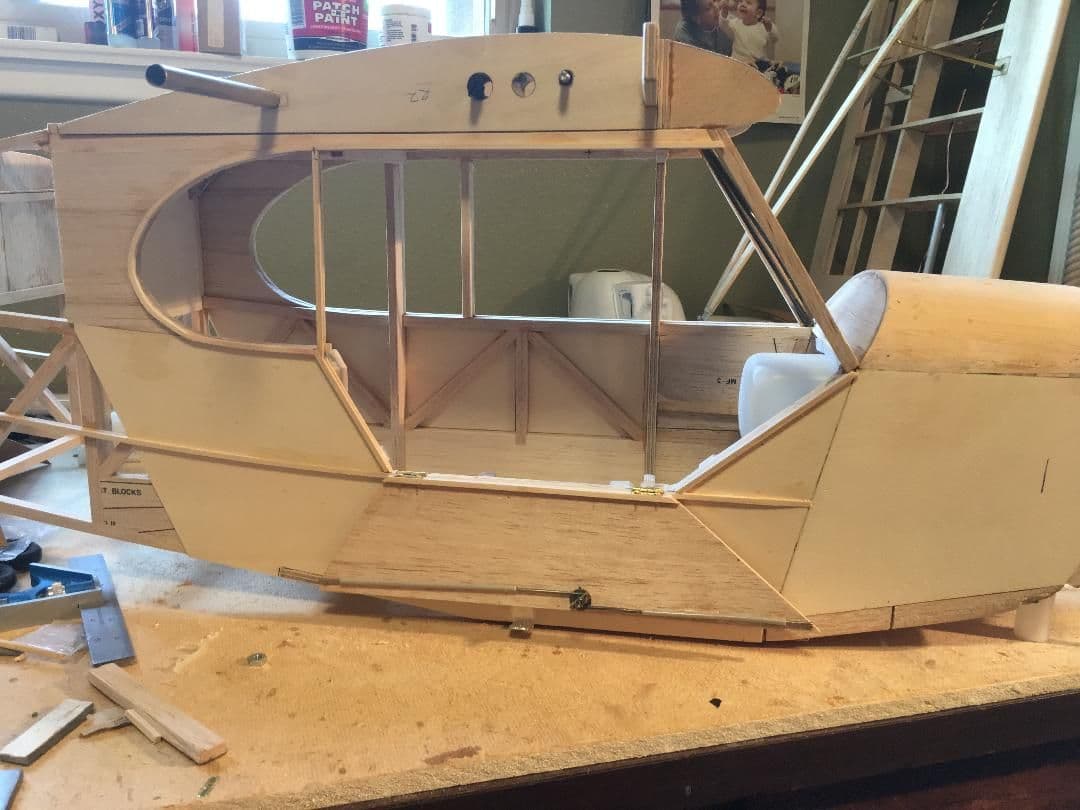
…………………………………………………………………………………………………………………………………… ………………………………………………………………………………...
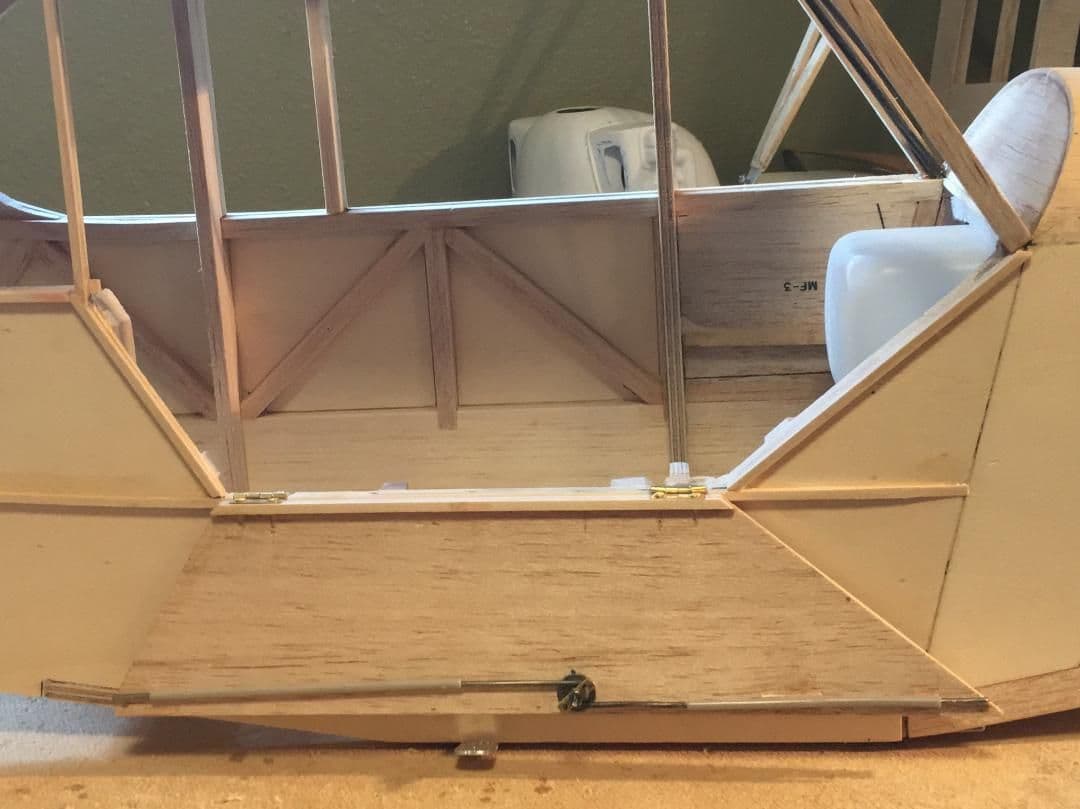
The Sig kit wasn't upgraded... the door / window mod you have seen on other sig 1/4 scale cubs was done by the builder... the door frame has to be re-enforced, preferably during the build... I'm in the process of cutting out the door on a already built 15 year old cub... its a bit more tedious doing the door after the fuselage has been built, but not impossible... I'll be posting some images on the ***Cub Brotherhood*** thread when I finish prepping all the bits an pieces... right now I have the right side fuse almost ready to glue in the re-enforcement wire, then I will move on to the left side fuse and re-enforce that side... then I'll be able to go back and cut out the door and window on the right side and then remove the 2 formers that the re-enforcement wires replace... then the cockpit will be free of any obstructions and can be fitted out with the interior.
Go to this link... Cub Man has posted instructions on how to do the door / window mod on the sig cub
http://thecubden.org/j3l4-related/op...oor-and-window
My question is: Has anyone done the reinforcement like what's in the article/website below. I haven't worked on my cub for awhile, but getting ready to start again, first have to reinforce the area where I cut the door out. Looks like I'll be using 5/32 piano wire along the top of the window and down along the side of the cabin brace.
John M wrote the thread below. I'm glad I found it, I was hoping to hear from him.
Please let me know what you think and if anyone had done this. What I had done, looks good and the door & window fits good. But it's not reinforced, please help me out here. I have posted pictures with my notes, but had no responses. I'm sure someone has been where I'm at.
Any help would be greatly appreciated! Please check out the Sig Cub kit upgrade below.
…………………………………………………………………………………………………………………………………… ………………………………………………………………………………...
The Sig kit wasn't upgraded... the door / window mod you have seen on other sig 1/4 scale cubs was done by the builder... the door frame has to be re-enforced, preferably during the build... I'm in the process of cutting out the door on a already built 15 year old cub... its a bit more tedious doing the door after the fuselage has been built, but not impossible... I'll be posting some images on the ***Cub Brotherhood*** thread when I finish prepping all the bits an pieces... right now I have the right side fuse almost ready to glue in the re-enforcement wire, then I will move on to the left side fuse and re-enforce that side... then I'll be able to go back and cut out the door and window on the right side and then remove the 2 formers that the re-enforcement wires replace... then the cockpit will be free of any obstructions and can be fitted out with the interior.
Go to this link... Cub Man has posted instructions on how to do the door / window mod on the sig cub
http://thecubden.org/j3l4-related/op...oor-and-window
11-20-2018, 08:14 PM
#4243
Join Date: May 2002
Location: Edmonton, AB, CANADA
Posts: 499
Likes: 0
Received 0 Likes
on
0 Posts
I need some help, please, with a Carl Goldberg Anniversary Cub that was just gifted to me in the bones. It is about 75% complete, and the workmanship is very skillfully done. But still needs bottom sheeting and formers for the stringers that run aft of the cabin down to the tail, so I need patterns for those.
I would also be in the market for an uncut cowl and windshield pattern & side windows, but I can also get those from Fiberglass Specialties Inc. I can cobble up the landing gear on my own.
First things first, though... can anyone possibly help me out with the plans? Does anyone have a spare set, a copy, or a digital file of the CG Anniversary Cub plans that I could buy/borrow/rent? I found a copy of the manual on line but a hard copy would be nice but not necessary.
It would be much appreciated.... Thanks!!
Bob
I would also be in the market for an uncut cowl and windshield pattern & side windows, but I can also get those from Fiberglass Specialties Inc. I can cobble up the landing gear on my own.
First things first, though... can anyone possibly help me out with the plans? Does anyone have a spare set, a copy, or a digital file of the CG Anniversary Cub plans that I could buy/borrow/rent? I found a copy of the manual on line but a hard copy would be nice but not necessary.
It would be much appreciated.... Thanks!!
Bob
The scale landing gear is not very scale like so a bender and some 3/16" wire could easily get yourself the bent parts.
I have a friend who's into 3D printing and he just printed me out a cowl. Not perfect but considering I had nothing, pretty good.
Cub Brother 220
11-21-2018, 04:37 AM
#4244
My Feedback: (2)
Thanks for the email PeterC. It would not be hard to finish that up and I have the manual, so I see the wire-bend layout for the LG. I was just hoping for some patterns to make life easier.
Fiberglass Specialties also makes cowls, etc., for the Goldberg Cub - in fact I think that they also have a windshield (unusual item to have for them) but your approach is similar to what I would do. I would definitely put at least two formers aft of the cabin to support the stringers though.
I tried to upload a copy of the CG Construction Manual for anyone who is interested or curious but the file size is just a bit over the RCU Limit. If anyone would like a copy (to safe the trouble of looking it up online) just PM me.
I am still looking for anyone who has a copy of the plans, please.. and thanks for your input, PeterC.
Bob
11-22-2018, 05:24 AM
#4247

At Light'm up LED's and The Cub Den store we are having a Black Friday / Cyber Monday sale on the full store. From Nov 22 thru Nov 26 15% off all orders. Just go to The Cub Den Store and Light m Up LEDs and use code black friday when you checkout.
Last edited by Cub Man; 11-22-2018 at 05:31 AM.
11-22-2018, 05:29 AM
#4249
Hello again. I didn't get any response on the Sig 1/4 scale J3 Cub on the "after thought" of installing the "door & window" question. I could use some help & thoughts on the install. The door & window is already cut out, built & installed. You know in adding a door & window on the Sig 1/4 scale J3 Cub, the areas cut out has to be reinforced because of cutting out Formers F5 & F6, has anyone added the door & window after the fuselage has been built?
My question is: Has anyone done the reinforcement like what's in the article/website below. I haven't worked on my cub for awhile, but getting ready to start again, first have to reinforce the area where I cut the door out. Looks like I'll be using 5/32 piano wire along the top of the window and down along the side of the cabin brace.
John M wrote the thread below. I'm glad I found it, I was hoping to hear from him.
Please let me know what you think and if anyone had done this. What I had done, looks good and the door & window fits good. But it's not reinforced, please help me out here. I have posted pictures with my notes, but had no responses. I'm sure someone has been where I'm at.
Any help would be greatly appreciated! Please check out the Sig Cub kit upgrade below.
�������������������������������������������������� ������������������������������...
The Sig kit wasn't upgraded... the door / window mod you have seen on other sig 1/4 scale cubs was done by the builder... the door frame has to be re-enforced, preferably during the build... I'm in the process of cutting out the door on a already built 15 year old cub... its a bit more tedious doing the door after the fuselage has been built, but not impossible... I'll be posting some images on the ***Cub Brotherhood*** thread when I finish prepping all the bits an pieces... right now I have the right side fuse almost ready to glue in the re-enforcement wire, then I will move on to the left side fuse and re-enforce that side... then I'll be able to go back and cut out the door and window on the right side and then remove the 2 formers that the re-enforcement wires replace... then the cockpit will be free of any obstructions and can be fitted out with the interior.
Go to this link... Cub Man has posted instructions on how to do the door / window mod on the sig cub
http://thecubden.org/j3l4-related/op...oor-and-window