


Hostetler Lancair ES Build with retracts.
 08-08-2014, 09:53 AM
#376
Senior Member
Join Date: Jun 2008
Location: JACKSONVILLE, FL
Posts: 244
Likes: 0
Received 0 Likes
on
0 Posts
This guy is so meticulous! He really builds beautiful planes! He has the patience of a saint,,, he has to, he hangs around with me and I am still breathing!! We pick on each other a lot! I am looking forward to when he finishes this one, as I may be the one who gets to maiden it! We did the maiden flight on his giant cessna 150 a while back,and it was a blood pumping experience! Flying such a beautiful plane that is not yours is nerve wracking,, but not as bad as flying one you built yourself. I built a giant TF Corsair and flying that one had my thumbs shaking! I think this one is going to be a beautiful one also! Can't wait until he starts the paint job! Keep up the good work Sebo!
 08-16-2014, 06:01 PM
#378

Thread Starter
A couple of more hours of cutting sanding and shaping ....I would have gotten more done but the electricity went out 7 times and I just don't like working by flashlight or candles....what a horrible thought that is.
08-17-2014, 06:59 PM
#379

My Feedback: (17)
Join Date: Dec 2002
Location: Edmond,
OK
Posts: 56
Likes: 0
Received 0 Likes
on
0 Posts
Sebo, I was talking to another gentlemen who owns one of the larger Hostetler Lancairs and he told me it takes all of 600ft to get up, don't try to land slow and careful on approach so as not to tip-stall while trying to make it flare like a high wing. Also, is that a Glasair in the background and if so can you tell me about it.
I should be ready to maiden my lancair within the next week or two. I'm stalling while I try to determine if I should make a couple changes. Probably should because it may save me some weight.
I should be ready to maiden my lancair within the next week or two. I'm stalling while I try to determine if I should make a couple changes. Probably should because it may save me some weight.
08-17-2014, 09:28 PM
#380
Thread Starter
Hi, zzwcpj....You have a good eye. Yes, that is a Glasair. I got a 3 view from Stoddard Hamilton (the designers) and a full wing plan.
Sat down and started drawing from the three view and wing plan....
It gave me the idea to try to build that plane from scratch.....the plane has somewhat of a boxy fuselage from the 3 view so I built it that way. It could have been rounded at the bottom but I didn't do it....I wrote an article for Model Airplane News when I completed the project.....I think it was back in the 1980's. It was published and I still have the plane as well as a set of plans. (Would you believe I had to buy the plans from MAN?) They gave me $800 for the article and they kept all of the photos...I hired a profession photographer to take the pics. I haven't flown it in many years....needs a new radio and better servos. It flies nice and is very predictable...I did slow it down too much on one landing and broke the wing...repaired and flew again......It has one of the old original OS 90 four strokes on it...it's enough power but could use a little more.
Wingspan is 72 inches. I chose to build the tail dragger. The wing is undercambered......the kits and arfs do not have that wing configuration....It sure doesn't want to land with that airfoil....it floats.....sounds nice with the 4 stroke....would make a great electric...If I live long enough I may convert it.....Need more info, just email me at [email protected]
Last edited by sebo; 08-17-2014 at 09:31 PM. Reason: added a little lmore info
08-21-2014, 04:17 AM
#381

Join Date: Jan 2003
Location: Warrenton, VA
Posts: 1,256
Likes: 0
Received 0 Likes
on
0 Posts
I'm having problems with the surgery to the left eye....the right eye has been postponed until I can see distance with my left one.
Close up with it is great but it has the new compound lense in it that allows far and close as well as straighten out the astigmitism.
I won't know how it is going to be handled until next wednesday....
Close up with it is great but it has the new compound lense in it that allows far and close as well as straighten out the astigmitism.
I won't know how it is going to be handled until next wednesday....
I hope your get repaired soon.
CB
08-21-2014, 11:12 AM
#382
Thread Starter
Thanks, CB.......I don't know if it is improving or not..........how is your depth preception with only one strong eye?
I have astigmatism too and they corrected it....I don't even have a 12 foot clear vision, only close, maybe 6 feet. I'm afraid that if I do as you have done my depth will not be there.....Ron
I have astigmatism too and they corrected it....I don't even have a 12 foot clear vision, only close, maybe 6 feet. I'm afraid that if I do as you have done my depth will not be there.....Ron
08-21-2014, 12:44 PM
#383
Join Date: Jan 2003
Location: Warrenton, VA
Posts: 1,256
Likes: 0
Received 0 Likes
on
0 Posts
It sounds like they put in a "reading" lens which is short distance focus. What I got was what my Dr. called a "mini-monovision" . I have no issue with depth perception at all. I ride motorcycle and if there was a depth perception issue I would have found out in a hurry. I have yet to fly, due to time, but when I rode to the field and watched others flying i had no problems what so ever in gauging depth. AND the planes were crystal clear compared to my last uncorrected visit to the field,
The amount of light coming in is staggering and bright as are all the colors. I live near the Blue Ridge mtns to me they were the Grey Ridge mountains. LOL
Good wishes for you to have them fix this right.
The amount of light coming in is staggering and bright as are all the colors. I live near the Blue Ridge mtns to me they were the Grey Ridge mountains. LOL
Good wishes for you to have them fix this right.
08-23-2014, 12:03 AM
#384
Thread Starter
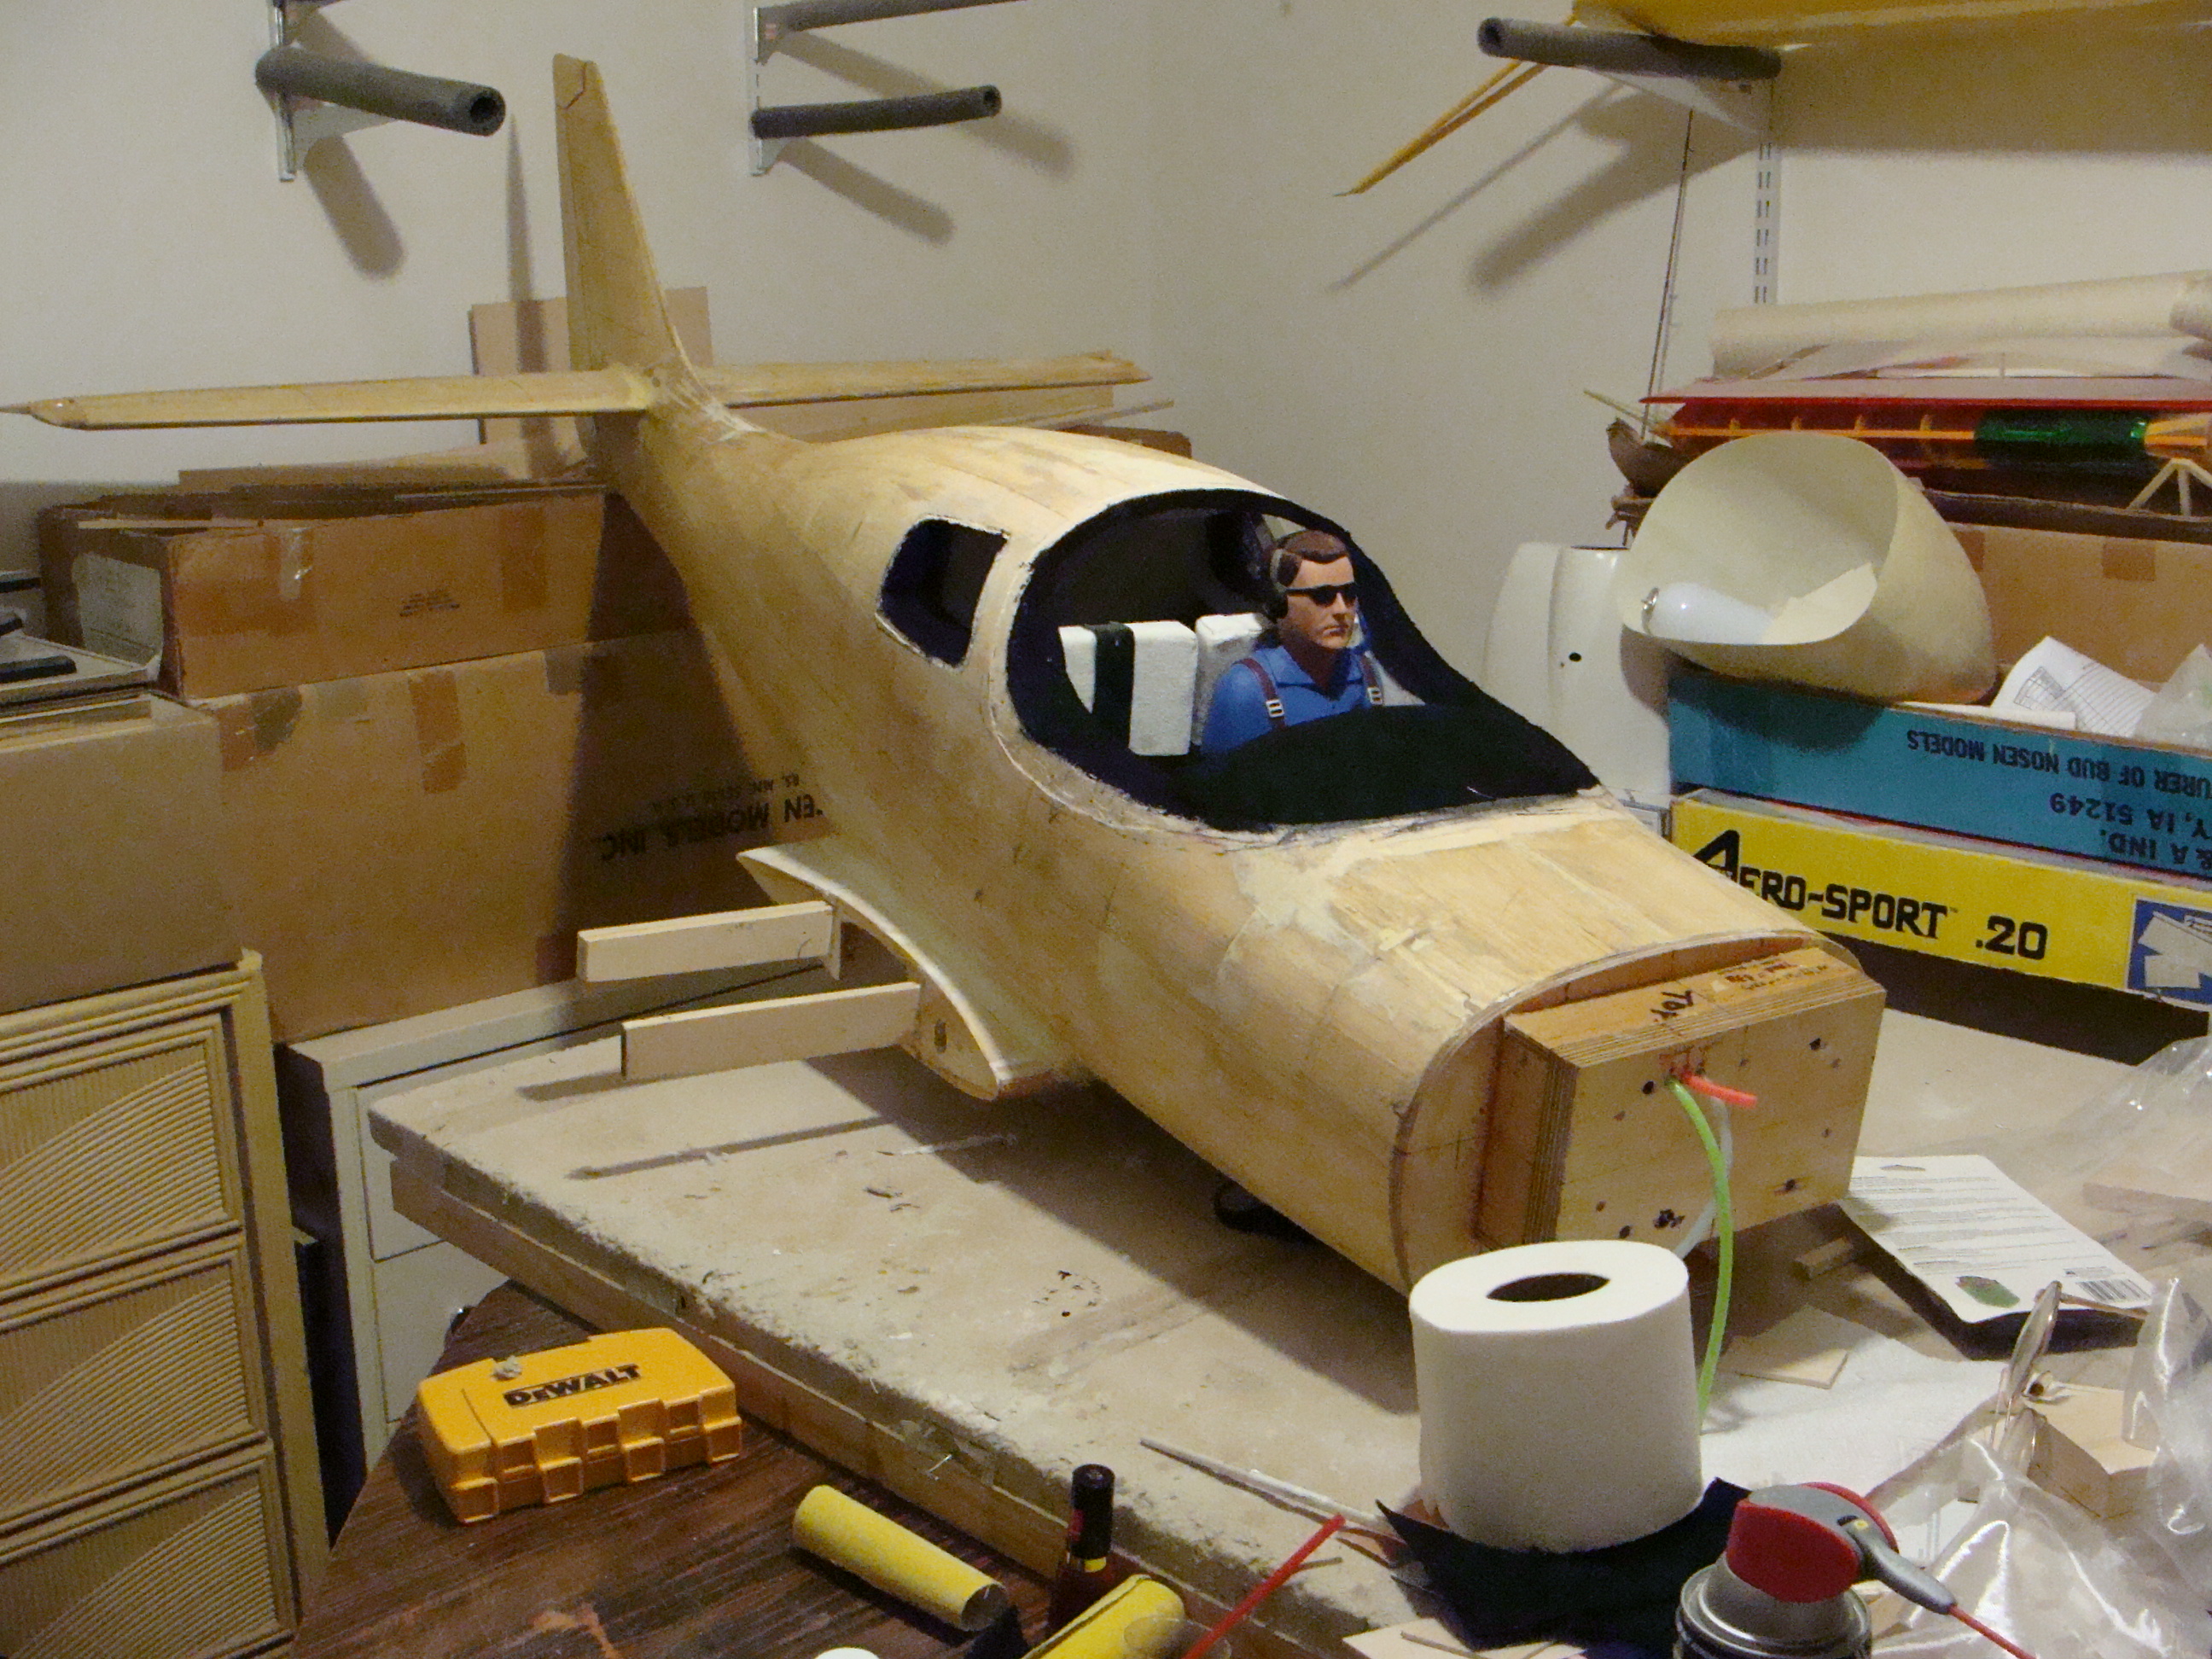
Worked on the tail another 4 hours.......I know, it looks like I didn't do anything....I really did. There are a lot of compound curves in this thing....
Maybe 2 more days for the underside.


Maybe 2 more days for the underside.
09-08-2014, 05:20 PM
#388
Thread Starter
You may be asking yourself if he's doing anything........Yes, he is..I mean I am.
Lots of rain this week and I am glassing the fuselage....I would like to finish it this week or be close to done.
I will have to work on the wings before I can glass them.....still have one wing tip to do and I have to run wires for the lighting.


I haveFormula 560 on order so that I can put the windows in and the canopy on.
It should be here Thursday but I won't be quite ready to put them in yet..
I still have to hook up the air lines for the retracts and hook up the servo for all linkages.
I thought I'd have it in the air by now....gee, I'm slow but it is fun.
Tune in again next week to see how the glassing is going.
Lots of rain this week and I am glassing the fuselage....I would like to finish it this week or be close to done.
I will have to work on the wings before I can glass them.....still have one wing tip to do and I have to run wires for the lighting.
I haveFormula 560 on order so that I can put the windows in and the canopy on.
It should be here Thursday but I won't be quite ready to put them in yet..
I still have to hook up the air lines for the retracts and hook up the servo for all linkages.
I thought I'd have it in the air by now....gee, I'm slow but it is fun.
Tune in again next week to see how the glassing is going.
Last edited by sebo; 09-08-2014 at 05:26 PM. Reason: added more stuff
09-09-2014, 04:15 PM
#391
Thread Starter
Thanks, guys......I am alergic to the fiber glass cloth.....I itch all over.....maybe it's the resin.....don't know for sure but wow.....
I am broken out in a rash..
My eye hasn't improved either. I have an appointment on the 16th.
I am broken out in a rash..
My eye hasn't improved either. I have an appointment on the 16th.
 09-12-2014, 05:21 PM
#393
Thread Starter
The fuse has been epoxied...except for the firewall.
One window has been installed and Now I have to wait 24 hours before I can install the other one........I would do it now but I want to see how this one turns out before I commit to the other one.

 I didn't like the way it looked with the interior completely white so I got some black felt and
cut it to shape for around the windows and canopy...I like it better now and it gives the
windows a more "plush" look as well as the instrument panel/dash board.
One window has been installed and Now I have to wait 24 hours before I can install the other one........I would do it now but I want to see how this one turns out before I commit to the other one.
cut it to shape for around the windows and canopy...I like it better now and it gives the
windows a more "plush" look as well as the instrument panel/dash board.
09-30-2014, 05:24 AM
#396
Thread Starter
I removed it and installed the correct window....Now I have to wait 24 hours for the glue to fully cure.
Putting the second one in required less tape and should look better
Last edited by sebo; 09-30-2014 at 05:56 AM.
09-30-2014, 12:25 PM
#397
Thread Starter
Since I have to wait for 24 hours for the window to cure, I decided to put the canopy on....I can wait for just about the same time for it to cure, so, tomorrow at about 5 pm I will pull the pins and tape to see what I have...either ok or re-do. I hope not a re-do because I don't want to try to pull another canopy.

10-02-2014, 01:09 AM
#398
Thread Starter
The side window did not go in correctly....it didn't curve with the fuselage as the other side did....
Soooo.........I took the Dremel to it and cut it out...Then I got my SEE TEMP (a plastic designed for creating templates) and created a new window template.
I should have done this with the other one too.....it wouldn't have worked with the canopy because of the curves.
The canopy isn't a perfect fit (now that it is glued into place but I have screwed a few places down after applying some more glue....I didn't put enough in the first time and it popped lose....the photo is of the SeeTemp in place....time for bed now...I'll cut and glue the new window in in the morning.
Tomorrow will tell the tale on that one.
Last edited by sebo; 10-02-2014 at 01:12 AM.
10-03-2014, 03:10 PM
#399
Thread Starter
Well folks, I learned a lesson..........don't work into the wee hours of the morning.........you might do what I did.
I glued the SEE TEMP into the window......had to tear it all out again.
Boy do I feel stupid.....
Back to square one on the window....looks like it will be a couple more days on it.
I glued the SEE TEMP into the window......had to tear it all out again.
Boy do I feel stupid.....
Back to square one on the window....looks like it will be a couple more days on it.
10-03-2014, 03:46 PM
#400
Thread Starter
Figured out how I made this mistake.................I accidently knocked the good window on the floor and didn't know it...The template was right there and I thought it was the window...soo, I glued it in.
Tonight I happened to look down (just as was about to create a new template) and there it was....the good window...
I glued it in and am as hoppy as a frog on a lilly pad.
I guess you would call that luck because I could have stepped on it and messed it up....I'm Happy, happy, happy!
Tonight I happened to look down (just as was about to create a new template) and there it was....the good window...
I glued it in and am as hoppy as a frog on a lilly pad.
I guess you would call that luck because I could have stepped on it and messed it up....I'm Happy, happy, happy!