


Sig kit
 08-09-2012, 11:34 AM
#1

Thread Starter

Just picked up my first kit today. It's the Sig 4 star 60 which it seems is one of the best for a first-timer like me. I have a Sig LT40 arf that I flew the glue off of and a few others. I'd like to put a 4 stroke on it and the plans say I should have an engine before building the fuse. My questions are:
1) Are there any modifcations or areas that need more strength
2) What size 4 stroke engine would let this plane be a sunday flier
3) Can ca glue be used all on the wing sections or would you use tite-bond
1) Are there any modifcations or areas that need more strength
2) What size 4 stroke engine would let this plane be a sunday flier
3) Can ca glue be used all on the wing sections or would you use tite-bond
 08-09-2012, 11:47 AM
#2
Senior Member
Join Date: Sep 2008
Location: Houston, TX
Posts: 2,101
Likes: 0
Received 0 Likes
on
0 Posts
ORIGINAL: my05monte
Just picked up my first kit today. It's the Sig 4 star 60 which it seems is one of the best for a first-timer like me. I have a Sig LT40 arf that I flew the glue off of and a few others. I'd like to put a 4 stroke on it and the plans say I should have an engine before building the fuse. My questions are:
1) Are there any modifcations or areas that need more strength
2) What size 4 stroke engine would let this plane be a sunday flier
3) Can ca glue be used all on the wing sections or would you use tite-bond
As far as glue goes, whatever you want. It's an awesome plane. You might want to beef up the areas around the landing gear with some tri-stock, and move as much weight forward as possible during building. The plane builds really tail heavy and I had to add 15oz. of lead up front. With my new build I'm planning on building my RX battery pack from sub C Nicads like the old school car guys used to use in order to add much needed nose weight that actually has a purpose. More MAH.
08-09-2012, 12:15 PM
#3
Senior Member

Join Date: Mar 2003
Location: Garland, TX
Posts: 6,544
Likes: 0
Received 0 Likes
on
0 Posts
Having the engine before building the fuselage makes it easier to set up the firewall for engine mounting but is not absolutely necessary. And, if you use an adjustable mount (such as Great Planes brand) you do not need the engine yet because the mount has a template for drilling the firewall.
You could use as small as a .70 size four stroke on the plane but an .91 to 1.00 is most commonly used.
I had a .70 on an Astro Hog (similar size and weight) and it flew very well. Nowhere near unlimited but very capable of loops and basic aerobatics.
You can use CA or wood glue for everything that doesn't specifically call for epoxy in the instructions.
08-09-2012, 12:27 PM
#4
Thread Starter
Ahhh... I thought I had to have the engine first. I was going to use the mount that came with the kit ( if one is there... Haven't opened the box yet) Or the great planes mount
08-09-2012, 02:39 PM
#5
My Feedback: (2)
If you are using a 4-Stroke, keep in mind where the throttle is so that you can cut a hole for the pushrod in the correct location. It won't be like a 2-Stroke. Most folks use a reverse curve for that or a dubro 4-Stroke throttle gizmo. Have you seen those or do you need a picture of a typical setup???
Bob
Bob

 08-09-2012, 03:05 PM
#7
Senior Member

Em, engines that I have had on my 4Star60: OS61FX, OS91FX, SuperTiger 90, Saito 91, Saito 100, YS 110, I use it for an engine run-in (or fly-in) test bench. I used different Hayes AL60 long mounts which allowed me to use one mounting pattern on the firewall and switch between the engines by simply swapping the mount for a new one. Yea, had 2 different throttle control rod approaches - no big deal.
Reinforcements?
Tri-stock on the back side of the firewall.
Tri-stock between the landing gear plate and the fuse sides.
Alterations?
I added a tank hatch on the foredeck.
Remove 1 or 2 wing rib bays to improve the roll rate of the 4Star.
Cut down the bubble that SIG calls a canopy. Saw a 4Star60 today that had a dark tinted Heli canopy - very nice.
Some would cut the amount of dihedral in half.
3)- yes. You can use CA for a quicker build and you can better ensure location of the joint because it dries almost immediately. Doesn't sand well at all!!!! With Titebond you'll need to pin, tape, clamp, weight the joint to ensure that the joint remains fixed during the drying cycle. If you are gluing a butt joint with end grain, pre-treat the end grain with Titebond to "satisfy"the end grain absorbtion of glue. Then use just enough glue to wet the surface. MinnFlyer told me to apply the glue then just wipe excess glue off with my finger - what remains is enough glue for a strong joint. If you wanna get anal (or are planning to use transparent covering) use a cottom swab wetted with water to clean up all around the joint.
HTH
08-09-2012, 05:49 PM
#8
Senior Member
Join Date: Sep 2008
Location: Houston, TX
Posts: 2,101
Likes: 0
Received 0 Likes
on
0 Posts
You can always build up a bellcrank set up like I did on my Alpha 40. I used a piece of fiberglass in order to insulate any EMI back to the RX. I had that problem with my 4*40.
08-09-2012, 06:38 PM
#9
My Feedback: (-1)
It's always easier to have the engine or motor on any build, not a real must have but if you haven't built before it is best. Last four stroke I used on one was the Saito 100. Unlimeted vertical is really streatching it a lot. With the YS 1.10 that is a true statement. I have also used the Magnum .921 and the OS .91. Last one I built was a full wing total stock build other then the angle stock behind the fire wall and reinforced LG block as Seamus mentioned. In two stroke the OS .75 is a great choice but any .60 is fine in that plane.
I use the plane to teach building with so I have used a bunch of different engines over the years. Ed Moorman did a kit bash on one to make it look like a warbird, one of the cooler builds I have ever seen.
I use the plane to teach building with so I have used a bunch of different engines over the years. Ed Moorman did a kit bash on one to make it look like a warbird, one of the cooler builds I have ever seen.
08-10-2012, 06:05 AM
#10
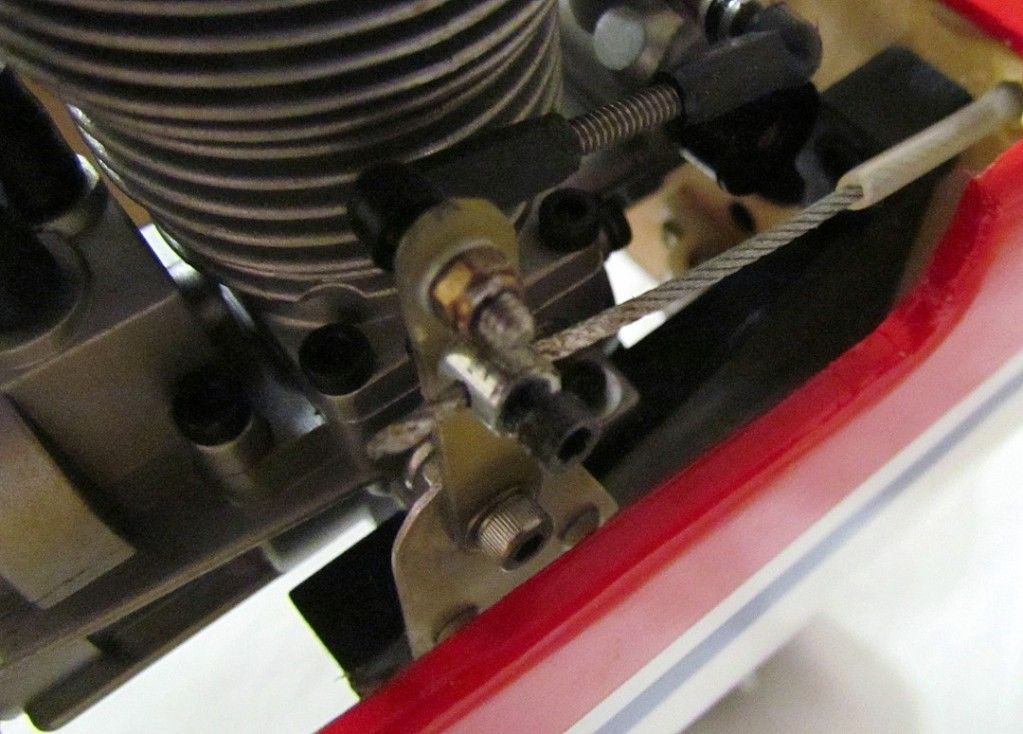
Use the throttle cable if you are going 4 stroke. I have 3 FS installs, and all use the cable setup without any special mods needed to make them work. The key is to make sure you have enough play at the firewall end to allow for the up/down movement of the cable as the throttle arm moves. What I do is put another 1/4" piece of plywood behind the FW where the throttle cable runs through, and slot the exit so it doesn't bind, yet still gives enough meat to secure the cable tube. I also use the screw type post on the arm as seen in the pic above, just make sure the thing is secured and wont come loose and use thread lock on the screw.
08-11-2012, 09:03 PM
#11
Join Date: Mar 2006
Location: Peculiar, MO, AMERICAN SAMOA (USA)
Posts: 87
Likes: 0
Received 0 Likes
on
0 Posts
For around 5 bucks,this saves a lot of headaches getting a 4 stroke linkage working.
http://www.advantagehobby.com/23809/DUB665/
Fred
http://www.advantagehobby.com/23809/DUB665/
Fred

 08-12-2012, 05:42 AM
#13
My Feedback: (-1)
ORIGINAL: Smashmaster
For around 5 bucks,this saves a lot of headaches getting a 4 stroke linkage working.
http://www.advantagehobby.com/23809/DUB665/
Fred
For around 5 bucks,this saves a lot of headaches getting a 4 stroke linkage working.
http://www.advantagehobby.com/23809/DUB665/
Fred
08-12-2012, 06:24 AM
#14
Senior Member
Join Date: Sep 2008
Location: Houston, TX
Posts: 2,101
Likes: 0
Received 0 Likes
on
0 Posts
ORIGINAL: Smashmaster
For around 5 bucks,this saves a lot of headaches getting a 4 stroke linkage working.
http://www.advantagehobby.com/23809/DUB665/
Fred
For around 5 bucks,this saves a lot of headaches getting a 4 stroke linkage working.
http://www.advantagehobby.com/23809/DUB665/
Fred
