


Help with four star canopy
 04-23-2015, 06:35 PM
#1
Member
Thread Starter
Join Date: Apr 2015
Posts: 46
Likes: 0
Received 0 Likes
on
0 Posts
Hello i need help with the canopy on a four star 40 kit, it doesn't make any since as to how to install. The manual says it should only touch the 3 fuselage stringers when installed correctly but it leaves a gap between each one when I put it on that way. Also I can't tell if the sides of the canopy are supposed to rest on sides of fuse or just rest flush with the bottom of the cockpit. The front seems to stick out way to far almost as far as the landing gear. I've trimmed and trimmed trying to get a good fit and I'm afraid to cut any more even tho it looks horrible on the rest of the fuse that I did such a good job on. I'm really getting frustrated with it and it's the only thing I lack of having it done. Any pics or advice on how other people have done it?
 04-23-2015, 06:52 PM
#2
Senior Member

Join Date: Apr 2006
Location: Hillsborough,
NH
Posts: 189
Likes: 0
Received 0 Likes
on
0 Posts
If you look close at the canopy, there is a faint line molded into it...that's where you want to cut it. It will fit down over the sides of the cockpit area, probably about 1/4". As far as the rear goes, it will have open areas between the stringers unless you fill that area in with small balsa blocks, then sand them to contour the area round, if it isn't covered yet. The open areas will do no harm, just make sure you keep it clean! This pic is not a Four Star, but you will get the idea as for what I'm talking about! I'd also recommend a good canopy glue, like Formula 560 by Pacer! It's quite thin, but only a very small bead around the edge is needed. Use masking tape to hold everything down tight and let it set up for at least a day before you remove the tape...it may take up to a week to dry completely clear, but it will be glued to the covering crazy good! 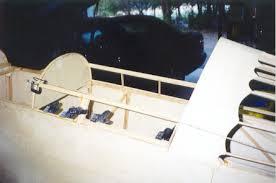

 04-23-2015, 07:46 PM
#4
Member
Thread Starter
Join Date: Apr 2015
Posts: 46
Likes: 0
Received 0 Likes
on
0 Posts
Thanx for the replys guys. Out of the box it had a line where it curved up from flat, which obviously is cut off, and above that is a fine line all the way around but if I cut that it will be too short to sit down on sides of fuse. Also yes it's allready covered so I'm thinking cut it down till the back of the canopy lines up with the arch in the headrest without touching stringers. I don't think I could turn it around tho since the back is allready cut out for the stringers? I can always cut off more but I don't want to be buying another canopy if this doesn't work.
04-24-2015, 08:56 AM
#5
Senior Member
Join Date: Apr 2006
Location: Hillsborough,
NH
Posts: 189
Likes: 0
Received 0 Likes
on
0 Posts
Remember that the further you slide it back, the lower it will set on the fuse sides... If I remember right, about 3/4" back from the headrest is where the canopy fits well.
04-25-2015, 04:31 AM
#7

Click on "Go Advanced" , just below this reply box, on the right. Scroll down to "Manage Attachments". Click on it. Click on "Add Files". Click on "basic Dowlloader and make a selection, by clicking on "Browse". Click on "Upload" Repeat until all desired pics are selected. Click on "Done".
Last edited by TomCrump; 04-25-2015 at 04:35 AM.
04-25-2015, 12:58 PM
#8
Junior Member
Join Date: Mar 2007
Location: , AFGHANISTAN
Posts: 23
Likes: 0
Received 0 Likes
on
0 Posts
Hi emblaze,
Son and I had the same problem with this canopy. I hadnt trimmed one for 20 years and so we looked around how others did it. A previous poster mentioned that turning the canopy around makes it look much sleeker - and he is right. Attached is an outline of how to cut the canopy. Hope this helps!
Greetings from New Zealand!
