


Covering This Wingtip??
 04-01-2015, 01:13 PM
#1

Thread Starter
Join Date: Nov 2014
Posts: 13
Likes: 0
Received 0 Likes
on
0 Posts
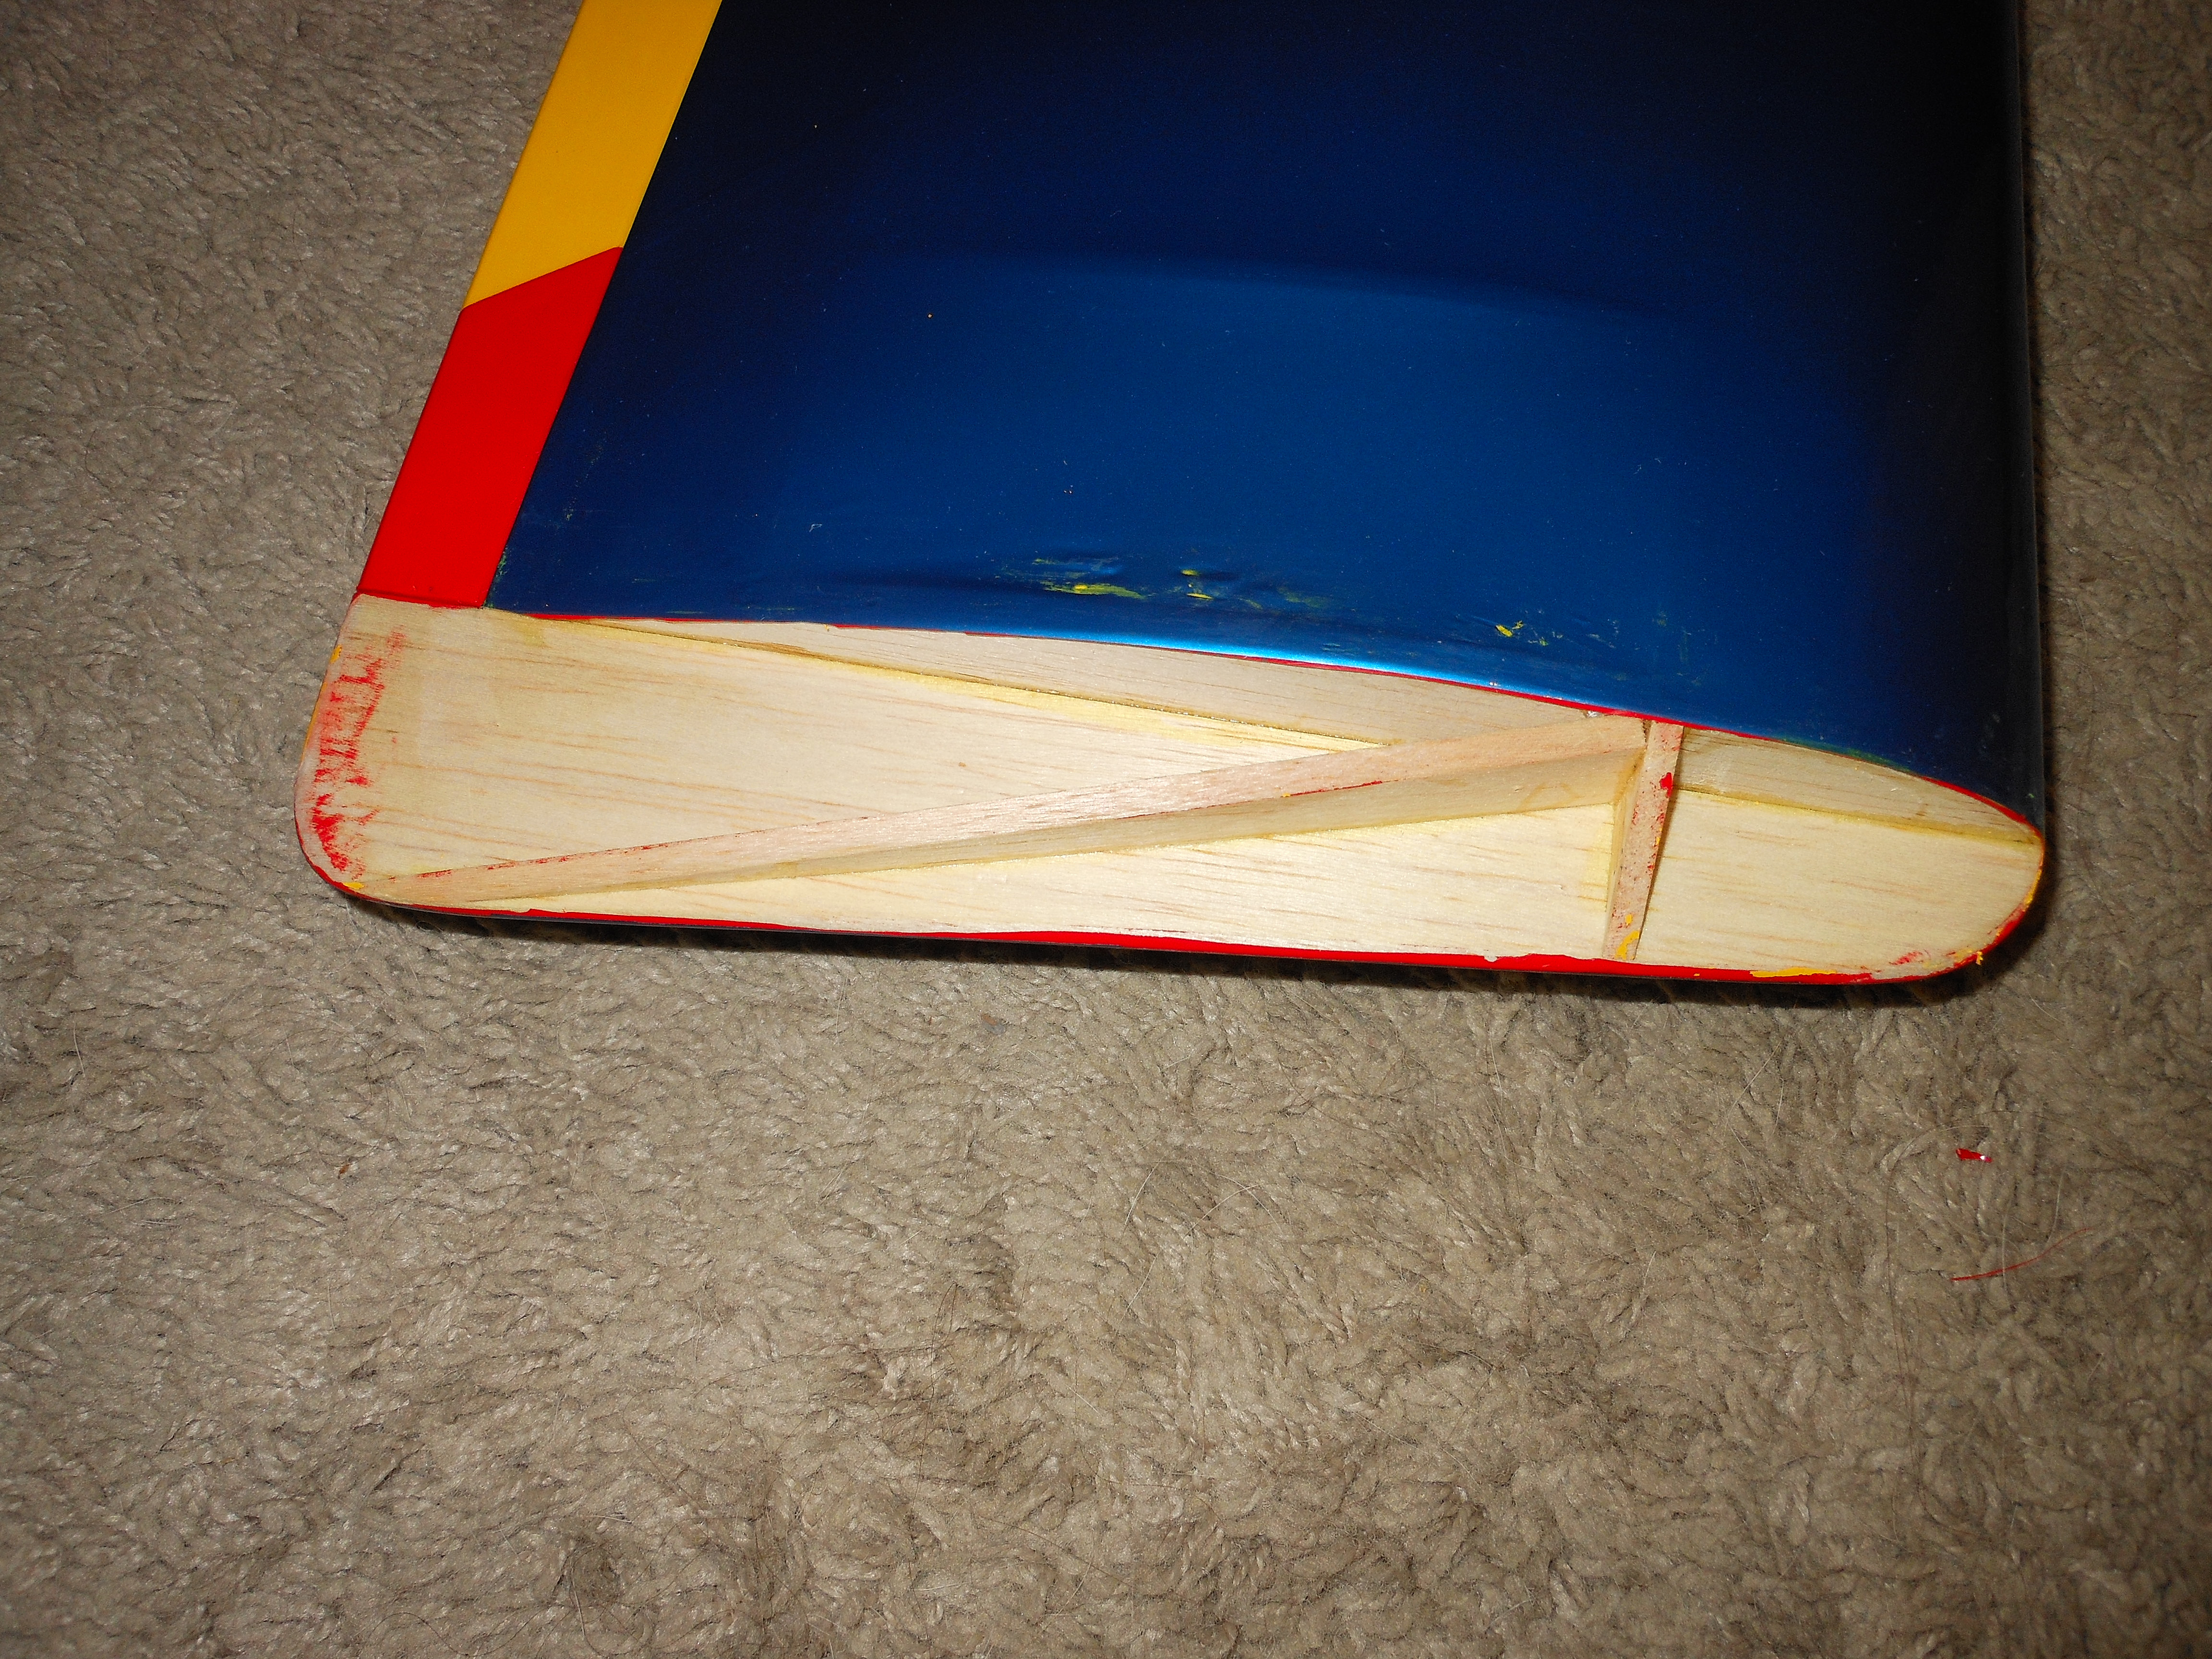
I'm having a heck of a time with this wingtip. Its basically a Sticks tip, and the compound curve is severe. Has anyone done one like this, and can you please explain the technique involved. I've been heating, and stretching the MonoKote, but am always left with too much at the leading edge. Thank you for your help, and suggestions.

 04-01-2015, 03:47 PM
#7
My Feedback: (81)
Just iron a piece over lapping the blue part by about a 1/2in. Take your heating gun and stretch and stretch and stretch over the wing tip. Use a glove so you don't get burnt and sometimes you can get help with someone heating while you stretch. If there are still wrinkles after you stretch just heat them out with your heating gun. It might take a few tries but you can do it. Monokote stretches pretty good. Make sure you have plenty of extra monokote to pull on, atleast 2 or 3 inches.
Last edited by dasquirrelisme; 04-01-2015 at 03:52 PM.
04-01-2015, 04:09 PM
#8
Thread Starter
Join Date: Nov 2014
Posts: 13
Likes: 0
Received 0 Likes
on
0 Posts
Maybe that's what I've been doing wrong. I leave about an inch an a half. I guess I'm not leaving enough covering. I've pulled, and heated quite a bit. I try to preshrink the covering before attaching it but the taper at the leading edge is so severe I'm always left with extra material.
I guess instead of trying to preshrink I should try to stretch the covering around the tip.
I get close, but just can't get it to be tight. I know if I lock MonoKote down, and try to remove the wrinkles there already locked in making it all, but impossible to remove.
I'll practice. I just hate trying to remove MonoKote as it leaves the residual color behind if I want to do a redo.
Last edited by CModel; 04-01-2015 at 04:13 PM.
04-01-2015, 06:33 PM
#9
What you need to remember is that with stick models, the area being covered is considerably less than what you're trying to cover in this build. Most use the supplied tissue to cover the model with so a little water tightens it right up. Along with the dope needed to hold the tissue to the wood, there's not a lot needed to cover with. I've built several Guillow's planes and, other than not breaking the sticks, putting your finger through the tissue is the hardest part
 04-02-2015, 05:06 AM
#11

My past experience with Monokote/UltraKote this kind of tip, should have been done with one piece for the whole bottom of the wing and one whole piece for the whole top of the wing. Starting from the center of the wing. Trying to cover just the tip is extremely difficult, as you are experiencing. Do the bottom of the wing first. Iron down the covering at the center of the wing. Do not attach the leading edge of the wing or the trailing edge of the covering. With a heat glove and gun, pull the whole sheet of covering over the center of the tip. As it attaches, continue to pull the covering working forward and towards the trailing edge of the tip. Once secure, then heat and pull the leading edge of the wing covering until secure. Repeat for the trailing edge of the wing. The one mistake I see, is that you are trying to have very little edge on the blue part of the main wing. There just isn't enough material to stretch. Has to be a whole wing panel. Thus, as you pull it, the heat pulls off of the blue too. Repeat for the top of the wing. You are trying to do it with too small of a piece. Has to be one whole panel.
Last edited by RCFlyerDan; 04-02-2015 at 05:55 AM.
04-02-2015, 07:49 AM
#12
My Feedback: (6)

Join Date: Dec 2002
Location: Algonquin, IL
Posts: 79
Likes: 0
Received 0 Likes
on
0 Posts
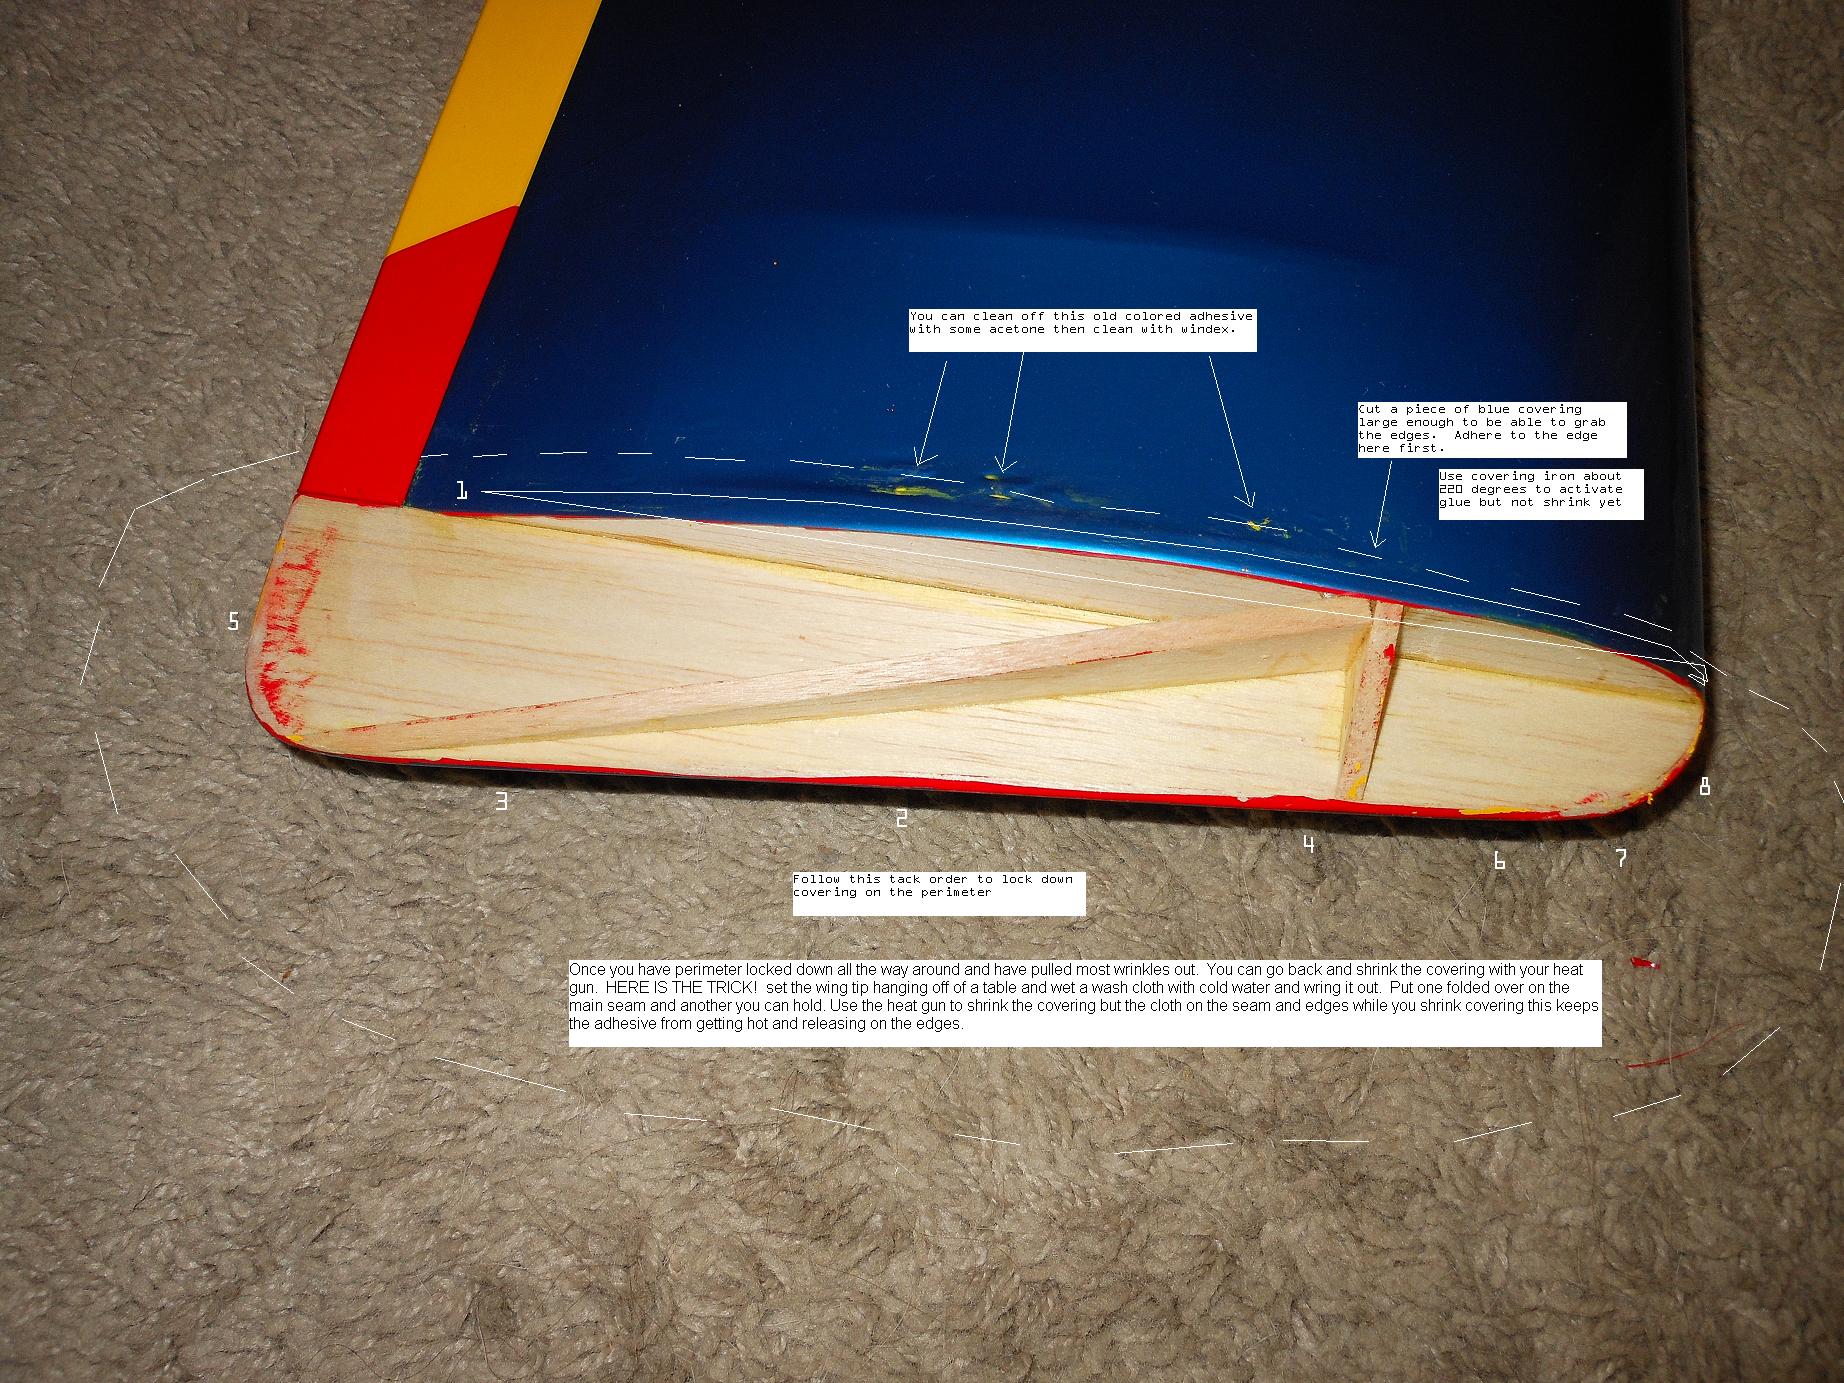
Here is a method I use when covering open structure wingtips. Hope this makes sense. Just let me know if you have any questions. The key is to keep the seam and edges cool when you shrink the open areas with your heat gun. Don't stay in one place to long, keep moving. Good Luck!
04-02-2015, 08:09 AM
#13
Thread Starter
Join Date: Nov 2014
Posts: 13
Likes: 0
Received 0 Likes
on
0 Posts
Great diagram! I will try it that way, but I have to say using MonoKote at least to me isn't easy. It seems like it doesn't shrink enough to pull tight. I have no experience with Ultra Coat, but have to say I'm more than curious now to try it. This plane holds more sentimental value as its over 20 years old, and my father, and I learned to fly on this model prior to him passing.
I will do whatever it takes to get it right, but these tips aren't making it easy.
I tried preshrinking MonoKote again, and still didn't see really any shrinking. the covering appears to only form heat blisters, and become stiffer, and less pliable after applying heat. I'm only talking about 220-240 degrees with the iron. I'm not sure if its just my technique, or its this difficult to work with.
Last edited by CModel; 04-02-2015 at 08:14 AM.
04-02-2015, 08:13 AM
#14

My Feedback: (-1)
Nothing secret or needing any tricks. Ultra shrinks and holds very well so it is easy. The Chinakote from Hobby King is every bit as good if not better then Ultra and at 13 bucks for a 5 meter roll you can't beat the price.
After I ran my iron over all the open bays and sheeting to remove the sag and wrinkles I also went over the top of the wing and removed all the wrinkles and bubbles that were from the factory. The wing now looks better then new and no longer has all the broken ribs.
The covering isn't touching any of the supports inside the tips, it just lays tight from the last rib and the edge of the tip then gets tightened.
04-02-2015, 08:22 AM
#15
My Feedback: (6)
Join Date: Dec 2002
Location: Algonquin, IL
Posts: 79
Likes: 0
Received 0 Likes
on
0 Posts
I prefer Ultracote. I have used both for number of years and switched to Ultracote exclusively unless recovering a plane that already has MonoKote. This is just my opinion as this topic appears to be like Chevy vs. Ford in the threads. All I know is I have actually covered wheel pants with ultracote because I can pull and stretch that stuff like crazy. Also I have found you need to use fairly fresh stuff whichever one you choose. I wrap all my covering rolls in plastic wrap once I am done to keep if fresh longer. There is nothing like the smell of hot Ultracote in the morning... LOL
04-02-2015, 08:22 AM
#16
I am assuming that the exisiting wing covering is Monocote. Monocote is a higher temp covering than Ultrakote. I would use a lower temp covering to patch over the Monocote so that you would not need to get very hot and affect the existing covering. I think UltraKote would be good here because you won't need to get it so hot, plus Ultrakote shrinks quite well. Also, you can use the Topflite Monocote adhesive/dissolver to rub off the coloring smudges that stuck to the existing covering, but make sure the dissolver is removed before you iron on the new covering. But the dissolver usage is optional and does add some complexity that you may not want.
As mentioned already, stick the covering around the perimeter with a lower temp setting just to make stick, but not shrink (the temps will vary based on which covering you are using). After you are 100% sure that the covering is glued down around the whole perimeter completely, then raise the temperature of the iron or heat gun and shrink it.
As mentioned already, stick the covering around the perimeter with a lower temp setting just to make stick, but not shrink (the temps will vary based on which covering you are using). After you are 100% sure that the covering is glued down around the whole perimeter completely, then raise the temperature of the iron or heat gun and shrink it.
Last edited by hsukaria; 04-02-2015 at 08:32 AM.
04-02-2015, 08:28 AM
#17
Nothing secret or needing any tricks. Ultra shrinks and holds very well so it is easy. The Chinakote from Hobby King is every bit as good if not better then Ultra and at 13 bucks for a 5 meter roll you can't beat the price.
After I ran my iron over all the open bays and sheeting to remove the sag and wrinkles I also went over the top of the wing and removed all the wrinkles and bubbles that were from the factory. The wing now looks better then new and no longer has all the broken ribs.
The covering isn't touching any of the supports inside the tips, it just lays tight from the last rib and the edge of the tip then gets tightened.
04-02-2015, 09:36 AM
#18
My Feedback: (-1)
Thanks, I had to repair both wing halves and removed only the bottom covering, I wanted to keep the graphics they have on the top. I have covered two planes with the Chinakote and found it goes on even better then Ultra. I had both planes out with me a couple times with the temps close to 90 degrees and like Ultra is doesn't sag or wrinkle in the heat. I'm very impressed with it and will now be using it exclusively from now on. Like Ultra the white glue that will squish out if too hot or too much pressure is used is removed with a rag and acetone.
This is the first time I have used the Ultra clear tinted covering and was also impressed with it too. Went down easy and shrunk well.
This is the first time I have used the Ultra clear tinted covering and was also impressed with it too. Went down easy and shrunk well.
04-02-2015, 10:07 AM
#19
Thanks, I had to repair both wing halves and removed only the bottom covering, I wanted to keep the graphics they have on the top. I have covered two planes with the Chinakote and found it goes on even better then Ultra. I had both planes out with me a couple times with the temps close to 90 degrees and like Ultra is doesn't sag or wrinkle in the heat. I'm very impressed with it and will now be using it exclusively from now on. Like Ultra the white glue that will squish out if too hot or too much pressure is used is removed with a rag and acetone.
This is the first time I have used the Ultra clear tinted covering and was also impressed with it too. Went down easy and shrunk well.
This is the first time I have used the Ultra clear tinted covering and was also impressed with it too. Went down easy and shrunk well.
The chinacote I used has white backing instead of color that matches the covering. So, I also learned to rub off the white exposed edges with acetone or Topflite Monocote adhesive/dissolver. I also used transparent yellow chinacote and it was very good too.
04-02-2015, 01:30 PM
#20
Thread Starter
Join Date: Nov 2014
Posts: 13
Likes: 0
Received 0 Likes
on
0 Posts
Great information guys. That seems to be the majority opinion on Monokote. Ultracoat seems like a more viable solution along with the technique written above. Gray Beard excellent job on the rebuild, and wingtip. I would never know you touched it. Honestly after doing some research on Oracover which I know is Ultracoat in the states it seems to be a more well engineered covering. They didn't make it with the color integrated in the glue layer, so removing, or repositioning is possible without covering, or model damage.
The model I'm working on is a plane popular in the 80-mid 90's. A Rick Stick Cmodel edition, which I removed the included engine which was a Tiger Shark .46, and installed a Rossi .45 black head. The only reason I went with MonoKote was that's what was used on the model when I found her at my hobby shop. She was showing the typical signs of her coverings age of wrinkles, and lifting in certain areas. I just wanted to touch her up, but didn't realize recovering with TF MonoKote would be so difficult. I can't see literally any shrink take place when heated. I was thinking it was simply my lack of skill, but after doing a little research found that apparently it's an epidemic with it. I won't debate which covering is better, cause I haven't used UltraCoat yet, but looking at Oracover's website, and how they provide a temperature to tack then another to shrink simply is pure logic.
I also couldn't believe the amount of covering color choices they have, and even exact color matched paint! I look forward to trying it, and posting my results.
Gray Beard clarified what I thought about no special tricks are required with it once the proper covering is used.
04-02-2015, 02:14 PM
#21
My Feedback: (-1)
I started out using Mono and then they changed the formula and shrinking was hit or miss depending on the color so I went to the Ultra and was amazed at how easy it is to put on and how well it shrinks. They don't have as many colors as Mono though. They did have there matching paint too but we can't get it in the states any longer?? I have some of the paint on hand but when it's gone it's gone!!
I was given a roll of the Chinakote last year to try and wow, really good stuff!!! I have only used the yellow though but my next order I will try the other colors.I still use Mono but only for trim work. Here in the desert our summers are quite warm {Understatement!} and MOno tends to sag and wrinkle in our heat. Once Ultra has been cured it has no problems with the heat. I do most of my work in the summer and when I finish a plane I set it in the hot sun before I do any trim work, take it back into the shop and shrink it again then repeat until it no longer sags.
So far the Chinakote hasn't sagged and I haven't cured it on either plane.
People have there favorites and to debate the brand of covering here on RCU has been beaten to death over the years. So far for me it has been Ultra and China and because of the price I have now become a big fan of the Chinakote and sticking with it. When I got this ARF it came with a roll of the Ultra so I knew there wouldn't be a problem.
I have had a problem with the Ultra chrome/silver and the Mono was a lot better so even Ultra isn't fool proof.
04-02-2015, 06:53 PM
#22
My Feedback: (33)
Join Date: Jul 2005
Location: ILION,
NY
Posts: 124
Likes: 0
Received 0 Likes
on
0 Posts
I don't like Monokote I don't think it stretches as well as Ultracote, but none the less, Leave about 3 inches overhang and use only the heat gun and with a gloved hand, stretch the covering while
heating. Work all wrinkles out with heat. I've done it on stick wing tips and it works great.
heating. Work all wrinkles out with heat. I've done it on stick wing tips and it works great.
04-03-2015, 04:41 AM
#23
My Feedback: (176)
Join Date: Dec 2003
Location: florence, CO
Posts: 124
Likes: 0
Received 0 Likes
on
0 Posts
CModel, try taking a piece of monokote about 2" larger all around compared to the area you are covering, adhere it to the edge of the wing first, keeping at least a quarter of Monokote at the edge, then pull it by hand down to the center edge of the wing and all around the edges, for myself the secret here is to keep the heat off the Monokote that you are putting on, Just enough heat to stick it to the edges. Making sure all the edges are adhered, use a heat gun and keep it fairly far away just enough to start seeing the wrinkles go away, they will continue to go away even after the heat is taken away. Patience is the key here. Try not to shrink the Monokoe with the iron when putting it on, so that when you are ready to use the heat gun, you will have all the shrinkability the monokote has to offer, because you have not used it up until the heat gun is applied, Bob.
04-03-2015, 05:52 AM
#25
Moderator
I've done a repair like this before. It can be done in one piece of covering. The trick is to use your heat gun for application and stretch the covering at the same time you are shrinking it. Iron the covering down without shrinking it on the flat part of the wing, stopping where the curve at the leading edge starts to tighten. Then you can pull on the covering at the front to stretch it as you use the heat gun to activate the adhesive. That will pull most of the wrinkles out of that annoying section between the spar and leading edge on the wingtip. Then use the same pulling technique to adhere the covering to the edge of the wingtip by wrapping the covering around and pulling from the bottom while heating the top. You'll need to aim the heat away from the first seam you made, so you'll need a glove to protect your hand. Once it's stuck all the way around, you can keep using the heat gun to wrap the covering around the radius of the wingtip. The last step, if needed, is to use the iron at shrinking temperature to shrink out any looseness that remains over the open structure.