


FB 1/7th F15 scale build
 01-12-2016, 04:13 AM
#251

Marcio was nice enough to send me his spare gear parts for the top and one worked OK the other snapped on installation. They didn't weld it properly where the bolt attatches. The other 2 I got from FB failed the same way also. FB is sending me better ones....
I took this one to my friend and he weleded it for me. I might take a day off and go put this plane through its paces now that it appears the gear is ready.

I took this one to my friend and he weleded it for me. I might take a day off and go put this plane through its paces now that it appears the gear is ready.
 01-14-2016, 02:19 PM
#254
Great day flying! Gear mods worked perfect. 6 flights on it today. Still some small issues to take care of but what a great flying plane. Like others have said I had to bring the plane to a crawl to get the gear to retract. So going to work on that now. Airbrake will only come up when the plane is in high alpha . its just to weak.
Inlet mod did great in flight. Didn't change the trim pretty much at all. Might do a mix on it now.

Inlet mod did great in flight. Didn't change the trim pretty much at all. Might do a mix on it now.
01-15-2016, 06:05 AM
#255
Congrats! So nice to see you get a bunch of great flights. I presume it's the mains that are hard to retract, presumably due to the air resistance when rotating? Is the nose gear working ok?
What air pressure are you running? I am doing hydraulic on mine, which will give more positive force and controlled motion through the cycle .. but the max pressure will be about the same (120 psi for the Hausl system I am using) so hyd vs air may not matter on the air resistance issue. I did my original plumbing with the JMP hi flow valve and all 4mm airlines and the force of slamming up and down was kind of shocking!
Any other tips for those of us getting close to our own maiden flights?
Dave
 01-15-2016, 07:00 AM
#257
Congrats! So nice to see you get a bunch of great flights. I presume it's the mains that are hard to retract, presumably due to the air resistance when rotating? Is the nose gear working ok?
What air pressure are you running? I am doing hydraulic on mine, which will give more positive force and controlled motion through the cycle .. but the max pressure will be about the same (120 psi for the Hausl system I am using) so hyd vs air may not matter on the air resistance issue. I did my original plumbing with the JMP hi flow valve and all 4mm airlines and the force of slamming up and down was kind of shocking!
Any other tips for those of us getting close to our own maiden flights?
Dave
What air pressure are you running? I am doing hydraulic on mine, which will give more positive force and controlled motion through the cycle .. but the max pressure will be about the same (120 psi for the Hausl system I am using) so hyd vs air may not matter on the air resistance issue. I did my original plumbing with the JMP hi flow valve and all 4mm airlines and the force of slamming up and down was kind of shocking!
Any other tips for those of us getting close to our own maiden flights?
Dave
To fix mine last night I added another airvalve to just the main gear up lines. Will sequence it in the transmitter and see if more volume helps.What I had will work but need to be flying very slow and that won't work for top gun. Not sure what im going to do about the speed brake yet. Its actually kinda works because I deploy it and as I get slow right before landing it finally pops up.
On the throws I am going to add a little more up elevator travel but im sure thats because I am slightly nose heavy since I have it balanced for ordnance. On the ailerons I went ahead and cut throw down 80% with flaps up. Flaps down they are 100% and I have some taileron mixed in. I really like this set up for high alpha. BTW this plane flies VERY slow and does it well.
FB sent me some remade parts. These are done pretty well and should work fine. They did much better on the elds this time.
Last edited by gunradd; 01-15-2016 at 07:16 AM.
 01-15-2016, 10:50 AM
#260

Join Date: May 2009
Location: Purcell,
OK
Posts: 15
Likes: 0
Received 0 Likes
on
0 Posts

 01-18-2016, 08:21 AM
#263
Mick, same thought on my mind. I got the Hausl system because it looked simple and pre-integrated. But honestly doing it with a spare jet fuel pump and the GEM pressure switch or modified air cylinder looks pretty doggone easy (having read many times about your system and its derivatives) and could get the higher pressure. At what pressure do you end up running your system? I have not asked Hausl why such a low max pressure spec for their system (spec is 10 bar max, 8 bar recommended) .. do you know?
Kris, to your question about incompressibility .. that is of course true but if the real issue is just a force of the cylinder vs. force of air on the sideways tire, then it's just a force (and thus pressure) issue. In this case air might actually have an advantage at the same pressure since it "slams" so hard on the up .. the momentum of the wheel and strut might get past the mid-retract point more quickly than the hydraulic. The hydraulic attracted me mostly because of the controlled motion and as Mick says, not so hard to mod the system for higher pressure if I need to. I've plumbed it with the festo tubes that can handle the higher pressures.
thanks
Dave
 01-19-2016, 02:31 AM
#269
Dave, I don't have answers regarding Hausl. My only experience came when Marc Scully fitted a set in an MB339 For Ali. I wasn't all that impressed as it pulsed all the time, couldn't figure out why. If you were to use my system you can adjust the working pressure by the value of the spring and fine tune by where the micro switch is triggered in the pressure graph. My F15 used 160psi max, if the pressure is set too low my system will pulse ditto the Hausel.
I'm afraid there is little or no fact in the second paragraph, Fluid is better suited to cylinder operation in every respect for power, speed and control.
m
I'm afraid there is little or no fact in the second paragraph, Fluid is better suited to cylinder operation in every respect for power, speed and control.
m
Last edited by mick15; 01-19-2016 at 02:34 AM.
01-19-2016, 08:15 AM
#270
Thanks for the invitation Gunradd.
Here are some pics of my install.
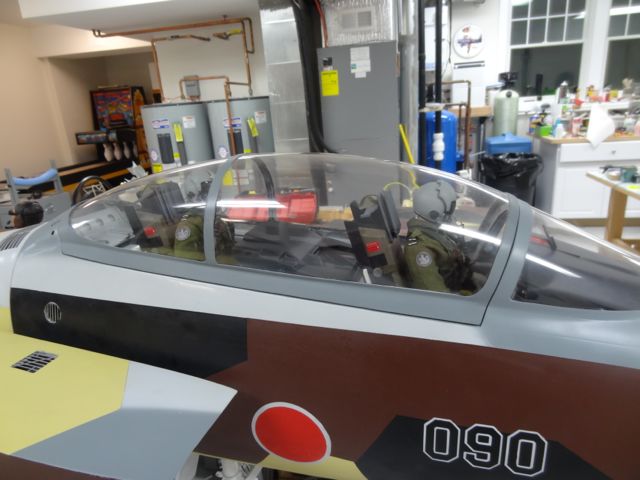
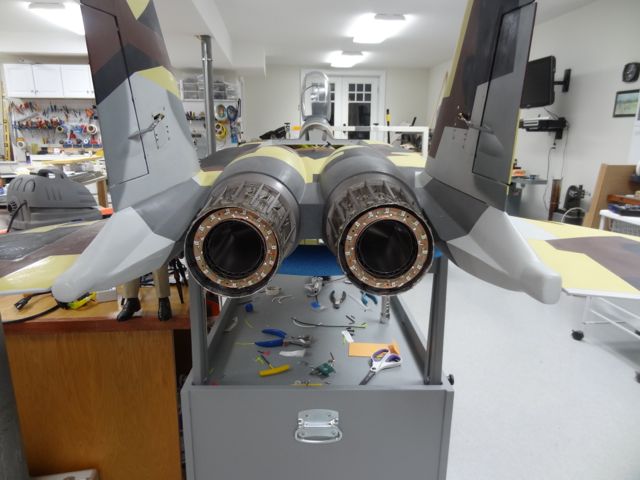
The paint scheme is from a Japanese aggressor F-15D (yes, a slight sin, technically this is a fantasy scheme to put a D paint job on an E aircraft). I asked FB to leave off the clear coat so I could add some graphics and I'll add the matte clear after that. I'll probably maiden it and fly it some as it sits.
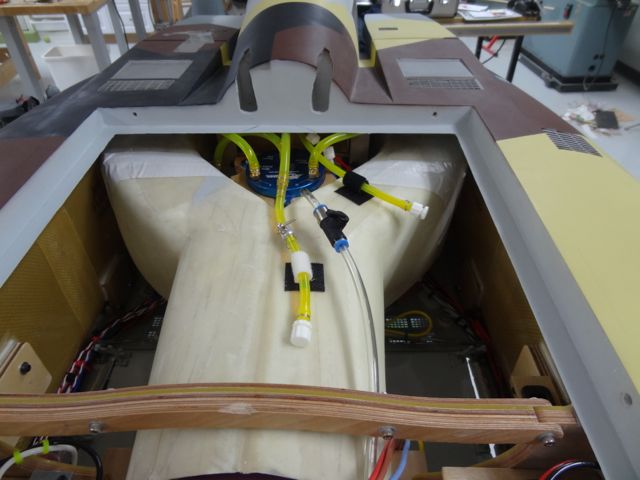
I elected to cut through the inlet ducts to take the Y-shaped part out during install. As you can see, I've got it reattached with white duct tape and am debating if I need something more robust. I'd actually prefer not to follow my original plan and glass the seams back permanently. It would be a wonderful upgrade to the kit if FB would consider putting a slip joint in the inlets at about the point where I cut them - for initial install and maintenance. I also removed the covers over the main gear wheel wells as I found it impossible to rig the gear doors and install the tanks with them in place. I currently do not plan to replace them. I did leave the nose gear well cover in place.
Like many builders I elected to cut off the nose cone and make it removable, there are three steel pins that position it at matching bulkheads I installed on either side of the cut. A single knurled screw holds it fast, accessible through a small flip-down at the nose that secures with a rare-earth magnet.
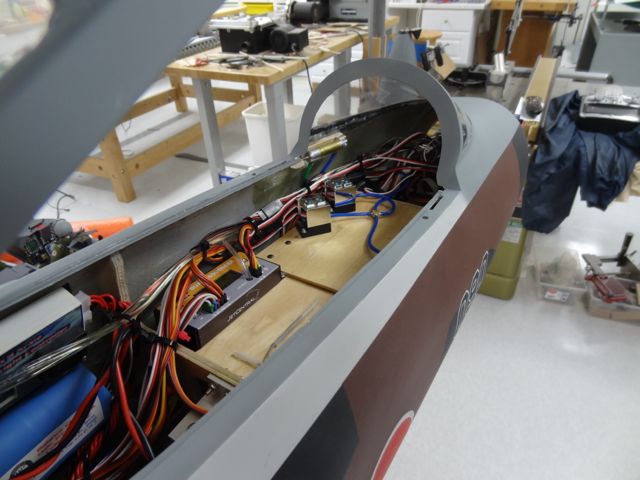
I did my best to put some weight in the nose (main batteries, etc), and to make all the startup/flightline stuff accessible without opening the main hatch. Currently I have the fuel fill, smoke fill and smoke system switch in the main hatch as that is something I generally do back in the pits, not at the flight line. I went a little crazy with 6 charge ports only 4 in use at this time (2x main RX batt, lighting system batt shared by lighting and AB ring, smoke battery). In the end I was a few mm nose heavy (!) compared to the 235mm suggested point so I placed the ECU battery back in the main hatch.
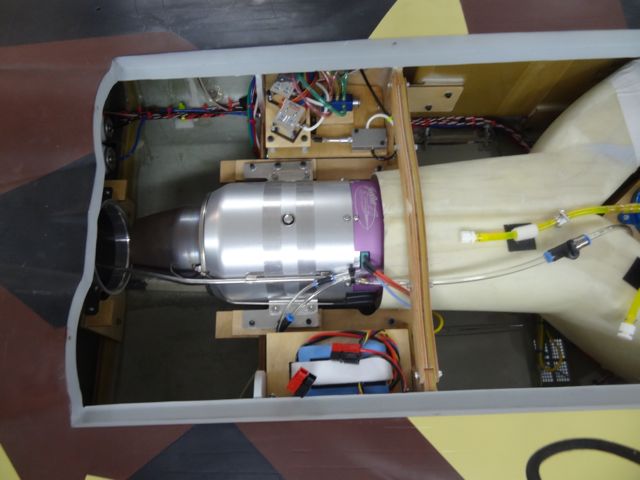
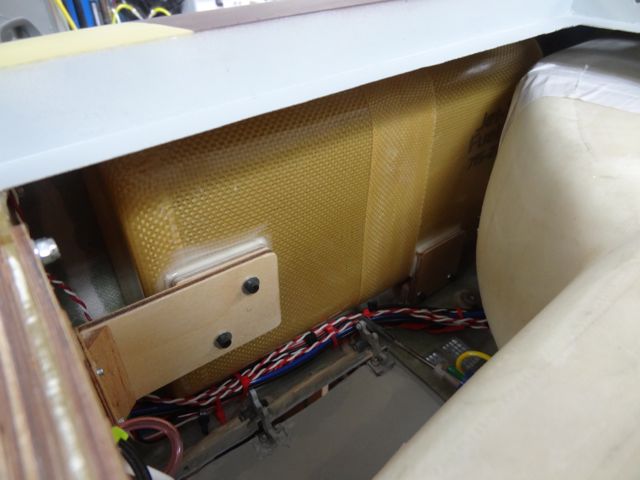
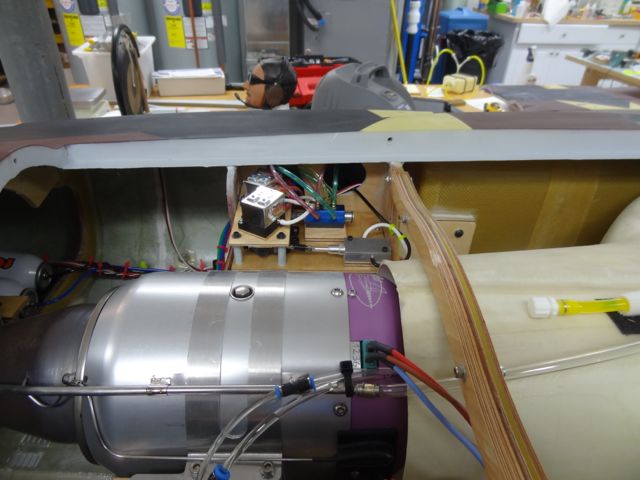
I used the Jet Central gear and canopy sequencer (which really is quite convenient) and JetTronics valves for the air functions. Robart restrictors on the air brake, canopy and all doors to keep them from slamming. I am not using the stock fuel tanks (they are fine but I wanted to set up differently). I had a set of larger "side" tanks made by Gary Mueller (Jet Tech), and his Reaction 54-size tank in the center position for smoke. The two side tanks feed the extra large Tom Cook/JMP Vertical Air Trap. The JMP trap is mounted in a plywood holder that is glassed to the fuse floor. It gives me about 230 oz of fuel and 72 oz of smoke. I have the PowerBox smoke pump and one large-size (3/16") Tam smoke injector .. this is a great combo I have used before. I did not order the plane with a pipe so the bifurcated pipe was done by Tam for the P200.
Power distribution and dual RX selection is via a Robbe PSS2018 power box with 2xR7008 Receivers. CB associates JetCat ECU telemetry unit and pitot/static airspeed sensor, all A123 batteries.
Pilots are from Tailored Pilots in the UK. The cockpits that come with the plane are quite nice (my son, an F-15E pilot, and his WSO colleagues declared them "pretty legit!" .. they also advised me that for the full "scale effect" the position light on the tail should be burned out :-) ). The pilot sitting position was not quite right - it was hard to get the pilots to sit low enough (they are a still bit too high), I had to cut the plastic seat "cushion" out and put the pilot torso on the floor and remove the molded legs and stuff the flight suit with cotton . None of that is visible with the pilots installed. I think they look great in the plane now.
To get the canopy to work reliably, I had to move the air cylinder bottom mounting point back about 2" to get better mechanical advantage at initial opening - no big deal and it really helped. I saw a very clever canopy lock mechanism on a friend's SM F-14 with wedge-shaped plungers driven by small air cylinders .. the small wedges are driven into a BVM canopy hook that faces forward so that as the air cylinders push toward lock the wedge engages with the slanted edge of the hook and pulls the canopy down strongly. It locks very tightly and releases easily. Nice. And easy to program with the JC sequencer.
Lighting system from Details 4 Scale, as well as the AB rings.
Dave McQ


Here are some pics of my install.
The paint scheme is from a Japanese aggressor F-15D (yes, a slight sin, technically this is a fantasy scheme to put a D paint job on an E aircraft). I asked FB to leave off the clear coat so I could add some graphics and I'll add the matte clear after that. I'll probably maiden it and fly it some as it sits.
I elected to cut through the inlet ducts to take the Y-shaped part out during install. As you can see, I've got it reattached with white duct tape and am debating if I need something more robust. I'd actually prefer not to follow my original plan and glass the seams back permanently. It would be a wonderful upgrade to the kit if FB would consider putting a slip joint in the inlets at about the point where I cut them - for initial install and maintenance. I also removed the covers over the main gear wheel wells as I found it impossible to rig the gear doors and install the tanks with them in place. I currently do not plan to replace them. I did leave the nose gear well cover in place.
Like many builders I elected to cut off the nose cone and make it removable, there are three steel pins that position it at matching bulkheads I installed on either side of the cut. A single knurled screw holds it fast, accessible through a small flip-down at the nose that secures with a rare-earth magnet.
I did my best to put some weight in the nose (main batteries, etc), and to make all the startup/flightline stuff accessible without opening the main hatch. Currently I have the fuel fill, smoke fill and smoke system switch in the main hatch as that is something I generally do back in the pits, not at the flight line. I went a little crazy with 6 charge ports only 4 in use at this time (2x main RX batt, lighting system batt shared by lighting and AB ring, smoke battery). In the end I was a few mm nose heavy (!) compared to the 235mm suggested point so I placed the ECU battery back in the main hatch.
I used the Jet Central gear and canopy sequencer (which really is quite convenient) and JetTronics valves for the air functions. Robart restrictors on the air brake, canopy and all doors to keep them from slamming. I am not using the stock fuel tanks (they are fine but I wanted to set up differently). I had a set of larger "side" tanks made by Gary Mueller (Jet Tech), and his Reaction 54-size tank in the center position for smoke. The two side tanks feed the extra large Tom Cook/JMP Vertical Air Trap. The JMP trap is mounted in a plywood holder that is glassed to the fuse floor. It gives me about 230 oz of fuel and 72 oz of smoke. I have the PowerBox smoke pump and one large-size (3/16") Tam smoke injector .. this is a great combo I have used before. I did not order the plane with a pipe so the bifurcated pipe was done by Tam for the P200.
Power distribution and dual RX selection is via a Robbe PSS2018 power box with 2xR7008 Receivers. CB associates JetCat ECU telemetry unit and pitot/static airspeed sensor, all A123 batteries.
Pilots are from Tailored Pilots in the UK. The cockpits that come with the plane are quite nice (my son, an F-15E pilot, and his WSO colleagues declared them "pretty legit!" .. they also advised me that for the full "scale effect" the position light on the tail should be burned out :-) ). The pilot sitting position was not quite right - it was hard to get the pilots to sit low enough (they are a still bit too high), I had to cut the plastic seat "cushion" out and put the pilot torso on the floor and remove the molded legs and stuff the flight suit with cotton . None of that is visible with the pilots installed. I think they look great in the plane now.
To get the canopy to work reliably, I had to move the air cylinder bottom mounting point back about 2" to get better mechanical advantage at initial opening - no big deal and it really helped. I saw a very clever canopy lock mechanism on a friend's SM F-14 with wedge-shaped plungers driven by small air cylinders .. the small wedges are driven into a BVM canopy hook that faces forward so that as the air cylinders push toward lock the wedge engages with the slanted edge of the hook and pulls the canopy down strongly. It locks very tightly and releases easily. Nice. And easy to program with the JC sequencer.
Lighting system from Details 4 Scale, as well as the AB rings.
Dave McQ
Thank you, Very Nice build and layout
Joe
01-19-2016, 09:43 PM
#272
Thanks Mick. I'd argue that the truth in the second paragraph is that the force provided by the retract cylinder at 120 psi does not care if it's air or oil pushing on it .. it translates to the same torque on the strut at an particular position in its motion. The dynamics are (very) different (smooth motion vs slamming) but if fully retracting or hanging up is a fight between dynamic pressure from the airflow on the sideways tire vs. the force from the cylinder .. well .. what's the difference? If you think I have that wrong, I am ready to be educated.
I completely agree that the hydraulic is a better setup. That's why I ripped the air setup out and replaced it with hydraulic. It was truly alarming to see how hard the gear slammed up and down with the hi-flow valves and all 4mm tubes in the air system! And if you put a needle valve in to soften the motion of the air system, there is no point in the hi-flow valve or 4mm tubes.
Joe, I use A123 batteries (I get them from Hangtime Hobbies) and they come with a separate charge wire with access to all the cells for use with a cell-by-cell balancing charter (I like the FMA Cellpro units). The 2-cell packs RX come with a std 3-wire servo connector for balance charging, the 3-cell ECU packs come with a variety of choices of 4-wire connectors.
Dave
Last edited by ww2birds; 01-19-2016 at 09:45 PM.
01-20-2016, 01:24 AM
#273
You've answered your own question Dave, both pressures are the same, it's how they are delved that's important. When you open the air valve you get the whole 120, take it or leave it, when you start a pump the pressure starts at zero gradually building up as required which is why the whole operation is more gentle and scale like.....................................no contest.
m
m
01-20-2016, 08:17 AM
#274
You've answered your own question Dave, both pressures are the same, it's how they are delved that's important. When you open the air valve you get the whole 120, take it or leave it, when you start a pump the pressure starts at zero gradually building up as required which is why the whole operation is more gentle and scale like.....................................no contest.
m
m
 01-20-2016, 10:14 AM
#275

Join Date: Oct 2013
Posts: 16
Likes: 0
Received 0 Likes
on
0 Posts
What brands of hydraulic systems have any of you tried? and what are your thoughts on them?
We are going to use Hydraulic for our F15 build.
We have been using these:
http://www.morpower.com.tw/mp_produc...ndinggear.html
$249.00 for the whole system which includes main and front gear.
We have had to heat up and remove the fittings from that gear for use on our gear, due to size.
They also offer a quick disconnect for the fluid lines when you have gear that stay in the wing:
http://www.morpower.com.tw/mp_product/connector.html
Pretty nice stuff, keeps the system sealed.
You have to e-mail them in order to buy it, they dont have an on-line store.
Thanks
Doug