


Skymaster F-4
 12-22-2015, 01:16 PM
#26

Imagine a big ugly with roll spoilers n speed brakes, maybe even an operable hook and soft wing!
I'm m sure all of you have seen this but if you haven't and love the Phantoms then here's a great video
http://youtu.be/eFhHqmrG8U8
I'm m sure all of you have seen this but if you haven't and love the Phantoms then here's a great video
http://youtu.be/eFhHqmrG8U8
 12-22-2015, 02:54 PM
#27

How cool would it be to see a 1/5th F-4 next to a 1/5th F-104! I hope they do it. The F-4 also utilized a shrink link on the MLG to compress the strut during retraction. This could also be done by SM if they utilized the pneumatic powered hydraulicly actuated gear as they use in the 104.
Last edited by 757Driver; 12-22-2015 at 02:57 PM.
12-23-2015, 11:28 AM
#28

Jason,
Great video!! It was full of cool information and lots of vids! I liked the 3 phantoms taking off of the carrier at the same time.
Nuno,
I looked at my phantom last night, and I saw a couple of new bubbles ..... So, the paint didn't work and it is still getting hot back there.
Your idea of flight metal maybe the ticket to solving that.
Great video!! It was full of cool information and lots of vids! I liked the 3 phantoms taking off of the carrier at the same time.
Nuno,
I looked at my phantom last night, and I saw a couple of new bubbles
..... So, the paint didn't work and it is still getting hot back there. Your idea of flight metal maybe the ticket to solving that.
 03-20-2017, 06:20 AM
#31
How many people are having heat problems under the stab? I don't recall having this issue on my FB F-4 but on my small SM F-4 the paint blistered with the first run up. I ended up putting aluminum tape under the stab but wondered how that heat would effect the glue joints. I would hate to lose a plane due to a stab failure. I sold the small F-4 before flying it. Lots of Large SM F-4's flying so I am guessing this is not an issue. I am considering building one of these (or the A-4) so understanding if there is an issue here and what the fix may be is a major consideration in my purchase decision. Seems to me that if the full size needed special metal in that area then our fiberglass versions are much more vulnerable. Thanks for any insight you can provide!
Last edited by MaJ. Woody; 03-20-2017 at 06:22 AM.
03-20-2017, 06:52 AM
#32

How many people are having heat problems under the stab? I don't recall having this issue on my FB F-4 but on my small SM F-4 the paint blistered with the first run up. I ended up putting aluminum tape under the stab but wondered how that heat would effect the glue joints. I would hate to lose a plane due to a stab failure. I sold the small F-4 before flying it. Lots of Large SM F-4's flying so I am guessing this is not an issue. I am considering building one of these (or the A-4) so understanding if there is an issue here and what the fix may be is a major consideration in my purchase decision. Seems to me that if the full size needed special metal in that area then our fiberglass versions are much more vulnerable. Thanks for any insight you can provide!
Mike
03-20-2017, 08:18 AM
#34

Run a tam pipe and put ali tape under the stab. Tam pipe has more down thrust and directs exhaust down further away from stab. The stock pipe generates some pretty ordinary thrust to pitch coupling.
03-20-2017, 08:32 PM
#37

I'm very picky when it comes to the F-4 and I've noticed again from pics Anton posted that there is an issue with the canopy proportions. It's the same issue the Medium scale model has. It's so obvious to me that it turned me off from building it, I know, stupid and OCD, but I see what I see and I can't spend that much money and just suck it up.
Sorry Anton, I've mentioned this before and your model maker missed this again. I'm not sure what your scale source is but it's incorrect. If I was a scale judge I'd see the problem right away and the score would reflect that.
I have photos of the full scale F-4 I took to compare the Medium F-4 to see what's going on. If anyone is interested I'll post them.
03-21-2017, 03:13 AM
#38

I'm very picky when it comes to the F-4 and I've noticed again from pics Anton posted that there is an issue with the canopy proportions. It's the same issue the Medium scale model has. It's so obvious to me that it turned me off from building it, I know, stupid and OCD, but I see what I see and I can't spend that much money and just suck it up.
Sorry Anton, I've mentioned this before and your model maker missed this again. I'm not sure what your scale source is but it's incorrect. If I was a scale judge I'd see the problem right away and the score would reflect that.
I have photos of the full scale F-4 I took to compare the Medium F-4 to see what's going on. If anyone is interested I'll post them.
Sorry Anton, I've mentioned this before and your model maker missed this again. I'm not sure what your scale source is but it's incorrect. If I was a scale judge I'd see the problem right away and the score would reflect that.
I have photos of the full scale F-4 I took to compare the Medium F-4 to see what's going on. If anyone is interested I'll post them.
04-09-2017, 01:52 PM
#40
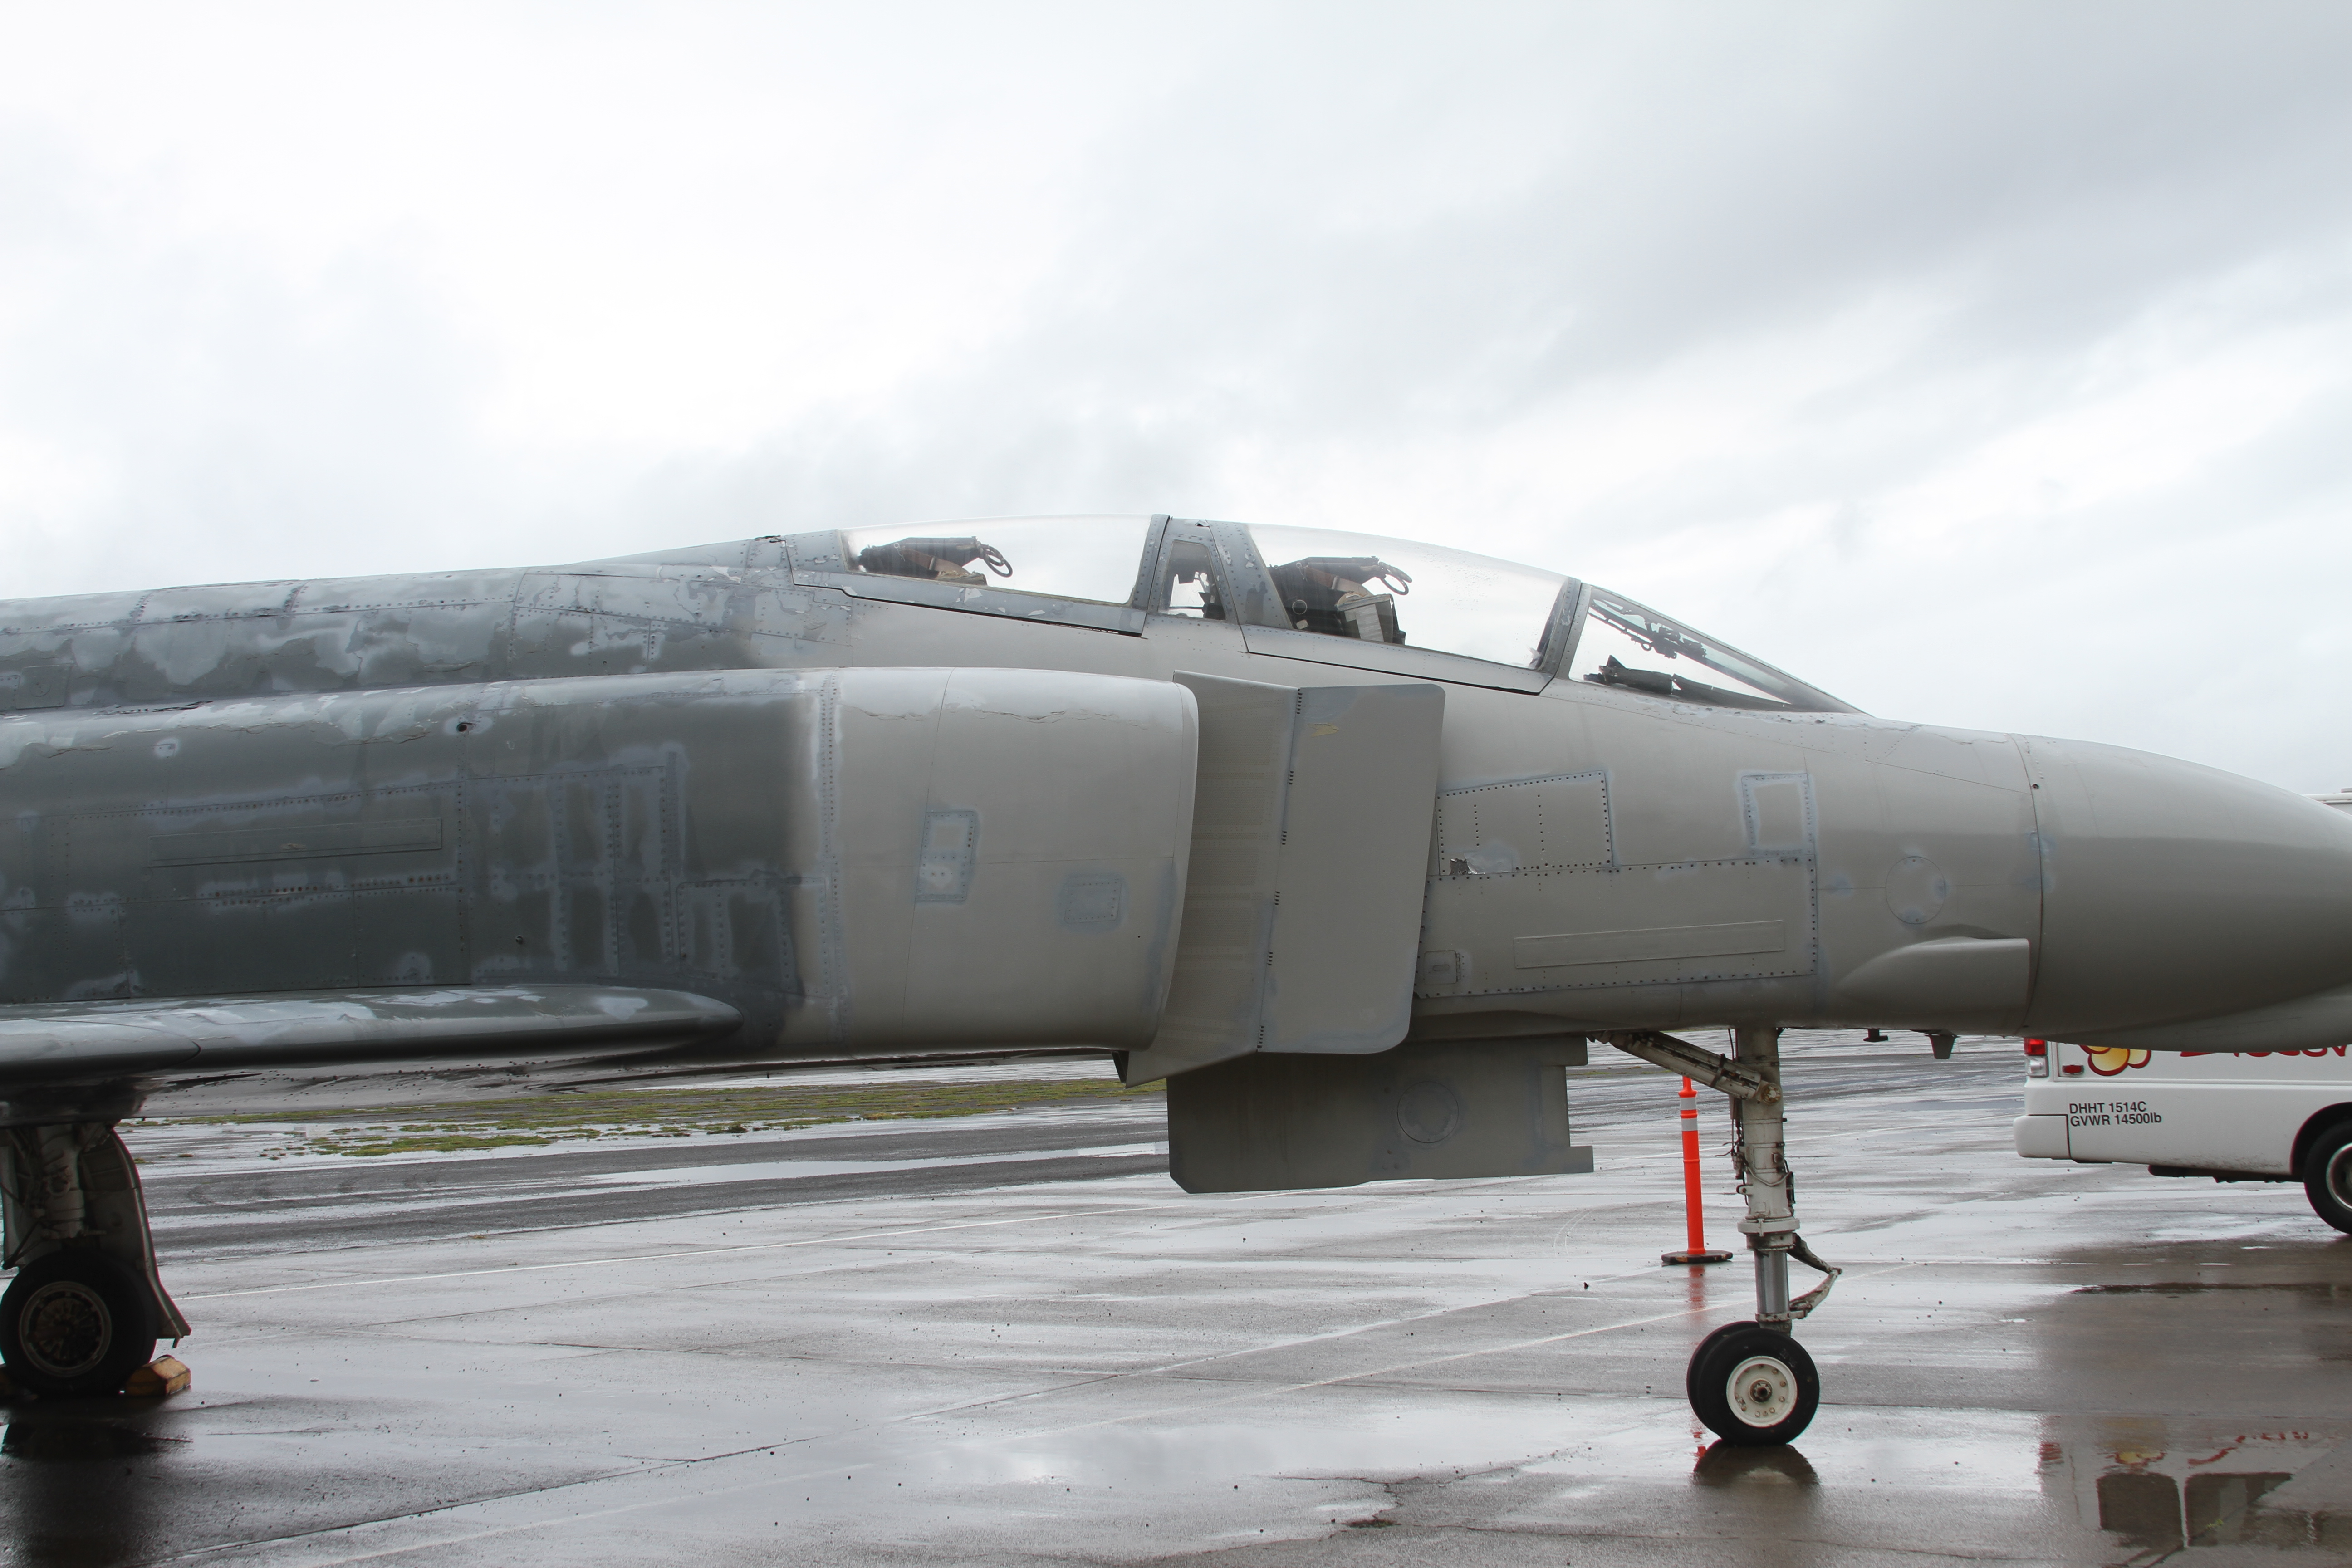
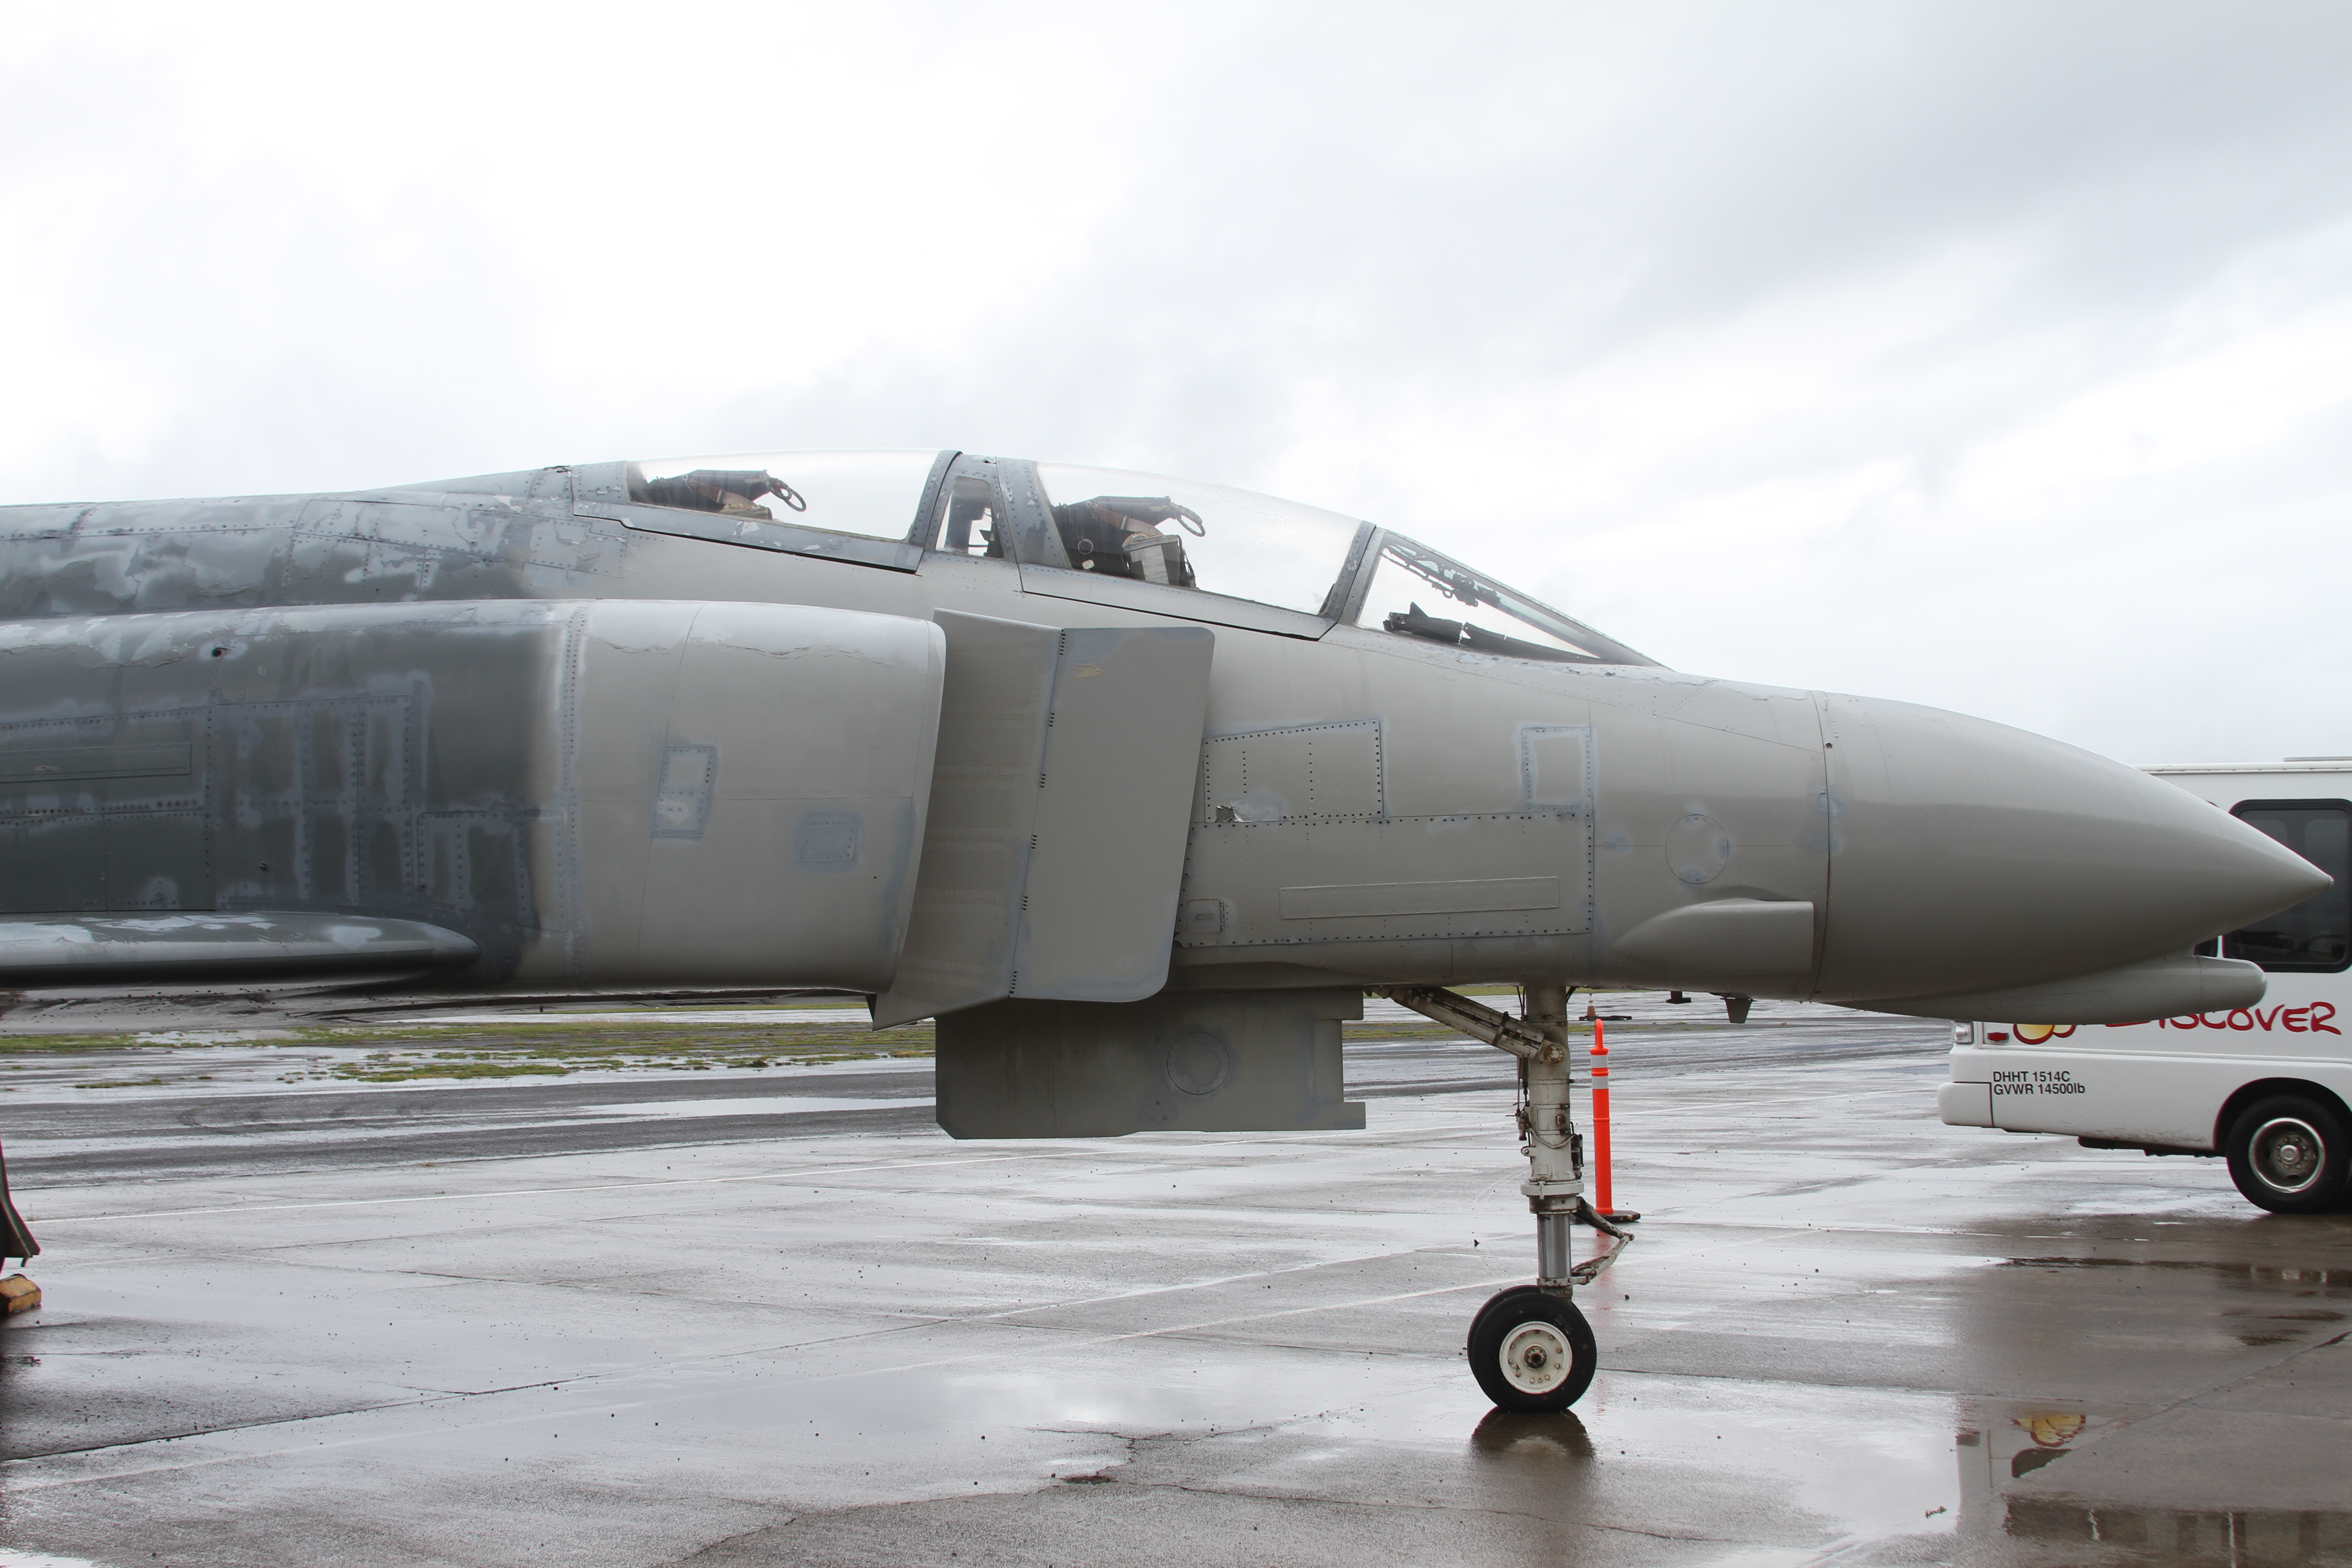
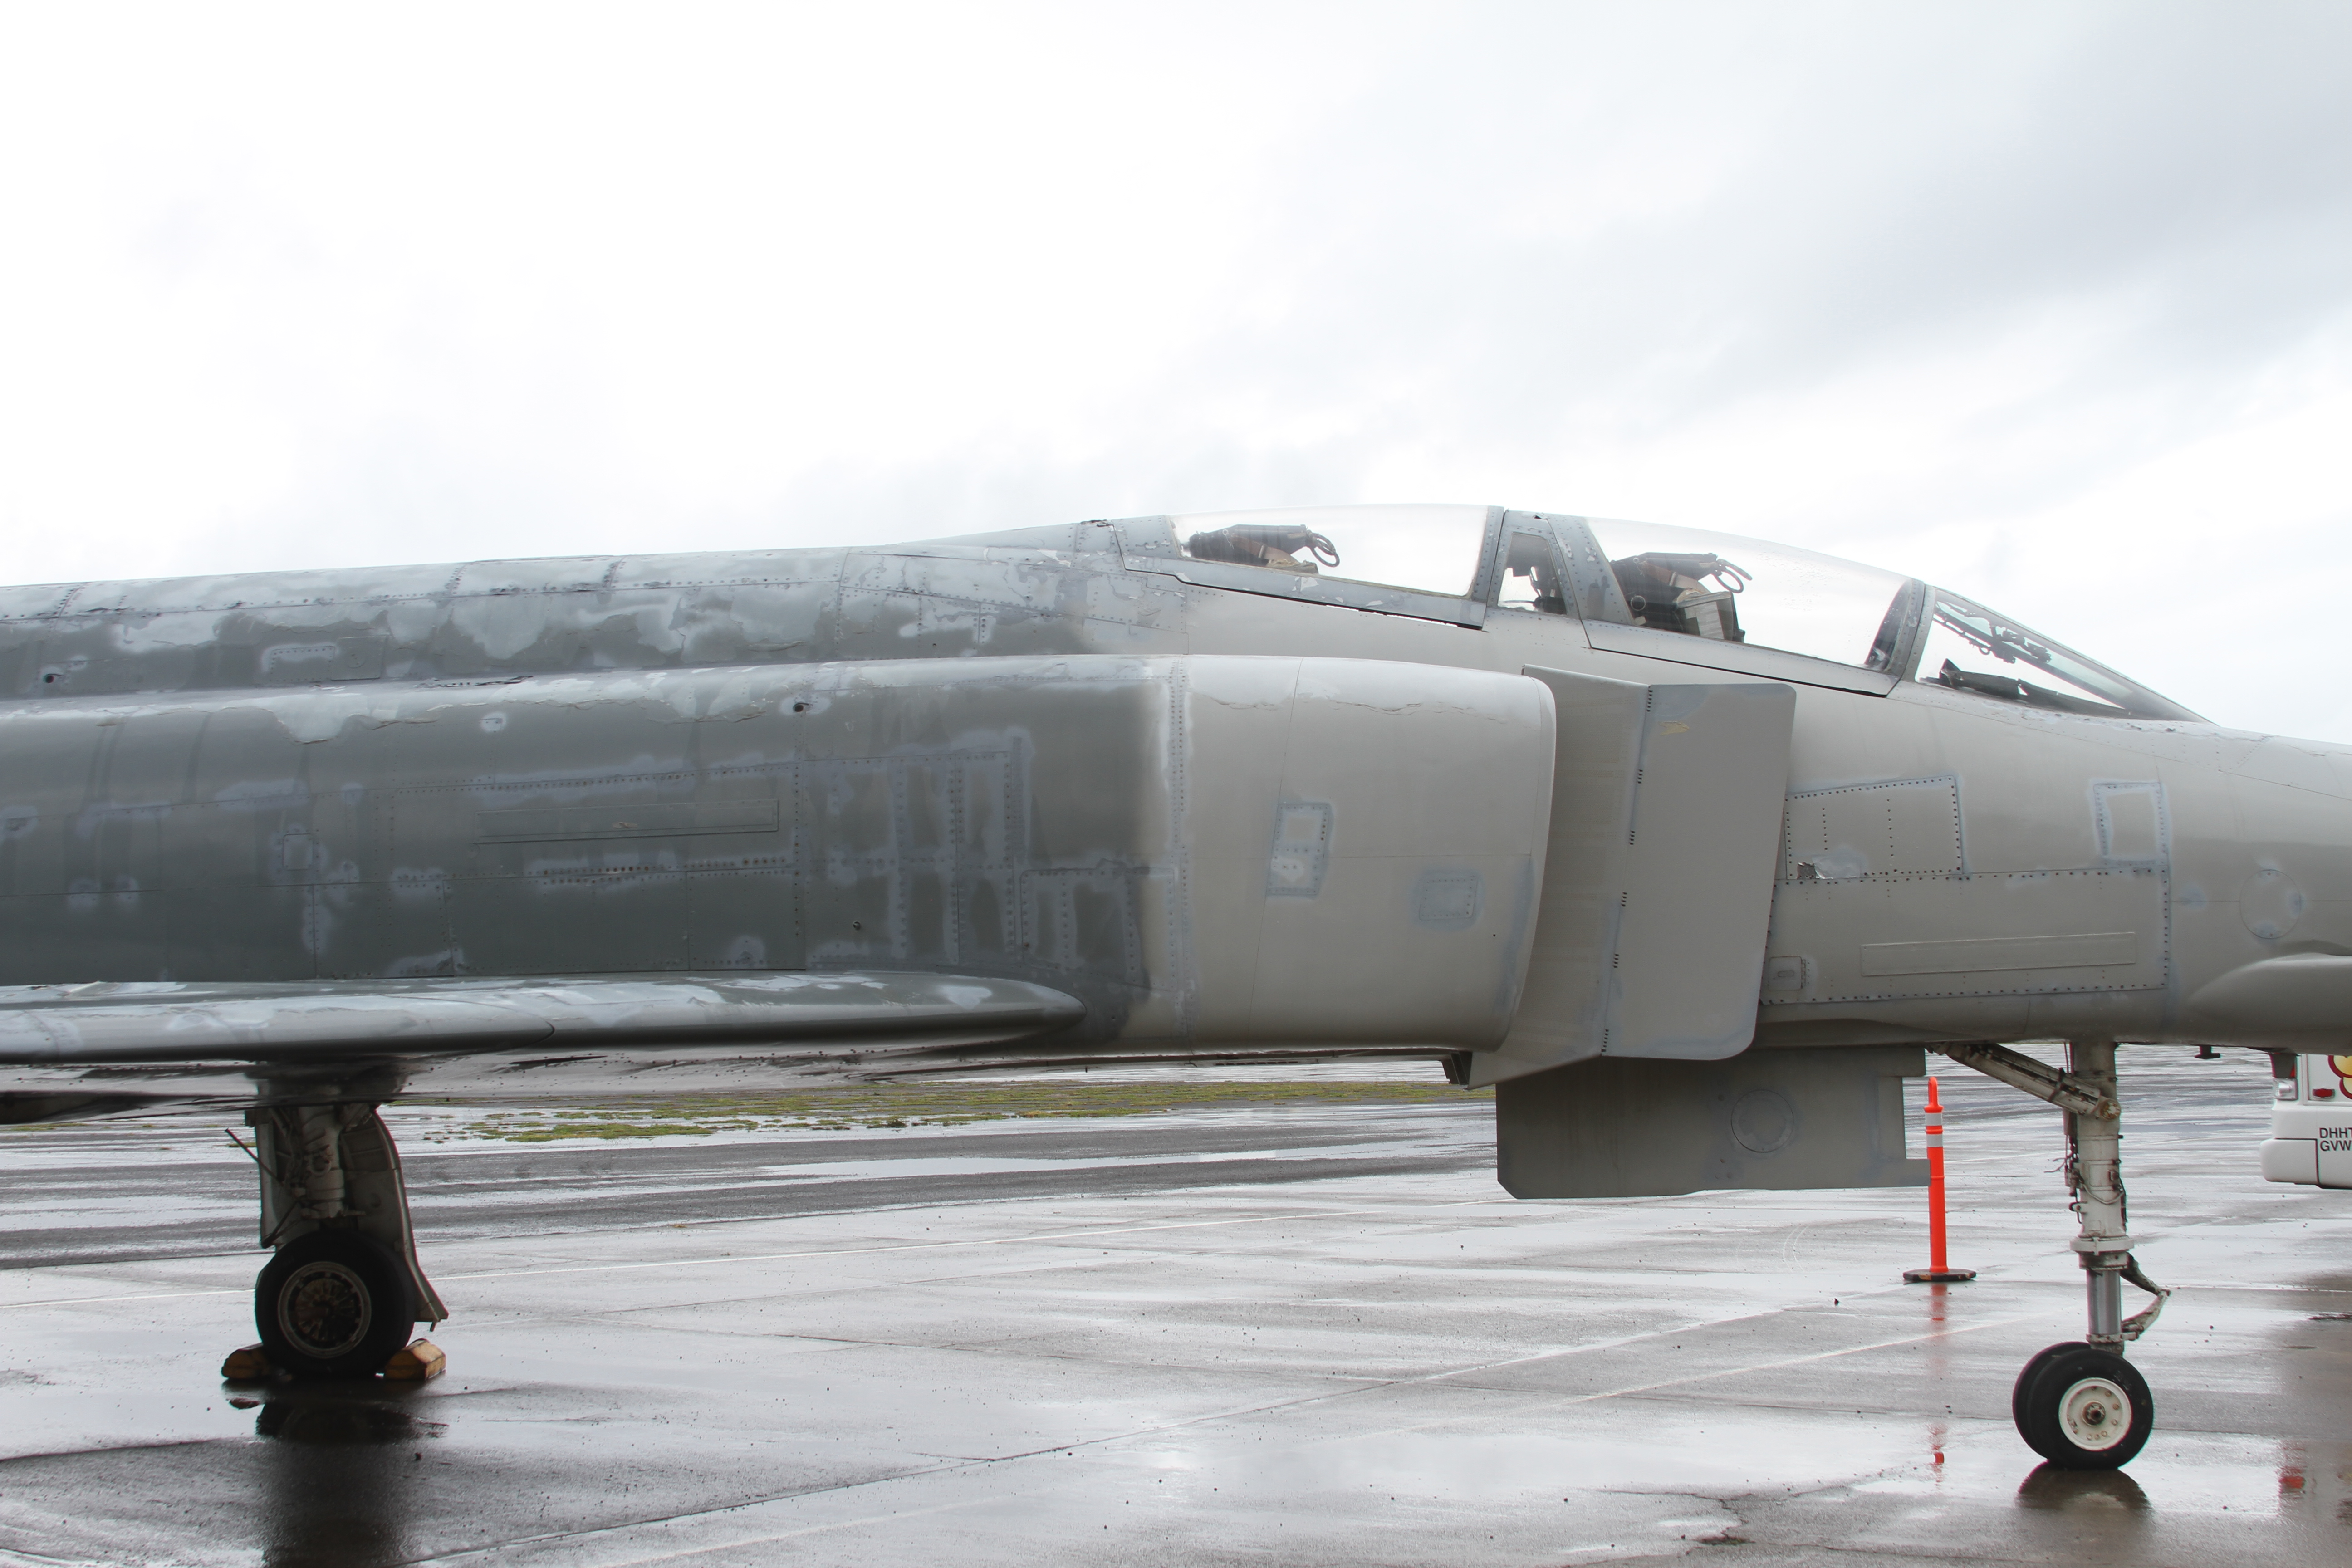
Here are a few pics I took of an F-4S at the Pacific Aviation Museum in HI.
I focused on the nose section specifically to see the proportion of the nose in relation to the barge boards and intakes. You can see there is a certain distance from the leading edge of the board to the windshield hoop. There is enough space for the width of a man and the ladder lets say. On the SM F-4, now in both sizes, the LE of the board is too close to the windshield hoop. In the photo of the smaller 1/7.75 kit I owned you can see how I pulled the nose forward to see how it looks. The result is pretty obvious, it looks better.
Centered on middle canopy frame
Centered on front windshield hoop
Centered on back canopy edge
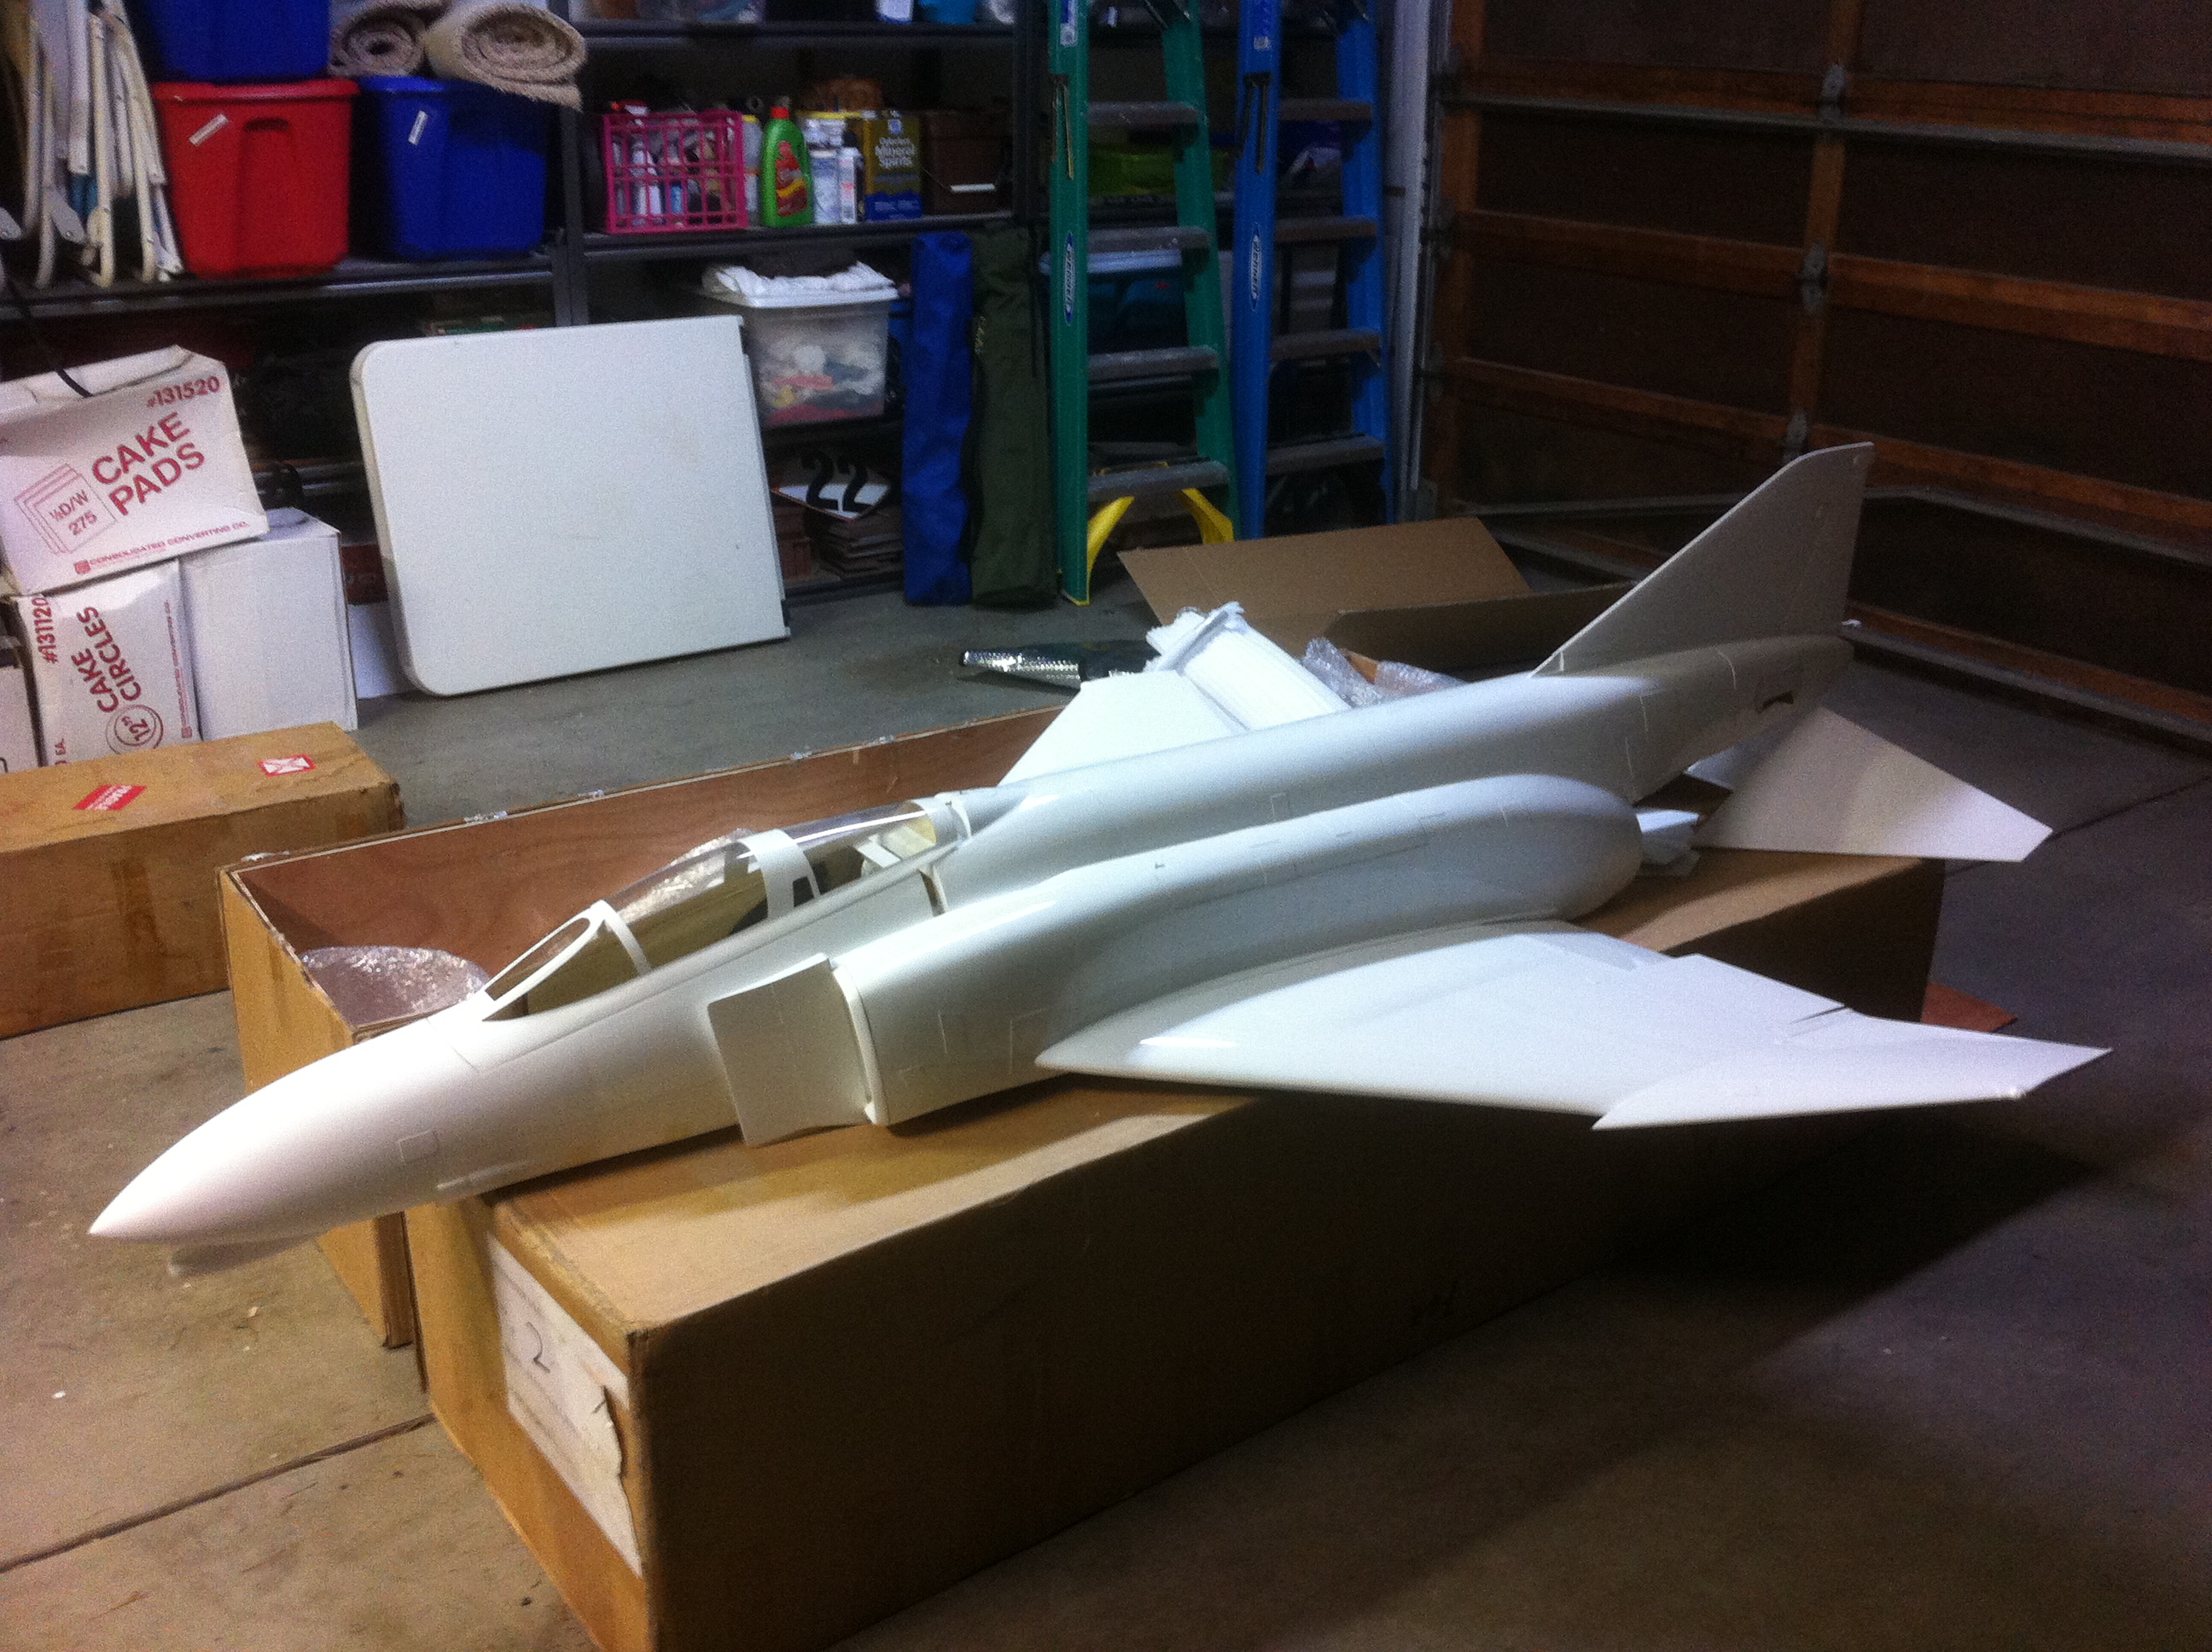
SM kit - moved nose section forward
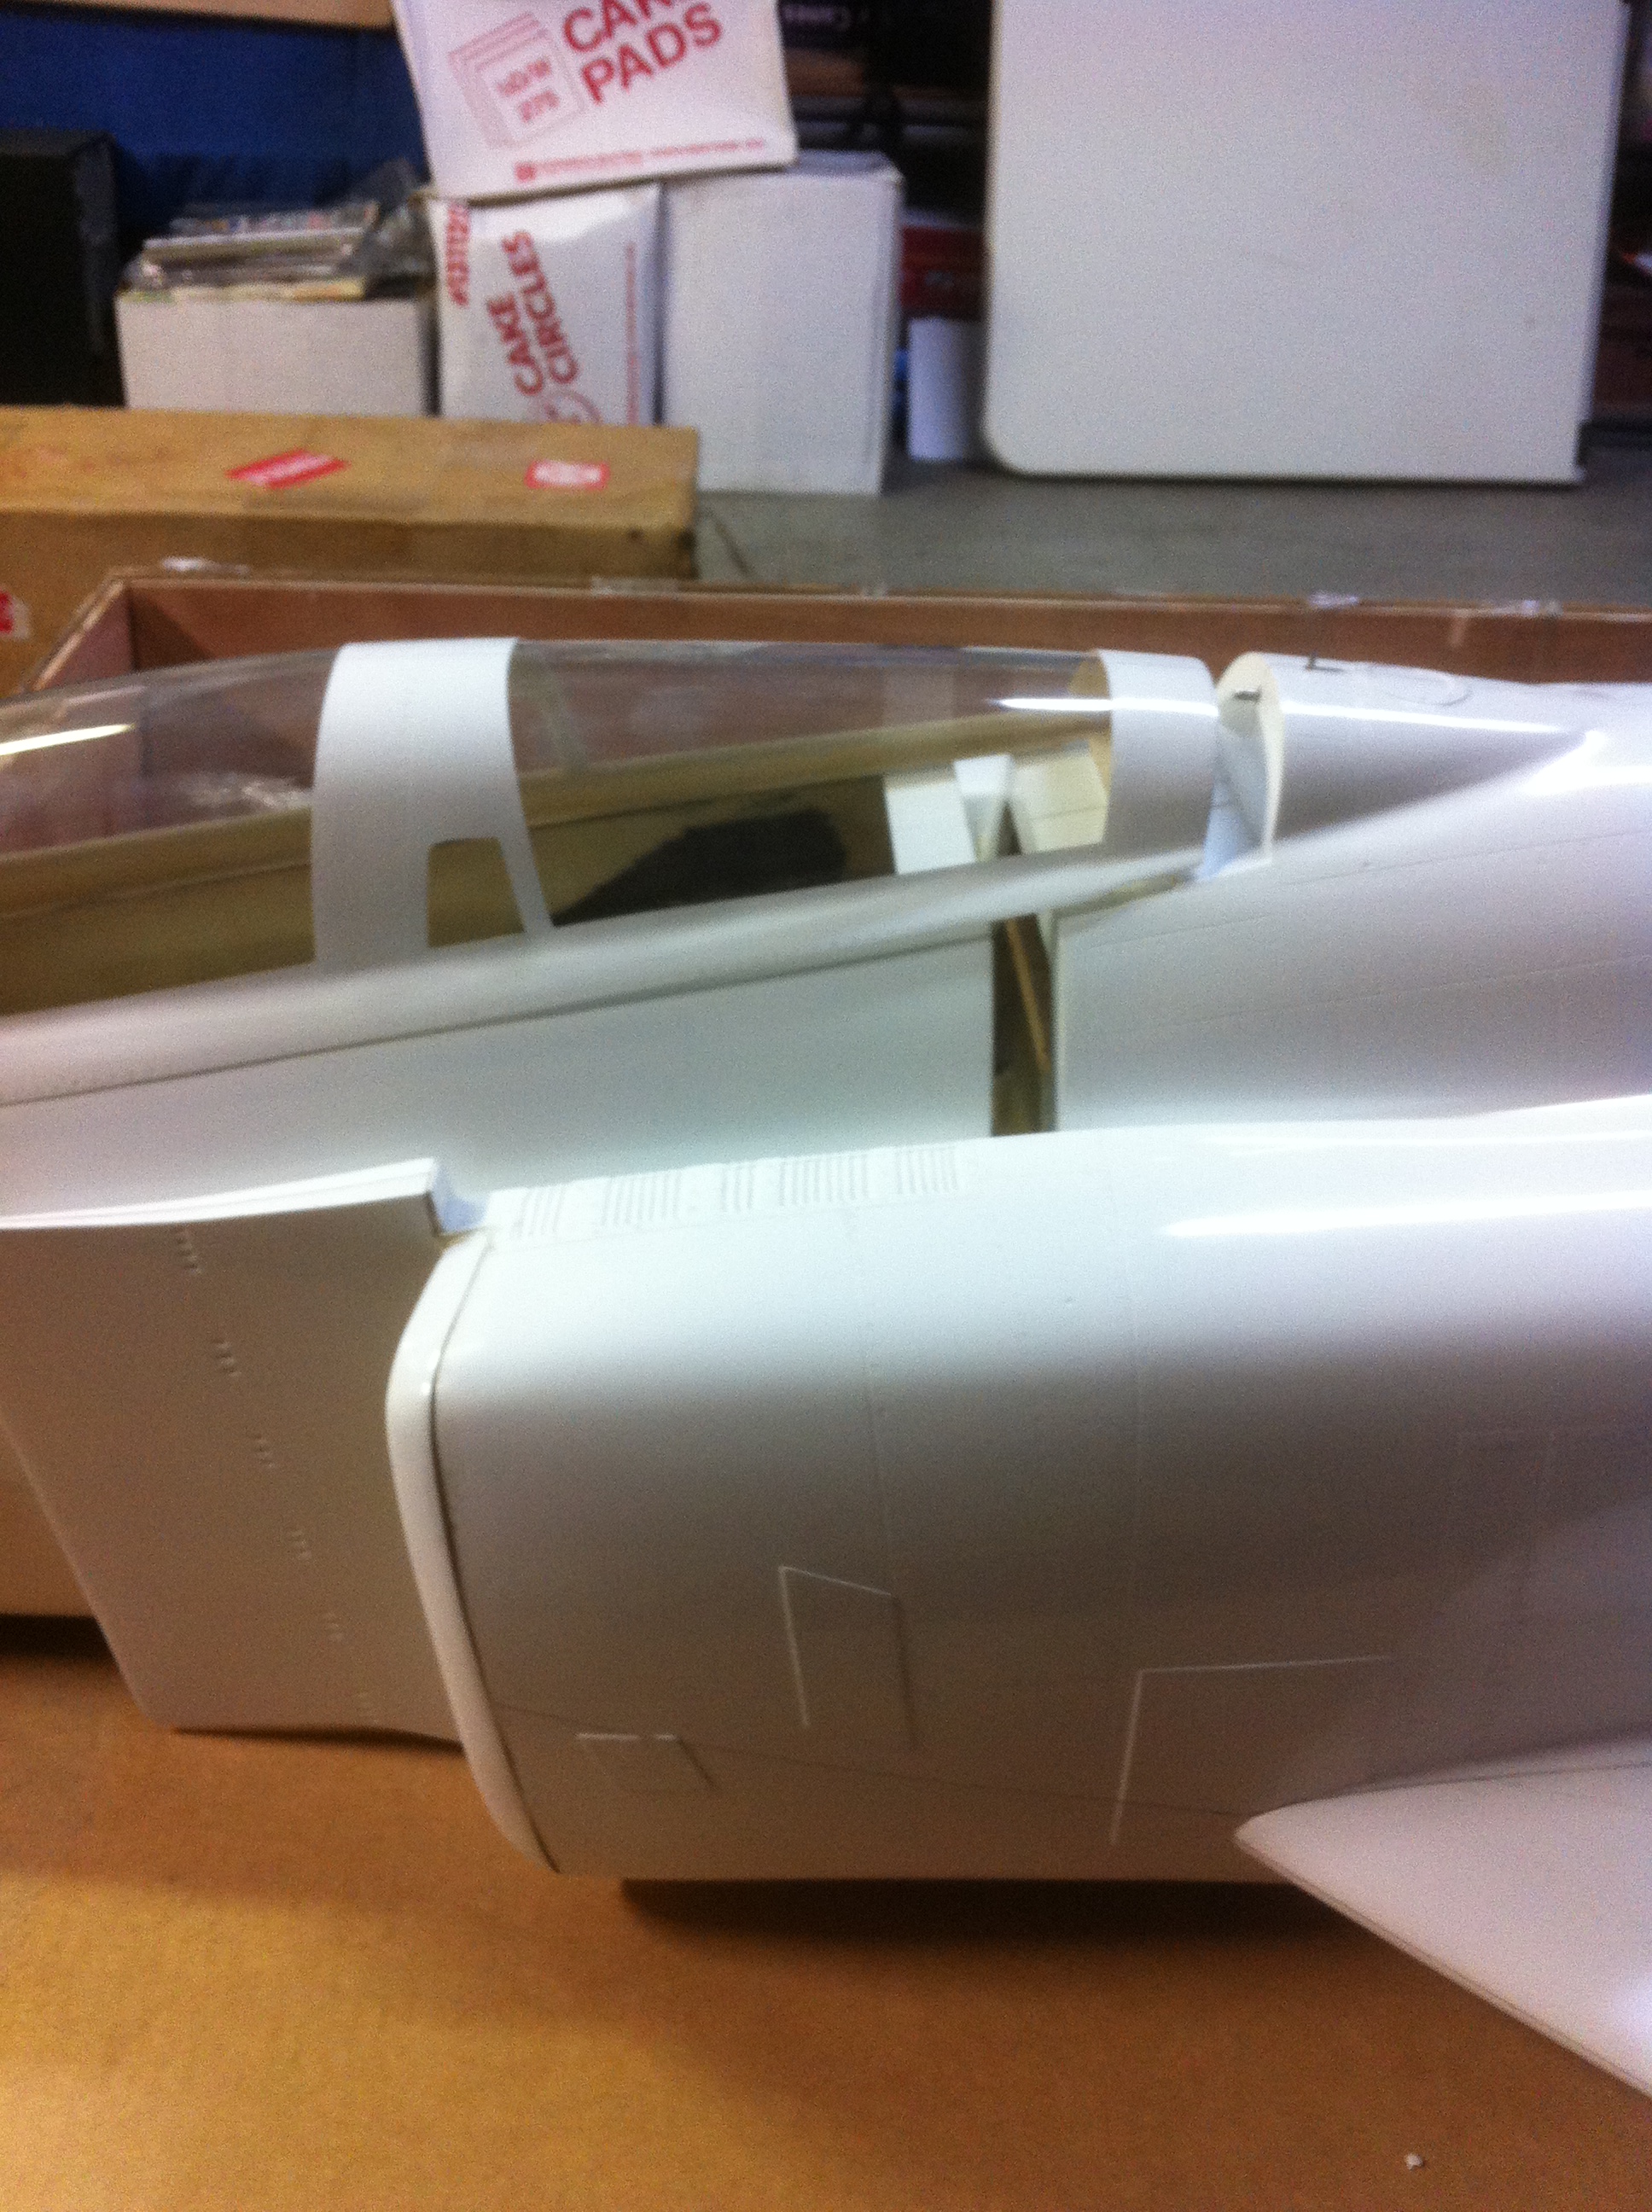
So it may be insignificant to most but it kills it for me! Its like all I see when I look at the model so its not something Im willing to fix for the expense I think it should be correct out of the box.
I focused on the nose section specifically to see the proportion of the nose in relation to the barge boards and intakes. You can see there is a certain distance from the leading edge of the board to the windshield hoop. There is enough space for the width of a man and the ladder lets say. On the SM F-4, now in both sizes, the LE of the board is too close to the windshield hoop. In the photo of the smaller 1/7.75 kit I owned you can see how I pulled the nose forward to see how it looks. The result is pretty obvious, it looks better.
Centered on middle canopy frame
Centered on front windshield hoop
Centered on back canopy edge
SM kit - moved nose section forward
So it may be insignificant to most but it kills it for me! Its like all I see when I look at the model so its not something Im willing to fix for the expense I think it should be correct out of the box.
04-09-2017, 01:57 PM
#41
In any case this was the most obvious thing that was out of scale. I remember I opened the box to inspect it and about as fast as I was excited to see it I was disappointed but couldn't put my finger on what was wrong. Then I pulled out the books and it became obvious what I was looking at. There are other details that let this cool plane down too but I just wanted to show you guys what I was talking about.
04-15-2017, 10:35 AM
#45
Ohh sorry i misread your issues. I thought you were criticising the proportions of the canopys....they are off too in my opinion (have the 1/7.5).
The pic is of my WIP plug of a museum scale 1/6 F-4E/F built from factory drawings.
The pic is of my WIP plug of a museum scale 1/6 F-4E/F built from factory drawings.
07-04-2017, 05:40 AM
#46

My Feedback: (134)
Join Date: Jul 2005
Location: Ladera Ranch,
CA
Posts: 825
Likes: 0
Received 0 Likes
on
0 Posts
I see there have been prior post on the topic of Heat on the stab. I am having this issue with the Tam Pipe. Ive tried the reflective tape and the heat is excessive even with it.
Can someone who is using the Tam Pipe, post some detail pics of the exit angle of your pipe and also how you mounted it on the inside. Can you explain if you had to ground out the rear formers to get the angle right. Ive read this and the other F4 forum, but looking for some quality detail pics to help me trouble shoot my heat issue.
Thanks
07-04-2017, 06:12 AM
#47
My Feedback: (134)
Join Date: Jul 2005
Location: Ladera Ranch,
CA
Posts: 825
Likes: 0
Received 0 Likes
on
0 Posts
Here is my current setup. You will notice the blistering on the stab. I started the engine for 45 seconds and immediately shut her down when I noticed the heat issue. The second test run...I put the 1000 degree tape and a coat of 1000 degree silver paint....I still saw signs of heat damage after 30 seconds of run up at idle only.
I open to suggestions.....Ive considered flipping the Pipe...but it wont fit without major grinding and adjusting the angel of the exhaust nozzles. I have some room to grind the rear formers down to get a bit more of a down angle...but will have to raise the engine mounts too...to avoid getting hot spots on the pipe.
I open to suggestions.....Ive considered flipping the Pipe...but it wont fit without major grinding and adjusting the angel of the exhaust nozzles. I have some room to grind the rear formers down to get a bit more of a down angle...but will have to raise the engine mounts too...to avoid getting hot spots on the pipe.
07-04-2017, 03:50 PM
#48
My Feedback: (2)

Join Date: Nov 2003
Location: Stittsville,
ON, CANADA
Posts: 86
Likes: 0
Received 4 Likes
on
4 Posts
I would drop the tail pipe more in the rear formers...you should be able to gain at least 0.5 inches, which makes a difference. I applied high heat tape to entire bottom of the tail section, tail hook and the bottom of the stabs. Also check there are vent holes in the stab root to let out any hot air from inside the stabs.
Cheers,
Cheers,
09-09-2017, 01:34 PM
#50
My Feedback: (2)
Join Date: Nov 2003
Location: Stittsville,
ON, CANADA
Posts: 86
Likes: 0
Received 4 Likes
on
4 Posts
For a CG of about 320mm, the stock elevator throw is fine. Try to get as much aileron throw as you can...I believe mine is near 40mm each way. Same for rudder...maximize it where possible. Flap throw is good too.
Jeff
Jeff