


Another Skymaster Viper


 06-11-2014, 12:39 AM
#1703

really nice formation fly!! (Ken McSpadden & Mike Adams flying formation at Castle AFB)
https://www.youtube.com/watch?v=meKRo5cvJPQ&list=UUVS-enG-giAKrsbuWGqXOaQ
https://www.youtube.com/watch?v=meKRo5cvJPQ&list=UUVS-enG-giAKrsbuWGqXOaQ
06-11-2014, 03:06 PM
#1705

Thanks, I'm glad you enjoyed it! The big ViperJet from Skymaster is such a great airplane for formation flying. It's very stable, but also aerobatic and maneuverable. The larger size makes it easier to see for both the pilot and spectators. Mike and I hope to keep practicing and maybe make it to the Formation Masters some day. It's a shame we don't have a formation event here in the States.
Ken McSpadden
Ken McSpadden
10-23-2015, 05:25 PM
#1707

Not sure if this thread is still alive or not. Looking for a couple of replacement tires for the mains if you've got them laying around. Let me know, I'll pay for the parts and shipping.
thanks!
Tom
thanks!
Tom
10-25-2015, 09:29 AM
#1708
My Feedback: (12)
Join Date: Oct 2009
Location: Bulger, PA
Posts: 83
Likes: 0
Received 0 Likes
on
0 Posts
I have a set but they are my spare between my two planes.
You should just email john at skymaster.
The set cost 45.00 and probably 20 to ship.
I order two sets if you like the plane and fly off of tarmack. Grass they'd never wear out.
You should just email john at skymaster.
The set cost 45.00 and probably 20 to ship.
I order two sets if you like the plane and fly off of tarmack. Grass they'd never wear out.
06-18-2017, 03:07 AM
#1710

i know it's an old thread but i just finished my viper and i have to add 2 lbs to the nose? i didn't put a cockpit in it " yet" and i 'm not using any heavy batteries . one 4000 2s lipo and a 3 cell life battery for power . i did my best to watch the tail . the only thing that might have added significant weight might be the two coats of heat shield i added to the top of the fuse from the engine to the tail cone . i did this because of heat build up i read about. the engine is a kingtech 120 which is lighter than a p-80 so i'm at a loss as to why the extra weight after reading how several guys used no weight. . oh... i'm using the 25mm balance point ,WB_1
08-04-2017, 11:02 AM
#1711
My Feedback: (10)
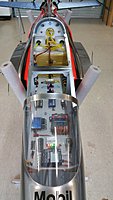
Just received a new Skymaster 2.6M Viper. A small hole in the side of the fuse that I can repair and some paint runs that I will try to rub out. Otherwise everything looks good.
One area I could use some help is mounting the upper fuel tank. I think I'm missing one plywood mounting piece and instead received 2 of the other plywood piece it mounts to.
One photo shows the 2 plywood mounts I received. The second photo shows where I believe one of the mounts gets epoxied. However I don't know how to mount the upper tank.
The upper tank has a curved top and somehow mounts above the intake duct. The instruction manual photo does not show what is under the tank and has vague instructions.
I can figure something out and make my own mount, but if someone else has done it then I'll see what you did first. Any suggestions or photos would be greatly appreciated.
The last photo shows the upper tank sitting on one of the supplied mounts. Only half the tank bottom covers the mount. I should have something else between the plywood mount shown and the bottom of the upper tank.
08-04-2017, 03:27 PM
#1712

Join Date: Jun 2006
Location: Gold Coast, Queensland, AUSTRALIA
Posts: 1,469
Received 26 Likes
on
24 Posts
Harvey,
I installed the top tank between the intakes. Flip it back, seal the current hole and make a new hole for the tank fittings. This way you don't need those plywood fittings and can use Velcro between the tanks and intakes. It also leave you the space above the intakes to use for smoke and other bits.
Cheers,
Jan
08-04-2017, 04:02 PM
#1713
My Feedback: (10)
Harvey,
I installed the top tank between the intakes. Flip it back, seal the current hole and make a new hole for the tank fittings. This way you don't need those plywood fittings and can use Velcro between the tanks and intakes. It also leave you the space above the intakes to use for smoke and other bits.
Attachment 2226939
Cheers,
Jan
08-04-2017, 05:41 PM
#1714

With the above setup the aft cockpit will need to be modified. I mounted per the instructions but made a mount to support the aft portion of the tank. I used a screw/blind nut on the aft support so it was removable. Plus it's closer to the CG for the second tank. That being said many others have done the above so both will work.
08-05-2017, 01:17 AM
#1716
Join Date: Jun 2006
Location: Gold Coast, Queensland, AUSTRALIA
Posts: 1,469
Received 26 Likes
on
24 Posts
With the above setup the aft cockpit will need to be modified. I mounted per the instructions but made a mount to support the aft portion of the tank. I used a screw/blind nut on the aft support so it was removable. Plus it's closer to the CG for the second tank. That being said many others have done the above so both will work.
Harvey, I have not had any reason to think my CofG is any different at any time during the flight.
cheers,
Jan
08-05-2017, 08:18 PM
#1718
Join Date: Jun 2006
Location: Gold Coast, Queensland, AUSTRALIA
Posts: 1,469
Received 26 Likes
on
24 Posts
Of course, knowing this in advance will guide you to install the cockpit kit forward, rather than backwards when you are doing it. My canopy and cockpit is a complete unit and is removed and installed in a single operation.
Cheers,
Jan
Last edited by Springbok Flyer; 08-05-2017 at 08:56 PM.
09-11-2017, 03:01 AM
#1720
The biggest things i see as an advantage is fire control and performance . i think bypasses tend to make turbine power more efficient thus better thrust performance and the biggest one is fire. had my friend had a bypass in his t1 , it most likely would have not burn up while idling when a fuel problem happened. so if you have the bucks,get on !! BVM makes the best one i've seen .WB_1
09-14-2017, 04:59 PM
#1721
My Feedback: (10)
The biggest things i see as an advantage is fire control and performance . i think bypasses tend to make turbine power more efficient thus better thrust performance and the biggest one is fire. had my friend had a bypass in his t1 , it most likely would have not burn up while idling when a fuel problem happened. so if you have the bucks,get on !! BVM makes the best one i've seen .WB_1
09-14-2017, 05:07 PM
#1723
09-14-2017, 06:09 PM
#1724
My Feedback: (10)
Here's a photo of what I received. I put the white mid-pipe on the front for reference. Notice at the rear there is a lip to fit a bell mouth that would connect to the tailpipe. I would like to know what others have received recently that are using a bypass, so I can determine exactly what is missing from my bypass kit and what is the best bell mouth to use, as I assume a metal one would be the best fix for the heat damage I have read about.
I don't care about extra performance from a bypass as I plan to use a P180NX, but I will consider adding the bypass if it makes a big difference with safety.
09-15-2017, 03:19 AM
#1725
I see them, Thanks again. I received a bypass from SM but I think it is missing a rear piece called the bell mouth. I understand there have been problems with heat damaging the bell mouth and they either have thicker ones now or they are now made from metal, depending on where you read.
Here's a photo of what I received. I put the white mid-pipe on the front for reference. Notice at the rear there is a lip to fit a bell mouth that would connect to the tailpipe. I would like to know what others have received recently that are using a bypass, so I can determine exactly what is missing from my bypass kit and what is the best bell mouth to use, as I assume a metal one would be the best fix for the heat damage I have read about.
I don't care about extra performance from a bypass as I plan to use a P180NX, but I will consider adding the bypass if it makes a big difference with safety.