


Tamiya King Tiger Build
 05-16-2017, 06:08 AM
#51
I'd have to agree with Cruiser. Kenny Kong's and Mitosal fit the first time every time. And yes, always...always get drive sprockets from the same place you get tracks. DKLM is also making a nice set of tracks. KK's tracks and DKLM are shiny finish, while Impact/Mitosal are sandblasted finish.
 05-16-2017, 06:18 AM
#52
Tamiya King Tiger tracks are the weakest link (LOL) of their plastic tracks but since you have addressed the idler tension issue (which the KT needs) with that fine DT part the stock tracks might last a little longer but can always be replaced long after the build is finished.
Which you are moving along on pretty fast!
Which you are moving along on pretty fast!
05-16-2017, 08:52 AM
#54
Is it possible that there are two version of king tiger torro tracks? Which colour are yours, yellowshaker? Ive found there are white and black ones made from torro.
White ones here:
https://www.aliexpress.com/item/Mato...3-71e36955bbce
Black:
Mato 1/16 RC HengLong King Tiger Tank Metal Tracks MT078T
 05-16-2017, 09:21 AM
#56


Join Date: Nov 2012
Location: USA
Posts: 903
Likes: 0
Received 0 Likes
on
0 Posts
Yellow definitely had better luck than me and I don't disagree with him necessarily, but I purchased Mato tracks with the thought of using them on my Lowe which used Tamiya sprockets and they did NOT fit without modification. They still bunch up from time to time, especially on carpet, so why take a chance?
05-16-2017, 10:45 AM
#57
Yellow definitely had better luck than me and I don't disagree with him necessarily, but I purchased Mato tracks with the thought of using them on my Lowe which used Tamiya sprockets and they did NOT fit without modification. They still bunch up from time to time, especially on carpet, so why take a chance?
Uops, just noticed: I just found this web:
WWW.JAGDPANZER.NET - English-Version
Notice that the tracks are for Tamiya and Matorro (not mato, not torro, Matorro, lol) so that might be the origen of the confusion. Maybe the ones compatible with tamiya are the matorro ones and not the mato!
05-19-2017, 04:37 PM
#58
Member
Thread Starter
Join Date: May 2003
Location: Arlington, VA
Posts: 37
Likes: 0
Received 0 Likes
on
0 Posts
Very nice work so far. ETO has the best customer service you can ask for and his knowledge in this hobby is the same. He helped me through my early days of the hobby and still does to this day.
The King Tiger is one of the most majestic tanks available as a kit, IMO. I loved building mine and soon I will be doing a repaint on it.
If I may give you a piece of friendly advice, get yourself an airbrush. The simple truth is painting a model with a spray can is nothing short of problems because of the amount of paint coming out and the lack of control you have using it. It will cover fine details and look quite bland in the end. Many guys use variants of Iwata while I have 4 different Paasche brushes at the moment. The paasche can be bought for around 100 dollars and comes with three interchangeable tips for different spray patterns. Number 2 is the one I use the most for the tanks. Check out Chicago airbrush supply and search paasche for the talon. Cannot go wrong with it. That and a compressor is money well spent for this hobby and the results cannot be achieved without it. I hope you are enjoying the hobby as much as I do. Keep up the great work.
I quote you here, but Im refering to your gearbox brace problem, lol. After seeing that was idiot proof I ordered one gearbox brace and I have it here waiting waiting to be installed. I was going to install it today but then I saw your gearbox alineation problem, that is what was worrying me.
I dont apreciate any problem in your photos, so what was the problem and where was the mistake?? The screws were too loose? Even being so loose the gearbox should not move to right or left due to the screws, right?
I dont apreciate any problem in your photos, so what was the problem and where was the mistake?? The screws were too loose? Even being so loose the gearbox should not move to right or left due to the screws, right?
TP, take note of your tracks, they are separating on both sides in several places. This is a known issue with those tracks unfortunately. I suggest you get some quality metal offerings from Kenny Kong or Mitosal especially now that you are using the awesome DT tensioner.
05-19-2017, 04:46 PM
#59
Member
Thread Starter
Join Date: May 2003
Location: Arlington, VA
Posts: 37
Likes: 0
Received 0 Likes
on
0 Posts
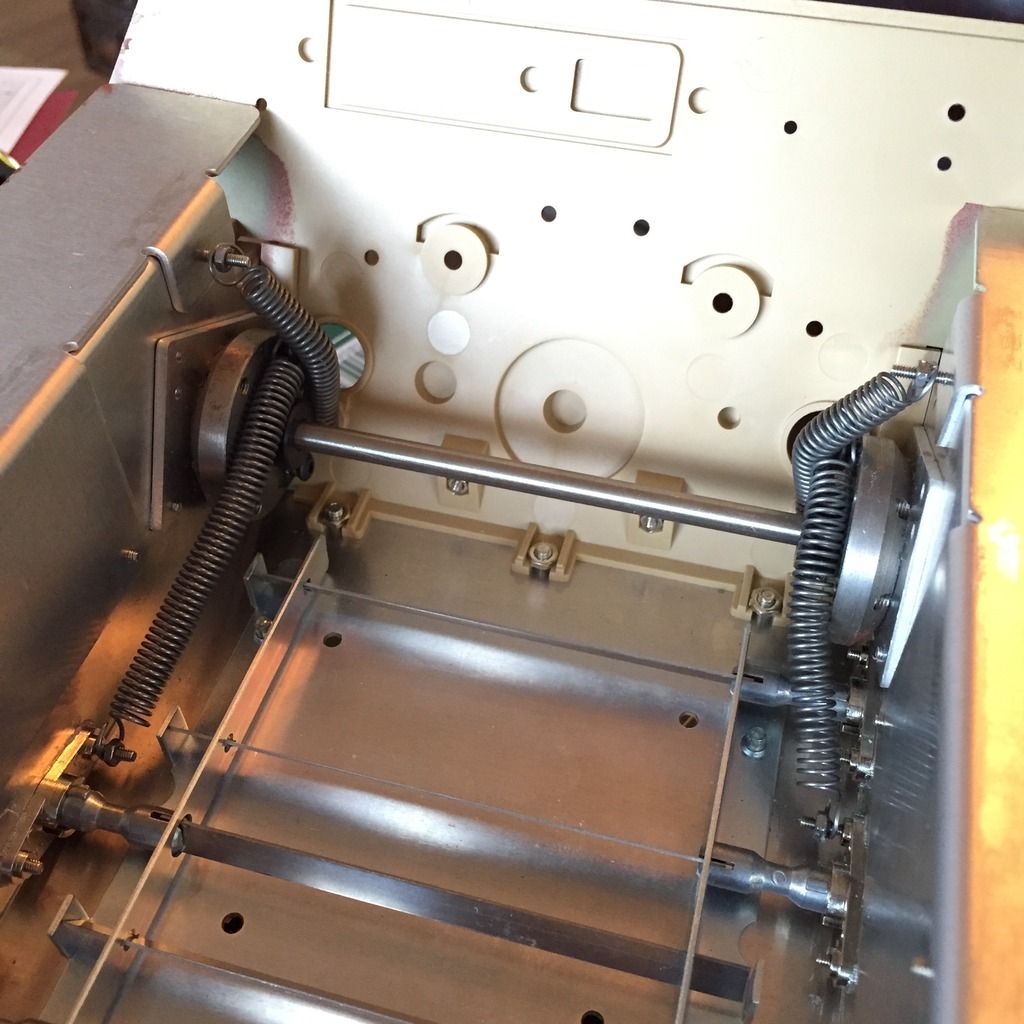
Moving on with the build....finished up the DT idler system. It may need some adjustment when the whole tank is done but for now I think it's sufficient. I was a bit intimidated when I first got the kit and instructions but it wasn't as difficult as I thought it would be.
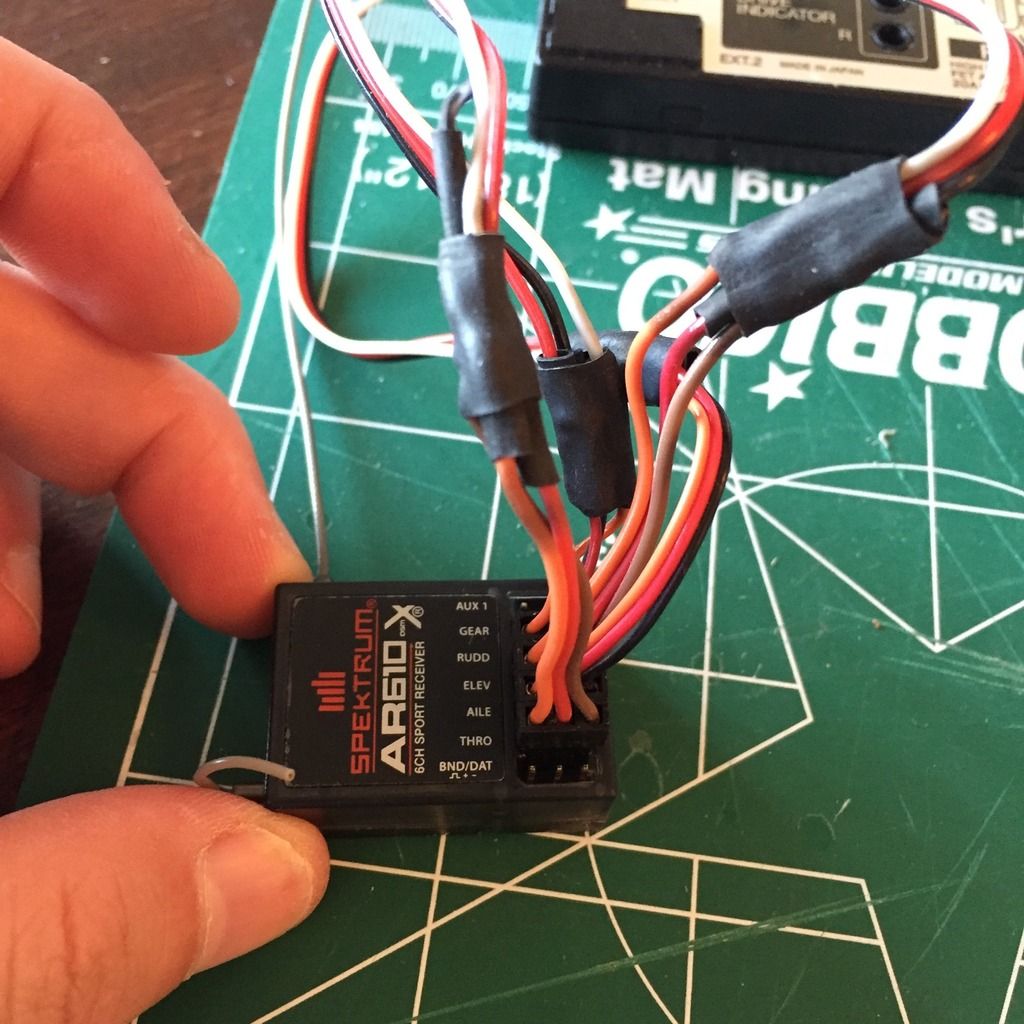
Since I'm using a Spektrum DX9 I had a friend install the correct servo leads to the DMD control unit.
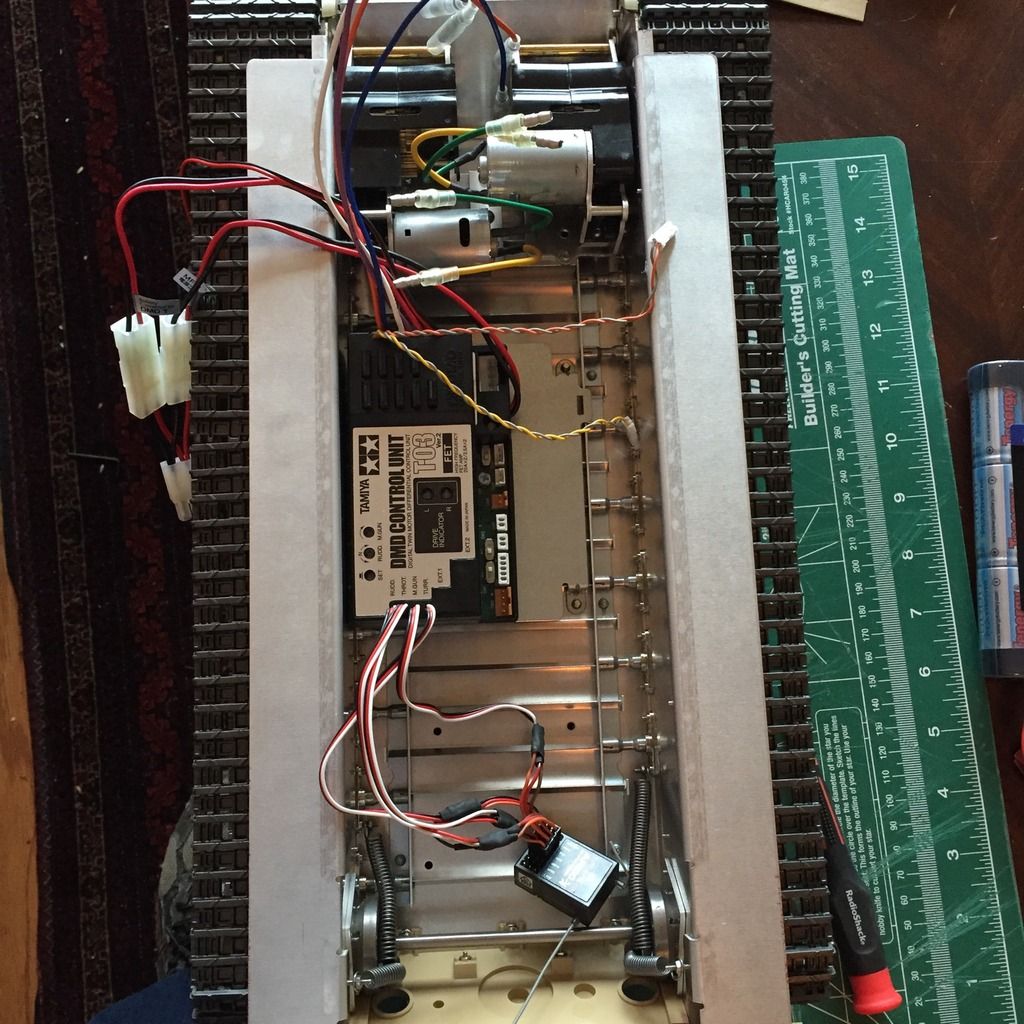
Installed the controller stack, everything else roughed in.
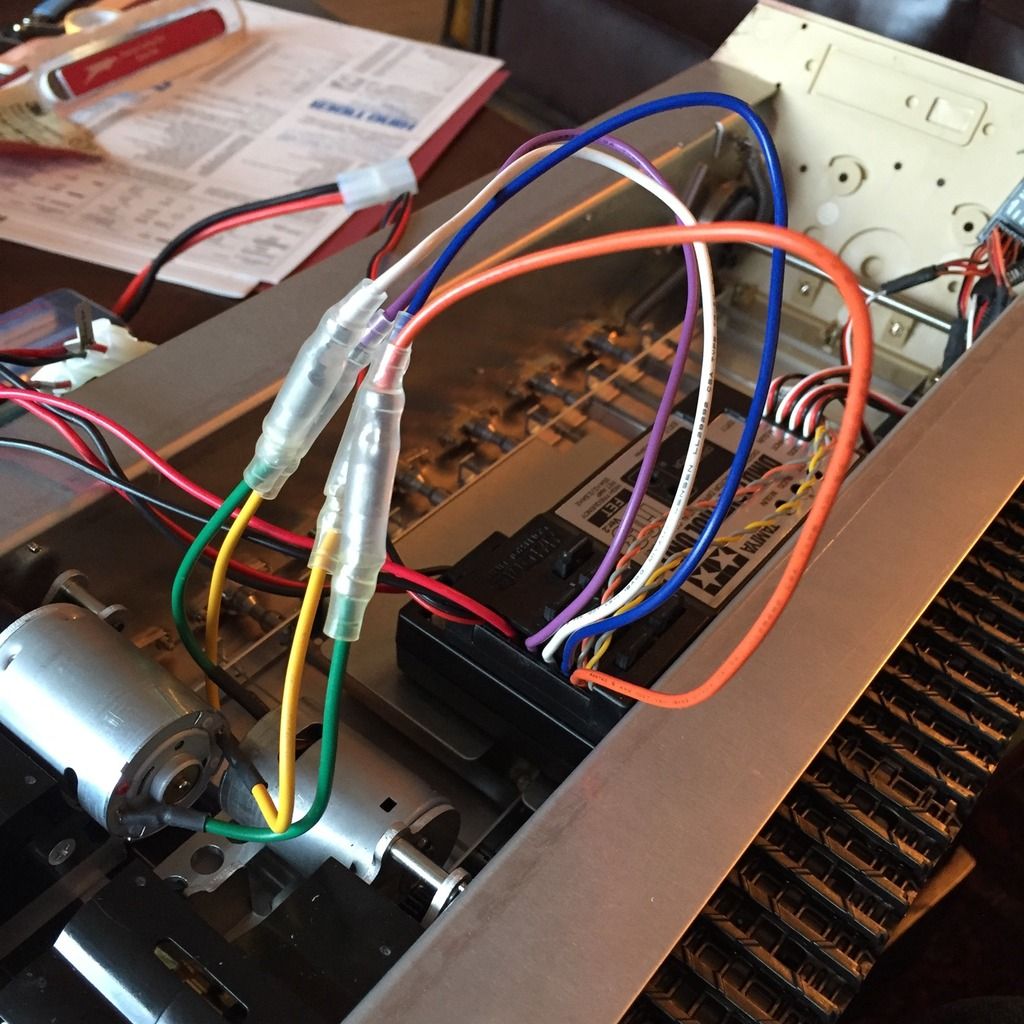
Any advice or best practices on how to tidy up the wires? They are pretty thick and it seems like you just mash everything together the best you can and zip tie it up?
Since I'm using a Spektrum DX9 I had a friend install the correct servo leads to the DMD control unit.
Installed the controller stack, everything else roughed in.
Any advice or best practices on how to tidy up the wires? They are pretty thick and it seems like you just mash everything together the best you can and zip tie it up?
05-19-2017, 06:35 PM
#60
On the servo leads, if you aren't using a Futaba receiver, just trim off the tabs on the DMD radio receiver leads with a hobby knife. They'll fit the Spektrum rx just fine.
Last edited by Jeff489; 05-19-2017 at 06:38 PM.
05-20-2017, 05:25 AM
#62
Join Date: Nov 2012
Location: USA
Posts: 903
Likes: 0
Received 0 Likes
on
0 Posts
I suggest you read Robert's thread carefully, it is chock full of great information. Clean wiring requires planning and strategic use of zip ties. I plan out where all my electronics will reside then run the wiring accordingly. Surprisingly, the Tamiya manual gives you a great blueprint to follow. I found the KT pretty easy to wire up, the Pershing on the other hand....hope you have a full bottle of bourbon on hand for that job....
05-25-2017, 06:20 AM
#63
Member
Thread Starter
Join Date: May 2003
Location: Arlington, VA
Posts: 37
Likes: 0
Received 0 Likes
on
0 Posts
05-25-2017, 12:23 PM
#65
Hey Tom, great work on this one, and I can tell you're having a lot of fun with it. Now, if you'll forgive me for going off topic for just a minute, I'm always interested in user names and why guys choose the ones they do, and when I saw yours I immediately thought of one of the most beautiful creatures on the face of the earth and I'm wondering if you're familiar with him.
The Pallas Cat

Highly endangered and very rare, but one of the coolest looking cats I've ever seen.
The Pallas Cat
Highly endangered and very rare, but one of the coolest looking cats I've ever seen.
05-25-2017, 01:04 PM
#66
Senior Member
Join Date: Dec 2012
Location: littlestown, PA
Posts: 758
Likes: 0
Received 0 Likes
on
0 Posts
I start out that way but after years of TU repair and Tamyia fuse failures some are just ziptied into a whip and stuffed in.
05-25-2017, 01:20 PM
#67
Now THAT was a write up! Brings back memories of yesteryear.

I just shorten the wires where I can, fold & tuck with wire ties and get rid of those Tamiya plugs.
 You do not need a Y-connector.
05-25-2017, 02:33 PM
You do not need a Y-connector.
05-25-2017, 02:33 PM
#68
I have to admit that I do like a tidy installation, and I've found that, in addition to zip ties, a little dab of Zap Goo can do wonders for holding things in place, and if you ever want to take it out it's not hard at all.
