


High Pin Count Connectors?
 09-25-2022, 03:44 AM
#1

Thread Starter

So, with my E-100 more or less finished I'm now living the dream of dealing with the self-inflicted cable mess coming from the Turret and going to the Controller Board situated in the Chassis whenever I need to separate the two.
Unlike my Gepard that uses some kind of CAN Bus System with only 4 wires ( 2x Power 2x Data ) between the two boards situated in the Chassis and Turret the E-100 with only one board has all the wiring coming from the Turret connected to the board in the Chassis which is kinda a R.P.I.T.A. to deal with which is why I'm looking for a Connector suitable for the 1:16 Scale ( or rather the available space inside ) of the model...
Any recommendations for a Connector Brand and Model in the 20-Pin range? 🤔
 09-25-2022, 05:25 AM
#2

Maybe something like this although you would need two or a 12 pin and an 8 pin. I use types like this on my 1/6 scale tanks. They are large but the E-100 is a large tank.
https://www.allelectronics.com/item/...nnector/1.html
https://www.allelectronics.com/item/...nnector/1.html
09-26-2022, 02:29 AM
#3
Thread Starter
Hmm... 🤔
Jokes aside... I assume this arrives like shown on the product website as an already assembled cable bundle with connectors attached to both ends - I'd have to cut it in the middle and solder the ends to the already existing cables?
You mention it being used on your 1:6 scale models - Is the wire gauge like that of regular Servo Wire leads or are they significantly thicker? What are the dimensions of the two Plugs connected to each other?
My E-100 is thick both on the outside and inside due to the scale thick armor and the firewalls creating the segmented compartments aren't helping either ( lessons learned 🤣 ):
I also have to take into account that the rear of the Gun Carriage can significantly protrude into the chassis when put at max elevation so using a smaller connector not taking up a lot of space and potentially colliding with it would still be preferred 😉
09-26-2022, 05:08 AM
#4
Go to eBay and search "large jst connectors". I saw them with as many as 12 pins, the connectors only on one end so you can solder the other end to whatever you want, but they're not cheap. The 12 pin I saw was about $35. I usually get my jst connectors in kits that have multiple plugs with different number of pins, but the highest kit I've seen only goes up to a five pin plug. Over that you have to start looking at individual connectors, and those can get rather pricey. Hope that helps.
 10-05-2022, 11:59 AM
#6
Curious, with he large turret why not have the control board in the turret? So only the drive motor cables exit the turret
The Maus I made has the Tam Leo DMD-07 in the turret and fits along with a stick battery
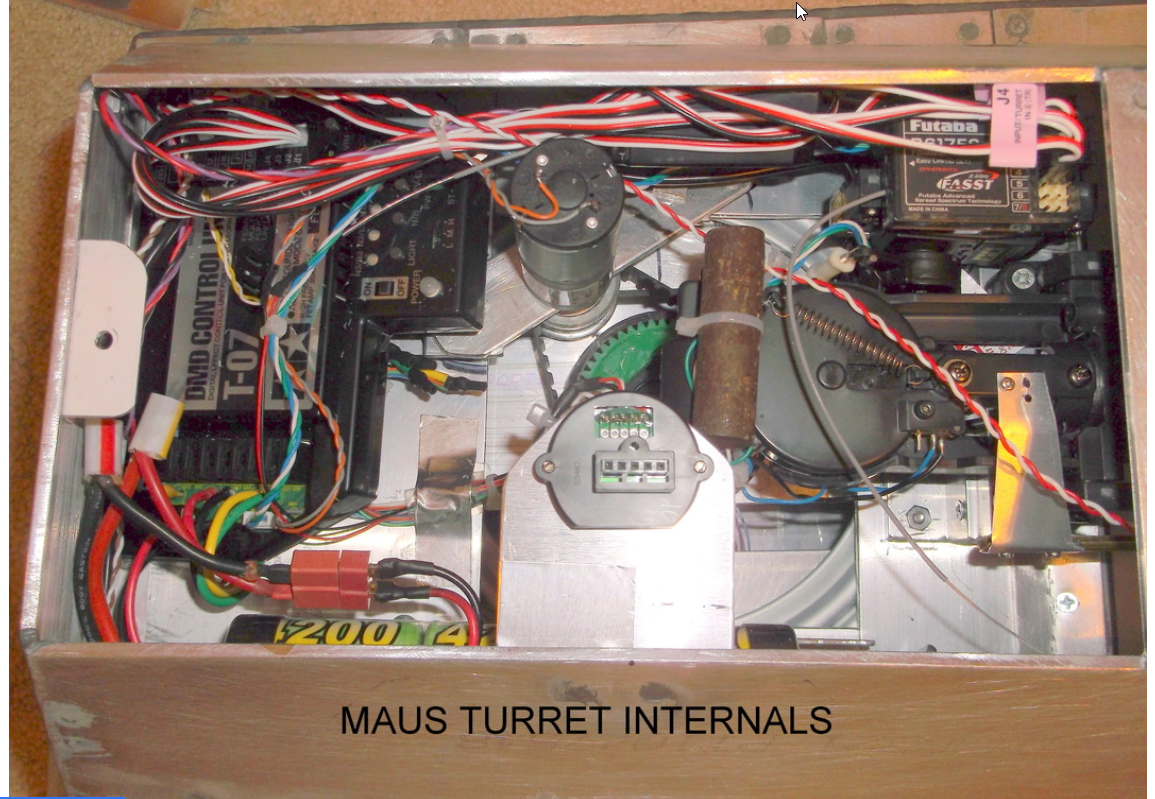
The Maus I made has the Tam Leo DMD-07 in the turret and fits along with a stick battery
10-05-2022, 03:35 PM
#7
Thread Starter
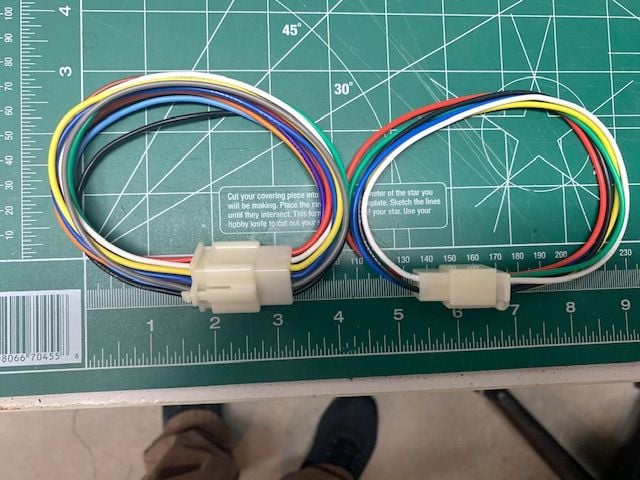
My noggin was kinda running on Energy Saver Mode as the most immediate solution to the Connector Question were plain and simple LiPo Balance Lead Extensions 😉
I just ordered myself a set of 10x 8S ones off Amazon that should do the trick with the added benefit of not looking like rainbow barf - Gotta adhere to my No Fun! standards 😑
Got a good chuckle out of that Hunk of Iron strapped to the end of the Recoil System 🤣
Installing the Board into the Turret would definitely have been an option and while the number of wires would have been less...
...they would still have been at least 15 going into the Chassis with half of them being hella Chunky�:
Maybe something for future me to think about 😁
I just ordered myself a set of 10x 8S ones off Amazon that should do the trick with the added benefit of not looking like rainbow barf - Gotta adhere to my No Fun! standards 😑
Installing the Board into the Turret would definitely have been an option and while the number of wires would have been less...
...they would still have been at least 15 going into the Chassis with half of them being hella Chunky�:
- Two 2x Motor Cables
- One 2x Battery Cable
- One 3x Servo Cable ( Turret Servo )
- Two 2x LED Cables ( Front & Rear )
- One 2x Speaker Cable
Maybe something for future me to think about 😁
The following users liked this post:
tankme (10-06-2022)
10-08-2022, 02:48 PM
#9
Thread Starter
10-20-2022, 01:13 PM
#10
Hi If you need a high count connector why not use computer cable ribbon . Here is an example a 10 way cable for all the low load electrics , you can buy wider ribbon cable and connectors are just a 2 part click together system . No crimps or solder on the computer plug/socket. . On most my models its just one plug for 2 MGs ,lights , flash , servo recoil and elevation along with the 8 way cable . Save unplugging lots of plugs at the MFU.
Last edited by ronnie42; 10-20-2022 at 01:18 PM.
10-21-2022, 10:29 AM
#11
Thread Starter
I already ran with the Balance Lead method 😁:
Cables are still too short to comfortably place the turret somewhere else while still connected but at the same time also a little long when everything's combined... One just cannot wine 🤣
But being able to disconnect everything with just two plugs IS still a great help.
While working in the cabling I've since also equipped the 75mm with a regular LED and prepared an SMD LED for installing into the root of the 20mm ( requiring a new part to be 3D Printed 😑 ).
I'm now waiting for Amazon to ship some small-scale brass tubes to make a barrel akin to the one that shipped with the ABER Kit the 20mm came from which unfortunately doesn't have a bore.
Once it has arrived, I'll be inserting a bit of spare Fiberoptics from my Tamiya #56020 Leopard 2A6 into the Brass tube for the LEDs light to pass through.
The Effect of either is pretty neat with the 75mm - despite being situated inside a technically opaque barrel - shining ever so slightly through the thin Resin 3D Printed Barrel making the flash also visible from the sides and the 20mm's fire being tied to the sound of the MG Firing flickering nicely along as the sound plays.
