


3D Printed 1:16 E-100
 06-21-2022 | 01:30 AM
#1

Thread Starter

Thought I'd be throwing my W.I.P. 3D Printed 1:16 E-100 into the fray 😁
For a more thorough read along the build journey there's an Imgur Gallery that gets updated as I chugg along with the current project goal being a Display Stand Model and the obvious long-term one being a Full-Option FPV capable RC Model.
Latest Images from the above-mentioned Gallery:
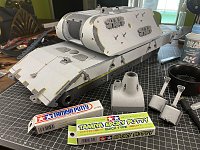
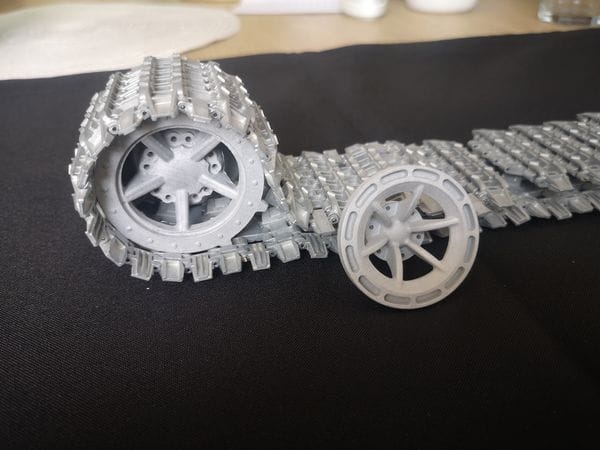
The model kinda started like two years ago with the intent of CNC machining it using my Inventables X-Carve 3-Axis CNC Machine out of scale thick plastic but the lack of affordable plastic at that thickness kinda soured the mood to continue it for a while despite the Tracks already having been SLA 3D Printed on my Formlabs Form�. The lack of a Metal Working Lathe and the unwillingness of local companies to even respond to pricing requests for having things like the Barrels and various Axles turned didn't exactly help either.
Still... At some point I even considered having the entire Tank professionally 3D Printed akin to how DKLMRC does some of their models at the expense of it losing the scale thick armor.
That obviously never matured either due to the high costs of having a model of that size made like that and the risk of it arriving totally warped wich I wasn't too much into either.
Fast forward about a year and the acquisition of a much faster Voron 2.4 CoreXY FDM 3D Printer ( compared to my back then Prusa i3 MK3S ) reignited my mood for tackling the project once more by restarting the CAD modelling from scratch due to the necessary clearances for an FDM approach not already having been part of the old CAD Files - Which also presented itself for fixing some errors and adding some neat things to it.
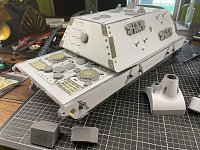
A week or so later a set of parts was sitting on my table:
My initial goal with the new FDM 3D Printing approach was for one to make use of a panel based assembly the E-100 would lend itself to ( so no complete hull in like 3 parts with everything included ) and for the other to have an easy game with the structuring of the surface by simply 3D printing them with the visible sides facing the textured Print bed and followed by partially sanding it down for a rolled steel effect - The latter of which didn't work out as by the time I'd have managed to get rid of the unfortunately still visible layer lines the effect for the rolled steel from the bumps in the print bed would long have been gone. So, in the end Tamiya Putty Basic Type it was.
As for the Running Gear I'm currently betting on the Standard Formlabs SLA Resin to not be snapping at the slightest sneeze:

The Test Axle in the picture is a simple 5mm Aluminium Round Stock cut to length over which a 6/5mm Brass Tube was placed onto that will keep the Wheel Bearings apart. The final ones will be made out of readily available Steel Dowel Pins with M3 Threads on one end from AliExp... Should the Swing Arms prove to be too brittle then Pewter Casting using High Temperature Silicone it will be for them.
So, yea... The Project is essentially a giant cluster**** of new experiences and problem solving because of lack of machinery 😁
For a more thorough read along the build journey there's an Imgur Gallery that gets updated as I chugg along with the current project goal being a Display Stand Model and the obvious long-term one being a Full-Option FPV capable RC Model.
Latest Images from the above-mentioned Gallery:
The model kinda started like two years ago with the intent of CNC machining it using my Inventables X-Carve 3-Axis CNC Machine out of scale thick plastic but the lack of affordable plastic at that thickness kinda soured the mood to continue it for a while despite the Tracks already having been SLA 3D Printed on my Formlabs Form�. The lack of a Metal Working Lathe and the unwillingness of local companies to even respond to pricing requests for having things like the Barrels and various Axles turned didn't exactly help either.
Still... At some point I even considered having the entire Tank professionally 3D Printed akin to how DKLMRC does some of their models at the expense of it losing the scale thick armor.
That obviously never matured either due to the high costs of having a model of that size made like that and the risk of it arriving totally warped wich I wasn't too much into either.
Fast forward about a year and the acquisition of a much faster Voron 2.4 CoreXY FDM 3D Printer ( compared to my back then Prusa i3 MK3S ) reignited my mood for tackling the project once more by restarting the CAD modelling from scratch due to the necessary clearances for an FDM approach not already having been part of the old CAD Files - Which also presented itself for fixing some errors and adding some neat things to it.
A week or so later a set of parts was sitting on my table:
My initial goal with the new FDM 3D Printing approach was for one to make use of a panel based assembly the E-100 would lend itself to ( so no complete hull in like 3 parts with everything included ) and for the other to have an easy game with the structuring of the surface by simply 3D printing them with the visible sides facing the textured Print bed and followed by partially sanding it down for a rolled steel effect - The latter of which didn't work out as by the time I'd have managed to get rid of the unfortunately still visible layer lines the effect for the rolled steel from the bumps in the print bed would long have been gone. So, in the end Tamiya Putty Basic Type it was.
As for the Running Gear I'm currently betting on the Standard Formlabs SLA Resin to not be snapping at the slightest sneeze:
The Test Axle in the picture is a simple 5mm Aluminium Round Stock cut to length over which a 6/5mm Brass Tube was placed onto that will keep the Wheel Bearings apart. The final ones will be made out of readily available Steel Dowel Pins with M3 Threads on one end from AliExp... Should the Swing Arms prove to be too brittle then Pewter Casting using High Temperature Silicone it will be for them.
So, yea... The Project is essentially a giant cluster**** of new experiences and problem solving because of lack of machinery 😁

The following users liked this post:
bowlman (06-21-2022)

 06-21-2022 | 10:00 AM
#4
Thread Starter
On the other hand, I still cannot stand the entire M3 and M4 Family Tree... To me, their proportions look quite literally like something you'd be having on a Badge with Cartoon aesthetics 🤔
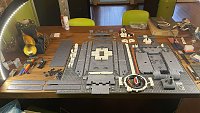
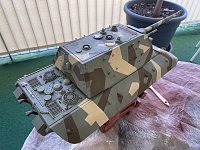
Last bunch of Screws arrived today allowing me to finish the Engine Deck ( among others ):
I'm now going to let it sit for like a day before Priming and Painting it to give myself the opportunity for adding some other stuff to it that would benefit from being added before the Priming / Painting.
Should probably also start thinking about a paint scheme too 🤔 ( no half finished ones with the Hull done and the Turret still in Red Oxide Primer )
06-21-2022 | 01:19 PM
#5
My Feedback: (1)
Having my Maus sitting on ( most of) my coffee table. Had anyone thought of how the Germans planned to dismount and get back aboard
these machines in the heat of combat? Especially if they lost the special metal ladder they used to get aboard with? What if they had to
quickly answer a 'call of nature'?
Could have been a problem under fire...
Jerry
these machines in the heat of combat? Especially if they lost the special metal ladder they used to get aboard with? What if they had to
quickly answer a 'call of nature'?
Could have been a problem under fire...
Jerry
The following users liked this post:
herrmill (06-23-2022)
06-21-2022 | 04:56 PM
#7
My Feedback: (1)
seriously about abandoning it.
Might be the making of a good diorama dark comedy scenario what with the slab faced sides and the high ends, maybe the E-100 was a little less so but even still...
No one ever figured these would be practical machines, just great modeling subjects. I think of them, at least the Maus as proving platforms for Porsche's final
version of his �Mixte� hybrid system...
Jerry
06-23-2022 | 10:24 AM
#8
Thread Starter
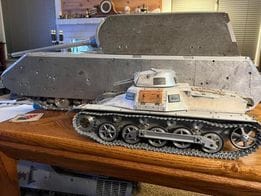
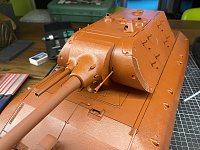
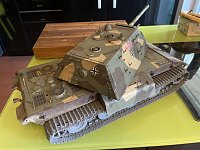
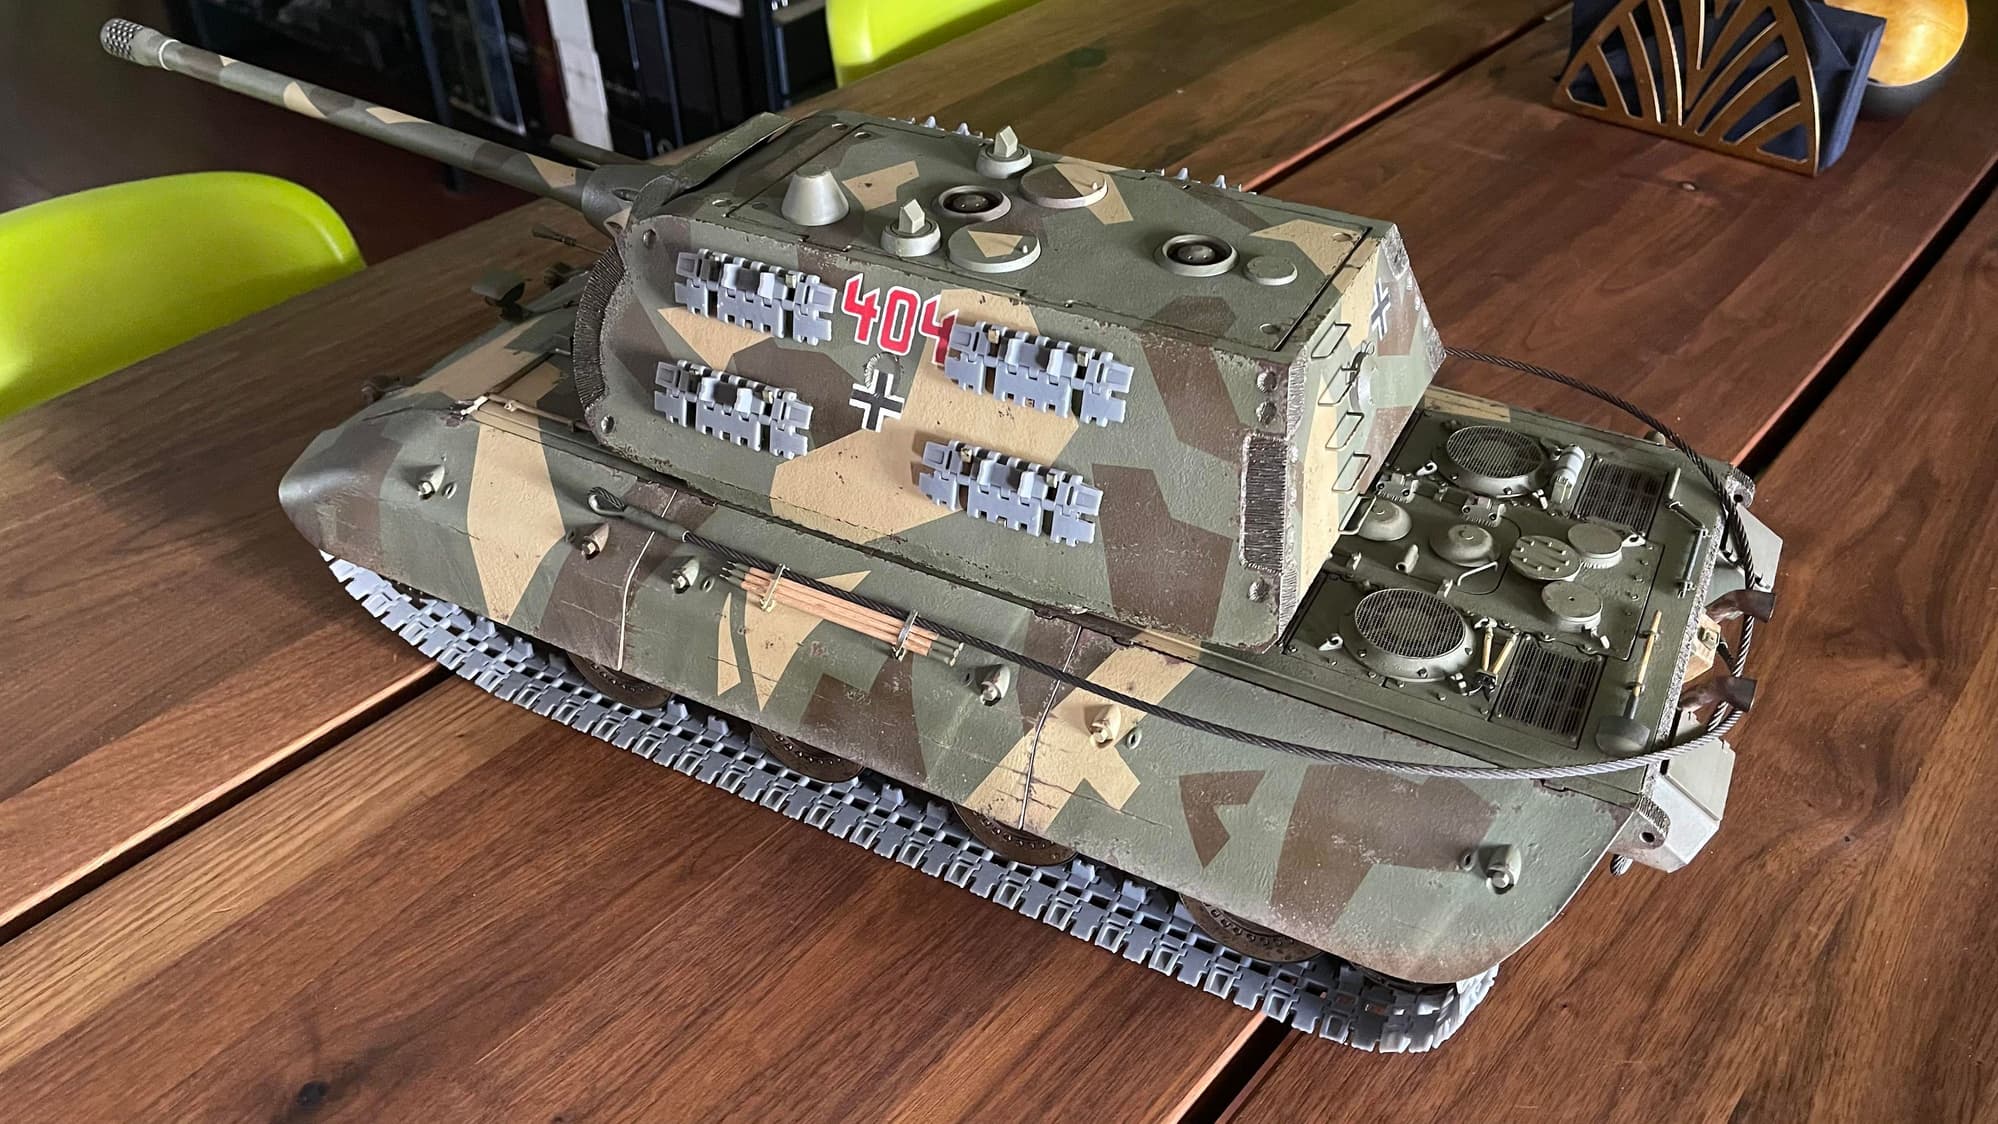
Most of the Tank has been primed ( with only the Running Gear & Tracks still left blank until successfully tested ):

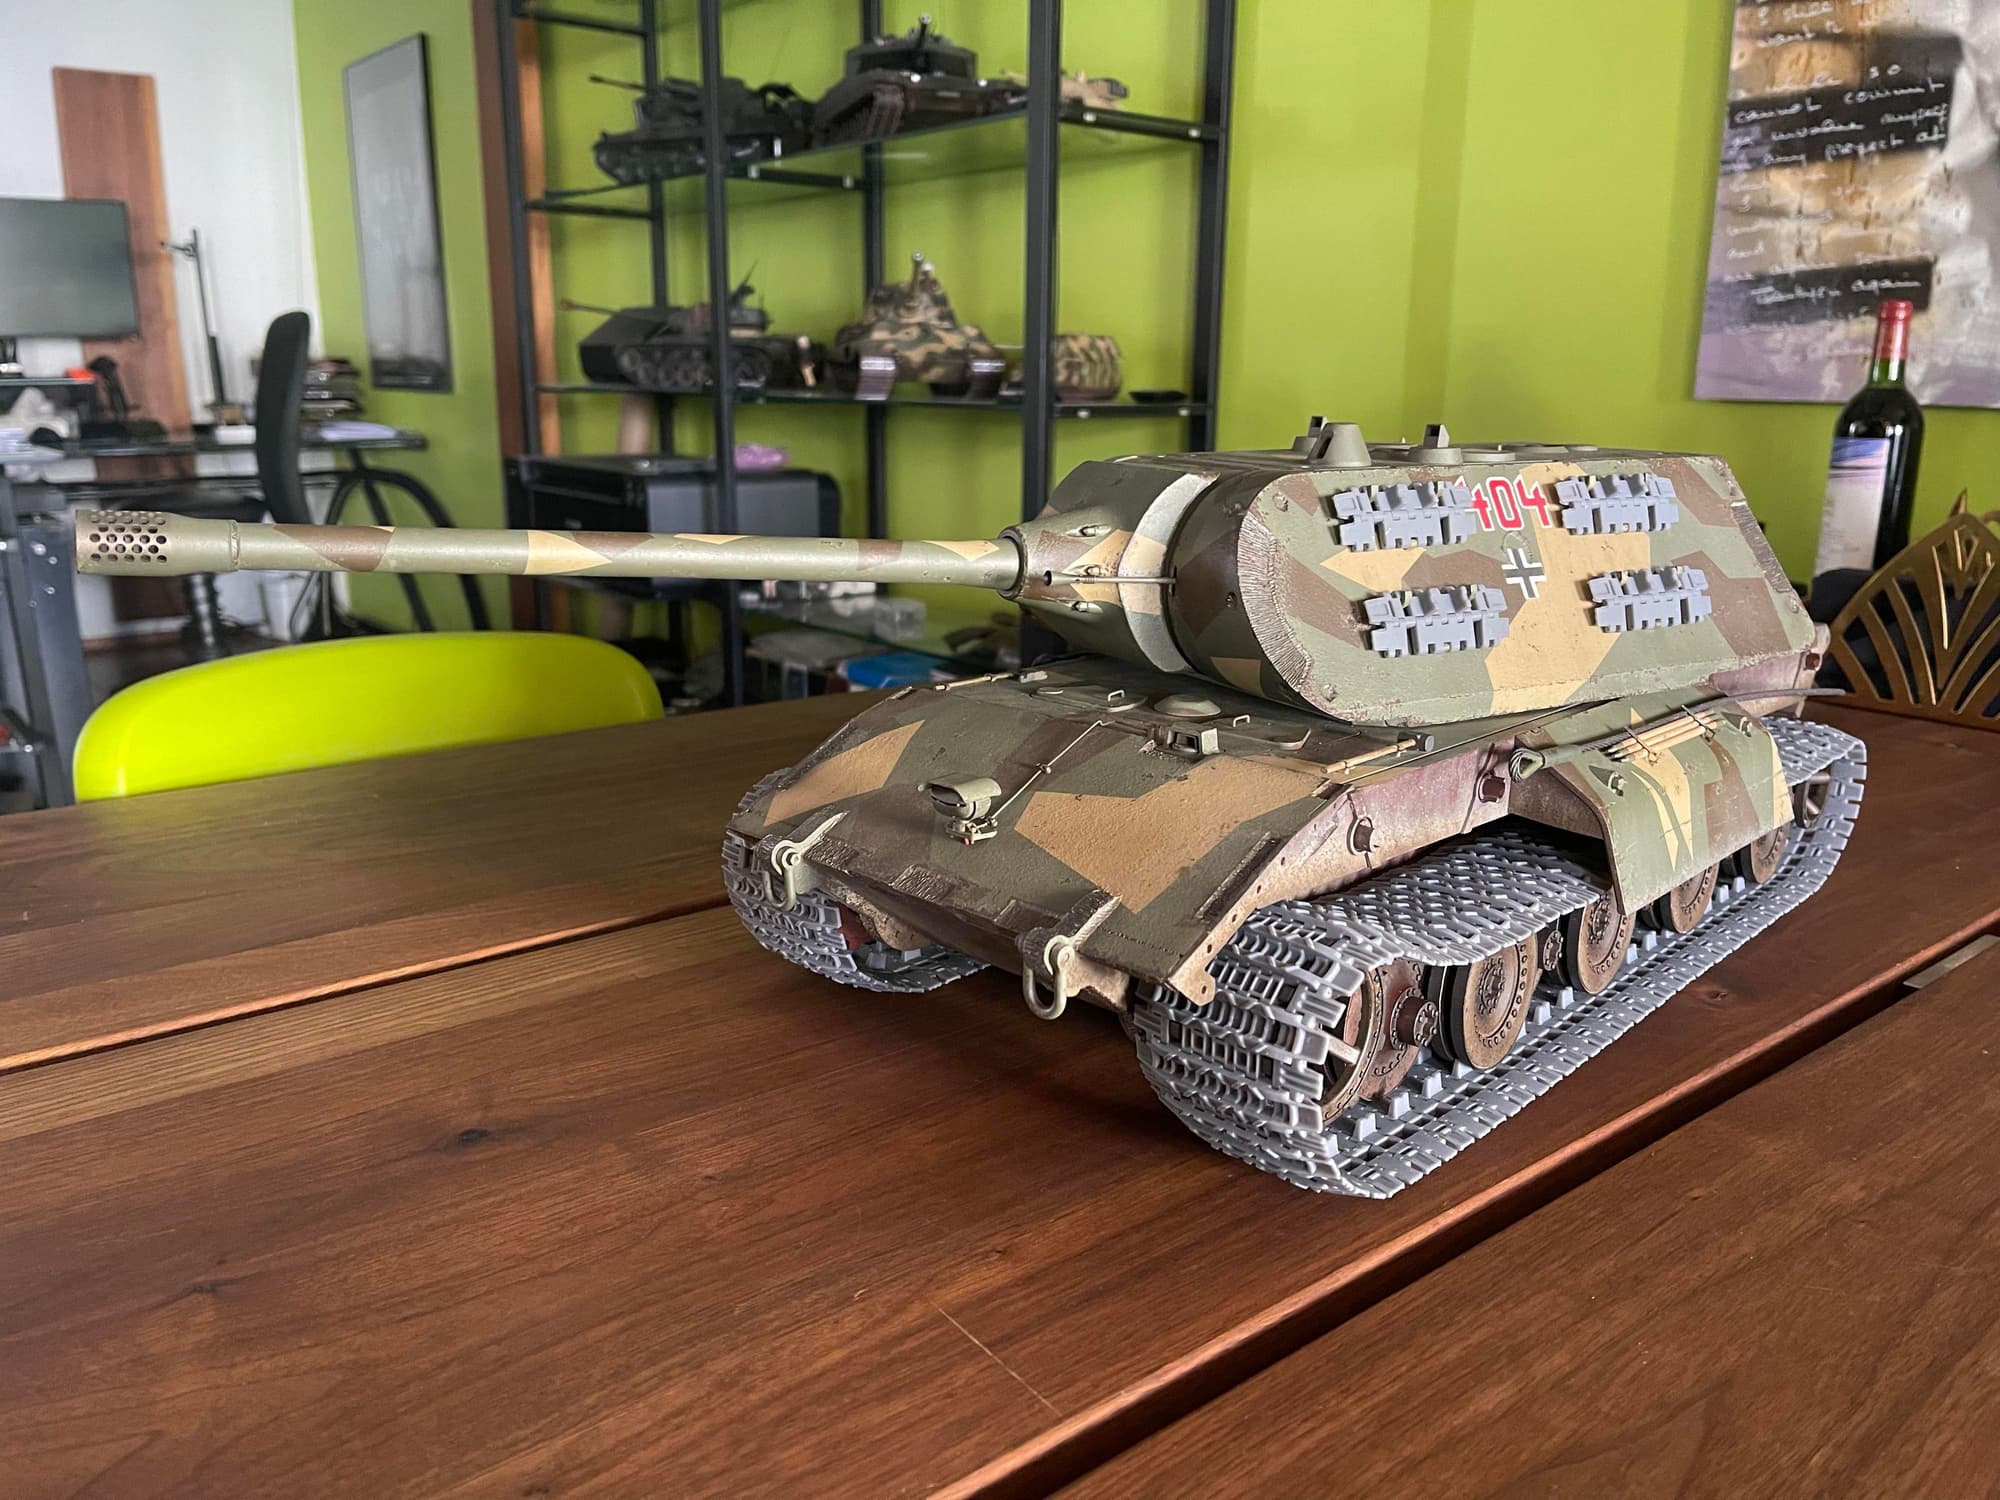
E-100 again in front of the Tamiya #56018 King Tiger

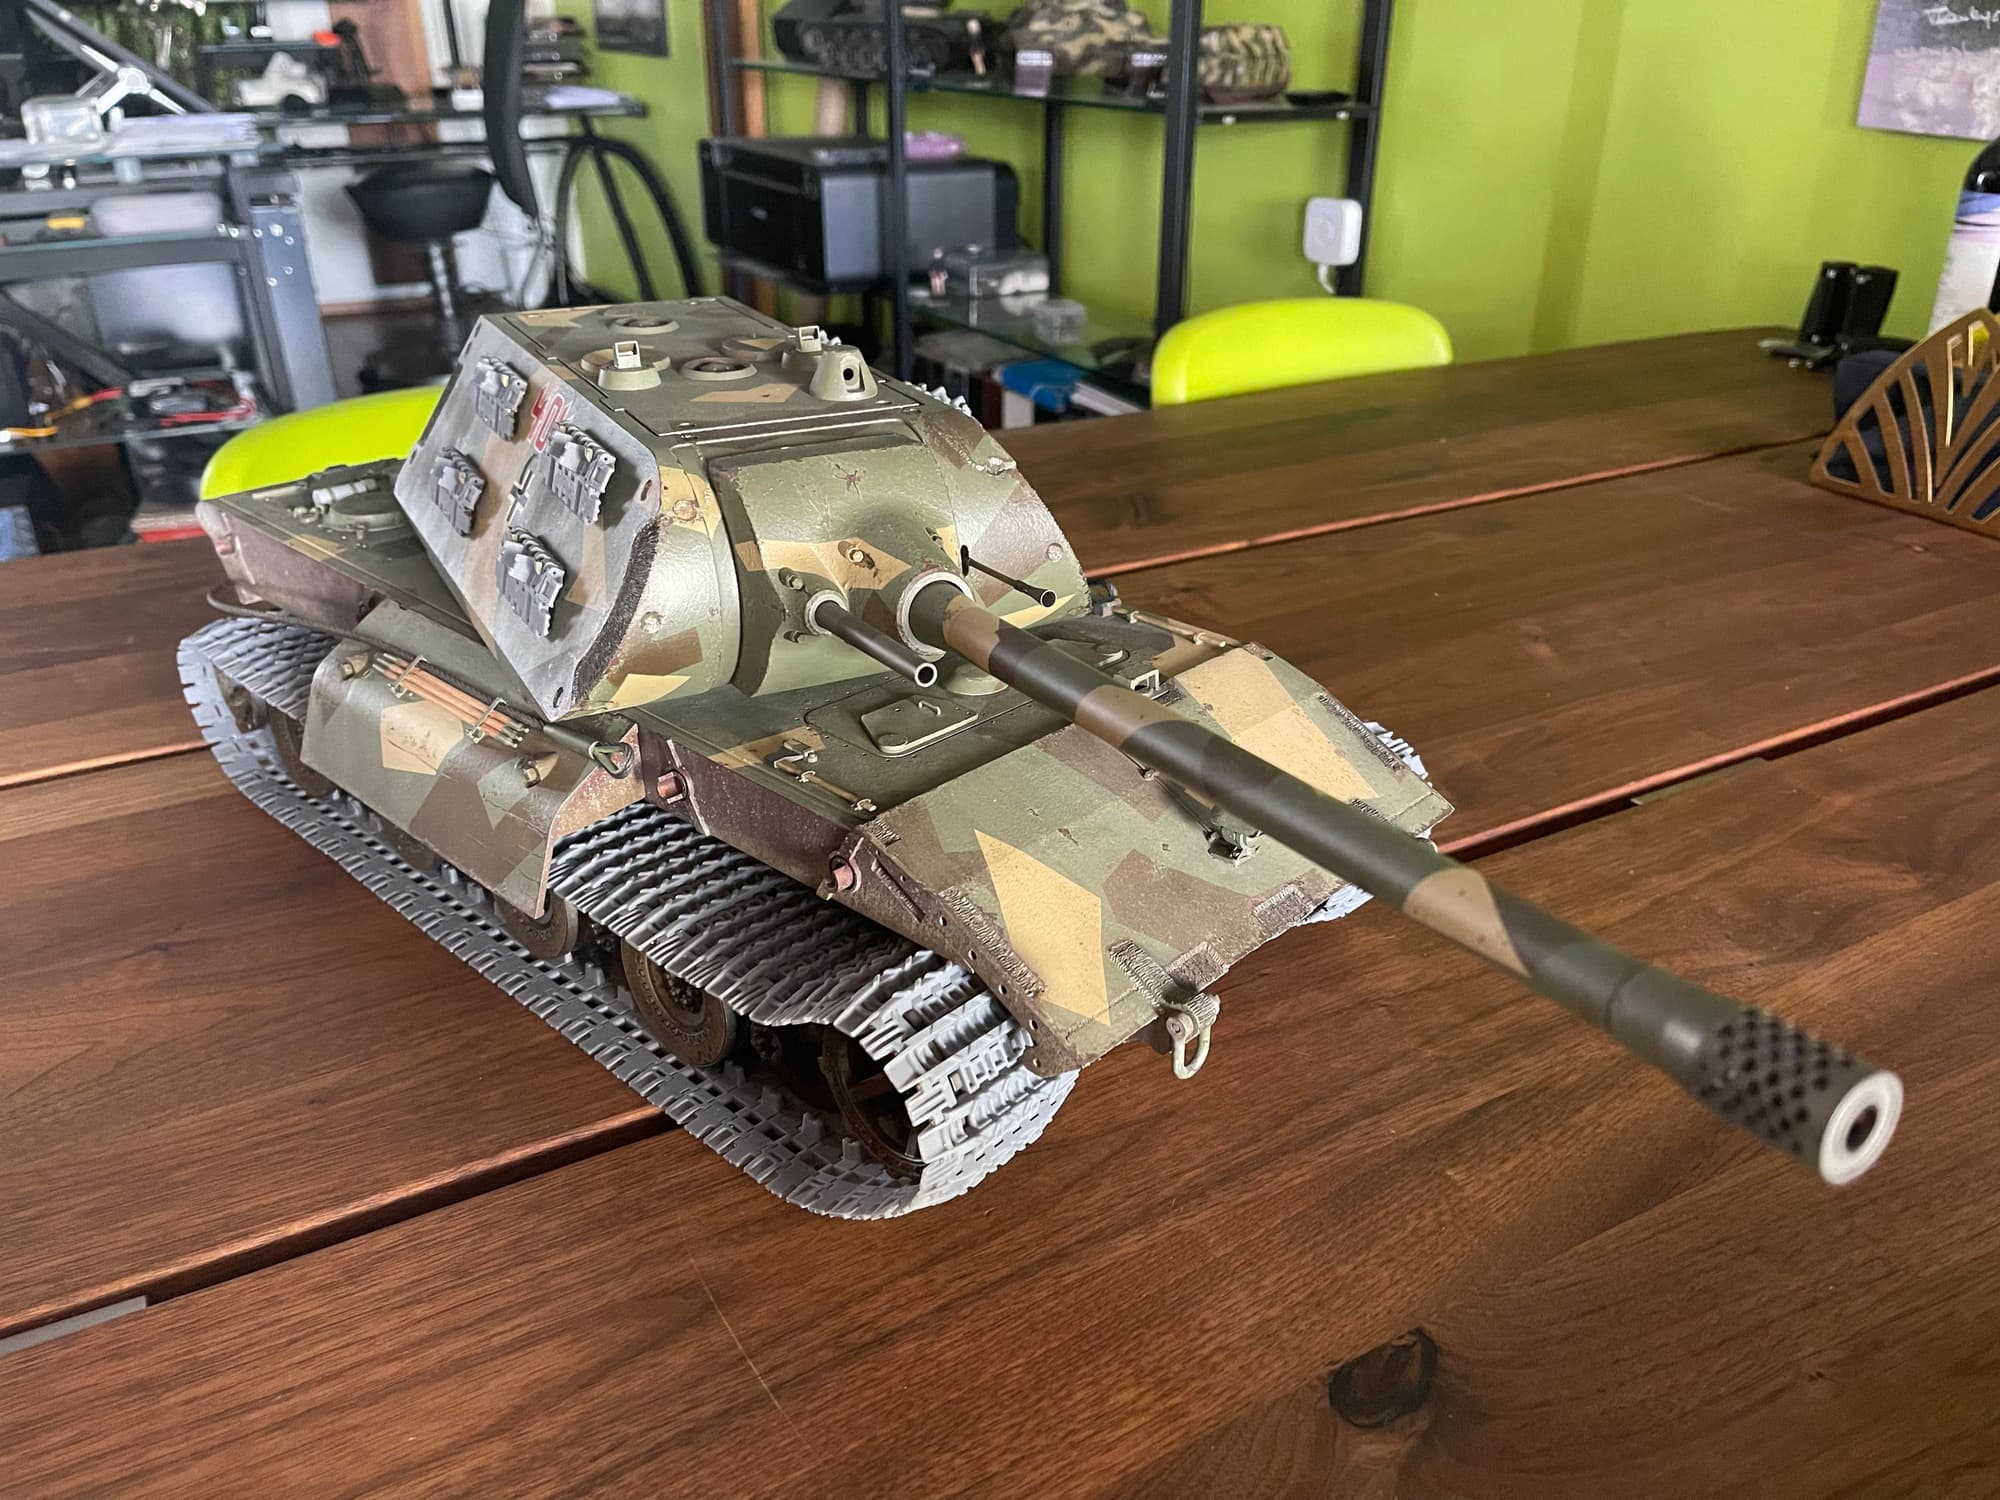
Rear view with the slightly modified Exhausts - Fairly pleased how the Cast Metal of the Exhaust Covers turned out - Despite having them glued on mirrored 😖

View of the Engine Deck.
Magnetically Detachable Skirts:
Covering up most of the Tracks would kind of be sad which is why I've - so far - decided to only be 3D printing the Center Pieces.
E-100 again in front of the Tamiya #56018 King Tiger
Rear view with the slightly modified Exhausts - Fairly pleased how the Cast Metal of the Exhaust Covers turned out - Despite having them glued on mirrored 😖
View of the Engine Deck.
Magnetically Detachable Skirts:
Covering up most of the Tracks would kind of be sad which is why I've - so far - decided to only be 3D printing the Center Pieces.
06-23-2022 | 11:00 AM
#9
My Feedback: (1)
I like these models. I like your project. I agree that with detail in the running gear it would be a shame to cover it up.
I'd print the complete set of side skirts but leave them off except for occasional perspectives of how it was envisioned to look
fully 'done up'.
I also have to admit a level of jealousy over the completeness of your construction. I mentioned I have a Ludwig aluminum
kit set of lower hull plates and most of the plates for a Maus-type turret. I have Geiswerk's track set for it. What I don't have is a
pattern or functional drawing for the side skirts. Any interest in selling a set of side skirts or print files? I don't even have a printer
that could print something that large.
Have you decided how you will create the suspension / road wheel assemblies? Will you use the coil springs as the prototype
used or the Belleville (washer) springs that the original design intended. I planned when it came time to make mine up that I wanted to try to use
Belleville types just to be different. I believe there are enough drawings of the design to make a go of it.
Great job on this. If ever a kit is in the offing put me on the list....
Jerry
06-23-2022 | 01:09 PM
#10
My Feedback: (1)
I like the project a lot. I'm thinking of printing an E100 for myself, but I like the Krupp turret better on the E100. Just a personal preference. Atilla from Attracks had cast some E100 tracks, sprockets, and idlers: https://www.facebook.com/Attracks.
Last edited by tankme; 06-23-2022 at 01:14 PM.
The following users liked this post:
MAUS45 (06-30-2022)
06-23-2022 | 04:33 PM
#11
Thread Starter
Btw... The two Buggers alone took me 8h+ to print with a 17.- cost in material...
The files would also need to address the intended method of installation:
- Magnetically requiring off scale Mounting Hardpoints for suitably large enough Magnets to fit into.
- Scale accurate Screw on Method.
To be honest I didn't even know Belleville was an option - And I also wouldn't know how to do them like that 🤔
And it's something I can still do at a later time 😁
Atilla from Attracks had cast some E100 tracks, sprockets, and idlers: https://www.facebook.com/Attracks.
If they end up being a problem, then replacing them with Pewter cast ones is still an option as it seems simple enough to do those myself unlike the larger ones probably requiring a centrifugal casting equipment.
06-23-2022 | 09:25 PM
#13
My Feedback: (1)
Y
.....probably cost an arm and a leg for a set. I'll have to see how my SLA 3D printed Tracks will hold up... My best guess will be the small Track Links being the weak spot due to their flaps being fairly thin.
If they end up being a problem, then replacing them with Pewter cast ones is still an option as it seems simple enough to do those myself unlike the larger ones probably requiring a centrifugal casting equipment.
1/10 scale models they weigh more than some of the smaller 1/10 scale tanks I have... Beautifully made (investment cast) and seem very strong in the bronze/brass alloy he used but I doubt they'll ever see much use...
06-25-2022 | 10:56 PM
#15
Thread Starter
Been looking for a nice Camo Pattern and I think I found something that will work for me... Basically, a WWII Tri-Tone Woodland Colors Pattern like the one on my King Tiger but with hard Geometric Shapes instead of the usual soft Contoured Splotches and a darker Red Oxide for areas like the insides of the Skirts and the Chassis Sides that would not have received a Camo Painting 🤔
As the lack of any sensible ranged Anti-Personnel Weaponry on the Tank started to bother me I decided to buy a 1:35 20mm Cannon Set which I'm repurposing for that task by mounting it into the Viewport Slit to the left of the Main Cannon:
Though with the Viewport Slit obviously not supporting the full range of motion of the Main Cannon but me absolutely wanting to have at least some movement in the otherwise static third Cannon if mounted directly to the Turret I had to come up with a mechanism that would allow it to be slaved to the Main Cannon while also complying to the limited Range of motion imposed by the Slit with the end result being a similar mechanic that I think can be found in PC Joysticks / RC Remote Gimbals 🤨
And on the actual model:
The amount of vertical motion ain't much but it's something ( I'm still missing a rubber band for it to work on its own 🤣 )
Last edited by Durahl; 06-26-2022 at 11:20 AM.
07-02-2022 | 07:04 AM
#16
Thread Starter
Ayo... Been a few days since my last Update...
Painting has mostly been done requiring only for things like the tools to have their painting added😁
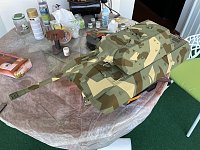
The Pattern is an almost 1:1 copy of a model I found while searching for Pattern Inspiration - I simply swapped black for brown.
Masking and Painting was done over two days.

Model with most of the Side Armor removed which is how I'll probably run the model.
Really digging how it came out 😁
Painting has mostly been done requiring only for things like the tools to have their painting added😁
The Pattern is an almost 1:1 copy of a model I found while searching for Pattern Inspiration - I simply swapped black for brown.
Masking and Painting was done over two days.
Model with most of the Side Armor removed which is how I'll probably run the model.
Really digging how it came out 😁
The following users liked this post:
MAUS45 (07-07-2022)
 07-05-2022 | 07:39 AM
#19
Thread Starter
Still waiting for parts like the Dowel Pins to be used as Axles to arrive from AliExpress and while reviewing the order of operations for the weathering while watching some Night Shift YouTube Videos I noticed I'm missing one of the components my local modelling shop didn't have in stock either so I'm kinda stuck waiting for things to arrive via mail.
Kinda bummed I grabbed a set of ABER Barrel Cleaning Rods plus Photo Etch Mounts meant for a King Tiger and gave it a shot - Didn't get far with the PE 😑

In the end I modelled and 3d printed the Mount and Wingnuts because folding that **** together would lead to nowhere.
I was at least able to salvage the hinged Thread the Wingnut would thread onto the Flap it would close and the Pin it attaches to - Good enough 😏

We now play the waiting game before I can continue... 😖
The only saving grace is a pack of O-Ring I've forgotten about having finally arrived allowing the final assembly of the motorized FPV / Rangefinder and watertight passthroughs for the Swing Arm Axles 😁
Kinda bummed I grabbed a set of ABER Barrel Cleaning Rods plus Photo Etch Mounts meant for a King Tiger and gave it a shot - Didn't get far with the PE 😑
In the end I modelled and 3d printed the Mount and Wingnuts because folding that **** together would lead to nowhere.
I was at least able to salvage the hinged Thread the Wingnut would thread onto the Flap it would close and the Pin it attaches to - Good enough 😏
We now play the waiting game before I can continue... 😖
The only saving grace is a pack of O-Ring I've forgotten about having finally arrived allowing the final assembly of the motorized FPV / Rangefinder and watertight passthroughs for the Swing Arm Axles 😁
The following users liked this post:
MAUS45 (07-07-2022)
07-08-2022 | 09:45 AM
#20
Thread Starter
Two days of weathering including Oil Washes / Dot Filtering and Acrylic Sponge / Brush Chipping...


Lucky me I'm super picky when it comes to either buying Tanks of that size or making my own, so doing that again will most likely not happen in quite a while 😑
Next thing will probably be adding some rust and grime effects...
Lucky me I'm super picky when it comes to either buying Tanks of that size or making my own, so doing that again will most likely not happen in quite a while 😑
Next thing will probably be adding some rust and grime effects...
07-18-2022 | 04:32 AM
#21
Thread Starter
The Steel Dowel Pins have finally arrived and as such...

...I was finally able to place the E-100 on its Running Gear.

The Running Gear works quite nicely though I would have preferred for a smidge more clearance between the Track and the Hull area above the Drive Sprocket as the Track every once in a while scrapes along it - Not great, not terrible...�
Painting of at least the Wheels, Drive Sprockets and Idlers can thus commence - I'm thinking of giving them the usual treatment with Red Oxide Primer and Tamiya XF-9 Hull Red for the inner wheels and areas while the outer wheels and areas would get a coating of just Tamiya XF-89 Dark Green 2 ( so no XF-88 Dark Yellow 2 and XF-90 Red Brown 2 ) followed by just the detailing using Silver for the Rims and obviously Weathering - Any thoughts on that idea? 🤔
My plans for creating my own Springs using Springsteel Wire was a bust mostly due to buying the wrong Wire Diameter and again not having even the right equipment - Who'd have thought 1mm Springsteel Wire would be this tough to work with... 🤕
But hey... AliExpress to the rescue - again? ( Amazon really needs to step up their game... Where's all the corporate greed when I need them 😁 )
Found a shop that was selling a plethora of sizes with the required Dimensions at varying Wire Diameter to experiment with for dirt cheap, so I got myself like 40 each in ranges between 0.4-0.8mm for less than 16 bucks in total incl. Shipping.
I've also ordered like 1'400x 70mm long Needle Pins with Heads to replace my current Track Link Pins made out of simple Brass Rods and a tendency to wander out with the oversized length allowing for the open end to receive a bend for securing them followed by shortening them where necessary. The remainder not used in this Project will find use in the Tamiya King Tiger having the same issue with wandering Tracks Pins and possibly the use in a Mouse project - This obviously delaying the Painting of the Tracks 😖
...I was finally able to place the E-100 on its Running Gear.
The Running Gear works quite nicely though I would have preferred for a smidge more clearance between the Track and the Hull area above the Drive Sprocket as the Track every once in a while scrapes along it - Not great, not terrible...�
Painting of at least the Wheels, Drive Sprockets and Idlers can thus commence - I'm thinking of giving them the usual treatment with Red Oxide Primer and Tamiya XF-9 Hull Red for the inner wheels and areas while the outer wheels and areas would get a coating of just Tamiya XF-89 Dark Green 2 ( so no XF-88 Dark Yellow 2 and XF-90 Red Brown 2 ) followed by just the detailing using Silver for the Rims and obviously Weathering - Any thoughts on that idea? 🤔
My plans for creating my own Springs using Springsteel Wire was a bust mostly due to buying the wrong Wire Diameter and again not having even the right equipment - Who'd have thought 1mm Springsteel Wire would be this tough to work with... 🤕
But hey... AliExpress to the rescue - again? ( Amazon really needs to step up their game... Where's all the corporate greed when I need them 😁 )
Found a shop that was selling a plethora of sizes with the required Dimensions at varying Wire Diameter to experiment with for dirt cheap, so I got myself like 40 each in ranges between 0.4-0.8mm for less than 16 bucks in total incl. Shipping.
I've also ordered like 1'400x 70mm long Needle Pins with Heads to replace my current Track Link Pins made out of simple Brass Rods and a tendency to wander out with the oversized length allowing for the open end to receive a bend for securing them followed by shortening them where necessary. The remainder not used in this Project will find use in the Tamiya King Tiger having the same issue with wandering Tracks Pins and possibly the use in a Mouse project - This obviously delaying the Painting of the Tracks 😖
07-18-2022 | 02:11 PM
#22
Wow, looks great so far!!!
 07-26-2022 | 07:28 AM
#24
Thread Starter
It's been a few more days since I was able of getting the model to stand onto its own... uhm... feet:
Unfortunately, the use of SLA 3D Printed Swing Arms has proven to be insufficient for the not even final weight model as over the course of just a few days they've experienced material creep causing the wheels to be pushed outwards.
Casting them in Pewter will thus end up being a necessity for the model to be turned into a Full Option ready RC Model.
By the time this happens I may also be remaking the Wheels in a mix of SLA 3D Prints for the detailed Covers and either 3D Printed ASA or machined Aluminium for the structural Rims as the fully SLA 3D Printed ones have proven to be quite fragile along the Rim edge they ride on. Knowing this I've still decided to paint them so the model wouldn't remain with an unpainted Running Gear for the foreseeable time ( Tracks will receive their paint once the replacement Tracks Pins have arrived ).

Only after fully assembling the model have, I found out that the Drive Sprockets too are kinda wobbly too necessitating a different approach there as well which I expect will end up a mix of casting a slightly oversized Wheel followed by CNC machining it down to spec as a whole or just the areas interfacing with the Gearbox Axles and Tracks. Quite literally the only Running Gear component I'm super happy about how it turned out would be the Idler Wheels - They run perfectly round. Sigh... Many lessons were learned in the making of my first - and still unfinished - scratch build Project but improvements can be made. Just not right now 😁
How the Towing Cables are being routed when the Model has its full complement of Skirts attached to it. Similar to how I did it with the Wooden Block strapped to the rear the Wire Cutters ( or whatever those are ) too have received some hold-down Straps made out of the Photo Etch Framing the Engine Deck Grilles resided in.
So, yea... Other than getting my hands on another one of the super sexy flexible Antennas from DKLMRC there's nothing much to add to the model for aesthetic reasons 🤔
The next most likely Update may either be one on the painting of the Tracks or the addition of working Springs but either of them are going to take their time 😁
Unfortunately, the use of SLA 3D Printed Swing Arms has proven to be insufficient for the not even final weight model as over the course of just a few days they've experienced material creep causing the wheels to be pushed outwards.
Casting them in Pewter will thus end up being a necessity for the model to be turned into a Full Option ready RC Model.
By the time this happens I may also be remaking the Wheels in a mix of SLA 3D Prints for the detailed Covers and either 3D Printed ASA or machined Aluminium for the structural Rims as the fully SLA 3D Printed ones have proven to be quite fragile along the Rim edge they ride on. Knowing this I've still decided to paint them so the model wouldn't remain with an unpainted Running Gear for the foreseeable time ( Tracks will receive their paint once the replacement Tracks Pins have arrived ).
Only after fully assembling the model have, I found out that the Drive Sprockets too are kinda wobbly too necessitating a different approach there as well which I expect will end up a mix of casting a slightly oversized Wheel followed by CNC machining it down to spec as a whole or just the areas interfacing with the Gearbox Axles and Tracks. Quite literally the only Running Gear component I'm super happy about how it turned out would be the Idler Wheels - They run perfectly round. Sigh... Many lessons were learned in the making of my first - and still unfinished - scratch build Project but improvements can be made. Just not right now 😁
How the Towing Cables are being routed when the Model has its full complement of Skirts attached to it. Similar to how I did it with the Wooden Block strapped to the rear the Wire Cutters ( or whatever those are ) too have received some hold-down Straps made out of the Photo Etch Framing the Engine Deck Grilles resided in.
So, yea... Other than getting my hands on another one of the super sexy flexible Antennas from DKLMRC there's nothing much to add to the model for aesthetic reasons 🤔
The next most likely Update may either be one on the painting of the Tracks or the addition of working Springs but either of them are going to take their time 😁
The following users liked this post:
MAUS45 (07-27-2022)
07-26-2022 | 09:12 AM
#25
My Feedback: (1)
I like the idea of using 3D printed covers to get the detail on the road wheels, but I wouldn't machine them out of aluminum, I would probably use stainless steel. The road wheels are unsprung weight so it really shouldn't hurt you if they're heavier and they won't be all that much heavier, but the stainless steel would wear and hold up much, much better than aluminum. Especially if you're using 6061. That stuff is soft as butter.

