


OFFICAL RC18R THREAD
 06-18-2009, 05:20 AM
#626
Member
Join Date: Jun 2009
Location: Tacoma,
WA
Posts: 79
Likes: 0
Received 0 Likes
on
0 Posts
I found some brushless systems I'm interested in, do you think 7800kv is overkill?
Should I just get 5200kv?
This is just for bashing mostly and some onroad on a 7.4 volt lipo
Should I just get 5200kv?
This is just for bashing mostly and some onroad on a 7.4 volt lipo
 06-18-2009, 08:20 AM
#627
Senior Member
My Feedback: (10)
Join Date: Jul 2005
Location: Montreal,
QC, CANADA
Posts: 1,299
Likes: 0
Received 0 Likes
on
0 Posts
If you were racing on a tight track I would say go for the 5200 because you don't need the top speed; linear throttle response is what you need.
For bashing, go for the 7800 you just can't get too high a KV in the R
For bashing, go for the 7800 you just can't get too high a KV in the R
06-18-2009, 01:29 PM
#628
Senior Member

Join Date: May 2008
Location: Crown Town,
CA
Posts: 419
Likes: 0
Received 0 Likes
on
0 Posts
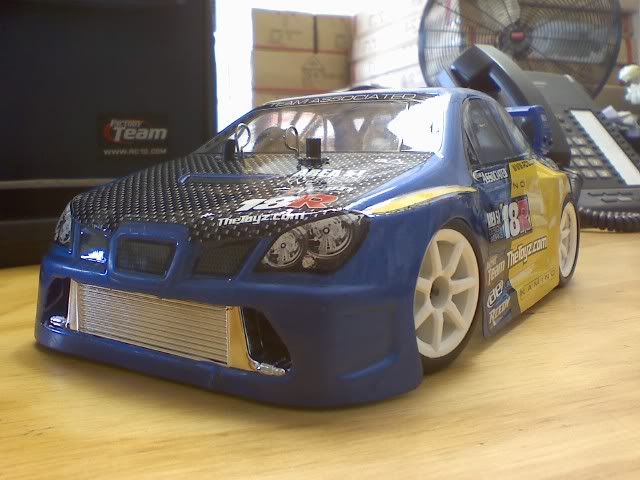
So as i promised, i got some photos of the new deep dish / offset drift wheels.
Frist, i'll show a little how to for any of those interested in giving your rims a little bit more of a "real" look to them.
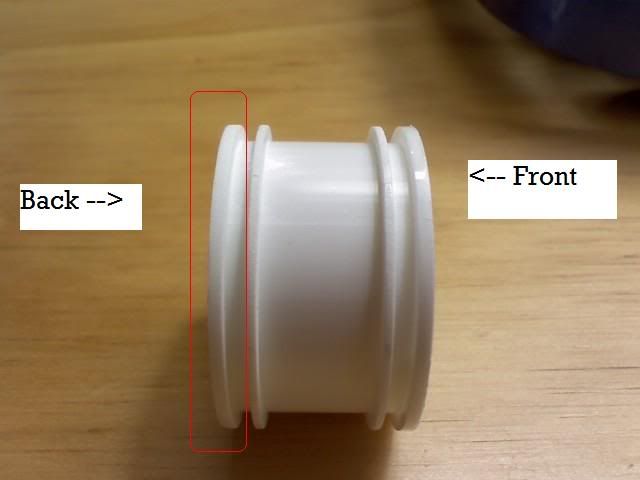
We start off with a pair of AE unmounted rims. Your choice in color. I chose white as i like how it goes with the blue.
You can see in this photo, i have outlined the section of the back side of the wheel to be cut off. I used a small saw blade though im sure there much easier ways of doing this. Youll want to cut it flush up against the inner "ring".
When you've made your cut, you should end up with something similar to this.
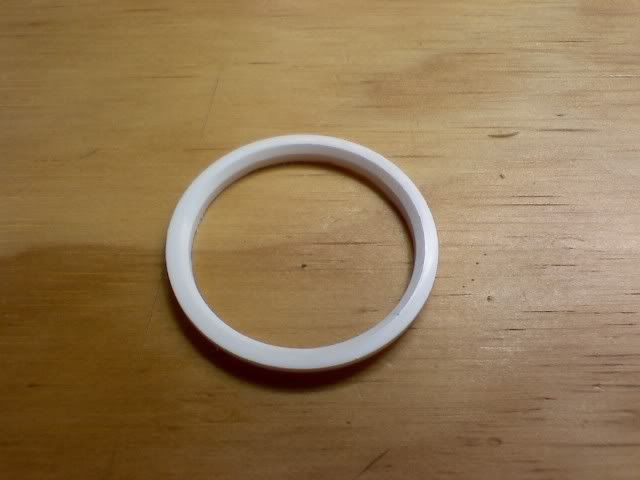
This picture shows what the back side looks like after it is cut. You can smooth it out better then i did with some sand paper. Also, youll see that the tire flushes up nicely with the inner "ring".

And this is what the front should look like. Notice the nice new offset!
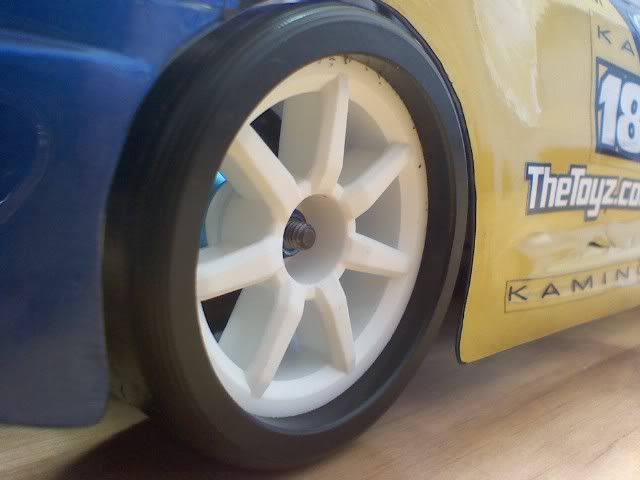
Now you can either glue it to the front of the rim or you can glue it to the tire after you have glued or secured the rim to the tire. I used a nice bead of hot glue along the middle of the rim and the back "ring". Hot glue is a bit thicker then super glue and will hold it plenty strong enough for drifting. Also should be able to break the rim free from the tire without and damage to the rim or the tire.
And your finished product will look something like this!
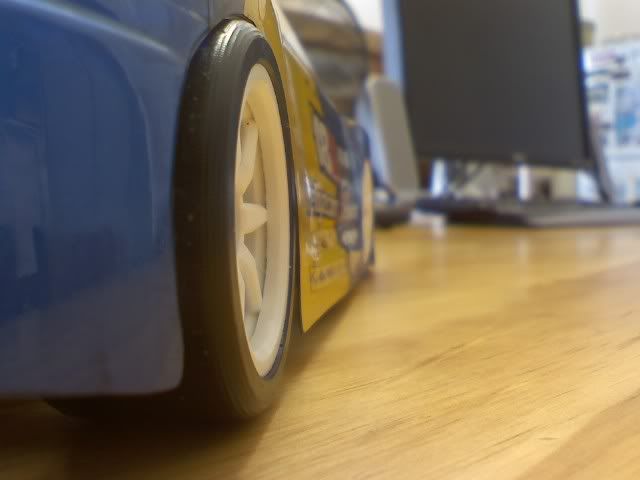

And for more "realness", i added an HPI intercooler lol.

Frist, i'll show a little how to for any of those interested in giving your rims a little bit more of a "real" look to them.
We start off with a pair of AE unmounted rims. Your choice in color. I chose white as i like how it goes with the blue.
You can see in this photo, i have outlined the section of the back side of the wheel to be cut off. I used a small saw blade though im sure there much easier ways of doing this. Youll want to cut it flush up against the inner "ring".
When you've made your cut, you should end up with something similar to this.
This picture shows what the back side looks like after it is cut. You can smooth it out better then i did with some sand paper. Also, youll see that the tire flushes up nicely with the inner "ring".
And this is what the front should look like. Notice the nice new offset!
Now you can either glue it to the front of the rim or you can glue it to the tire after you have glued or secured the rim to the tire. I used a nice bead of hot glue along the middle of the rim and the back "ring". Hot glue is a bit thicker then super glue and will hold it plenty strong enough for drifting. Also should be able to break the rim free from the tire without and damage to the rim or the tire.
And your finished product will look something like this!
And for more "realness", i added an HPI intercooler lol.
 06-19-2009, 02:11 PM
#632
Senior Member
Join Date: May 2008
Location: Crown Town,
CA
Posts: 419
Likes: 0
Received 0 Likes
on
0 Posts
Just got a kinda cool idea for an even more personalized wheel, i could take the cut off section and either dye or paint it to have a colored lip! My mind is working circles today haha 
EDIT: See this if you havent already http://www.rcuniverse.com/forum/m_79...tm.htm#8862434
EDIT: See this if you havent already http://www.rcuniverse.com/forum/m_79...tm.htm#8862434
06-19-2009, 03:27 PM
#633
Senior Member
My Feedback: (2)

Join Date: Jun 2008
Location: Panama City Beach,
FL
Posts: 886
Likes: 0
Received 0 Likes
on
0 Posts
ORIGINAL: aflipz
If someone made body/shock posts a nose cone/front wing that replaces the front bumper for easy replacement and a body that loosely interprets/mimics the F1 car I would give them a blank check! It would look particularly cool with 3racing wheels because the fronts are narrower which is more
If someone made body/shock posts a nose cone/front wing that replaces the front bumper for easy replacement and a body that loosely interprets/mimics the F1 car I would give them a blank check! It would look particularly cool with 3racing wheels because the fronts are narrower which is more


i personally think the better looking option would be to use a buggy body, buggy wing in the front & a lexan nose cone that terminates at the shock towers. i think this one would look more realistic than the first example if you were to simply swap the wheels & tires, swap the rear wing and add a front wing.
 06-21-2009, 04:32 PM
#634
Senior Member
Join Date: May 2008
Location: Crown Town,
CA
Posts: 419
Likes: 0
Received 0 Likes
on
0 Posts
Alright well, i didnt go with my initial plans on the Tomei / Cusco paint scheme. Im now trying to find a place i can get to duplicate the decals that are on it so i can make a semi replica of it. So for now, my freshly painted body is painted in Pactra Outlaw black and will be a 2nd beater body Probley use all the factory provided decals unless my LHS carries Yokomo decal sheets.
Probley use all the factory provided decals unless my LHS carries Yokomo decal sheets.
06-21-2009, 05:26 PM
#635
Junior Member
Join Date: Jun 2009
Location: norfolk, VA
Posts: 4
Likes: 0
Received 0 Likes
on
0 Posts
Dude you should try the Decal Idea that is in the new Xtreme Rc Mag. Print them out on shipping lables and cover with clear tape. Looks to be a pretty good temp idea. If you need help designing Hit me up. I work at a sign shop and have done so since 1995. I have all the software at home. I will be glad to see what I can do.
As for my rc18r She has transformed. The rear diff has been tightend up all the way, rc18t Stub axles with Mini T Tires and wheels Paddles in the rear. This thing is a blast in the sand with 7 cells. STUPID question here. I have a New LOSI 12t ESCout of a Desert truck the same as the slider. It is very smal the same size as the stock AE one. Can I use that with a 370 Motor???
As for my rc18r She has transformed. The rear diff has been tightend up all the way, rc18t Stub axles with Mini T Tires and wheels Paddles in the rear. This thing is a blast in the sand with 7 cells. STUPID question here. I have a New LOSI 12t ESCout of a Desert truck the same as the slider. It is very smal the same size as the stock AE one. Can I use that with a 370 Motor???
06-21-2009, 10:33 PM
#637
Senior Member
My Feedback: (10)
Join Date: Jul 2005
Location: Montreal,
QC, CANADA
Posts: 1,299
Likes: 0
Received 0 Likes
on
0 Posts
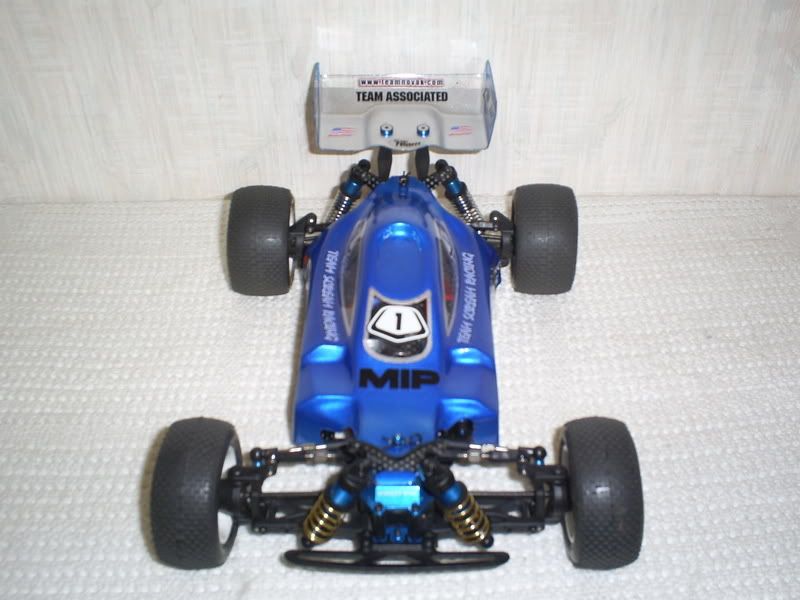
Cool stuff sonicj, I had hever seen that body anywhere. It's at the very least quite different than what we are used to seeing.
Turns out my 8900kv motor/sidewinder micro sport are drawing a lot more power than Ithough. 34.7A peak and 200 watts! I definitely need to use the stronger packs only and pull down that aggressive gear ratio.
The body made a gigantic difference, there is a bump that I am hitting close to the manhole, it usually sends the car flipping if I don't let off throttle, with this body I can go right over it without lifting. Removing all those excess body posts, the lighter weight of the body and it's reduced drag make it handle so well as you can see I have to get used to it (and reduce steering ratio, what used to plow straight in understeer now makes the car do a sharp U turn that would snap your neck with G forces)
Today I was running without the nose cone and a 19 gram weight penalty sitting up high in the cockpit. Ican't wait to see what it will do without that ballast on 4 new tires and strong packs.
On the surface where the video was shot, which shore hardness foam tires by 3racing do you think would be best?
http://www.vimeo.com/5266600 (you may need to copy and paste the link in a new browser window)
06-22-2009, 07:24 PM
#639
Senior Member
My Feedback: (10)
Join Date: Jul 2005
Location: Montreal,
QC, CANADA
Posts: 1,299
Likes: 0
Received 0 Likes
on
0 Posts
Thanks!
I think it looks a bit bulky, I'd like to one about as long but with a little less girth. But you get the idea. See how RPMmakes a nice one piece bumper that doubles as the suspension arm pin holder; I'd like them to make a light but strong front wing and cone all in one piece that fits the car. Ideally it should allow you to take to top deck off without removing the bumper.
Just for fun, I jammed a 3 cell 1320 in there and everything fits nice and tight. But the way things were cooking in there on 2S I'd better think about adding some ventilation first.
06-22-2009, 11:27 PM
#640
Senior Member
Join Date: Jul 2008
Location: Malibu,
CA
Posts: 419
Likes: 0
Received 0 Likes
on
0 Posts
Ihave a major problem with the MIPSuper Diffs.
They are causing major binding?!
Ihave all shims removed and everything is soo tight, with the motor removed, when I turn one wheel the wheel moves the opposite direction.
***?? The super diffs have been out for years how could Ibe having a problem?
They are causing major binding?!
Ihave all shims removed and everything is soo tight, with the motor removed, when I turn one wheel the wheel moves the opposite direction.
***?? The super diffs have been out for years how could Ibe having a problem?
06-22-2009, 11:38 PM
#641
Senior Member
My Feedback: (10)
Join Date: Jul 2005
Location: Montreal,
QC, CANADA
Posts: 1,299
Likes: 0
Received 0 Likes
on
0 Posts
I think your problem might be elsewehere.
How tight do you keep your diffs? (they can be tight enough to almost locked or loose enough so there is no friction at all (this is completely open) In the later, even the slightest drivetrain drag will be enough to let the (open)diff do it's job like you describe. Your bearings might be dirty? (assuming you checked them all and the diffs kick in even though you got them really tight)
with the motor off, wheels straight, if you push it forward does it keep going?
06-23-2009, 01:33 AM
#642
Senior Member
My Feedback: (2)
Join Date: Jun 2008
Location: Panama City Beach,
FL
Posts: 886
Likes: 0
Received 0 Likes
on
0 Posts
im diggin the f1 look! what motor are you running? its gotta be a sauna under that lid with that gearing! i was thinking about cutting some ventilation holes in my buggy body then possibly using some plastic mesh screen material over the openings.
i would think focusing on a proper front wing might yeild better results over the nose cone. nose cone should be a peice of cake once you have a secure wing in place.
that data logger is sweet!
just my 2¢ fwiw...
i would think focusing on a proper front wing might yeild better results over the nose cone. nose cone should be a peice of cake once you have a secure wing in place.
that data logger is sweet!
just my 2¢ fwiw...
06-26-2009, 11:17 PM
#644
Senior Member
My Feedback: (10)
Join Date: Jul 2005
Location: Montreal,
QC, CANADA
Posts: 1,299
Likes: 0
Received 0 Likes
on
0 Posts
Ok so the 18B body allowed me to use everything the 1320mah 3 cell was able to give me for several consecutive passes at WOT several seconds in a row. MAN is that ever fast... TOO fast. It hit a curb and missed a nice old man on the sidewalk by a few feet before crashing deep into a large shrub. LUCKY no one was hurt. Luckier still; zero damage. It was probably still doing about 45mph when it hit the shrub.
Lesson learned, I now know exactly how fast too fast is. I think I will stick to 2s packs in the future. Still, always looking for little things to tweak to make it handle better I decided to attempt the "lengthened wheelbase" mod. This involves mostly flipping over all 4 suspension arms and drilling new holes for the ball studs A few tweaks had to be applied here and there to make it all work but it seems like it's going to be a real winner!
So far I only tried it indoors on a small patch of carpet and some hardwood, it definitely doesn't seem as eager to snap it's tail as it used to. Tentatively, I'll say this will help stabilize this thing and dramatically reduce spin-outs.
06-27-2009, 10:00 AM
#645
Senior Member
Join Date: May 2008
Location: mill valley,
CA
Posts: 434
Likes: 0
Received 0 Likes
on
0 Posts
wow... lucky you didn't break anything (people included  ) on an 8900Kv motor note, I notice mine draws a lot of power also.. with the mamba esc it gets my 3s pretty warm, like 130F +/- 5 or 10 I reckon.. the sticker on the battery says don't let it get over 156F which I have not done, but it's getting close kinda.. I was thinking about gearing the motor down to 14 on the pinion..
) on an 8900Kv motor note, I notice mine draws a lot of power also.. with the mamba esc it gets my 3s pretty warm, like 130F +/- 5 or 10 I reckon.. the sticker on the battery says don't let it get over 156F which I have not done, but it's getting close kinda.. I was thinking about gearing the motor down to 14 on the pinion..
06-27-2009, 01:49 PM
#646
Senior Member
Join Date: May 2008
Location: Crown Town,
CA
Posts: 419
Likes: 0
Received 0 Likes
on
0 Posts
Aflipz, could you post some close ups or even a small write up on what exactly you did to flip the arms around. Im very interested in this! My back end likes to "wobble" alot under heavy excelleration. Would the adjustable turnbuckles be needed? I have them but reverted back to the stock plastic ones as i feel i get better handling with them [sm=confused.gif]
peelin_out, whats the C rating of the battery? Thats sounds pretty dang hot for a battery to be running. My 3s never gets past 100F even after super hard WOOT runs. Though i am using a 14t pinion and 55t spur, i do run a "hotter" motor being 9400kv.
peelin_out, whats the C rating of the battery? Thats sounds pretty dang hot for a battery to be running. My 3s never gets past 100F even after super hard WOOT runs. Though i am using a 14t pinion and 55t spur, i do run a "hotter" motor being 9400kv.
06-27-2009, 01:54 PM
#647
Senior Member
Join Date: May 2008
Location: mill valley,
CA
Posts: 434
Likes: 0
Received 0 Likes
on
0 Posts
hrm.... it's not high... 15c with 20c burst.. I haven't had any issues with my 6800Kv and the same esc + batt combo.. I get good run times and good power from the battery... I think the motor is draining it at max level for long durations though, which is why it's warming up so much...
06-27-2009, 08:31 PM
#648
Senior Member
My Feedback: (10)
Join Date: Jul 2005
Location: Montreal,
QC, CANADA
Posts: 1,299
Likes: 0
Received 0 Likes
on
0 Posts
Peelin out, first off gearing; My early results were done in very low ambient temperatures without actual data logger info so pretty much eyeballing how much current it was drawing I was also going by touch (heat) and gut feeling as to what gears gave best results, worst still back then we were alternating between A123 2s packs an 2s lipos; retained voltage under load varies wildly between those two types and I think the A123's warranted the 17/55 gearing, and it "seemed" faster on 2s. I think what made me get away with it then is the ample ventilation the bigger bodies had and the cooler air (20 degrees celcius air vs 30 degrees cecius air temp does not quite cool components at the same rate)
After seeing the shocking data logger graph and it's burst currents going upwards of 34A on 2s lipos (and motor getting quite hot) I decided to try pulling the gearing back; yesterday I ran a 17/60 gearing and lost no top speed at all (confirmed in top speed drag race with identical car, identical pack etc only difference being gearing, and we were dead even). I am convinced I could go all the way to 14/60 and the motor would unload some more without running out of rpm's for top speed on 2s. More so on 3s. So yeah I think we have been running these things with way too long ratios, which would explain the heat... amazing how much abuse these little motors have endured.
Mousesi2k;
I'm a bit tight on time right now for a detailed writeup with pics but let's see if this can help a little;
1) I use the titanium turnbuckles, they are essential because a couple of parameters had to be corrected a little due to the offset created by flipping the arms. there is no logical reason why they should give you poor handling unless they are set at lengths that throw the alignment off or, and I have seen the later happen; you might have some binding issues particularly if you once over screwed the links it creates a dimple inside the ball cup as the threaded rod meets the inside of the cup wall. You can remedy this by taking long nose pliers and squeezing the cup against the ball a couple of times, this should loosen the load in there. Basically you put them all on the car without the shocks; when you move the suspension arms all the way up and let go their own weight should be enough to pull it all the way back down, if it doesn't the car will handle like garbage regardless of how good an alignment setup you have.
2) what needed to be done;
I had to take off the arms, and on the back side (the completely flat one) there is no screw hole for the ball stud so you have to drill them, don't recall the exact size bit I used but it's roughly the same size as the threaded part of the ball studs, minus a little bit (you want it to thread into plastic not air) I did this with a hand drill; made pilot holes by turning the tip of a hobby blade on the desired location then finished with the drill. The location of the holes is crucial as they will determine ride height; I am using B type body mounts so I had to eyeball it to get about 4MM + sag ride height, but in your case it should be easy as pie; to keep the same height you would place your holes at the same distance from the end of the arms as the original holes are, only on the other side of the arm.
Other than that, there isn't much to it, I did have another "special needs" specific to my vehicle; I am using the team associated hitec servo mounting kit along with a HS65mg servo in combination with a DP drag link steering linkage. For some reason that I don't fully understand, even with the arms straight this mount had the servo horn sitting a couple of MM rearward of where it should have been, this was OK by my standards with the stock arm position, but pushing the C hubs farther forward meant the linkages came at it with too much angle and caused binding; I simply made shims to push the servo forward a bit and this worked perfectly.
3) body may not like this extra wheelbase; you might have to enlarge the wheel wells, this of course is not a concern with the buggy body.
I hope this helps... Let me know if you need anything else.
Disclaimer; your mileage may vary... I have not fully tested this on the wide open road and don't know if it's worth it yet, but this is not my idea I KNOW I have read about others doing this somewhere and swearing by it, it's all reversible (except the holes drilled in the A arms) if it doesn't work it's going back to stock.
06-28-2009, 12:11 AM
#649
Senior Member
Join Date: Apr 2007
Location: Thousand Oaks,
CA
Posts: 8,958
Likes: 0
Received 0 Likes
on
0 Posts
aflipz great cars and even better story  . I see you are running the $15 hobby city brushless motors, what KV are you running on them. I had the 4200 in my 18T before i cooked the motor by having my gearing super tight [
 ]
]
. I see you are running the $15 hobby city brushless motors, what KV are you running on them. I had the 4200 in my 18T before i cooked the motor by having my gearing super tight []
06-28-2009, 08:29 AM
#650
Senior Member
My Feedback: (10)
Join Date: Jul 2005
Location: Montreal,
QC, CANADA
Posts: 1,299
Likes: 0
Received 0 Likes
on
0 Posts
ORIGINAL: calvino
aflipz great cars and even better story. I see you are running the $15 hobby city brushless motors, what KV are you running on them. I had the 4200 in my 18T before i cooked the motor by having my gearing super tight []
aflipz great cars and even better story
. I see you are running the $15 hobby city brushless motors, what KV are you running on them. I had the 4200 in my 18T before i cooked the motor by having my gearing super tight []
Thanks calvino, actually, we got the motors off ebay and yes they were pretty cheap. They are said to be 8900kv and I have no problem believing it.