hello! I've decided to make a thread for setting up this fine bird.
to start is the setting up portion. I'll get to the asembling portion once my new parts come in. feel free to ask questions.
one last thing before I start. I'm going to be using quite a few pic's, so dialup users beware
STEP 1 setting up and ridding of that tail vibration and wag
once you've set up your heli using this guide the controler trims should look like this:

all centered, which is always the best setup as it uses the least power, giving you much longer flight times. remember the tabs are just so while flying you don't have to put it down if you're having fun, but after flight you should always fix the problem!
First on the list is centering that tail and removeing tail wag. lets take a quick look

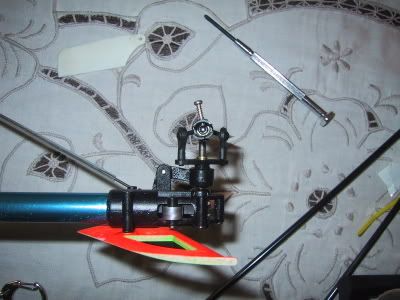
ok as you can see the tail slider is supposed to be centered. (duh!) i have larger blades which are at 215mm, err shorter due to crashes... in anycase there are a couple ways to fix this.
1 slide the rear servo holder until the problem is fixed
2 change the positons on the servo horn
3 use the trim tabs on your Tx
4 legnthen the tail blades
5 change the postion of the blade holders on the shaft giving a larger/smaller movement area.
the recomended one? #1 #2 #4 and #5 so yes that's why I don't do tests, trick questions are much too fun :8
now how is this accomplished? Before I show more pics the servo horn should ALWAYS be in perpendicular to the tail boom when in neutral position. this allows for the largest range of travel
ok pic num #1 this shows a little black screw in the middle of the blade holders. this screw is VITAL, if it comes out, your heli will have some "difficultys countering" so just tighten it once done.

Ok now take this screw and loosen it. now slide it up and down the shaft usually only a mm or two.
This has screwed up your slider! it's now not in the exact middle any more. so to change it less than the horn, slide the holder on the shaft until the tail slider is almost centered, exact adjustments are hard, so you need to screw this ball link off just a tad at a time until it's completely centered. you may want to chck by flying ABOVE 3 feet and seeing if tail wag is gone.
now for checking tail wag REMOVE THE GYRO!! this could potentally cause problems. now note which way that tail is spinning. if you don't feel comfortable flying that high get a helper to tell you. flying on it's own is preferred. now if it's (head) turning to the right you'll want to slide that blade holder out. if the opposite way, slide it in. once it stays steady and only wind is affecting it stick the gyro back on. the tail wag should be completely gone, at least once out of ground effect inground effect tail wagging is normal, so don't worry about that, if you're just flying in ground effect removing the gyro is the best choice.
Now sometimes those blades come and the plastic holders are off center, it really stinks, and you don't know what to do. well this is the assemblers fault, not the heli's! now look you may not be able to see this in the pic, it's hard to take such close up pics, but there's a allen key screw in the holder, you must remove the blade to see it. just unscrew a ways until both match. This is also the way to make the tail have more athority so if they can't counter the larger blades by sliding on that shaft.
now for the final instruction in step one, most people have rolling problems, if they looked at their tail if their swash is level then they could find the problem. I have. the tail can rotate because of loose bolts. now if the tail shaft is not perfectly level then the tilt can cause the heli to roll, once I found myself trying to counter the roll and luckly found this. just level out your tail then point it up around 2-4 degrees, this should keep it still in the air and will help in ground effect.
You have completed step one. congrats!