


Goldwing Sukhoi SU-26 70" 'Assembly' thread
 09-11-2013, 01:22 PM
#1

I'm not sure I can actually call this a BUILD thread... 
but I just placed an order with general hobbies for a 70" Goldwing Sukhoi SU-26 Decked out in Honda Colors:
http://www.generalhobby.com/goldwing...ane-p-351.html
I plan on putting a rather inexpensive 30 CC gasser in it, from AGM:
http://www.agm-engine.com/agm-engines-c-82.html
I'll keep this thread updated with photos, assembly info and of course a FLIGHT report
 09-12-2013, 05:35 AM
#3
so far so good... I ordered it at 4PM CDT yesterday, it's already shipped with a tracking number.Incidentally, General Hobbies is Rich Yan, who regularly sells his products in the marketplace here.
I'm looking forward to this Airplane!
09-18-2013, 08:45 AM
#7
nice... the Sukhoi arrived two days early!
Still unboxing, I'll post pics shortly.. first impressions: this is one nice airframe! straight, light. strong and beautiful!
the assembly manual is a single generic manual that covers 4 different subjects, it seems understandable enough, but is not quite written in what I would call 'Proper English'
Fortunately except for hinging the flight controls there simply isn't a whole heck of a lot of work here besides installing equipment.
Last edited by AMA 74894; 09-18-2013 at 09:42 AM. Reason: fix spelling
09-18-2013, 09:48 AM
#8
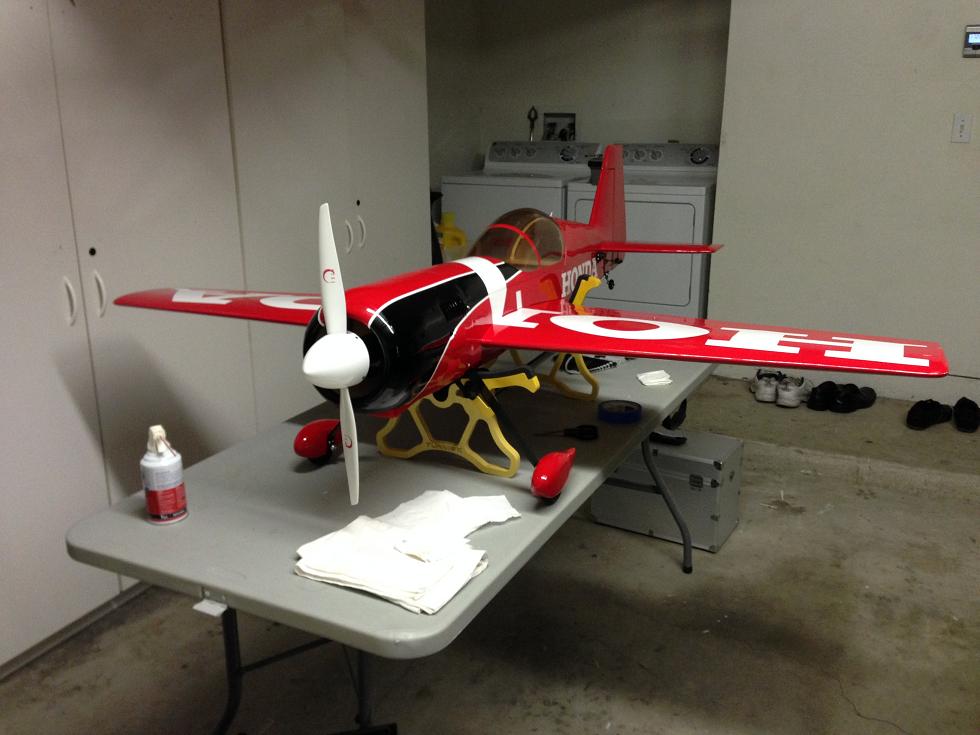
Very nice so far... the covering is beautiful, fiberglass cowl is very very nice, heavy duty. Aluminum LG looks more than adequate (although not scale... they're straight bent aluminum, not rounded as the full scale Sukhoi has)
not a big deal for me. the Canopy/hatch is a single piece of clear painted plastic over a wood frame. certainly looks good. hardware all looks better than average.
some decisions to make: Dual or single elevator servo's (I'm going with split elevators/ dual servos) pull pull cables for the rudder.
fuel tank looks smallish, since this is designed for 26CC but I'm going with 30CC I'll likely replace the fuel tank.
09-18-2013, 08:12 PM
#9
Member
Join Date: Jul 2010
Location: Irvine, CA
Posts: 85
Likes: 0
Received 0 Likes
on
0 Posts
Got mine today as well. Arrived in a bomb proof out box. No way UPS could damage it. Everything looks awesome. I absolutely love the HONDA scheme. My only gripe is the wheel pants. The full scale Honda scheme Sukhoi has the fully covered wheel pants.
I'll need to find some wheel pant replacements in red....
I'll doing an electric setup on this one.
M3
I'll need to find some wheel pant replacements in red....
I'll doing an electric setup on this one.
M3
09-19-2013, 06:40 AM
#10
I sort of like the spats... so far I'm impressed: the airframe fit and finish is VERY good, wing / stab alignment is perfect right out of the box.hinge alignment is pretty close to perfection too. (I'm using this airframe as a replacement for my CMPro Marathon 24, which is a decent enough airframe but mine has some MAJOR alignment issues)
on the Sukhoi, the only thing I've found so far that I'm not in love with: the supplied CA type hinges... they've never been my favorite hinge method... IF I use them they will be pinned.
Today I'll be going over the covering with an iron / heatgun (this is not an absolute necessity, but mine has a small wrinkle or two) sealing the seams in the covering with CA (again, not required... but I'm a little picky
)and hinging and sealing the hinge gaps (yup, you guessed it... not required for everyone, but I've found it helps the airplane track through loops much better)
the paint on the cowling matches perfectly with that on the fuselage.... holy cow if the only thing I have to complain about is that they put CA hinges in the box, I'm a happy camper!
one other thing... there doesn't seem to be a platform to mount the fuel tank on... the manual shows a different airplane (as noted, the manual covers several different airframes)
it LOOKS like I should be able to just mount it to the floor, but I may add a platform after I locate the engine's position. the floor may be lower that I'd prefer.
also: the supplied control horns are of the 'threaded type' (they're basically machine screws that run through the control surfaces) the holes in the control surfaces are not pre drilled....
the BAD news: you've got to drill them (accurately) yourself. the GOOD news: that's still MUCH easier than trying to FIX inaccurate factory drilled holes.
more pics hopefully this afternoon.
09-25-2013, 11:47 AM
#11
a couple of non RC issues have kept me busy the last couple of days... no new photos yet...
I have finished hinging (replaced the provided CA type hinges and used proper DuBro pinned hinges using Gorilla Glue, hinges are also held in place with straight pins.)
I've decided AGAINST CA'ing all the covering seams, since is seems completely unnecessary. also no going over the covering with an Iron... the job was simply done correctly at the factory and there is no need.
gotta love THAT in an inexpensive ARF.
I AM however still going to seal the hinge gaps with Silicone sealer.
09-25-2013, 01:38 PM
#12

Join Date: Nov 2012
Location: Colorado springs, CO
Posts: 142
Likes: 0
Received 0 Likes
on
0 Posts
I have the Gold wing Extra 260 70" I'm putting a RCGF 26cc in it. It went together great except for the blind nuts for the wing and gear, the ones in the wing were compressed and 2 of the three blind nuts in the gear acted like they were stripped. I replaced the bad ones. I will finish it in a couple of weeks and maiden it. It is well made and I'm looking forward to flying it.
12-22-2013, 07:07 PM
#13
Junior Member
My Feedback: (1)

Join Date: Feb 2003
Location: Galt,
CA
Posts: 14
Likes: 0
Received 0 Likes
on
0 Posts
I have the same aircraft, General Hobbies' SU-26, 26cc, 70", which I purchased about a little over a month ago. The build issues I had besides what was mentioned above are:


The 4-1/2 inch c/g guideline is a good starting point. Aircraft will be very stable. Also, this is the first ARF in this size that I've acquired which was built true. The incidence meter was within 1/4 degree all the way around. This was verified with a 0 trim first flight. I have not seen a need to change the engine thrust angles either. I'm using a Saito 180 with a Hyde soft mount. No firewall modifications needed. I did add 1/64 ply around the motor box with 3/4 ounce cloth and West Systems epoxy to seal up all the lightening holes.
- One of the wheel fairings scrubbed against the tire. Fix it by elongating or slotting the holes on the fairing in which the mounting screws pass through.
- (First Photo) The fuselage formers aft of the canopy were puckering from the tension of the skin and covering because they used very light and thin ply and there is no bottom stringer. Fix it by doubling the formers with some form of strengthening technique. I added hard balsa 3/8 square) across the low and mid cross-sections of the formers to get them to flatten back to shape. Without this, the fuselage may be crushed simply by grabbing it when lifting the aircraft, or worse...will fall apart during side load aerobatics.
- Fiberglassed cowl is on the brittle side and will crack if flexed. I doubled mine with epoxy resin (West Systems) and 2 oz cloth along the bottom scoop and contours.
- (Second Photo) The canopy assembly's forward locking tabs fit loosely into the plywood former's slots. Adjust as required. I added dowels to secure it and have eliminated the rattling.
- Pre-installed "Honda" sticker on right side of fuselage should be upside down (for the scale purist). Mine came right side up.
- Up to 3/32nd inch gap around the wing slot...where it passes through the fuselage cut-out.
The 4-1/2 inch c/g guideline is a good starting point. Aircraft will be very stable. Also, this is the first ARF in this size that I've acquired which was built true. The incidence meter was within 1/4 degree all the way around. This was verified with a 0 trim first flight. I have not seen a need to change the engine thrust angles either. I'm using a Saito 180 with a Hyde soft mount. No firewall modifications needed. I did add 1/64 ply around the motor box with 3/4 ounce cloth and West Systems epoxy to seal up all the lightening holes.
Last edited by StanleyR; 12-30-2013 at 08:33 PM. Reason: Photos Added
12-22-2013, 11:45 PM
#14
Member
Join Date: Jul 2010
Location: Irvine, CA
Posts: 85
Likes: 0
Received 0 Likes
on
0 Posts
Finally got around to building mine. Setup for electric on 8S. Just need to set the CG and slap on the decals. Should be ready for maiden this weekend.
Here's some photo's of mine.


Here's some photo's of mine.
12-23-2013, 12:01 AM
#15
Senior Member
Join Date: Sep 2008
Location: Mumbai, INDIA
Posts: 2,224
Likes: 0
Received 0 Likes
on
0 Posts
I would suggest to atleast go over all the fuse joints with thin & then thick CA. From previous experience with the brand. that's a minimum. Then strengthen as you go along and as required- looks like you are already doing that
Sometime back I used to think GW is very fragile. But, with exception of few things, they are quite good
Sometime back I used to think GW is very fragile. But, with exception of few things, they are quite good
12-23-2013, 04:31 AM
#16
Join Date: Nov 2012
Location: Colorado springs, CO
Posts: 142
Likes: 0
Received 0 Likes
on
0 Posts
I finally got mine flying, they are very lightly built, I went over mine with thin CA twice, reinforced the fire wall with 3/32 plywood and a combo of triangle stock and fiberglass and epoxy. Mine is a joy to fly but if there is a very hard landing it may tear it up. I also had some holes behind the fire wall that I covered with balsa but I have a 26cc gas engine, I was getting black exhaust soot inside the airframe.

 01-22-2014, 08:35 AM
#18
was that for me? mine is complete, but I'm in Minnesota :-/ it's currently -1F, and that's the warmest it's been all week!
I'm hoping to bring it down to Florida next month, but that's yet to be determined.
I can post more pics tomorrow, but I don't think I'll have a maiden complete for another month at least.
(I'll include ANYTHING I did differently/ not covered in the manual, such as CG, lateral balance, hinge gap sealing etc.)
01-24-2014, 06:18 PM
#19
Hi Jim,
Yes, that was for you - sounds good, thanks What are your overall thoughts on the quality, same or different than some mentioned above? I am looking at some of the Goldwing ARFs from General Hobby as well so I am interested in your experience.
We got a message at work today saying that the local energy company couldn't keep up with the gas demand due to the cold. Today I am actually thankful to have electric heat! Stay warm!!!
Yes, that was for you - sounds good, thanks
What are your overall thoughts on the quality, same or different than some mentioned above? I am looking at some of the Goldwing ARFs from General Hobby as well so I am interested in your experience.We got a message at work today saying that the local energy company couldn't keep up with the gas demand due to the cold. Today I am actually thankful to have electric heat! Stay warm!!!
01-27-2014, 07:49 AM
#20
I've actually had very good luck with both gold wing and general hobby... I'm starting to get spring fever (hehe... EIGHTEEN below this morning) and am seriously thinking about a pitts S-2 from GH.
as for the Sukhoi, I tend not to beef up structure too much, (and DO tend to keep airplanes for a decade or so) but I'm going to have a closer look at the bulkhead 'puckering' that's been mentioned.
I really don't like adding weight unless I NEED to
I did need to cut a hole in the firewall for the Engine (I caved and went with a DLE 30CC instead of the AGM I mentioned in the first post) as a result, I needed to use different standoffs (I used standoffs from Evolution)
I also brushed on a thinned coat of finish epoxy to the entire interior fuselage back to about the CF spar. it doesn't get more gas and oil proof
mine is done and ready to maiden... and I can't wait!
I did also have an issue with the graphics... (vinyl I THINK) they don't stretch / go around curves well at all.
(the ones on the cowling HAVE to) I'm gonna try a couple tricks, (and will report) but I may end up pulling them off and painting them on the cowl.
01-28-2014, 01:52 PM
#21
After having another look at mine, I did notice the bulkhead 'puckering' that StanleyR mentioned... I will be doing exactly the same fix.. (I'm not sure it's required, but absolutely those bulkheads are a bit thin)
I added a small plywood plate to support the tailwheel, and frankly I may have used a tail gear I had on hand...
I've also included a pic of the ign cutoff switch, and Gas fill line... I always like to make it so there's nothing extra required to remove the cowl... and have always used big 'ol loud 'snappy' ign cutoff switches...
I did seal the hinge gaps with silicone RTV, but have NOT yet laterally balanced it. I've got a list of 4 or 5 (three minute) items before it's ready for a maiden.
Anxiously awaiting the temps to climb about 50F more than they are now.. (it's gotten all the way up to 10 BELOW today )


I added a small plywood plate to support the tailwheel, and frankly I may have used a tail gear I had on hand...
I've also included a pic of the ign cutoff switch, and Gas fill line... I always like to make it so there's nothing extra required to remove the cowl... and have always used big 'ol loud 'snappy' ign cutoff switches...
I did seal the hinge gaps with silicone RTV, but have NOT yet laterally balanced it. I've got a list of 4 or 5 (three minute) items before it's ready for a maiden.
Anxiously awaiting the temps to climb about 50F more than they are now..
(it's gotten all the way up to 10 BELOW today )
03-07-2014, 10:10 PM
#22
Junior Member
Join Date: Sep 2013
Posts: 3
Likes: 0
Received 0 Likes
on
0 Posts
Any news on this plane. I am ready to pull the trigger in the ARFMFG that's 73.5" http://www.generalhobby.com/arfmfg-s...ane-p-576.html It looks very similar to yours, and it's from the same folks.
You guys are a ray of sunshine, and have be ready to buy one. You see, I have tried to contact that company 3 times via his website, and 2 times via Ebay to ask about spare parts (just in case I mess up my plane) only to fall on deaf ears. Also I found some not so flattering info on Rich Yan.
I am glad to see three folks bought from GH and got their planes. The flimsy motor box seems like an easy fix.
Does any of you have any flight video of your plane?
03-10-2014, 06:16 AM
#23
I'm desperately hoping to maiden mine this weekend... but our field still has three feet of snow. C'mon SPRING!
Any news on this plane. I am ready to pull the trigger in the ARFMFG that's 73.5" http://www.generalhobby.com/arfmfg-s...ane-p-576.html It looks very similar to yours, and it's from the same folks.
You guys are a ray of sunshine, and have be ready to buy one. You see, I have tried to contact that company 3 times via his website, and 2 times via Ebay to ask about spare parts (just in case I mess up my plane) only to fall on deaf ears. Also I found some not so flattering info on Rich Yan.
I am glad to see three folks bought from GH and got their planes. The flimsy motor box seems like an easy fix.
Does any of you have any flight video of your plane?
You guys are a ray of sunshine, and have be ready to buy one. You see, I have tried to contact that company 3 times via his website, and 2 times via Ebay to ask about spare parts (just in case I mess up my plane) only to fall on deaf ears. Also I found some not so flattering info on Rich Yan.
I am glad to see three folks bought from GH and got their planes. The flimsy motor box seems like an easy fix.
Does any of you have any flight video of your plane?
03-10-2014, 06:28 AM
#24

I do not miss living in the twin cities area. It was nice to have R/C City right there on 7th st and Maury was great to deal with ( RIP ) and The Hub Hobby Center was well stocked. These days I have to drive 120 miles to a good hobby shop. I however do not miss the cold nor having to put the toys away for 5 months a year.
