


Advice for building and flying the avistar

")

 08-15-2003 | 01:35 PM
#27
Senior Member
Joined: Apr 2002
Posts: 4,987
Likes: 0
Received 0 Likes
on
0 Posts
From: Laurel, MD,
About turning clevises, there is actually a clevis and ball link turning tool out there. It works farily well, and I liked mine until I lost the darn thing.
Generally, if I have to make a lot of turns, I'll close the clevis, put on the keeper (fuel tubing or whatever) and run a bit of music wire sidways though the slot and just spin that with my fingers. It gives you the leverage to turn it quickly and easily.
Btw, if you click on the "edit" button under your post, there is an option at the top to delete your duplicate post.
08-15-2003 | 02:01 PM
#28
Senior Member
My Feedback: (2)
Joined: Jun 2003
Posts: 361
Likes: 0
Received 0 Likes
on
0 Posts
From: LA,TX,MS,AL
I do like above but I just close the clevis and make me a little tool out of lite ply or whatever I have that will fit between there to turn it.
Also I've had some clevis's that the back part that's hex shaped is the same size as a bicycle spoke and you can use a bicycle spoke tool. I'm not sure on the avistar even tho I have one. With the spoke tool it's the easiest thing to do cause it's slotted to allow it to slip over the spoke and turn it by griping 3/4 of the way around it.
Also I've had some clevis's that the back part that's hex shaped is the same size as a bicycle spoke and you can use a bicycle spoke tool. I'm not sure on the avistar even tho I have one. With the spoke tool it's the easiest thing to do cause it's slotted to allow it to slip over the spoke and turn it by griping 3/4 of the way around it.
08-15-2003 | 10:47 PM
#29


Here is the clevis tool on Tower Hobbies wegsite. However, I do know of another that is plastic. Costs less and has several fittings for wing bolts, clevis's, ball joints, etc.
http://www2.towerhobbies.com/cgi-bin...?&I=LXK355&P=7
http://www2.towerhobbies.com/cgi-bin...?&I=LXK355&P=7
08-16-2003 | 01:11 AM
#30
Senior Member
Joined: Jan 2003
Posts: 810
Likes: 0
Received 0 Likes
on
0 Posts
From:
tsawyer148, nice seeing you around too... 
I usually hang around in the other forums, but always check here to see if there is anything that I can babble on about... Sometimes, it actually seems like I know something over here.
Now, on to the clevis thing.
I usually stick something through them to turn the clevis just like the other guys. But most of the time I use metal clevis's, so it's incredibly easy to turn them...If it bothers you that much, go for the metal ones with a nut. That little thingie that goes across the clevis and goes through the control horn won't bend or break like it does on the plastic ones. It really makes things a lot easier...
You should NEVER use those quick connector/easy connectors on the elevator, ailerons, or rudder. Even on a trainer...It's ok for the nose wheel, but I would really avoid them for everything else...
I usually hang around in the other forums, but always check here to see if there is anything that I can babble on about... Sometimes, it actually seems like I know something over here.
Now, on to the clevis thing.
I usually stick something through them to turn the clevis just like the other guys. But most of the time I use metal clevis's, so it's incredibly easy to turn them...If it bothers you that much, go for the metal ones with a nut. That little thingie that goes across the clevis and goes through the control horn won't bend or break like it does on the plastic ones. It really makes things a lot easier...
if your using the quick connector on the servo arms just loosen the screw and move the rod thats what i do
08-16-2003 | 05:09 PM
#31
Member
Joined: Jul 2003
Posts: 61
Likes: 0
Received 0 Likes
on
0 Posts
From: Scottsdale,
AZ
Thanks all on the clevis turning suggestions. I think the tool hookedonrc identified is just what I'm looking for, so I'll pick one up for the long-term. In the meantime (for this weekend), I'm going to try out some of the other ideas posted.
Cheers!
Cheers!
10-06-2003 | 10:29 PM
#32
Junior Member
Joined: Sep 2003
Posts: 22
Likes: 0
Received 0 Likes
on
0 Posts
From: Mary Esther, FL,
Hello all!
I hoping I can get some help from experienced builders of the Avistar (the one with monokote)
The build is going pretty well, although I must say I'm having some second thoughts about the positioning of the control rods. In my ARF, the servo tray came pre-installed, as did the motor mount. From where the throttle rod must be placed, the rod must make a significant bend downward into the bottom of the fuselage to meet up with where the servo tray is located. I was thinking about epoxying two .5 inch blocks onto the servo tray as it is installed to raise the throttle servo to a level where I won't have to make a bend. My main concern is to avoid friction in the operation of the throttle arm and while I'm fairly certain this will work, I'm surprised/dismayed at this apparent problem with the design and was wondering if anyone else had this problem.
I've built kits before and bought this ARF to save on build time and get back into the hobby after a break. As such, I'm used to being able to have the freedom to position items before they're glued! The placement of this servo tray is puzzling to me...does anyone have any advice/similar experience? Also, I was shorted a control rod tube and and rod! What gives?
-Rob
10-06-2003 | 10:35 PM
#33

My Feedback: (8)
Joined: Mar 2003
Posts: 680
Likes: 0
Received 0 Likes
on
0 Posts
From: Southern, UT
It is not going to be a problem to put a bend in the throttle rod sufficient to make it to the servo arm. The throttle will have little or no stress in flight. What I found in building the two Avistar's I have is that it actually made it easier to put the battery and receiver on the tray in front of the servos.
By epoxying blocks in you may end up with unwanted weight and also taking away some of the useable room inside of the fuse.
Hope this helps.
T.
By epoxying blocks in you may end up with unwanted weight and also taking away some of the useable room inside of the fuse.
Hope this helps.
T.
 08-16-2005 | 08:18 PM
#35
Senior Member
Joined: Jun 2005
Posts: 565
Likes: 0
Received 0 Likes
on
0 Posts
From: Prescott Valley,
AZ
Hope someone can help this newby. I'm building an Avistar Monokote with an OS 40LA engine. My current problem is that the engine does not seem to fit the supplied mount. It looks like I just install the engine using some supplied brackets that hold on to the engine mount by screwing them tight (no way to align the engine). This seems foreign to me. Shouldn't the mount have screws that fit through the enging bracket and then into the engine mount?
08-16-2005 | 08:45 PM
#36
My Feedback: (8)
Joined: Mar 2003
Posts: 680
Likes: 0
Received 0 Likes
on
0 Posts
From: Southern, UT
No, not on this particular plane. The brackets just fit over the flanges, not through the mounting holes on the engine. Just line the engine up centered between the engine mount beams and tighten the bolts evenly.
T.
T.
08-17-2005 | 06:42 AM
#37

Senior Member
Joined: Aug 2003
Posts: 152
Likes: 0
Received 0 Likes
on
0 Posts
From: Edemonton,
AB, CANADA
I have an Avistar with a O.S. 46fx flies like it is on rails hope to have this plane around long after I get my wings. Mine balanced with the battries and transmitter on the tray battries in the rear position. Hope this information is of help.
08-17-2005 | 07:57 AM
#38
My Feedback: (27)
Joined: Mar 2004
Posts: 1,251
Likes: 0
Received 0 Likes
on
0 Posts
From: Port Washington,
WI
I would highly suggest reinforcing the vert. fin/fuselage joint with some triangle stock. Mine broke after 1 flight and a ground run. I was exceptionally careful NOT to score the wood when removing the covering prior to gluing and the subsequent inspection revealed that it was not the cause of failure. Fortunately, I discovered the fracture durring the ground run and not in the air.
I would also suggest reinforcing the wing jount with fiberglass. I just had an unintentionally abrupt and very hard "landing"[:@] with an overly vertical approach (Yes, it hit on all wheels only) that literally folded the wing at the joint right over the fuselage. The wings parted company and all 12 rubber bands remained strung on the fuse. Note that the glue joint held up fine, but there was a lot of splintered wood on either side. Aside from that, it is an amazingly tough plane and great fun to fly with a strong .46 engine.
I would also suggest reinforcing the wing jount with fiberglass. I just had an unintentionally abrupt and very hard "landing"[:@] with an overly vertical approach (Yes, it hit on all wheels only) that literally folded the wing at the joint right over the fuselage. The wings parted company and all 12 rubber bands remained strung on the fuse. Note that the glue joint held up fine, but there was a lot of splintered wood on either side. Aside from that, it is an amazingly tough plane and great fun to fly with a strong .46 engine.
08-17-2005 | 08:13 AM
#39
Senior Member
Joined: Sep 2003
Posts: 285
Likes: 0
Received 0 Likes
on
0 Posts
From: Hamilton Square,
NJ
Adding my .02, I also agree with all the folks here, it is a great flying plane with a 46FX, that was my original engine and I can't think of flying it with anything else, unless I switch it with the 40FX I have on my low-wing trainer (a LOT of power!).
I've gone through 3, rebuilt one and still have the extra fuse and partial wing (for parts), and I've already decided that I'm going to keep one in my hangar all the times.
If you have the ARF version, I would suggest the following, besides everything that the folks here have suggested; fiberglass the center joint on the main wing, change out the wire main gear with a duralum one (gets rid of the dreaded "Avistar Bounce") and also change out the tires that came with it to better DuBro ones. The original ones on mine have split inside of the plastic hubs and they no longer spin true. Also after you have gotten good with it, change it over from rubber bands to wing bolts so that you can get a perfect fit each time you go out flying. I have found out that everytime I have to take the wing off and on at the field, I have to do some slight re-trimming.
With the RTF, do the same, but don't forget the metal rod since this gives the wing strength. Other than that, have a great time with this plane. My Instructor has stopped bringing his own planes to the field when we're together because he gets a lot of pleasure in flying mine, and he has shown me what it can do in the hands of an experienced pilot. I can only hope to get that good!
Regards,
Don
08-17-2005 | 08:09 PM
#40
Senior Member
Joined: Jun 2005
Posts: 565
Likes: 0
Received 0 Likes
on
0 Posts
From: Prescott Valley,
AZ
Thanks for the input. I think I have finally figured out the mounts. But, I see that one screw is located under the 46LA's needle valve. I had to remove the muffler to get to the screws on the other side. I just screwed down the bracket on the side with the needle valve and tightened the forward bolt later. This seems to work.
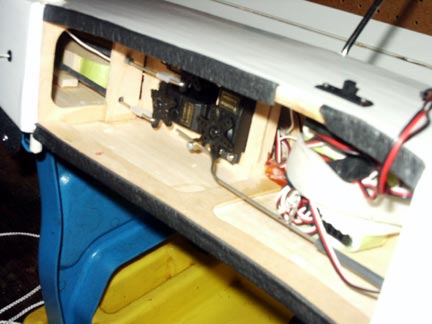
I have the plane together and have started checking out the servo alignment. It seems that there is a lot of binding in the push rods but every thing seems to work OK. Is this also normal with plane? Any other hint's you can give would be appreciated.
I have the plane together and have started checking out the servo alignment. It seems that there is a lot of binding in the push rods but every thing seems to work OK. Is this also normal with plane? Any other hint's you can give would be appreciated.
08-17-2005 | 09:25 PM
#41
My Feedback: (8)
Joined: Mar 2003
Posts: 680
Likes: 0
Received 0 Likes
on
0 Posts
From: Southern, UT
There should be no binding in the control rods. If there is, it would be best if you do everything you can to get rid of it. It can cause alot of undo stress on your servos and will drain your batteries alot faster.
T.
T.
08-18-2005 | 07:36 AM
#42
Senior Member
Joined: Sep 2003
Posts: 285
Likes: 0
Received 0 Likes
on
0 Posts
From: Hamilton Square,
NJ
Which push rods are binding? If they are the ones for both the elevator and rudder, it might indicate that you glued the ply piece with the 2 holes for the guide tubes comming into the servo compartment too high on the former. That can cause binding (been there, done that). If you are using standard servos, the piece should only be like 1/8th of an inch up from the surface of the servo tray. To stop the throttle servo from doing this, you can put a medium "Z" bend close to the servo. I did this after also getting a lot of binding/noise from my servos and it made all the difference. Just remove and reglue the rear ply piece after checking the alignment with the pushrod ends next to the servo arms.
Don
Don
08-18-2005 | 10:32 AM
#43
Senior Member
My Feedback: (1)
Joined: Sep 2004
Posts: 465
Likes: 0
Received 0 Likes
on
0 Posts
From: Houston,
TX
So many adjustments and modifications! I have been flying my avistar for almost a year now with no special modifications. i assembled it just as the instructions say, with a few minor bends in the control rods for the elevator and rudder. Other than that it is a "stock" build and it flies beautifully. I have a Thunder Tiger .46 Pro in it and it really moves spinning an 11x5 wood prop. As for the "avistar bounce".. i used to bounce it but then i learned how to land it without hopping down the runway. Changing the landing gear is, IMO, cheating yourself out of a good learning experience.
anyways.. wonderful plane and i'm sure you'll enjoy it.
John
anyways.. wonderful plane and i'm sure you'll enjoy it.
John
08-18-2005 | 03:12 PM
#45
Senior Member
My Feedback: (2)
Joined: Jun 2004
Posts: 133
Likes: 0
Received 0 Likes
on
0 Posts
From: NYA,
MN
One thing that may help your binding pushrods is to remove the metal rod from the tube and apply 2 heavy coats of automotive paste wax. Any brand will do. This works great for lubing many tupes of sliding parts. It lasts a really long time and wont attract dust like a grease or oil will. Also make sure the rods are not binding because of poor alignment. You can sometimes bend them a little so they enter and exit the guide tube straighter and relieve the stress. Jeff
08-28-2005 | 09:28 PM
#47
Banned
My Feedback: (12)
Joined: Nov 2004
Posts: 518
Likes: 0
Received 0 Likes
on
0 Posts
I got a busted up Avistar AWARF from e-bay and did some major mods out of necessity during the rebuild such as:
Swapped the 40 LA LA with an OS 46FX and an 11X5 APC prop = MAJOR power difference!!
Changing to sullivan glod metal clevis' along with 256 rods for the ailerons and 440 rods and clevis for the rudder and elevator
Tri-stock gussets on upper and lower rear horizontal stab and vertical wing
3 inch foam treaded wheels for the main gear and 3 inch rubber low bounce for nose gear for grass runway take offs
I re epoxied the firewall and all available exposed joints and expoxied the "seams" on the stock fuel tank to prevent inevitable leaks that I've heard thru RCU forums.
My Avistar took a months vacation since i bought a TT Lazy Tiger as my 3rd plane and 1st low wing tail dragger.
I took her out today cause it was way too gusty for the Lazy Tiger and WWWWWWWOOOOOW that's the last time this little spedd demon/ Monster will ever sit that long.
It really reminded me of how it is to fly FAST - even at 1/2 throttle you have to stay "right on her" constantly........everything happens SO quickly.
I was correct in thinking how she could handle the wind without much of a problem--------she SLICED thru the gusts with only very little twitching.
I still love this plane:
10-03-2005 | 08:24 PM
#48

My Feedback: (6)
Joined: Sep 2003
Posts: 99
Likes: 0
Received 0 Likes
on
0 Posts
From: North Aurora, IL
First when cutting away the monocote for the elevator and rudder, do not use your hobby knife use a soldering iron. You will not score the balsa this way and take a chance on weakening them. Second seriously consider removing the dihedral in the wings. I have trained 3 people using my Avistar without the dihedral and all of them have thought it was much easier to fly then the Avistar with the dihedral. It will stay in a bank without additional aileron input, not have any adverse yaw, fly inverted easier and roll more axially. This can be easily done by sanding the root rib with a belt sander so the rib is vertical and adding a 2" fiberglass reinforcement when you join the wing. It is much stronger then the stock wing.
10-08-2005 | 07:49 AM
#49
Senior Member
Joined: Dec 2002
Posts: 131
Likes: 0
Received 0 Likes
on
0 Posts
From: Lenoir City,
TN
A good way to fuel proof the inside of the plane without a lot of weight being added is to spray the insides with polyurethane spray paint (clear of course) which you can purchase at Home Depot. Fuel proofs the trays and wood and will allow you to glue or add things later without trouble. And by all means epoxy the wings together on the top as well as the bottom. Nothing compares to seeing the wings come apart in mid air.
11-10-2009 | 01:14 AM
#50
Senior Member
Joined: Jun 2009
Posts: 129
Likes: 0
Received 0 Likes
on
0 Posts
From: Fergus Falls,
MN
I am in the process of building the Avistar 40 Arf, but I have already run into an issue with the aileron servo tray. I epoxyed my wings together, but my servo does not fit into the hole on the wing itself. In fact, the hole cutout on my wing is shorter in length than my servo tray. Was anybody else confused by the instructions? Did anybody else have to cut the hole on their wing larger?

