


RC Car Actions "How to port a Nitro Engine"
 03-03-2007, 06:26 PM
#76
Senior Member
Join Date: Jul 2005
Location: Kuwait, KUWAIT
Posts: 452
Likes: 0
Received 0 Likes
on
0 Posts
Right things are sounding more logical to me so far, any particular angle to the turbo cut that needs to be predetermined before the machining takes place on the crankshaft ? Looking at the turbo cut stock one and the modded one you did, there is more of an angular circular direction to it then the stock ones, and much more then just one cut, what determines the numbers and the angles of the cut as well as the depth of each cut in the specific location ? Calcultions based on what specificaly ?
P.S. I have not forgotten about your timming information when you get the freetime I am all eyes
P.S. I have not forgotten about your timming information when you get the freetime I am all eyes
 03-03-2007, 08:47 PM
#77
Senior Member

Join Date: Jul 2005
Location: Torchy the Fiery Fast RC Turtl
Posts: 10,544
Likes: 0
Received 0 Likes
on
0 Posts
There is no calculations that I used as far as cutting the turbo scallops; I just eye balled it since it was my first attempt ever. As a matter of fact, I might have cut too much material off. Check out the pics on my post #55.
As for which way to direct the turbo cuts, I chose to have them start off directed away from the center and then curve back and away from the direction of rotation. This would be better for faster RPMs and help somewhat slow the speed of the fuel-air coming from that particular scallop. But since the engine is turning 15000RPM to 30000+RPM, the velocity of the fuel-air coming from each scallop might be moot.
As for the calculations of what timings you want to cut the sleeve and induction ports to, I'll start on that essay and begin to draw diagrams. This will take me a while and I think I will do it in two separate threads: one to do the induction port timing of the crank and another on the sleeve ports.
03-03-2007, 09:35 PM
#78
Senior Member
Join Date: Jan 2006
Location: Portland,
OR
Posts: 2,682
Likes: 0
Received 0 Likes
on
0 Posts
Looking forward to the writeup SAVAGEJIM, I've been curious about tweaking the timing but don't have the know-how yet...
As for grinding on the crank, here's one that I just finished for my OS .12 CV...
Before...
After...
As for grinding on the crank, here's one that I just finished for my OS .12 CV...
Before...
After...
03-04-2007, 07:01 PM
#79
Senior Member
Join Date: Jul 2005
Location: Torchy the Fiery Fast RC Turtl
Posts: 10,544
Likes: 0
Received 0 Likes
on
0 Posts
Nice job on the crank face. These help promote performance to a little degree, even the extensive crank face work of the other posts here only promote performance a little bit.
The true performance gains that are gained from engine modding is in the timing profiles. I have already begun the instructional write-up (I'm typing it in MS Word), but as for the diagrams, I have not started that yet. I'm going to ask my brother to borrow his camera again to take some pics so those will be one less thing to draw diagrams of.
The true performance gains that are gained from engine modding is in the timing profiles. I have already begun the instructional write-up (I'm typing it in MS Word), but as for the diagrams, I have not started that yet. I'm going to ask my brother to borrow his camera again to take some pics so those will be one less thing to draw diagrams of.
03-04-2007, 07:26 PM
#80
Senior Member
Join Date: Jan 2006
Location: Portland,
OR
Posts: 2,682
Likes: 0
Received 0 Likes
on
0 Posts
Thanks...
I am looking forward to learning about timing.. I figure this is a perfect motor to mess around with also, parts are dirt cheap in comparison to most, a new ABC piston/sleeve is only $20 [sm=thumbup.gif]
I also did work on the con rod, sleeve, piston, carb, intake side of the crank and did a little grinding on the block too (cleaned up the bottom of the transfer ports)... I just liked the way the crank turned out the best, so I posted a pic
03-04-2007, 08:12 PM
#81
Senior Member
Join Date: Jul 2005
Location: Kuwait, KUWAIT
Posts: 452
Likes: 0
Received 0 Likes
on
0 Posts
Those turbo cuts in effect are acting similar to a turbine propellar, basically the angular cuts are used to whirrel the fuel charge more effectively by the looks of it, based on those swirrel marks left on the backplate of the engine ?
I was just brushing up last night on my 2 stroke motorcycle book, recalling BBDC, ABDC, ATDC and BTDC, It helped alot, made more sense to what you guys were reffering to in acronyms
The usage of the 360 degree wheel in relation to find the port open and close timing, is understood but I would need to find a damaged engine at the workshop to give it a shot and see it from the none theoretical perspectice, that way it would sink in more. The flash light idea to see the closing and opening of the ports is clever, thanks for sharing the info.
Just recalling through the motorcycle book last night, I do recall some mention about altering openings on the sleeve has to be pretty much identical, as such alterations may vary the flow rate resulting in an imbalance of fuel air charge mixture, something along those lines if I am not mistaken, and that such workmanship usually is at best done with precise milling machinery, where a hand made job would not be as precise and could result in further performance drops, looking at it from the perspective of how small nitro engines are and the sleeve openings are, I would assume that a 0.1% difference in machining would have dramatic changes on the performance of the engine ? Or is it safe to assume that a general enhancement of the flow path in any direction generally improves the performance of the engine, as well as in regards to reducing the amount of weight that the crankshaft would require load and unload the charge ?
I dont know if what I wrote up there made any sense ???
03-04-2007, 08:53 PM
#82
Senior Member
Join Date: Jan 2006
Location: Portland,
OR
Posts: 2,682
Likes: 0
Received 0 Likes
on
0 Posts
Using a mill would be the best way to mod pretty much anything I would think... but, if you've got a steady hand and have a good idea of what you're getting into, and what to do, then doing the mods by hand will be just as effective IMO.. the small imperfections will make a difference but probably not enough to notice if the overall job is done right.
And.. I didn't polish the crank to a mirror finish like most that you see (including the last crank I did), I'm just trying something different this time around, I guess ....some of the parts I modded are polished to a mirror finish (on the intake side) but not all..
And.. I didn't polish the crank to a mirror finish like most that you see (including the last crank I did), I'm just trying something different this time around, I guess
....some of the parts I modded are polished to a mirror finish (on the intake side) but not all..
03-04-2007, 11:19 PM
#83
Senior Member
Join Date: Jul 2005
Location: Torchy the Fiery Fast RC Turtl
Posts: 10,544
Likes: 0
Received 0 Likes
on
0 Posts
Machine tools with precision motions are the best, but for us hoobiests, we just fo not have such equipment. We have to rely on strady hands and creative inginuity to assure precision work. I'm pretty sure reputable nitro engine modders have devised jigs and special vise clamps to assure such precision whenever they Dremel any ports as far as precision timing modifications
Since our model engines turn up to as fast as 45000RPM (advertised, 40000RPM in reality), tolerances that are more thean 1% off can have a significnat impact.
Since our model engines turn up to as fast as 45000RPM (advertised, 40000RPM in reality), tolerances that are more thean 1% off can have a significnat impact.
03-05-2007, 11:57 PM
#85
Senior Member

Join Date: Jun 2006
Location: marrero,
LA
Posts: 1,291
Likes: 0
Received 0 Likes
on
0 Posts
so that the fuel can flow better.
ORIGINAL: Harvz
What is exactly the purpose of the putting epoxy on the crank?
What is exactly the purpose of the putting epoxy on the crank?
03-23-2007, 07:46 PM
#86
Senior Member
Join Date: Jul 2005
Location: Torchy the Fiery Fast RC Turtl
Posts: 10,544
Likes: 0
Received 0 Likes
on
0 Posts
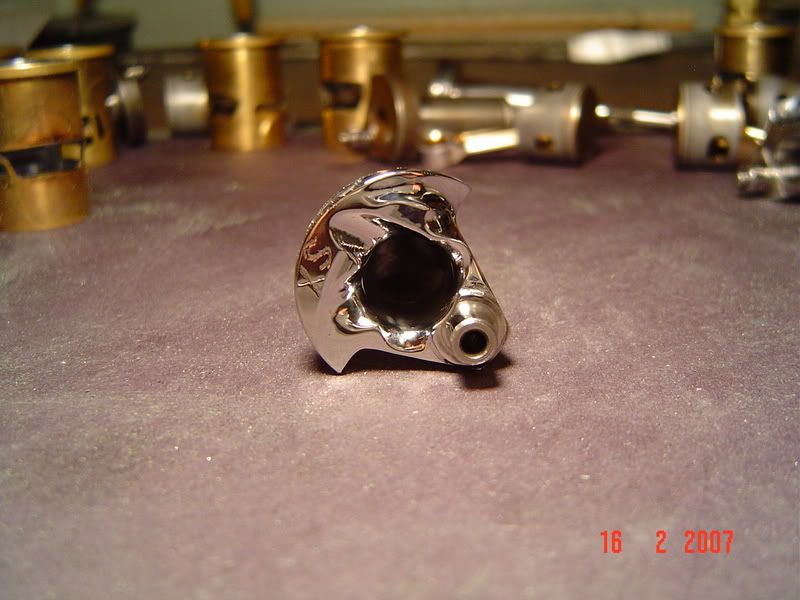
I finally finished modding my D30M. I hope the work I did is not excessive; its no big deal to me, I'll just order a new sleeve, piston and crank if they aer ruined.
Here are some of the pics of the mods I did om my sleeve. I am disappointed in my D30M sleeve; the primary clue that makes my sleeve different from the current D30M sleeve is the front boost port. Check out proper D30M sleeves (1st pic, a pic postd by purenitro33 on a different thread) and compare it to the 2nd pic (my D30M sleeve).
Note: I thinned the boost port thickness (the material under the boost port itself) from 1.05mm to 0.65mm to create a semi-flow channel the width of the boost port. After seeing purenitro33's pics of his D30M sleeves, I realized that my D30M sleeve is an obsolete designed sleeve and therefore not the version with the tighter pinch[ ]
]
Here are some of the pics of the mods I did om my sleeve. I am disappointed in my D30M sleeve; the primary clue that makes my sleeve different from the current D30M sleeve is the front boost port. Check out proper D30M sleeves (1st pic, a pic postd by purenitro33 on a different thread) and compare it to the 2nd pic (my D30M sleeve).
Note: I thinned the boost port thickness (the material under the boost port itself) from 1.05mm to 0.65mm to create a semi-flow channel the width of the boost port. After seeing purenitro33's pics of his D30M sleeves, I realized that my D30M sleeve is an obsolete designed sleeve and therefore not the version with the tighter pinch[
]
03-23-2007, 08:02 PM
#87
Senior Member
Join Date: Jul 2005
Location: Torchy the Fiery Fast RC Turtl
Posts: 10,544
Likes: 0
Received 0 Likes
on
0 Posts
Now for the actual mod work I did on my D30M sleeve. I cut flow channels, and now that I look at it and compare it to a professional porting job, I realize I have taken off an excessive amount of material.
I did leave the port timings stock and did not increase them in any manner. I do hope the mods I did do help in performance if only for a little.
I did leave the port timings stock and did not increase them in any manner. I do hope the mods I did do help in performance if only for a little.
03-23-2007, 09:25 PM
#88
Senior Member
Join Date: Jul 2005
Location: Torchy the Fiery Fast RC Turtl
Posts: 10,544
Likes: 0
Received 0 Likes
on
0 Posts
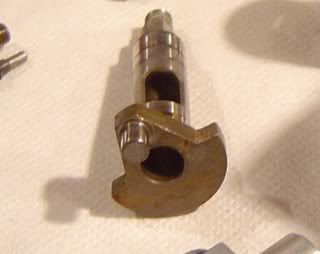
Here are three pics of the D30M conrod. The 1st and 2nd pics are nod modded, the 3rd is. All I did is touch up where I scratched it up from trying to pull it off the crank pin and I made a shallow valley cut on the big end on big end of the conrod.
03-23-2007, 10:39 PM
#89
Senior Member

Join Date: Apr 2005
Location: Charlottesville,
VA
Posts: 5,253
Likes: 0
Received 0 Likes
on
0 Posts
Why cut the conrod like that? It just makes it weaker and that's the part of it that needs the material.
03-23-2007, 11:42 PM
#90
Senior Member
With everyone showing some picks, I figured I would show a 4.1 stage x crank that I worked.
Here is a vid of a 14 pound savage with that engine.
http://video.google.ca/videoplay?doc...45908564176496
Here is a vid of a 14 pound savage with that engine.
http://video.google.ca/videoplay?doc...45908564176496
03-24-2007, 01:04 AM
#91
Senior Member
Join Date: Jul 2005
Location: Torchy the Fiery Fast RC Turtl
Posts: 10,544
Likes: 0
Received 0 Likes
on
0 Posts
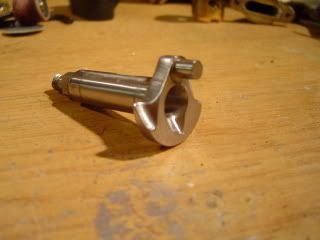
I know the strength would be compromised so I made precautions not to cut this vally too deap. This valley is intended to do two things. The first is to reduce rotating mass on the heaviest part of the conrod (which happens to also be the part of the conrod the exhibits the most moment of inertia). The second is to slightly reduce its cross sectional area that must fight against the fuel-air mixture (to reduce aerodynamic drag).
I had to reduce the weight on the conrod side because I cut a whole lot of metal off of the crankshft counterweight. I'll post those pics next; I just need to get them off my brother's camera.
I had to reduce the weight on the conrod side because I cut a whole lot of metal off of the crankshft counterweight. I'll post those pics next; I just need to get them off my brother's camera.
03-24-2007, 01:25 AM
#92
Senior Member
Sorry there Jim, I slapped that post up so fast that I didn't mention that I like your work Looks like you have carefuly thought out each mod you did, It's good to see some mods that will realy show an improvment, you see some pretty scary stuff somtimes. Keep up the good work.
Robin
Looks like you have carefuly thought out each mod you did, It's good to see some mods that will realy show an improvment, you see some pretty scary stuff somtimes. Keep up the good work.Robin
03-24-2007, 01:28 AM
#93
Senior Member
Join Date: Jul 2005
Location: Torchy the Fiery Fast RC Turtl
Posts: 10,544
Likes: 0
Received 0 Likes
on
0 Posts
Again, I cut this crank quite excessively. If I ruined it, I will simply buy another crankshaft.
In the pics below, the second pic shows my D30M crank I just modified and a K4.6 crank I used as a practice piece. The crank on the left is the D30M crank; the one on the right is of course the K4.6 crank.
I do not know yet, but I think the D28M and D30M use the very same crankshaft. I will dismount my D28M, diassemble it, and measure the critical dimensions on it to see if they match those of the D30M.
03-24-2007, 01:31 AM
#94
Senior Member
.28 and the .30 are the same crank, I think the .21 has the same crank as well. That looks like it should work just fine.
03-24-2007, 01:39 AM
#95
Senior Member
Join Date: Jul 2005
Location: Torchy the Fiery Fast RC Turtl
Posts: 10,544
Likes: 0
Received 0 Likes
on
0 Posts
I think ou are right. The D21x (T, B, &E), D28M, & D30M all have the exact same stroke.
Interestingly enough, the K4.6 crankshaft will fit into a D28M/D30M block; the only difference is that the K4.6 has a slightly longer stroke (16.91mm instead of the D28M/D30M's 16.80mm).
Interestingly enough, the K4.6 crankshaft will fit into a D28M/D30M block; the only difference is that the K4.6 has a slightly longer stroke (16.91mm instead of the D28M/D30M's 16.80mm).
03-24-2007, 08:15 AM
#96
Senior Member
Join Date: Apr 2005
Location: Charlottesville,
VA
Posts: 5,253
Likes: 0
Received 0 Likes
on
0 Posts
ORIGINAL: SAVAGEJIM
I know the strength would be compromised so I made precautions not to cut this vally too deap. This valley is intended to do two things. The first is to reduce rotating mass on the heaviest part of the conrod (which happens to also be the part of the conrod the exhibits the most moment of inertia). The second is to slightly reduce its cross sectional area that must fight against the fuel-air mixture (to reduce aerodynamic drag).
I had to reduce the weight on the conrod side because I cut a whole lot of metal off of the crankshft counterweight. I'll post those pics next; I just need to get them off my brother's camera.
Besides that you got a steady hand.
03-24-2007, 10:41 AM
#97
Senior Member
Join Date: Jul 2005
Location: Torchy the Fiery Fast RC Turtl
Posts: 10,544
Likes: 0
Received 0 Likes
on
0 Posts
Thanks! I botched up up several of my K4.6 sleeves practicing to get to the level I am at. Fortunately, those sleeves were usesless before I even put the Dremel to them.
My next step is to thoroughly clean everything again and reassemble the D30M for a proper break-in. I am crossing my fingers and hoping all will go well.
My next step is to thoroughly clean everything again and reassemble the D30M for a proper break-in. I am crossing my fingers and hoping all will go well.
03-25-2007, 01:34 AM
#99
Senior Member
Join Date: Jul 2005
Location: Torchy the Fiery Fast RC Turtl
Posts: 10,544
Likes: 0
Received 0 Likes
on
0 Posts
Sorry, I have it halfway done, I've just been caught up on my new D30M and my first attempt to mod it (actually, my first attempt at modding an engine I intend to use, not just practice on worn and useless parts).