


Electronic solutions to modifying glow engines of all sizes to gasoline


 03-14-2023 | 05:14 PM
#1503

My Feedback: (1)
#Metoo...
Way I see it, fiston and running gear is 100% safe. We know that from earlier conversions. Leaves only the rotary valve, and it has all appearance that this particular construction is extremely easy to dismantle and inspect for wear every runhour until you are sure no bad stuff happens.
I would say, go for it, Chris!
03-14-2023 | 05:25 PM
#1504
My Feedback: (1)
Found a Manual for the Webra T60. A unique entry says you can modify the "valve" timing by one notch ether way of alignment mark to "Increase Performance" - going from glow to gas would there be a preferred direction or would it solely depend on "prop load" and RPM.
Great effort on the various Carb experiments Dan.. Building the Knowledge base...
Great effort on the various Carb experiments Dan.. Building the Knowledge base...
03-15-2023 | 12:01 AM
#1505
Found a Manual for the Webra T60. A unique entry says you can modify the "valve" timing by one notch ether way of alignment mark to "Increase Performance" - going from glow to gas would there be a preferred direction or would it solely depend on "prop load" and RPM.
Great effort on the various Carb experiments Dan.. Building the Knowledge base...
Great effort on the various Carb experiments Dan.. Building the Knowledge base...
This is mainly caused by the closing point of the intake: The inrushing fuel/air mixture, as well as the column of spent gas at the exhaust stroke have inertia, and by shifting the valve overlap period, as well as the closing point of the intake a bit later, this inertia can be used to improve cylinder filling at high RPM when there is not much time.
Advancing the timing will basically FORCE the peak torque and peak power to occur at a lower RPM.
Retarding the timing will improve absolute peak power by shifting peak torque to a higher RPM, but that will happen at the cost of decent low RPM behaviour. Advancing the timing will improve low RPM behaviour (not performance) at the cost of absolute peak power. The length of the intake tract also has influence on this, but I am not exacly sure which change does what, and where in the rev range that change will have effect.
But I do have a nice video where this effect is demonstrated: My Wankel has a very crude muffler originally, that does little for noise reduction and even less for performance, but simply adding a length of completely random and untuned tubing to the tailpipe. has a very significant effect on peak power of about 8~9%
For what it is worth, I would not tune the engine for high RPM (increased heat) and I would not tune it for low grunt either (higher loads on the conrod), I would leave timing original, because spark ignition on its own will allready increase the engines ability to swing larger props at lower RPM.
03-15-2023 | 03:58 AM
#1506
Of course, Bert is correct.
We all played with cam timing quite a bit in my drag/road racing racing days, amateur-ish as we were. Advancing cam timing for peak torque at lower rpm, retarding for peak torque at higher rpm. Cam timing changes using higher duration cams has a more dramatic effect on performance than with stock cams; due to a greater change in cranking compression/dynamic compression ratio.
P/S, Listening to that Webra in the vid, it sounds like predetonation transitioning off idle. Could be the nitro content is too high, maybe bad needle adjustments, or maybe the cam timing is off too far. Don't know, but it doesn't sound happy throttling up. Makes me cringe.
If the Webra timing gears allow for a change in cam timing of +/- 6 degrees or less I might give it a try just to satisfy curiosity. Any more than that I would install in "straight up" and leave it alone.
Last edited by Glowgeek; 03-15-2023 at 04:24 AM.
03-15-2023 | 04:29 AM
#1507
We all played with cam timing quite a bit in my drag/road racing racing days, amateur-ish as we were. Advancing cam timing for peak torque at lower rpm, retarding for peak torque at higher rpm. Cam timing changes using higher duration cams has a more dramatic effect on performance than with stock cams; due to a greater change in cranking compression/dynamic compression ratio.
Different cams are the only real solution if you really want to extract more power from the engine. Because advancing or retarding an existing cam changes both opening AND closing times, and that is never "optimal".
03-15-2023 | 04:35 AM
#1508
P/S, Listening to that Webra in the vid, it sounds like predetonation transitioning off idle. Could be the nitro content is too high, maybe bad needle adjustments, or maybe the cam timing is off too far. Don't know, but it doesn't sound happy throttling up. Makes me cringe.
It could very well be that it detonates or pre-ignites (it sure sounds like it, no doubt), it is just hard to tell with this kind of testbeds.
03-15-2023 | 05:13 AM
#1509
My Feedback: (1)
As soon as i started reading Bert and Lonnie' s responses - it jogged my Memory on this subject.. on my 69 Camaro I remember running the cam Timing advanced.. It was the DZ 302 engine and had a copy of the "Stage 2" solid lifter camshaft. Being a short stroke - big bore version of the chevy small block it really liked to Rev. Running the cam advanced (variable keyway settings) made it more "street friendly" and restored some low end grunt. It still didn't really come alive until 4000 rpm though - but it helped. Funny how you forget stuff.
Got the bearings changed - was tough to pull the piston pin to remove the rod (one piece case) but got it.. Everything looks great inside and can tell it has very little runtime. Got a replacement prop driver almost done for the magnet mounting- so I can keep the "stock piece" intact.
Got the bearings changed - was tough to pull the piston pin to remove the rod (one piece case) but got it.. Everything looks great inside and can tell it has very little runtime. Got a replacement prop driver almost done for the magnet mounting- so I can keep the "stock piece" intact.


The following users liked this post:
Cat 1 (03-16-2023)
03-16-2023 | 08:43 PM
#1512
My Feedback: (1)
As much as it pains me to say this I must leave this group�.. I have thought I could get along and not have it affect me that dramatically�.. but I must go before any further suffering occurs.
I just Ty-Wrapped a sensor on. 🤣🤣🤣. ***!!!🤣
Can�t believe how well it worked and how well it holds. Tightens it a bit to much and had a heck of a time adjusting the timing!!!!
I just Ty-Wrapped a sensor on. 🤣🤣🤣. ***!!!🤣
Can�t believe how well it worked and how well it holds. Tightens it a bit to much and had a heck of a time adjusting the timing!!!!
 03-16-2023 | 10:17 PM
#1514
Cat1 great job..its ready to go
Look forward to see it running..
Got my twin ignition for the asp ft160..time to rig it up and see what happens..im still thinking to try the sto k carb ..i tried the stock carb on the fs91 no hope of running..infact i now know why i had a tough time tuning that engine on glow to begin..hs needle has to be wound out 2 turns before fuel can pass it and ls needle problematic..well i may just stick with the saito gas carb it works just fine
03-16-2023 | 11:49 PM
#1515
Cat1 great job..its ready to go
Look forward to see it running..
Got my twin ignition for the asp ft160..time to rig it up and see what happens..im still thinking to try the sto k carb ..i tried the stock carb on the fs91 no hope of running..infact i now know why i had a tough time tuning that engine on glow to begin..hs needle has to be wound out 2 turns before fuel can pass it and ls needle problematic..well i may just stick with the saito gas carb it works just fine
Look forward to see it running..
Got my twin ignition for the asp ft160..time to rig it up and see what happens..im still thinking to try the sto k carb ..i tried the stock carb on the fs91 no hope of running..infact i now know why i had a tough time tuning that engine on glow to begin..hs needle has to be wound out 2 turns before fuel can pass it and ls needle problematic..well i may just stick with the saito gas carb it works just fine
It literally was its first run here so there is not very much WOT running in the vid.
Sure, you can fly a plane with it (sufficient power, and it near 100% sure won't stall) but try dosing throttle for landing... It truly is horrible. And it is not because it was not yet adjusted from the box, it never got better until I modded the carb.
(This vid is also the LAST time EVER that I used gloves to start an engine, but that as an aside)
03-17-2023 | 12:05 AM
#1516
That surely looks likecit runs fairly wel bert ..
but i an see its not truly running well of throttle there ..it seems a bit off. And yeah new engine..and i wathched your video of throttle mod.bad lighting but i understandwhat you were showing... .i got a pair of asp fs80 mufflers with my engine..well the exhaust is slapped together for its run tomorrow..il just use the fg arb ..i know i can get a tune with it..
but i an see its not truly running well of throttle there ..it seems a bit off. And yeah new engine..and i wathched your video of throttle mod.bad lighting but i understandwhat you were showing... .i got a pair of asp fs80 mufflers with my engine..well the exhaust is slapped together for its run tomorrow..il just use the fg arb ..i know i can get a tune with it..
03-17-2023 | 12:23 AM
#1517
That surely looks likecit runs fairly wel bert ..
but i an see its not truly running well of throttle there ..it seems a bit off. And yeah new engine..and i wathched your video of throttle mod.bad lighting but i understandwhat you were showing... .i got a pair of asp fs80 mufflers with my engine..well the exhaust is slapped together for its run tomorrow..il just use the fg arb ..i know i can get a tune with it..
but i an see its not truly running well of throttle there ..it seems a bit off. And yeah new engine..and i wathched your video of throttle mod.bad lighting but i understandwhat you were showing... .i got a pair of asp fs80 mufflers with my engine..well the exhaust is slapped together for its run tomorrow..il just use the fg arb ..i know i can get a tune with it..
This mod works OK on the FT160, but you have to be a bit careful, it only needs a little bit of grinding (compared to singles).
I think that this is caused by uneven mixture distribution, and leaning out midrange too much will cause the leanest cylinder to drop.
Getting the distribution more even can be done in a similar way as what I did with my Radial (the tiny airholes) but I have the feeling that unlike the radial, on the FT160 this solution is very sensitive to dirt due to the location of the carburettor. I opted for a tiny "spoiler" in the intake instead.
03-17-2023 | 12:43 AM
#1518
Wow..would definitely have to be careful on the die grinder to take a small amount off the groove..well im going forward with gas conversion anyway..so i will give its carb a shot ..with a little bit of are ..i may manage it😆

 03-17-2023 | 02:48 AM
#1520
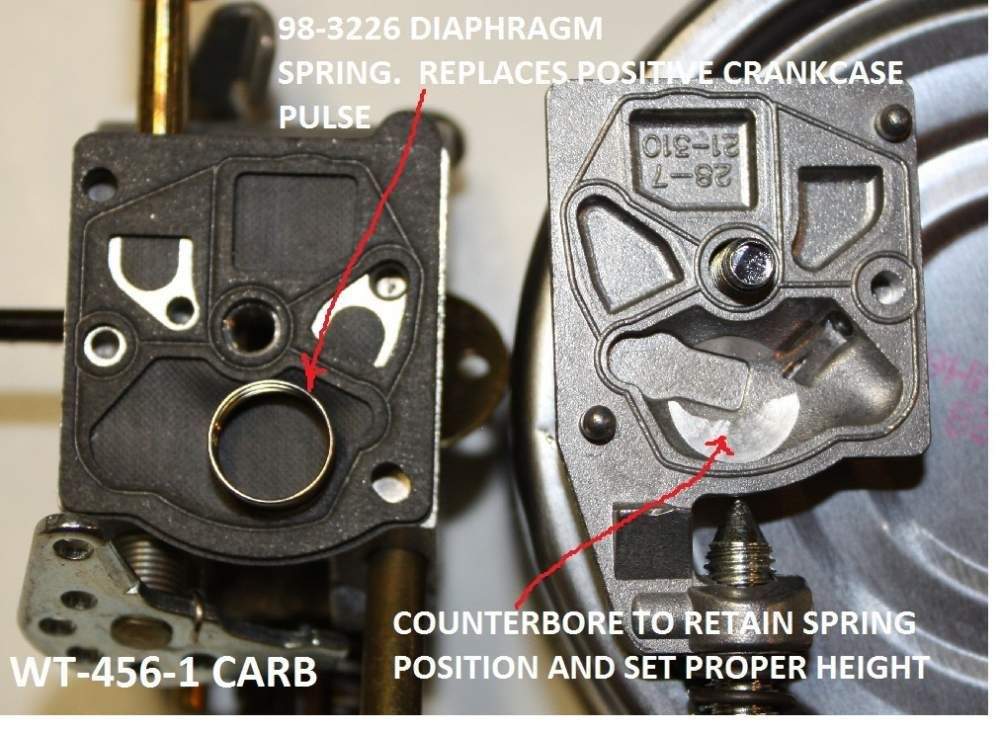
In general, if you remove about half the thickness of a standard Dremel cutting disc off the low end, and make the cut a bit "rounded" to by and large 1/2 of the total stroke, that is a good beginning for a single.
Just start carefully and gradually increase after testing. Do NOT go all the way on the testbench, because you cannot "ungrind", and engines need a bit more fuel in the air than they do on the ground, but it is not very critical. After I did about three carbs, I could basically do them freehand and end up near spot on.
A pic to give you an idea of how the final result should look, give or take...

ASP FS52. The original slot is milled therefore ends abruptly, it is unvoidable to cut a bit beyond the end, because the side of the slot needs to be ground to full depth.
It does not affect functioning of the carb or the throttle movement.
03-17-2023 | 03:20 AM
#1522

And you have a printer and abs filament too. My god, man. What is wrong with you.
As much as it pains me to say this I must leave this group�.. I have thought I could get along and not have it affect me that dramatically�.. but I must go before any further suffering occurs.
I just Ty-Wrapped a sensor on. 🤣🤣🤣. ***!!!🤣
Can�t believe how well it worked and how well it holds. Tightens it a bit to much and had a heck of a time adjusting the timing!!!!
I just Ty-Wrapped a sensor on. 🤣🤣🤣. ***!!!🤣
Can�t believe how well it worked and how well it holds. Tightens it a bit to much and had a heck of a time adjusting the timing!!!!
03-17-2023 | 03:21 AM
#1523
Yeah, the first time you take the grinder to a carb, definitely feels a bit uncanny.
In general, if you remove about half the thickness of a standard Dremel cutting disc off the low end, and make the cut a bit "rounded" to by and large 1/2 of the total stroke, that is a good beginning for a single.
Just start carefully and gradually increase after testing. Do NOT go all the way on the testbench, because you cannot "ungrind", and engines need a bit more fuel in the air than they do on the ground, but it is not very critical. After I did about three carbs, I could basically do them freehand and end up near spot on.
A pic to give you an idea of how the final result should look, give or take...
ASP FS52. The original slot is milled therefore ends abruptly, it is unvoidable to cut a bit beyond the end, because the side of the slot needs to be ground to full depth.
It does not affect functioning of the carb or the throttle movement.
nice and easy with the dremel.
03-17-2023 | 04:21 AM
#1524
My Feedback: (1)
Actually this is a printed holder. The wrap goes through a bolt hole and around. I think I will try a printed design actually made for a tie-wrap to be the fastening device. The wrap method actually strengthens the whole printed mount and does away with the bolting holes which are always the weak spot on a printed one
03-17-2023 | 05:51 AM
#1525
drank toooooo much kool-aid!!!!
Actually this is a printed holder. The wrap goes through a bolt hole and around. I think I will try a printed design actually made for a tie-wrap to be the fastening device. The wrap method actually strengthens the whole printed mount and does away with the bolting holes which are always the weak spot on a printed one
Actually this is a printed holder. The wrap goes through a bolt hole and around. I think I will try a printed design actually made for a tie-wrap to be the fastening device. The wrap method actually strengthens the whole printed mount and does away with the bolting holes which are always the weak spot on a printed one


