Engine mounting question--help!
 02-10-2008 | 09:58 AM
#1
Thread Starter
Member
Joined: Feb 2007
Posts: 44
Likes: 0
Received 0 Likes
on
0 Posts
From: Prairieville, LA
Does anyone see a problem with this setup? I have a BCMA sport 26 on a GP Super Stearman. I put a 1/2 inch steel spacer on both sides of the supplied standoffs. On the firewall I have a 1/16 inch thick steel plate so the spacers don't dig into the firewall. The plate is only 1/2 wide just enough to cover two bolts each(two seperate plates). The weight is not an issue. So, in order, there's engine, steel spacer, standoff, steel spacer, plate, firewall. Would this be Ok? I had it mounted this way and it feels pretty sturdy, but I took it off to break in the engine on a test stand. Any advise please...
 02-10-2008 | 10:50 AM
#2

If you could post a photo of your set up...we can help you better. I think one of the best is to use wooden dowels for stand offs (they can be sanded for engine off-set) together with a aluminum plate against engine lugs ....so they are better protected from breakage. Just My observation. Capt,n ADDED PHOTO
ADDED PHOTO
02-10-2008 | 12:17 PM
#3
Thread Starter
Member
Joined: Feb 2007
Posts: 44
Likes: 0
Received 0 Likes
on
0 Posts
From: Prairieville, LA
I am still breaking in my engine. I should be finished running the required one gallon with extra oil today. I will mount the engine and post pictures later today.
02-10-2008 | 01:30 PM
#4
Senior Member
My Feedback: (1)
Next time break the engine in on the plane. It's a lot better for the engine and you get to do more flying that way. I find it hard to understand why an engine distributor would tell someone to break an engine in on a stand.
Your installation sounds like it will be fine if you keep everything tight. A whole lotta parts for the mounts though. There are easier ways as noted above.
Your installation sounds like it will be fine if you keep everything tight. A whole lotta parts for the mounts though. There are easier ways as noted above.
02-10-2008 | 05:48 PM
#5
Senior Member
Pat,
I too recommend setting up an engine outside the plane first. I know it is harder on the cooling, but it still is better than running it in a plane without flying, like I see many do. The other advantage is, that you get to know the engine and check it out before you fit it into the plane.
I would not recommend to do the complete running in outside the plane (like 3W does). Just the starters to set it up and get aquainted with the controls, prop and needles.
02-10-2008 | 09:13 PM
#6
Thread Starter
Member
Joined: Feb 2007
Posts: 44
Likes: 0
Received 0 Likes
on
0 Posts
From: Prairieville, LA
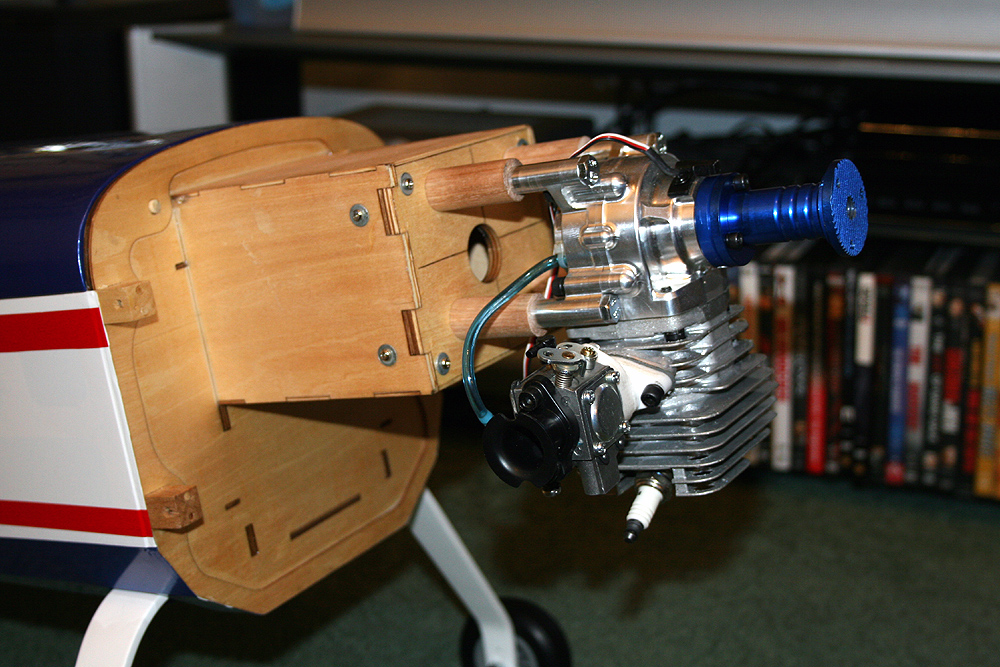
O.K. Here are the pictures of the mount. Please be critical. I can easily change this. It's my first attempt at a gas engine, but I am a pretty competent mechanic. If the wooden dowels are better, it's just a short trip to Lowe's.
02-10-2008 | 09:53 PM
#8
Senior Member
My Feedback: (1)
The pictures help...a lot.
Although the installation appears rigidly mounted, in this case it's not. It's a bit worse than using long one piece standoffs since you have room at several places for the standoff to permit the bolt inside to move a little. Long single piece satndoffs are not a lot better since they permit twisting from engine torque to transfer through the fire wall.
If it was mine and I needed to use a long engine offset then I would use two 3/4" wide hardward blocks the correct length, drilled for the bolts, to attach the engine to the firewall and eliminate the twisting forces.
Pe,
I'm with you when it comes to running the engine the first time on the ground to get everything set, but after that I'm part of the break in while flying crowd.
02-10-2008 | 10:24 PM
#9
Thread Starter
Member
Joined: Feb 2007
Posts: 44
Likes: 0
Received 0 Likes
on
0 Posts
From: Prairieville, LA
Pat, do you mean using one block for two bolts, one across the top and one across the bottom? Sort of like I have those plates against the firewall? Of course I still need to use the supplied standoffs to clear the carb and the shaft sticking out the rear of the engine.
02-10-2008 | 10:51 PM
#10
Senior Member
My Feedback: (1)
Joined: Oct 2004
Posts: 1,416
Likes: 0
Received 0 Likes
on
0 Posts
From: Altaville,
CA
He means two pieces of hard wood. Cut to be slightly wider than the engine mounts, the same width as your currant standoffs are and from 3/4" solid wood. So a piece of oak or maple about 4"x2.5"x3/4 thick, times two.... A large lightening hole can be cut in the center. Glue the blocks on edge wise to the firewall. And drill it for the engine. This will give it latteral strength.
Another option is to use 3/4 or 7/8" dowels like the picture above but cut grooves for installing shear webs between each standoff to give latteral bracing. Glue the dowels to the firewall also.
The torque load of those standoffs you put together will go directly to the engine mounting lugs and most likely break them off in short order.
02-10-2008 | 11:21 PM
#12
Senior Member
My Feedback: (1)
You can't tell that Altavillan and I know each other, can you?
That would not happen immediately, but the firewall would start suffereing abuse the first time it ran. Using two wood blocks with cut outs to let the mounts clear the carb will last forever. Long metal standoffs will not. Depending on the firewall composition long standoffs can be very short lived.
That would not happen immediately, but the firewall would start suffereing abuse the first time it ran. Using two wood blocks with cut outs to let the mounts clear the carb will last forever. Long metal standoffs will not. Depending on the firewall composition long standoffs can be very short lived.
02-11-2008 | 08:03 AM
#13
Thanks to you and Altavillan for this bit of info as I am about to do my first longer than 1/2" standoff arrangement, and I do believe than this thread might just have saved me from some possible grief.
Karol
Karol
02-11-2008 | 10:41 AM
#14
Senior Member
My Feedback: (1)
You guys should go over to the Wild Hare Forum and take a look at the first post in the 40% Giles Quickbuild thread. Tom used some home made standoffs in the engine installation picture that will fit just about anything and work extremely well. I think they cost about a buck or less for the material used.
02-11-2008 | 05:25 PM
#16
Thread Starter
Member
Joined: Feb 2007
Posts: 44
Likes: 0
Received 0 Likes
on
0 Posts
From: Prairieville, LA
O.K. How about this? That's two 3/4 inch blocks with 5/8 inch dowels. All red oak. The bolt is all thread with nylon lock nuts.
02-11-2008 | 05:35 PM
#17
That arrangement looks real neat and sturdy but maybe a bit on the heavy side for my liking. I would certaintly make good use of some serious lightning holes wherever possible.
Karol
Karol
02-11-2008 | 05:38 PM
#18
Senior Member
Joined: Nov 2007
Posts: 525
Likes: 0
Received 0 Likes
on
0 Posts
From: newark, UNITED KINGDOM
The oak isn't going anywhere! Very sturdy indeed [sm=regular_smile.gif]
Allthread can be a bit soft. If you can find some caphead bolts the right length, they would be better.
Allthread can be a bit soft. If you can find some caphead bolts the right length, they would be better.
02-11-2008 | 05:40 PM
#19
Senior Member
Joined: Nov 2007
Posts: 525
Likes: 0
Received 0 Likes
on
0 Posts
From: newark, UNITED KINGDOM
ORIGINAL: karolh
That arrangement looks real neat and sturdy but maybe a bit on the heavy side for my liking. I would certaintly make good use of some serious lightning holes wherever possible.
Karol
That arrangement looks real neat and sturdy but maybe a bit on the heavy side for my liking. I would certaintly make good use of some serious lightning holes wherever possible.
Karol
Yes, a ~2" holesaw through the middle would be good - instead of the ~1".
02-11-2008 | 05:40 PM
#20
Thread Starter
Member
Joined: Feb 2007
Posts: 44
Likes: 0
Received 0 Likes
on
0 Posts
From: Prairieville, LA
The allthredad is 4" long. I couldn't find a bolt that long. How about stainless allthread? BTW, the plane needs the weight up front.
02-11-2008 | 05:46 PM
#21
Senior Member
Joined: Nov 2007
Posts: 525
Likes: 0
Received 0 Likes
on
0 Posts
From: newark, UNITED KINGDOM
Try what you've got. The nuts can be nipped up after some running if necessary. The oak looks MUCH better than the stacked standoffs you had to start with [sm=thumbup.gif] Functional ballast weight is also a plus.
02-11-2008 | 06:27 PM
#22
What I would like too see ...is more metal around the mounting lugs on engine to begin with. It is not going to add that much more weight! Capt,n
02-11-2008 | 06:35 PM
#23
Senior Member
My Feedback: (1)
You can obtain 4" number 10 hex head cap screws for about a buck apiece from [link]http://www.microfasteners.com[/link] The all thread works just fine as well but you have to secure both ends instead of one. The nylon in ny-lock nuts gets hot when used on an engine and loosens up so you want to check them frequently. When you're completey satisfied with the engine installation and have no possibility of needing to remove it for a long time use some green Locktite on the nylocks to better secure them.
02-12-2008 | 09:50 AM
#24
Thread Starter
Member
Joined: Feb 2007
Posts: 44
Likes: 0
Received 0 Likes
on
0 Posts
From: Prairieville, LA
I will replace the allthread with stainless; the locknuts with nuts and lock washers and locktite. I will install engine without putting epoxy on the mount or drilling more lightning holes, put in all radio gear and see how she balances before drilling more holes.