WMM PJ-260 Biplane
 12-28-2013, 10:54 AM
#1

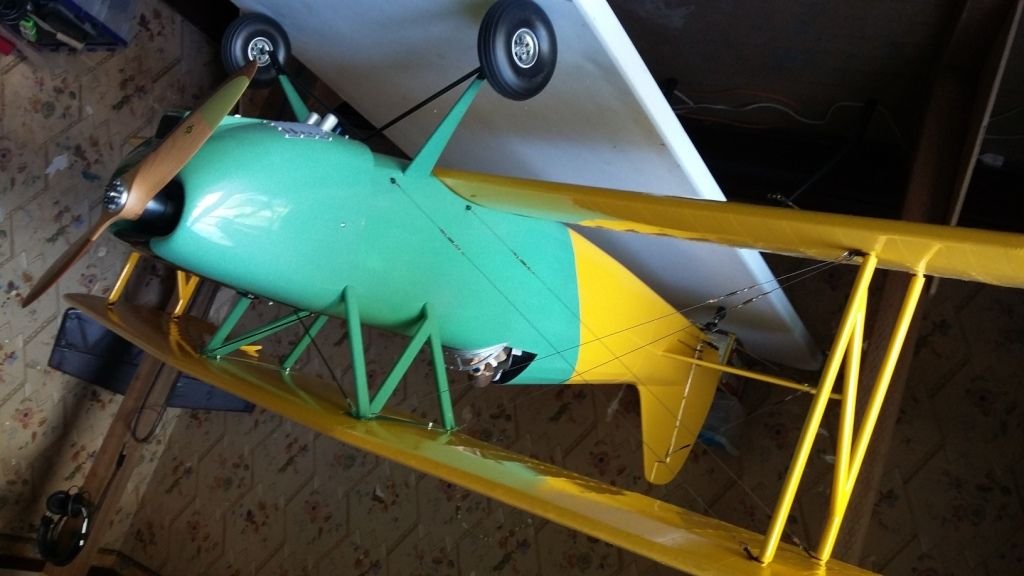
I acquired a 33% scale PJ-260 Biplane with plans. It is a Walt M. Models design. This biplane was built prior to me getting it and someone had installed an OS Max 1.60 in it. I changed this to a 50 cc gas engine and ordered in a Bisson wrap around pitts muffler. Next, I tossed the old super thick ABS cowling and ordered a new one from Fiberglass Specialties, (both FGS and Bisson folks are great to work with!).
Both the top and bottom wings were misaligned. The top wing was rotated 7/8" counter-clockwise and the bottom wing was rotated 5/16" clock-wise-no wonder the "N"-struts didn't work...so after cutting and re-silver soldering the Cabane wires back together I built new covers for them using hemlock screen door trim from the lumber yard that I grooved out with a router. (The prior builder(s) were just going run the cabane wires painted with no covers and I thought since this is a rare scale project I had better do it justice and go ahead and build the covers out of nice wood.) I also drilled out the lower wing threaded blocks and epoxied in hardwood doweling and then re-drilled and tapped the blocks so that the lower wing is aligned properly.
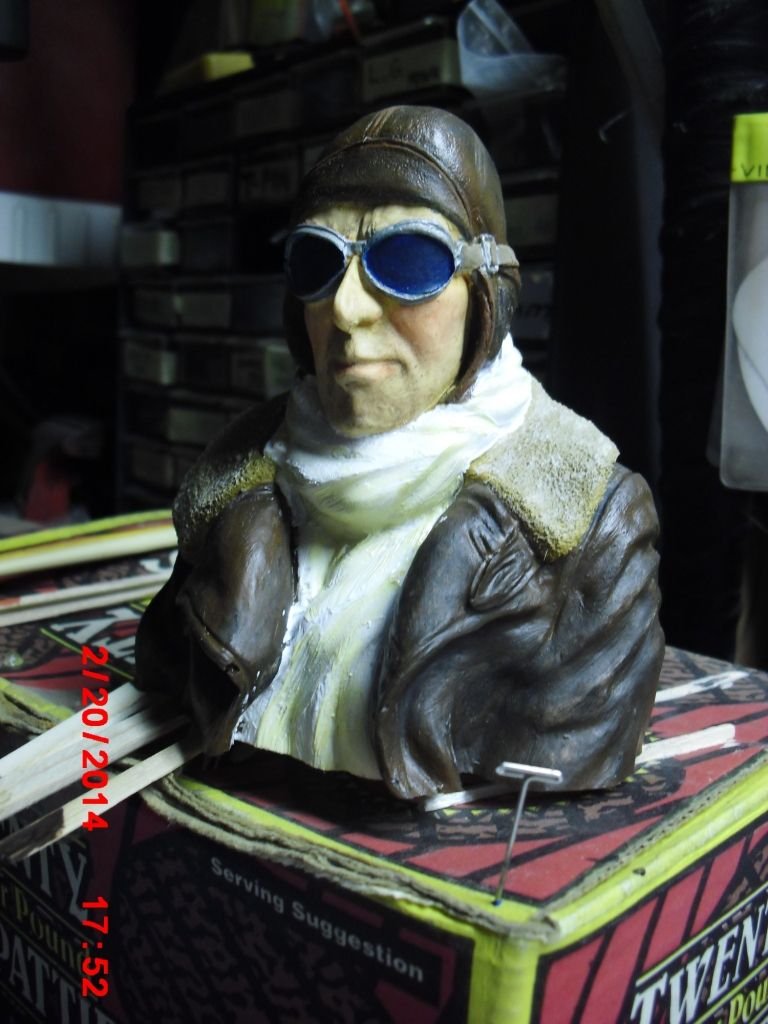
This is a scale airplane that had rib stitching on the full sized bird. I will be simulating rib stitching using 1" finishing tape from the "S****-Lite" folks. The full sized bird uses flying wires on the wings...so will this scale model. (Why are the flying wires so often overlooked? Scale is scale right?)
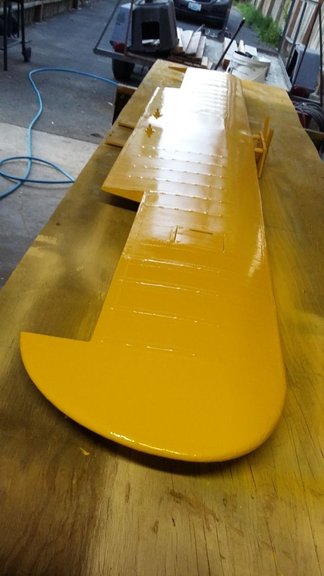
Since the wings are already painted with TF Lustrekote I will be using either Poly-tak or poly-fill to attach the ribbing strips and finishing tape to the already painted rib caps, (I will experiment on a small spot first...). This will be re-painted using Klass-kote epoxy two part paint. Since TF Lustrekote is a custom formulated fuel resistant Laquer, a person can use a few light coats of epoxy primer without the dissimilar materials having a negative reaction to each other. The trick will be to allow the existing paint to gas out a bit from the new solvent before completely covering it with the new epoxy primer. The colors I will be using are Deep Blue #310 and White #100 kicking it with the high gloss catalyst.
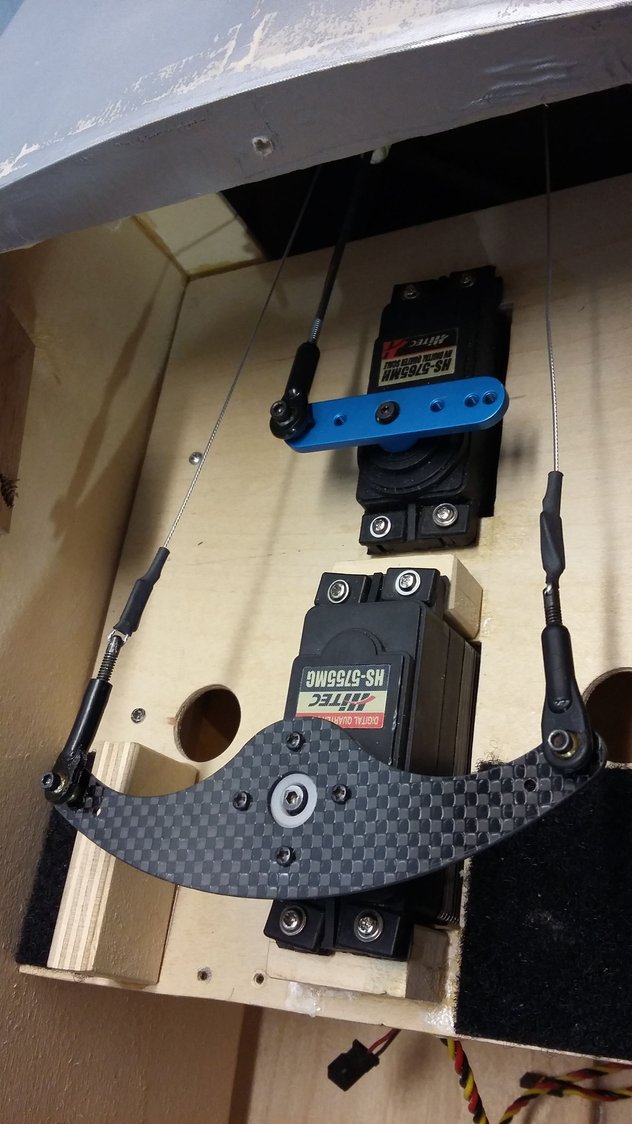
The ailerons will be linked just like the full sized bird. I am going to use Savox SC-1232SG servos which provide 365 ounces of torque. Quarter scale digital form factor servos will be used in the tail.
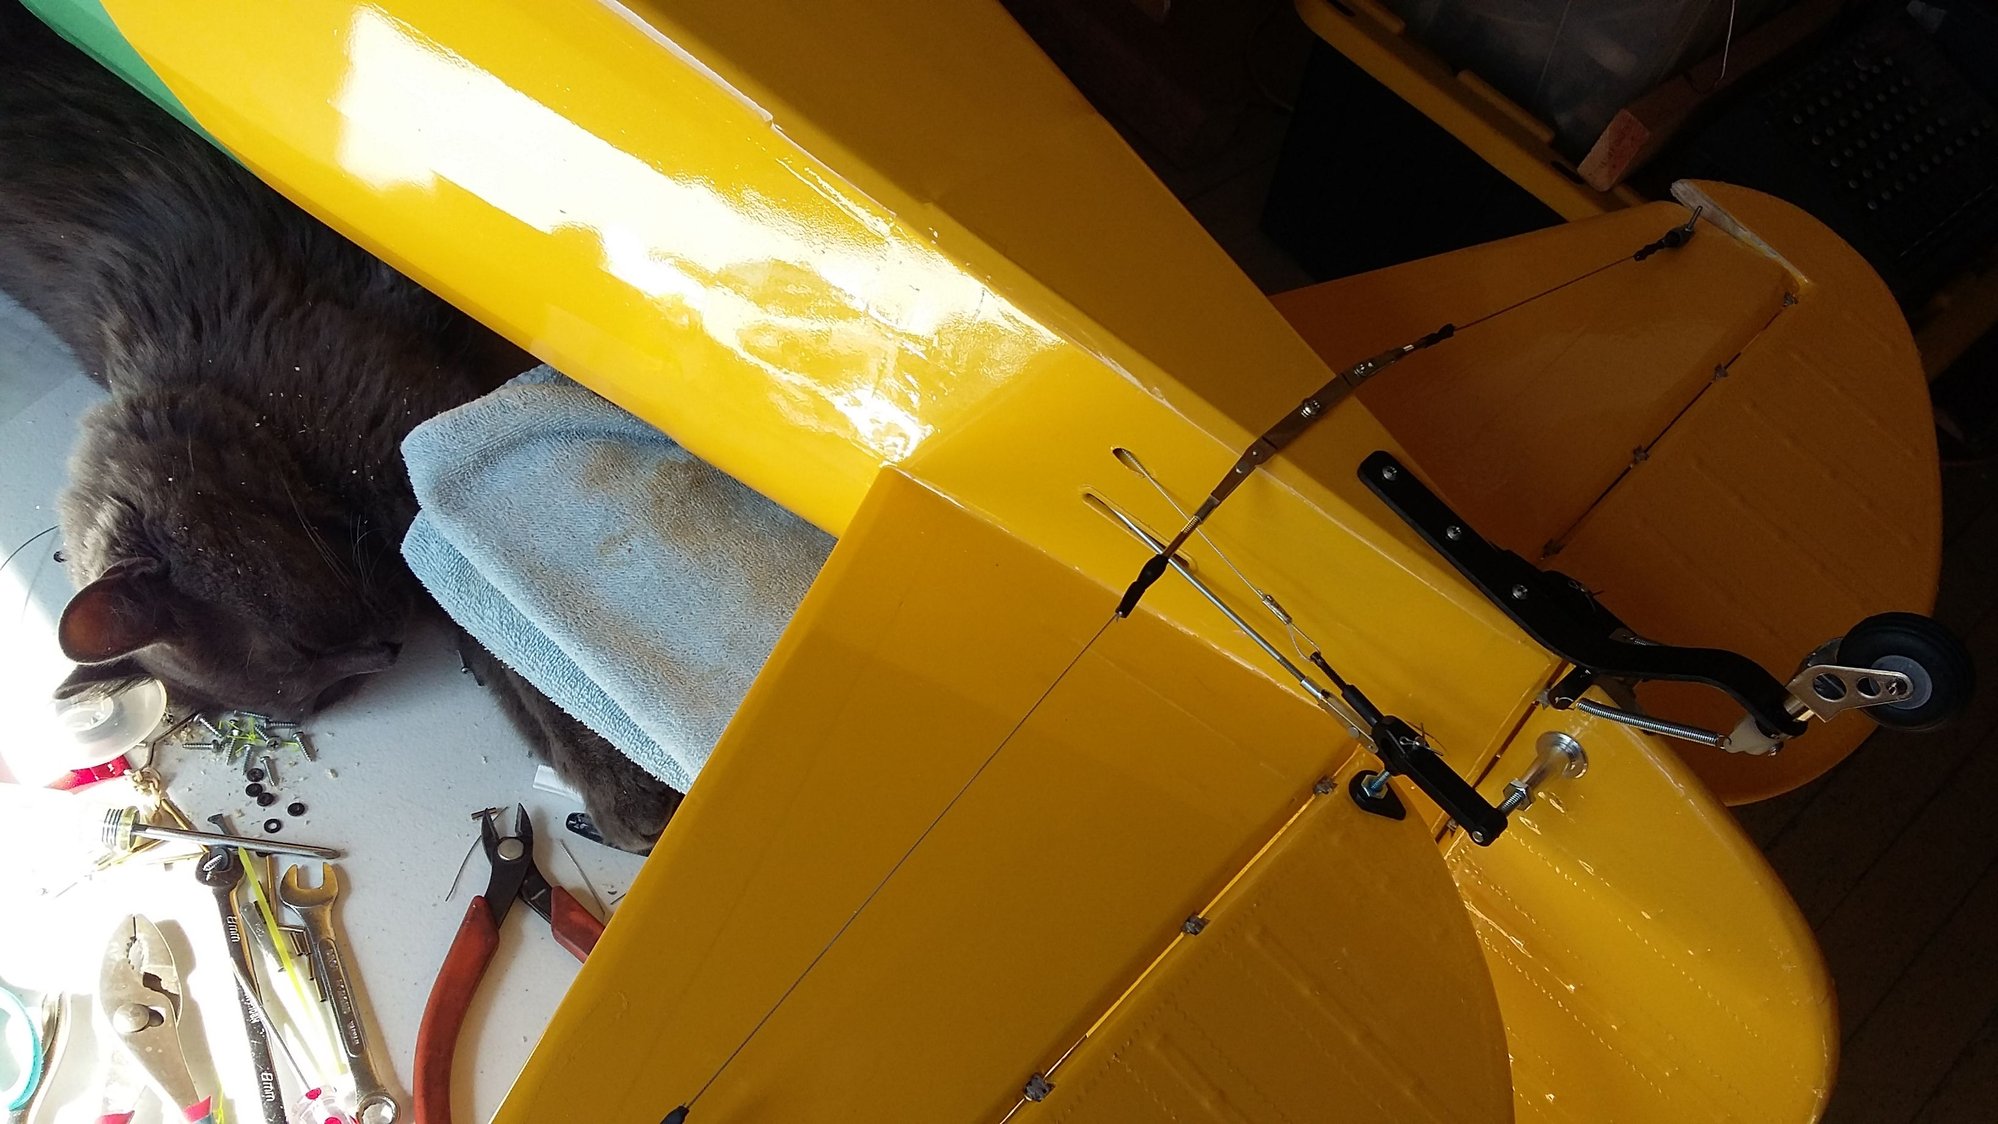
The landing gear by design I felt were too flimsy so I added in a 1/4" diameter music wire spring which seems to help immensely.


Here are a couple of pictures...

Both the top and bottom wings were misaligned. The top wing was rotated 7/8" counter-clockwise and the bottom wing was rotated 5/16" clock-wise-no wonder the "N"-struts didn't work...so after cutting and re-silver soldering the Cabane wires back together I built new covers for them using hemlock screen door trim from the lumber yard that I grooved out with a router. (The prior builder(s) were just going run the cabane wires painted with no covers and I thought since this is a rare scale project I had better do it justice and go ahead and build the covers out of nice wood.) I also drilled out the lower wing threaded blocks and epoxied in hardwood doweling and then re-drilled and tapped the blocks so that the lower wing is aligned properly.
This is a scale airplane that had rib stitching on the full sized bird. I will be simulating rib stitching using 1" finishing tape from the "S****-Lite" folks. The full sized bird uses flying wires on the wings...so will this scale model. (Why are the flying wires so often overlooked? Scale is scale right?)
Since the wings are already painted with TF Lustrekote I will be using either Poly-tak or poly-fill to attach the ribbing strips and finishing tape to the already painted rib caps, (I will experiment on a small spot first...). This will be re-painted using Klass-kote epoxy two part paint. Since TF Lustrekote is a custom formulated fuel resistant Laquer, a person can use a few light coats of epoxy primer without the dissimilar materials having a negative reaction to each other. The trick will be to allow the existing paint to gas out a bit from the new solvent before completely covering it with the new epoxy primer. The colors I will be using are Deep Blue #310 and White #100 kicking it with the high gloss catalyst.
The ailerons will be linked just like the full sized bird. I am going to use Savox SC-1232SG servos which provide 365 ounces of torque. Quarter scale digital form factor servos will be used in the tail.
The landing gear by design I felt were too flimsy so I added in a 1/4" diameter music wire spring which seems to help immensely.
Here are a couple of pictures...
Last edited by Steve S. Helland; 12-28-2013 at 10:58 AM.

 04-29-2018, 07:58 AM
#4
I added scale rib stitching. This project has been going on for too long. I am committed to finishing it this year. When you hear about finishing taking longer than it took to build the kit always remember...IT'S TRUE! Each wing has many hours invested in just finishing and paint. All the handling of each part after applying the seal coats of nitrate dope has been done using nitrile gloves to keep oils off to reduce anomalies in the paint. This has been a very long journey for me but it has been very rewarding, especially as of late with all the time I've been putting into it.
05-05-2018, 03:03 PM
#5
So,
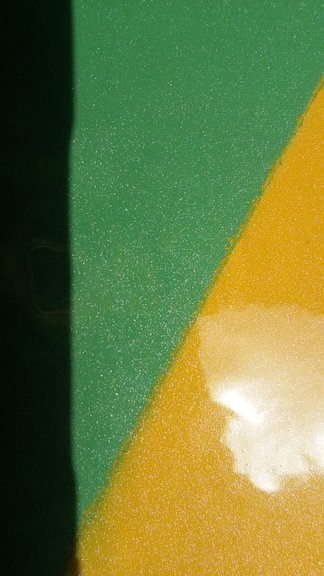
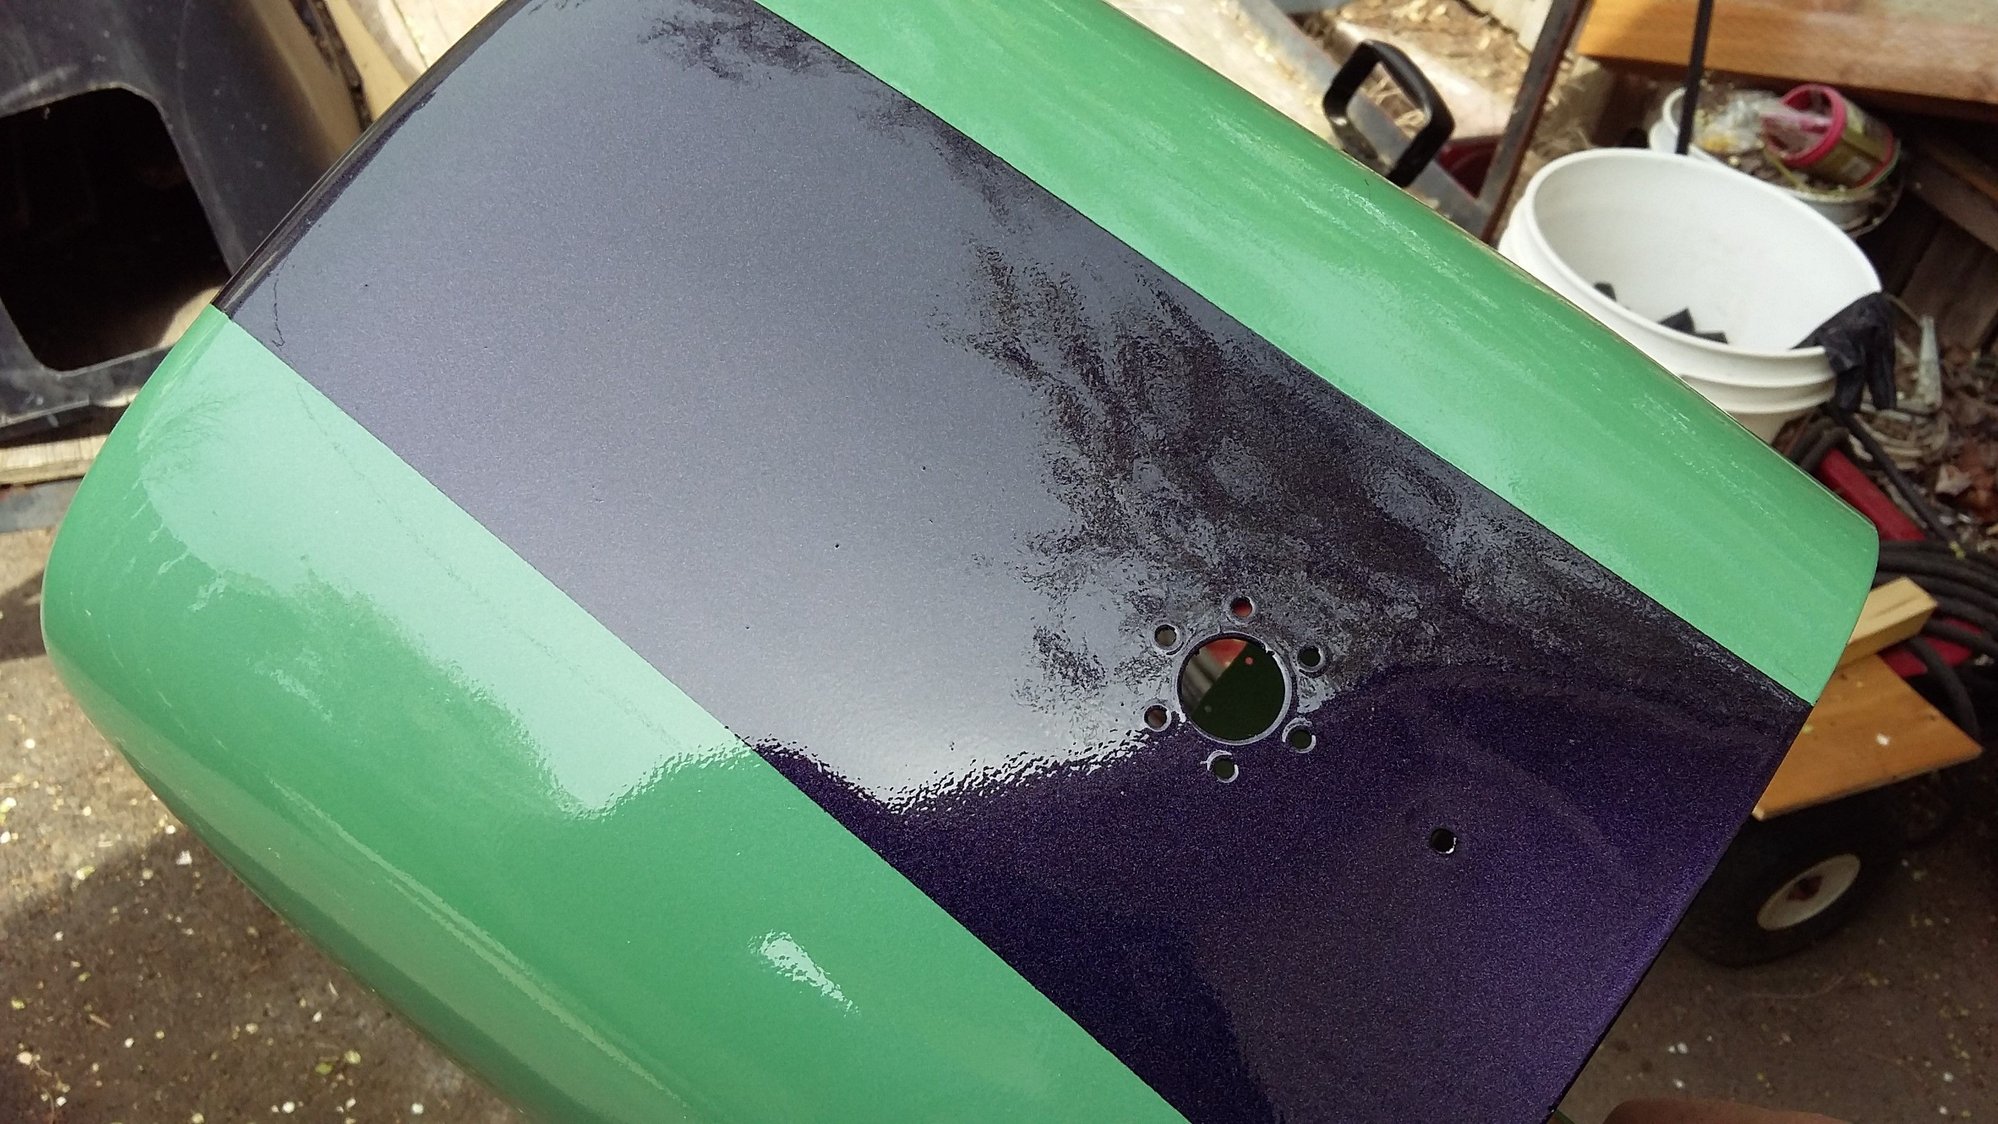
I have experimented with A PPG product that is a custom additive to clear coat. It is called "Luminescence" and is a pigment type of additive. I really had no idea what to expect because I added it to an epoxy type paint but the results were very good as you can see in the photo. It reminds me of the old STREN fishing line how it reacts to light and as you walk by my biplane the color/sheen changes and plays subtle tricks with the eyes. I think it is kind of neat...check it out!
Attachments area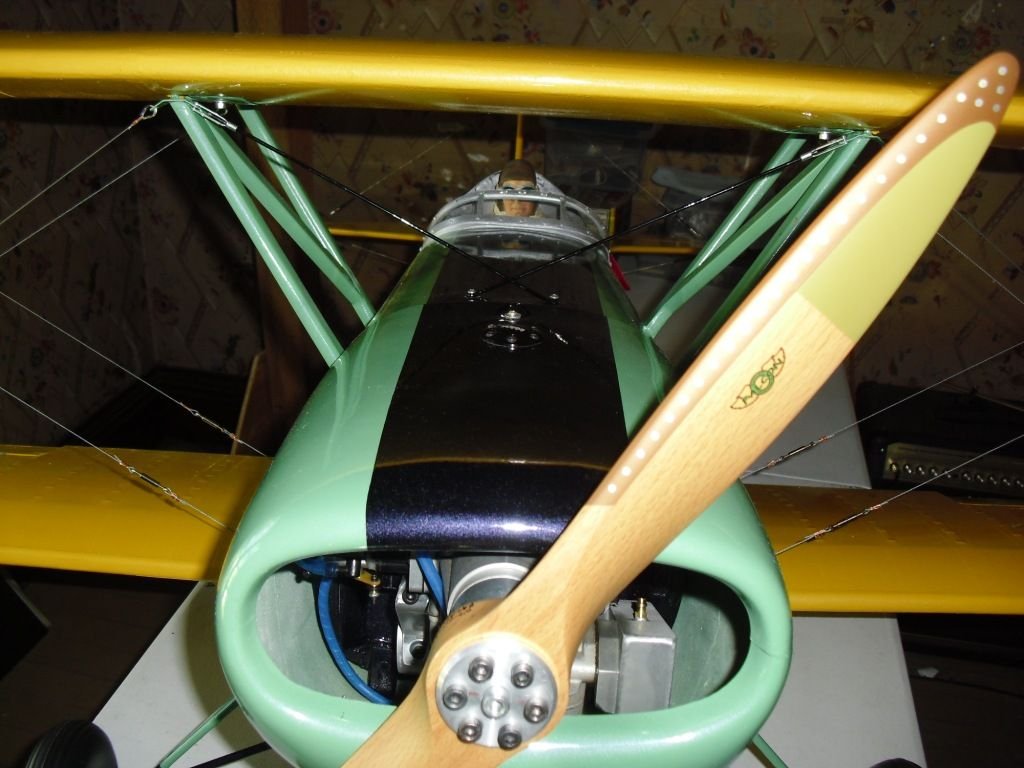
 07-04-2018, 11:00 AM
#7

Nice looking PJ, Steve. I love those flying wires! I bought a kit back in the 90's but didn't finish it until 2008. The kit had instructions and parts to complete it as one of three different versions. I completed mine as the PJ295 version with enclosed cockpit. It's a very nice flyer and I still take it out a few times a year.
Good luck on the maiden,
Patrick
Good luck on the maiden,
Patrick
09-06-2018, 08:20 PM
#8
The maiden went pretty good, It flew nice but severely underpowered. Almost stalled out on the first turn which was downwind. Yep, it got really dopey. Then after flying several oval circuits (because that's all it would do...very limited vertical climbing allowed) I landed it without incident...perfect landing. I spent a long time building this one and after hearing my story about needing a new and bigger motor my wife told me to go ahead and get a new one, so, without delay I just ordered in a brand new RCGF 60 single that will turn a 22X10 at 7500 RPM which provides 37 Lbs. of static thrust. At 26 Lbs. weight that sounds to me like unlimited vertical performance. Anyways, the engine hasn't made it to my door yet. Looking forward to the Yakima fly-in at Zillah, WA. Going to fly my 35% Extra 300 and 30% Pitts Challenger.
09-07-2018, 11:39 AM
#10
Ten years ago it was hard to find Walt Moucha. He is a famous retired kit designer for Balsa USA way back in the day. He had a few of his own kits that he sold privately and the ones I know of are the: Marquart Charger and the Senior Aerosport (PJ-260/295). The Marquart is a way more popular kit and you can find them here and there, just keep your eyes open on RCU or other places. The Senior Aerosport kit I have never seen for sale. I got lucky and acquired this one partially built and was able to convert it from the Senior Aerosport into a PJ-260. This guy has not been active at all that I have seen since about 2006 and he was or is the owner of Walt Moucha Models.
I built in 2 degrees of right thrust into the motor box and it tracked straight down the runway on takeoff...amazing!
Good Luck! These are getting to be very rare. The Charger kit would be a good one to collect.
I built in 2 degrees of right thrust into the motor box and it tracked straight down the runway on takeoff...amazing!
Good Luck! These are getting to be very rare. The Charger kit would be a good one to collect.
09-10-2018, 01:59 PM
#11
thanks for the info, Steve. that Plane is beautiful. I am a die hard biplane fan,....have been all my 63 years...............time to build one ! i'll have to keep a sharp eye on the classifieds and such.
04-13-2022, 03:03 PM
#12
Join Date: Mar 2016
Posts: 12
Likes: 0
Received 0 Likes
on
0 Posts
The maiden went pretty good, It flew nice but severely underpowered. Almost stalled out on the first turn which was downwind. Yep, it got really dopey. Then after flying several oval circuits (because that's all it would do...very limited vertical climbing allowed) I landed it without incident...perfect landing. I spent a long time building this one and after hearing my story about needing a new and bigger motor my wife told me to go ahead and get a new one, so, without delay I just ordered in a brand new RCGF 60 single that will turn a 22X10 at 7500 RPM which provides 37 Lbs. of static thrust. At 26 Lbs. weight that sounds to me like unlimited vertical performance. Anyways, the engine hasn't made it to my door yet. Looking forward to the Yakima fly-in at Zillah, WA. Going to fly my 35% Extra 300 and 30% Pitts Challenger.
Thanks
04-13-2022, 06:00 PM
#13
Steve, I realize that this is an old thread, but I was curious how the Senior Aero Sport flew with the RCGF 60? I have the same kit on the shelf and plan to start building this fall. I�d like to put an RCGF 70 twin on mine if it fits under the cowl! We�re at 3500� field elevation so extra power is always appreciated.
Thanks
Thanks
The RCGF 70 twin should do very well on this airplane using the 22-10 propeller. Don't go any bigger of a prop or it will be a slow pig. Just do yourself a favor...when you taxi out and are ready to roll out only advance the throttle to about 5/8.until the rudder stabilizes nicely, then pull back on the elevator a little bit and she'll take right off...then punch a really big hole in the sky!
Please post some progress on here when you get started!
Thanks
04-13-2022, 06:46 PM
#14
Join Date: Mar 2016
Posts: 12
Likes: 0
Received 0 Likes
on
0 Posts
Thanks for the update! As you mentioned, it�s a rare kit and not much information online. Did you mount the servos in the tail or mid-fuselage? I�m planning to cover it with Monokote or Oratex. I built a full-size Christavia MK-1 from plans and used the Stewart System to cover it. The non-flammable, no fume chemicals allowed me to cover the plane in the basement.
I�m planning to build mine using the PJ-260 modifications. I found a subject to model which the owner calls a PJ-295, but it has the longer lower wing, two cockpits and the upper wing cutout. Unfortunately, I�m not yet allowed to post pictures or YouTube links.
I�m planning to build mine using the PJ-260 modifications. I found a subject to model which the owner calls a PJ-295, but it has the longer lower wing, two cockpits and the upper wing cutout. Unfortunately, I�m not yet allowed to post pictures or YouTube links.
04-14-2022, 05:32 AM
#15
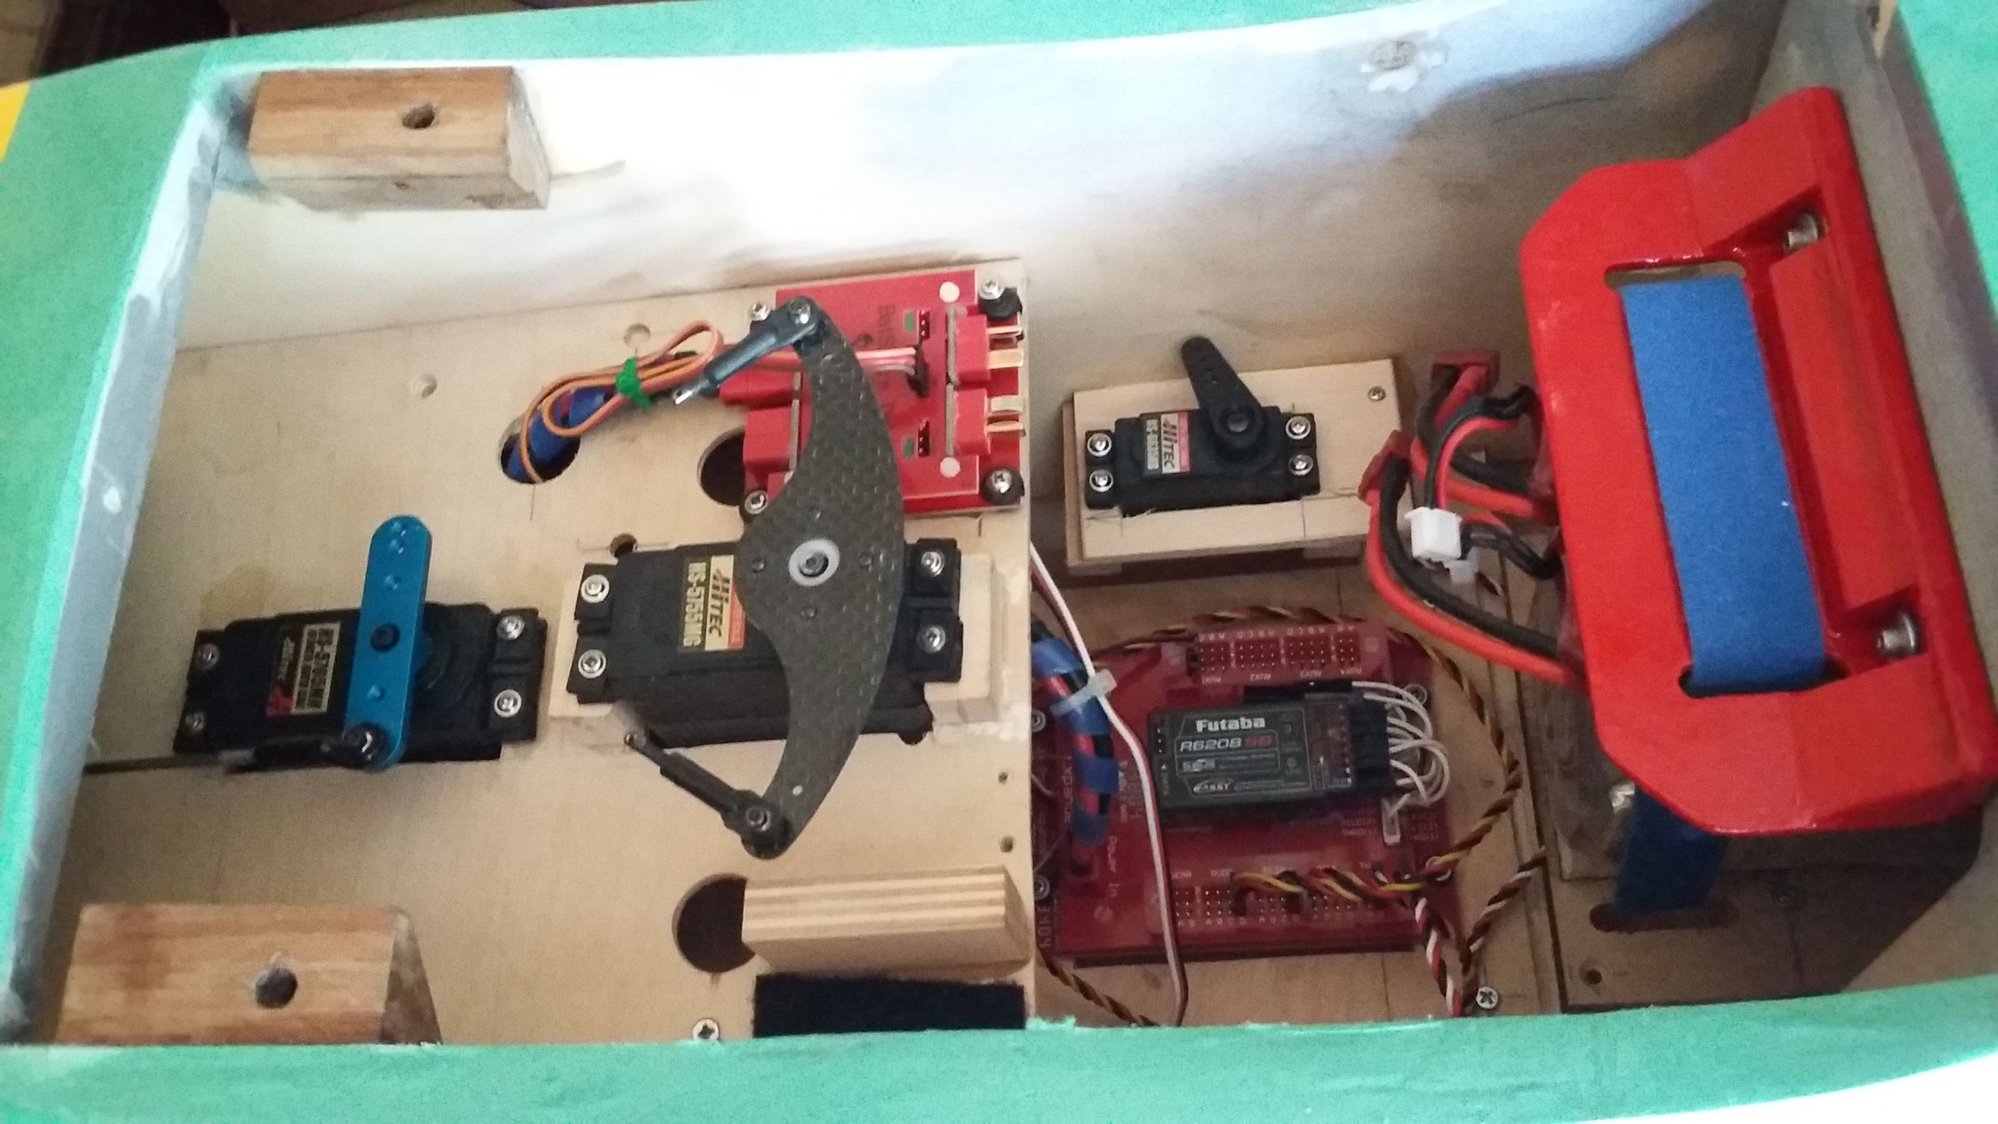
You must not put the servos in the tail! Keep the weight back there AS LIGHT AS POSSIBLE as it is designed to be heavy back there. It seemed like for every couple ounces added in the rear a pound it took to counteract it to achieve the desired C.G. target. I used 1/4 scale servos on the rudder and elevators. I took out and threw away the heavy metal internal elevator control horn and simply did a split pushrod for the two elevator halves. I'm glad I can help.
04-14-2022, 10:51 AM
#16
Join Date: Mar 2016
Posts: 12
Likes: 0
Received 0 Likes
on
0 Posts
Beautiful job on the plane! I love the scale look. I noticed that you covered yours in Stits-Lite. When I built the full-size Christavia, I did some practice/test panel with 102 and 101 fabrics. The 102 fabric (2.7 oz/sqyd) came in at around 10 oz/sqyd with a light coat of filler/paint (fabric weave visible) and around 12 oz with a high gloss finish. The 101 (3.5 oz/sqyd) came in at 12 and 14 oz respectively. I suspect that the Stits-Lite (1.8 oz/sqyd) would come in around 8 to 10 oz/sqyd. Monokote is listed at 1.8 oz/sqyd. With about 3 sq.yds of covering behind the CG, I think I can reduce the tail weight by about 18-24 oz. Granted, quite a bit of that will be in the wing with a small moment, but it should help.
I�ve been competing in IMAC for the past few years (just Basic class� for now) and I�d love to have some different from the plethora of Extras, Edges and Lasers. It�s probably not competitive in Intermediate or higher classes, but I�m years from that! That�s why I�m going for light weight over scale detail.
I�ve been competing in IMAC for the past few years (just Basic class� for now) and I�d love to have some different from the plethora of Extras, Edges and Lasers. It�s probably not competitive in Intermediate or higher classes, but I�m years from that! That�s why I�m going for light weight over scale detail.
 04-18-2022, 07:10 AM
#19
Join Date: Mar 2016
Posts: 12
Likes: 0
Received 0 Likes
on
0 Posts
Last summer I picked up a used 27% H9 Extra 260 with a DA-50. It came with spare wings, tail, canopy, cowl and cockpit! I need to replace the servos with metal gear, high torque versions. It�s in pretty good shape!