


Questions about Evolution engine teardown and starting
 08-04-2014 | 08:54 AM
#1
Thread Starter
Junior Member
Joined: Jul 2014
Posts: 10
Likes: 0
Received 0 Likes
on
0 Posts
From: Bellevue, Mi
I've recently aquired a "slightly used" Hanger9 Alpha with a 40 engine. Would only start for a few seconds then die. Suspect glo driver replaced. This time would start again but only when primed. Verified only run with fuel put in carb or primed.
Black goo in fuel lines removed carb and that other thing (?) to clean. Don't really want to mess with the settings but seems inevitable. Looking down throat of engine (intake?) I noticed rust on the crankshaft. Soo..I have proceded to take engine apart to inspect and clean.
Now things I have noticed:
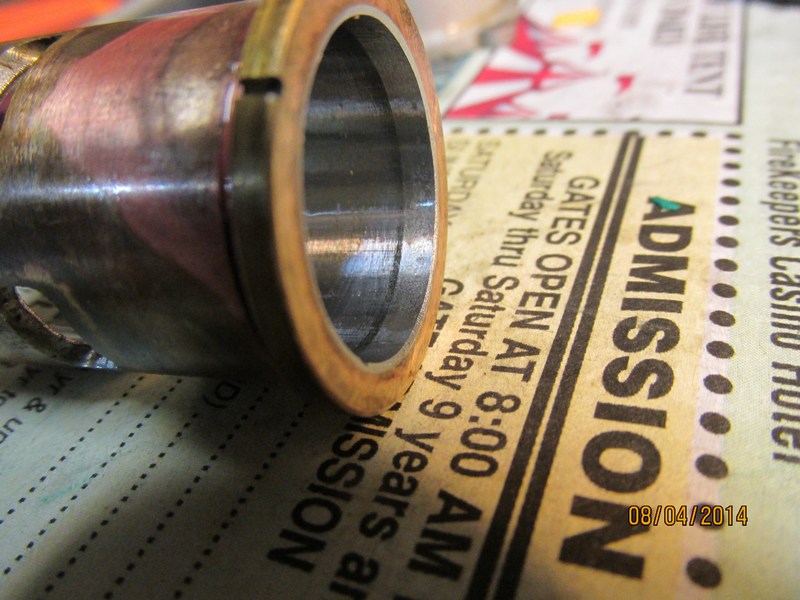
The bearings inside crankase are all red rusty looking. Is it rust or a byproduct of nitro combustion?
Everything is fairly new looking but... without the prop on for leaverage I can feel a �catch" when i turn crank. At tdc. There is some scuffs in the cylinder there. Would this be due to the engine being barely broke in? Rest of the cylinder shows crosshatching still. Is this what provides compression due to being ringless and will break in?
I have looked for information on glo engines other than basic info there doesn't seem to be much available. Can someone suggest a good resource please?
I have tried to remove the connecting rod with no luck. To remove rust on crank bearings and wrist pin. It looks like it should pull from crank pin after uh... thing on back of motor is removed (forgive my newbieness). But alas it will not and don't want to do damage. Am I missing something here?
Sorry for long post, buts dize gots qwestions! Thanks atleast for reading.
Black goo in fuel lines removed carb and that other thing (?) to clean. Don't really want to mess with the settings but seems inevitable. Looking down throat of engine (intake?) I noticed rust on the crankshaft. Soo..I have proceded to take engine apart to inspect and clean.
Now things I have noticed:
The bearings inside crankase are all red rusty looking. Is it rust or a byproduct of nitro combustion?
Everything is fairly new looking but... without the prop on for leaverage I can feel a �catch" when i turn crank. At tdc. There is some scuffs in the cylinder there. Would this be due to the engine being barely broke in? Rest of the cylinder shows crosshatching still. Is this what provides compression due to being ringless and will break in?
I have looked for information on glo engines other than basic info there doesn't seem to be much available. Can someone suggest a good resource please?
I have tried to remove the connecting rod with no luck. To remove rust on crank bearings and wrist pin. It looks like it should pull from crank pin after uh... thing on back of motor is removed (forgive my newbieness). But alas it will not and don't want to do damage. Am I missing something here?
Sorry for long post, buts dize gots qwestions! Thanks atleast for reading.
 08-05-2014 | 05:39 AM
#2
Senior Member
My Feedback: (2)
Joined: Jan 2004
Posts: 636
Likes: 0
Received 0 Likes
on
0 Posts
From: Helena,
MT
Usually the cylinder will have to be pulled up and out of the engine case before the connecting rod can be lifted off the crankshaft. You should mark the rear of the connecting rod before pulling it off if there is not any marks already there to be able to put it back in the same direction. I have never had a evolution engine before but on most engines the proceedure to disassemble the engine are as follows:
1. remove backplate and head
2. pull cylinder liner out of engine
3. pull connecting rod off crank shaft and remove piston and connecting rod together
4. remove thrust washer plate
5. push crankshaft rearward through bearings and out of back of engine
6. (if removing bearings) remove carb and heat engine cranckcase in oven at 300 deg for 10-15 minutes and remove from oven and tap engine on rear and rear bearing should fall out.
7. use wood dowel from rear of engine to knock out front bearing if it does not fall out.
If the engine is really rusty inside, the cylinder liner might be hard to get out. I usually have to soak the engine in a old crock pot full of antifreeze to get some stuck liners out of the case. Sometimes just heating up the case in the oven might loosen some of the crusty oil to break the liner free. I only once ever had to build a liner puller to get a stuck liner out of a case before and that was a machining defect that caused that liner to stick.
Also, if you had black goo in the fuel lines, you should remove the fuel tank and disasemble and clean well, replace fuel tubing, inside and out, and reassemble before trying to start it again.
If it is a ringless engine, it is an ABC or ABN engine and the piston should be tight at the top of the stroke. This loosens up when the engine is at operating temperatures. If the scratches are light, that is probably normal.
Last edited by flybyjohn; 08-05-2014 at 05:47 AM.
08-05-2014 | 07:19 AM
#3
Thread Starter
Junior Member
Joined: Jul 2014
Posts: 10
Likes: 0
Received 0 Likes
on
0 Posts
From: Bellevue, Mi
Hello Flyby thanks for the reply. Seems just the right guy happened along. I'm posting some pics of the engine.
It looks as though a good cleaning is in order and I don't anticipate any any other issues. At the moment, but that how it goes. I would appreciate opinions on these.
It did not come apart easy at all. I tried using zip ties to remove the sleeve with no luck. Eventually end up using a flat piece of soft metal and wrench to get it to budge. Uh..that was tense! All is well. The crankshaft, the same. I put the nut on and had to wack it a good one with a plastic hammer to get it free! Glad it's over.
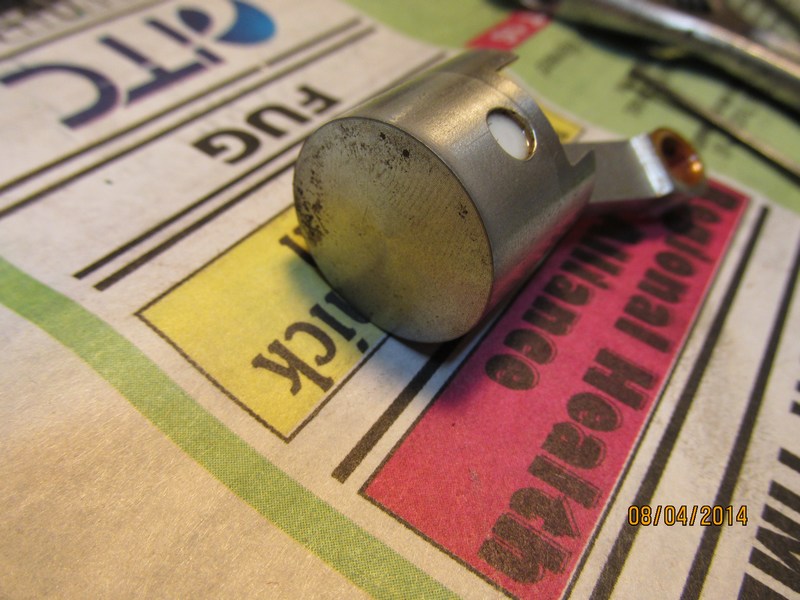
I've cleaned the parts dissassembled everything, all full of rust and goo. Need to get gasket set. All cleaned except crank. Will remove rust with p oil and steel wool. I am told this engine has only ran a couple times then stored in basement for 4 years. By looking at wear in cylinder and piston I believe this to be true. But I think it is the result of not using after run oil. Can someone confirm?
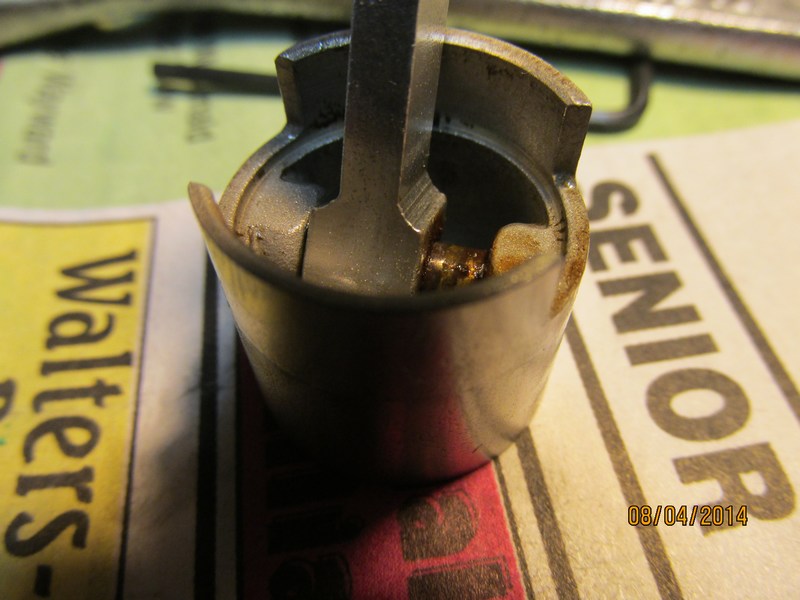
There is a pic of the mark in sleeve at tdc. Any thoughts? The discoloration on the outside of sleeve. Don't know what to think. Will polish with steel wool as well.
I'll leave it to be here. Thanks!

It looks as though a good cleaning is in order and I don't anticipate any any other issues. At the moment, but that how it goes. I would appreciate opinions on these.
It did not come apart easy at all. I tried using zip ties to remove the sleeve with no luck. Eventually end up using a flat piece of soft metal and wrench to get it to budge. Uh..that was tense! All is well. The crankshaft, the same. I put the nut on and had to wack it a good one with a plastic hammer to get it free! Glad it's over.
I've cleaned the parts dissassembled everything, all full of rust and goo. Need to get gasket set. All cleaned except crank. Will remove rust with p oil and steel wool. I am told this engine has only ran a couple times then stored in basement for 4 years. By looking at wear in cylinder and piston I believe this to be true. But I think it is the result of not using after run oil. Can someone confirm?
There is a pic of the mark in sleeve at tdc. Any thoughts? The discoloration on the outside of sleeve. Don't know what to think. Will polish with steel wool as well.
I'll leave it to be here. Thanks!
08-05-2014 | 01:10 PM
#4
Senior Member
My Feedback: (2)
Joined: Jan 2004
Posts: 636
Likes: 0
Received 0 Likes
on
0 Posts
From: Helena,
MT
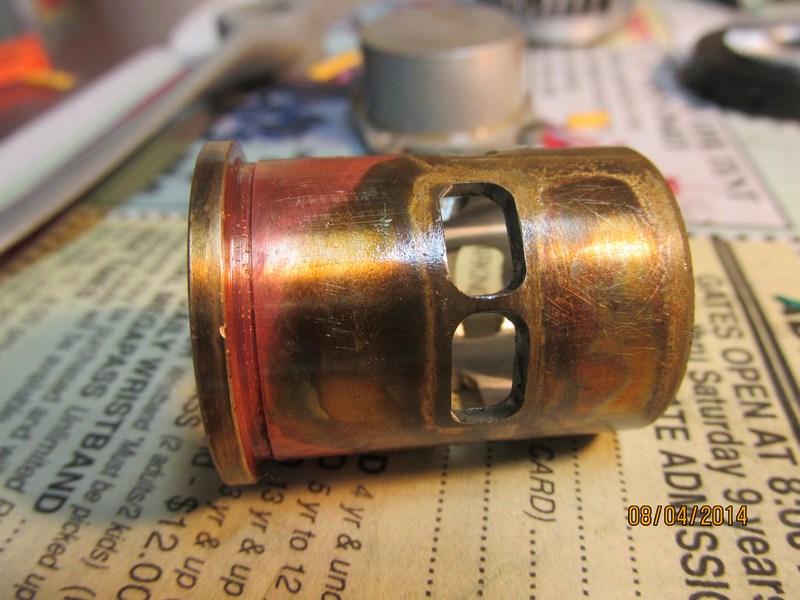
The rust doesn't look that bad at all to me. I have run engines much worse than that. Since you have it all apart, clean it out a bit, lube it up and slide the crank in and turn it and see if the bearings feel smooth. If they are not gritty, I would put it back together, clean the fuel tank and fire it up. The only gasket you should need is the rear plate gasket if it is broke which I use a thin layer of silicone in place of a lot of the time. The head gasket should be more of a shim and is reusable. If the bearings feel gritty then you might want to replace at this time. A set of bearings from someplace like rcbearings.com should only run about 15.00 or so. I haven't looked them up for that engine yet. The cylinder looks normal to me. I think the dark ring looking mark is the top of the piston stroke.
Last edited by flybyjohn; 08-05-2014 at 01:13 PM.
08-06-2014 | 08:13 AM
#5


My Feedback: (3)
I don't mean to be critical, but saying that you used a soft metal tool and a wrench is a little worrisome. A good trick is to try inserting a small piece of wood, like a popsicle stick, inside of the exhaust port and rotating the prop to raise the piston up to push the piece of wood up too. Those holes or slots are exhaust ports in the sleeve, so you would be pushing the piston against the popsicle stick against the sleeve to push it up and out of the cylinder head. This is after heating things up, of course. You can start by heating the cylinder head with a covering heat gun. It heats things up pretty good.
08-06-2014 | 11:08 AM
#6
Thread Starter
Junior Member
Joined: Jul 2014
Posts: 10
Likes: 0
Received 0 Likes
on
0 Posts
From: Bellevue, Mi
Thanks Flyby for your input. I've cleaned things up with 0000 steel wool looks real good. Discoloration on sleeve removed with a bit of elbo grease. The gaskets for things like nipples and such I can get away with some sealer but not sure about the exhaust port. A small piece of gasket tore off not sure what to do besides getting a new one. I have some gasket material but not sure if exhaust temps would be an issue with that type of repair. Perhaps gastet sealer? I have no problem saving the money on the price of a new gasket and shipping (especially due to the fact I'm poor and impatient! lol). The head gaskets and “rear cover" gasket is fine (I'm learning, even learned what it's called)
Mr. Blw, your concern is noted. I tried many different alternatives prior to using the soft metal tool. Witch happened to be a flat key that is used for removing car stereos. Like stamped tin. Heating it would have been a great idea had I thought of it. Maybe help any other newbies that read this. Still looking for a good source of info on engines. Little here, little there. Perhaps theres just not much to say. I find more info from nitro car sources. I am interested very much in scratch building techniques. With your pool of information to draw on maybe you know of some good info. I shall also post that request elseware.
Thanks again
08-07-2014 | 04:33 AM
#7
Senior Member
My Feedback: (2)
Joined: Jan 2004
Posts: 636
Likes: 0
Received 0 Likes
on
0 Posts
From: Helena,
MT
You won't need an exhaust gasket. I never use them just becuase they always seam to blow out on me and then you have loose muffler problems. Here's what I do: I take some automotive high temp silicone, (I use the gray stuff, matches better) squeeze out a very small amount on your finger and after cleaning the muffler and case with alcohol, dab your finger on the mating surfaces. You want just a little thin layer and the dabbing seems to apply it evenly. Again, use only a little bit of silicone, about the size of half to one quarter of a pea. Put the screws in and tighten it up. Let it dry and you will have a leak proof seal that will not blow out and is easy to replace when needed. The silicone works so well that I can usually take out my screws when removing the muffler and the muffler will stay affixed to the engine. I have to grab the muffler and twist it to get it off the engine.
I am not really sure the correct name for the rear cover either. I think it is often refered to as the back plate.
I am not really sure the correct name for the rear cover either. I think it is often refered to as the back plate.
Last edited by flybyjohn; 08-07-2014 at 04:36 AM.
08-10-2014 | 12:46 PM
#9

My Feedback: (90)
Do not use steel wool on an engine EVER. Use one of the Scotch brand green scrub pads and you wont run the risk of scratching you liner. Or the worst is that you leave some of the small bits that inevitably shed from the pad and will get trapped in the engine with perhaps unwelcome results
08-10-2014 | 02:45 PM
#10
Thread Starter
Junior Member
Joined: Jul 2014
Posts: 10
Likes: 0
Received 0 Likes
on
0 Posts
From: Bellevue, Mi
Well Dennis a little late! It did a nice job. Any other steel wool courser than 0000 and I wouldn't even do it. The steel pieces cling pretty good to the part, especialy where ther was oil or fuel residue. I cleaned the parts afterward with acetone to disolve the oil and let loose of the pieces then blew everything with the air compressor. Coated everything with afterrun oil and reassembled. Will check into the scotchbrite next time. Thanks for the tip.
08-10-2014 | 02:51 PM
#11
Thread Starter
Junior Member
Joined: Jul 2014
Posts: 10
Likes: 0
Received 0 Likes
on
0 Posts
From: Bellevue, Mi
I need to get a new glo driver. The local hobby store didn't have what I needed. Guess it's a popular item. When I recieve it I'll post the results. I appreciate all the help.
08-13-2014 | 06:35 AM
#12
Hi!
The bearings need to be replaced if you are serious about you engine! -They look terrible!
See to that you get C3 or C4 ball bearings ,those have more play than standard bearings, which means the engine has less friction and has the ability to turn more rpm.
Swiss brand WIB is regarded as being one of the best manufacturer.
08-14-2014 | 08:14 AM
#13
My Feedback: (3)
For the Alpha 40 spending the money on "Swiss bearings" is a waste of money, Jan. Just buy the Evolution bearings from Advantage RC for about $15 and the engine will be happy for years and years. This 40 was always used on Hangar 9 trainers. It will never turn serious rpms even though it is a good engine for what it is designed for- trainers.
The 46NT is a 40 that has a bored out liner, larger piston, longer rod, and a new crankshaft for the longer stroke. This is a different animal altogether.
The 46NT is a 40 that has a bored out liner, larger piston, longer rod, and a new crankshaft for the longer stroke. This is a different animal altogether.
08-14-2014 | 11:19 AM
#14
Senior Member
My Feedback: (2)
Joined: Jan 2004
Posts: 636
Likes: 0
Received 0 Likes
on
0 Posts
From: Helena,
MT
I can't state as to the condition of the bearings because I can't see enough of them in the picture and looking at a bearing in a picture does not even give enough information as to the condition of the bearing. If it is smooth, run it. If you cleaned it out good, you probably got all the caster crud out of them so you should not be feeling any of that. If it is gritty or bumpy, or makes noises when you turn it slowly then replace with inexpesive bearings. Notice I did not say cheap, some things can be low cost and not cheap. The set , front and back, are 12.95 free shipping on the bay store right now and rc bearings.com has them for 9.95 set plus reasonable shipping. I am guessing it will run just fine with the bearings in it right now. If they really are bad, it will get worse rather quickly and then you can replace them.
08-14-2014 | 12:49 PM
#15
Thread Starter
Junior Member
Joined: Jul 2014
Posts: 10
Likes: 0
Received 0 Likes
on
0 Posts
From: Bellevue, Mi
Is that what it is, castor gunk? Castor oil? It cleaned up real easy. i used old nitro fuel and a brush, most came off. Then I used some acetone and the rest came off. A red goo? Maybe nitro residue with rust suspended in it? No staining or pitting. The crank actually had stain from rust. I used the steel wool on that but it was really fine and didn't remove the stain. The bearings cleaned real nice, oiled with after run oil and are very smooth.
Is this the result of someone not using after run oil? Is the red goo something to do with oil in the nitro? It ony ran pink fuel in it. Castor gunk? Is the oil in nitro castor oil?
I have yet to run it. But soon. I appreciate everyones input, thanks.
Is this the result of someone not using after run oil? Is the red goo something to do with oil in the nitro? It ony ran pink fuel in it. Castor gunk? Is the oil in nitro castor oil?
I have yet to run it. But soon. I appreciate everyones input, thanks.
08-15-2014 | 03:55 AM
#16

Castor oil is one of several lubricants that mixes with methanol and has been used for many many years. It has good rust prevention properties because it has an affinity for metallic surfaces. When it sits for a long time it dries out into a hard crusty substance much like regular vegetable oils. It tends to look like rust as the heat and combustion residues turn it brown. Heat and a little methanol usually loosens it up, acetone would probably dissolve it faster and cleaner though. I just took apart a few new engines recently that felt like they had sand in the bearings. Soaking in methanol for half a day broke most of the oil residue and had the bearings turning smooth as butter. The engines I speak of were factory run only 15+ years ago.


