


Top Flite GS P-47 sports scale; diary of a build
 04-01-2014, 12:33 PM
#1251

My Feedback: (6)
T/B
The air speed is recorded ? or is it real time and do you have to look at the screen or can you have a squacker if speed lo/limit is reached?
I am not an event pilot just a spectater and have seen a bunch of nice birds flop or snap in etc. on finaldue to lack of speed and after t/t the pilot his comment was he thought he was fast enough. That is one of the reasons I tend to land a bit hot.
Cheers Bob T
 04-01-2014, 01:31 PM
#1252


The pitot tube is real time. You can set alarms or go with an earbud and get airspeed realtime or have your alarm at stall speed set to vibrate. You can also get a telemetry box that mounts on the top of your radio showing realtime speed. But I like the alarm and all the new radios talk to you so you can hear your speed from the radio.
TB
TB
04-01-2014, 02:08 PM
#1253
Also it does record the high speed of that flight too. With the Robbe Telemetry Box, it is a seporate telemetry receiver it is not part of your radio. It gets the single from the receiver and dessplay it independently from your radio. At an event or competition you will be reqiered to have a spotter. The spotter could monitor your spoed and give you feed back on landings, high speed passes and so on so I think it is a good tool to have even if you don't use it on a regular fly day at your field.
TB
TB
Last edited by TonyBuilder; 04-01-2014 at 02:14 PM.
 04-01-2014, 03:45 PM
#1255
My Feedback: (6)
+ 1 But I don't want to buy a new radio as after 10 years I am just getting good with the one I have. side note when I worked in the computer industry they called us mfg engineers, but never had to use one, then after leaving that industry had to learn to use them still hait the bleep things
Sorry about the rant
Cheers Bob T
side note when I worked in the computer industry they called us mfg engineers, but never had to use one, then after leaving that industry had to learn to use them still hait the bleep thingsSorry about the rant
Cheers Bob T
04-02-2014, 03:18 AM
#1257
Originally Posted by [email protected]
Yeah, by the time you get good with a radio, it's outdated.
")
TB

 04-02-2014, 05:53 AM
#1260
My Feedback: (7)
Join Date: Dec 2008
Location: Owatonna,
MN
Posts: 226
Likes: 0
Received 0 Likes
on
0 Posts
TB,
I seen a page or two back that you were looking at some painting options. I went with using Krylon Metalic Silver, then knocked it down with 0000 wool pads. Giving it a brushed Aluminum appearance. The aluminum paint itself seems to not translate to the eyeball as good in my opinion. Here are a couple of pics. One is on the ground with some overcast giving it a less polished appearance. The second pic is the plane in the air catching a break in the sunshine.
Z
04-02-2014, 06:07 AM
#1261
I'm planning on using this (see link below) for the aluminum on the Ryan and painted Solartex for the fabric covered areas of the wing and tail.
http://www.aero-accessories.com/Builders.html
http://www.aero-accessories.com/Builders.html
04-02-2014, 06:45 AM
#1262
TB
04-02-2014, 06:48 AM
#1263
TB,
I seen a page or two back that you were looking at some painting options. I went with using Krylon Metalic Silver, then knocked it down with 0000 wool pads. Giving it a brushed Aluminum appearance. The aluminum paint itself seems to not translate to the eyeball as good in my opinion. Here are a couple of pics. One is on the ground with some overcast giving it a less polished appearance. The second pic is the plane in the air catching a break in the sunshine.
Z
TB
04-02-2014, 06:53 AM
#1264
I'm planning on using this (see link below) for the aluminum on the Ryan and painted Solartex for the fabric covered areas of the wing and tail.
http://www.aero-accessories.com/Builders.html
http://www.aero-accessories.com/Builders.html
TB
04-02-2014, 07:11 AM
#1265
My Feedback: (2)

Join Date: Jun 2013
Location: Evansville, IN
Posts: 429
Likes: 0
Received 0 Likes
on
0 Posts
Looking good Tony...........! Awsome skills
Speaking of Radios, If anyone is using a Spektrum DX 18 please PM me. I am thinking of going from my JR 11x to the DX 18 and I have questions.
Keith
Speaking of Radios, If anyone is using a Spektrum DX 18 please PM me. I am thinking of going from my JR 11x to the DX 18 and I have questions.
Keith
04-05-2014, 04:43 AM
#1266
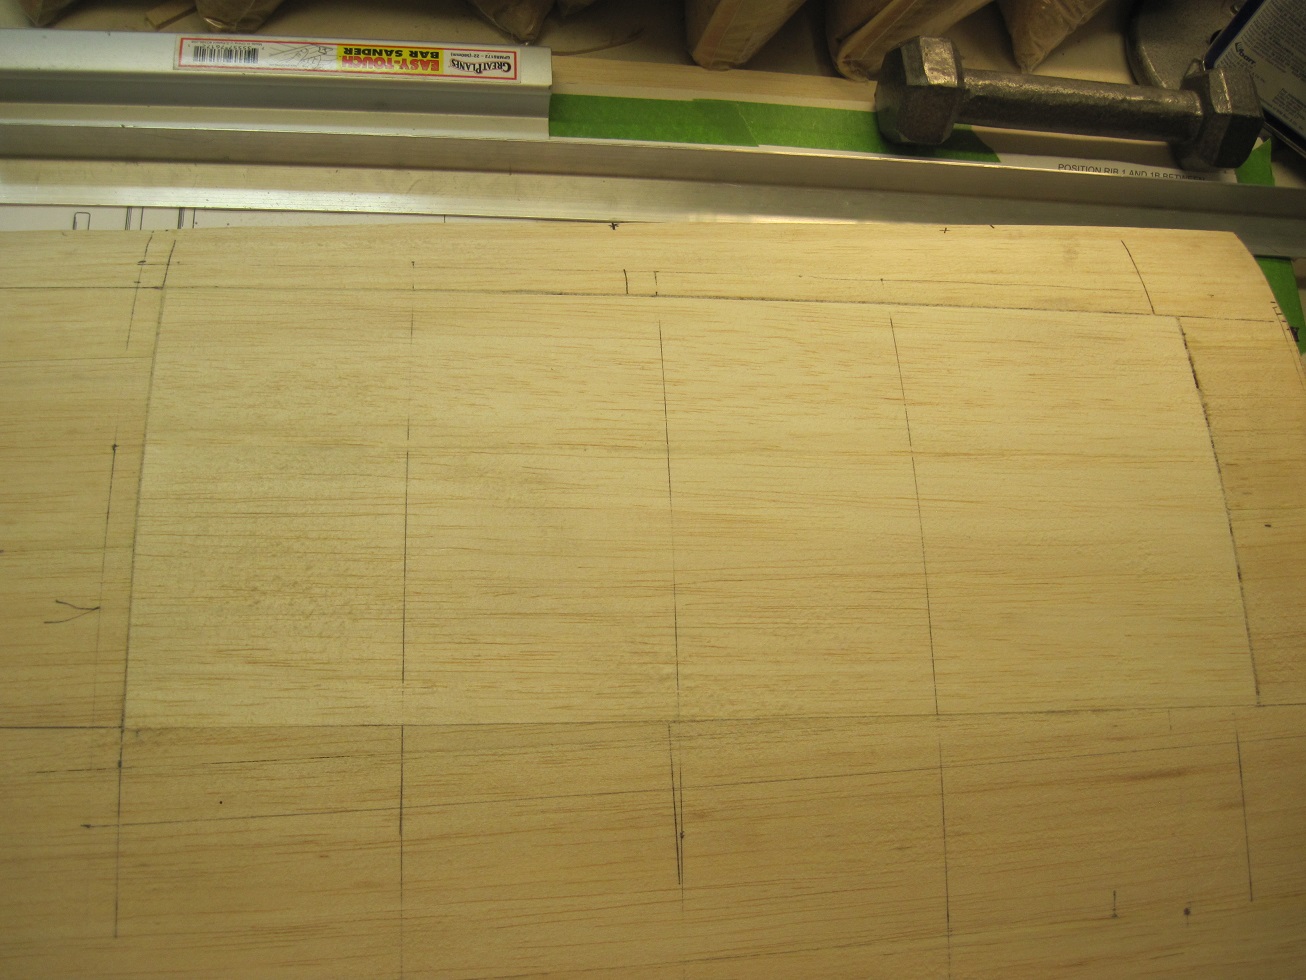
Back to work on the left wing.
I cut the opening for the CF skin and it is ready for a fitting.


The CF skin is marked and ready for cutting.

I will cut the skin on my scroll saw and glue it in today. Should get the aileron and flap top skins in too. Feels good to be back working on Angie
TB
I cut the opening for the CF skin and it is ready for a fitting.
The CF skin is marked and ready for cutting.
I will cut the skin on my scroll saw and glue it in today. Should get the aileron and flap top skins in too. Feels good to be back working on Angie
TB
04-05-2014, 11:47 AM
#1267
The CF shell is cut and glued in.

1/16" balsa skin laminated and glued in over the CF shell.

Once this cures I will glue in the aileron and flap top skins and then flip the wing. I will work on the other side tomorrow.
Nice to have some progress
TB
1/16" balsa skin laminated and glued in over the CF shell.
Once this cures I will glue in the aileron and flap top skins and then flip the wing. I will work on the other side tomorrow.
Nice to have some progress
TB
Last edited by TonyBuilder; 04-05-2014 at 11:50 AM.
04-05-2014, 12:52 PM
#1268
My Feedback: (2)
Join Date: Jun 2013
Location: Evansville, IN
Posts: 429
Likes: 0
Received 0 Likes
on
0 Posts
Tony,
Question: Why the CF skin then the balsa skin? I "assume" for strength? If for strength then why not all the skin?
Just curious as I am finishing my ARF and my next plane will be a kit then after that maybe a scratch........... Trying to learn and you are a really good teacher......!
Keith
Question: Why the CF skin then the balsa skin? I "assume" for strength? If for strength then why not all the skin?
Just curious as I am finishing my ARF and my next plane will be a kit then after that maybe a scratch........... Trying to learn and you are a really good teacher......!
Keith
04-05-2014, 12:59 PM
#1269
The reason for the CF skin is for strength, for detailing and this is where the wheel slams in. It is a large area that is weak if just balsa. You would have to have a couple short ribs to support the skin, I did not want that. The bottom CF skin is also for strength and to creat the lip for the gear doors. It is not necessary as many have built this kit without it, just my style of building.
TB
TB
Last edited by TonyBuilder; 04-05-2014 at 01:03 PM.
04-06-2014, 05:34 AM
#1271
The top of the left wing is completed and rough sanded. I glue two jigs to the top so I can work on the bottom.
The 1'16" balsa skin completes the top where the carbon fiber sub skin was installed.


The top is sanded and ready for the bottom work to begin.


Why I use a carbon fiber sub skin for the inside surface of the landing gear is for strength and to give me a clean surface to detail.
Laying up three layers of 5.6 oz. carbon fiber cloth yields a 1/32" skin. With the 1/16" balsa I get 3/32".
I layup the carbon with the squeegee method and I do not apply another coat after it dries. This gives me a consistent 1/32" layup.

Once I glue the jigs to the top surface I flip the wing and remove the tabs and sand the ribs and spar even with the couture of the wing.

The carbon fiber sub skin is glued in from the front spar to the rear spar. From rib #6 to rib # 2This also creates a strong area from spar to spar where the landing gear mounts are and where the wheel well is.


Next I will cut in the landing gear and glue in the mounts. I bring the carbon fiber sub shell 1" past rib #2 so I have a solid area to install the inner gear door hinges to.


The wing is ready for hinge blocks, gun blocks and the pitot tube block.
TB
The 1'16" balsa skin completes the top where the carbon fiber sub skin was installed.
The top is sanded and ready for the bottom work to begin.
Why I use a carbon fiber sub skin for the inside surface of the landing gear is for strength and to give me a clean surface to detail.
Laying up three layers of 5.6 oz. carbon fiber cloth yields a 1/32" skin. With the 1/16" balsa I get 3/32".
I layup the carbon with the squeegee method and I do not apply another coat after it dries. This gives me a consistent 1/32" layup.
Once I glue the jigs to the top surface I flip the wing and remove the tabs and sand the ribs and spar even with the couture of the wing.
The carbon fiber sub skin is glued in from the front spar to the rear spar. From rib #6 to rib # 2This also creates a strong area from spar to spar where the landing gear mounts are and where the wheel well is.
Next I will cut in the landing gear and glue in the mounts. I bring the carbon fiber sub shell 1" past rib #2 so I have a solid area to install the inner gear door hinges to.
The wing is ready for hinge blocks, gun blocks and the pitot tube block.
TB
Last edited by TonyBuilder; 04-06-2014 at 05:37 AM.
04-06-2014, 08:34 AM
#1273
Thanks Steve, I too am learning how to use CF and reg glass cloth. CF is great for strength and to hold its shape. I am only using reg. Zpoxy finishing resin but there are better resins for CF that are more stiff and resistant to heat. I may try using Kevlar at some point, it is just down from CF in cost, but much better then reg glass cloth.
TB
TB
04-06-2014, 08:44 AM
#1274
The left gear mount is cut in and the blocks are glued and drying.
I made a jig from the right wing to keep the wheel in the same location on the left as the right is.

This also will help to get the right angle too so the gear does not sit to deep in the well, right now it is almost flush with the skin, that will be perfect for the gear doors.


The blocks that the gear mount sit on are 3/8" 9 ply birch. I first made templates out of scrap 3/32" balsa.


They get glued in first then the mount.


The mount is cut from 1/2" 9 ply birch. I made a template off of the right wing to get the location the same, and for fitting.

I will glue this in later today. This is a big step and I am glade it is almost behind me, know I can move onto more pleasant things like the wheel wells, the flaps, and ailerons.
TB
I made a jig from the right wing to keep the wheel in the same location on the left as the right is.
This also will help to get the right angle too so the gear does not sit to deep in the well, right now it is almost flush with the skin, that will be perfect for the gear doors.
The blocks that the gear mount sit on are 3/8" 9 ply birch. I first made templates out of scrap 3/32" balsa.
They get glued in first then the mount.
The mount is cut from 1/2" 9 ply birch. I made a template off of the right wing to get the location the same, and for fitting.
I will glue this in later today. This is a big step and I am glade it is almost behind me, know I can move onto more pleasant things like the wheel wells, the flaps, and ailerons.
TB
Last edited by TonyBuilder; 04-06-2014 at 08:47 AM.
04-06-2014, 12:27 PM
#1275
The left wing gear mount is glued in and done!


I worked a bit on the right wing wheel well.
Got the side walls fitted.


The notch at the top of the sidewall closets to the wing center will be cut back for the hinge plate. This will hold the inner gear door hinge assembly.


There is still some work to do here. I wont glue these in until I do the left wing. I have corner pieces that will finish the walls out.


Still a lot to do on the left wing to get it to the point the right wing is, but its getting
TB
I worked a bit on the right wing wheel well.
Got the side walls fitted.
The notch at the top of the sidewall closets to the wing center will be cut back for the hinge plate. This will hold the inner gear door hinge assembly.
There is still some work to do here. I wont glue these in until I do the left wing. I have corner pieces that will finish the walls out.
Still a lot to do on the left wing to get it to the point the right wing is, but its getting
TB