


BUSA 1/4 Scale Fokker Dr 1
 08-19-2013, 05:29 PM
#76

Thread Starter
My Feedback: (7)
Join Date: Jan 2004
Location: Parrish,
FL
Posts: 206
Likes: 0
Received 0 Likes
on
0 Posts
Rear fuselage deck stringers are in and sheeted. I kinda like the plywood sheeting. It should hold up to minor bumps better than balsa. I like jeffo's idea about the wing bolts, and it would look much better than a couple of holes in the top of the fuse. My fiberglass cowl has been ordered from Fiberglass Specialties. The instructions tell me it's decision time on the cockpit, so I will not be building a full cockpit. VG's looks great, but I'm not putting that much detail in. A couple of instruments and an Aces of Iron bust will do for me. Besides, if I had a full cockpit, I would have to get the Best Pilots Lothar figure to the tune of $300. Not this time.


 08-19-2013, 05:49 PM
#77
I have had to resort to only using the top half of my Lothar as his full body was just too hard to fit in there. Plus, his top half fills the cockpit and you cannot see his legs anyway. Also, with the full seat and his full body, it was making me slightly tail heavy.
So, while I love best pilots, Lothar is tricky to shoehorn into a scale cockpit on this plane. He may fit in the larger DVII easier. The Aces pilots are a good choice. I have had a few of them.
So, while I love best pilots, Lothar is tricky to shoehorn into a scale cockpit on this plane. He may fit in the larger DVII easier. The Aces pilots are a good choice. I have had a few of them.
08-19-2013, 07:10 PM
#78

My Feedback: (1)

Join Date: Jan 2002
Location: Monroe, NY
Posts: 154
Likes: 0
Received 0 Likes
on
0 Posts
A H Design, Mountain Ash, Rhyd-y-Foel Road, Llanddulas, Nr Abergele, Clwyd, LL22 8EG
[TABLE="align: center"][TR]
[TD="width: 140"]Telephone:[/TD]
[TD="width: 183"]01492 512765[/TD]
[/TR]
[TR]
[TD]Fax:[/TD]
[TD]01492 512662[/TD]
[/TR]
[TR]
[TD]E-mail:[/TD]
[TD][email protected][/TD]
[/TR]
[/TABLE]
Full body 1/4 scale pilot about $50.00


Last edited by wings2an3; 08-19-2013 at 07:13 PM.
08-20-2013, 01:27 AM
#79
My Feedback: (68)
Ab.-put a little more structure in the tail.When mine sat on the ground the bottom longereons would sag,and bow the covering.Reinforce the rudder post,I had a deadstick landing,just shy of the runway,flipped on its back and knocked the rudder post off.-jeffo
08-21-2013, 03:50 PM
#80
Thread Starter
My Feedback: (7)
Join Date: Jan 2004
Location: Parrish,
FL
Posts: 206
Likes: 0
Received 0 Likes
on
0 Posts
I have not gotten much done in the last two days. Yesterday morning, while trimming a palm, I stuck a thorn into the knuckle of my right index finger. Within an hour it felt like I had hit my finger with a hammer, so no work last night. I put the deck in my cockpit today, and had planned to get the cockpit sheeted, at least. But the sheeting is giving me a problem. I keep screwing up the cutting of the 1/32 plywood. I think the left half panel in my photo will work, but I've gotten frustrated with it tonight, so it will have to wait till tomorrow.
Jeffo, I'm going to do something a bit different on the rudder. I will have a steerable tail skid. The rudder post will have to be reinforced for that.


Jeffo, I'm going to do something a bit different on the rudder. I will have a steerable tail skid. The rudder post will have to be reinforced for that.
08-22-2013, 03:17 PM
#82
Thread Starter
My Feedback: (7)
Join Date: Jan 2004
Location: Parrish,
FL
Posts: 206
Likes: 0
Received 0 Likes
on
0 Posts
I had hopes of getting more done tonight, but I had to call it quits for lack of parts. I'm taking jeffo's advice about center wing attachment and bolting it on from the bottom rather than cutting two holes in the fuselage deck. It's bound to look a lot better and I can't find a single reason not to do it. However, I found that I have no 1/4-20 blind nuts in my parts bin. The hardware store will have them.
I got the cockpit sheeted. I cut the opening before gluing. It just took some time, and plywood, to get it right.

I can't wait to attach the wings. I know I will spend about 30 minutes just playing with it making motor and machine gun noises. Hope the wife doesn't catch me doing that.
I got the cockpit sheeted. I cut the opening before gluing. It just took some time, and plywood, to get it right.
I can't wait to attach the wings. I know I will spend about 30 minutes just playing with it making motor and machine gun noises. Hope the wife doesn't catch me doing that.
08-23-2013, 04:48 PM
#85
Thread Starter
My Feedback: (7)
Join Date: Jan 2004
Location: Parrish,
FL
Posts: 206
Likes: 0
Received 0 Likes
on
0 Posts
My modified center wing attachment is completed, and the rear of the forward fuse deck is sheeted. I will have to fill a low spot on each side of the cockpit sheeting just aft of the forward fuse deck. I think these spots came about because of the curvature of the ply sheeting and the way I applied it. I don't have a pic of that spot because I was disappointed with my work and didn't want to show it off. Once filled and covered, no one will know. Next is mounting the center wing.
Tomorrow....


Tomorrow....
08-24-2013, 07:39 AM
#87
That is a good mod. The holes are hidden pretty well by the machine guns. I just wonder, how hard will it be accessing that location to get the bolts tightened? You reach up through the cutout for the lower wing? This will effect final placement of radio and tank, to maintain access. Otherwise, it will look better.
08-24-2013, 04:10 PM
#88
Thread Starter
My Feedback: (7)
Join Date: Jan 2004
Location: Parrish,
FL
Posts: 206
Likes: 0
Received 0 Likes
on
0 Posts
At first I enjoyed the plywood sheeting, not so much now. The center wing is mounted and the fuse is sheeted forward of the wing. It's gonna look good later, but no fun to work with. With balsa, if you're off by say 1/32, you can just sand that away. With 1/32 plywood, you can't do that, so it has to be right the first time. I still have some sanding to do, but it's late. I'm tired and there is plenty to do tomorrow. Oh, even though it's not mounted, I could not resist placing the bottom wing and taking a pic.


08-24-2013, 07:00 PM
#89
Great job. Unless you experience it, you really do not know how much work is in a model like this.
One trick on sanding the plywood. Yuo can wrap sandpaper around a dowel, gluing on with contact cement. This gives you solid support of the paper to sand those tough round areas. Like where it meets the LE. That joint will be covered over anyway though. So it really will not be seen.
One trick on sanding the plywood. Yuo can wrap sandpaper around a dowel, gluing on with contact cement. This gives you solid support of the paper to sand those tough round areas. Like where it meets the LE. That joint will be covered over anyway though. So it really will not be seen.
 08-28-2013, 04:23 PM
#91
Thread Starter
My Feedback: (7)
Join Date: Jan 2004
Location: Parrish,
FL
Posts: 206
Likes: 0
Received 0 Likes
on
0 Posts
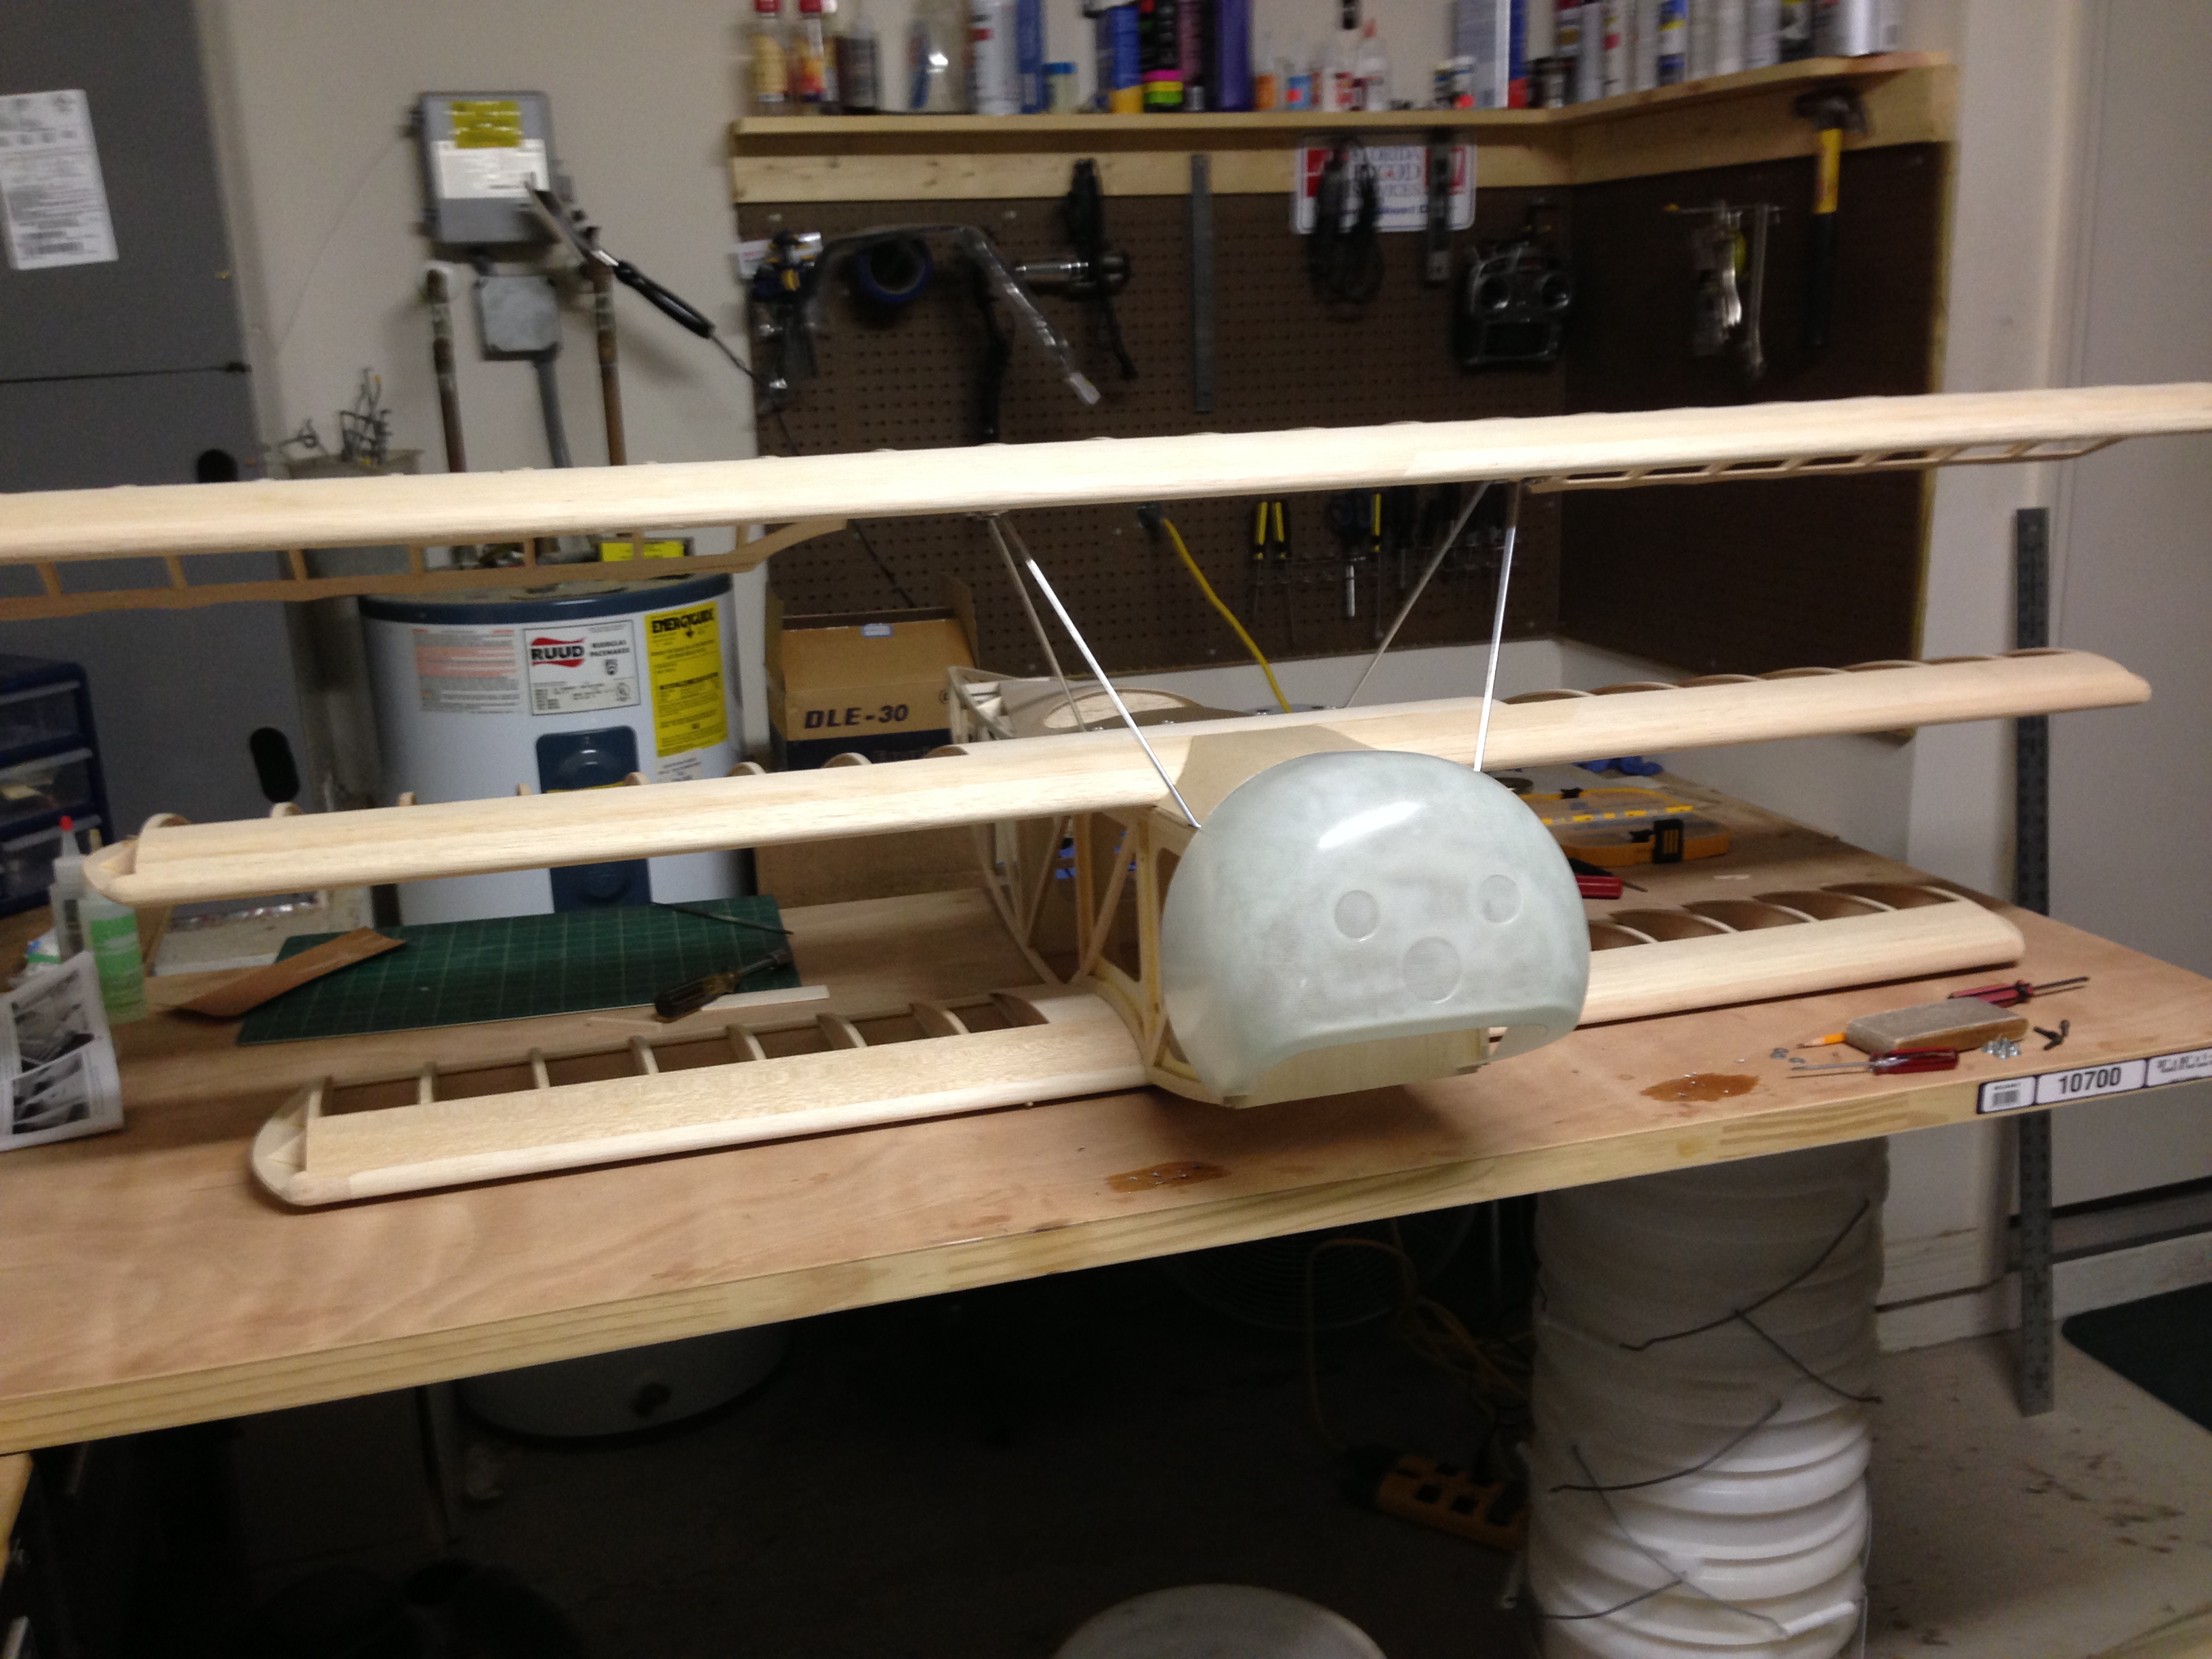
I've been sort of busy the last few days and have accomplished little in the way of Dr 1 construction. I did manage to get the lower wing attached. Such things are normally painfully slow for me as they involve measuring the wing attachment about 20 or 30 times. Next step is top wing attachment, which is considerably more involved. My glass cowl arrived from Fiberglass Specialties. It appears to be an exact match for the ABS cowl supplied by BUSA. I'm thinking this plane is a keeper, so hence the glass cowl. I want to put smoke in it, which would be really cool on the triplane, but I'll wait and survey the available space for installation before making that decision.


08-29-2013, 05:22 PM
#92
Thread Starter
My Feedback: (7)
Join Date: Jan 2004
Location: Parrish,
FL
Posts: 206
Likes: 0
Received 0 Likes
on
0 Posts
I've started mounting the top wing. The mounting jig is complete and I pressed the solder clamps on the cabane struts. I had to use my vise to press the clamps on and did not achieve the shape shown in the BUSA pics. I hope it's not to big of a deal. At worse, a washer will be needed to fill the gap. It's gonna become a triplane soon.


08-29-2013, 05:27 PM
#93
Never could figure out how to get that thing flat like it shows in the plans! It seems like I came up with an idea, but have forgotten it! lol It works just fine as you have it. THe most important thing is to get a good solder joint. Use silver solder if you can.
 08-31-2013, 06:32 AM
#95
Thread Starter
My Feedback: (7)
Join Date: Jan 2004
Location: Parrish,
FL
Posts: 206
Likes: 0
Received 0 Likes
on
0 Posts
Lots to talk about this time. First off, thanks for the tip SDP. I'll try channel locks next time. I had to find a work-around this time, more about that later. I'm gonna run through this pic by pic.
1. Solder jig is attached and lined up.
2. Because of my method of bending the solder clamps I have a gap that needs to be filled with a washer. However, I'm not happy with the surface area for the solder to attach to.
3. I cut down some fender washers to increase the size of the solder joint.
4. Attachment looks better with the larger washers.
5. VG, I've used this product in the past. Stay-Brite silver solder. My soldering skills are pretty bad, so I need to use a good product.
6. Finished solder joint. This is about as good it gets with my skill level.
7. I couldn't resist taking this pic. It looks like a triplane!
Man, I hope this thing flies well. I'm starting to fall in love with it.
08-31-2013, 06:49 AM
#96
Looks good. The important thing here is to get a good joint with the cabane wire and the solder tab. The tab being bolted to the wing mount plate will never move. Especially since it just stays bolted all o f the time. The other thing also, this is when the top wing incidence is set. Remember, if you have to make any adjustments, you can shim under this mount. Any adjustments you want to make to the incidence need to be done before the interplane struts are installed.
You will love her even more after you fly her. I promise!
You will love her even more after you fly her. I promise!
08-31-2013, 03:58 PM
#97
Thread Starter
My Feedback: (7)
Join Date: Jan 2004
Location: Parrish,
FL
Posts: 206
Likes: 0
Received 0 Likes
on
0 Posts
I'm done for today. It's about 100 degrees in my garage and the game is about to start. My youngest son is a senior at Clemson, and they are playing Georgia. Being a Georgia Tech grad myself, I have no great love for Georgia, so I hope Clemson whips their buts. We will see. I'm fitting the interplane struts. Hope to finish that task tomorrow.

08-31-2013, 04:08 PM
#98
I am currently moving my shop. All of my build projects will be on hold for a bit. I need to drywall the garage and completely start over setting up all of my machines. Kind of exciting to start over, but kind of a drag having to put my project on hold. This is the single most complicated plane I have ever built. a 1/5th scale TA 152 

09-01-2013, 02:39 PM
#99
Thread Starter
My Feedback: (7)
Join Date: Jan 2004
Location: Parrish,
FL
Posts: 206
Likes: 0
Received 0 Likes
on
0 Posts
VG, nice looking build. A 1/5 scale TA 152 is what? 9 foot wingspan? That's some bird. I dislike fiberglassing so much that I'll never build anything like that. When it's time to sand and prime one of those projects, it seems like it will never end. But, that's just me.
I've been working on the interplane struts on my Dr 1. I noticed that my wings were crooked and realized that I had skipped something. When setting the blind nuts in my top wing, the bottom of the wing where it sets on the cabane struts got dented. BUSA mentions this in the instructions, but I forgot to stop and fill those dents.

Now I'm wondering what would be best to fill that with. Thinking of epoxy and micro balloons. It's pretty hard and should not dent too easy, but harder to sand than other fillers.
Not too much to show on installing the struts. It's a lot of work with little to show.

I've been working on the interplane struts on my Dr 1. I noticed that my wings were crooked and realized that I had skipped something. When setting the blind nuts in my top wing, the bottom of the wing where it sets on the cabane struts got dented. BUSA mentions this in the instructions, but I forgot to stop and fill those dents.
Now I'm wondering what would be best to fill that with. Thinking of epoxy and micro balloons. It's pretty hard and should not dent too easy, but harder to sand than other fillers.
Not too much to show on installing the struts. It's a lot of work with little to show.
09-01-2013, 06:40 PM
#100
My TA 152 will have a 118" span. It is a ton of work, but a dream build of mine really.
To be honest, I did not bother fixing any dents on my top wing. They were very minor, and would not have effected the alignment of my wing. Maybe the best thing to do would be to place some glass cloth over that area. Be sure to grease the blind nuts so they will still function and not strip or spin off.
To be honest, I did not bother fixing any dents on my top wing. They were very minor, and would not have effected the alignment of my wing. Maybe the best thing to do would be to place some glass cloth over that area. Be sure to grease the blind nuts so they will still function and not strip or spin off.