


BUSA QS Sopwith Camel
 06-03-2015, 03:12 PM
#126

Thread Starter
Join Date: Apr 2006
Location: Philadelphia,
PA
Posts: 263
Likes: 0
Received 0 Likes
on
0 Posts
Todays subject is why I love Solartex and Callie Graphics. The tail feathers are all finished up, covered, and back in working order. Once the Solartex weathers in, you'll be hard pressed to tell that this plane was damaged. Will it be perfect? HELL NO! This is a battle tested airplane that's going back on the front lines. However, Solartex makes even my crappy work look good. Also, most of the decals from Callie Graphics are reusable. The roundels on the fuselage sides were never disturbed and the hearts and numbers just peeled off the old covering and adhered to the new stuff. Life is good. The elevator halves and the rudder have been reinstalled, the pushrods are back in place, the servos are reconnected, and everything is bench trimmed and ready for action. I've started working on the new motor mount and am in the process of rebuilding the cabanes. As in the words of Tony Orlando and Freddie Printz; Looooooooooooooooking GoooooooooooooooooooD!

 06-04-2015, 04:04 PM
#128
Thread Starter
Join Date: Apr 2006
Location: Philadelphia,
PA
Posts: 263
Likes: 0
Received 0 Likes
on
0 Posts
The parts for my NGH 38cc FSG came today so I installed the new rocker arm assembly, pushrods, and valve cover. I also fashioned a new firewall which will be installed flush with the front of the fuselage. This will mean moving the engine forward 2 inches but it will also mean less or no added weight to balance the plane. I will be purchasing a new cowl from Fiberglass Specialties to take up the added space. A new gun is on its way from Tower and parts from BUSA. I redid the cabanes so they're ready for when the wings are repaired. It's coming along nicely.
06-08-2015, 03:57 PM
#129
Thread Starter
Join Date: Apr 2006
Location: Philadelphia,
PA
Posts: 263
Likes: 0
Received 0 Likes
on
0 Posts
Here's the new firewall that will be mounted flush with the front of the fuselage. Notice that I glued triangle stock to the back so I can have a bigger glueing surface for my epoxy. Also, all the holes are drilled. In photo 2, the firewall was epoxied in place AFTER I installed the engine standoffs. I'm no dummy! I am a high school graduate! In photo 3, the engine has been installed and the landing gear has been reattached. I'll probably reinstall the fuel system tomorrow and run the engine to see if it's ok after the repairs. Once that is done, it'll be time to repair the wings and the hump. The parts from BUSA are coming tomorrow. I can't wait.
06-10-2015, 03:00 PM
#131
Thread Starter
Join Date: Apr 2006
Location: Philadelphia,
PA
Posts: 263
Likes: 0
Received 0 Likes
on
0 Posts
Things are coming along well. The damaged section on the lower wing panel has been rebuilt, recovered, and had the ailerons and the servos reinstalled. The fuselage is looking good as the "hump" has been rebuilt. Without the hump, it's just a horse with a long neck and goofy feet! I'm not having much luck finding the stain for the cockpit wood. If I don't find it at Lowes, I might have to paint the wood and cowl red. We'll see. Tomorrow, I'll start working on the top wing and the struts. Yay!
06-12-2015, 04:42 PM
#134
Thread Starter
Join Date: Apr 2006
Location: Philadelphia,
PA
Posts: 263
Likes: 0
Received 0 Likes
on
0 Posts
I got me a 55" FMS BF 109 to take to an electric FF and a Mustang Fly. The CD of the Mustang Fly just wants Mustangs but I said you have to have the bad guys! Where's the fun of having cowboys without the indians? We're still working on him. Anyway, todays progress finds us with the top wing back together and ready for sanding. It'll be mounted and squared up on the cabanes and struts before it's covered. I feel Camel flying coming on real soon!
06-14-2015, 03:25 PM
#136
Thread Starter
Join Date: Apr 2006
Location: Philadelphia,
PA
Posts: 263
Likes: 0
Received 0 Likes
on
0 Posts
Look ma, I got wings! The repair job on the top wing is done so I decided to mount the wings and set them up on the cabanes. So far, so good. The cabane mounts will get a false rib attached and then some epoxy to seal everything up real good. Notice I have wax paper on the bottom wing. This is so no CA drips on the covering. I'm a real slob! The upper wing will get its covering after I've installed the struts. I feel a test flight coming on real soon!
06-18-2015, 10:29 AM
#137
Thread Starter
Join Date: Apr 2006
Location: Philadelphia,
PA
Posts: 263
Likes: 0
Received 0 Likes
on
0 Posts
All Righty Roonies!
Onwards and upwards! The cabanes and struts have been rebuilt, the wings have been reinstalled and recovered, and we're ready for balancing. Even the new cowl from Fiberglass Specialties has arrived. Yay! All I have to do is install and paint the cowl, get and install new heart graphics for the top wing, and she'll be as good as new. She'll be flying this weekend.
06-18-2015, 01:02 PM
#138
Thread Starter
Join Date: Apr 2006
Location: Philadelphia,
PA
Posts: 263
Likes: 0
Received 0 Likes
on
0 Posts
Balancing update! I put everything together and hung the plane over my table with a bungee and it's still tail heavy (and what else is new). After a little experimenting I got it to balance but it will mean building a tray that sits out over the engine mounting lugs. I'm lucky this engine can be installed either as a radial or on beams. I'll bolt the tray to the engine mounting lugs and then tape the battery and lead to the tray. I'm using a 5 cell sub C NiMi battery which weighs 12 oz. (just like BUSA did) and I'll be adding 2.5 pounds of lead so with the weight of the tray, tape, and bolts, I'll be adding 4 pounds. That may sound like alot but when I had the engine installed as per the plans I had added 7 pounds to achieve balance. BUSA said their prototype took 8 oz. of lead to achieve balance. Given that their engine weighs twice as much as mine (they used a G-26), either they moved their engine out also or added more weight than they said. Who knows. Anyway, the plane weighs 5 pounds less and has achieved balance and should fly in a scale manner. Even though I'm using an NGH 38cc FSG swinging a 20x8 MA Classic, I would reccomend to anyone building one of these planes to install either a G-38 or a US 41. The extra weight will help in balancing, the rear exhaust will make things easier, and the extra power will help to pull this plane along with more authority.
06-19-2015, 12:44 PM
#143
Thread Starter
Join Date: Apr 2006
Location: Philadelphia,
PA
Posts: 263
Likes: 0
Received 0 Likes
on
0 Posts
Great news! I weighed the Camel today after installing the balancing weight and the battery pack and it came in at 18 pounds! OK, this is at the top of the weight range as per BUSA but at least it's in the range! I installed a tray to the engine and then taped the weights and battery to the tray. It's the black thing just above the engine. The cowl and all the trim stuff (guns, cockpit cowling, etc.) will be installed later. For now, I'm going to fly her and trim her out tomorrow. Wish me luck!
06-23-2015, 07:38 AM
#144
Thread Starter
Join Date: Apr 2006
Location: Philadelphia,
PA
Posts: 263
Likes: 0
Received 0 Likes
on
0 Posts
Bad news guys. I took the plane out to the field and set her up to fly. With the engine moved forward she seems to want to nose over so taxiing and takeoff run were a little hairy. Also, my repaired engine wasn't revving up and wasn't able to achieve flight. When I got home and started to investigate I noticed black gunk in the tube from the crankcase to the intake manifold and an oily discharge was dripping from the exhaust with black gunk suspended in it. This means bad bearings so there's internal damage from the crash inside the engine. It's time for plan B which is to install a G-38 and move the firewall to achieve balance. It'll fly now! I'll update this thread after I receive, install, and fly the plane with the G-38.
06-24-2015, 03:51 AM
#145

Join Date: Mar 2006
Location: Peculiar, MO, AMERICAN SAMOA (USA)
Posts: 87
Likes: 0
Received 0 Likes
on
0 Posts
I don't think I would be so quick to condemn bearings. Are you sure something didn't happen to the cam when the rocker pivot broke? Another possibility is a bent valve stem,not allowing a valve to seat all the way,which would certainly make black gunk.
Of course I can see where you would put a G 38 on it if you had one sitting around,and that is more the motor this plane was designed for. But if you are going out and buying one,I would give your old motor a closer look.
Of course I can see where you would put a G 38 on it if you had one sitting around,and that is more the motor this plane was designed for. But if you are going out and buying one,I would give your old motor a closer look.
Last edited by Smashmaster; 06-24-2015 at 03:54 AM.
06-24-2015, 10:53 AM
#146
As to the balance point on your Camel.. I think Balsa USA is very generous on the CG,.. I think their plans tend to have you balance it a bit nose heavy.. which isn't bad for early flights.
06-28-2015, 02:49 PM
#149
Thread Starter
Join Date: Apr 2006
Location: Philadelphia,
PA
Posts: 263
Likes: 0
Received 0 Likes
on
0 Posts
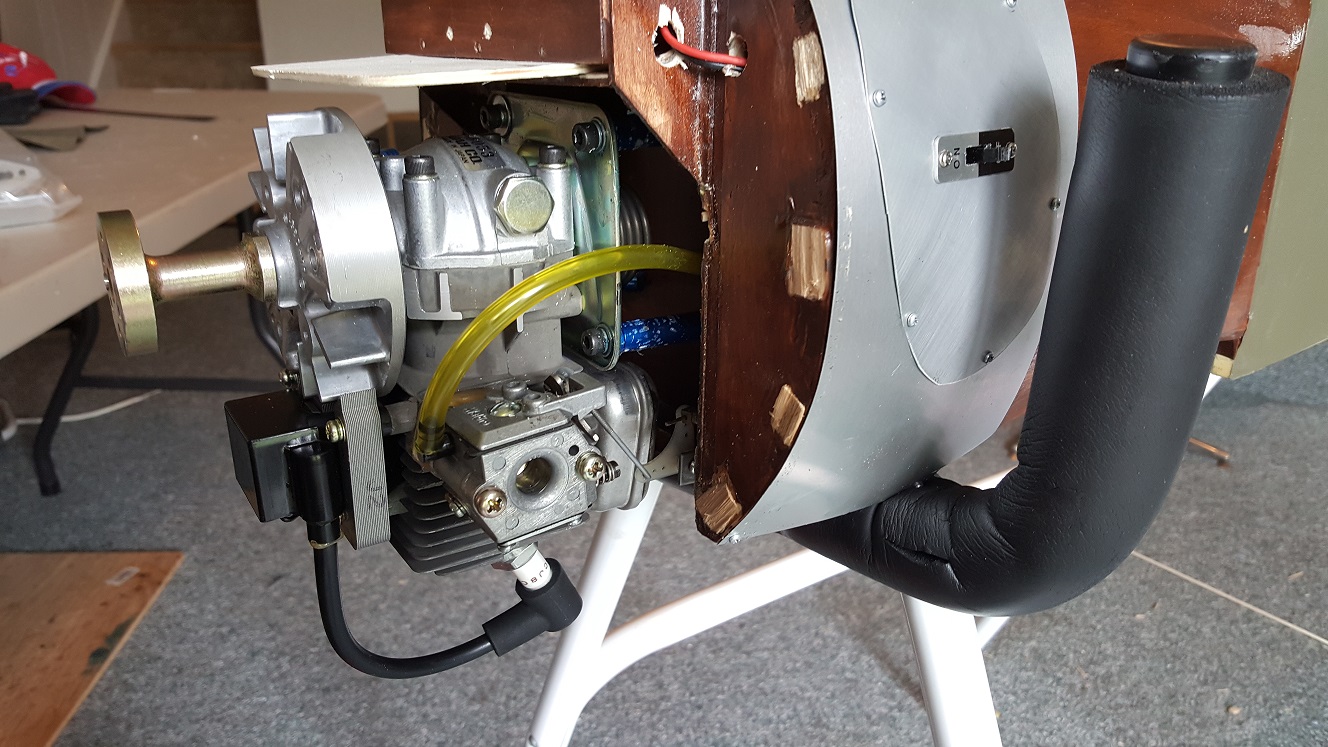
Howdy, Here's the G-38 installed and ready to go. As per my usual, the kill switch is mounted on the right side and the power switch is mounted on the left. This is totally functional and not intended for any type of contest.

06-30-2015, 01:45 PM
#150
Thread Starter
Join Date: Apr 2006
Location: Philadelphia,
PA
Posts: 263
Likes: 0
Received 0 Likes
on
0 Posts
Howdy Campers,
Believe it or not, this BUSA QS Camel is once again ready to fly. The bad new is that it's a little fat as it weighs 20 pounds by my bathroom scale but I think that G-38 will take care of that. All that is left to do is adjust the carb and then fly. The black lump above the engine is the 2.5 pounds of lead that it took to balance this bugger. Had I kept the firewall all the way forward where it was, I could have come in at 18 pounds. That makes the nose stick out too far and make the plane very easy to nose over. Now, everything is where it's supposed to be. I guess you can see the maple leafs on the top wing. The smaller versions for the fuselage and vertical stab sides are coming soon. My pilot is ready to fly and this plane is now a part of the RCMP! BTW, that funny looking knurled thing is a needle valve adjustment tool I bought from B & B Specialties for Walbro carbs. It helps you get to those hard to reach need valves on some engines. While you probably could do without it, it's only $3.95 and a neat little tool to have. Check out the tools B & B has on their site. They're pretty handy. So, kiddie kiddies, wish me luck as I'll be flying this repaired beauty on the next nice day we have. Hopefully my next post will be my last on this subject.