


My very first Kit!
 01-20-2015, 05:23 PM
#1

Thread Starter
My Feedback: (2)
Join Date: Sep 2005
Location: Castries, SAINT LUCIA
Posts: 513
Likes: 0
Received 0 Likes
on
0 Posts
Alright!!!! 
So this is going to be my very first stab at this!
The story goes like this. A buddy called me up one day (lets call him Slick) and wanted a new plane. knowing what he was after I suggested the GP uproar. His reply was to say the least
not at all enthusiastic.
I think he said something along the lines of "That thing is !@#$!@#$-ing Ugly!!!"
I chuckled and pointed out its redeeming attributes and that I'm sure he would love it etc etc eventually I got him to agree on the plane (after I'd offered to buy it for him") lol )
lol )
It came... he loved it! and an other club member decided that we should all get one and that I should go ahead and order three (well I was low on funds and i ordered just one-for him)
This time I bought the GP Dazzler and handed it to the other guy (we'll call him, R.N.) It was built, had been flown, crashed, rebuilt and flown too many times to count!
F-Fwd to present day, both of these guys decided that it was time that I got my feet wet where kit building was concerned and unknown to me went ahead and located a dazzler
(ebay or what not) bought the thing, handed it to me and said, You're always buying planes for other people well now its our turn to return the favor so
"here, you've got a week to finish this!"
A week?.... yeah right.. took me all but a month to finish the bugger.
I did take a boat load of pics which I'd like to share on this thread for anyone (especially them) who may like to check it out..
So without any further delay.. here goes! I can't promise to post them all right away but I'll be uploading as the days go by.
Hope you enjoy and thanks for checking out my thread
So this is going to be my very first stab at this!
The story goes like this. A buddy called me up one day (lets call him Slick) and wanted a new plane. knowing what he was after I suggested the GP uproar. His reply was to say the least
not at all enthusiastic.
I think he said something along the lines of "That thing is !@#$!@#$-ing Ugly!!!"
I chuckled and pointed out its redeeming attributes and that I'm sure he would love it etc etc eventually I got him to agree on the plane (after I'd offered to buy it for him
lol ) It came... he loved it! and an other club member decided that we should all get one and that I should go ahead and order three (well I was low on funds and i ordered just one-for him)
This time I bought the GP Dazzler and handed it to the other guy (we'll call him, R.N.) It was built, had been flown, crashed, rebuilt and flown too many times to count!
F-Fwd to present day, both of these guys decided that it was time that I got my feet wet where kit building was concerned and unknown to me went ahead and located a dazzler
(ebay or what not) bought the thing, handed it to me and said, You're always buying planes for other people well now its our turn to return the favor so
"here, you've got a week to finish this!"
A week?.... yeah right.. took me all but a month to finish the bugger.
I did take a boat load of pics which I'd like to share on this thread for anyone (especially them) who may like to check it out..
So without any further delay.. here goes! I can't promise to post them all right away but I'll be uploading as the days go by.
Hope you enjoy and thanks for checking out my thread
Last edited by el_xero; 01-20-2015 at 06:20 PM.
 01-20-2015, 05:41 PM
#3
Thread Starter
My Feedback: (2)
Join Date: Sep 2005
Location: Castries, SAINT LUCIA
Posts: 513
Likes: 0
Received 0 Likes
on
0 Posts
So I didn't go into super detail with the step by step but I'm sure that's not going to be a problem.
First time builder as I said so there are pins every where. I've been told that, that's kind of a no no.. You live and learn!
I've extended the rudder on the thing (I want to knife edge this bird bad!)
And for those of you wondering? yes I've added extra bracing on the ailerons and rudder (I'm a bit paranoid and they just didn't look strong to me even though I know I'm wrong about that)
Ah and yes I did most of this section of the build with nothing but Titebond II. I planned to do the entire plane with Titebond, but doing the wing cured me of that mission in a jiffy! I'll get to that part later on.
You can't see on here but there are tooth picks going into most of the joints on the control surfaces and stabilizer, especially the counter balance of the rudder (really wished it took pics of that). I don't know how much of a difference that makes to the overall strength though.
Last edited by el_xero; 01-20-2015 at 06:22 PM.
01-20-2015, 06:15 PM
#4
Thread Starter
My Feedback: (2)
Join Date: Sep 2005
Location: Castries, SAINT LUCIA
Posts: 513
Likes: 0
Received 0 Likes
on
0 Posts
Somewhere in my build, I decided that I wanted even more rudder... After seeing these shots, Slick protested... "toooooo much rudder"...
errrr yeah...


Did I mention that this plane was going to be done with nothing but Titebond II?
Well on to the wing..which cured me of that desire right quickly! What a pain in the rear it was trying to keep every thing straight with weights on while the glue cured! Holy sheep's balls batman! I'll never do that again!
Never!


One of the guys (Looking at you R.N.) had this lovely idea to make the wing one piece... no joining just one lovely wing. So I was given two rather lengthy errr lengths of mahogany with which to build my wing...
(most bendiest bent and twisted friggin things I ever did see let me tell you right now! Oye!!!! but anyway it was a great idea and I figured the pins would fix it right up.. on with the build!)


So an other great idea, was to add a piece of mahogany to the trailing edge of the wing where it meets up with the fuselage. A crash from one of our dazzlers and uproar relieved that this area is rather weak, not to mention
a pain to repair when broken so on I went with the idea and wouldn't you know it, it seemed to have worked out fine ah-hem.. Although as you would have guessed.. hinging that bugger in that area would be and did in fact turn out to be an adventure to say the nothing of the trouble which I had dealing with that...however.. gripes aside.. it was worth the trouble.
Right! Moving on!


I did say, that the lengths of mahogany were bent beyond comprehension yes? Well check out the sanding,... check out the ruler and gap yo! smh.... I don't think I'll be doing that again me thinks.. well.. not unless I let it sit in a drum of water for a week then let it dry out pinned down in a straight line first!
"oh but the sheer webs etc will straighten er right up" they said!
ya well... no.. it didn't .. My wing was twisted you can see the beginnings of it in one of the pics, ahhh but what a learning experience it was no worries, trims will take care of that in flight...
lets carry on shall we?


A little elbow grease, a GP mini plane, about an hour and buckets of sweat later (not really) and we have a leading edge anyone would love... cept I goofed up some on the sheeting and had to mix some balsa dust with Titebond II to make a fill and (oh don't do this guys.. it's nice in theory but in actuality it's a really, really bad idea. It doesn't work at all. What I got was a rubbery hard to sand fill ew.. I ended up using regular hobby filler after over that balsa dust fill to smooth it all out) ya...uh huh.
So next up is the fuse.. I'm stopping here for tonight though. Back tomorrow or something.
Hope someone enjoyed this.. I'm out
Thanks for checking it out again.
errrr yeah...Did I mention that this plane was going to be done with nothing but Titebond II?
Well on to the wing..which cured me of that desire right quickly! What a pain in the rear it was trying to keep every thing straight with weights on while the glue cured! Holy sheep's balls batman! I'll never do that again!
Never!
One of the guys (Looking at you R.N.) had this lovely idea to make the wing one piece... no joining just one lovely wing. So I was given two rather lengthy errr lengths of mahogany with which to build my wing...
(most bendiest bent and twisted friggin things I ever did see let me tell you right now! Oye!!!! but anyway it was a great idea and I figured the pins would fix it right up.. on with the build!)
So an other great idea, was to add a piece of mahogany to the trailing edge of the wing where it meets up with the fuselage. A crash from one of our dazzlers and uproar relieved that this area is rather weak, not to mention
a pain to repair when broken so on I went with the idea and wouldn't you know it, it seemed to have worked out fine ah-hem.. Although as you would have guessed.. hinging that bugger in that area would be and did in fact turn out to be an adventure to say the nothing of the trouble which I had dealing with that...however.. gripes aside.. it was worth the trouble.
Right! Moving on!
I did say, that the lengths of mahogany were bent beyond comprehension yes? Well check out the sanding,... check out the ruler and gap yo! smh.... I don't think I'll be doing that again me thinks.. well.. not unless I let it sit in a drum of water for a week then let it dry out pinned down in a straight line first!
"oh but the sheer webs etc will straighten er right up" they said!
ya well... no.. it didn't .. My wing was twisted
you can see the beginnings of it in one of the pics, ahhh but what a learning experience it was no worries, trims will take care of that in flight...lets carry on shall we?
A little elbow grease, a GP mini plane, about an hour and buckets of sweat later (not really) and we have a leading edge anyone would love... cept I goofed up some on the sheeting and had to mix some balsa dust with Titebond II to make a fill and (oh don't do this guys.. it's nice in theory but in actuality it's a really, really bad idea. It doesn't work at all. What I got was a rubbery hard to sand fill ew.. I ended up using regular hobby filler after over that balsa dust fill to smooth it all out) ya...uh huh.
So next up is the fuse.. I'm stopping here for tonight though. Back tomorrow or something.
Hope someone enjoyed this.. I'm out
Thanks for checking it out again.
Last edited by el_xero; 01-20-2015 at 06:54 PM.
01-21-2015, 12:28 PM
#5
My Feedback: (-1)
Did you go into Rick Stubbs Up-Roar build thread at all before you started gluing? Worth the read. Rick tried to build three Roars at the same time and tried to make them as light as it could be done. The Roar was my weapon of choice in the old fun fly days and as of now I have built 9 of them that I remember and a couple of the Dazzlers. I thought Rick went a bit over board but when I got to see them fly I changed my mind. The one I just finished is as light as his and I used several of his tricks in my build. Worth the read.
I'm enjoying your build a lot. Wish more people would build the Roar and Dazzler, fun build and fantastic little plane to fly!!!
I'm subscribed.
I'm enjoying your build a lot. Wish more people would build the Roar and Dazzler, fun build and fantastic little plane to fly!!!
I'm subscribed.
01-21-2015, 02:07 PM
#6
Thread Starter
My Feedback: (2)
Join Date: Sep 2005
Location: Castries, SAINT LUCIA
Posts: 513
Likes: 0
Received 0 Likes
on
0 Posts
Did you go into Rick Stubbs Up-Roar build thread at all before you started gluing? Worth the read. Rick tried to build three Roars at the same time and tried to make them as light as it could be done. The Roar was my weapon of choice in the old fun fly days and as of now I have built 9 of them that I remember and a couple of the Dazzlers. I thought Rick went a bit over board but when I got to see them fly I changed my mind. The one I just finished is as light as his and I used several of his tricks in my build. Worth the read.
I'm enjoying your build a lot. Wish more people would build the Roar and Dazzler, fun build and fantastic little plane to fly!!!
I'm subscribed.
I'm enjoying your build a lot. Wish more people would build the Roar and Dazzler, fun build and fantastic little plane to fly!!!
I'm subscribed.
I'm happy you could join me on this build review.Actually I've already finished and flown the plane, What I'm doing here is documenting the build and what went on through out as I didn't have time to do this as I built it. I'll be uploading the fuse a little bit later today.
I'll still check out that build thread you've suggested though, as I'm sure this isn't going to be the only Dazzler in my hangar. I'm sure Rick's build will definitely be helpful, thanks for the tip on that one!
Mine is actually quite heavy, You'll see just why as this build progresses I do hope you have as good a time as I am documenting it here on RCU.
Keep checking in! I'll be back in a couple hours with more stories and pics haha.
EDIT.... hang on... did you say you built 9? Nineeee of these???? ok dude.. no pics means it never happened!
you're just going to have to start posting pics on this thread pronto! er... you do have pics, do you not?
Last edited by el_xero; 01-21-2015 at 02:18 PM.
01-21-2015, 02:25 PM
#7
My Feedback: (-1)
Well, it's almost the same plane. When I built this last one, it's in the last few pages of the roar thread, I added the rudder and fin of the dazzler to my roar. The rudder and fin have a bit more area to them. The planes are so short coupled they really don't knife edge real well, they will, just not great.
At the end of our clubs fun fly craze the big three planes were the Roar, Dazzler and Fun 51. The 51 was also a good plane and used the same wing. If you want to build a fantastic plane go to the Blue Jay models web site. They still cut the original Bridi kits and the Kaos and Dirty Birdi are two of the best flying machines ever designed.
I did shutter a bit when I saw you adding that hardwood on the TE or the wing, that isn't the weak spot of this design. Rick and I are friends and you can ask us anything about these little planes, I love them both!!
01-21-2015, 03:05 PM
#8
Thread Starter
My Feedback: (2)
Join Date: Sep 2005
Location: Castries, SAINT LUCIA
Posts: 513
Likes: 0
Received 0 Likes
on
0 Posts
Pics dude pics Me wants to see em haha.
As for the rudder, I've not leaned out my engine yet and I'm flying an 11x5 master airscrew on an o.s. 46fx might try an 11x7 but so far it wont knife edge but lets see what happens this weekend.
That's too bad about that technical limitation though I was really looking fwd to practicing knife edging with this one.
I've heard about the dirty birdi from R.N. it's one of his fave kits of yesteryear so I'll check out blue jay for sure.
I'm sure Slick will also, ever since he build his first kit (GP Rapture) he's gone bat **** crazy about building .
.
Yeah you should have heard the phone call I got from R.N. and Slick when I posted the trailing edge mahogany pic to them via Whatsapp
(uuum you did it wrong, what madness? what are you thinking? etc etc) Slick; now a certified kit addict
and R.N. and old hand at the game of RC (I'm talking about self built proportional systems and bell crank mixing yo?)
Soooo I can see why anyone would cringe when they see that.
A closer look though and you'll see that this piece is very short and that it's actually forward of the actual trailing edge balsa,
(and I could hear the relief in their breath as I explained what I'd done to both Slick and R.N. at that point hah)
About that weak spot... hmmm interesting you would say that it's not a weak spot, and odd.
Um because we have one Uproar and one Dazzler which might want to disagree with that.
I my self had a bit of a wrap around landing on my third flight. A poor line up had me hitting my left wing onto a pole sticking out of the ground.
Dented my leading edge and spun me round so bad that my rudder clevice disconnected and tail wheel got bent.
I've got it all sorted, a bit of water and a hot iron fixed my trailing edge, pliers made short work of the tail wheel.
R.N. did point out that an impact like that could have broken that trailing edge of the wing right where
it meets the fuse had I not re-enforced it. I guess I'll never know, but better safe right?
um.. still waiting on pics man lol
As for the rudder, I've not leaned out my engine yet and I'm flying an 11x5 master airscrew on an o.s. 46fx might try an 11x7 but so far it wont knife edge but lets see what happens this weekend.
That's too bad about that technical limitation though I was really looking fwd to practicing knife edging with this one.
I've heard about the dirty birdi from R.N. it's one of his fave kits of yesteryear so I'll check out blue jay for sure.
I'm sure Slick will also, ever since he build his first kit (GP Rapture) he's gone bat **** crazy about building
.Yeah you should have heard the phone call I got from R.N. and Slick when I posted the trailing edge mahogany pic to them via Whatsapp
(uuum you did it wrong, what madness? what are you thinking? etc etc) Slick; now a certified kit addict
and R.N. and old hand at the game of RC (I'm talking about self built proportional systems and bell crank mixing yo?)
Soooo I can see why anyone would cringe when they see that.
A closer look though and you'll see that this piece is very short and that it's actually forward of the actual trailing edge balsa,
(and I could hear the relief in their breath as I explained what I'd done to both Slick and R.N. at that point hah)
About that weak spot... hmmm interesting you would say that it's not a weak spot, and odd.
Um because we have one Uproar and one Dazzler which might want to disagree with that.
I my self had a bit of a wrap around landing on my third flight. A poor line up had me hitting my left wing onto a pole sticking out of the ground.
Dented my leading edge and spun me round so bad that my rudder clevice disconnected and tail wheel got bent.
I've got it all sorted, a bit of water and a hot iron fixed my trailing edge, pliers made short work of the tail wheel.
R.N. did point out that an impact like that could have broken that trailing edge of the wing right where
it meets the fuse had I not re-enforced it. I guess I'll never know, but better safe right?
um.. still waiting on pics man lol
Last edited by el_xero; 01-21-2015 at 03:09 PM.
01-21-2015, 04:58 PM
#9
Thread Starter
My Feedback: (2)
Join Date: Sep 2005
Location: Castries, SAINT LUCIA
Posts: 513
Likes: 0
Received 0 Likes
on
0 Posts
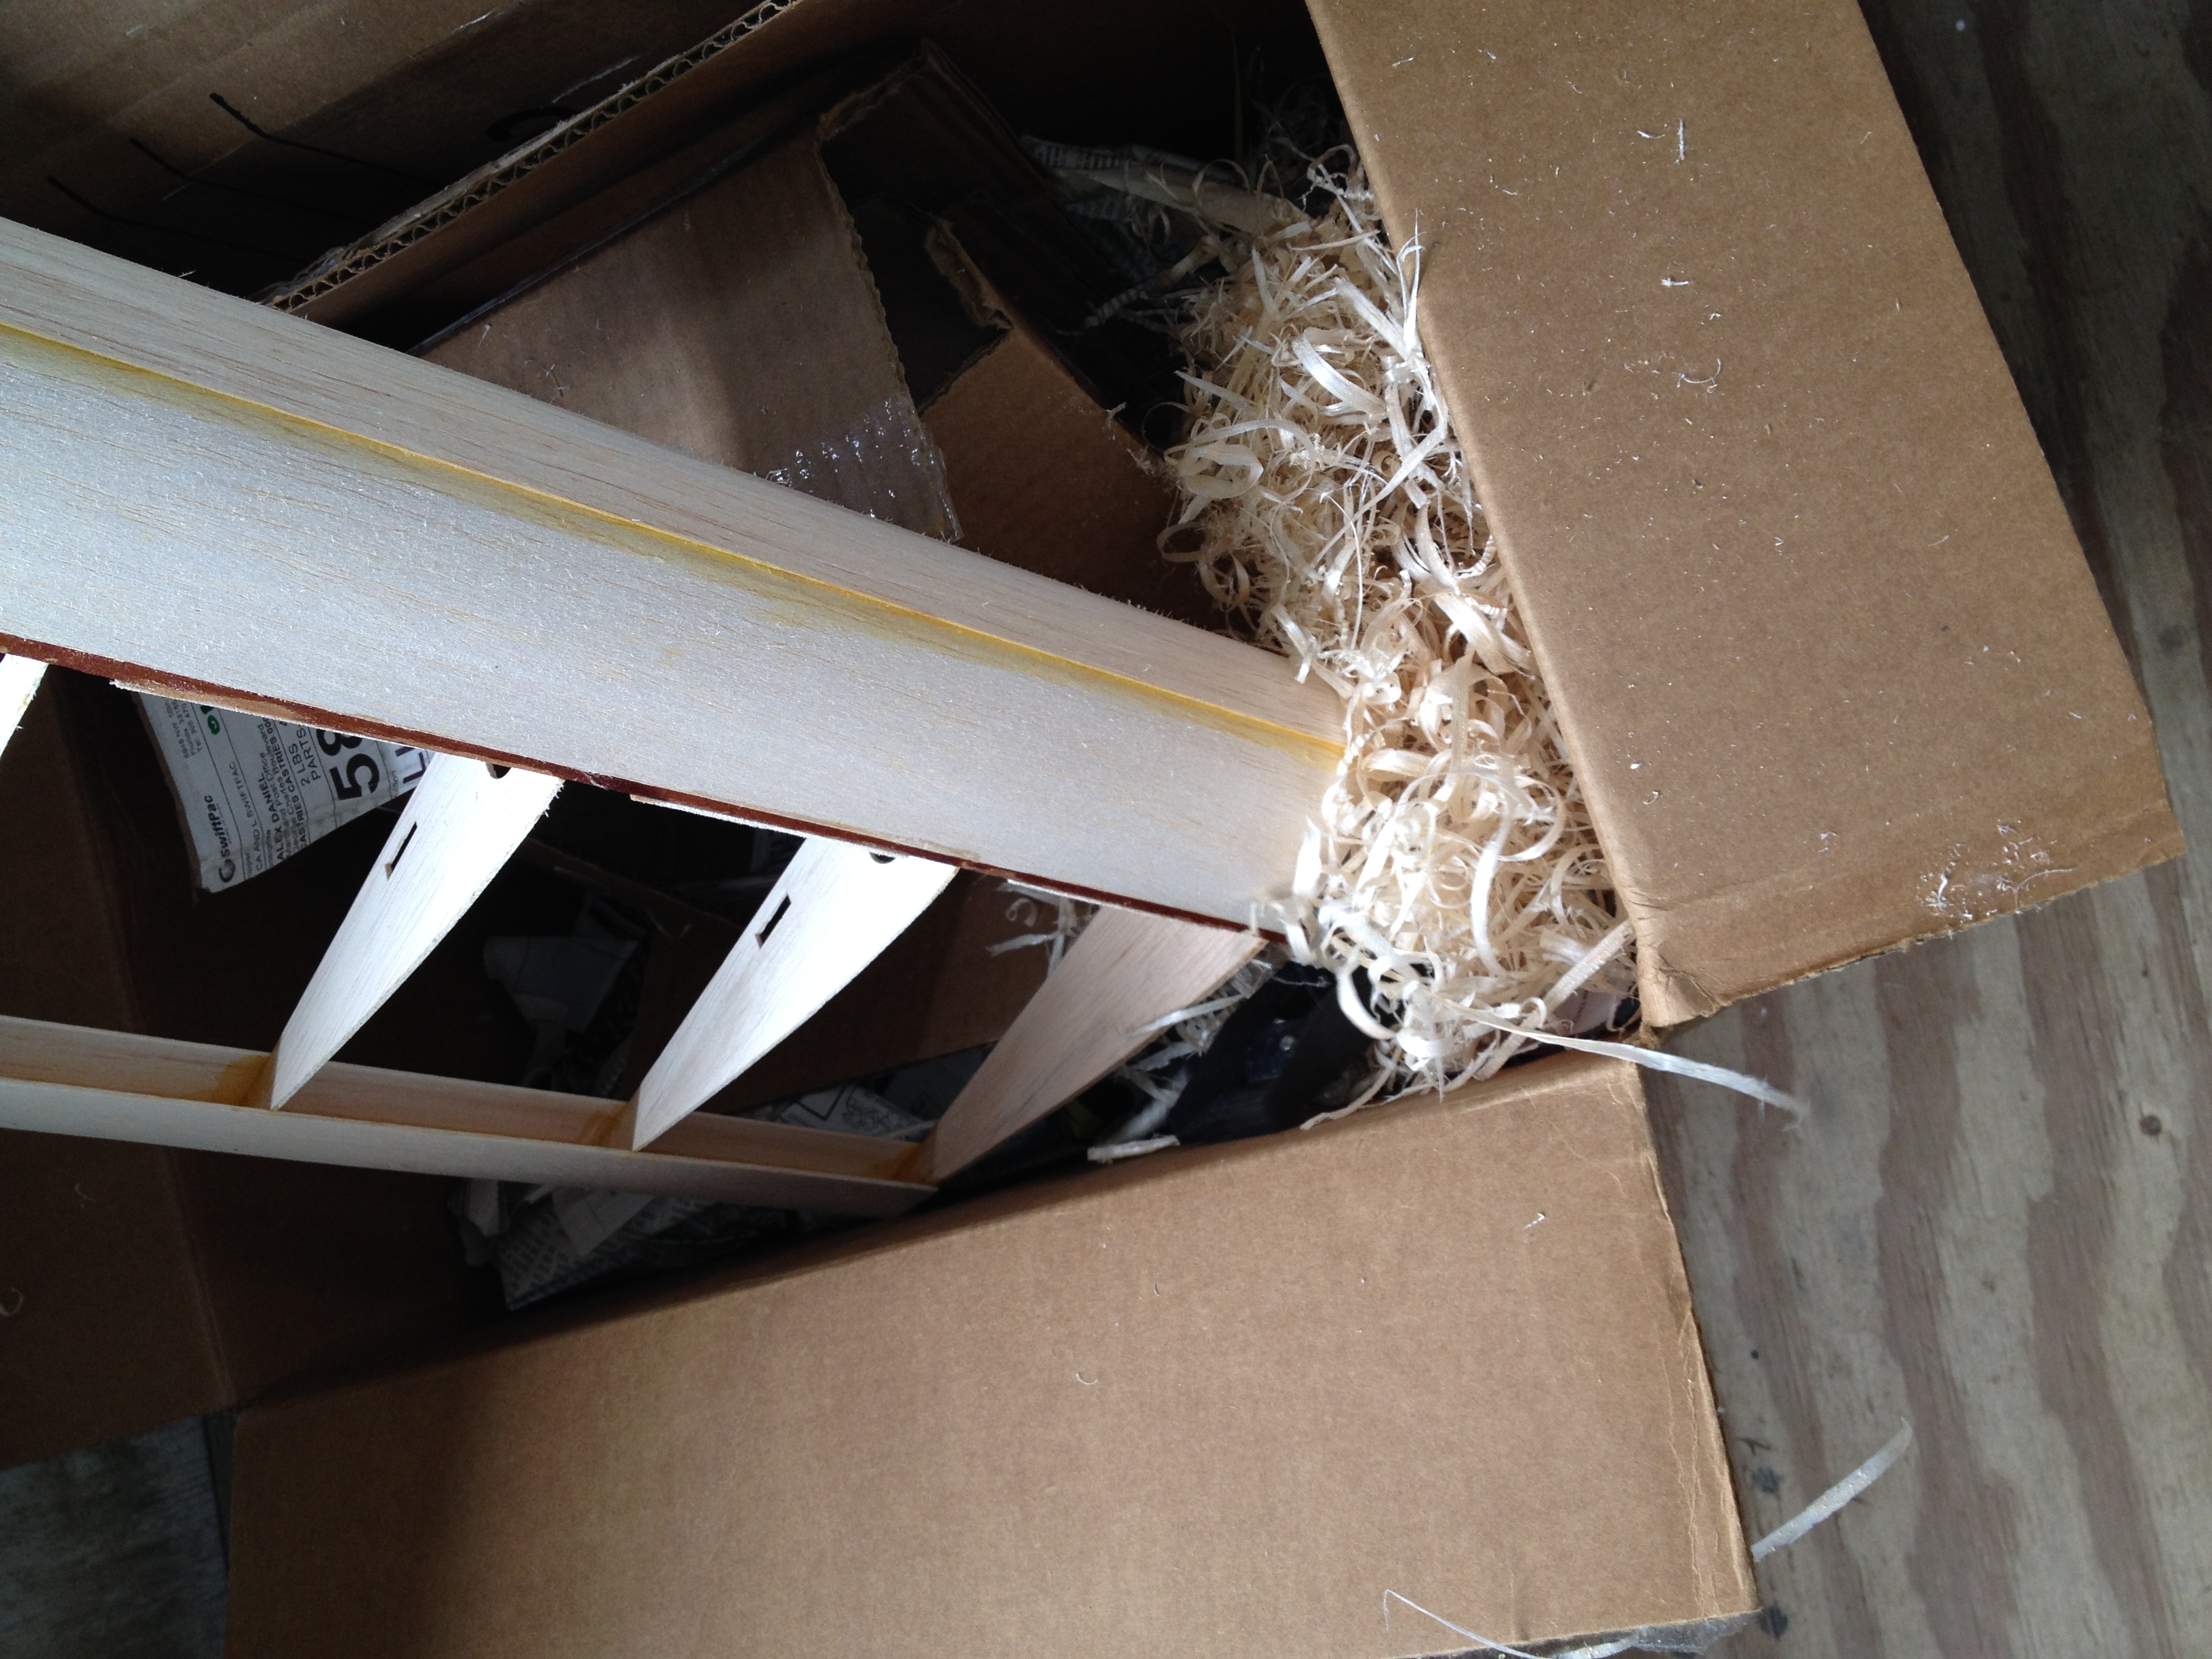
Let's get on to the fuselage!
Now..... what might these be?


Well after suffering through er.. a few... crashes on their uproar and dazzler R.N. came up with this little tingy.
Nifty way of re-enforcing the front of the fuse which has this nasty habit of snapping off on the slightest of hits (that's my story, and we're all sticking with it)
Here is where they go.


The Idea is really simple...(if you ask R.N. haha)
There is a hole where leading edge fits and two rear notches which you'd glue onto the main spars.
Honestly I can see how this would help and it would be a welcome addition AFTER a prang, but during the build it proved to be too much for me to handle.
It requires one to build the wing, then cut it at the leading edge, fit these in and then glue the leading edge back again.
As I've said on a plane with the nose snapped off this is no big deal, cut and snip, saw and fit, glue and you're good.
You'd have a hard time snapping it off after that's in there. (R.N. should know)
During the build however, the only way I saw that going in was to build the fuse onto the wing ie: build the wing, fit the fuse sides onto the wing and then continue the build.
Why? because you simply can't complete the fuse otherwise not to mention that with cutting the wing without it already being installed into a complete plane to keep it rigid, you've just risked giving your self a twist in the wing no matter how good you are gluing it back and and and... ok I could go on....
but
I'd already started on the fuse by the time I realized this, with the rear-top and bottom balsa cross sheets in place, the only way I was going to get these in, would be
if i pried open the front section of the plane enough to fit them.
No matter how I looked at it, with the back of the fuse already glued down the front would snap if I tried to open it up any.
Bottom line.. I spent half an afternoon crafting these just right ( what? I'm new with wood work okay sheesh... tough crowd... ) and didn't end up using them. I decided to go with 1/4' x 1/4' bass wood on all four sides top and bottom of the wing, I figured I'd keep these and use them later if my idea proved fruitless.
*He did point out that with my way, it would break anyway*
but I rebutted... only if I crash the darn thing! ha!
ha!
(ya.... let's not go there)
onward!


Umm Does this go here?
Yes that was an actual question (an actual phone call had to be made to one of the guys to be sure that I got this bit right... some how I couldn't find this section anywhere in the manual....I'm sticking with that story too)

As it turned out, It did.. and boy was I relieved! haha
making the box


I went ahead and extended the bass wood as seen here, as part of my re-enforcement idea.
This was done on the top and bottom of the wing and extends from the main bulkhead in front
of the wing all the way to the bulk head at the trailing edge of the wing, lets hope it holds up.

Trying to visualize, taking a pause ( okay I tried to come up with something somewhat spiritual to say here but I'm drawing blanks sorry)

Almost, nearly there.

Notice the holes in the firewall? Slick pointied out that I'd done a booboo with my throttle push rod location. Given that the manual calls for a top mounted engine and I was bent on going with a side mounted engine...(he was having a lovely chuckle about it too, no worries, I found and alternative use for that hole! ha!)
Right, so this is the sort of thing you end up with when you either a) misunderstand what you've read or b) didn't bother to read the thing carefully I'm not saying which which is which you pick
All I know is, the picture on the box for this area looks very much different from this. (I'm talking about the bass wood dowels drilled for the bonnet (lets call it that)


Okay wiggle time... yes I've invented a semi new dance.
Wiggle wiggle, squeak , sheeky sheek (sanding) wiggle and squeak squeak.. That took a blooming long time to get done didn't it?
I can't tell you how much sweat went into this bit!
I can't believe you people are able to get that wing in there without cracking the fuse!!!!!
The amount of force I used to get mine in surely would have broken mine.. (well I did use 1/4" top and bottom of the wing so that made mine that much harder.. oops


test fitting stabs ( cuz sometimes you just wanna sit back and admire your handy work ) okay enough admiring!
Let's put this thing together already!

YES before you ask... it is indeed a battery... heavy bugger too!... um I didn't have the right kind of clamps. RC modelers improvise! That's how we roll


Now..... what might these be?
Well after suffering through er.. a few... crashes on their uproar and dazzler R.N. came up with this little tingy.
Nifty way of re-enforcing the front of the fuse which has this nasty habit of snapping off on the slightest of hits (that's my story, and we're all sticking with it)
Here is where they go.
The Idea is really simple...(if you ask R.N. haha)
There is a hole where leading edge fits and two rear notches which you'd glue onto the main spars.
Honestly I can see how this would help and it would be a welcome addition AFTER a prang, but during the build it proved to be too much for me to handle.
It requires one to build the wing, then cut it at the leading edge, fit these in and then glue the leading edge back again.
As I've said on a plane with the nose snapped off this is no big deal, cut and snip, saw and fit, glue and you're good.
You'd have a hard time snapping it off after that's in there. (R.N. should know)
During the build however, the only way I saw that going in was to build the fuse onto the wing ie: build the wing, fit the fuse sides onto the wing and then continue the build.
Why? because you simply can't complete the fuse otherwise not to mention that with cutting the wing without it already being installed into a complete plane to keep it rigid, you've just risked giving your self a twist in the wing no matter how good you are gluing it back and and and... ok I could go on....
but
I'd already started on the fuse by the time I realized this, with the rear-top and bottom balsa cross sheets in place, the only way I was going to get these in, would be
if i pried open the front section of the plane enough to fit them.
No matter how I looked at it, with the back of the fuse already glued down the front would snap if I tried to open it up any.
Bottom line.. I spent half an afternoon crafting these just right ( what? I'm new with wood work okay sheesh... tough crowd... ) and didn't end up using them. I decided to go with 1/4' x 1/4' bass wood on all four sides top and bottom of the wing, I figured I'd keep these and use them later if my idea proved fruitless.
*He did point out that with my way, it would break anyway*
but I rebutted... only if I crash the darn thing!
ha!(ya.... let's not go there)
onward!
Umm Does this go here?
Yes that was an actual question (an actual phone call had to be made to one of the guys to be sure that I got this bit right... some how I couldn't find this section anywhere in the manual....I'm sticking with that story too)
As it turned out, It did.. and boy was I relieved! haha
making the box
I went ahead and extended the bass wood as seen here, as part of my re-enforcement idea.
This was done on the top and bottom of the wing and extends from the main bulkhead in front
of the wing all the way to the bulk head at the trailing edge of the wing, lets hope it holds up.
Trying to visualize, taking a pause ( okay I tried to come up with something somewhat spiritual to say here but I'm drawing blanks sorry)
Almost, nearly there.
Notice the holes in the firewall? Slick pointied out that I'd done a booboo with my throttle push rod location. Given that the manual calls for a top mounted engine and I was bent on going with a side mounted engine...(he was having a lovely chuckle about it too, no worries, I found and alternative use for that hole! ha!)
Right, so this is the sort of thing you end up with when you either a) misunderstand what you've read or b) didn't bother to read the thing carefully
I'm not saying which which is which you pick All I know is, the picture on the box for this area looks very much different from this. (I'm talking about the bass wood dowels drilled for the bonnet (lets call it that)
Okay wiggle time... yes I've invented a semi new dance.
Wiggle wiggle, squeak , sheeky sheek (sanding) wiggle and squeak squeak.. That took a blooming long time to get done didn't it?
I can't tell you how much sweat went into this bit!
I can't believe you people are able to get that wing in there without cracking the fuse!!!!!
The amount of force I used to get mine in surely would have broken mine.. (well I did use 1/4" top and bottom of the wing so that made mine that much harder.. oops
test fitting stabs ( cuz sometimes you just wanna sit back and admire your handy work ) okay enough admiring!
Let's put this thing together already!
YES before you ask... it is indeed a battery... heavy bugger too!... um I didn't have the right kind of clamps. RC modelers improvise! That's how we roll
Last edited by el_xero; 01-22-2015 at 07:52 AM.
01-21-2015, 05:33 PM
#10
Thread Starter
My Feedback: (2)
Join Date: Sep 2005
Location: Castries, SAINT LUCIA
Posts: 513
Likes: 0
Received 0 Likes
on
0 Posts
What? you mean it isn't obvious what this tingy is? What's that? It's not in your manual? You musta got the old one... yeah.


Okay okay I'm up to mischief here's a hint. That yellow bit would be one half of my LiFe P04 battery pack 1100mah (I love those things)


So that's one hatch for the top and one for the bottom rear or the plane behind the trailing edge wing bulk head.. plenty room back there if you do it right.
What? Hey it's straight alright. look look seeeeeee?


More fitting and admiring, more like procrastinating on doing the turtle deck....(what? I caught hell doing the leading edge wing sheeting man don't give me any attitude okay)


And I got loads of sighs from Slick concerning my rudder again haha
Alright I guess I couldn't delay forever.... got reminded of a great tip from slick... wet the sheets so they bend easier...(no wonder my wing sheeting crackled and popped here and there oh brother!)
Soak it... and soak it gooooood! don't be afraid to wet it!
No one told me Id be gluing my fingers onto the fuse in multiple places while I did up that turtle deck though.... buggers!


weeeell now.. that wasn't too hard was it?... three days later I'm still chipping off CA from the back of my hands boy.. I tell ya.. they don't call it hot stuff for nothing!
A hinging I will go!


Hinge tools.... guys... you probably already know this.....Don't use em... they suck... I'm not just saying that... I really really mean they suck! I prefer the results I get when i just use and exacto knife, seriously!
Hatch! Nooo not the egg type... I mean this!

Oh and those would be my main switch my locator buzzer and a teeny hole for my balance port thingy I jimmyed (who wants to constantly remove a LiFe pack for charging and balancing pfff.)
Okay okay I'm up to mischief here's a hint. That yellow bit would be one half of my LiFe P04 battery pack 1100mah (I love those things)
So that's one hatch for the top and one for the bottom rear or the plane behind the trailing edge wing bulk head.. plenty room back there if you do it right.
What? Hey it's straight alright. look look seeeeeee?
More fitting and admiring, more like procrastinating on doing the turtle deck....(what? I caught hell doing the leading edge wing sheeting man don't give me any attitude okay)
And I got loads of sighs from Slick concerning my rudder again haha
Alright I guess I couldn't delay forever.... got reminded of a great tip from slick... wet the sheets so they bend easier...(no wonder my wing sheeting crackled and popped here and there oh brother!)
Soak it... and soak it gooooood! don't be afraid to wet it!
No one told me Id be gluing my fingers onto the fuse in multiple places while I did up that turtle deck though.... buggers!
weeeell now.. that wasn't too hard was it?... three days later I'm still chipping off CA from the back of my hands
boy.. I tell ya.. they don't call it hot stuff for nothing!A hinging I will go!
Hinge tools.... guys... you probably already know this.....Don't use em... they suck... I'm not just saying that... I really really mean they suck! I prefer the results I get when i just use and exacto knife, seriously!
Hatch! Nooo not the egg type... I mean this!
Oh and those would be my main switch my locator buzzer and a teeny hole for my balance port thingy I jimmyed (who wants to constantly remove a LiFe pack for charging and balancing pfff.)
Last edited by el_xero; 01-21-2015 at 06:43 PM.
01-21-2015, 05:39 PM
#11
Thread Starter
My Feedback: (2)
Join Date: Sep 2005
Location: Castries, SAINT LUCIA
Posts: 513
Likes: 0
Received 0 Likes
on
0 Posts
Posing time!


Some smarty decided to taunt me with, " you're going to have to bring that rudder upward if it's to have any sort of ground clearance"... yeah...well...


What's that?
Two inches suckers!
How'd yuh like them apples heh!
They are called pliers ... go bend summin haha!
ok ok fine fine.. I curved it up a lil bit for ya Slick okay? oh and I did remove just a teeny bit of rudder (sort of) just for you...
Some smarty decided to taunt me with, " you're going to have to bring that rudder upward if it's to have any sort of ground clearance"... yeah...well...
What's that?
Two inches suckers!
How'd yuh like them apples heh!
They are called pliers ... go bend summin haha!
ok ok fine fine.. I curved it up a lil bit for ya Slick okay? oh and I did remove just a teeny bit of rudder (sort of) just for you...
Last edited by el_xero; 01-21-2015 at 06:46 PM.
01-21-2015, 05:44 PM
#13
Thread Starter
My Feedback: (2)
Join Date: Sep 2005
Location: Castries, SAINT LUCIA
Posts: 513
Likes: 0
Received 0 Likes
on
0 Posts
Sooooo
what does she look like?
Patience patience!!!!
let's have a look at the power plant first okay?


So by now you should have noticed something odd....
??? no?... (are you visually impaired or something? okay that was mean, I kid I kid.)
The canopy man the canopy!
YO!! check eeeet ouuuuut!


huh? huh? huuuuuuh???
Are you tickled ? Meeee toooo I'm soooo tickled Tehehe!
I'm so proud of me!
what does she look like?
Patience patience!!!!
let's have a look at the power plant first okay?
So by now you should have noticed something odd....
??? no?... (are you visually impaired or something? okay that was mean, I kid I kid.)
The canopy man the canopy!
YO!! check eeeet ouuuuut!
huh? huh? huuuuuuh???
Are you tickled ? Meeee toooo
I'm soooo tickled Tehehe! I'm so proud of me!
Last edited by el_xero; 01-21-2015 at 06:49 PM.
01-21-2015, 05:48 PM
#14
Thread Starter
My Feedback: (2)
Join Date: Sep 2005
Location: Castries, SAINT LUCIA
Posts: 513
Likes: 0
Received 0 Likes
on
0 Posts
Niiiiceeee ouuu looks vintage! check out the aluminum soldered landing gear!
Love the spinner. and totally digging the side mounted engine. (what you got on there?)
and dig the pulled back canopy ultra coolness
.. (I like how this guy thinks)yeah sure hit me up with that link.. what does the bottom of that bird look like?
Great plane brother! I always loved the fact that the Uproar's fuse was wider than the Dazzler's. I like wiggle room!
Does this one still fly?
01-21-2015, 05:58 PM
#15
Thread Starter
My Feedback: (2)
Join Date: Sep 2005
Location: Castries, SAINT LUCIA
Posts: 513
Likes: 0
Received 0 Likes
on
0 Posts
something went awfully wrong my pic's aren't showing...
I'll stop here for now, because that was quite a bit of work, to have it all not work out... sucks.
I'll stop here for now, because that was quite a bit of work, to have it all not work out... sucks.
Last edited by el_xero; 01-21-2015 at 06:33 PM.
01-21-2015, 06:17 PM
#16
My Feedback: (-1)
I brought up the thread for you. I posted photos as I went along there are several photos there. I was given an old but new in the box Fox .40 and I fired it up two weeks ago. It ran off the prime and quit without drawing fuel so I pulled the engine and soaked it for two days then cleaned it out, now it is drawing fuel but I have been down for two weeks with a super cold and don't feel up to going flying yet. My planes tend to last for decades but I have this and a big one needing the maiden. I do a lot of build threads but my photo file was lost, I have no plans to put it back up.
01-21-2015, 06:24 PM
#17

Very nice work there!... I like that fuselage reinforcement.. and the additional webbing.. And... yes... great suggestion on that Uproar thread.. I've followed that for a few years or more. Enjoy... I remember seeing a video quite a while back of a Dazzler doing extreme stuff.. I haven't been able to find it in years though.. So... get a vid up of some extreme stuff... Congrats on a cool plane... have fun. 
01-21-2015, 06:33 PM
#18
Thread Starter
My Feedback: (2)
Join Date: Sep 2005
Location: Castries, SAINT LUCIA
Posts: 513
Likes: 0
Received 0 Likes
on
0 Posts
Is it just on my end? half of my newer pics aren't showing it just says Attachment followed by a number I've deleted and re-uploaded the pics and still some just won't show.. what's going on?
01-21-2015, 06:35 PM
#19
Thread Starter
My Feedback: (2)
Join Date: Sep 2005
Location: Castries, SAINT LUCIA
Posts: 513
Likes: 0
Received 0 Likes
on
0 Posts
I brought up the thread for you. I posted photos as I went along there are several photos there. I was given an old but new in the box Fox .40 and I fired it up two weeks ago. It ran off the prime and quit without drawing fuel so I pulled the engine and soaked it for two days then cleaned it out, now it is drawing fuel but I have been down for two weeks with a super cold and don't feel up to going flying yet. My planes tend to last for decades but I have this and a big one needing the maiden. I do a lot of build threads but my photo file was lost, I have no plans to put it back up.
Where is it? I've even searched for the members name I can't find it. can you post a link in here ?
01-21-2015, 06:52 PM
#21
Here's a link. The thread is actually in this forum.... running right up with yours... a few spots up or down on this forum page.
http://www.rcuniverse.com/forum/kit-...-40-build.html
I think GrayBeard meant he'll "pull it up to the top of the forum"... possibly.. there ya go though.
http://www.rcuniverse.com/forum/kit-...-40-build.html
I think GrayBeard meant he'll "pull it up to the top of the forum"... possibly.. there ya go though.
01-21-2015, 06:55 PM
#22
And... yes.. this site is slow on loading anything anymore. You're a long time member too it looks like... so you probably know about ups and downs of the site over the years.. Sorry you're having probs.. I'm wanting to see the pics too.... Not your fault though obviously, as you did great on the previous pics..
I'm also having a prob blowing those up for full view... its so slow to enlarge them... I'm getting through it though. Good luck.
I'm also having a prob blowing those up for full view... its so slow to enlarge them... I'm getting through it though. Good luck.
01-21-2015, 06:56 PM
#23
Thread Starter
My Feedback: (2)
Join Date: Sep 2005
Location: Castries, SAINT LUCIA
Posts: 513
Likes: 0
Received 0 Likes
on
0 Posts
I brought up the thread for you. I posted photos as I went along there are several photos there. I was given an old but new in the box Fox .40 and I fired it up two weeks ago. It ran off the prime and quit without drawing fuel so I pulled the engine and soaked it for two days then cleaned it out, now it is drawing fuel but I have been down for two weeks with a super cold and don't feel up to going flying yet. My planes tend to last for decades but I have this and a big one needing the maiden. I do a lot of build threads but my photo file was lost, I have no plans to put it back up.
No problem man, You're busy so can't do it all.
I'm beat myself so this is it for me for tonight. I'll come back tomorrow morning with the pics of the covering job and wrap up this thread
Glad you came along!
DGrant! Thanks for stopping by! As I said in the other thread I used your thread a lot while building mine, you were a big help! Glad you decided to look mine up
Last edited by el_xero; 01-22-2015 at 03:59 AM.
01-21-2015, 06:59 PM
#24
Thread Starter
My Feedback: (2)
Join Date: Sep 2005
Location: Castries, SAINT LUCIA
Posts: 513
Likes: 0
Received 0 Likes
on
0 Posts
And... yes.. this site is slow on loading anything anymore. You're a long time member too it looks like... so you probably know about ups and downs of the site over the years.. Sorry you're having probs.. I'm wanting to see the pics too.... Not your fault though obviously, as you did great on the previous pics..
I'm also having a prob blowing those up for full view... its so slow to enlarge them... I'm getting through it though. Good luck.
I'm also having a prob blowing those up for full view... its so slow to enlarge them... I'm getting through it though. Good luck.
ohhhhh that's what he meant? okay. Well thanks for the link!
much appreciated!Long time member but not very active and not very many posts either. I usually jump in when I need information on something, I'm way too busy these days.
I'm checking it out now and avoiding sleep haha .. I'd better just book mark it haha. I've fixed the pics though! Next up is the covering job.. I didn't go into detail on that either so it will be very short, My thread is almost done. I'd probably be finished by tomorrow morning