


Top flite p-40 .60
 02-18-2015, 09:47 AM
#1
Member
Thread Starter
My Feedback: (1)
Join Date: Jul 2011
Location: Corbin, KY
Posts: 70
Likes: 0
Received 0 Likes
on
0 Posts
I am currently building the top flite p-40 .60 and will be adding pictures here later today and do a build thread. I have a question though I am not sure what servos I should order. I am using a spextrum dx7s with this plane. Additionally what are your recommendations about using the bell crank system or switching to a duel aileron set up. I will probably be using either an OS FS .91 or RCV 90 SP engine.
Thanks
Thanks
 02-18-2015, 03:27 PM
#2
Member
Thread Starter
My Feedback: (1)
Join Date: Jul 2011
Location: Corbin, KY
Posts: 70
Likes: 0
Received 0 Likes
on
0 Posts
additionally what are the opinions of the p-40's bell crank system? I was thinking about modifying it to have individual servos instead of the bell crank.
02-18-2015, 11:12 PM
#3

My Feedback: (13)
it takes very little work to have the servos for the ailerons mounted in the wings I used the typical ARF mounting method and placed the servos on ply hatches this is from my rehab project I picked up, still half finished after sitting on a shelf life's been busy. 
02-19-2015, 09:05 AM
#4
Member
Thread Starter
My Feedback: (1)
Join Date: Jul 2011
Location: Corbin, KY
Posts: 70
Likes: 0
Received 0 Likes
on
0 Posts
Tim thanks for the picture it helps. Also I went and looked at the ARF manual and it looks pretty easy. I am sure the weight of the plane will be happy with the removal of the bell system.
Talking about keeping weight down what is the opinion of fiberglass or monokote. I was planning one using .6ounce glass as that is the lightest I can find and painting it it.
Talking about keeping weight down what is the opinion of fiberglass or monokote. I was planning one using .6ounce glass as that is the lightest I can find and painting it it.
02-19-2015, 09:33 AM
#5

Why would adding 2 servos in the wing reduce weight? The bell crack system has worked fine for years, and I have used it in my TF P-47 just fine. Make sure you use red locktite on the bolt holding the bellcrank, or use a nyloc nut instead.
02-19-2015, 11:12 AM
#6
Member
Thread Starter
My Feedback: (1)
Join Date: Jul 2011
Location: Corbin, KY
Posts: 70
Likes: 0
Received 0 Likes
on
0 Posts
For me thinking bout it, having individual servos instead of the bell crank allows me to have a pice of mind that I can quickly check the connections in the wing. Actually the individual servos are probably better as I would think if the bell was better the ARF would use it as well.
So here is where I am at in the build in about 4 days.
So here is where I am at in the build in about 4 days.
02-19-2015, 02:09 PM
#7

I always thought the bell crank system was an added point of trouble. Just my two cents worth. Do the instructions still say to balance the plane with the landing gear down? If so, don't do it. The gear need to be up when setting the balance. Nice work on the build!
02-19-2015, 08:37 PM
#8
Member
Thread Starter
My Feedback: (1)
Join Date: Jul 2011
Location: Corbin, KY
Posts: 70
Likes: 0
Received 0 Likes
on
0 Posts
Well, I didn't do much today but finish putting the rudder together and shaping the ribs. Now I have to decide if want to start the wings as I am off of work again for the weather. I guess I could do the wings tomorrow and the weekend and miss my wife's birthday, Ha. We'll see. Additionally, I placed all the pieces on the on the digital scale to see where I was at. I saw this in another build and they had the weight around 5.8 ounces. So I was expecting somewhere around there, but it was 3.7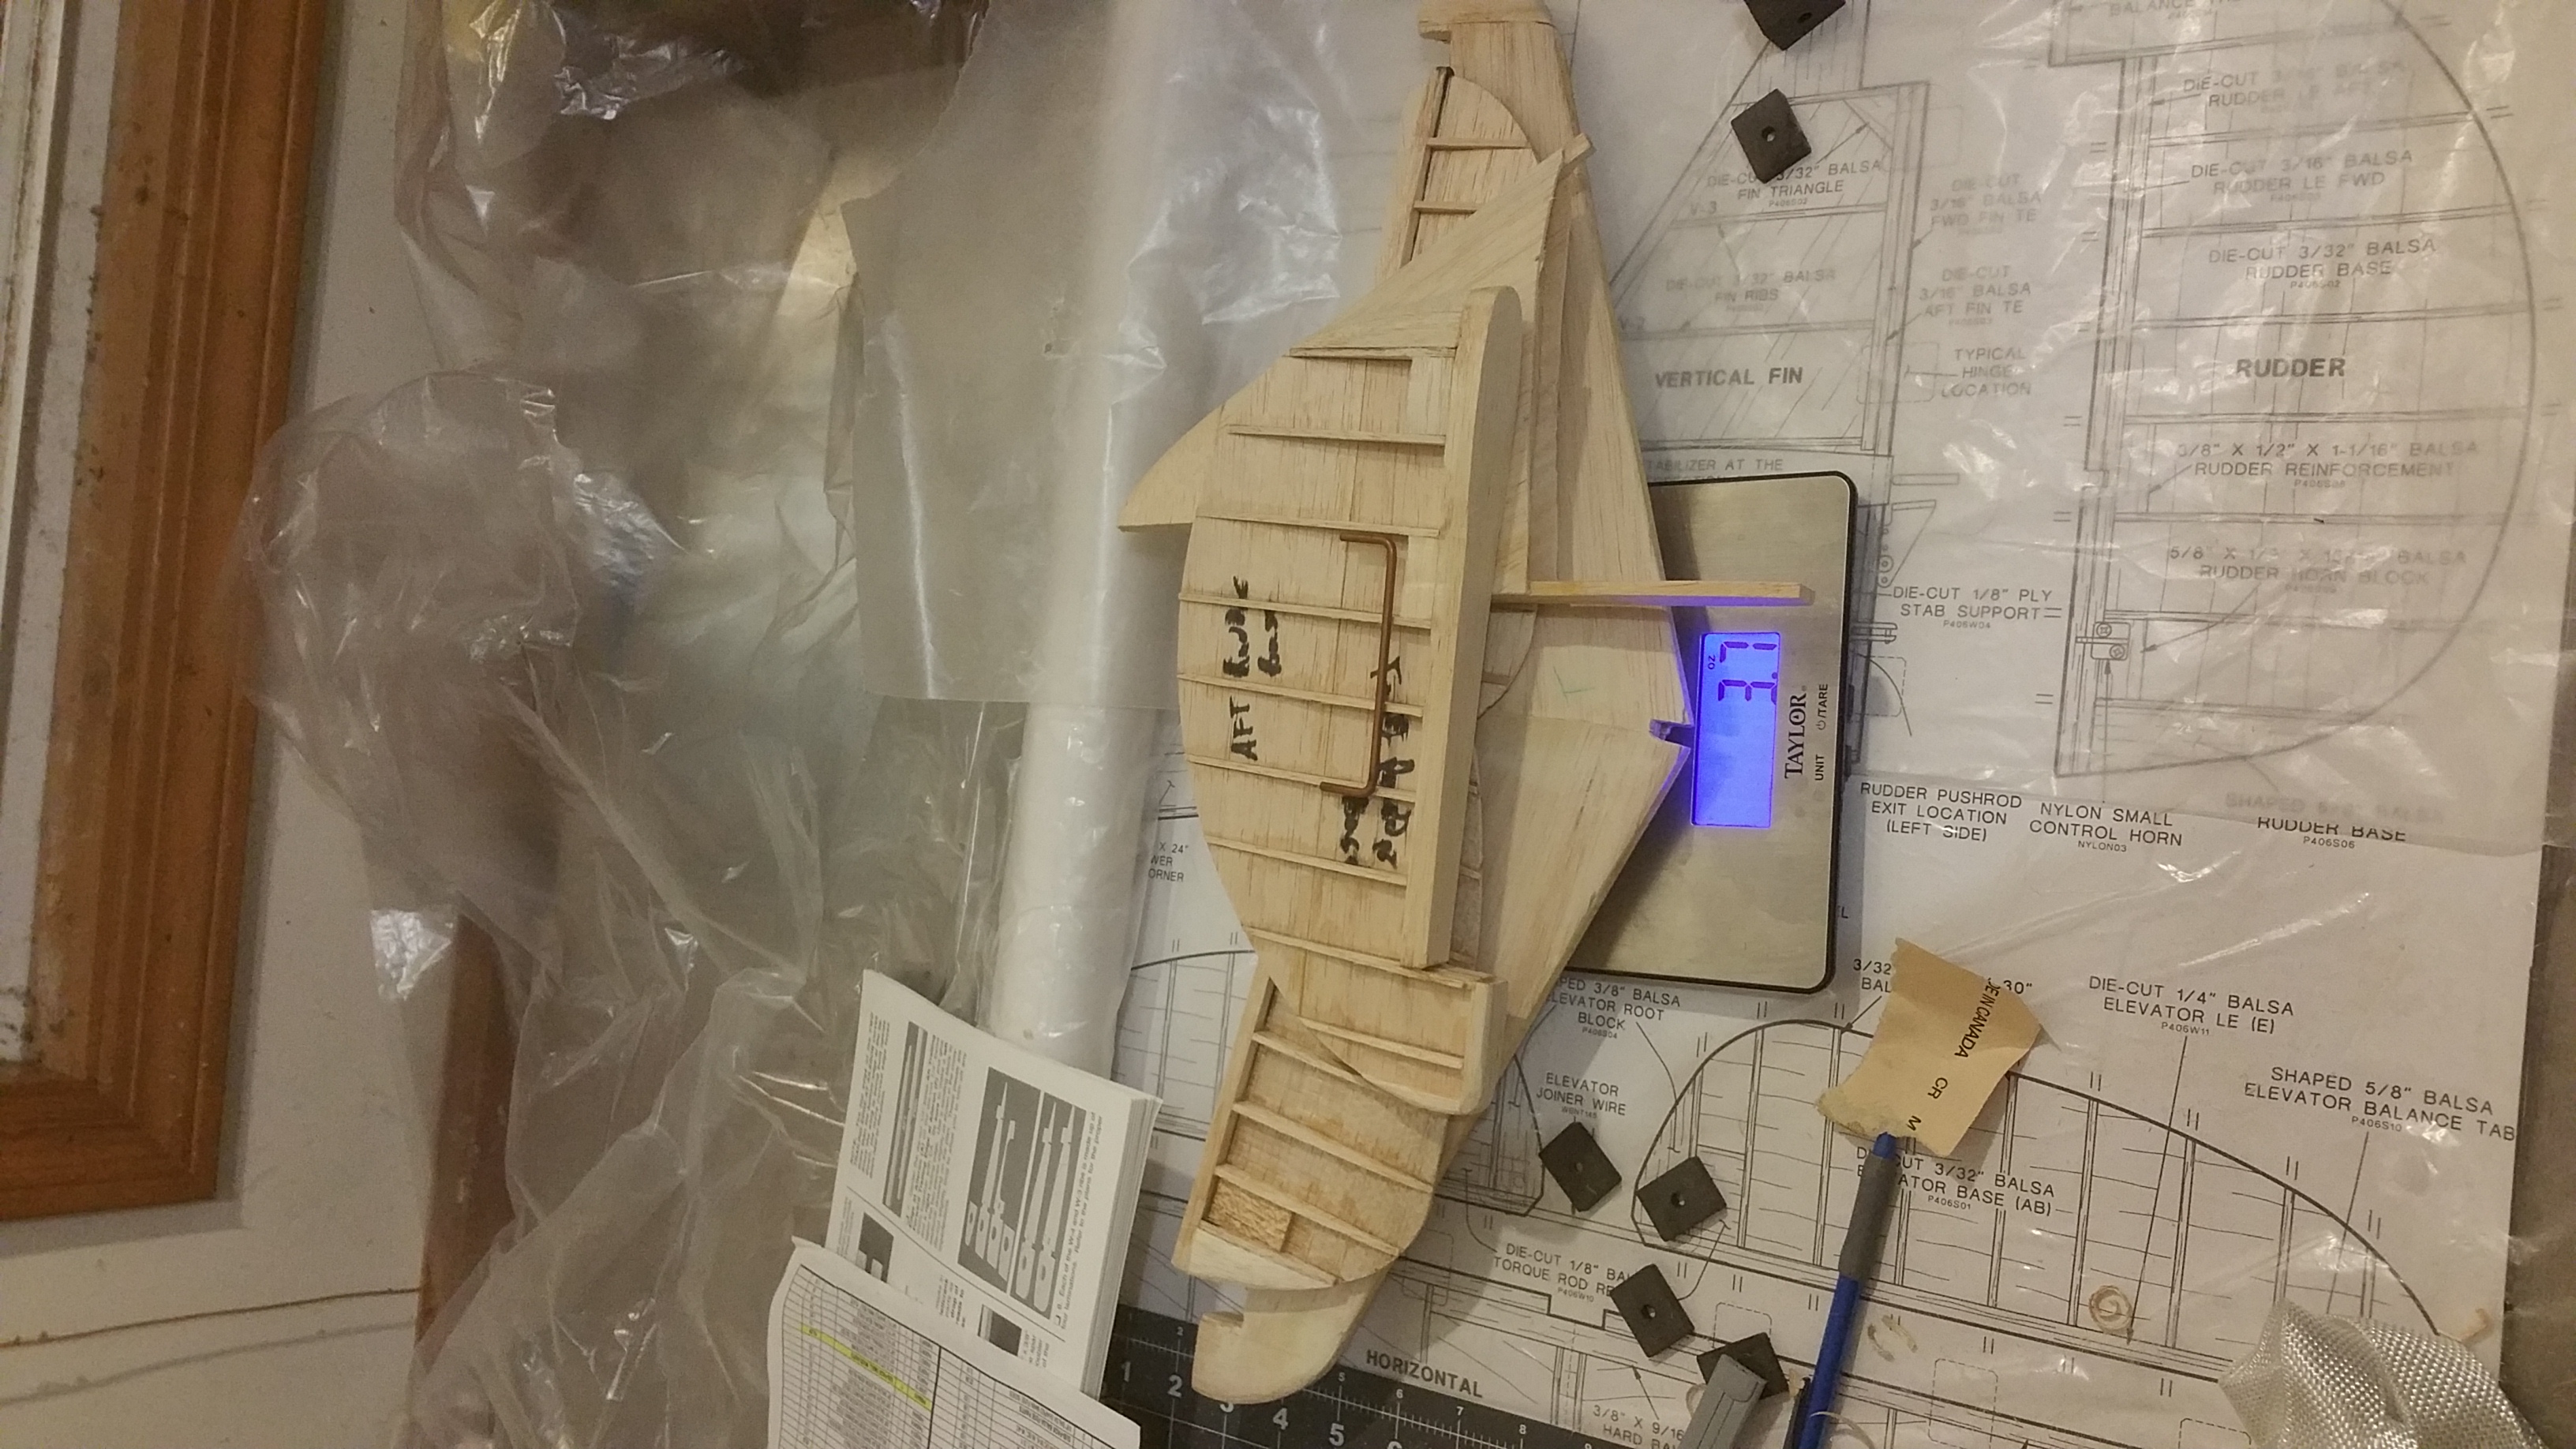


 with all the tail pieces and I am happy with that.
02-20-2015, 07:42 PM
#10
My Feedback: (13)
having glassed several models with .6os glass its light weight and strong also provides a great base for painting there are several sources of info for glassing with water based poly my preferred method for glassing http://www.rcuniverse.com/forum/rc-w...l-fw190a8.html been working on this project for a while and I try to cover the glassing process pretty thoroughly or tompierce.net is where i heard about using poly for covering models with LW fiberglass cloth.
I also finished the fuse of the P-40 using the same method after much repair and rehabilitation

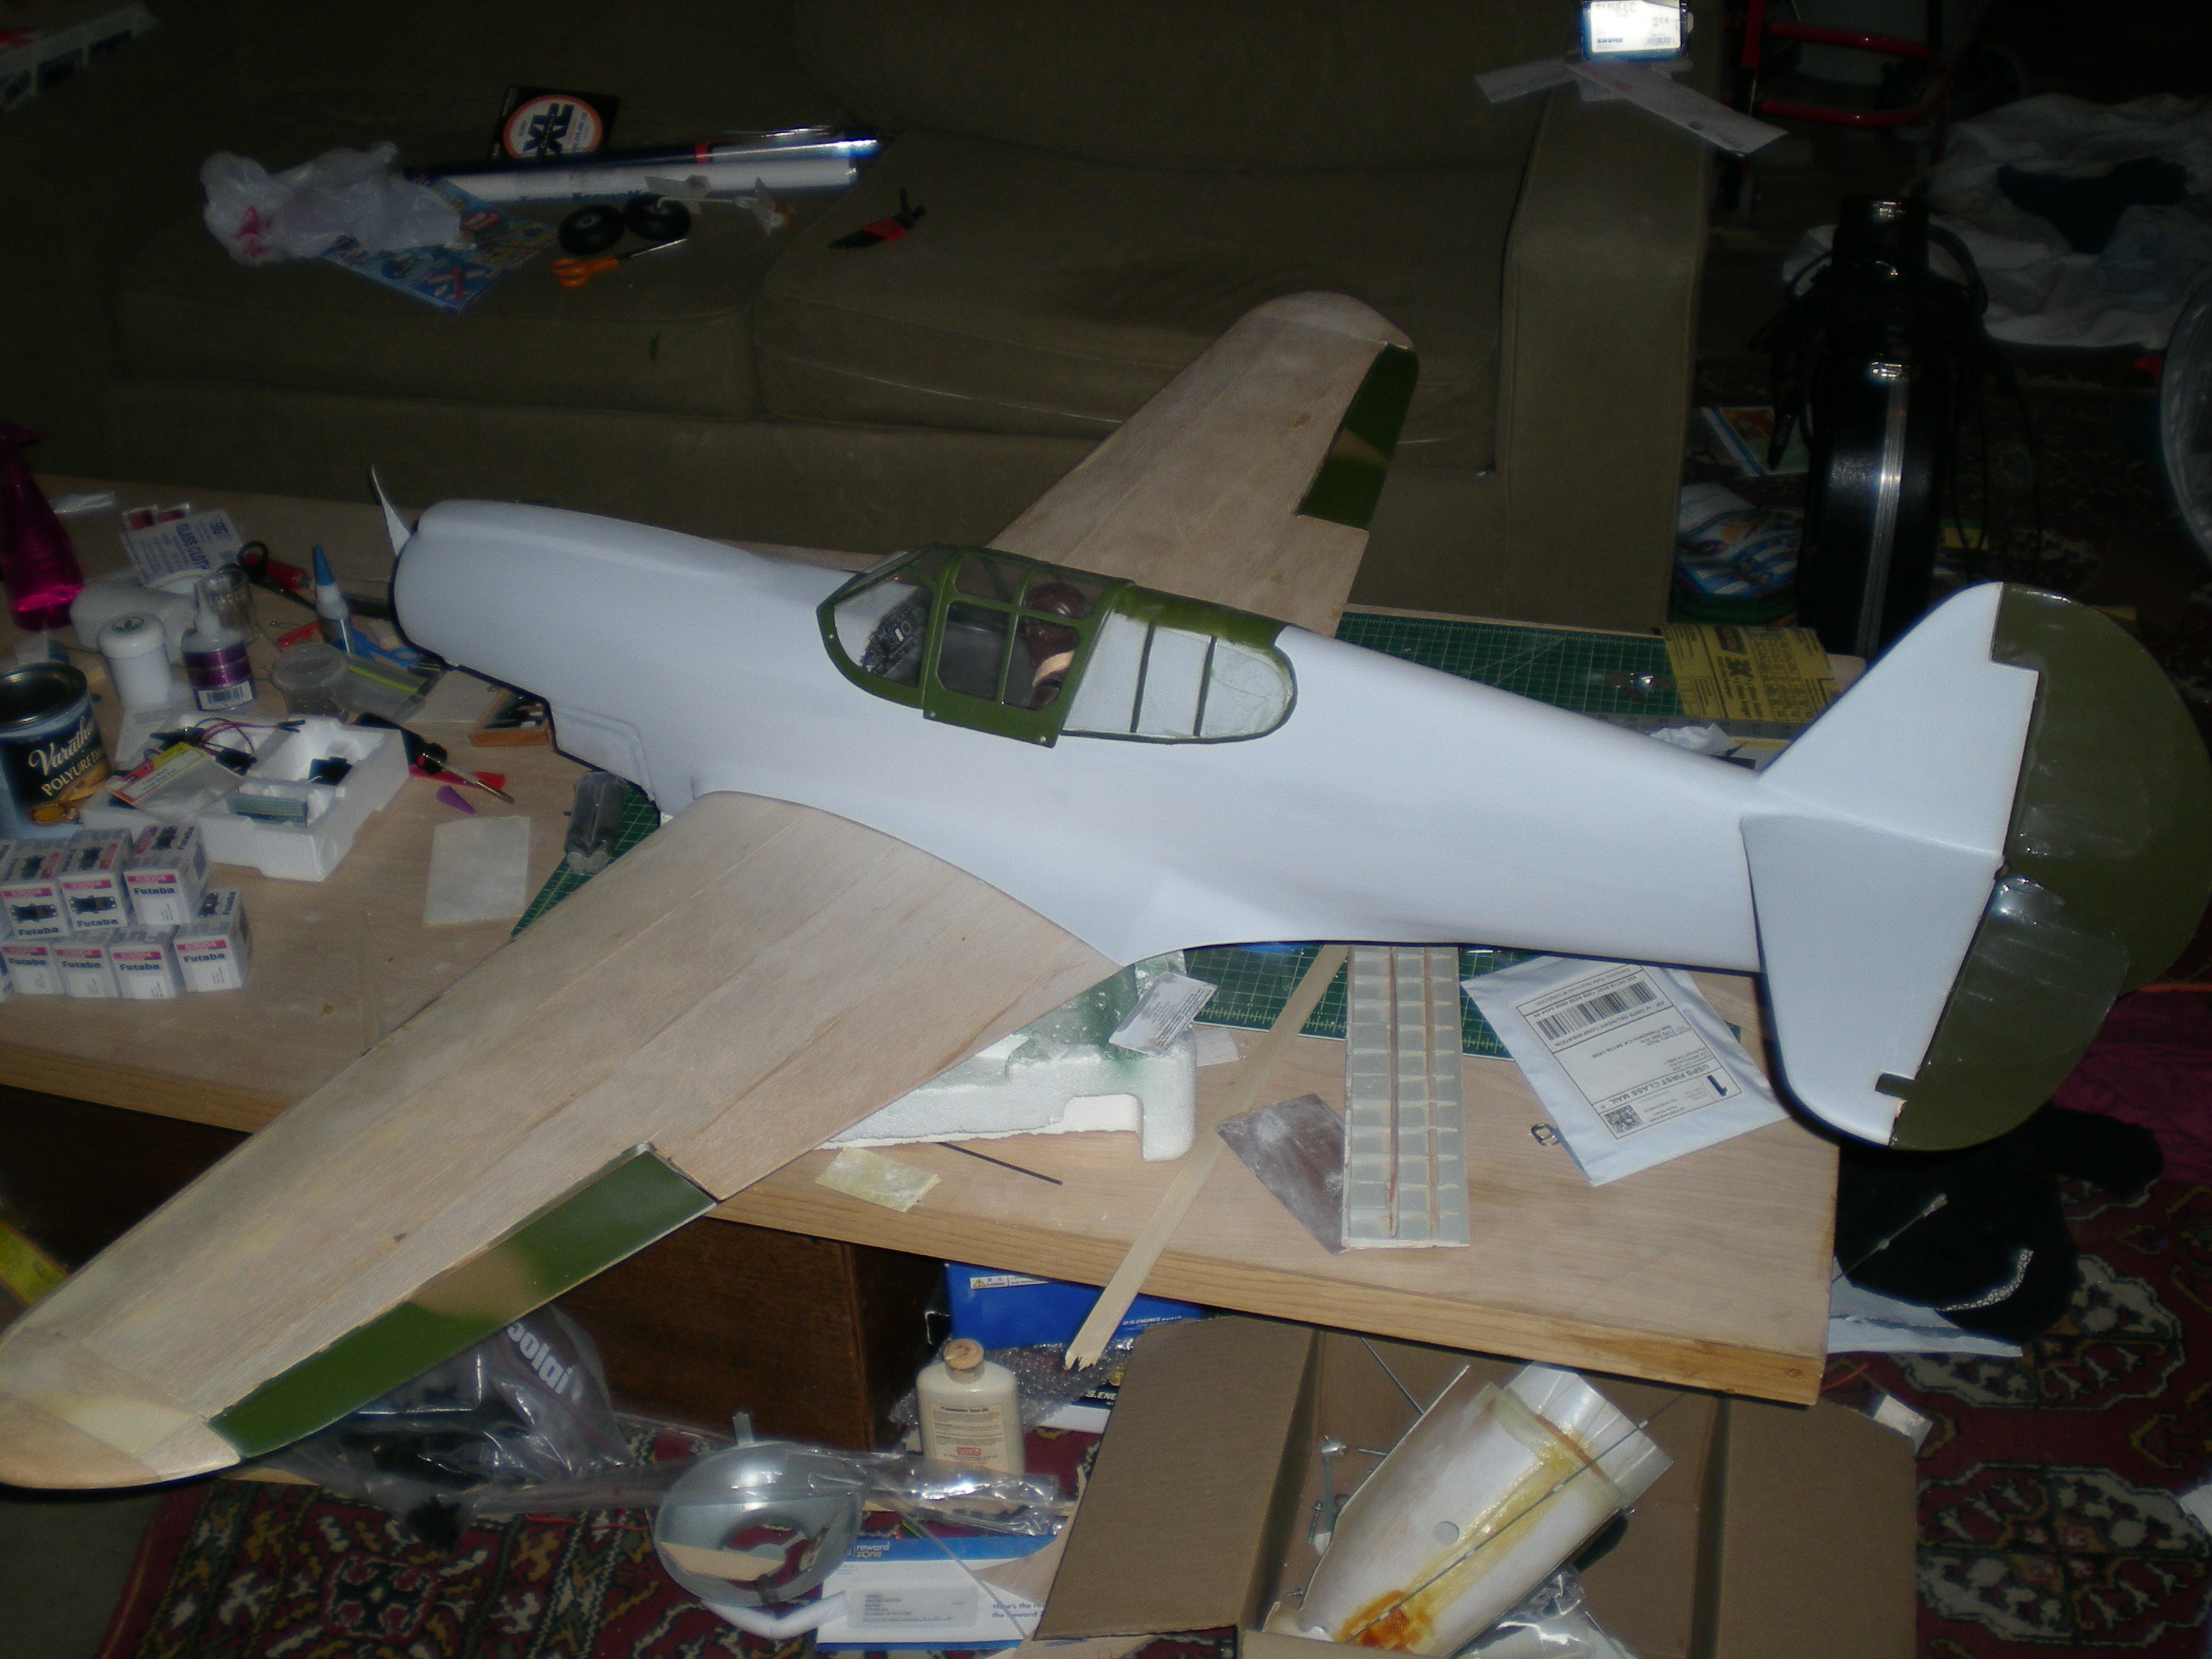
I also finished the fuse of the P-40 using the same method after much repair and rehabilitation
02-21-2015, 08:23 AM
#11
Member
Thread Starter
My Feedback: (1)
Join Date: Jul 2011
Location: Corbin, KY
Posts: 70
Likes: 0
Received 0 Likes
on
0 Posts
Tim: I have seen both glassing techniques on line and had some questions about about using poly. I thought one of the reasons for using epoxy was to allow the wood to absorb some of the epoxy strengthing it. Is this actually the case and does poly allow this as well? I ask because one of the glassing videos ive watched on youtube was upgrading a Giant P-40 ARF glassing it using poly. In this video series, he stated he built surfboards and used poly now to glass the boards. He also said a wood sealer should be added to ensure the poly doesn't absorb into the wood.
Thanks for your help.
Thanks for your help.
02-22-2015, 05:17 PM
#12
My Feedback: (13)
Not really sure about epoxy technique since I have never used it for finishing models only the WB method,but to prevent warping of the balsa its recommended to use a sealer I used to use Deft brushing lacquer as a sealer over the wood before glassing so the water doesn't warp the wood, I have used the WB poly over thicker balsa without sealing it but going over any wood 1/8 or thinner I would seal it first.
as a alternative to the brushing Deft I have switched to the spray satin you can spray lighter coats and its much quicker to limit your self to exposure to fumes I always open my garage door because of the odor,the WB poly has virtually no odor at all which is a plus.
as for added strength needing epoxy to soak into the wood,I'm not sure about that, the wood on these TF 60 size planes is plenty strong and works fine if you just cover it with mono or any other iron on covering after using the WB poly and .6oz cloth the skins are plenty strong, I like the glassing method mainly for painting, it does add some strength,the nice thing about the Water Based material besides the ease of clean up,and odor, is that its light weight once the water evaporates the resin is not that heavy.
my preferred material besides the deft spray is Varathane Diamond finish, its very hard when cured and sands to a nice smooth surface after just a few coats, also a inexpensive alternative to hobby filler is Minwax wood filler I add just a tiny bit of water to it so its spreadable and it is great to work with.
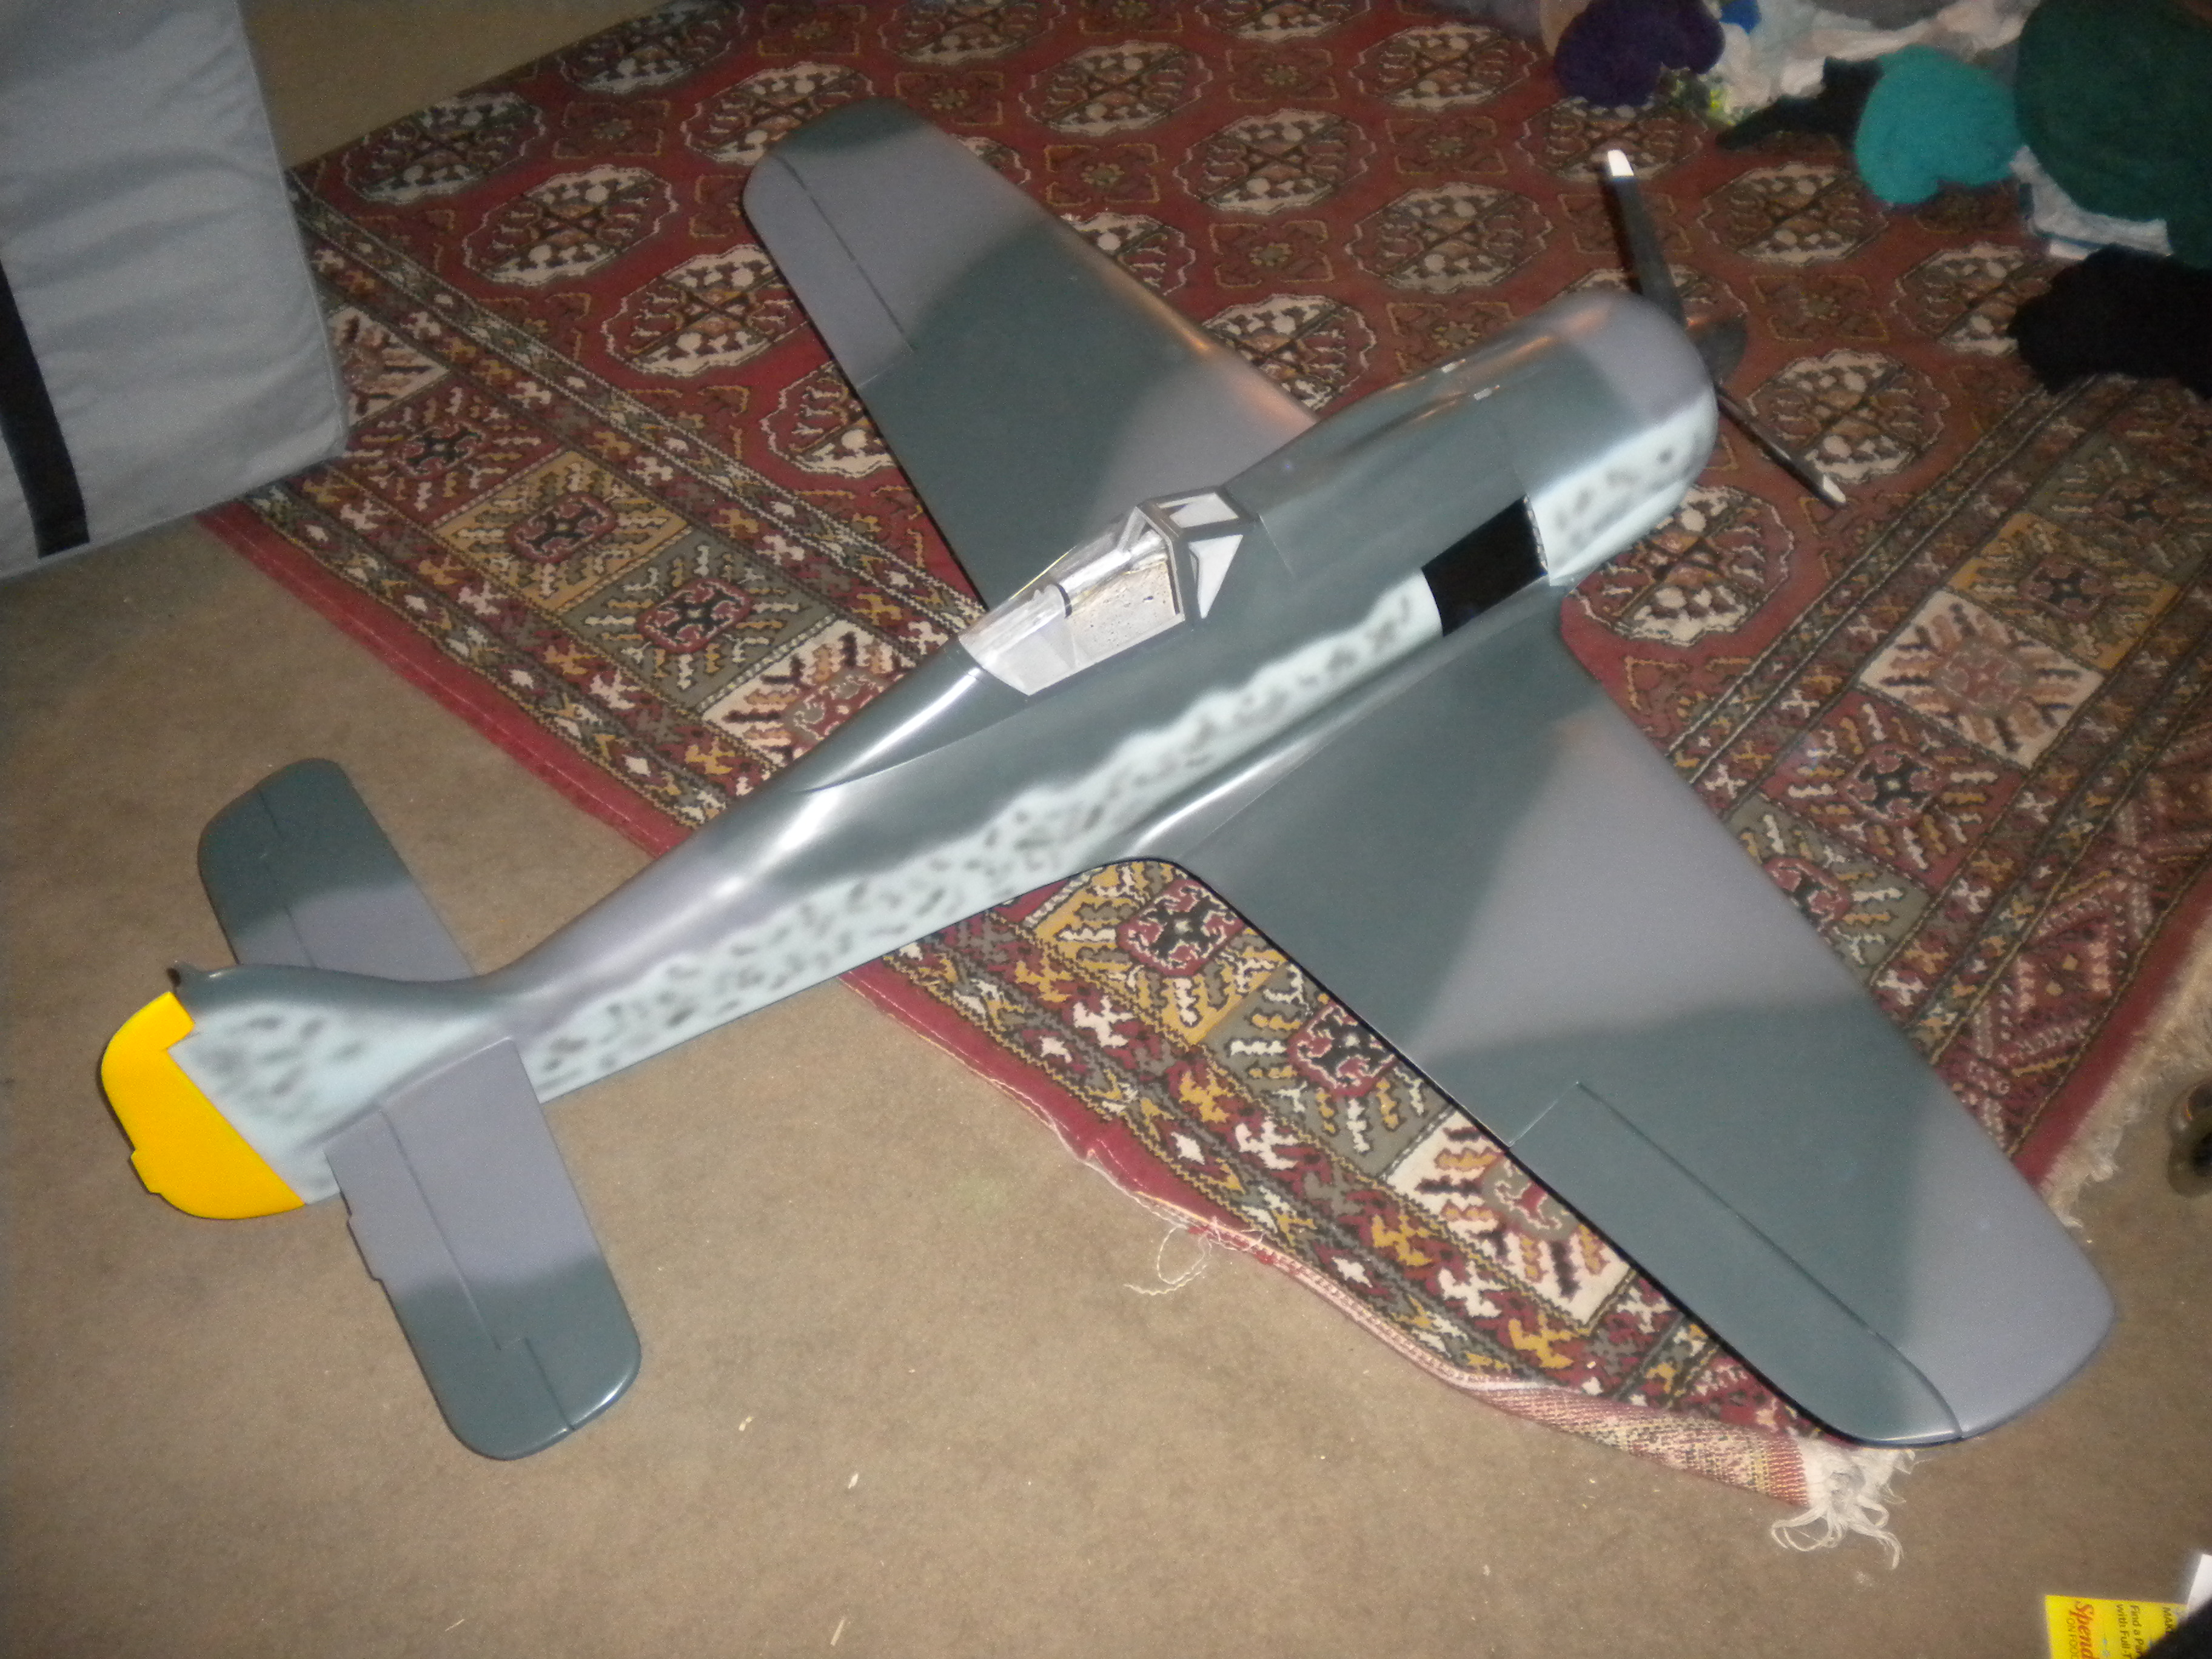
some examples of the results you can get with the WB materials the Spitfire and P-47 are Top Flite 60 size kits


as a alternative to the brushing Deft I have switched to the spray satin you can spray lighter coats and its much quicker to limit your self to exposure to fumes I always open my garage door because of the odor,the WB poly has virtually no odor at all which is a plus.
as for added strength needing epoxy to soak into the wood,I'm not sure about that, the wood on these TF 60 size planes is plenty strong and works fine if you just cover it with mono or any other iron on covering after using the WB poly and .6oz cloth the skins are plenty strong, I like the glassing method mainly for painting, it does add some strength,the nice thing about the Water Based material besides the ease of clean up,and odor, is that its light weight once the water evaporates the resin is not that heavy.
my preferred material besides the deft spray is Varathane Diamond finish, its very hard when cured and sands to a nice smooth surface after just a few coats, also a inexpensive alternative to hobby filler is Minwax wood filler I add just a tiny bit of water to it so its spreadable and it is great to work with.
some examples of the results you can get with the WB materials the Spitfire and P-47 are Top Flite 60 size kits
03-26-2015, 03:52 PM
#14
Member
Thread Starter
My Feedback: (1)
Join Date: Jul 2011
Location: Corbin, KY
Posts: 70
Likes: 0
Received 0 Likes
on
0 Posts
Question: I have the robart 619 retracts with the 650 struts. How do I put the struts on the retracts? This is probably stupid but I am dealing with retracts for the first time and the instructions Robart gives are very lacking.
