Skybolt hangar and clubhouse
 06-09-2012, 05:54 PM
#1551
Banned
gasayers,
Now you can try a 13 x 6 three blades and make your model look more realistic.
You may even find that you can reduce the idling by another 100 rpm.
More mass and momentum with little extra drag (torque).
Zor
Now you can try a 13 x 6 three blades and make your model look more realistic.
You may even find that you can reduce the idling by another 100 rpm.
More mass and momentum with little extra drag (torque).
Zor
 06-09-2012, 06:36 PM
#1552
Banned
Reasoning and making deductions is useful but there is nothing like prooving it.
I deducted that two of the cells were shorted thus reading 2.8 volts.
Ifeven only one had been opened I would have read nothing (open circuit).
I unwrapped the package and measured each cell.
Two were showing 1.38 volts which adds to 2.76 . Close enough to 2.8 V.
Two were reading absolutelu 0 (zero); dead short.
The replacemnt packs I bought are 2,000 mAh instead of 1,100 and are dimentionally smaller and lighter.
That is good and they are NiMh most recent technnology.
Zor
.
 06-09-2012, 09:03 PM
#1554
Senior Member
Join Date: Oct 2004
Location: Auckland,
SK, NEW ZEALAND
Posts: 192
Likes: 0
Received 0 Likes
on
0 Posts
Thanks, three blader sounds cool but speaking of scale zor any chance of some pictures and detail of you rigging? looks impressive and is the kind of detail I like. Particularly as my plane travels in one piece.
06-10-2012, 01:36 AM
#1555

Join Date: Apr 2009
Location: Alstead,
NH
Posts: 194
Likes: 0
Received 0 Likes
on
0 Posts
ORIGINAL: Cougar429
Zor, NiMH are good cells. Other than two planes with A123 packs they are all I run. Only negative I found is their self-discharge rate is much higher than NiCads.
Zor, NiMH are good cells. Other than two planes with A123 packs they are all I run. Only negative I found is their self-discharge rate is much higher than NiCads.
Try Sanyo Eneloop NiMH Cells. You can get them from Batteries America among other places. They have almost no self discharge (90% left after a year or two I think it is). The also supposedly have a longer cycle life. They do not have as high a C rating so are not good with high torque power hungry servos but I have found that they work with standard digital servos like the Futaba S 3152. I am slowly switching all my planes over.
06-10-2012, 03:57 AM
#1556
u2builder, I tried one of their Eneloop 5 cell packs I picked up at the Toledo Show. Looked great, but died on the 4th charge. I was able to save and reuse the plug and cable. Still, very disappointing and likely very rare.
gassayers, a 13/6 3-blade is a perfect combi for that size motor and will allow it to peak out. Your vertical may suffer just a touch, but the torque effects should seem much less than that larger diameter 14/6 you have now.
gassayers, a 13/6 3-blade is a perfect combi for that size motor and will allow it to peak out. Your vertical may suffer just a touch, but the torque effects should seem much less than that larger diameter 14/6 you have now.
06-10-2012, 11:22 AM
#1557
Senior Member
Join Date: Oct 2004
Location: Auckland,
SK, NEW ZEALAND
Posts: 192
Likes: 0
Received 0 Likes
on
0 Posts
Thanks cougar, sounds like it's worth trying. It won't hover anyway with the 91.
Regarding power supplies I've converted about 6 planes (including the bolt) to 2cell 900mah li + ubec, The results are far superior to any battery pack I've ever had. Lighter and last longer per charge and more predictable. imho i.e 900mah 2 cell lip = app 1700 mah eneloop 4 cell
Regarding power supplies I've converted about 6 planes (including the bolt) to 2cell 900mah li + ubec, The results are far superior to any battery pack I've ever had. Lighter and last longer per charge and more predictable. imho i.e 900mah 2 cell lip = app 1700 mah eneloop 4 cell
06-11-2012, 04:20 AM
#1558
Join Date: Jun 2011
Location: Birmingham, UNITED KINGDOM
Posts: 128
Likes: 0
Received 0 Likes
on
0 Posts
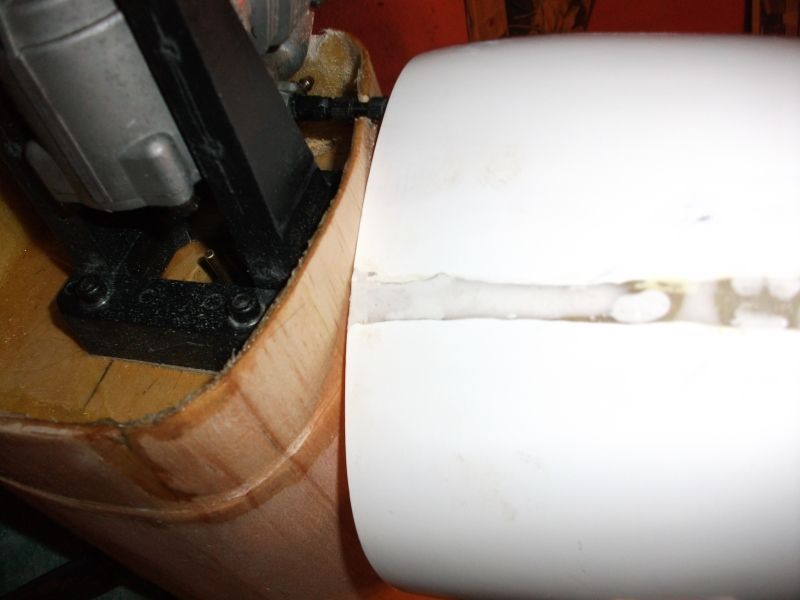
quick question - did anyone else find the cowling a very tight fit? I rebated the sides, top and bottom of the fuselage by about 1/16" so that the cowl would fit flush but it still wouldn't go back far enough to get the 6" prop drive to firewall measurement. I couldn't take any more wood off as there wasn't enough left to keep the lip intact, besides which that would have resulted in a step down to the cowl. I tried both the aftermarket fibreglass unit and the supplied plastic moldings but they were both the same size, as though my firewall was oversize to start with.
I ended up slotting the bottom of the cowl so that it could expand by about 3/8" and patching it with glass and resin so it now fits flush with the fuselage top and sides.
QQ#2 - did anyone need additional engine cooling measures? Those inlets either side of the prop look a tad small to me.
I ended up slotting the bottom of the cowl so that it could expand by about 3/8" and patching it with glass and resin so it now fits flush with the fuselage top and sides.
QQ#2 - did anyone need additional engine cooling measures? Those inlets either side of the prop look a tad small to me.
06-11-2012, 07:37 AM
#1559
Banned
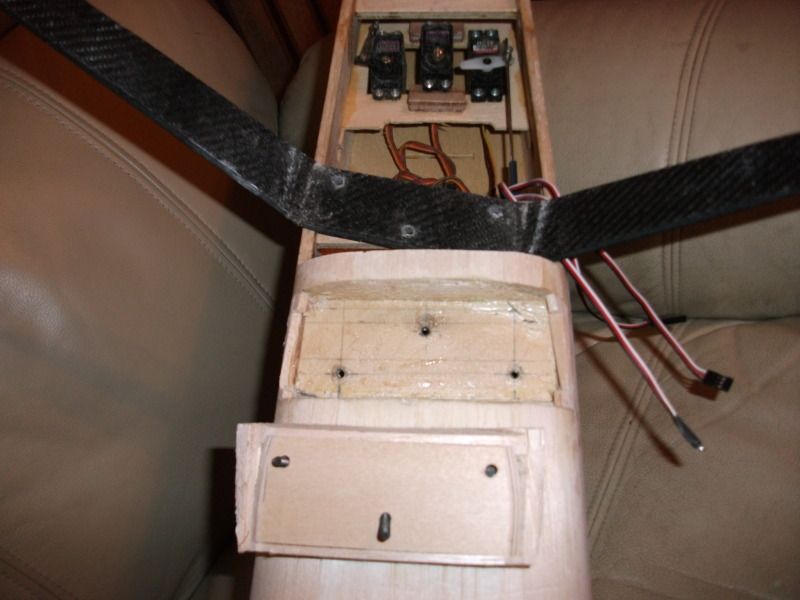
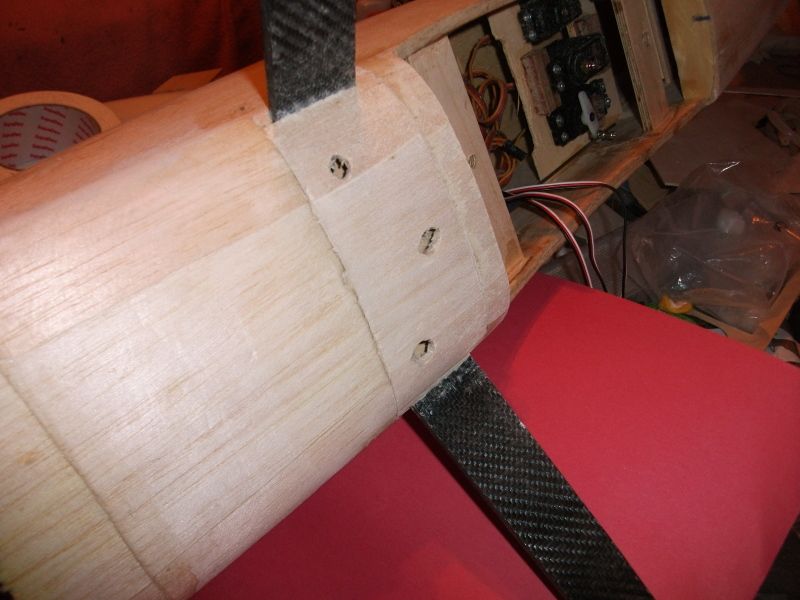
New final hatch installation.
The picture illustrate the new hatch setup.
Put the airplane upside down.
Remove the tiny screw at the rear bottom center of the engine cowling.
Loosen the screw at the center of the two springs that reinforce the landing gear ( a couple of turns).
Turn the small aluminim plate 90 degrees.
Slide the hatch forward 1/8" for its rear to clear the landing gear.
Lift the rear of the hatch and slide it out backward.
Voila ___nothing else to touch and the battery and fuel tank can come out as needed.
Zor
Edited to correct "typos".
06-11-2012, 07:51 AM
#1560
Banned
ORIGINAL: Cougar429
Zor, NiMH are good cells. Other than two planes with A123 packs they are all I run. Only negative I found is their self-discharge rate is much higher than NiCads.
Zor, NiMH are good cells. Other than two planes with A123 packs they are all I run. Only negative I found is their self-discharge rate is much higher than NiCads.
The local LHS does not carry NiCd anymore in these kind of battery packs.
I had no choice than pick up the NiMh.
I bought both the 4.8 V and the 6.0 V .
It will allow me to try 6 volts in the system.
I will have to be carefull about the higher self discharge of the NiMh.
I preferred NiCd because of the higher current capability but these NiMh are supposed to have high current capability.
All remains to be seen and proven.
Zor
06-11-2012, 08:30 AM
#1561
Banned
ORIGINAL: robc57
quick question - did anyone else find the cowling a very tight fit? I rebated the sides, top and bottom of the fuselage by about 1/16" so that the cowl would fit flush but it still wouldn't go back far enough to get the 6" prop drive to firewall measurement. I couldn't take any more wood off as there wasn't enough left to keep the lip intact, besides which that would have resulted in a step down to the cowl. I tried both the aftermarket fibreglass unit and the supplied plastic moldings but they were both the same size, as though my firewall was oversize to start with.
I ended up slotting the bottom of the cowl so that it could expand by about 3/8" and patching it with glass and resin so it now fits flush with the fuselage top and sides.
QQ#2 - did anyone need additional engine cooling measures? Those inlets either side of the prop look a tad small to me.
RE: quick question ___
You are not alone with this situation. I have seen the same when I built mine.
This kit had quite a few problems that have been discussed before in this thread.
One fellow wrote at one time (quite a while ago) that he had no problems at all and that everything fitted perfectly. My conclusion is that he simply wanted to indicate that all of us were stupid and did not have the experience and dexterity of building a kit. He never proved his statements. It was not worth replying to him.
After getting the fuselage panels tight and well glued against the firewall I could not push in the cowling far enough to get the 6.0625" distance (firewall to engine flange {prop rear face}) so I started sanding the outside faces of the fuselage. In that process and pushing hard on the cowling it started to split.
My solution was as follows ___
I used one inch wide fabric ribbon on the outside of the cowling and doped it so that one edge of the ribbon is flush with the rear of the cowling. I then put in a second layer of ribbon also doped on. That stopped any cracking of the cowling rearend. I now could push hard and do more sanding of the fuselage.
The fuselage became too thin for my liking so I used more ribbon on the inside of the fuselage and epoxied it to rebuild the thicknes of the planking.
I am happy and had no more trouble with that situation.
Others may have or have had a different solution.
qq#2
It appears that your engine is all inside the cowling.
I believe that these two openings are sufficient to keep the engine at normal operating temperature if you have at least double that area for the air to come out likely at the bottom rear of the cowling.
I do not have this as a problem because my Saito 125 cylinder is exposed to direct airstream as well as the muffler.
NOTE:
Someone just requested a picture of the Skybolt with a three bladed prop.
I will postsome pictures in my next posting for him.
You will see my engine installation in that picture.
Zor
06-11-2012, 08:44 AM
#1562
Banned
ORIGINAL: Cougar429
u2builder, I tried one of their Eneloop 5 cell packs I picked up at the Toledo Show. Looked great, but died on the 4th charge. I was able to save and reuse the plug and cable. Still, very disappointing and likely very rare.
gassayers, a 13/6 3-blade is a perfect combi for that size motor and will allow it to peak out. Your vertical may suffer just a touch, but the torque effects should seem much less than that larger diameter 14/6 you have now.
A 14" dia prop is accelerating backward a cylinder of air having a surface of 153.94 square inches.
A 13" dia prop is accelerating backward a cylinder of air having a surface of 132.73 square inches.
Quite a difference of air mass even asuming the same prop pitch.
Zor
06-11-2012, 09:03 AM
#1563
Banned
ORIGINAL: gasayers
Thanks, three blader sounds cool but speaking of scale zor any chance of some pictures and detail of you rigging? looks impressive and is the kind of detail I like. Particularly as my plane travels in one piece.
Thanks, three blader sounds cool but speaking of scale zor any chance of some pictures and detail of you rigging? looks impressive and is the kind of detail I like. Particularly as my plane travels in one piece.
Her a couple of ;pics of the three blade appearance.
This prop is a 15 x 7 on a Saito 125 but it should give you a good idea of the appearacnce.
Zor
.
06-11-2012, 09:13 AM
#1564
Senior Member
Join Date: Jul 2002
Location: Brunswick, ME
Posts: 1,192
Likes: 0
Received 0 Likes
on
0 Posts
I'm flying a larger GP WACO YMF-5D on a Saito 125 and it's more than enough power. I can't imagine trying to fly a Skybolt with that big an engine on the front. My Skybolt has an OS 90 and flies great.
I did have trouble getting the Fiberglass specialties cowling to seat all the way over the firewall, but it only took a small amount of material removal, but a lot of slow sanding all around to get it to fit.
The cylinder head on mine exits the side and I opened up a section on the bottom of teh cowl to help with cooling. A rule of thumb I've heard is to have three times the exit air area as you do the intake air to help move the air through. Otherwise it will get trapped inside the cowl and won't flow or carry the heat out with it.
Glad your not letting that guy get to you Zor. Darn perfect builders with no problems.
Jaybird
06-11-2012, 10:01 AM
#1565
Join Date: Apr 2009
Location: Alstead,
NH
Posts: 194
Likes: 0
Received 0 Likes
on
0 Posts
I also had trouble getting the Fiberglass Specialties Cowl to fit. Much careful sanding. I've got that big Saito 125 on mine but haven't flown it yet. I figure I can use as much throttle as I want to. It balanced well with the big Saito. Saito's are light and it takes a big one to put some decent weight up front. I put the Skybolt last on my list of maiden's because it is so nice I figured it would be last. And with the crappy weather and things coming up I am not moving very fast
06-11-2012, 10:06 AM
#1566
Senior Member
Join Date: Jul 2002
Location: Brunswick, ME
Posts: 1,192
Likes: 0
Received 0 Likes
on
0 Posts
They are light. On the WACO I had to move my 2100 mAh NiHm 4.8 volt pack from inside the radio compartment to the firewall, use the Harris Higley heavy brass jam nut and prop hub AND add a strip of lead weights off of the end of the motor mount on a bracket. A lot of work, but I had to get it balanced. My Skybolt has a mass of lead on a bracket off the motor mount as well, but I forget how much.
The throttle stick is a good thing!
I've flown with the Guildhall Fun Flyers of Vermont. Are they anywhere near you?
Jaybird
The throttle stick is a good thing!
I've flown with the Guildhall Fun Flyers of Vermont. Are they anywhere near you?
Jaybird
06-11-2012, 10:56 AM
#1567
Senior Member
Join Date: Oct 2004
Location: Auckland,
SK, NEW ZEALAND
Posts: 192
Likes: 0
Received 0 Likes
on
0 Posts
thanks for the picks zor. Love the skis, flying in the snow is real dedicated, however to be quite honest it was pictures of your wire rigging and how you've attached it I was hopping for if you don't mind.
Cheers
Glen
Cheers
Glen
06-11-2012, 11:04 AM
#1568
Senior Member
Join Date: Jul 2002
Location: Brunswick, ME
Posts: 1,192
Likes: 0
Received 0 Likes
on
0 Posts
You can always click the "Gallery" link near the top of the page and then scroll through all the photos that have been posted if you have the time. Zor's plane is a pretty distinct white with broad red stripes on the top and blue pinstripes on the bottom...and the maple leaf of course.
You can also "search" the thread by putting "flying wires" in the search box.
Jaybird
You can also "search" the thread by putting "flying wires" in the search box.
Jaybird
06-11-2012, 11:16 AM
#1569

My Feedback: (3)
I've got the Fiberglass Specialties cowl on mine and it did take quite a bit of work to make it fit. But there was plenty wood that could be carved off. Once I finally got it sliding on I would check the fit carefully and then carve where needed with a razor plane. The chin block was where I removed the most material but it was plenty thick. By the time I got finished the front of the chin block was fairly thin.
It can be made to fit, it just takes lots of carving and fitting.
Dave
It can be made to fit, it just takes lots of carving and fitting.
Dave
06-11-2012, 12:32 PM
#1570
Join Date: Jun 2011
Location: Birmingham, UNITED KINGDOM
Posts: 128
Likes: 0
Received 0 Likes
on
0 Posts
I'm getting dangerously close to starting the covering.
Here's how the cowl ended up after splitting the underside, opening it out and glassing over the gap
I didn't like the way the dash panel was done so I faired it in with 1/16" sheet:
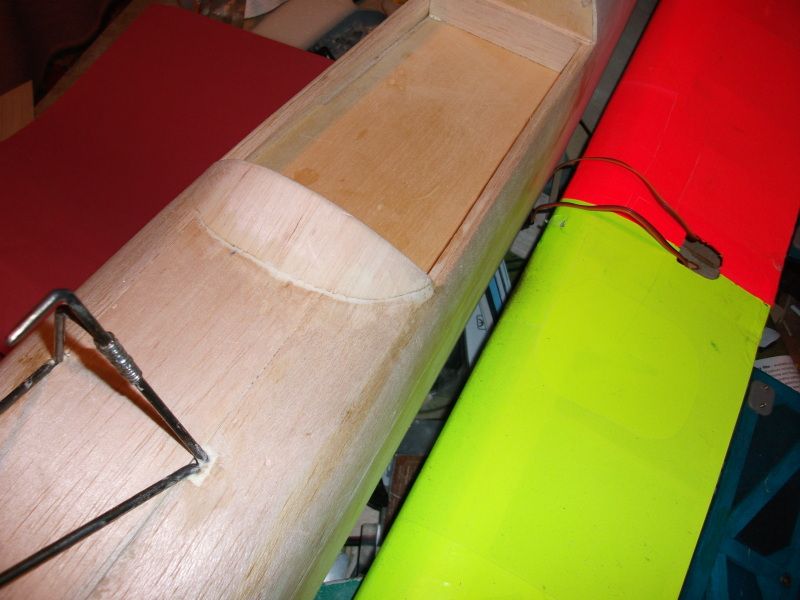
and my u/c mount cover:
Here's how the cowl ended up after splitting the underside, opening it out and glassing over the gap
I didn't like the way the dash panel was done so I faired it in with 1/16" sheet:
and my u/c mount cover:
06-11-2012, 02:53 PM
#1571
Banned
ORIGINAL: gasayers
thanks for the picks zor. Love the skis, flying in the snow is real dedicated, however to be quite honest it was pictures of your wire rigging and how you've attached it I was hopping for if you don't mind.
Cheers
Glen
thanks for the picks zor. Love the skis, flying in the snow is real dedicated, however to be quite honest it was pictures of your wire rigging and how you've attached it I was hopping for if you don't mind.
Cheers
Glen
I do not mind at all.
It is always nice to help someone by showing what we do without telling them what to do.
I have pictures but have to find them in my accumulation of nearly 5,000 pics.
It might be faster to take new pics ___Hee! Hee! LOL.

On my way to take new pictures.
Watch for my next posting.
Zor
06-11-2012, 03:22 PM
#1572
Banned
gasayers,
Here are five pictures showing the flying wires attachments.
I do not know in which order the pics will load up so I will come back after posting and add explanations for the pics.
Explanations will be here.
There is 10 wires. Each side has 3 flying wires from bottom of fuselage to top end of the interfstrut and 2 landing wires.from the cabane rear to the front of the bottom of the interstrut.
This is the same as on the full size Skybolts.
Pic 1 (top left of the stamps below) show the flying wires at the top of the interstrut under the top wing.
Note that the airplane is upside down.
Pic 2 is a closer view of pic 1 .
Pic 3 shows the flying wires attachment to the fuselage bottom. Each wire is adjustable with its own clevis.
The alumnum piece to which the clevis are connected is a piece of dural alumnum that goes all the way across the fuselage bottom and appears the same on the other side. It is completely independent of the landing gear mounting.
Do not get confused with the wires shadows due to the flash that was necessary to take these pics.
Pic 4 shows the landing wires at the top rear of the cabane wires. A single clevis adjust both wires.
Pic 5 shows the landing wires at the bottom of the interstrut front on top of the low wing.
in this pic there is an illusion of a wire at the rear end of the interstrut.
That is a flash reflection due to the gap of the aileron leading edge. There is only two wires attached to the front of the interstrut.
Here and there you may have to stand on your head to keep things right side up.
The little ferrules (alclad alloy) are hooked to the piano wires at top and bottom of the interstruts.
Please anyone ___I do not need corrections on my selection of words. The importance here is to respond to the query and not to play semantics.
Zor
 06-11-2012, 06:00 PM
#1574
Senior Member
Join Date: Oct 2004
Location: Auckland,
SK, NEW ZEALAND
Posts: 192
Likes: 0
Received 0 Likes
on
0 Posts
Thanks, Glad I asked for the pics. I'd guessed how the bottom was done but your system for the top of the struts is simplicity itself and far better than the series of holes and braces and clevises I was imagining.
Cheers
Jaybird thanks for the heads up, I had no idea the gallery feature was available. cool, very slow and didn't quite come up with the pics I was after. Couldn't see the top.
Cheers
Jaybird thanks for the heads up, I had no idea the gallery feature was available. cool, very slow and didn't quite come up with the pics I was after. Couldn't see the top.
06-11-2012, 11:53 PM
#1575
Join Date: Jun 2011
Location: Birmingham, UNITED KINGDOM
Posts: 128
Likes: 0
Received 0 Likes
on
0 Posts
The U/C came from here as did the cowl. The carbon composite (ie a mix of carbon and glass cloth) U/C is not an exact match being a little taller, so Iraised the mounting plate in the fuselage by 1/2". After sheeting the underside and cutting out the U/C section, Iattached a 1/16" ply plate under the heads of the leg bolts and glued the removed section of sheet to that. I still need to line the holes in the under-undercart panel that give access to the boltheads.