


Telemaster 40 covered - laser cut monokote logos!
 04-26-2009 | 08:05 PM
#1
Thread Starter
Junior Member
My Feedback: (14)
Joined: Jan 2009
Posts: 6
Likes: 0
Received 0 Likes
on
0 Posts
From: , TN
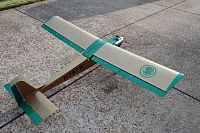
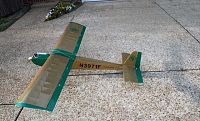
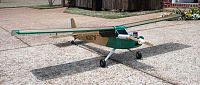
My father and I just finished building and covering a tele 40 - fun build and ready to fly it (been to windy). Covered in his high school colors and I laser cut his mascot out of monokote and ironed it on the wing and tail. Wasn't sure how it would cut, but after a bit of a learning curve the cuts turn out perfect every time. Way, way more detail than by hand and sticks better than any sticker or decal. Just lay a piece of old cotton bed sheet on the logo and iron it. Works great for multi layered color logos as well.

 04-26-2009 | 09:56 PM
#2
Senior Member
More details please. What did you use for a laser?? How did you keep the detail in alignment while transfering it to the covering?
Don
Don
04-26-2009 | 11:07 PM
#3
Junior Member
Joined: Apr 2009
Posts: 7
Likes: 0
Received 0 Likes
on
0 Posts
From: Oakland, TN
ORIGINAL: Campgems
More details please. What did you use for a laser?? How did you keep the detail in alignment while transfering it to the covering?
Don
More details please. What did you use for a laser?? How did you keep the detail in alignment while transfering it to the covering?
Don
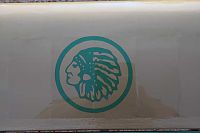
Don, I use a Epilog Helix 45 watt laser. I do marble laser engraving and also robotic chassis cutting for the DIY robotic community; [link=http://www.cascabots.com]cascabots[/link] is the site name. As far as alignment, it was pretty easy to just eyeball it - placed the ring where I wanted it and ironed it on, and then placed the logo centered inside of it; monokote "clings" so it's easy to line everything up.
Doug
04-27-2009 | 12:05 AM
#4

Senior Member
Joined: Mar 2005
Posts: 1,469
Likes: 0
Received 0 Likes
on
0 Posts
From: Lompoc ,
CA
you can get a a serious business out of this, most vinyl cutter guys won't try cutting monokote after their first attempt, so if you got a way to cut it right on, so is this a hand held laser traced over an outline or is it attached to a plotter. you got some pics of the laser unit
04-27-2009 | 12:19 AM
#5
Junior Member
Joined: Apr 2009
Posts: 7
Likes: 0
Received 0 Likes
on
0 Posts
From: Oakland, TN
It's a ZXY 3 axis unit, with a 4th axis rotary. Here it is cutting out acrylic robotic chassis components -
[link=http://www.youtube.com/watch?v=G-IjF28nO2s]My Helix Video[/link]

I'm kinda excited about it because your right - cutting with a plotter is futile, and cutting monokote by hand is drudgery and it's absolutely impossible to get this detail with either method.
[link=http://www.youtube.com/watch?v=G-IjF28nO2s]My Helix Video[/link]
I'm kinda excited about it because your right - cutting with a plotter is futile, and cutting monokote by hand is drudgery and it's absolutely impossible to get this detail with either method.
04-27-2009 | 12:26 AM
#6
Senior Member
Joined: Mar 2005
Posts: 1,469
Likes: 0
Received 0 Likes
on
0 Posts
From: Lompoc ,
CA
so this is definitely pro lvl gear, so much for joe blow doing this. So someone were to e-mail a corel file, .bmp,jpeg generic cad file would ya be able to cut it out?

 04-27-2009 | 12:34 AM
#8
Junior Member
Joined: Apr 2009
Posts: 7
Likes: 0
Received 0 Likes
on
0 Posts
From: Oakland, TN
ORIGINAL: redfox435cat
so this is definitely pro lvl gear, so much for joe blow doing this. So someone were to e-mail a corel file, .bmp,jpeg generic cad file would ya be able to cut it out?
so this is definitely pro lvl gear, so much for joe blow doing this. So someone were to e-mail a corel file, .bmp,jpeg generic cad file would ya be able to cut it out?
The limitation is that your art needs to be silhouette; details can be added with permanent marker (think nose art with facial features) if you need it. The logo on the Telemaster is a silhouette. The laser can mark extreme details in hard materials and excels at cutting softer ones.
04-27-2009 | 12:38 AM
#9
Junior Member
Joined: Apr 2009
Posts: 7
Likes: 0
Received 0 Likes
on
0 Posts
From: Oakland, TN
ORIGINAL: Telemaster Sales UK
What's the engine you're using Casca?
What's the engine you're using Casca?
It's a [link=http://www3.towerhobbies.com/cgi-bin/wti0001p?&I=LXJA86&P=ML]Tower Hobbies .46[/link]
11-13-2016 | 07:44 PM
#10
Junior Member
Joined: Jul 2007
Posts: 8
Likes: 0
Received 0 Likes
on
0 Posts
From: crofton,
BC, CANADA
hi doug, i know that this is an old thread, but im hopping you are still on here
can you please tell me the process that you use to prep for the cutting. how did you get the covering to lay flat, etc.
thank you
can you please tell me the process that you use to prep for the cutting. how did you get the covering to lay flat, etc.
thank you
11-18-2016 | 11:48 AM
#11
Junior Member
Joined: Apr 2009
Posts: 7
Likes: 0
Received 0 Likes
on
0 Posts
From: Oakland, TN
Jeffrey, the Monokote needs to be fresh and untouched - it also has to be Monokote, the generics didn't work well. Shiny side up, don't touch it more than you have to. Gloves help. Also, smooth it out with a clean soft cloth or the shoe of the iron you use for attaching the Monokote works well for this. The laser settings weren't that touchy as I remember, but they did require some testing.


