


Official F27 Stryker Part 8: Beginners to Custom Darkness
 05-21-2010, 04:09 AM
#1351
Senior Member
Join Date: Sep 2008
Location: Somewhere,
NY
Posts: 1,200
Likes: 0
Received 0 Likes
on
0 Posts
I remember that day....................
I too was devistated !!!
Good thing I had one of those motors as well.
I think it burned with about 170 amps.
I too was devistated !!!
Good thing I had one of those motors as well.
I think it burned with about 170 amps.
 05-21-2010, 07:45 AM
#1352
Senior Member
Join Date: Apr 2010
Location: Askim, NORWAY
Posts: 109
Likes: 0
Received 0 Likes
on
0 Posts
Hi!
The motor end plate is actually 2,5mm thick - measured by caliper.
Shaft side is part of the can as yours. Here are some photos:
The motor end plate is actually 2,5mm thick - measured by caliper.
Shaft side is part of the can as yours. Here are some photos:
05-21-2010, 05:58 PM
#1353
Senior Member
Join Date: Apr 2010
Location: Askim, NORWAY
Posts: 109
Likes: 0
Received 0 Likes
on
0 Posts
Short build report:
Setup:
Motor: NEU 1115/1Y
Esc: Turnigy Plush80 (waiting for a 200A)
Servos: Turnigy Max 380 MGs
LiPos: Two Turnigy 3S2200mAh in P (when the 200A esc arrives this will be exchanged by single Turnigy 4S5000 40C)
Prop: APC 6*5.5e
Static tests: APC 6*4e: 79,9Amp, 905W at 12.1V
APC 6*5.5e: 87,7Amp, 956W at 11.9V
RPM: Would really want to know! My rpm meter acted as expected until I reached half throttle - then is suddenly droped from 18K to 7K reading!!!! This is what I used: http://hobbyking.com/hobbycity/store...dProduct=10335
Any thoughts anyone?
Fuse mods: Stock FG tubes (LE) replaced by 5mm CF tubes. 3mm CF rod embedded tip-to-tip appx 1 inch from the tail. 6mm CF tube from nose to tail. 10cm long 6mm tubes from the nose to each wing-root LE. Appx 20cm 3mm rods (sharpened) run through the 6mm wing-root tubes. Stock elevons glassed top and bottom. Glassed 1inch of TE top and bottom. Batt bay carved like an old canoe - glassed on the outside. Made a "hood scoop" by cutting the tip of a disposable spoon and epoxied it to the cover. Enlarged the hole beneeth it.
Time to cross my fingers - maiden tomorrow. "Hope I don't run out of airspeed, altitude and ideas at the same time.......
05-22-2010, 12:38 AM
#1354
Senior Member
Join Date: Sep 2008
Location: Somewhere,
NY
Posts: 1,200
Likes: 0
Received 0 Likes
on
0 Posts
ORIGINAL: Arcteryxxx
Hi!
The motor end plate is actually 2,5mm thick - measured by caliper.
Shaft side is part of the can as yours. Here are some photos:
Hi!
The motor end plate is actually 2,5mm thick - measured by caliper.
Shaft side is part of the can as yours. Here are some photos:
Do you have any pictures of that Stryker you can post here so we can all see what you have done ?
I think you need a quality RPM meter. Eagletree, Phoenix ICE, and even Medusa Oracle (if you have a friend with one) will be dead nutz accurate
05-22-2010, 12:41 AM
#1356
Senior Member
Join Date: Sep 2008
Location: Somewhere,
NY
Posts: 1,200
Likes: 0
Received 0 Likes
on
0 Posts
ORIGINAL: gabe_tuft
Mopar,
I started my build and when I attached on of the balsa elevons, the bottom doesn't quite line up with the trailing edge. Should I just file it down flush or should I pull the bass wood off and be more careful where I place the hinge slits?
Mopar,
I started my build and when I attached on of the balsa elevons, the bottom doesn't quite line up with the trailing edge. Should I just file it down flush or should I pull the bass wood off and be more careful where I place the hinge slits?
How is it going ?
Filing done ?
05-22-2010, 08:46 AM
#1359
Senior Member
Thread Starter
Join Date: Jul 2003
Location: Charlotte,
NC
Posts: 2,693
Likes: 0
Received 0 Likes
on
0 Posts
I guess the Thunder Power employee was really busy with other customers at JOE Nall and gave me the wrong max Watts.
He has said 400W, but this picture that someone took at JOE NAll 2010 shows 500W.
Question is this: 500W per side, or 500 W total??? We'll see.
(Remember this is a dual port charger, 20A max, 8S max).
Gryphon
He has said 400W, but this picture that someone took at JOE NAll 2010 shows 500W.
Question is this: 500W per side, or 500 W total??? We'll see.
(Remember this is a dual port charger, 20A max, 8S max).
Gryphon
05-22-2010, 12:56 PM
#1360
Senior Member
Join Date: Apr 2010
Location: Askim, NORWAY
Posts: 109
Likes: 0
Received 0 Likes
on
0 Posts
I drilled a hole on each side as shown (about 10 cm deep) and glued some 6mm CF tubes in there. Afterwards I slided 3mm CF rods through the hollow tubes, extending some 12 cm further along the LE wing root.
Not sure if this was necessary in any way but it seemed like a good idea at the time
Not sure if this was necessary in any way but it seemed like a good idea at the time
05-22-2010, 04:47 PM
#1362
Senior Member
Join Date: Apr 2010
Location: Askim, NORWAY
Posts: 109
Likes: 0
Received 0 Likes
on
0 Posts
Had the maiden flight today. The air was turbulent and the servo throws were much too high. A friend of mine helped me launch, and it took of like a rocket! Luckily I got home safe! Was gentle on the throttle and had a really nice maiden. But: This one sure makes som noise!!!!
Setup for maiden:
NEU1115/1Y
Plush80
Two Turnigy 3S2200 in parallell
Master AirScrew 6.5*4
Preflight static testing showed 106Amps ans 1188Watts on the wattmeter.
Launch:
www.youtube.com/watch
Landing:
http://www.youtube.com/watch?v=7TzN390PGG4
Setup for maiden:
NEU1115/1Y
Plush80
Two Turnigy 3S2200 in parallell
Master AirScrew 6.5*4
Preflight static testing showed 106Amps ans 1188Watts on the wattmeter.
Launch:
www.youtube.com/watch
Landing:
http://www.youtube.com/watch?v=7TzN390PGG4
05-22-2010, 04:54 PM
#1363
Senior Member
Thread Starter
Join Date: Jul 2003
Location: Charlotte,
NC
Posts: 2,693
Likes: 0
Received 0 Likes
on
0 Posts
Arcteryxxx,
Congratulations on your maiden. It will get MUCH louder on 4S.
A couple more flights and some adjustments and you’ll love it even more.
No doubt you had insane acceleration immediately following the release….it’ll be mostly downhill from here with other props and higher voltage…so keep giving it your best and perfecting your throw till you get to 4S, heavier build with wooden elevons and more reinforcements, and when it launches fine on your max speed prop, then and only then try to learn how much softer you can launch it (if that is even an option then).
__________________________________________________ ________
1) Mark the position of “EACH Elevon” where the plane flies level…ALSO record the amount of travel you have on each Elevon, up and down using elevator, Aileron, and full diagonals on trans stick….(Check for bind at all locations at same time too).
2) Now instead of reducing your low rate throw on trans, unscrew/raise the location of the rod to the very top of your awesome control horns.
(If the rod is too short, consider making new rods….the whole rod should not be threaded because that makes it weaker, threads on one side and soldered or “Z” bend on other side)
3) Increase high rate and fine tune low rate as needed through your trans.
The above will help give you more resolution…..not that it makes a huge difference with your stock elevons etc….but at least you will do it best way possible.
Question: Are you going to be changing your sub trim settings on the trans?
__________________________________________________ _______________
Anyone else have helpful tips? Now is the time.
Gryphon
05-22-2010, 05:13 PM
#1364
Senior Member
Join Date: Apr 2010
Location: Askim, NORWAY
Posts: 109
Likes: 0
Received 0 Likes
on
0 Posts
Thanks Gryphon! And Mopar too - for all the useful inputs along the way.
Haven't really considered changing subtrim settings yet. Hoping to avoid it by adjusting horns and rods.
The turbulence today made trimming very difficult. Will do that exercise in calmer conditions...
Going to bed with a smile on my face tonight.....
Haven't really considered changing subtrim settings yet. Hoping to avoid it by adjusting horns and rods.
The turbulence today made trimming very difficult. Will do that exercise in calmer conditions...
Going to bed with a smile on my face tonight.....
05-22-2010, 07:57 PM
#1365
Senior Member
Join Date: Sep 2008
Location: Somewhere,
NY
Posts: 1,200
Likes: 0
Received 0 Likes
on
0 Posts
Gryphon is 100% correct on getting the rod higher on the elevon controll horn.
I have seen HS65MG's and HS85MG's strip in the air from having small resolution and only using relatively small throws on the servo due to lowering their travel through the transmitter.
When you raise the rod on the controll horn, you can increase the travel, bringing in more servo throw, which equates to a stronger mechanical advantage by utilizing more gear and more servo travel.
After getting MAX resolution, I am able to use HS65MG's where my HS85MG failed.
I can also now use HS85MG's where I was needing larger HS5245MG's.
Dont get me wrong, at speeds over 180 mph, I dont trust anything but a full size HS5465MG.
For the majority of all Stryker Dudes, HS85MG's set with MAX resolution will hold up to speeds of 160-165 mph. I run those speeds flight after flight with HS85MG's all day long now.
05-22-2010, 08:25 PM
#1366
Senior Member
Thread Starter
Join Date: Jul 2003
Location: Charlotte,
NC
Posts: 2,693
Likes: 0
Received 0 Likes
on
0 Posts
Arcteryxxx,
That was a trick question....Once subtrim is set in case you set it before even connecting rods or elevons, it should not need to be touched.
I have to run, but someone needs to do a write up.
Gryphon
That was a trick question....Once subtrim is set in case you set it before even connecting rods or elevons, it should not need to be touched.
I have to run, but someone needs to do a write up.
Gryphon
05-23-2010, 12:53 AM
#1367
Senior Member
Join Date: Apr 2010
Location: Askim, NORWAY
Posts: 109
Likes: 0
Received 0 Likes
on
0 Posts
ORIGINAL: Gryphon
Arcteryxxx,
That was a trick question....Once subtrim is set in case you set it before even connecting rods or elevons, it should not need to be touched.
I have to run, but someone needs to do a write up.
Gryphon
Arcteryxxx,
That was a trick question....Once subtrim is set in case you set it before even connecting rods or elevons, it should not need to be touched.
I have to run, but someone needs to do a write up.
Gryphon
05-23-2010, 01:55 AM
#1368
Senior Member
Thread Starter
Join Date: Jul 2003
Location: Charlotte,
NC
Posts: 2,693
Likes: 0
Received 0 Likes
on
0 Posts
Arcteryxxx,
JUst got back home....had a good Sat night.
Subtrim is different than trim.
Subtrim is set after the servo arm is placed on correct spline and servo gets installed. It has nothing to do with rod, or elevons. Subtrim of under 30-40 steps helps set each individual Servo arm where you want it to be....such as exactly vertical etc.....
Once subtrim is set, then forget it.
Not everyone sets subtrim, many are happy enough that they place the servo arm on closest spline and call it good.
Some who don’t want to use as much subtrim may opt for buying several sets of servo arms to see which ones come closer in order to use much less subtrim (if they are being extra precise/aaaaannnnnnaaaaaa____L).
____________________________________
Now, if elevons and other things need to be adjusted they get done through mechanical adjustments of rod length and its place on control horn, and its other end on servo arm, and travel adjust on transmitter and "regular" trim levers on face of trans.
______________________________________
After the plane is trimmed and it flies great, let us know and we can talk about how to take the trim out of trim levers through mechanical adjustment. This way you will regularly be flying with about zero trim on face of trans....this allows you a bunch of adjustment if you ever need it....also this step is much more useful to people with regular non-computer transmitters.
Gryphon
05-23-2010, 10:20 AM
#1369
Junior Member

Join Date: Sep 2009
Location: West Chester, PA
Posts: 9
Likes: 0
Received 0 Likes
on
0 Posts
First, I'd like to thank all of you (Mopar., Gryph., etal) for your timeless efforts in these phenominal threads!
Quick frequency question: I'm building two Strykers; one mostly stock and the other Darkside (don't worry about
your records; only lookin' for a little over a "buck".) I've read about interferrence problems with my 72 mHZ (Futaba);
system,will keep ESC as far away from receiver as possible, twist wires. Am capable of PCM and PPM mode.
Which would be most likely to reject the RF interference?
Any other suggestions to minimumize risk would be greately appreciated.
TIA,
Side
05-23-2010, 02:42 PM
#1370
Senior Member
Join Date: Sep 2008
Location: Somewhere,
NY
Posts: 1,200
Likes: 0
Received 0 Likes
on
0 Posts
ORIGINAL: Gryphon
Arcteryxxx,
That was a trick question....Once subtrim is set in case you set it before even connecting rods or elevons, it should not need to be touched.
I have to run, but someone needs to do a write up.
Gryphon
Arcteryxxx,
That was a trick question....Once subtrim is set in case you set it before even connecting rods or elevons, it should not need to be touched.
I have to run, but someone needs to do a write up.
Gryphon
Using regular trim adjustments will alter the amount of servo travel and you can see some strange things in flight when you use regular trims.
Subtrim is an easy way of trimming in flight without having funny movements in flight. They do NOT alter the servo travel like regular trim adjustments do.
Example;
Launch with subtrim menu on screen and trim with subtrims for straight flight. You can land and start to adjust the clevises on your controll rods, then back down on the subtrim and launch again and see how she flies. You repeat this a few times and all of a sudden, you are at zero subtrim, Stryker flies straight, and NO regulat trims needed.
A few clicks of regular trim probably wont cause "funny" things to happen, but if you need more than 3 or 4 clicks, you might start to see the Stryker track down or up while in a high speed banking turn. You can also see the Stryker want to roll on landings when you have just elevator commanded from the sticks. This is all from the regular trim altering servo travel.
Give it a try
05-23-2010, 02:44 PM
#1371
Senior Member
Join Date: Sep 2008
Location: Somewhere,
NY
Posts: 1,200
Likes: 0
Received 0 Likes
on
0 Posts
ORIGINAL: Sidewinder11055
First, I'd like to thank all of you (Mopar., Gryph., etal) for your timeless efforts in these phenominal threads!
Quick frequency question: I'm building two Strykers; one mostly stock and the other Darkside (don't worry about
your records; only lookin' for a little over a ''buck''.) I've read about interferrence problems with my 72 mHZ (Futaba);
system,will keep ESC as far away from receiver as possible, twist wires. Am capable of PCM and PPM mode.
Which would be most likely to reject the RF interference?
Any other suggestions to minimumize risk would be greately appreciated.
TIA,
Side
05-23-2010, 04:06 PM
#1372
Senior Member

Join Date: Jan 2009
Location: Tampa,
FL
Posts: 139
Likes: 0
Received 0 Likes
on
0 Posts
Mopar,
I'm waiting for my parts to arrive. Hopefully they will get to my house by the time I get back on Wednesday so I can keep going with the build. I do have a question though; with those CA hinges, do I drip the glue onto the ends of the hinge and then insert it I to the basswood and elevon, or do I simply place a few drops in the center of the hinge after installation?
Here's a few pics of where I'm at:
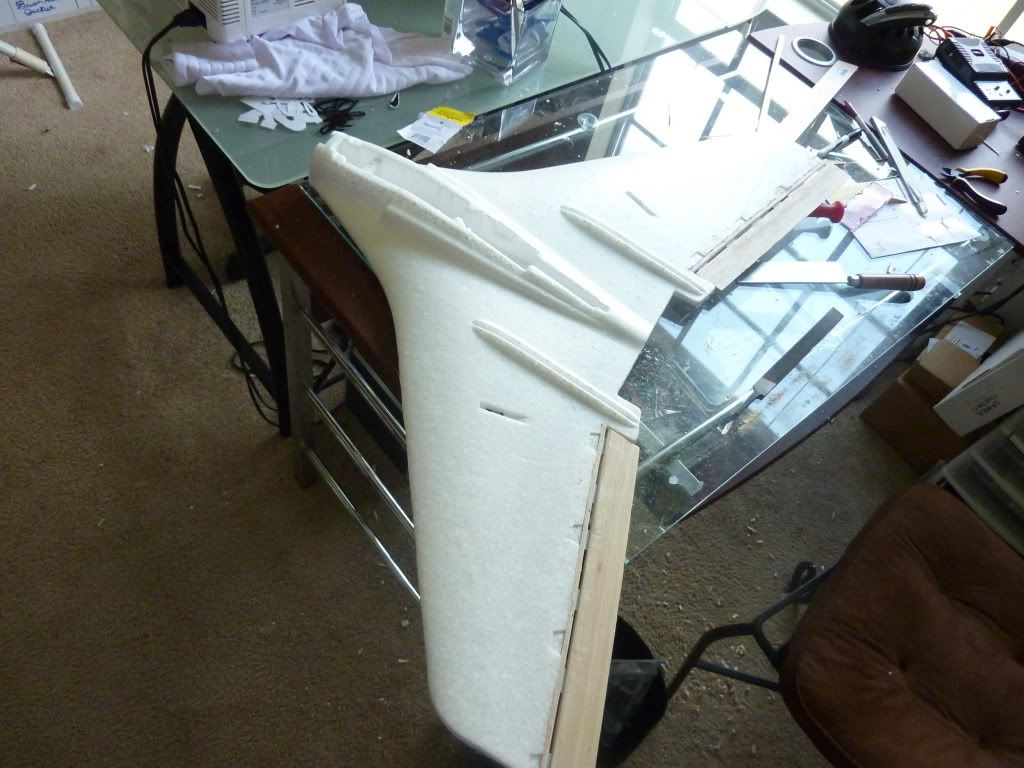
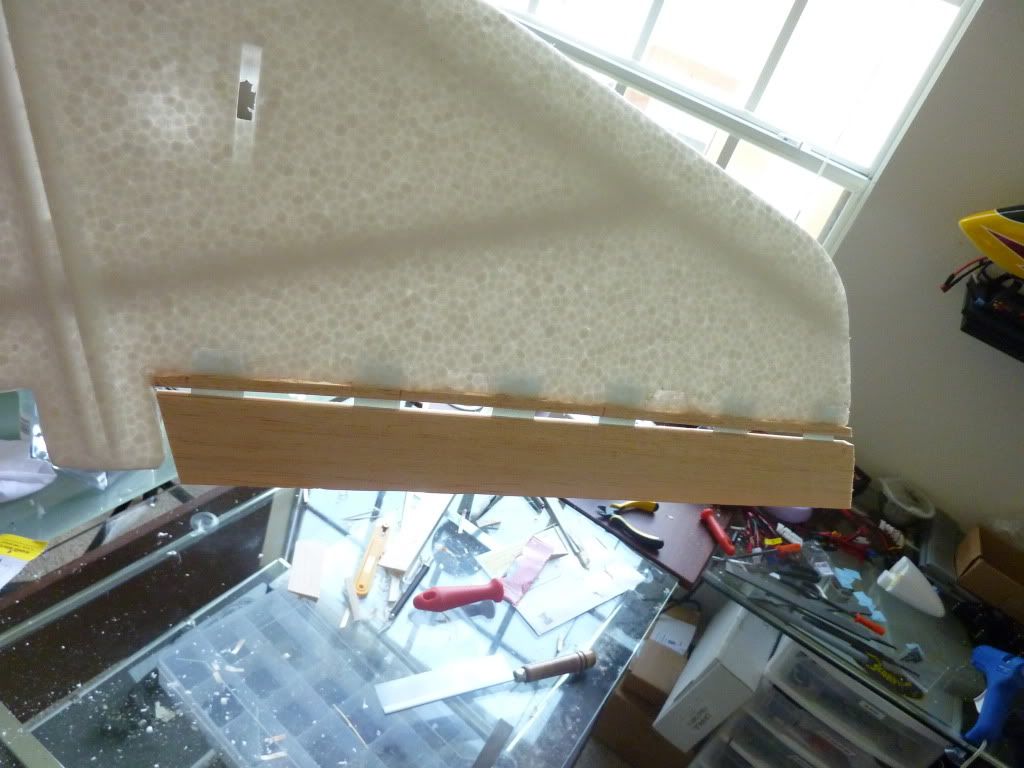
Filing is complete
I'm waiting for my parts to arrive. Hopefully they will get to my house by the time I get back on Wednesday so I can keep going with the build. I do have a question though; with those CA hinges, do I drip the glue onto the ends of the hinge and then insert it I to the basswood and elevon, or do I simply place a few drops in the center of the hinge after installation?
Here's a few pics of where I'm at:
Filing is complete
05-23-2010, 04:12 PM
#1373
Senior Member
Join Date: Jan 2009
Location: Tampa,
FL
Posts: 139
Likes: 0
Received 0 Likes
on
0 Posts
Here's the final build on my first generation Stryker. This was the one will the aileron flutter and the one where I damaged the trailing edge foam when I pulled out the elevons. I thought it would be easier to just buy a new fuse. Still using the E-Flite Six Series motor and the mount from Gary. I still haven't installed the CF tubing on the bottom yet, I'm waiting for it in the mail. I also used hinge tape on the top and bottom of the elevons to eliminate the aileron flutter - its gone completely now.
I had the bottom painted candy apply red, but it was too hard to see in the sky so I slapped some yellow on there. I'm waiting for it to dry to test out the visibility again.
Also, I forgot to purchase the two little holders for the vertical stabs so I ended up hot gluing the stabs in there. They didn't budge on the first flight, and I doubt they will.
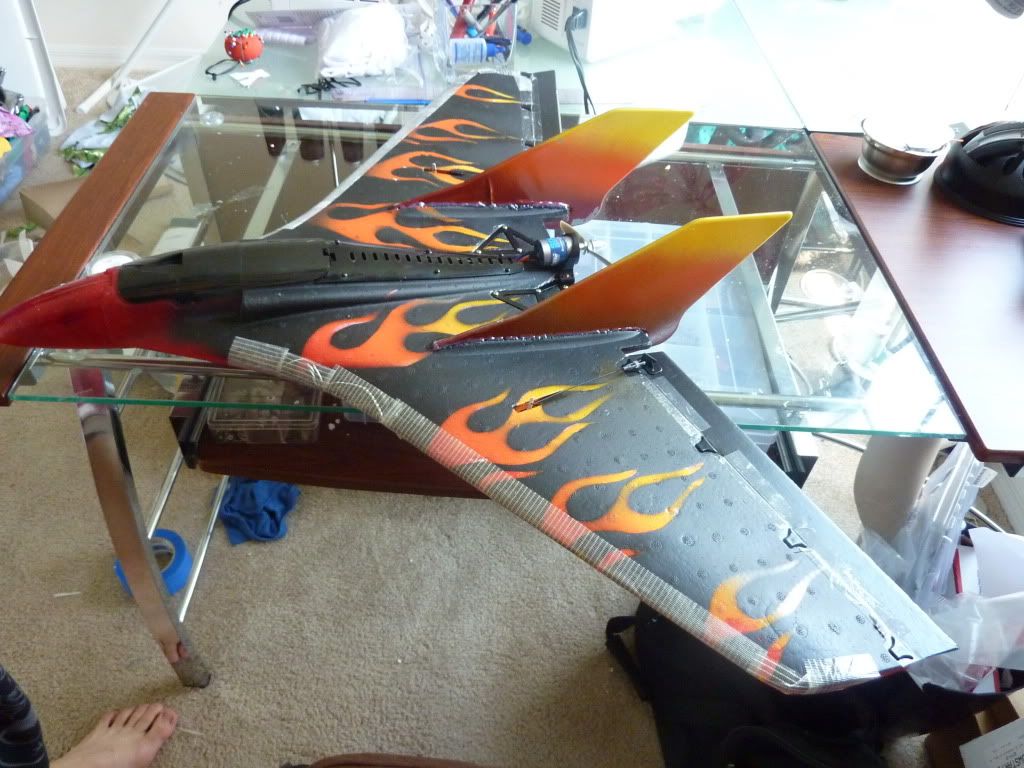
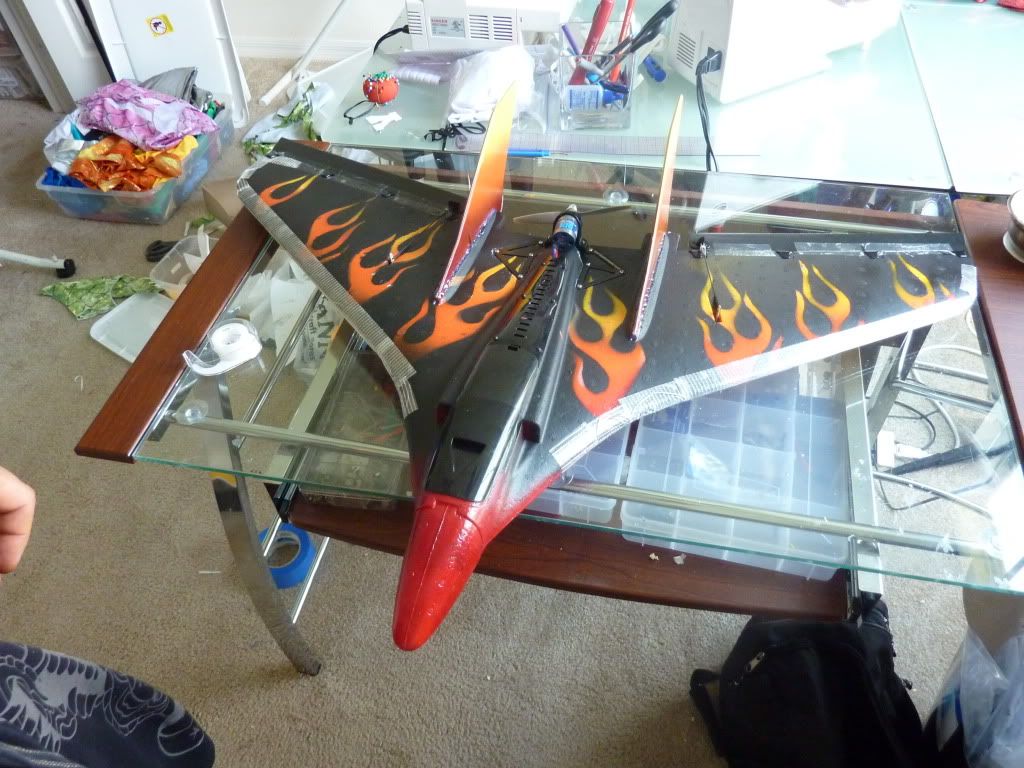

Thanks for all the encouragement guys! This was a fun one!
I had the bottom painted candy apply red, but it was too hard to see in the sky so I slapped some yellow on there. I'm waiting for it to dry to test out the visibility again.
Also, I forgot to purchase the two little holders for the vertical stabs so I ended up hot gluing the stabs in there. They didn't budge on the first flight, and I doubt they will.
Thanks for all the encouragement guys! This was a fun one!
 !
05-23-2010, 05:53 PM
!
05-23-2010, 05:53 PM
#1375
Senior Member
Join Date: Jan 2009
Location: Tampa,
FL
Posts: 139
Likes: 0
Received 0 Likes
on
0 Posts
Thanks! The tape is the Extreme Packing Tape from Home Depot. Gryphon and Mopar recommended it and so far the stuff seems indestructible!