


First kit, rookie question - custom made tail?
 10-23-2014, 06:31 PM
#1
Senior Member
Thread Starter

I've started work on my first kit, an AMR Trainer 26. I bought the kit secondhand and I believe it's an older version because the hardcopy of the manual is different from the .pdf of the manual on the vendor's website.
On the subject of "Tail group assembly", the .pdf states that "This assembly is made from 3/8�� laser-cut balsa parts and 3/8�� square balsa sticks" and gives somewhat detailed instructions on how to build them pinned to the plans. And while there are plans for the tail in the box, there are no laser-cut parts matching the photos and the hardcopy makes absolutely no reference to the construction of the stabilizers, rudder or elevator - it only talks about how to hinge the completed, sheeted parts together.
I have emailed the vendor and the original kit owner to learn more but in the meantime...
Question:
Am I expected to cut and shape these parts, lay them out and glue them up according to the plans? I'll do it if that's what has to be done... having no prior experience with kits I have no basis for comparison.
Thanks!
 10-23-2014, 09:12 PM
#2

My Feedback: (1)
grosbeak, Let me first say how sorry I and any other Americans that I know are over yesterday's attack on your country. We, the civilized world, are going to be in this together for a long time. And this was right in your city! OK, off my soapbox. I don't know anything about the kit you have, but normal procedure is to pin the parts down over the plans with wax paper or the like protecting the plans from glue. If using thin CA you can pin the parts in place and then add glue to the joints, and if using other types of non-instant glue add glue to the joints then position and pin the parts in place till the glue sets. A building board" that is soft enough to push the pins into is needed under the plans. Of course it must be flat. I use a large section of ceiling tile laid on a thick flat top metal office type desk as my building bench. There other ways too. All the tail feathers and wing sections will be built over the plans in this fashion. Sometimes the fuselage is also at least partially built over the plans pinning the parts down in place to be glued. BTY, wax paper is not the best for plan protection if using CA but works well with other glue. Tower Hobby sell a "plan protector" product however i have never used it. Some use sections of the clear backing from Monokote but I have never tried it. I use wax paper with CA and make it work. For "pins" you will want to buy some assorted size t-pins from a hobby supply (local hobby store ,Tower, ect), Your wife's sewing pins will work for some small stuff but you will want T- pins also. Buy one bag of small and one bag of large size. I know with the repair and mods you have done you will do well with the kit build. Is this what your question was??
10-24-2014, 01:49 AM
#3
My Feedback: (3)
grosbeak,
I think the answer to your question is that yes, you'll have to make up the parts yourself. Between the plans and the instructions, hopefully you have enough information to determine both the shape of the parts as well as the sizes of wood they are made from. Being a secondhand kit, in all likelihood a previous owner started construction of the tail feathers (which most people do), screwed something up and gave up. Hence, the parts are no longer in the kit.
No big deal. Tail feathers on trainers are usually pretty straightforward construction. And don't sweat whether or not you get them exactly the correct size and shape. Anything close will be good enough for a trainer. Much more important that you make both halves symmetrical and build them flat (i.e., without any warps in them).
10-24-2014, 07:02 AM
#4
Senior Member
Thread Starter
I don't know anything about the kit you have, but normal procedure is to pin the parts down over the plans with wax paper or the like protecting the plans from glue. If using thin CA you can pin the parts in place and then add glue to the joints, and if using other types of non-instant glue add glue to the joints then position and pin the parts in place till the glue sets. A building board" that is soft enough to push the pins into is needed under the plans. Of course it must be flat. I use a large section of ceiling tile laid on a thick flat top metal office type desk as my building bench. There other ways too. All the tail feathers and wing sections will be built over the plans in this fashion. Sometimes the fuselage is also at least partially built over the plans pinning the parts down in place to be glued. BTY, wax paper is not the best for plan protection if using CA but works well with other glue. Tower Hobby sell a "plan protector" product however i have never used it. Some use sections of the clear backing from Monokote but I have never tried it. I use wax paper with CA and make it work. For "pins" you will want to buy some assorted size t-pins from a hobby supply (local hobby store ,Tower, ect), Your wife's sewing pins will work for some small stuff but you will want T- pins also. Buy one bag of small and one bag of large size. I know with the repair and mods you have done you will do well with the kit build. Is this what your question was??
grosbeak,
I think the answer to your question is that yes, you'll have to make up the parts yourself. Between the plans and the instructions, hopefully you have enough information to determine both the shape of the parts as well as the sizes of wood they are made from. Being a secondhand kit, in all likelihood a previous owner started construction of the tail feathers (which most people do), screwed something up and gave up. Hence, the parts are no longer in the kit.
No big deal. Tail feathers on trainers are usually pretty straightforward construction. And don't sweat whether or not you get them exactly the correct size and shape. Anything close will be good enough for a trainer. Much more important that you make both halves symmetrical and build them flat (i.e., without any warps in them).
I think the answer to your question is that yes, you'll have to make up the parts yourself. Between the plans and the instructions, hopefully you have enough information to determine both the shape of the parts as well as the sizes of wood they are made from. Being a secondhand kit, in all likelihood a previous owner started construction of the tail feathers (which most people do), screwed something up and gave up. Hence, the parts are no longer in the kit.
No big deal. Tail feathers on trainers are usually pretty straightforward construction. And don't sweat whether or not you get them exactly the correct size and shape. Anything close will be good enough for a trainer. Much more important that you make both halves symmetrical and build them flat (i.e., without any warps in them).
10-24-2014, 09:37 AM
#5
My Feedback: (1)
grosbeak, I guess I didn't understand that the pieces for the tail are missing. I thought you weren't sure what the normal assembly procedure was for glueing it all together. There is someone on RCU that says something to the effect of "you glue all the wood in the box together then sand off anything that doesn't look like an airplane!" . All the best to you. P.S. And I agree with RBACONS, someone likely started the kit with the tail feathers then "punted".
. All the best to you. P.S. And I agree with RBACONS, someone likely started the kit with the tail feathers then "punted".
Last edited by 52larry52; 10-24-2014 at 09:42 AM.
10-24-2014, 10:40 AM
#6
Senior Member
Thread Starter
grosbeak, I guess I didn't understand that the pieces for the tail are missing. I thought you weren't sure what the normal assembly procedure was for glueing it all together. There is someone on RCU that says something to the effect of "you glue all the wood in the box together then sand off anything that doesn't look like an airplane!". All the best to you. P.S. And I agree with RBACONS, someone likely started the kit with the tail feathers then "punted".
. All the best to you. P.S. And I agree with RBACONS, someone likely started the kit with the tail feathers then "punted".
10-24-2014, 05:58 PM
#7
Senior Member
Thread Starter
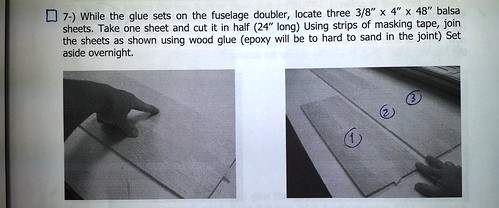
Ever have a light click on? This was a 100 watt bulb. The tail pieces are all made from 3/8" balsa sheets.
Here are some shots from the hardcopy of the manual.
Step 7 - I had no idea what these sheets were for. The manual gives no clue.
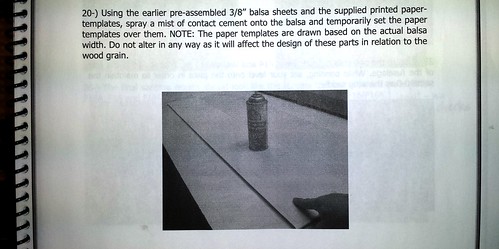
Step 20. Turns out the balsa sheets are for the empennage and the plans get cemented to the sheets for cutting. Note that there is still no mention of the tail section.
Step 21 - gluing on the tips. NOW we see a mention in the wording. All this time I was studying the new manual, which is totally different for the tail section.
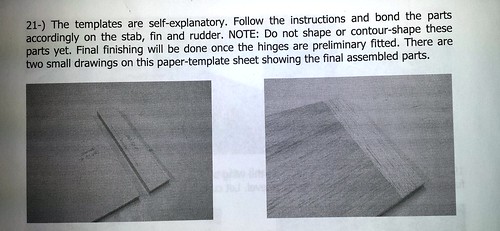
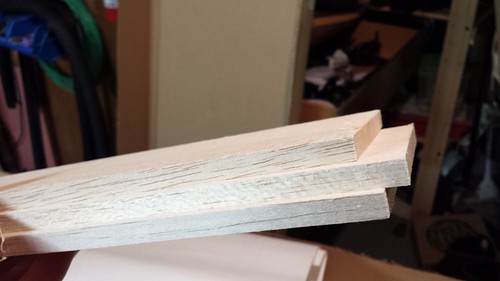
The manual goes on to explain how to join the control surfaces to the stabilizers. CA hinges are specified - I'll be using Robart 1/8" hinge points. Here's the balsa for all of the tail pieces.
Here are some shots from the hardcopy of the manual.
Step 7 - I had no idea what these sheets were for. The manual gives no clue.
Step 20. Turns out the balsa sheets are for the empennage and the plans get cemented to the sheets for cutting. Note that there is still no mention of the tail section.
Step 21 - gluing on the tips. NOW we see a mention in the wording. All this time I was studying the new manual, which is totally different for the tail section.
The manual goes on to explain how to join the control surfaces to the stabilizers. CA hinges are specified - I'll be using Robart 1/8" hinge points. Here's the balsa for all of the tail pieces.
