


Anyone Into 1/8 Scale Unlimited Hydros?
 08-22-2023, 11:15 PM
#1

Thread Starter
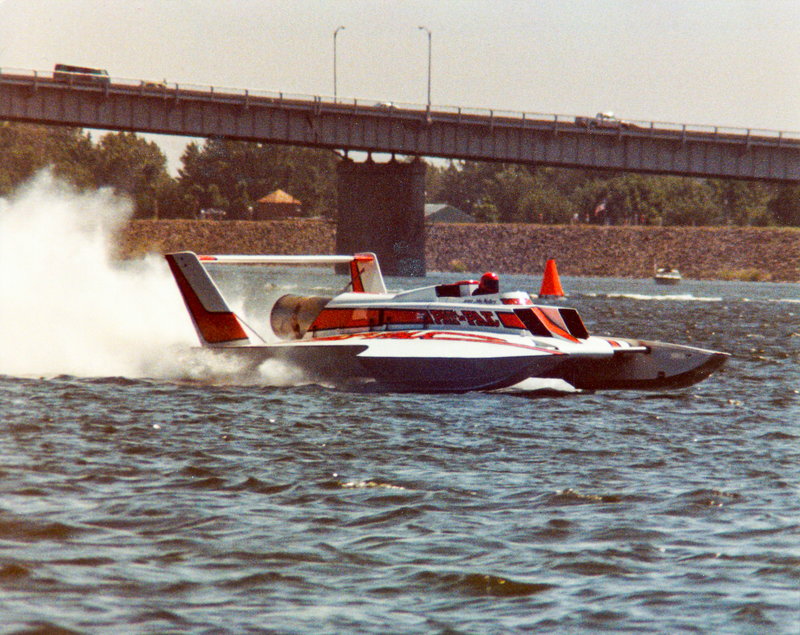
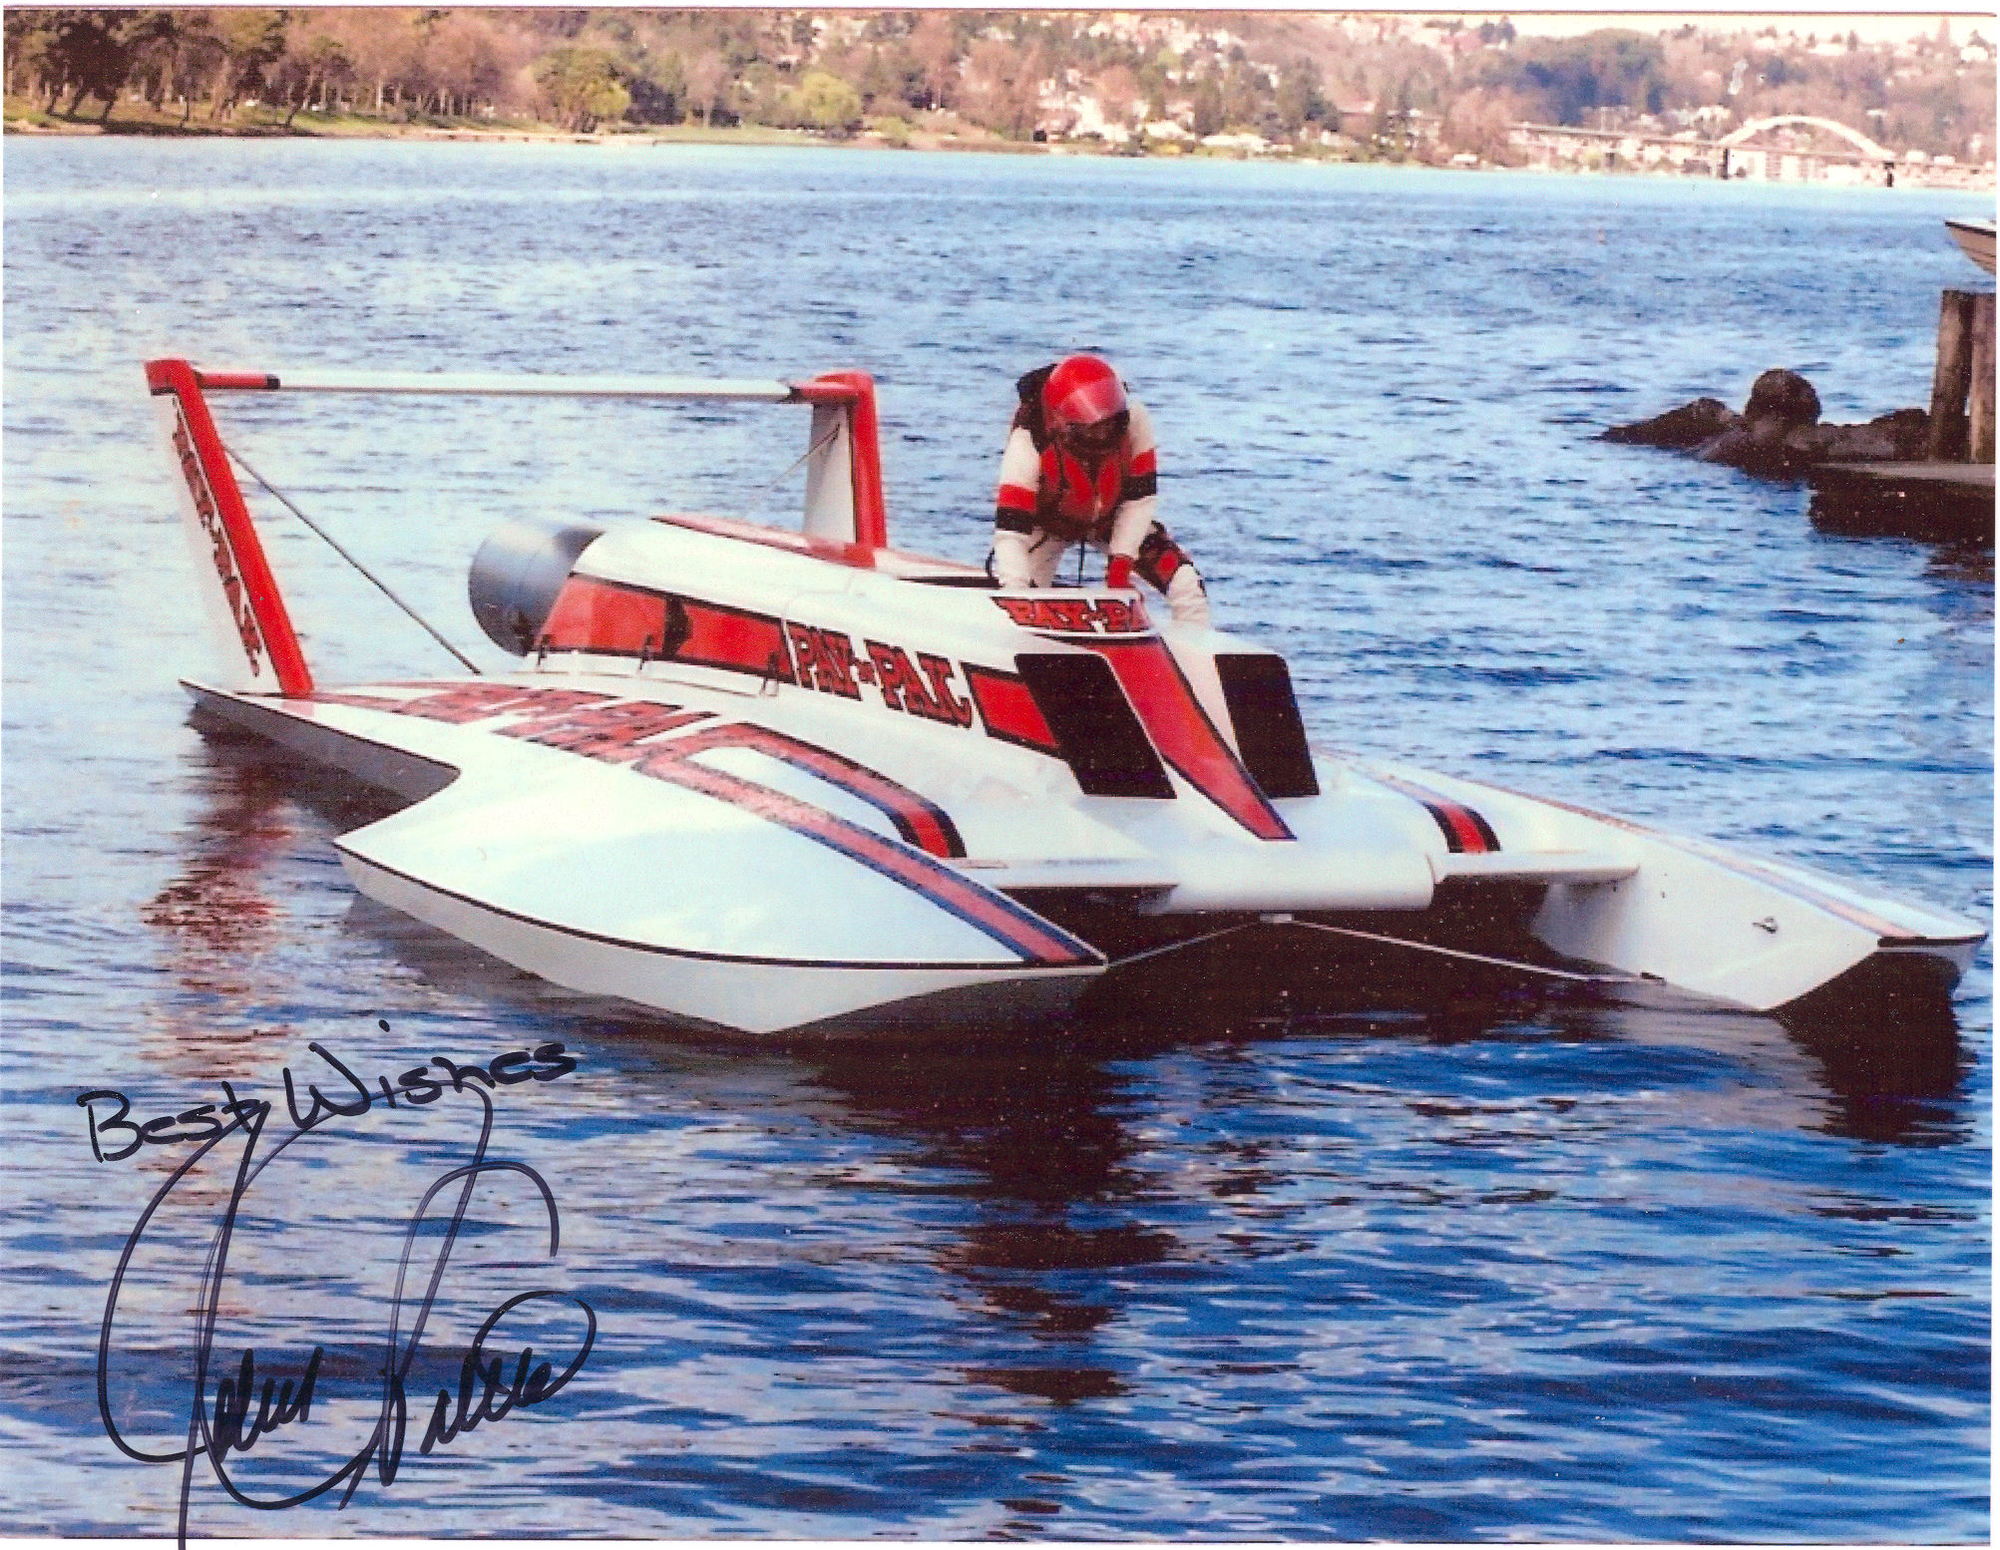
I grew up just miles from the Unlimited Hydros...Hearing the piston boats (the same motors that were in some of our most treasured WWII warbirds) in the 70's, that turned to the quieter whine of the jet turbines in the 80's. A total fanboy to be sure. I am in the process of building my all-time favorite hydro...The 1982 Miss Pay N' Pak. The first ever turbine unlimited hydroplane. A 1/8 scale FE (Fast Electric) version. I was curious if anyone else here is into unlimiteds? Better yet, RC 1/8 scale unlimiteds?
If so I will be happy to continue this thread with details, info, video and photos. If not, no biggie, just checking to see if there is any interest.
If so I will be happy to continue this thread with details, info, video and photos. If not, no biggie, just checking to see if there is any interest.
Last edited by Aros; 08-22-2023 at 11:18 PM.
 08-23-2023, 03:28 AM
#2

Apparently you've never heard of R/C Unlimiteds, Electric R/C Unlimiteds or any of the other NAMBA District 8 clubs.
R/C Unlimiteds runs both 1/8th scale nitro and electric as well as gas scale.
Now, for a couple of corrections to your post:

R/C Unlimiteds runs both 1/8th scale nitro and electric as well as gas scale.
Now, for a couple of corrections to your post:
- There isn't a "Miss" in the name of the boat. All of the Heerensperger boats were called "Pride of Pay'N Pak"
- The Turbine "Pak" wasn't the first turbine hydroplane. The first "competition" turbine hydroplane was the U-95. It ran in 1974 with twin Lycoming T53 turbines, a smaller version of the T55 L7 C presently used in the Unlimiteds
Last edited by Hydro Junkie; 08-23-2023 at 03:31 AM.
08-23-2023, 07:13 AM
#3
Thread Starter
Yes I have heard of R/C Unlimiteds but I was asking if anyone here on this forum was into 1/8 scale hydros. Thank you for your corrections but good lord your post was oozing with uncalled for condescension I could have done without.
08-23-2023, 11:37 AM
#4

I don't own an RC hydroplane but I have attended scale Hydroplane races at Twin Lakes near Marysville and Lake Tye near Monroe in Wa. several times. Lots of fun to watch.
I grew up watching the Thunderboats on Lake Washington and still like to watch the modern H1 races every time they are live on youtube.
Steve
I grew up watching the Thunderboats on Lake Washington and still like to watch the modern H1 races every time they are live on youtube.
Steve
08-23-2023, 12:52 PM
#5
Thread Starter
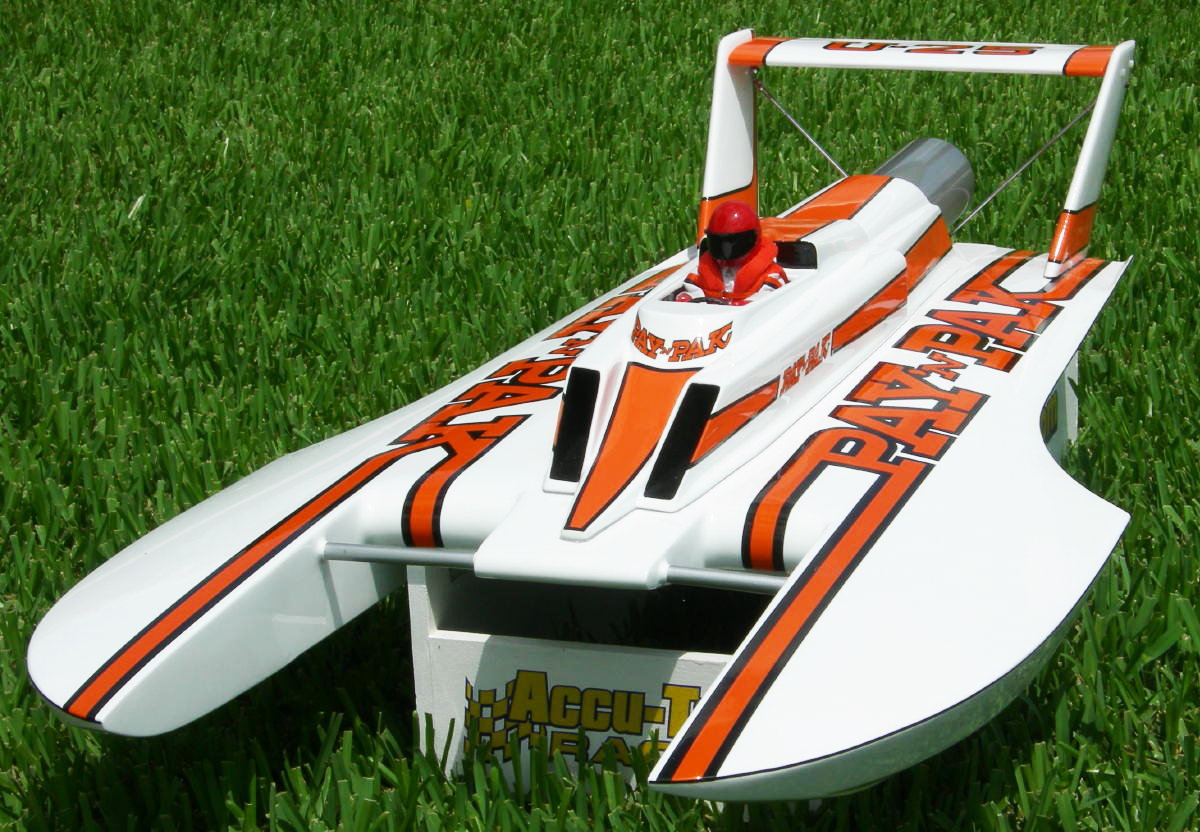
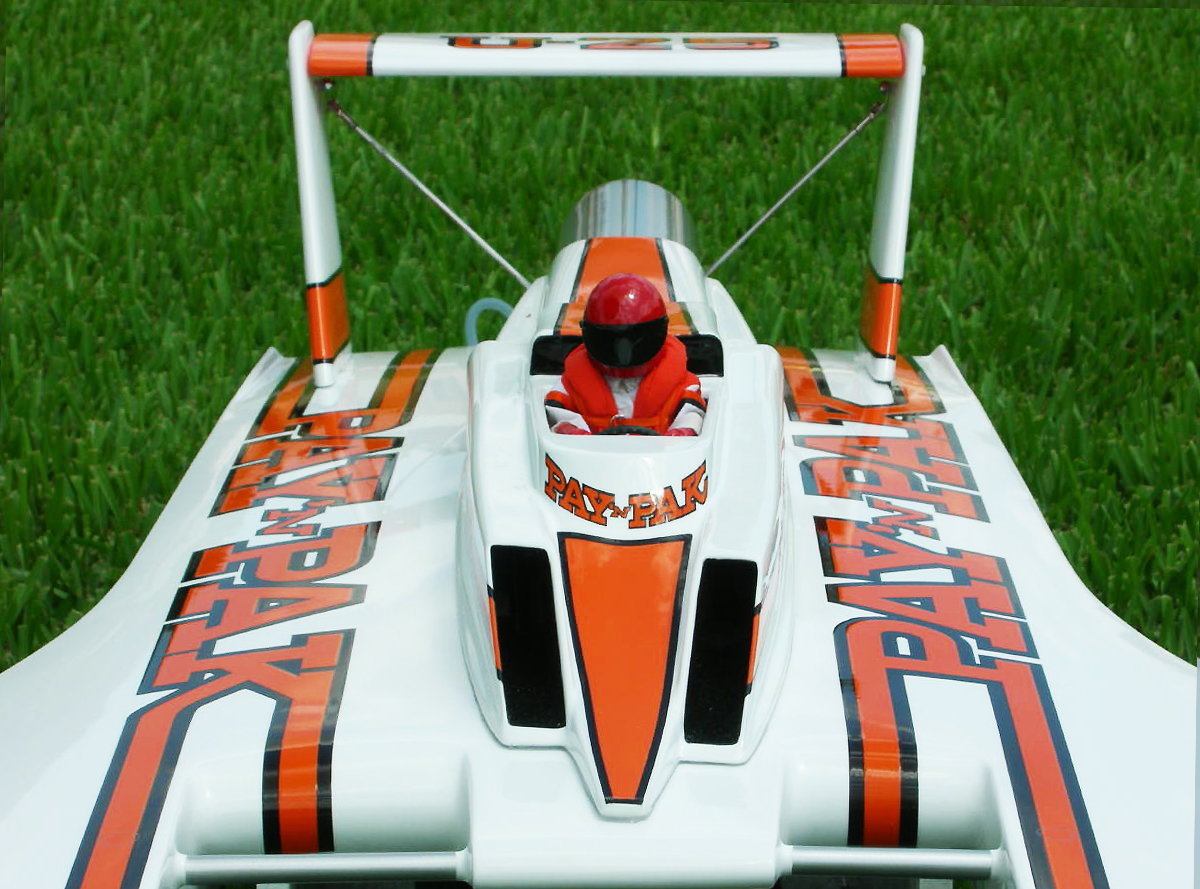
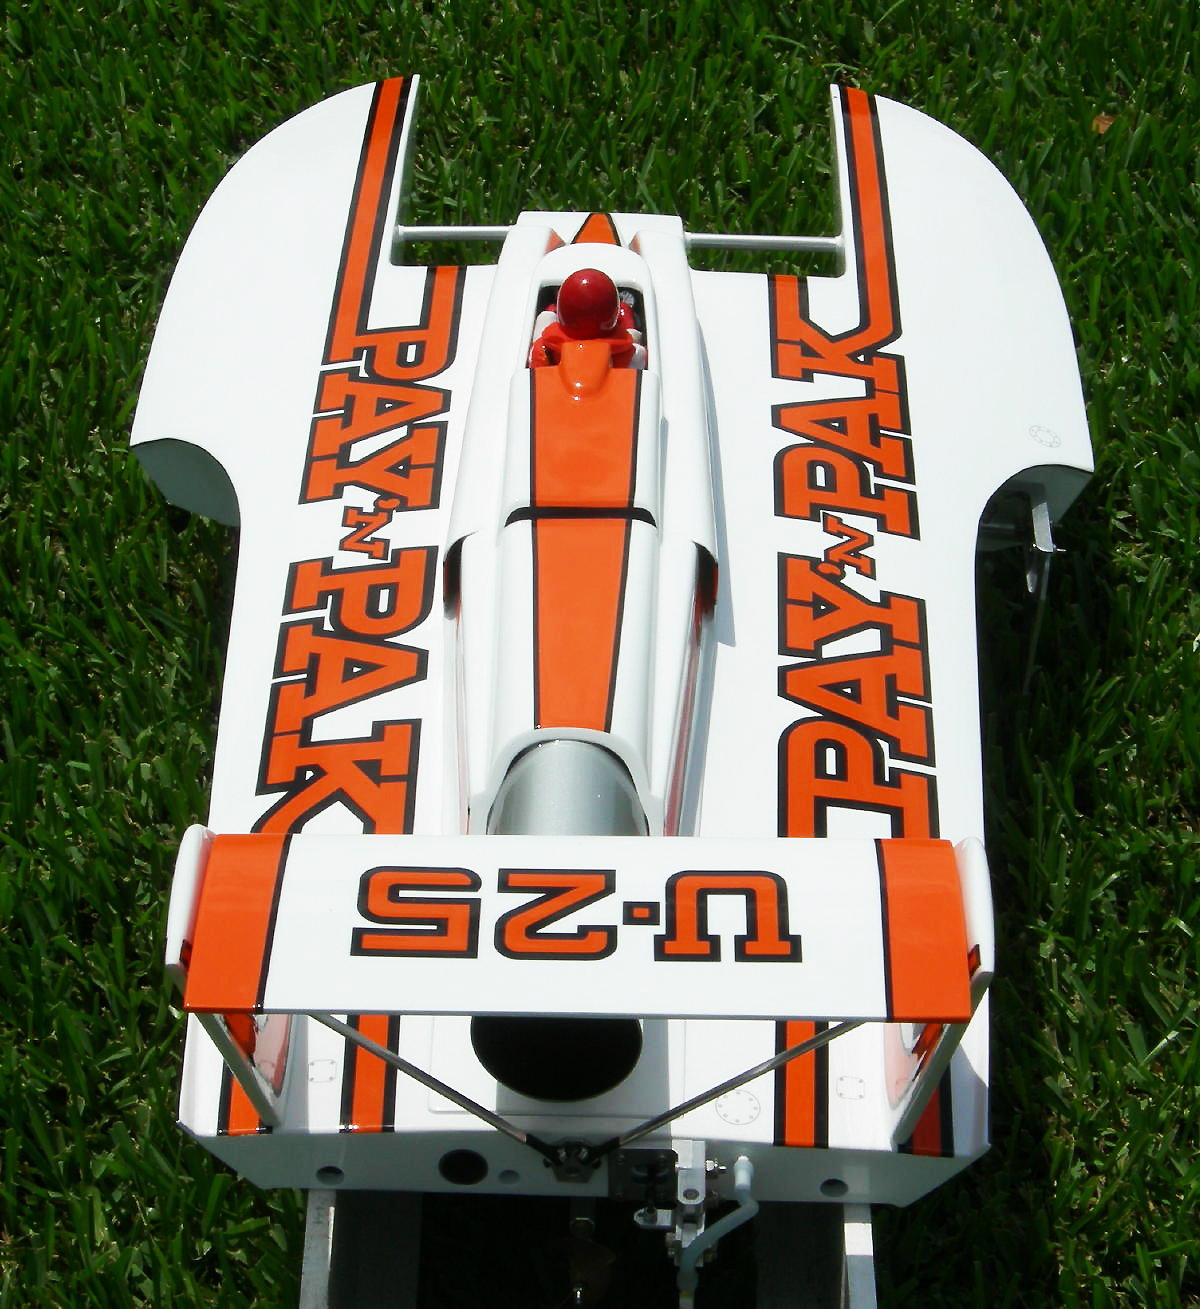
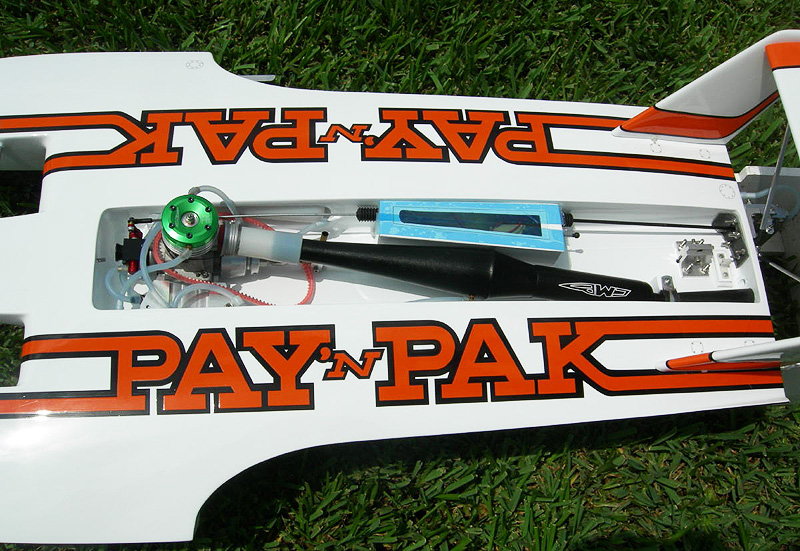
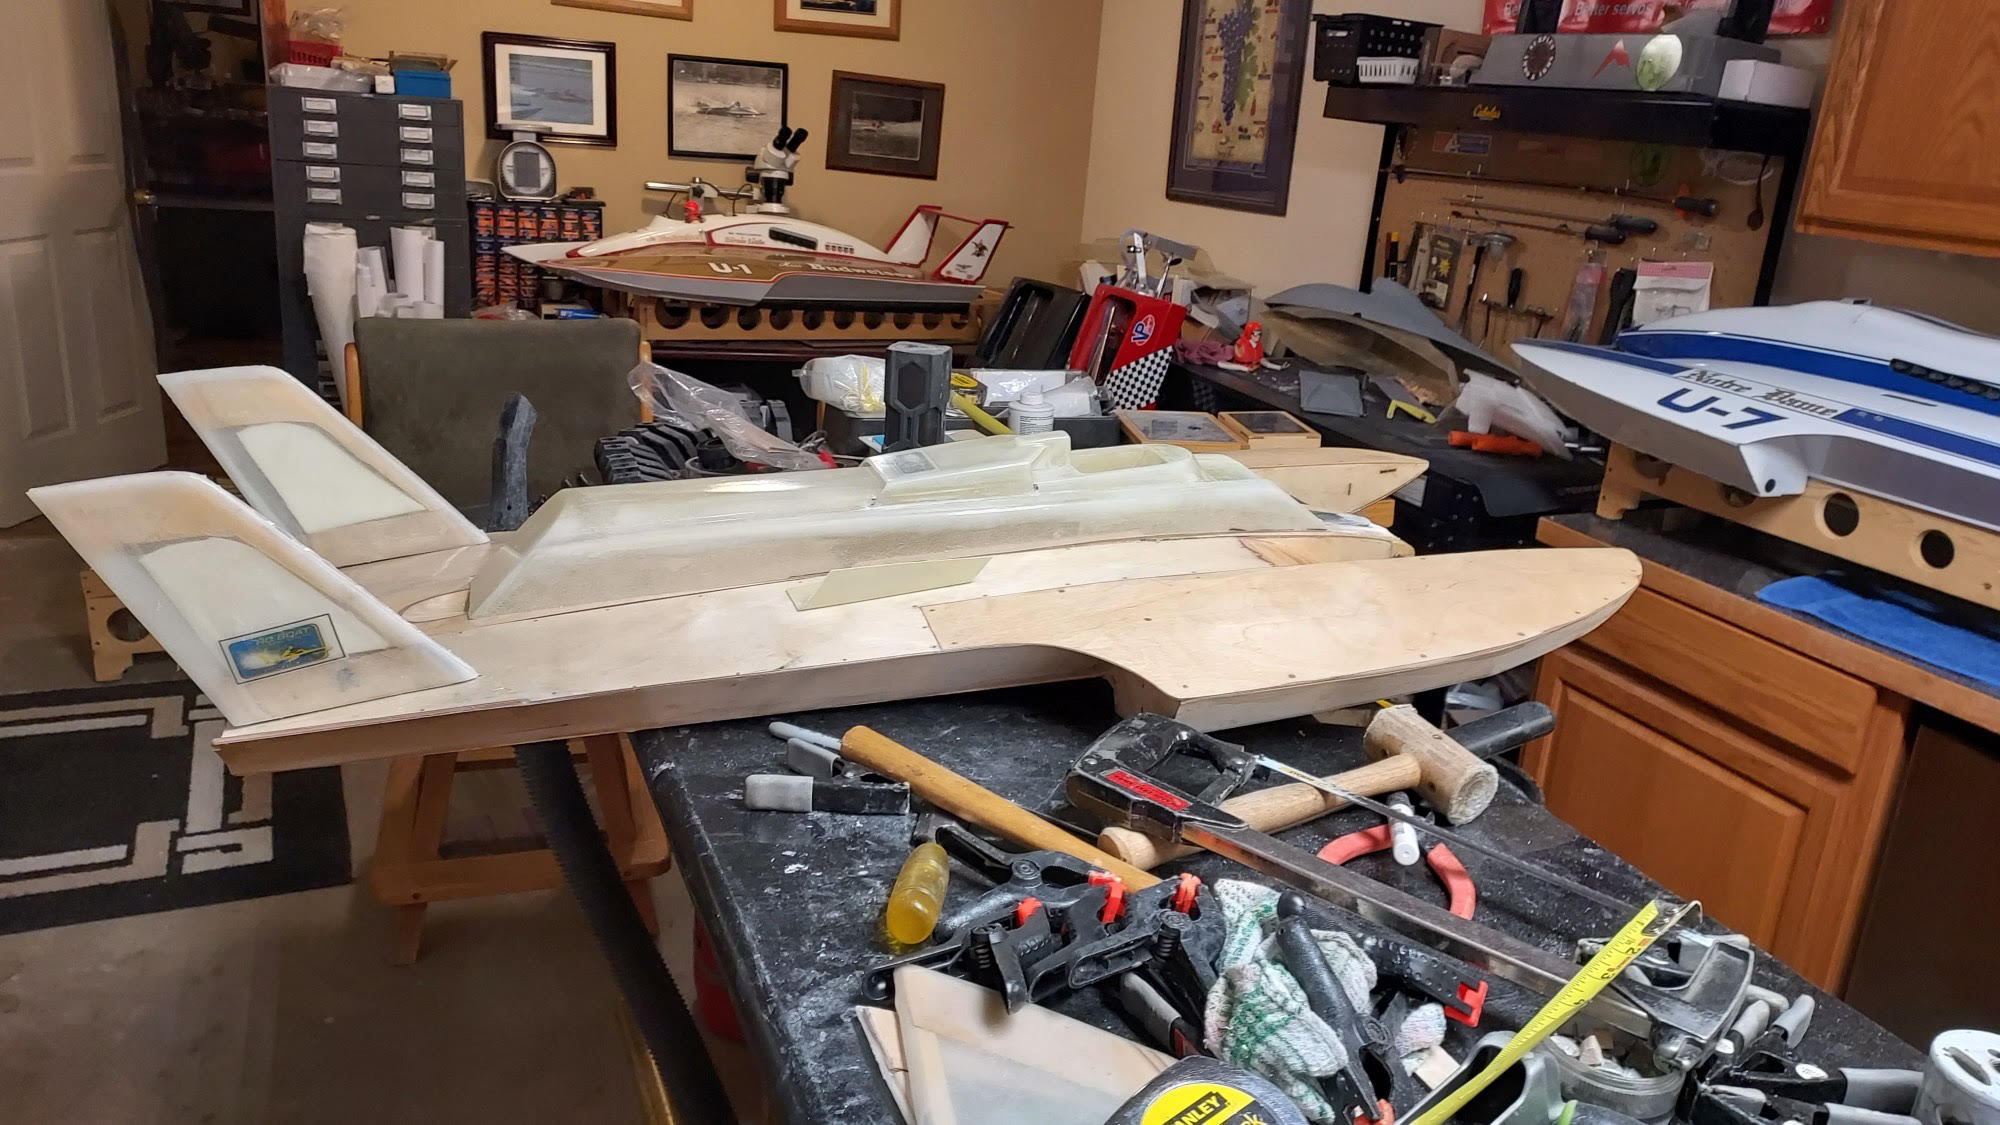
That's great! I too grew up watching the boats at SeaFair on Lake Washington. Great memories! I haven't watched R/C hydro races, that sounds like fun. I regrettably sold my 1/8 82 Pak years ago but I am having a new one built, this time all electric. Here's some pictures of my former boat...

08-23-2023, 05:18 PM
#6
If you took my post as "condescending", I do apologize as that was not my intention.
If either of you are interested, R/C U will be racing at Lake Waughop in Fort Steilacoom Park down in Lakewood(southwest Tacoma) on Sunday and at Lake Tye in Monroe on on September 10th(test session on the 9th). I doubt I'll make the race down south but I do plan on making at least the test day in Monroe
If either of you are interested, R/C U will be racing at Lake Waughop in Fort Steilacoom Park down in Lakewood(southwest Tacoma) on Sunday and at Lake Tye in Monroe on on September 10th(test session on the 9th). I doubt I'll make the race down south but I do plan on making at least the test day in Monroe
08-23-2023, 06:12 PM
#7
Thread Starter
Thank you I really appreciate your clarifying. I used to run a forum for years and I know firsthand how easy it is to misconstrue the tenor and tone of someone's post when just reading words on a page. We don't have the luxury of viewing body language, voice inflection and the such. So thanks again.
Unfortunately I will be out of town for both those events but I will definitely keep my eyes open to future events. Man these boats can fly! I only drove my former boat once, and that was on a lake with a "no gas motors" policy...Whoops.
My current boat is coming together pretty quick. It's going to be delivered basically RTR when all is said and done but not painted. I just ordered the decals but would love some information on how to properly prep and paint the model.
08-24-2023, 04:30 AM
#10
It's a multi-step process:
- sand the hull to remove any unwanted sharp edges.
- apply a thin coat of epoxy. Some will tell you to dilute it up to 50% with alcohol but that's up to you. I don't since I use West Systems and it says not to
- sand smooth
- apply a layer of primer
- apply a second layer of primer, using a different color
- sand off the second layer of primer to expose any low spots in the skin
- apply a filler(I use epoxy and micro balloons) to any low spots, sand smooth when cured
- repeat steps 5-7 until no high or low spots are left
- apply primer, sand smooth without going through it
- apply you color coat
- apply a single layer of clear coat(if desired) and the decals
- apply clear coat with as many layers as desired
08-24-2023, 06:42 AM
#12
I would still do the first three steps yourself. If you don't apply the epoxy layer, the wood could get wet through any scratches or cracks in the paint and the grain will end up showing through as ridges and ripples
08-24-2023, 07:19 AM
#13
Thread Starter
My builder said he would be doing those steps so I got lucky! Looks like I will just be doing the primer/paint/decal phase. I may have an autobody shop do it. Not sure I want to rattle can it. Thoughts?
08-25-2023, 04:55 PM
#14
You might consider a white, two part, "rattle can" primer instead of paint. It would reduce the amount of finish work since you wouldn't need to apply layers of color coating over the primer. After the primer has dried, apply the decals and let them dry followed by clear. Wesco Auto Body Supply has it in stock, at least in Everett 
 08-30-2023, 03:06 PM
#17
Thread Starter
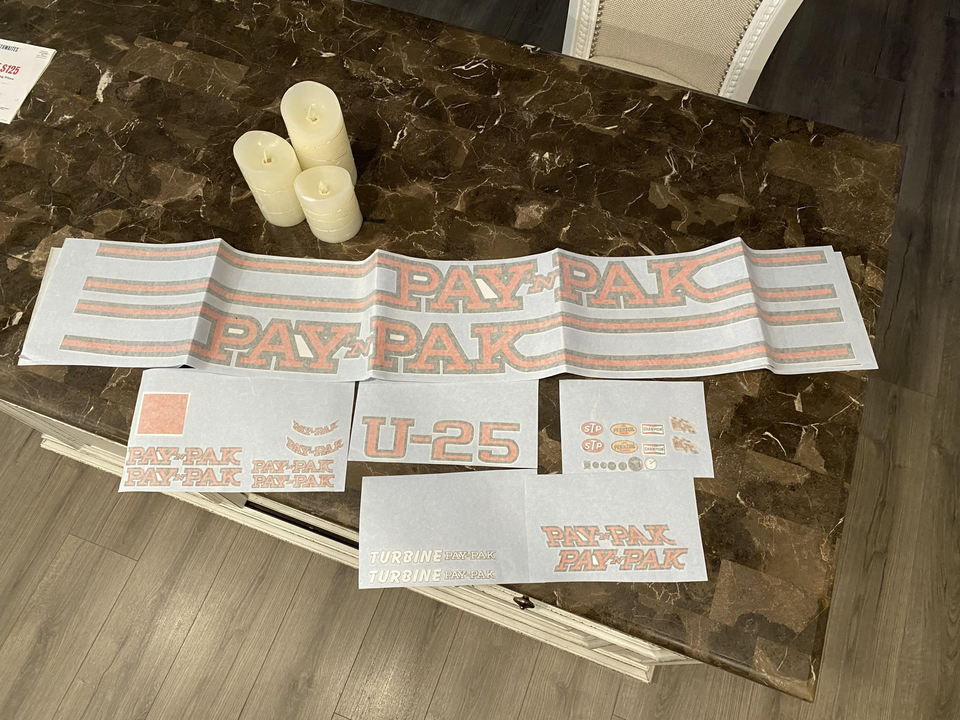
As an aside, I no longer need this decal set I purchased as it's missing the tail and cowling striping. I ordered a new set from a different source that includes everything.
If anyone is interested I am selling the set for $75 (paid $125).
If anyone is interested I am selling the set for $75 (paid $125).
08-30-2023, 11:12 PM
#18
Who did you order the first decal set from? Most times, if something is missing, they will replace it. You might also consider keeping the set so you will have it if you need to make repairs or repaint something later
Last edited by Hydro Junkie; 08-30-2023 at 11:16 PM.
08-31-2023, 07:41 AM
#19
Thread Starter
Good idea about holding on to the decals, however the orange may not match the new decal set I am acquiring...I got this first set from Wesley's Custom Graphics who I was referred to by my builder. Inexplicably they did mention the cowl stripes are not included in the set (nor were the tail decals other than the "U-25"). Meanwhile I've since ordered the complete set (he confirmed which does include all the decals and striping) from Mike Mcknight for the same price! So go figure, lol.
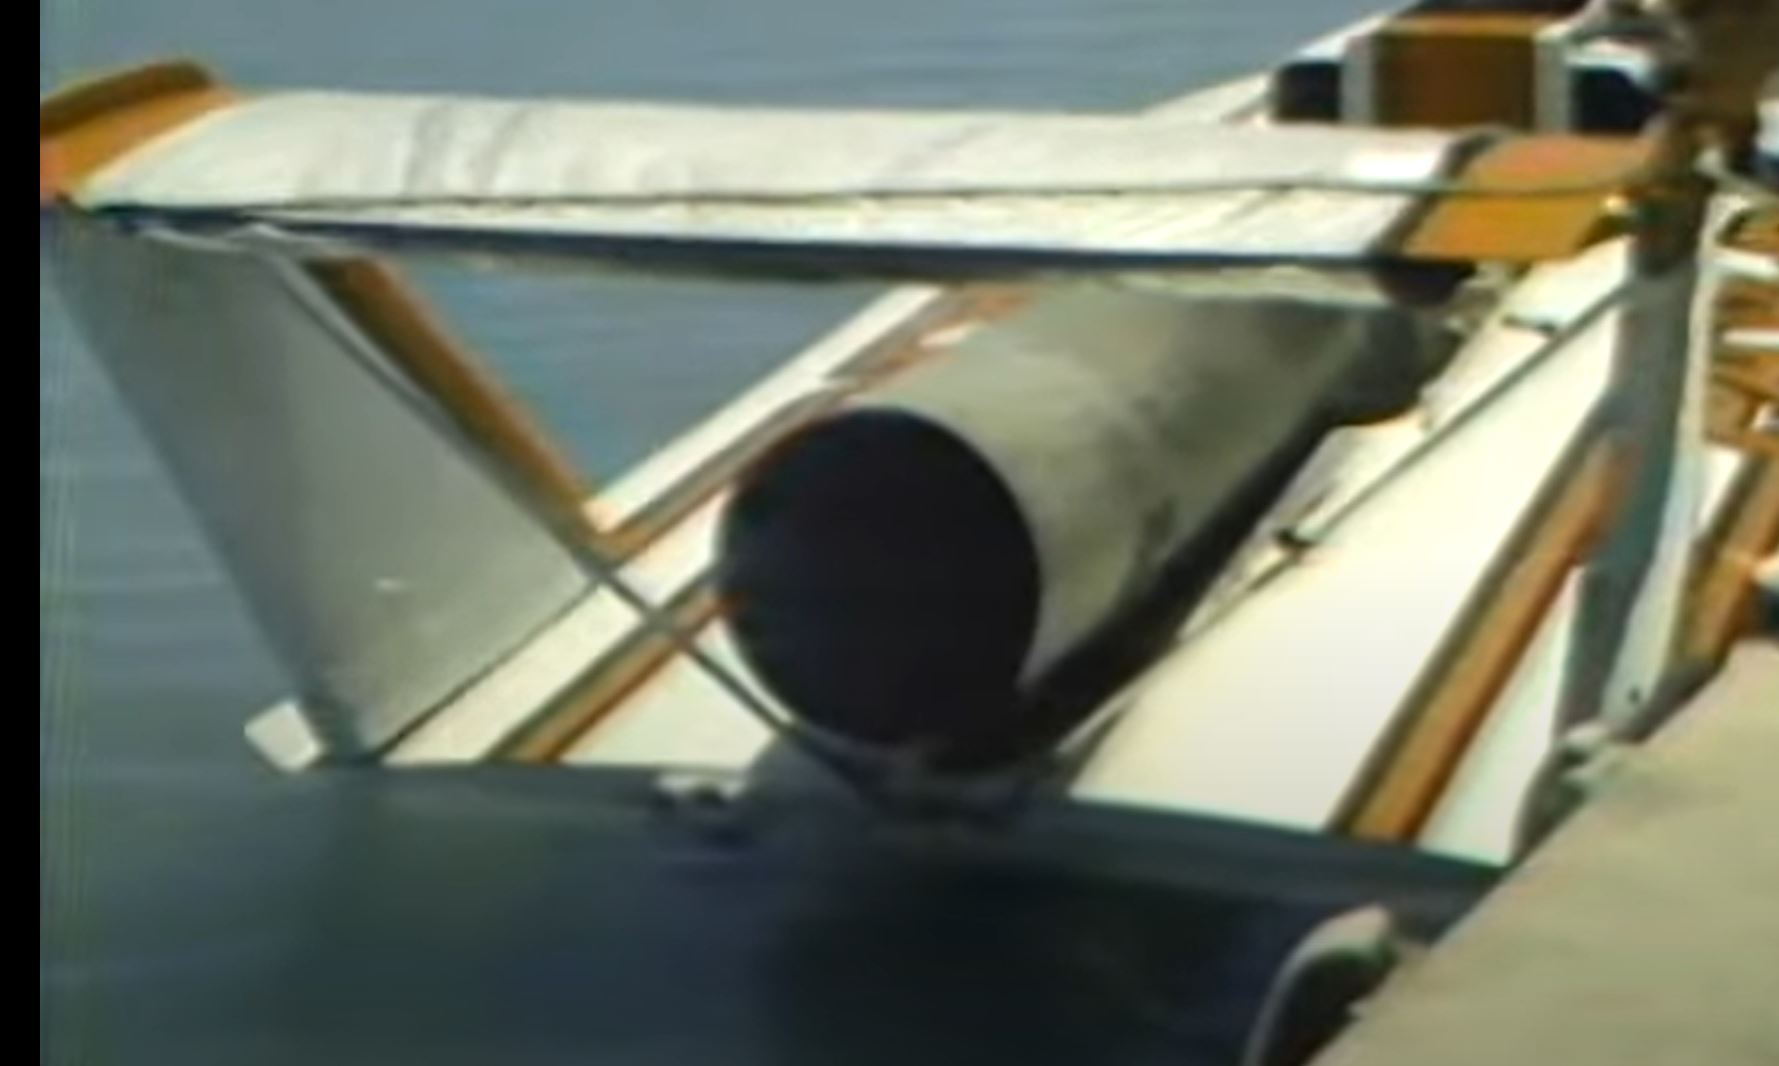
I'm also wondering the best route for the turbine tube. My builder said some will take plastic water bottles and wrap them. That might be a good route, and I can rattle can it with aluminum color.
I'm also wondering the best route for the turbine tube. My builder said some will take plastic water bottles and wrap them. That might be a good route, and I can rattle can it with aluminum color.
08-31-2023, 05:25 PM
#21
Not really. My source for drivers and detail parts has kind of dried up since the guy I used to go to has pretty much left the hobby.
There are people that are making 3D printed stuff that does look really good but I don't really have any contact info for them. I'm sure someone in the other forum will be able to help you out on that one
There are people that are making 3D printed stuff that does look really good but I don't really have any contact info for them. I'm sure someone in the other forum will be able to help you out on that one
09-04-2023, 07:36 AM
#23
Thread Starter
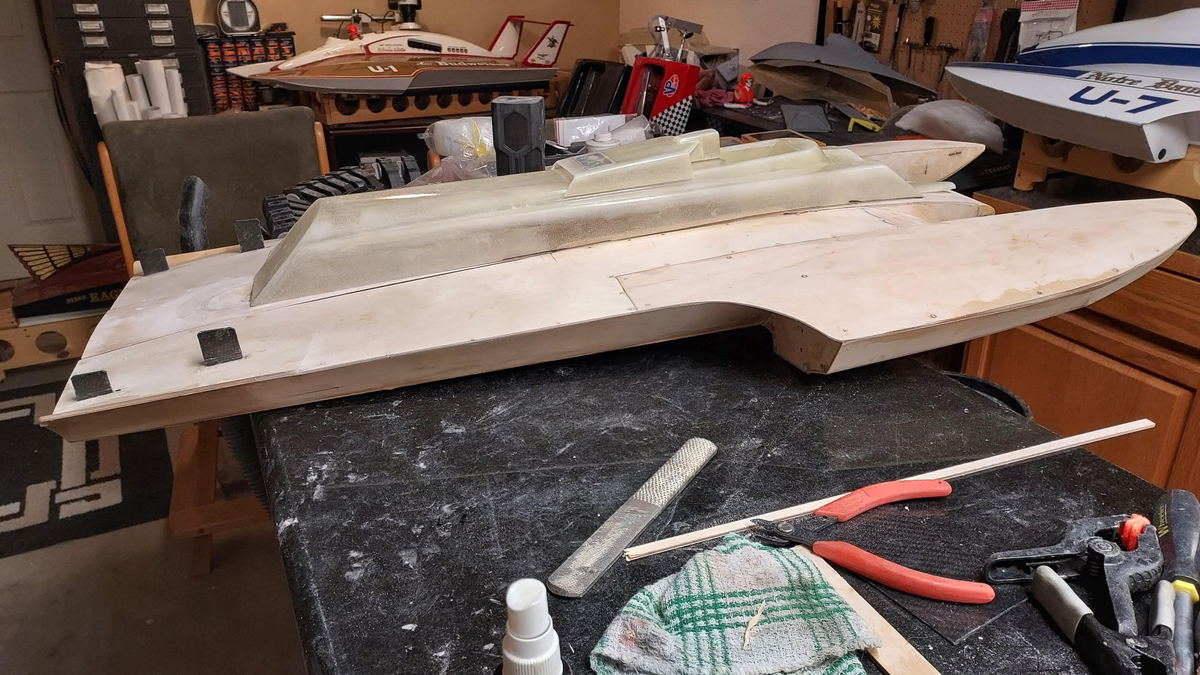
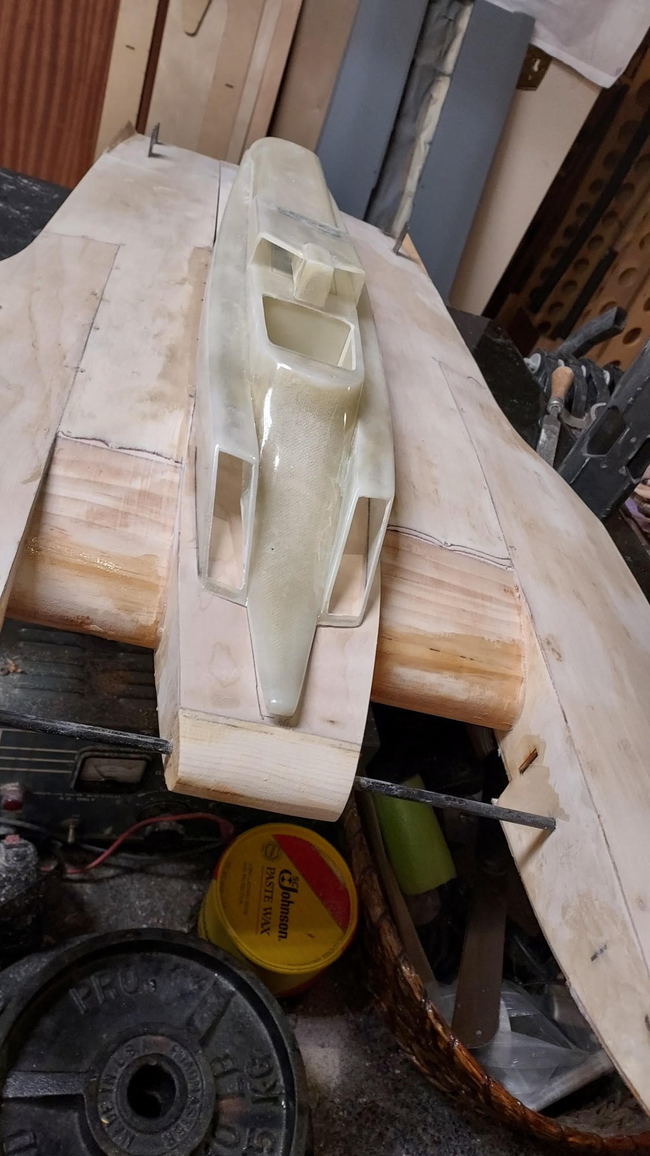
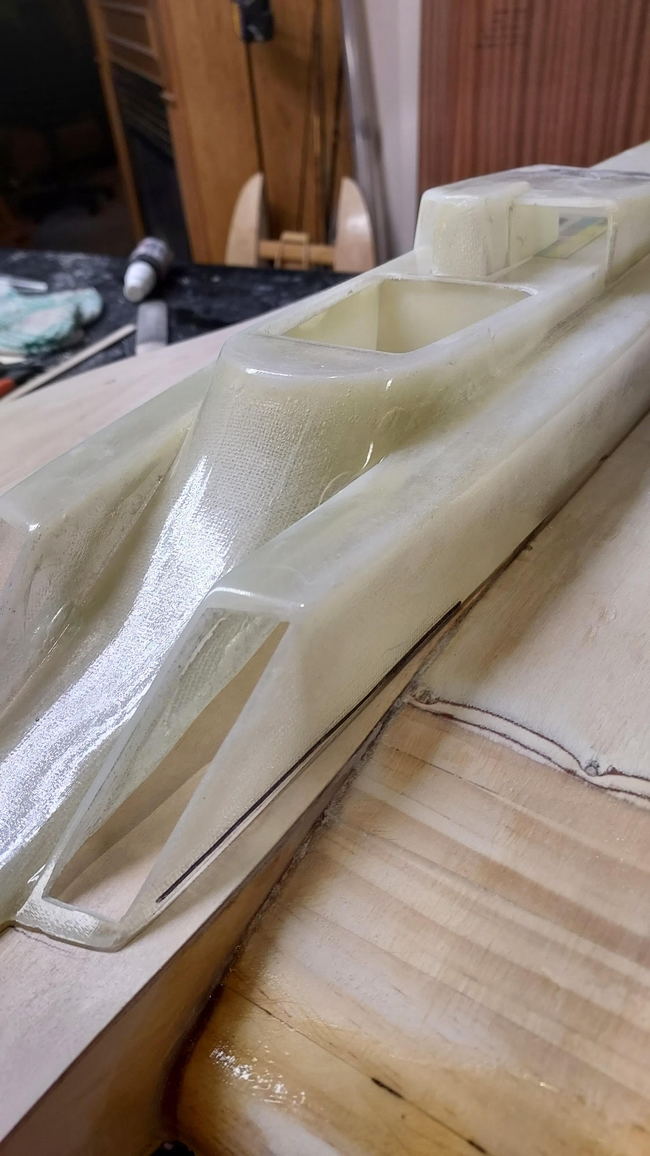
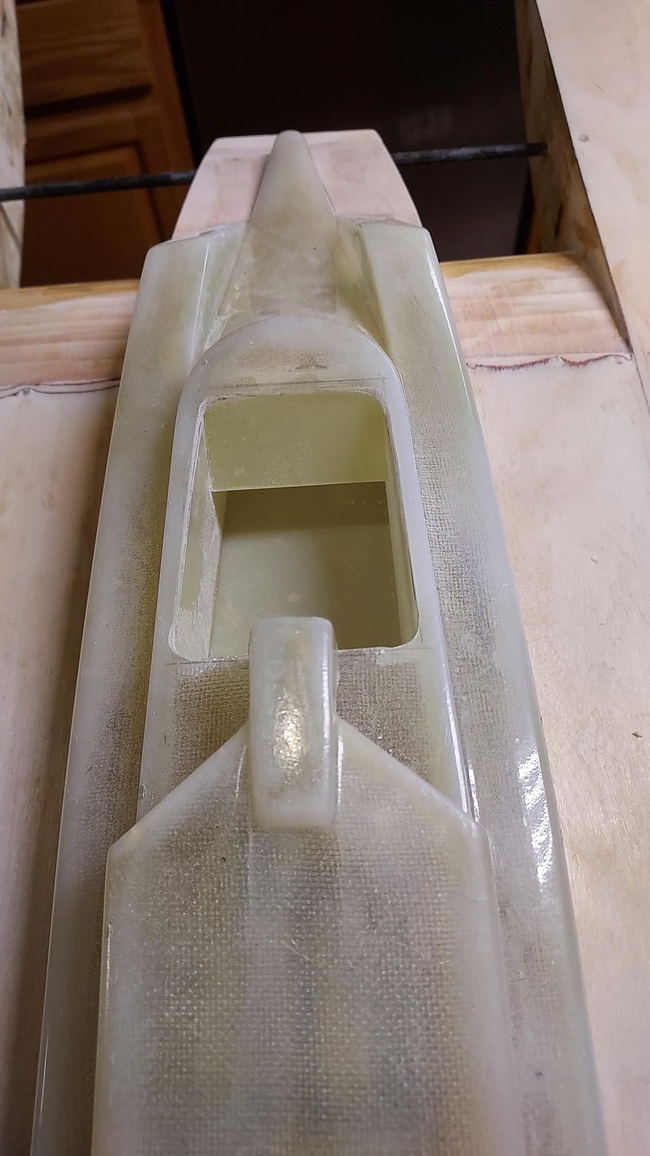
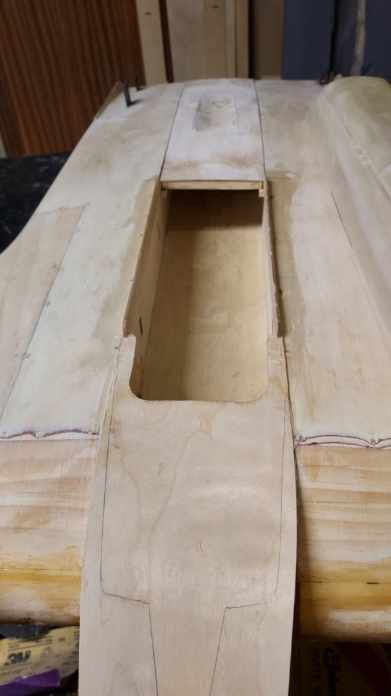
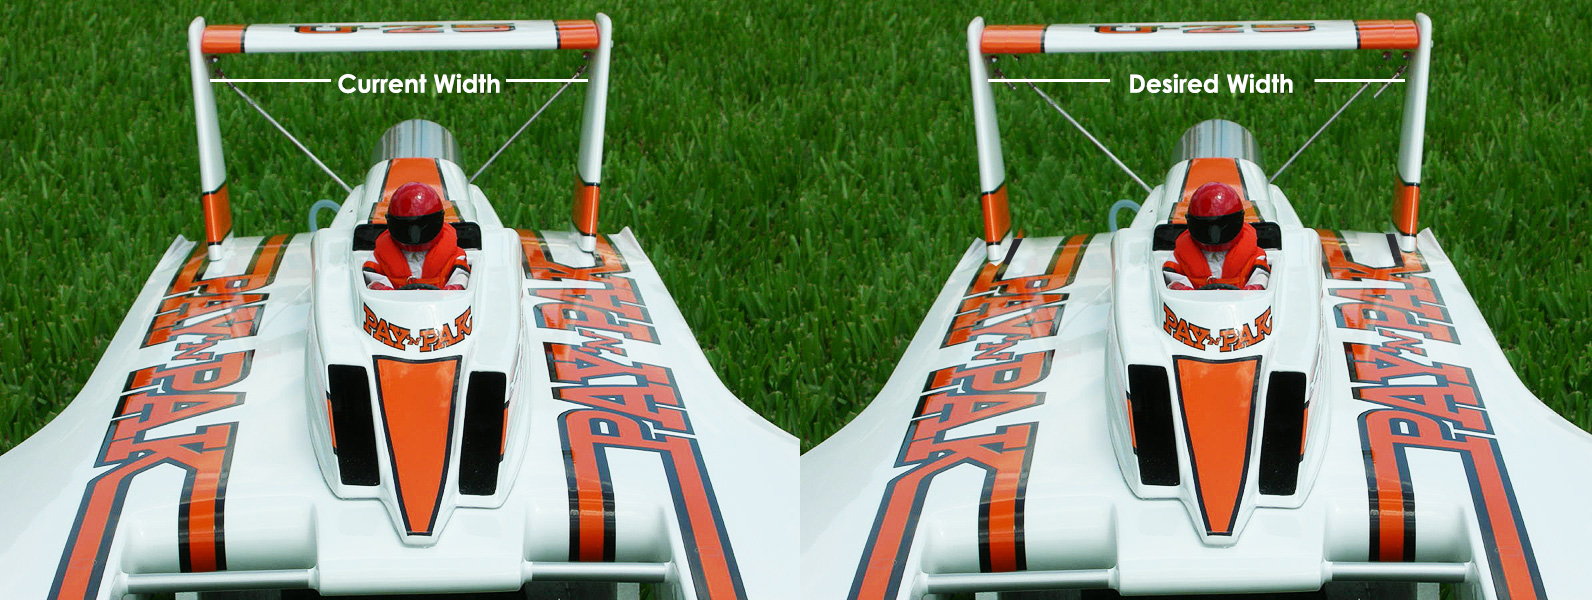
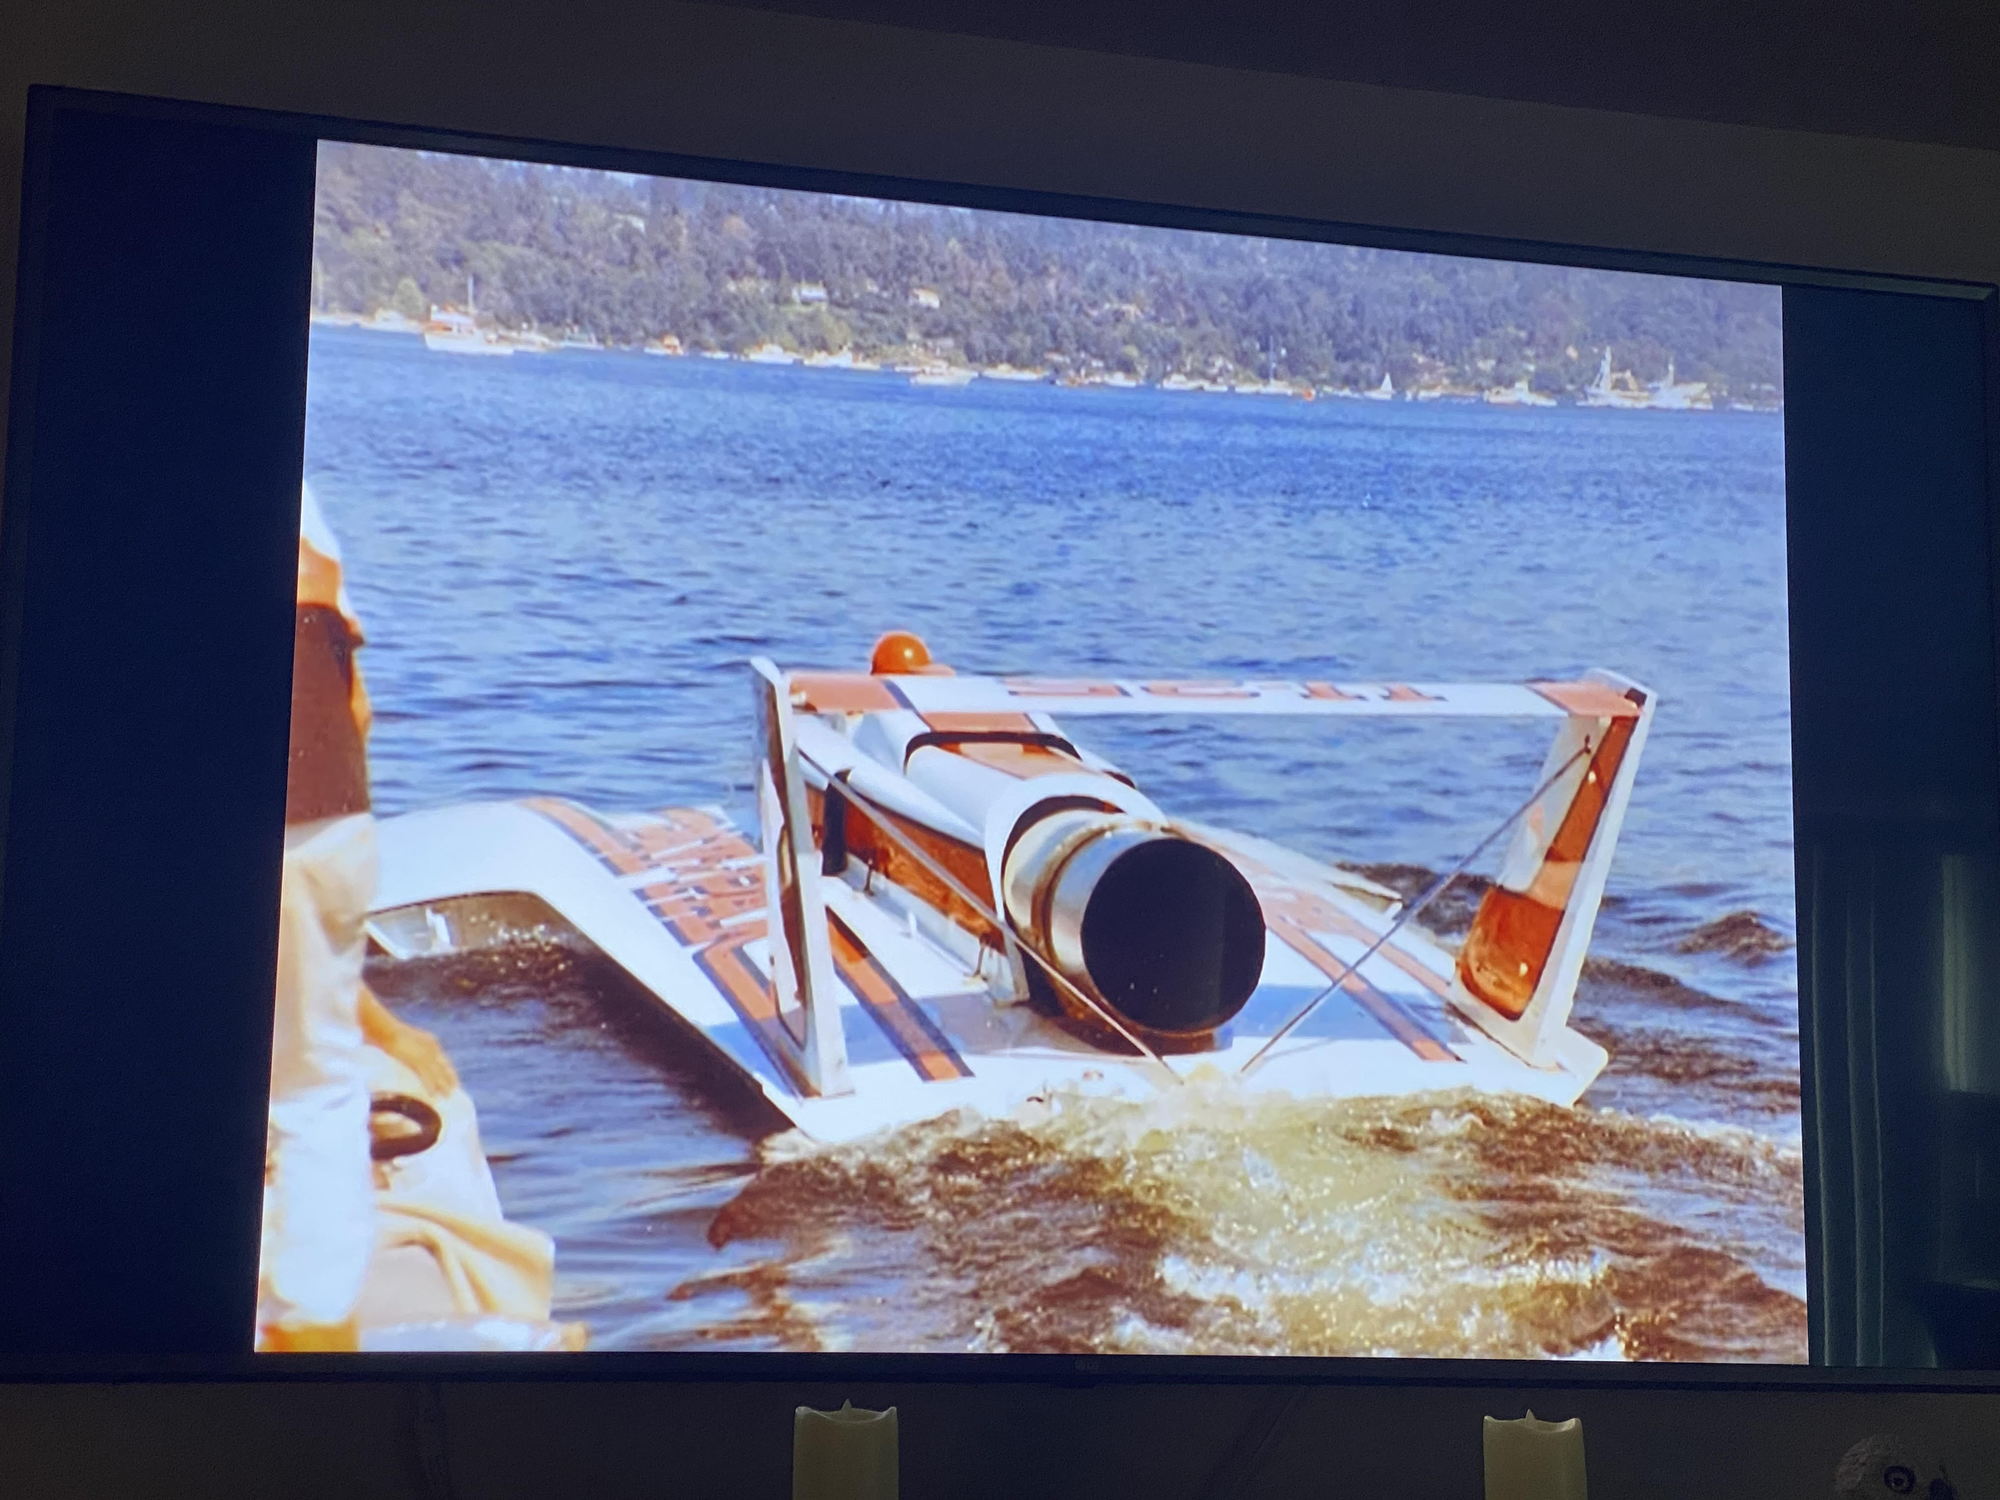
Latest updates...The first photo shows the before and after of the intake width. The original mold of the cowling has the intakes too narrow..Full scale is more wide...My builder added width to the intakes for a closer to scale look which I love...
Original size intakes on the left. New, more scale width on the right.
Coming along.
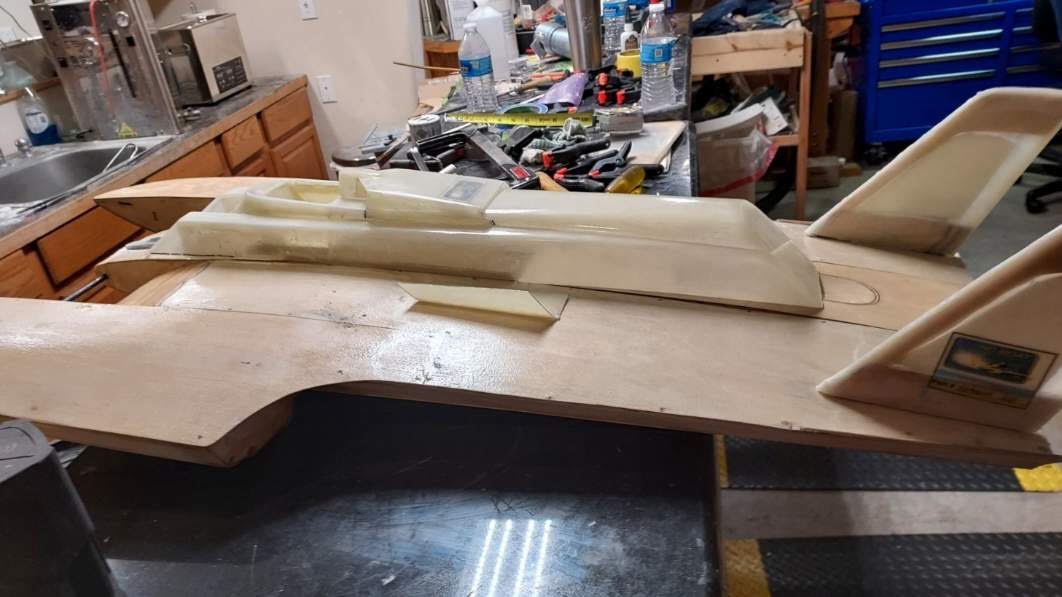
I wish the fins were not so close together...Not sure there is anything we can do about that.
Original size intakes on the left. New, more scale width on the right.
Coming along.
I wish the fins were not so close together...Not sure there is anything we can do about that.
09-04-2023, 07:45 AM
#24
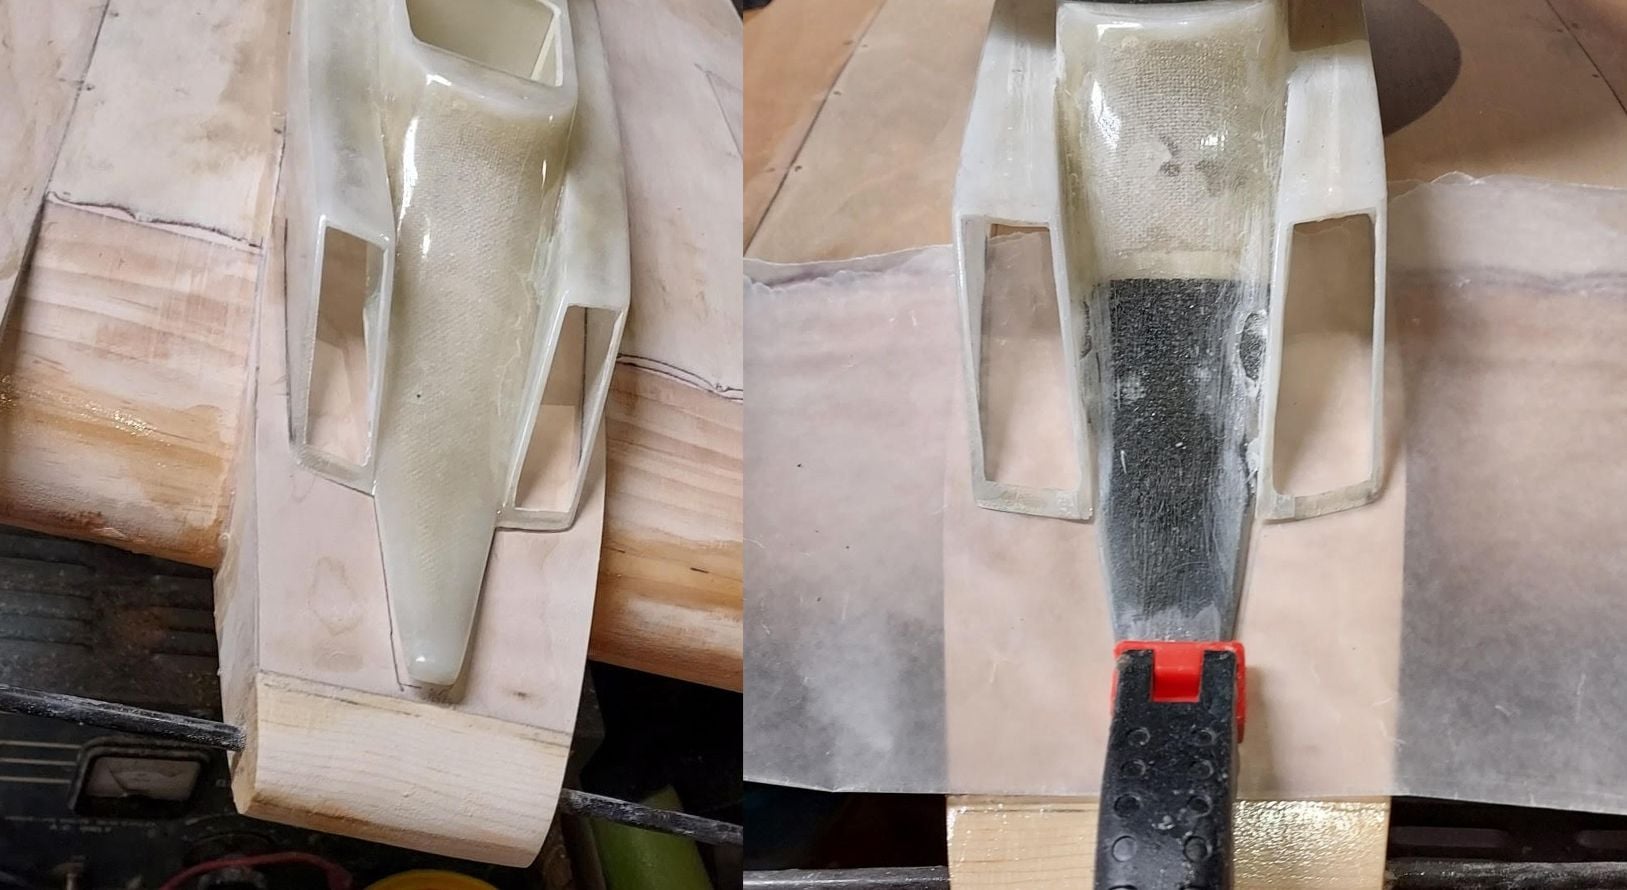
Actually, the verticals should be on top of the sponson insides, where it appears he has them in the bottom pictures, as well as in the picture from the front of the boat back at post 16. I you go to the HARM and look at all of the boats that have the twin tail arrangement, you will find it to be pretty much standard. Even the 1973 Pak has the tails on top of a vertical, lengthwise frame. The only difference is that the 73 has the tails mounted on the engine bay walls instead of the sponson insides, as shown in this picture:
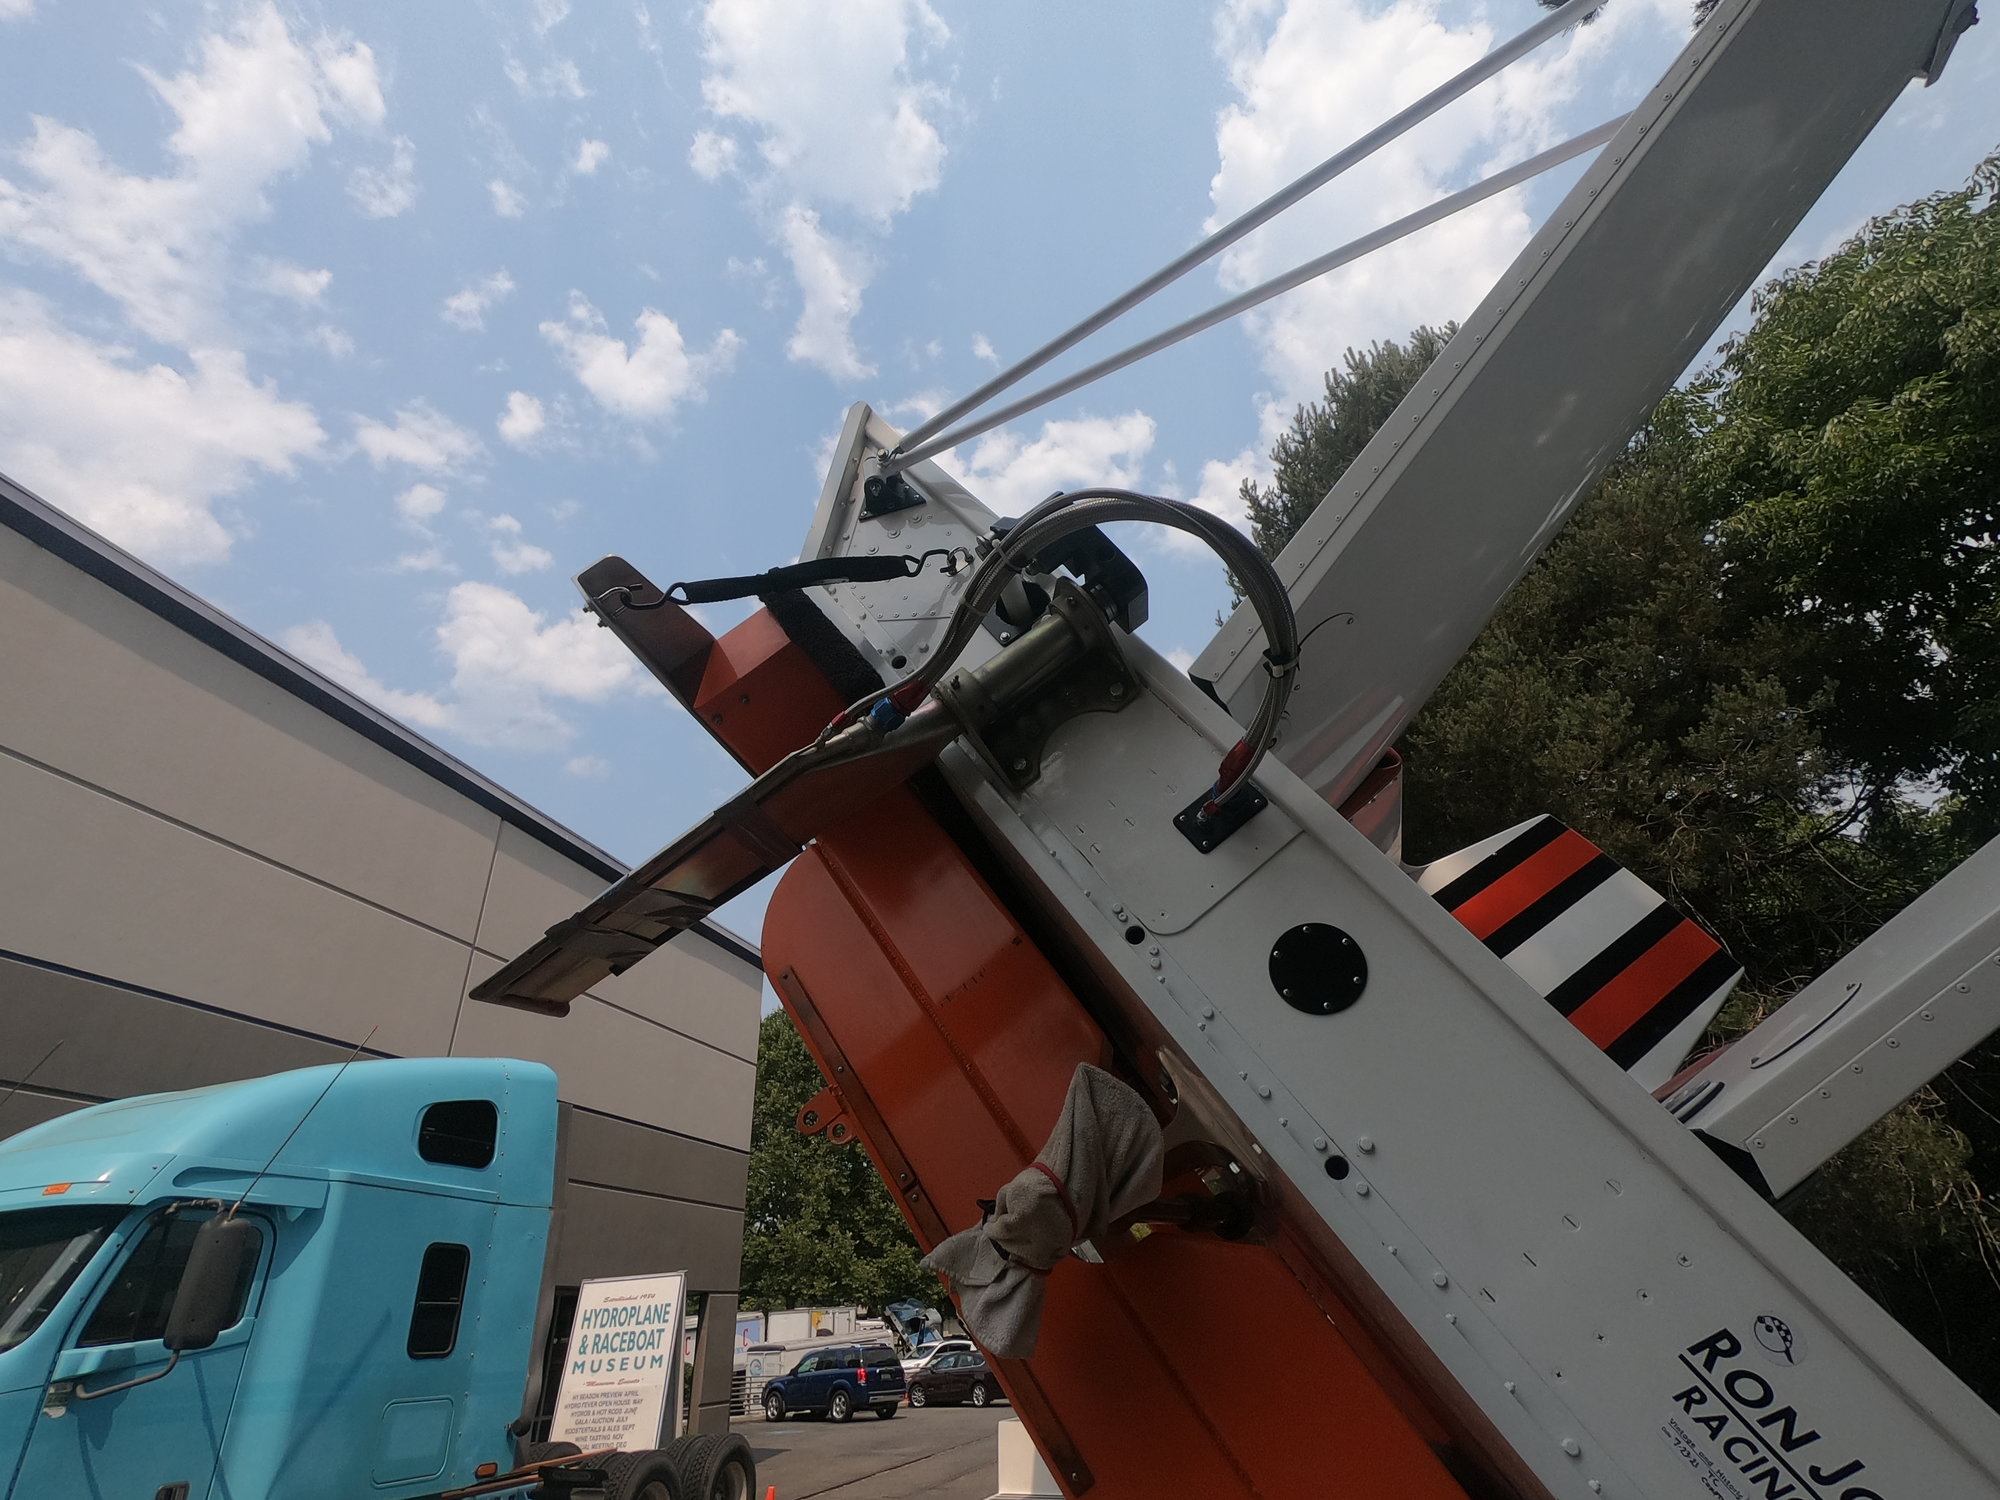
You can see the screw heads that attach the brackets that hold the engine bay walls to the transom directly below the tails. You can also see the screw heads for the similar brackets for the sponson insides above the tie down and just above the trailer's padded rail. This would be where the tails on your boat are actually mounted on the full sized boat
You can see the screw heads that attach the brackets that hold the engine bay walls to the transom directly below the tails. You can also see the screw heads for the similar brackets for the sponson insides above the tie down and just above the trailer's padded rail. This would be where the tails on your boat are actually mounted on the full sized boat
Last edited by Hydro Junkie; 09-04-2023 at 07:59 AM.
09-04-2023, 07:55 AM
#25
Thread Starter
You know much more than I do for sure, even the vernacular goes over my head, lol...However, to be clear, this is what I am referring to...The 82 vertical tails were closer to the edge and my builder agreed. The configuration of the current setup seems more contemporary...Have a look...Not trying to be argumentative in the least, this is merely going off of the eye test...Thoughts?
The following users liked this post:
birdo (09-04-2023)