


Bringing a Classic back from the ashes
 02-26-2016, 08:43 PM
#1

Thread Starter

Join Date: Feb 2016
Location: Arizona
Posts: 58
Likes: 0
Received 0 Likes
on
0 Posts
New to the forum so I thought I'd share a bit. I've owned a, what is now known as an, RC 10 Classic, though when. I ran it, it was just an RC 10 lol. After my best friend suffered a traumatic brain injury and I loaned him my car to get him engaged in something, I later got it back, stripped and missing almost all of the parts. I've kept what I had in a cloth bag for over 20 years and finally decided to get her back together. Thank God there are still parts available. Well the parts are coming in and she's starting to take shape again. I had a grand into it when she was running and I'll probably spend more than half that getting her running again. Some would ask, and some have, why not just buy a new one. The answer is she's a Classic and she was practically bullet proof when I had her. Plus, she was mine and I have some great memories, chasing real cars at around 40 mph lol. If anyone is interested, I'll keep posting updates on the rebuild. Right now I've got the chassis, front assembly and the new bulkhead installed along with the rear A-arms. Waiting on bearings to throw the tranny together. Needs a few odds and ends like rear shocks (I've only found 1 so far and I still need the springs and internals). Got the wheels but no rubber yet. Afterwards, it's all the electrics. Can't wait to run her again.
 02-28-2016, 07:37 AM
#3
Senior Member

That is cool you are bringing back your car. please keep us posted and as already stated pictures are a plus.
Mr. Bob
Countyline Hobbies
Grovertown, IN.
574-540-1123
[email protected]
www.countylinehobbies.com
Mr. Bob
Countyline Hobbies
Grovertown, IN.
574-540-1123
[email protected]
www.countylinehobbies.com
02-28-2016, 07:45 AM
#4
Thread Starter
Join Date: Feb 2016
Location: Arizona
Posts: 58
Likes: 0
Received 0 Likes
on
0 Posts
Absolutely, if I can figure out how this forum works, I will post pics lol. One thing I didn't count on is the parts lost I have is incomplete so I'm still short a couple of parts for the tranny. Always a disappointment lol. It's not like I can run down to the corner store and pick them up but I will find them. Plus I need to find an Allen small enough to put the screws on the diff gears lol. Ah, the trials 
02-28-2016, 08:42 AM
#5

Absolutely, if I can figure out how this forum works, I will post pics lol. One thing I didn't count on is the parts lost I have is incomplete so I'm still short a couple of parts for the tranny. Always a disappointment lol. It's not like I can run down to the corner store and pick them up but I will find them. Plus I need to find an Allen small enough to put the screws on the diff gears lol. Ah, the trials
02-29-2016, 09:06 AM
#6
Thread Starter
Join Date: Feb 2016
Location: Arizona
Posts: 58
Likes: 0
Received 0 Likes
on
0 Posts
You can upload pictures easily. Click the "Go Advanced" button to reply instead of the quick reply button. Then go to "Manage Attachments" and in the upper right corner is "Add Files". Click that and you're set. Click the + sign for up to three uploads at one time. Select the photos and click upload. After the upload, click "Done" in the bottom right of the screen. You can have more than 3 photos on one post, just follow the "Add files" part until all photos are at the bottom of the screen before clicking "Done" in the bottom right.
03-01-2016, 01:41 PM
#7
Thread Starter
Join Date: Feb 2016
Location: Arizona
Posts: 58
Likes: 0
Received 0 Likes
on
0 Posts
Installed the CVA set and rear axles. Took a bit of finagling since this part isn't original but thanks to YouTube I was able to figure it out. Still waiting on diff rings and a set of flange-less bearings before I can throw the tranny together, but she's coming along. I'm going full bearings throughout as I never had much patience with stock bushings.
03-01-2016, 02:21 PM
#8
Thread Starter
Join Date: Feb 2016
Location: Arizona
Posts: 58
Likes: 0
Received 0 Likes
on
0 Posts
That is cool you are bringing back your car. please keep us posted and as already stated pictures are a plus.
Mr. Bob
Countyline Hobbies
Grovertown, IN.
574-540-1123
[email protected]
www.countylinehobbies.com
Mr. Bob
Countyline Hobbies
Grovertown, IN.
574-540-1123
[email protected]
www.countylinehobbies.com
03-11-2016, 06:00 PM
#9
Thread Starter
Join Date: Feb 2016
Location: Arizona
Posts: 58
Likes: 0
Received 0 Likes
on
0 Posts
Well, she's moving along. Got the rear shock kit (would have been nice if the bottom caps were included), but they're built and waiting for another trip to the hobby store. Still, she's almost there. Finished the steering assembly, rear cambers are done, fit the front wheels (the rears don't fit) and mounted the tranny. All she needs is the shocks finished and installed, rubber for the front, wheels and rubber for the rear and she'll be a rolling chassis. Bought the new motor, my old servo still works lol, but not sure about my original speed control until I get power. Pics below showing progress.
 03-12-2016, 07:30 AM
#11
Thread Starter
Join Date: Feb 2016
Location: Arizona
Posts: 58
Likes: 0
Received 0 Likes
on
0 Posts
Yes indeed. I also have their aluminum tranny case but the hub bearings don't fix. I know I can get a set of bearings that will, but I have bearings and I have other parts to buy lol. Later I will.
03-12-2016, 06:51 PM
#12
Thread Starter
Join Date: Feb 2016
Location: Arizona
Posts: 58
Likes: 0
Received 0 Likes
on
0 Posts
Well, I had to order the shock spring holders, so a couple more days for that and the front rubber, but I did get the rear wheels and tires, slicks, painted and mounted. The motor needs a plastic washer before installing as the spur gear may be touching and we cannot have any of that lol.
03-13-2016, 10:43 AM
#13
Thanks for taking the time to post; showing new and old RCers your re-birth of a classic.
03-13-2016, 11:15 AM
#14
Thread Starter
Join Date: Feb 2016
Location: Arizona
Posts: 58
Likes: 0
Received 0 Likes
on
0 Posts
Those dyed components reminds me of what I did to my RC10 Stealth Team Car's parts. I wish I would have waited a lil' longer back in the day. The RC10 wasn't out yet when I first jumped into hobby grade RCs. I settled for The Frog as my introduction to the addiction. Who knows if I would have given the RC10 a second look back then. I'm guessing the price alone would have turned me away from purchasing one. It wasn't until '91 when I first got my hands on a Team Associated's RC10 black tub beauty. It's been pretty much a love affair ever since then with AE and me.
Thanks for taking the time to post; showing new and old RCers your re-birth of a classic.
Thanks for taking the time to post; showing new and old RCers your re-birth of a classic.
By next week I should have a rolling chassis and get a radio and body kit. She's going to be a pearl white FR-S, which is what I drive. I plan on running her on the street and asphalt and I'd be interested in any advice on a good motor / Gear combo to get the best speed out of her. I don't think the current motor is going to give monstrous speed. I actually still have my Trinity Diamond motor which I ran originally. It's currently at the hobby store where a friend is doing a rebuild on it. I may swap that motor out if it'll run quicker. Plus it adds to the vintage lol.
03-13-2016, 01:28 PM
#15
Thread Starter
Join Date: Feb 2016
Location: Arizona
Posts: 58
Likes: 0
Received 0 Likes
on
0 Posts
Motor is installed. All it took was a .75" nylon washer with an inner diameter of .504". Works perfectly and doesn't interfere with the vents. Washer is about 1/8th inch thick. See pics below.
03-17-2016, 08:29 PM
#16
Thread Starter
Join Date: Feb 2016
Location: Arizona
Posts: 58
Likes: 0
Received 0 Likes
on
0 Posts
Last of the needed parts finally came in. I had to get and install the front axle conversion kit because tires for the existing rims are too hard to come by and I didn't want to install the same old narrow stock wheels. Tomorrow I'll finish the shocks, install them and the steering servo and rod and she'll be a rolling chassis.
03-18-2016, 05:14 AM
#17
Without the nylon washer, you were not able to position the pinion gear correctly?
03-18-2016, 05:38 AM
#18
Last of the needed parts finally came in. I had to get and install the front axle conversion kit because tires for the existing rims are too hard to come by and I didn't want to install the same old narrow stock wheels. Tomorrow I'll finish the shocks, install them and the steering servo and rod and she'll be a rolling chassis.
Did I miss something? Is your motor mount a replacement?
The more I check out this thread, the more I want the Worlds Car kit. The only problem is that I made a promise to myself...no more 2wd buggies
 .
03-18-2016, 12:46 PM
.
03-18-2016, 12:46 PM
#19
Thread Starter
Join Date: Feb 2016
Location: Arizona
Posts: 58
Likes: 0
Received 0 Likes
on
0 Posts
03-18-2016, 01:51 PM
#20
Thread Starter
Join Date: Feb 2016
Location: Arizona
Posts: 58
Likes: 0
Received 0 Likes
on
0 Posts
Makes sense to me. Plus, I still dig the "blacked out" look on RC cars.
Did I miss something? Is your motor mount a replacement?
The more I check out this thread, the more I want the Worlds Car kit. The only problem is that I made a promise to myself...no more 2wd buggies.
Did I miss something? Is your motor mount a replacement?
The more I check out this thread, the more I want the Worlds Car kit. The only problem is that I made a promise to myself...no more 2wd buggies
.
03-19-2016, 04:49 PM
#22
Thread Starter
Join Date: Feb 2016
Location: Arizona
Posts: 58
Likes: 0
Received 0 Likes
on
0 Posts
The bulkhead is Dhawk. I also have the Dhawk tranny case but the bearings didn't fit and I'd rather spend money on more parts rather than buy more of the same bearings that fit.
03-21-2016, 06:58 PM
#23
Thread Starter
Join Date: Feb 2016
Location: Arizona
Posts: 58
Likes: 0
Received 0 Likes
on
0 Posts
Finally Finished!!! Installed the rear shocks and steering servo and she's ready to run. I picked up the Lexan FR-S body kit. Now I just need to figure out how to fit the body to the chassis and do it justice. A few weeks and I'll get the radio, battery (going with LiPo) and probably a new speed control and she'll be off and running. It's good to see her whole again after all these years.
11-06-2019, 06:49 PM
#24
Thread Starter
Join Date: Feb 2016
Location: Arizona
Posts: 58
Likes: 0
Received 0 Likes
on
0 Posts
Been a long time since I commented on this one. A lot has happened. Finished the Edinger and she runs just fine. I gave up on the notion of mounting an Fr-s body on her and went with just a stock Traxxas shell until I find something better. While scrounging for spare parts I came across a Champion�s Edition RC10 for next to nothing, cost wise bit instead on canibalizing the CE, I restored that one as well. She now sports a Brushless / 2s LiPo and she really moves. She�s almost too fast as I�m having trouble keeping her front end down. I also tried my hand at painting a body, since I hadn�t done that in 30 years. Now to starting two new vintage road car projects. 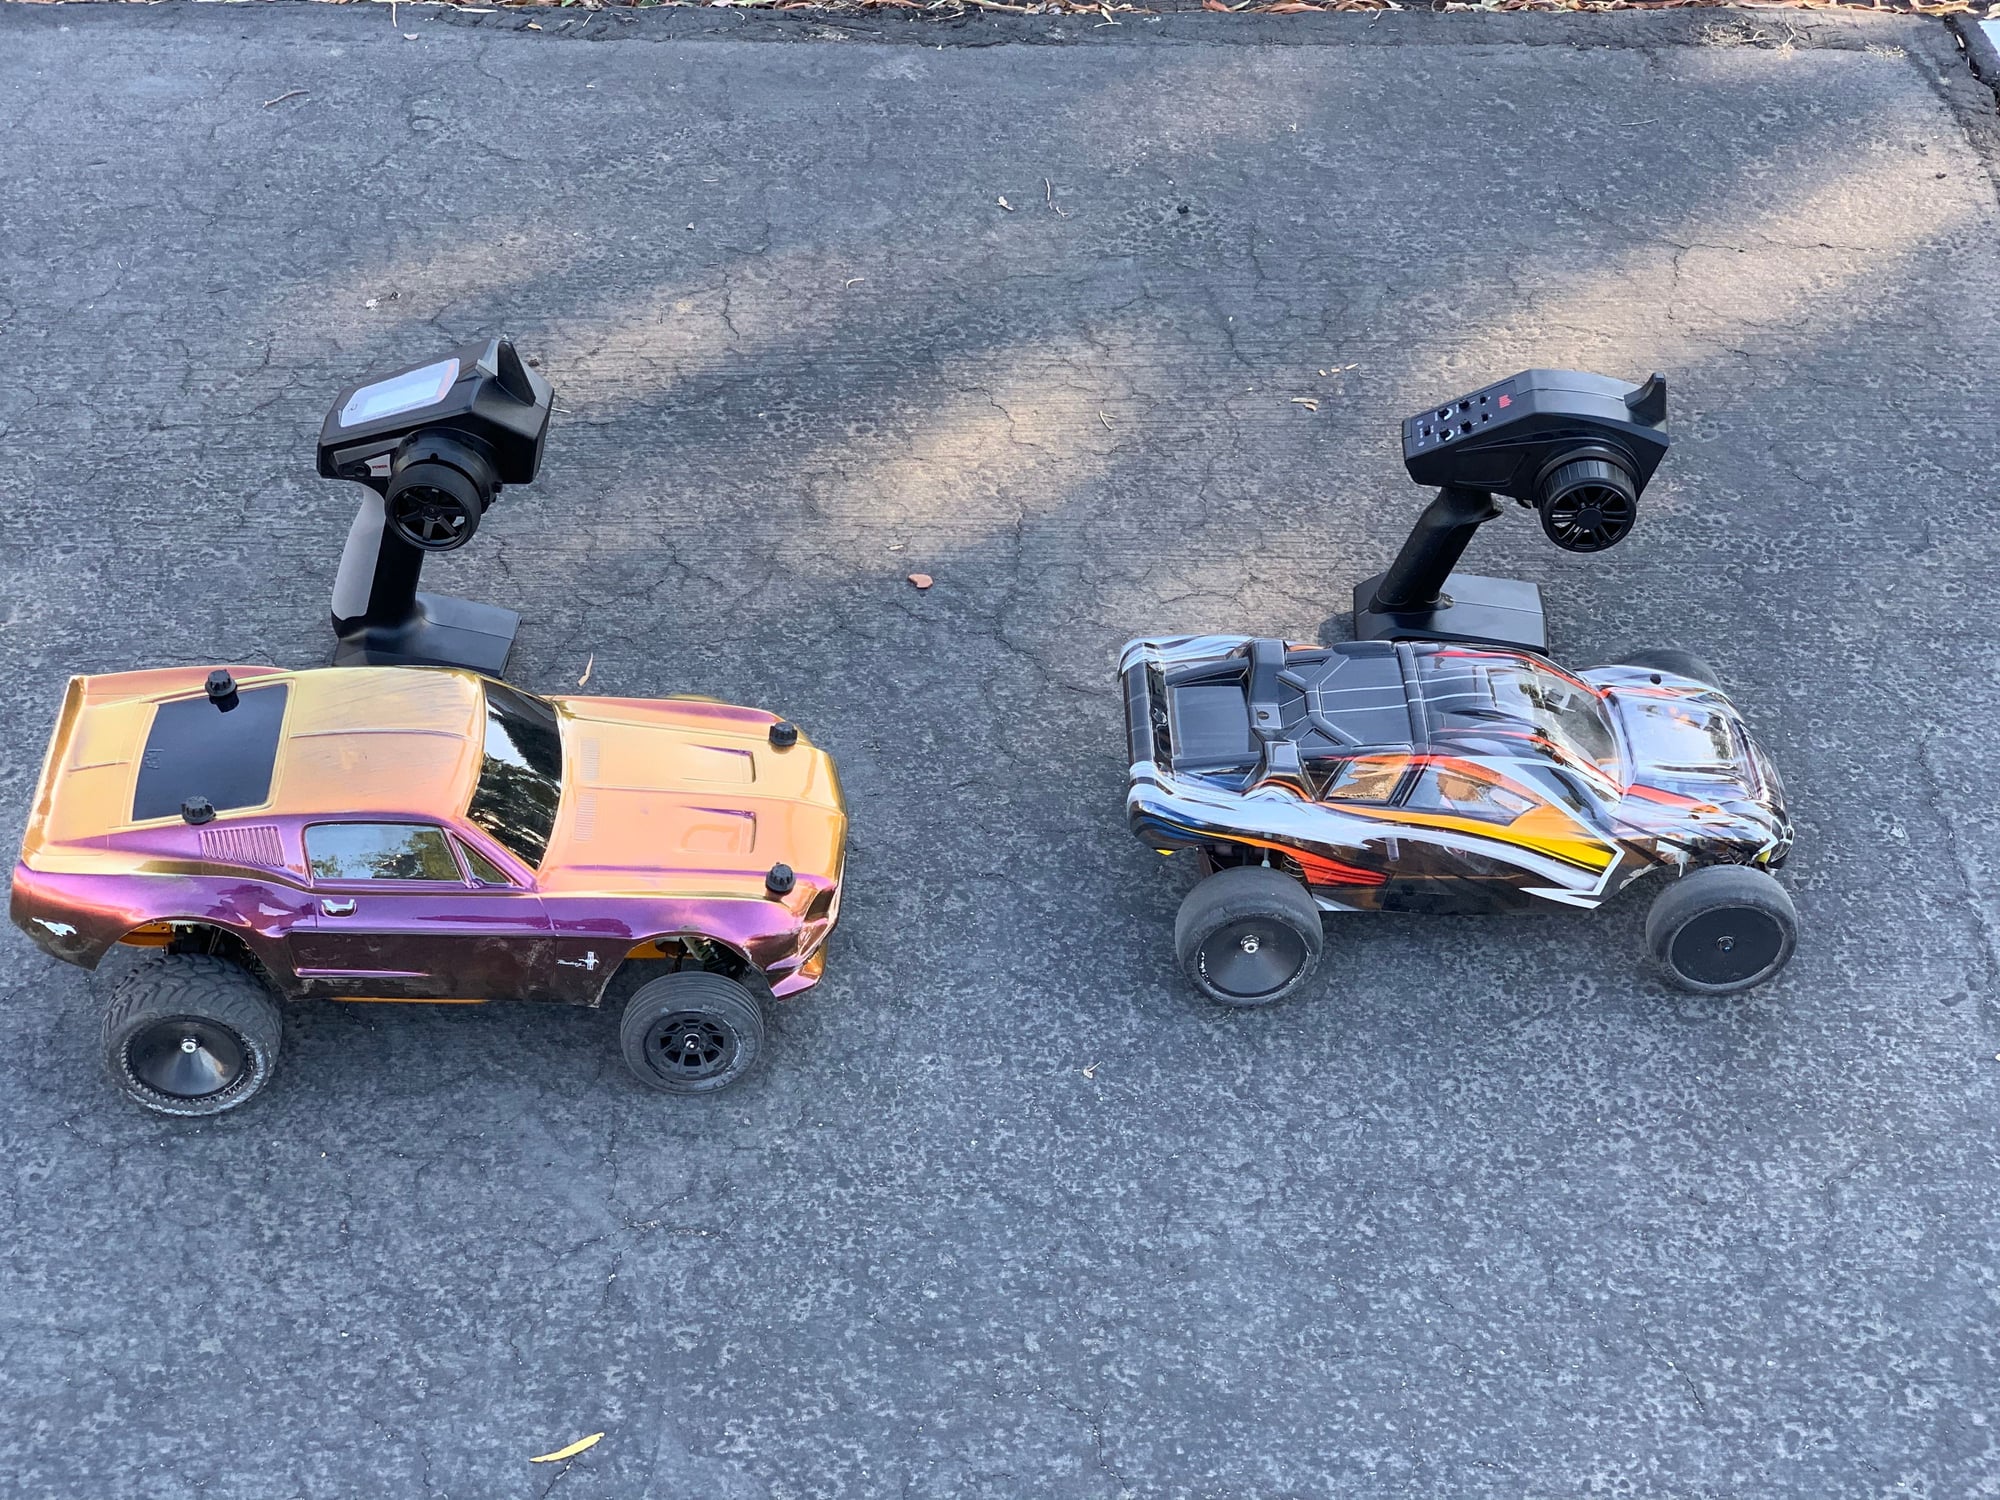
12-23-2019, 12:01 PM
#25
Junior Member

Sweet! Nice job, and looks like a blast. It's good to see some old junk brought back to life. I'm not a big fan of electrics, but RC-10s were definitely top shelf, back in the day. Awesome job on the bodies, BTW!
