


Futaba FX10 Polishing
 09-27-2013, 03:38 PM
#1

Thread Starter
Guys I'm going to use this thread to follow the rejuvenation or polishing of an old Futaba FX10. I'm going to stop short of calling this a restoration as I'm going to use as much of the original parts as possible. My intent is not to make this car 100%. It's simply to make a nice semi restored classic that can be passed along to someone to either place on their shelf or finish to the degree that they see fit.
These days my personal collection has far outgrown the space I have to store them so the only real way for me to continue to handle new and different cars is to buy a couple at a time, typically from old collections then clean them up to some degree. Once I have taken them as far as I'm going to I am forced to part with them to make room for the next project. Don't get me wrong. When that special car or truck comes along I seem to find one more place to tuck it away but the vast majority go up forsale shortly after I'm done.
Follow along as I take this old girl and make her presentable again.
Here is what I'm starting with. The old girl looks worse for wear than she actually is. There is about a 1/4 inch of dust covering most of the chassis and it appears that the car was left out in the open when the previous owner had his house repainted so there is a fair amount of paint overspray on the car. It also appears to have been stored in a really damp place so I don't have much faith that either of the servos will ever work again. The good news is the gearbox is smooth and doesn't make any kind of odd noises and nothing is bent or broken. The only missing piece seems to be the front bumper.
Here you can see rust on the springs and shock pins. The wheels have yellowed badly and the main chassis is also yellowed and dirty.

Looking at the rear you can see that overspray I was talking about as it shows nicely on the red rear wing. Note the rust on the motor. That's going in the trash for sure.

The underside shows that this car has been run but nothing is broken or badly worn. I don't honestly think it was ran all that much.

Here she is with the body removed. Thankfully the inside looks a lot better than the outside.

 10-04-2013, 06:42 PM
#3
Thread Starter
Guys I had some time last night to tear into the FX10. All I can say is that I'm thankful everything came apart without breaking. Some of the parts were badly rusted. Others were just stuck together from years of goo settling on the car.
Over all it took about 10 mins to tear the car down from beginning to end. Not bad really.
With the wheels and tires out of the way we can start to see what were working with. This isn't pretty.

Still not pretty.

Stripped of its front suspension and guts. All that's left is the rear end.

The bottom. Why exactly am I doing this again!!!!!!

Here's all the pieces. Thankfully nothing is broke and I didn't hurt it during disassemble.

Now the hunt is on for parts. Gonna need mostly new metal parts like springs, motor, Shock shafts etc.
10-05-2013, 05:23 AM
#4
Thread Starter
Well guys I spent spent some quality time last night with tooth picks, q-tips and tooth brushes and got all the gunk and junk off the chassis. From there it took about an hour with some 400 grti sand paper to remove 95% of the scratches and gouges from the main chassis. While it still looked terrible it was clean and smooth. First thing this morning I stopped by my buddies shop (also a huge RC car nut) and had him prime the chassis. This was done with two coats of adhesion promoter then 2 coats of primer with a flex agent so it won't ever flake or peel.
I prefer to use real automotive products whenever I can as the quality, durability and finish are better than anything you can achieve with hobby or hardware store stuff. Yeah it costs more but you only do it once.
Going to let it cure for a couple of days then its a couple of coats of pure white to get it back to the original color.


 10-10-2013, 10:45 AM
#5

Join Date: Jan 2007
Location: Oshkosh,
WI
Posts: 221
Likes: 0
Received 0 Likes
on
0 Posts
My FX-10 and I are jealous! Never thought of painting the chassis back to white. Though mine isn't nearly as bad. I was going to try the old peroxide and sun method to bring mine back, however after finding a crack, painting seems a better option. Very nice. If you needs parts check Team CRP for vintage FX-10 bits. I have some form an almost complete second car, but most are not worthy. Keep the pics coming. S
10-11-2013, 08:17 AM
#6
Thread Starter
Thanks Skippy, The Chassis, Wheels and Wing are all at my buddies shop being painted. I'm hopping to have them back tonight as numerous parts have begun arriving from Ebay.
I'm hoping to have some time to dedicate to this project this weekend so I'll get some more pics up in the next few days.
I'm hoping to have some time to dedicate to this project this weekend so I'll get some more pics up in the next few days.
Last edited by john01374; 10-23-2013 at 10:23 AM.
03-21-2022, 08:46 AM
#7
Thread Starter
It's been almost 10 yrs since I started this thread. In that time my interests have strayed away from RC and into other hobbies like auto racing, mid to high power rocketry and a bunch of other little things. While I took a break from building and actively running these cars daily, I've never stopped collecting and have kept up with all of the Tamiya special releases and all of the re-releases from various manufactures. I feel like I lost interest due to the limited space I had to run these and the one track we had locally closed up so I pretty much just put things away. I have recently purchased some land that will allow me to build my own vintage friendly track so I'm happy to say that I've been back in the hobby for a few month now.
As luck would have it I was at a flee market a couple of weeks back and stumbled on a seller that had a large box of misc. RC car parts. Looking through the box I was excited to see a couple of half built but never completed Strikers, an almost completed FX10 and a couple of of fairly well used FX10 Chassis's along with a bunch of new and used parts in bags and containers. I was able to pick up the entire box of parts for a very reasonable amount and it reminded me that I never finished this thread. After Picking through the parts I decided that I wanted to do two different builds.
The first build will be a runner and be documented below. This build will have modifications to the chassis for strength, run bearings and modern electronics. It will look very much stock but stronger with better parts. For this I'm not concerned with scratches on parts etc. The used parts will be what are going into this build. The second build will be a 100% stock build with all original parts including vintage radio gear. This will be a shelf queen that will be done in box art and never driven.
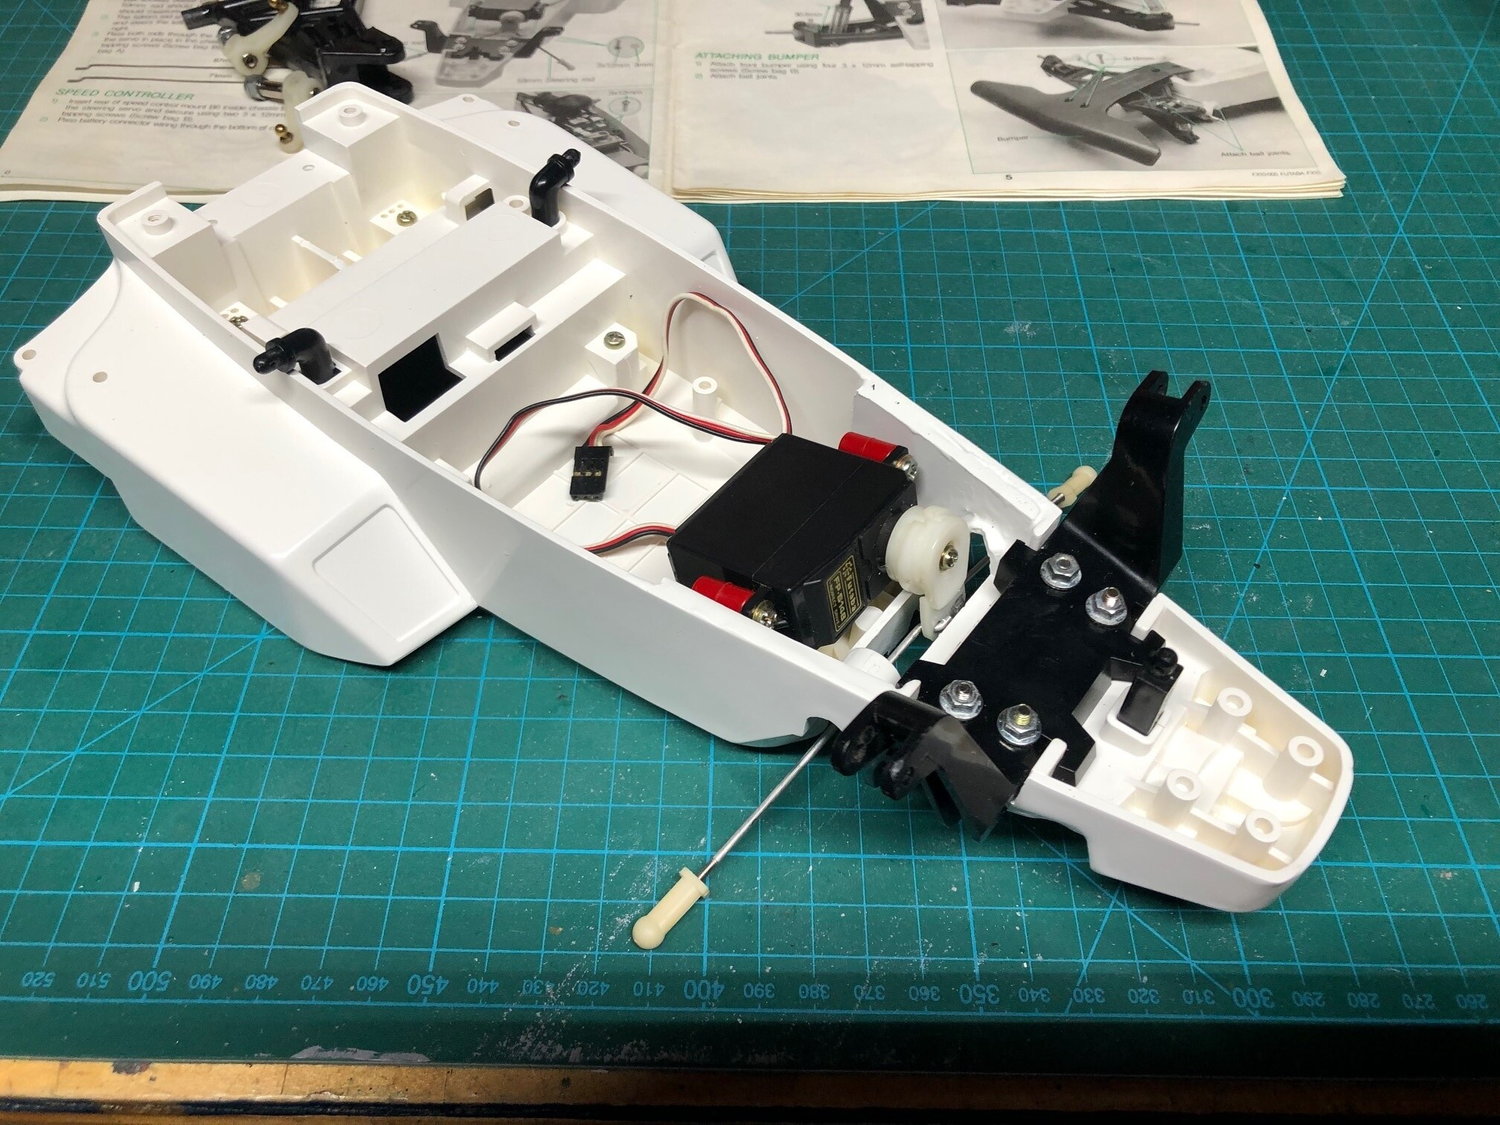
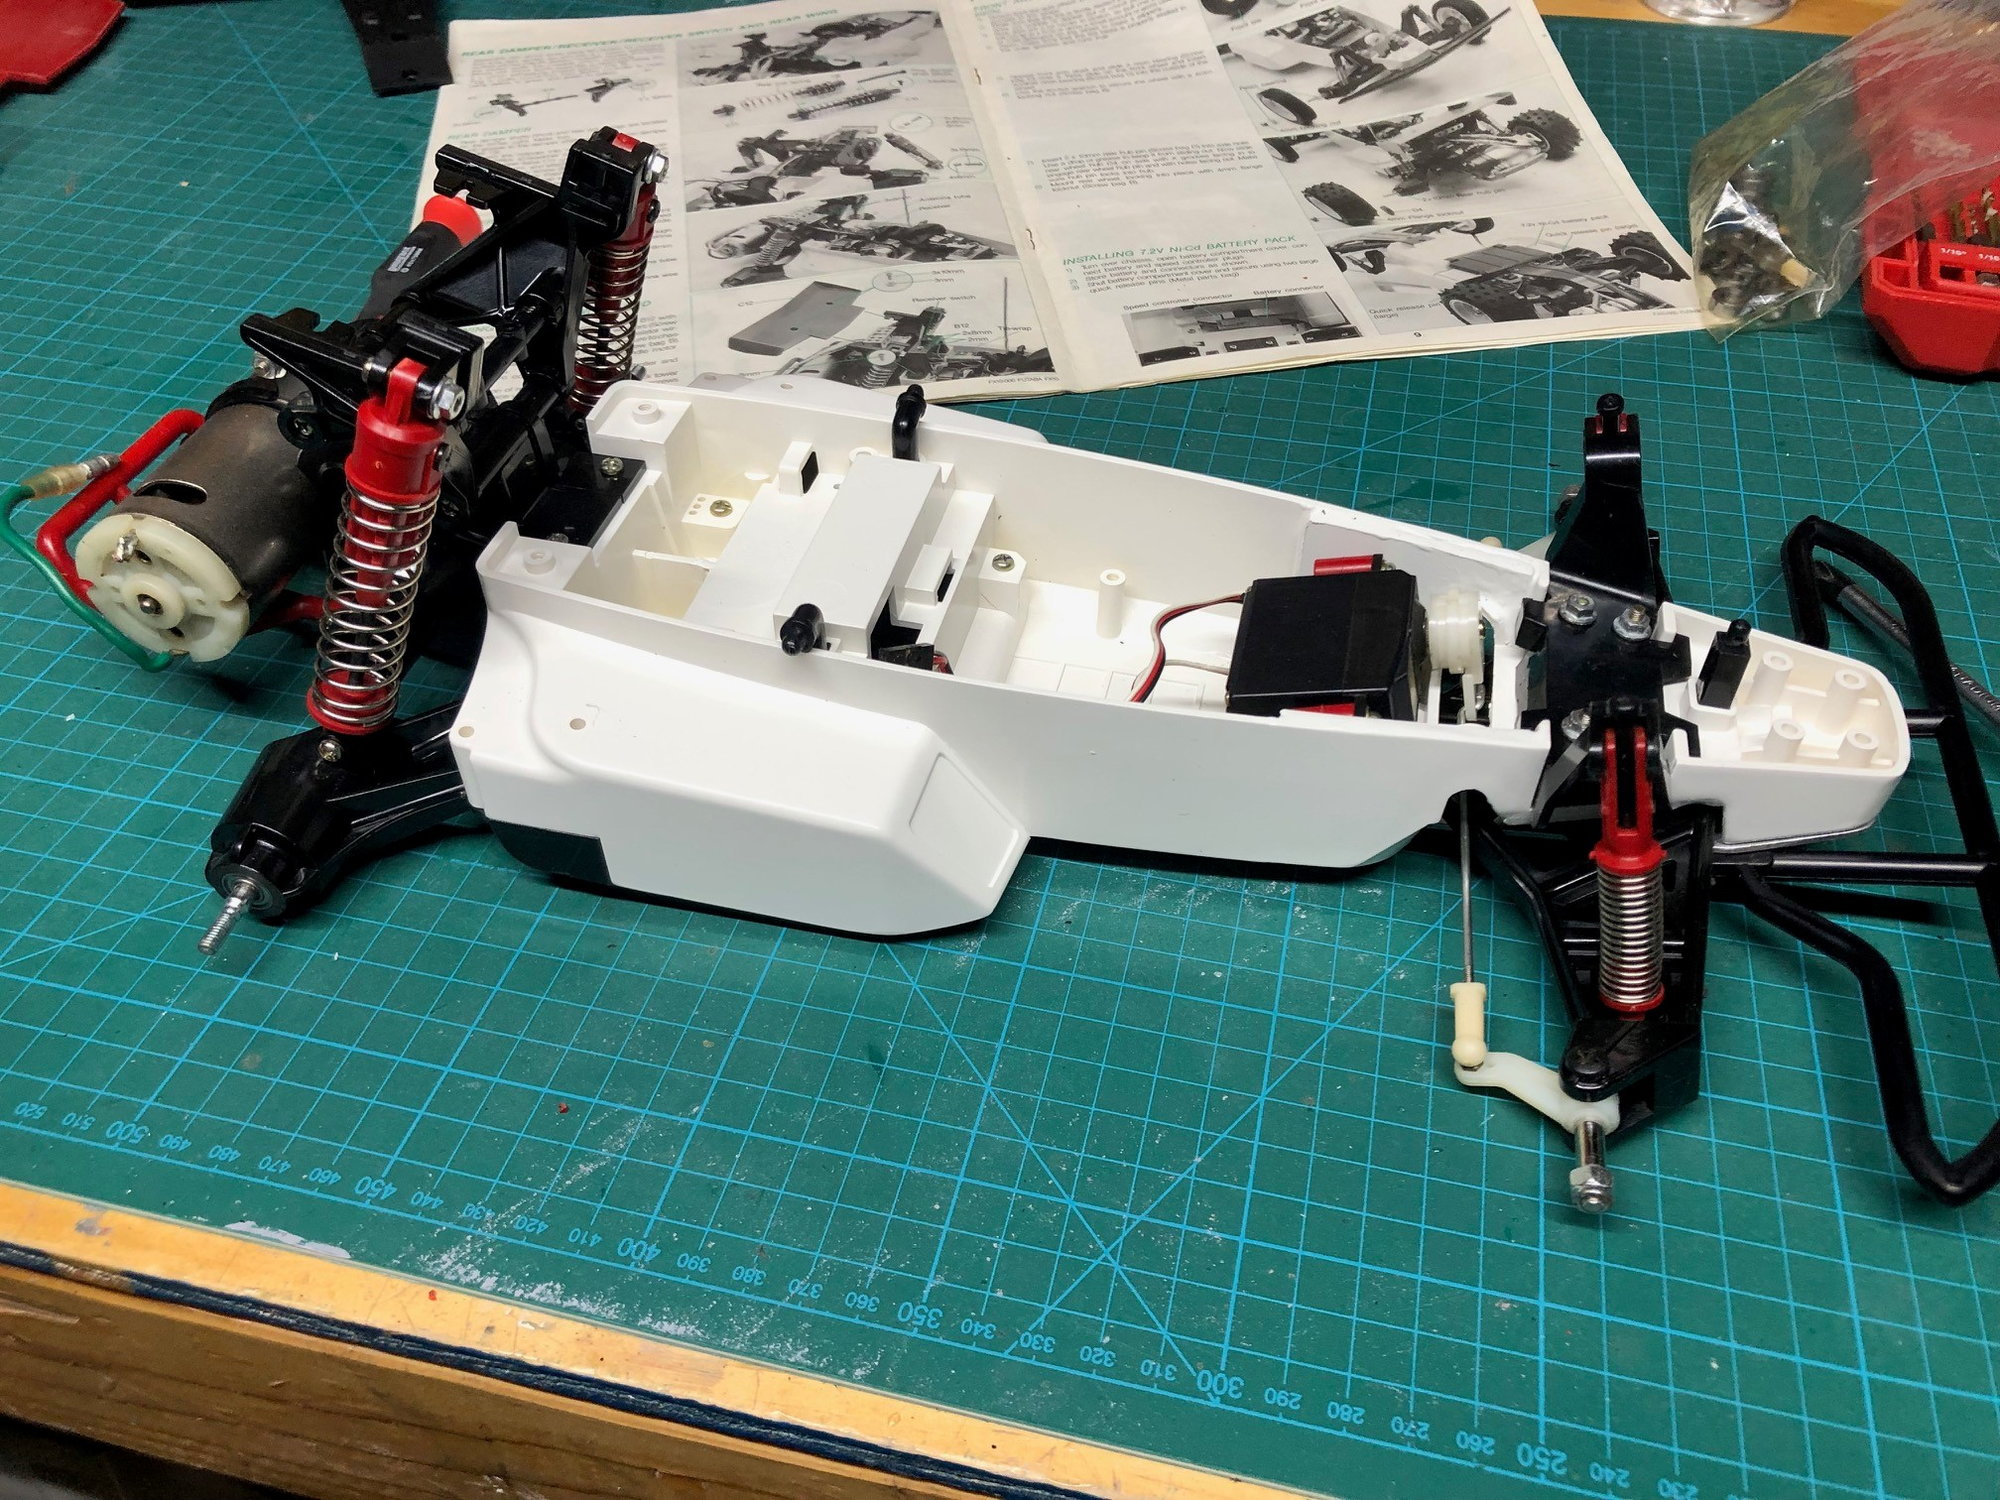
Enough with the back story. Lets get building. Below we see the main chassis. This is a well used chassis that was sanded, filled and painted to make it presentable. Three coats of Duplicolor basic white was what was required to get it to this point. The major issue with these cars were the front of the chassis. It's near impossible to find one that isn't broken or cracked in some way. To strengthen the chassis area I have used 1/8" ABS sheet stock cut to fit the inside and under the chassis. This has been bonded to the tub.
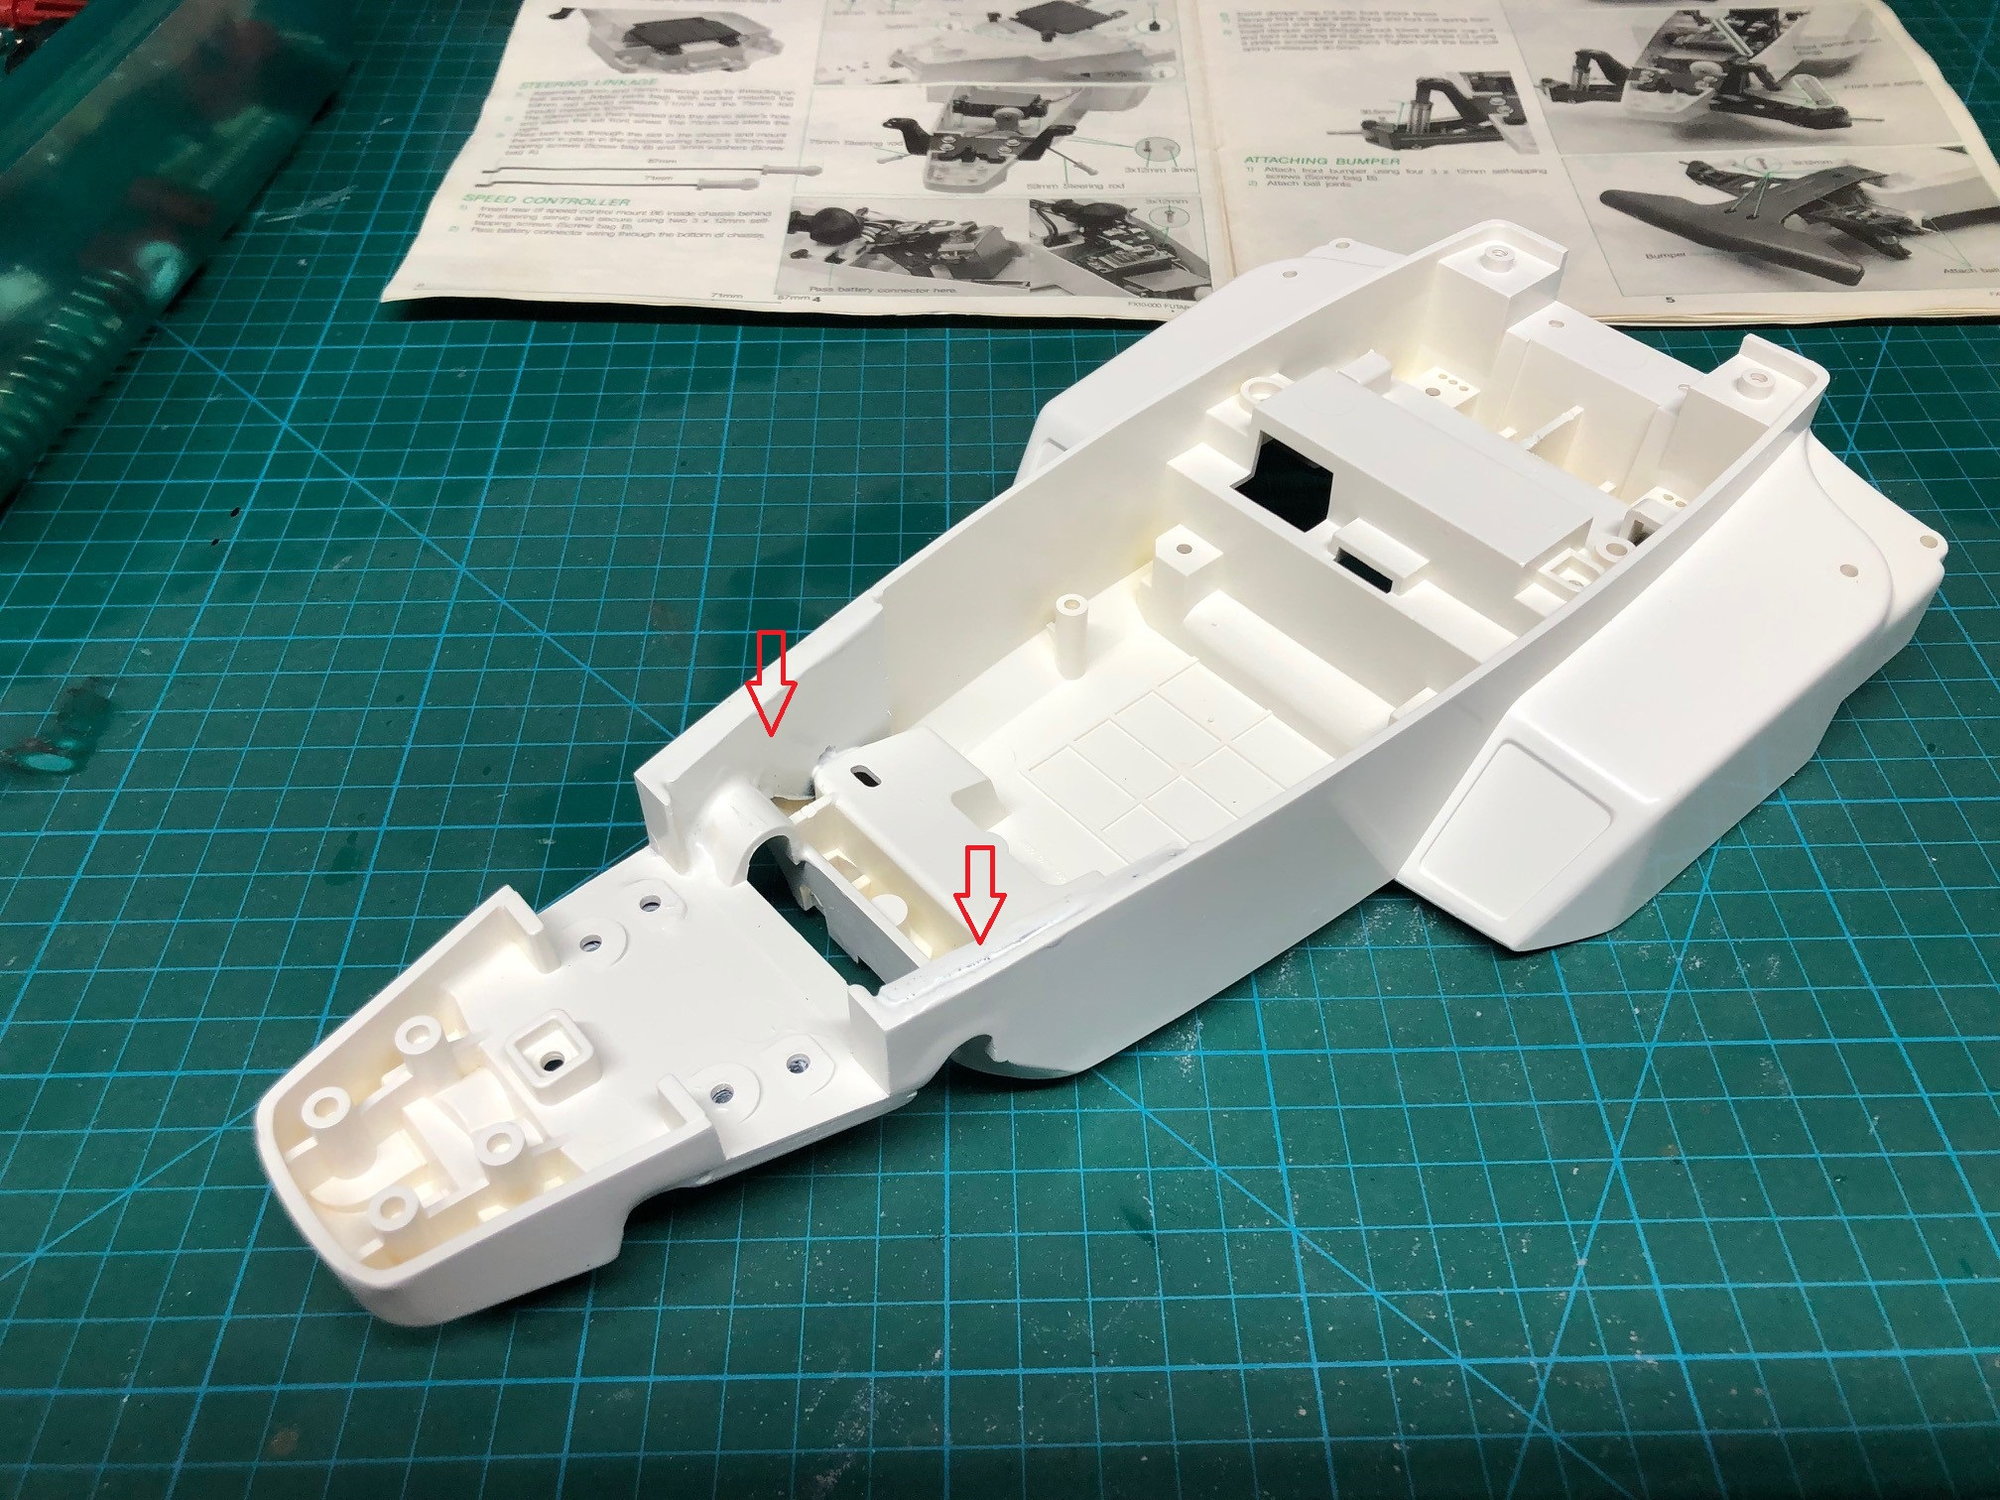
Main Chassis. Not the addition of 1/8 ABS sheet stock to strengthen the front of the chassis
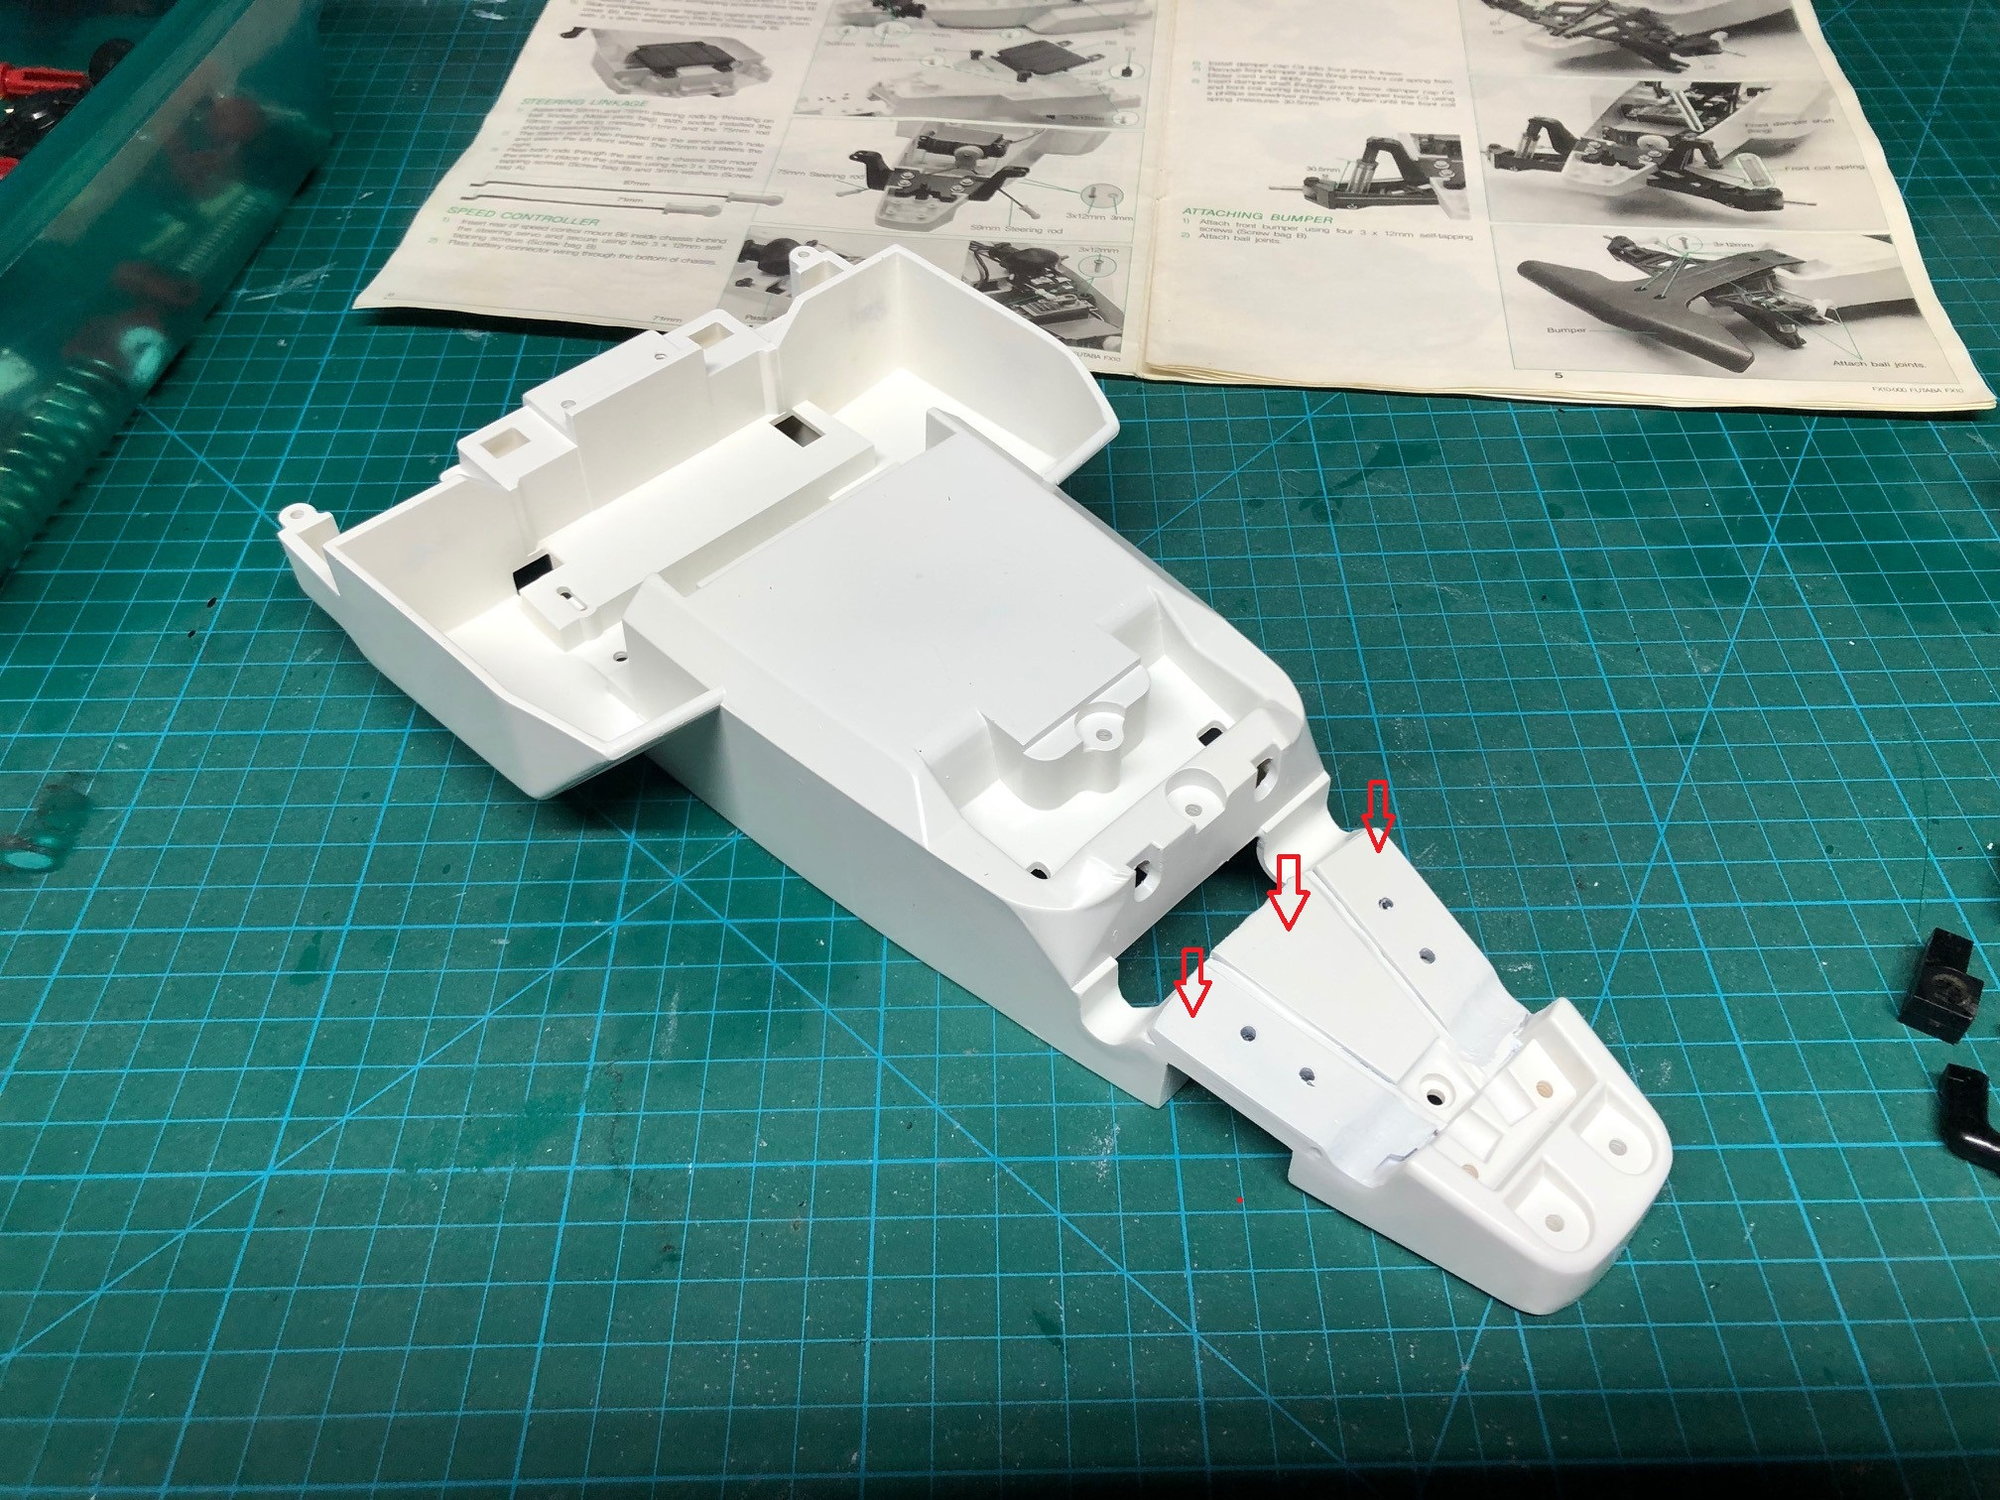
Main chassis underside. Additional bracing was added in the forward locations as shown for strength.
Next up installing the front body mount, Shock tower and rear body mounts. The front shock tower did require screws that were 1/8 longer than stock as they needed to pass through the extra thickness of the ABS sheet. The lower battery door mounts were also installed underneath.
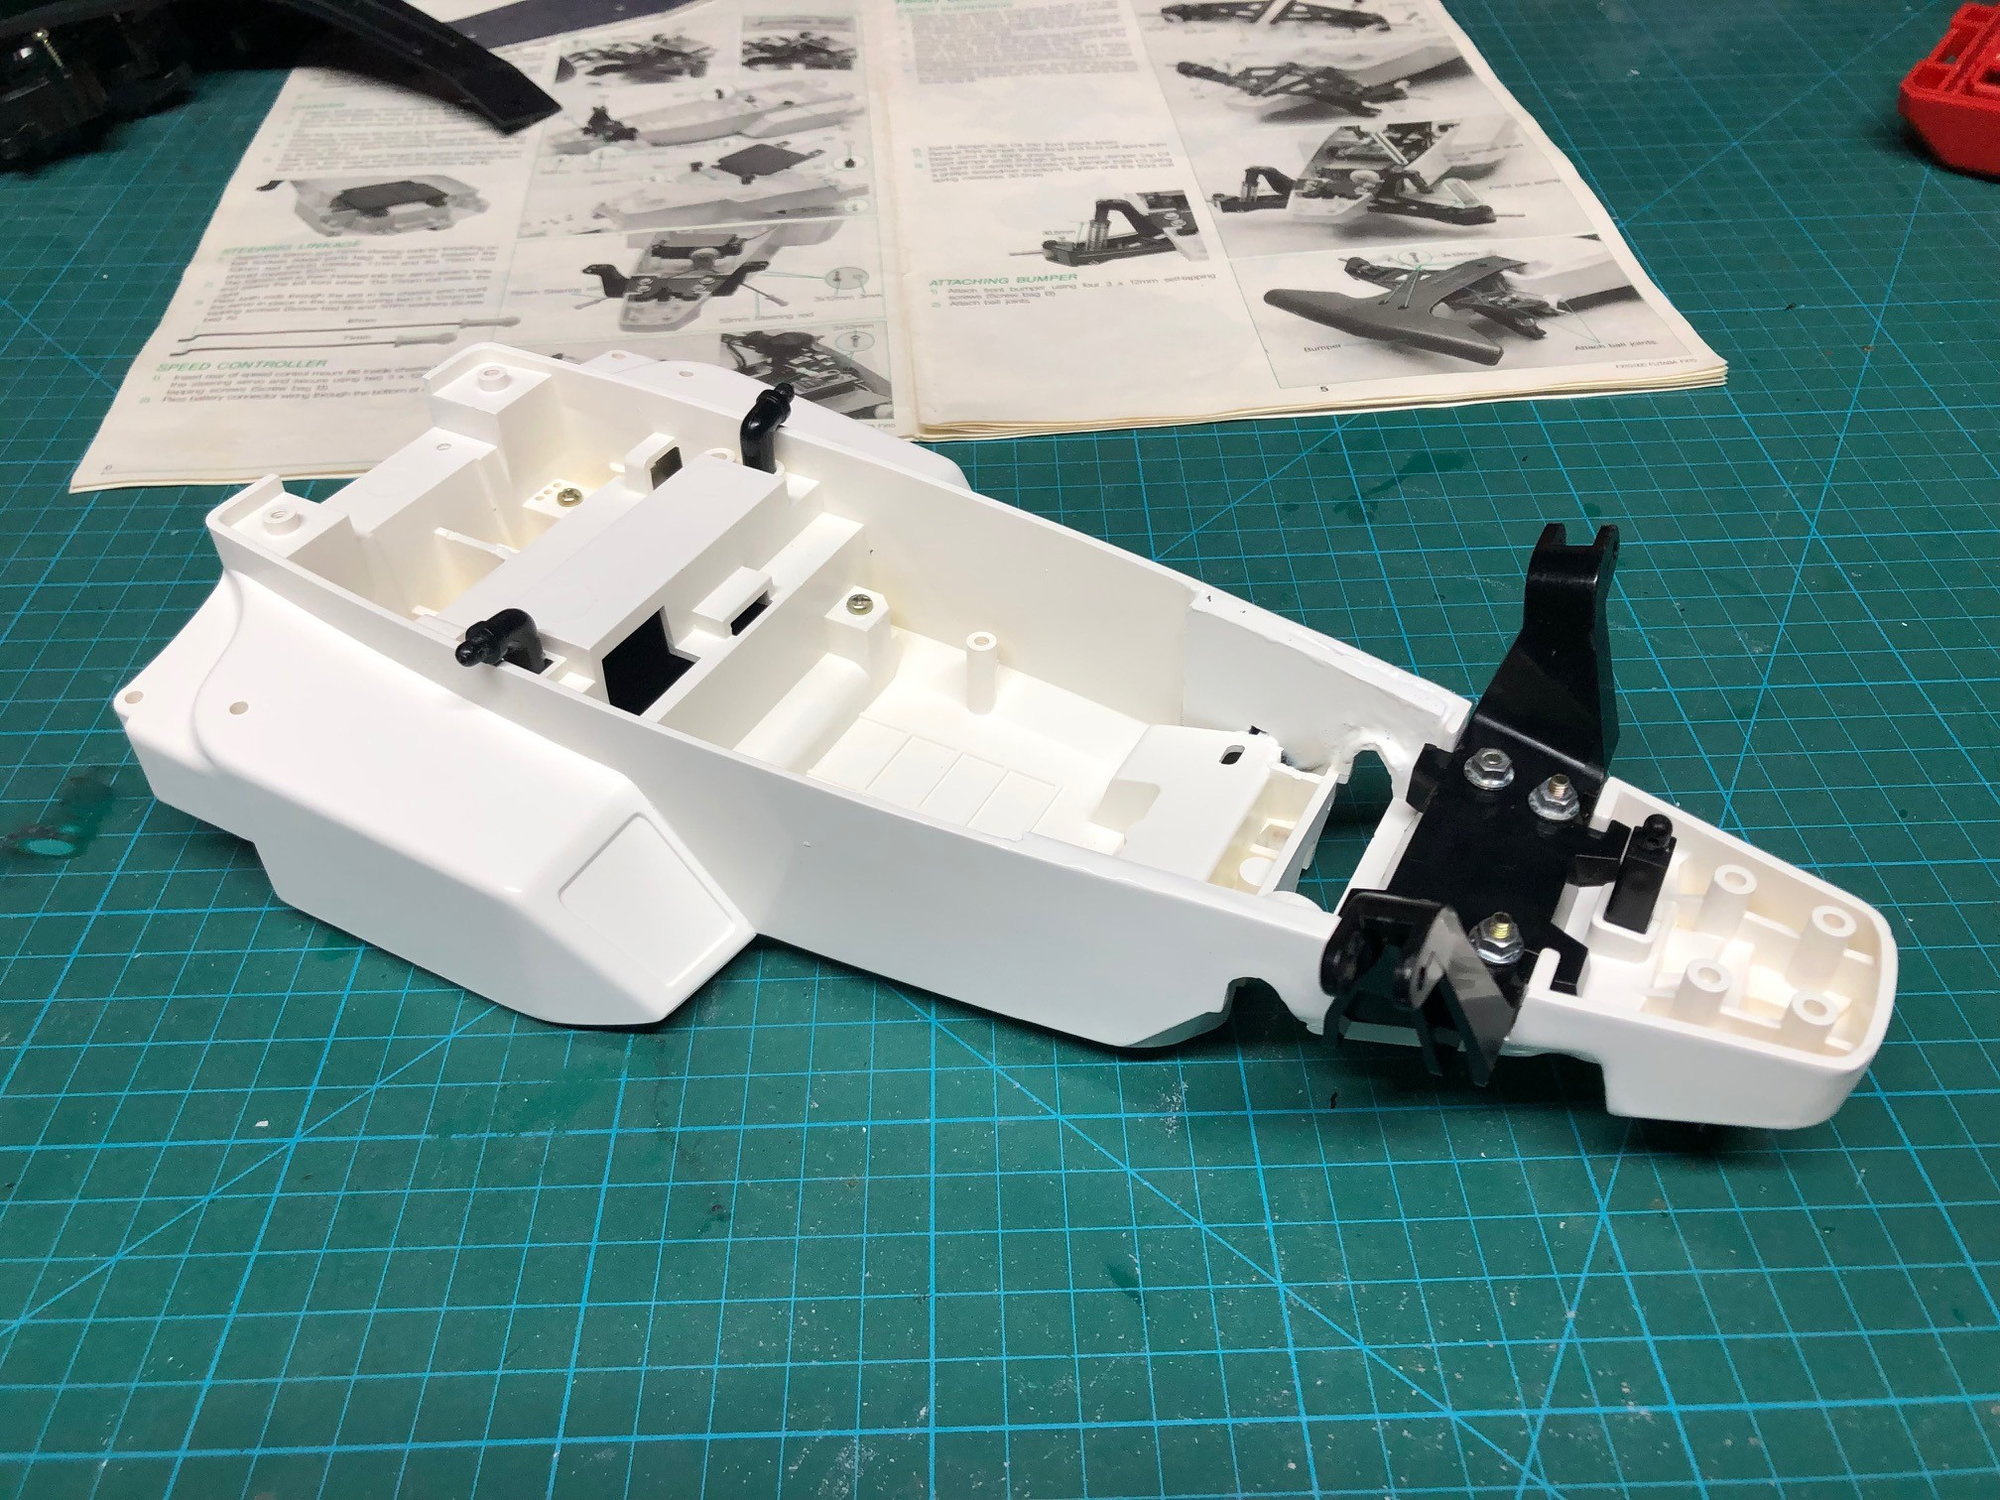
Then it was time for steering. I have a bunch of these old school Futaba S148 servos so I installed one along with the stock servo saver and tie rods.
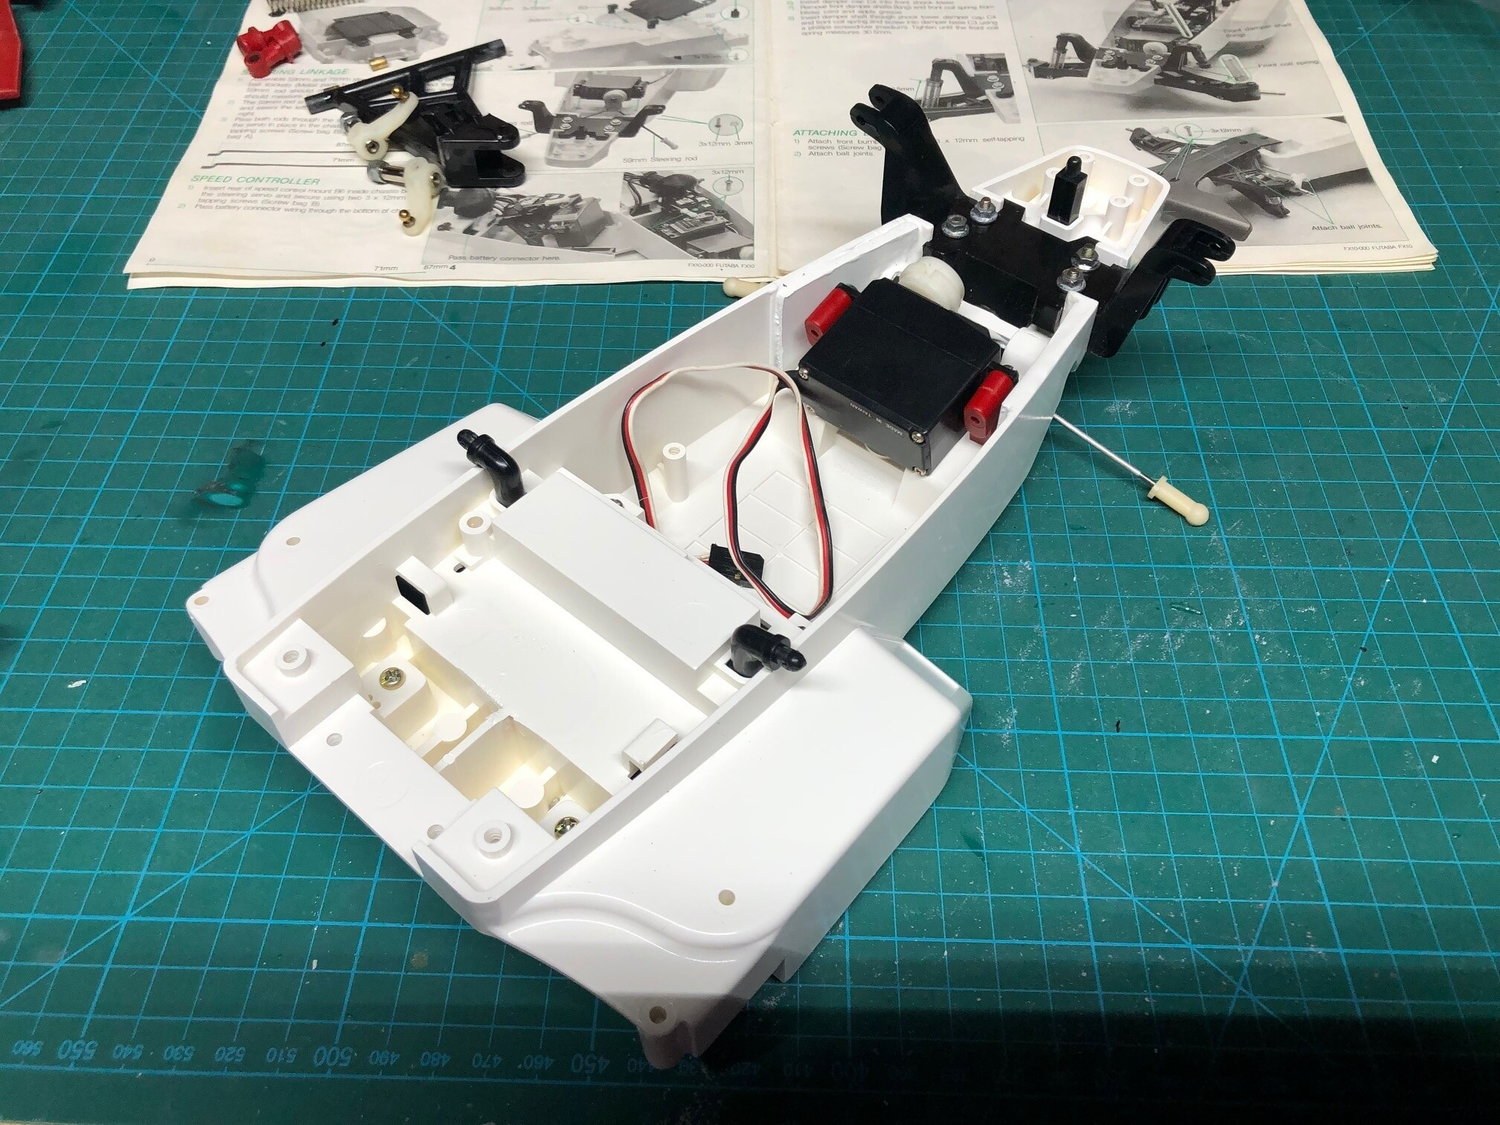
Next up was the control arm, lower shock mounts along with the axles were installed using all of the original hardware.
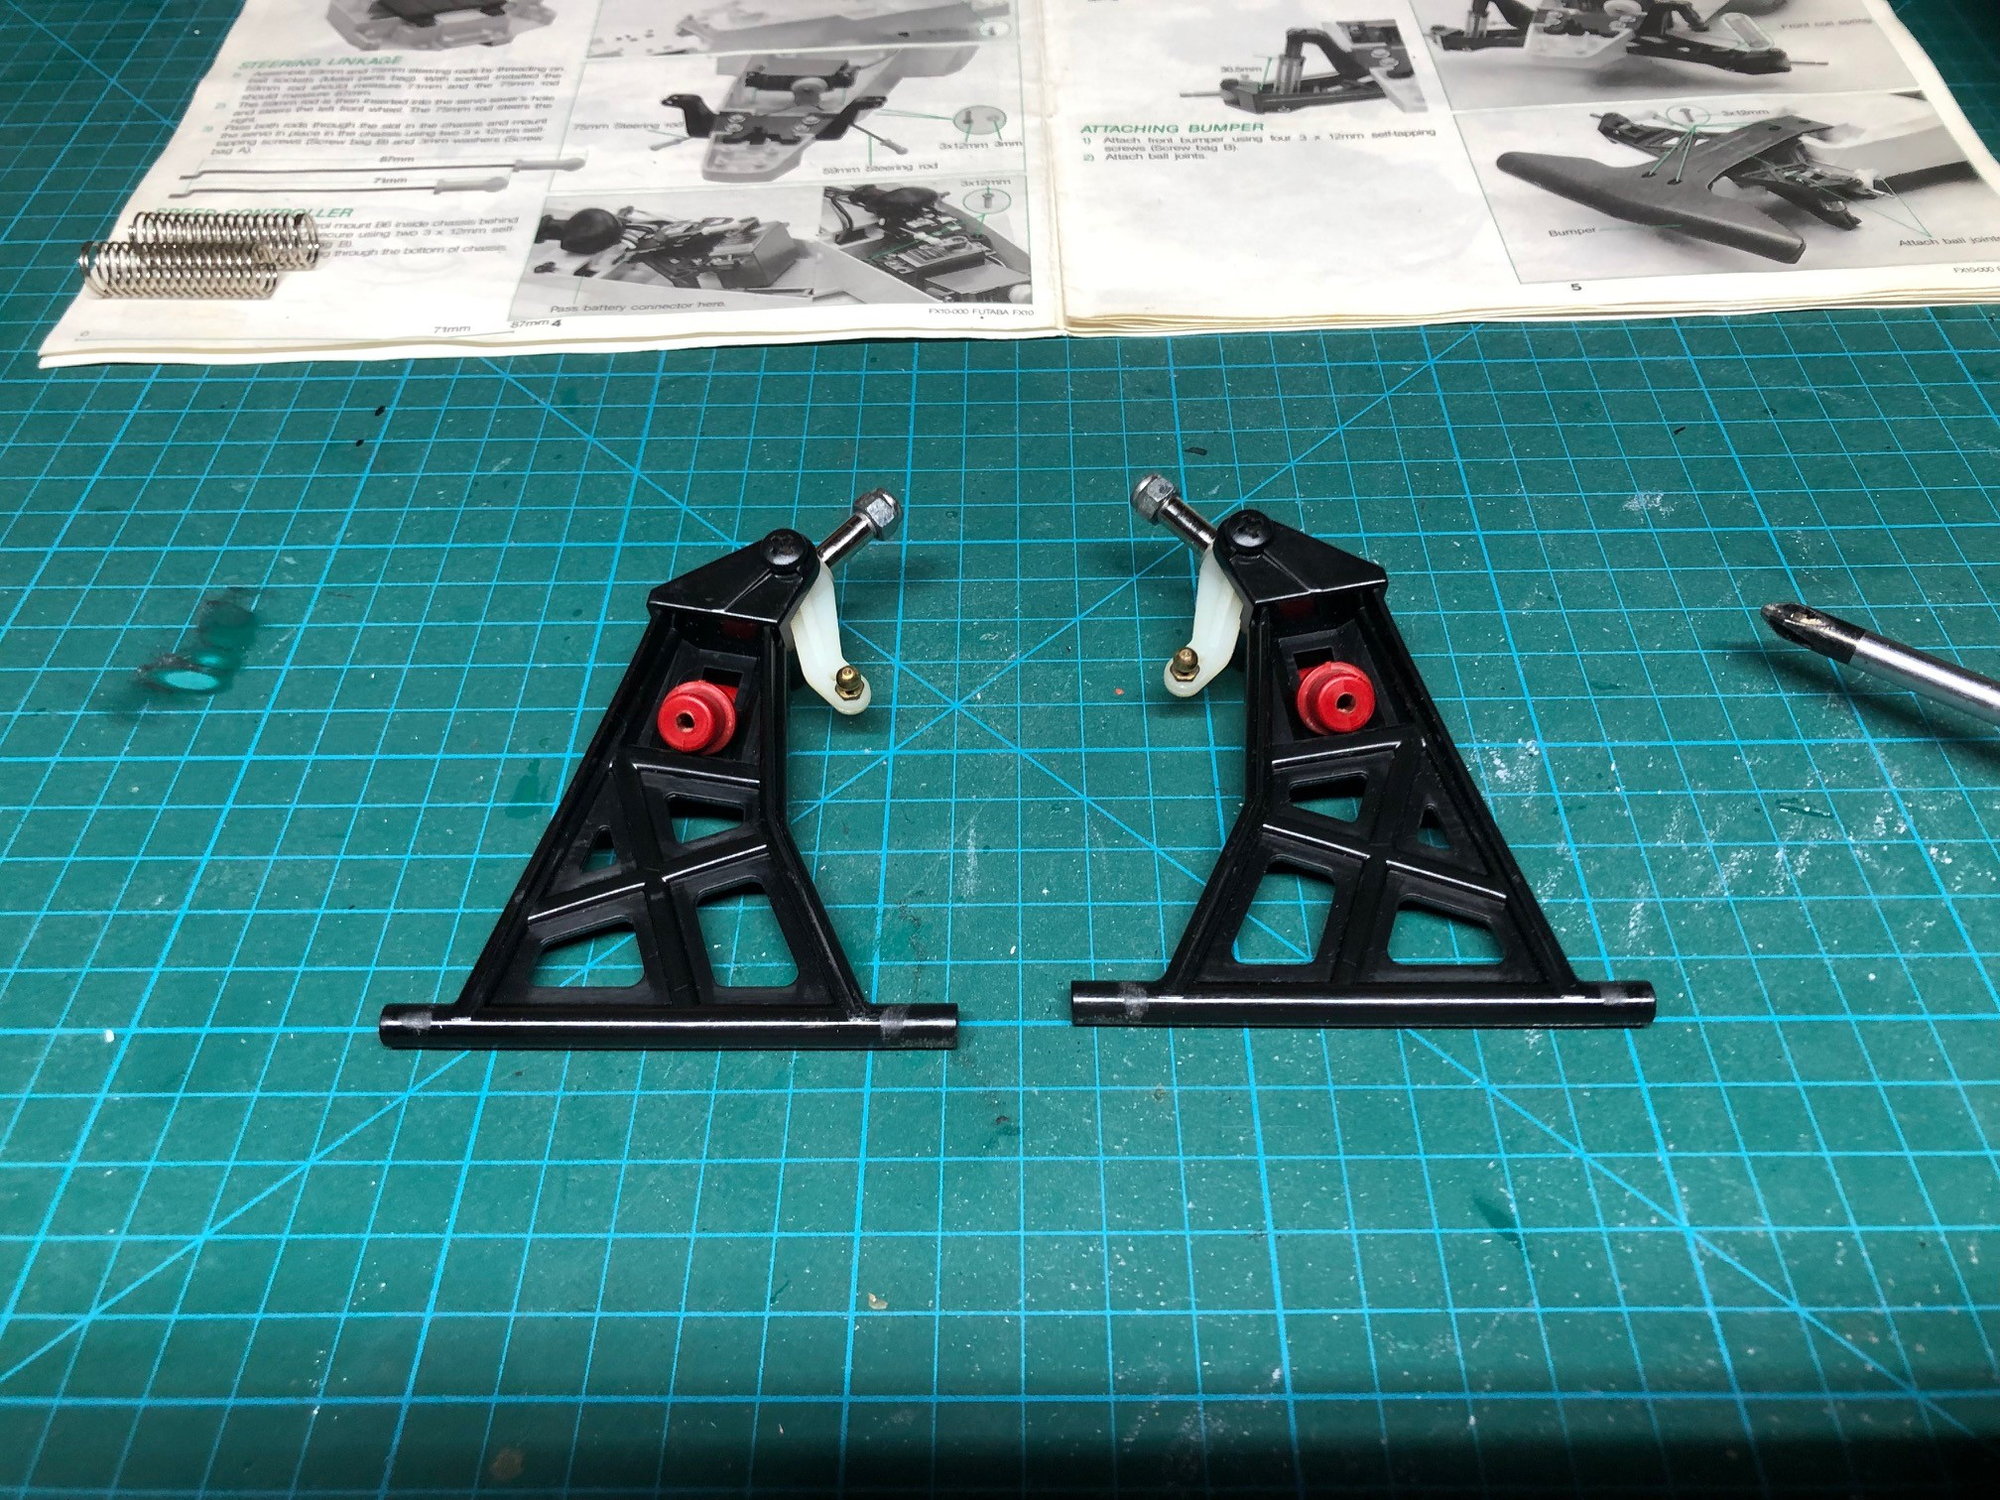
The A-Arms were attached to the chassis, springs installed and tie rods attached.
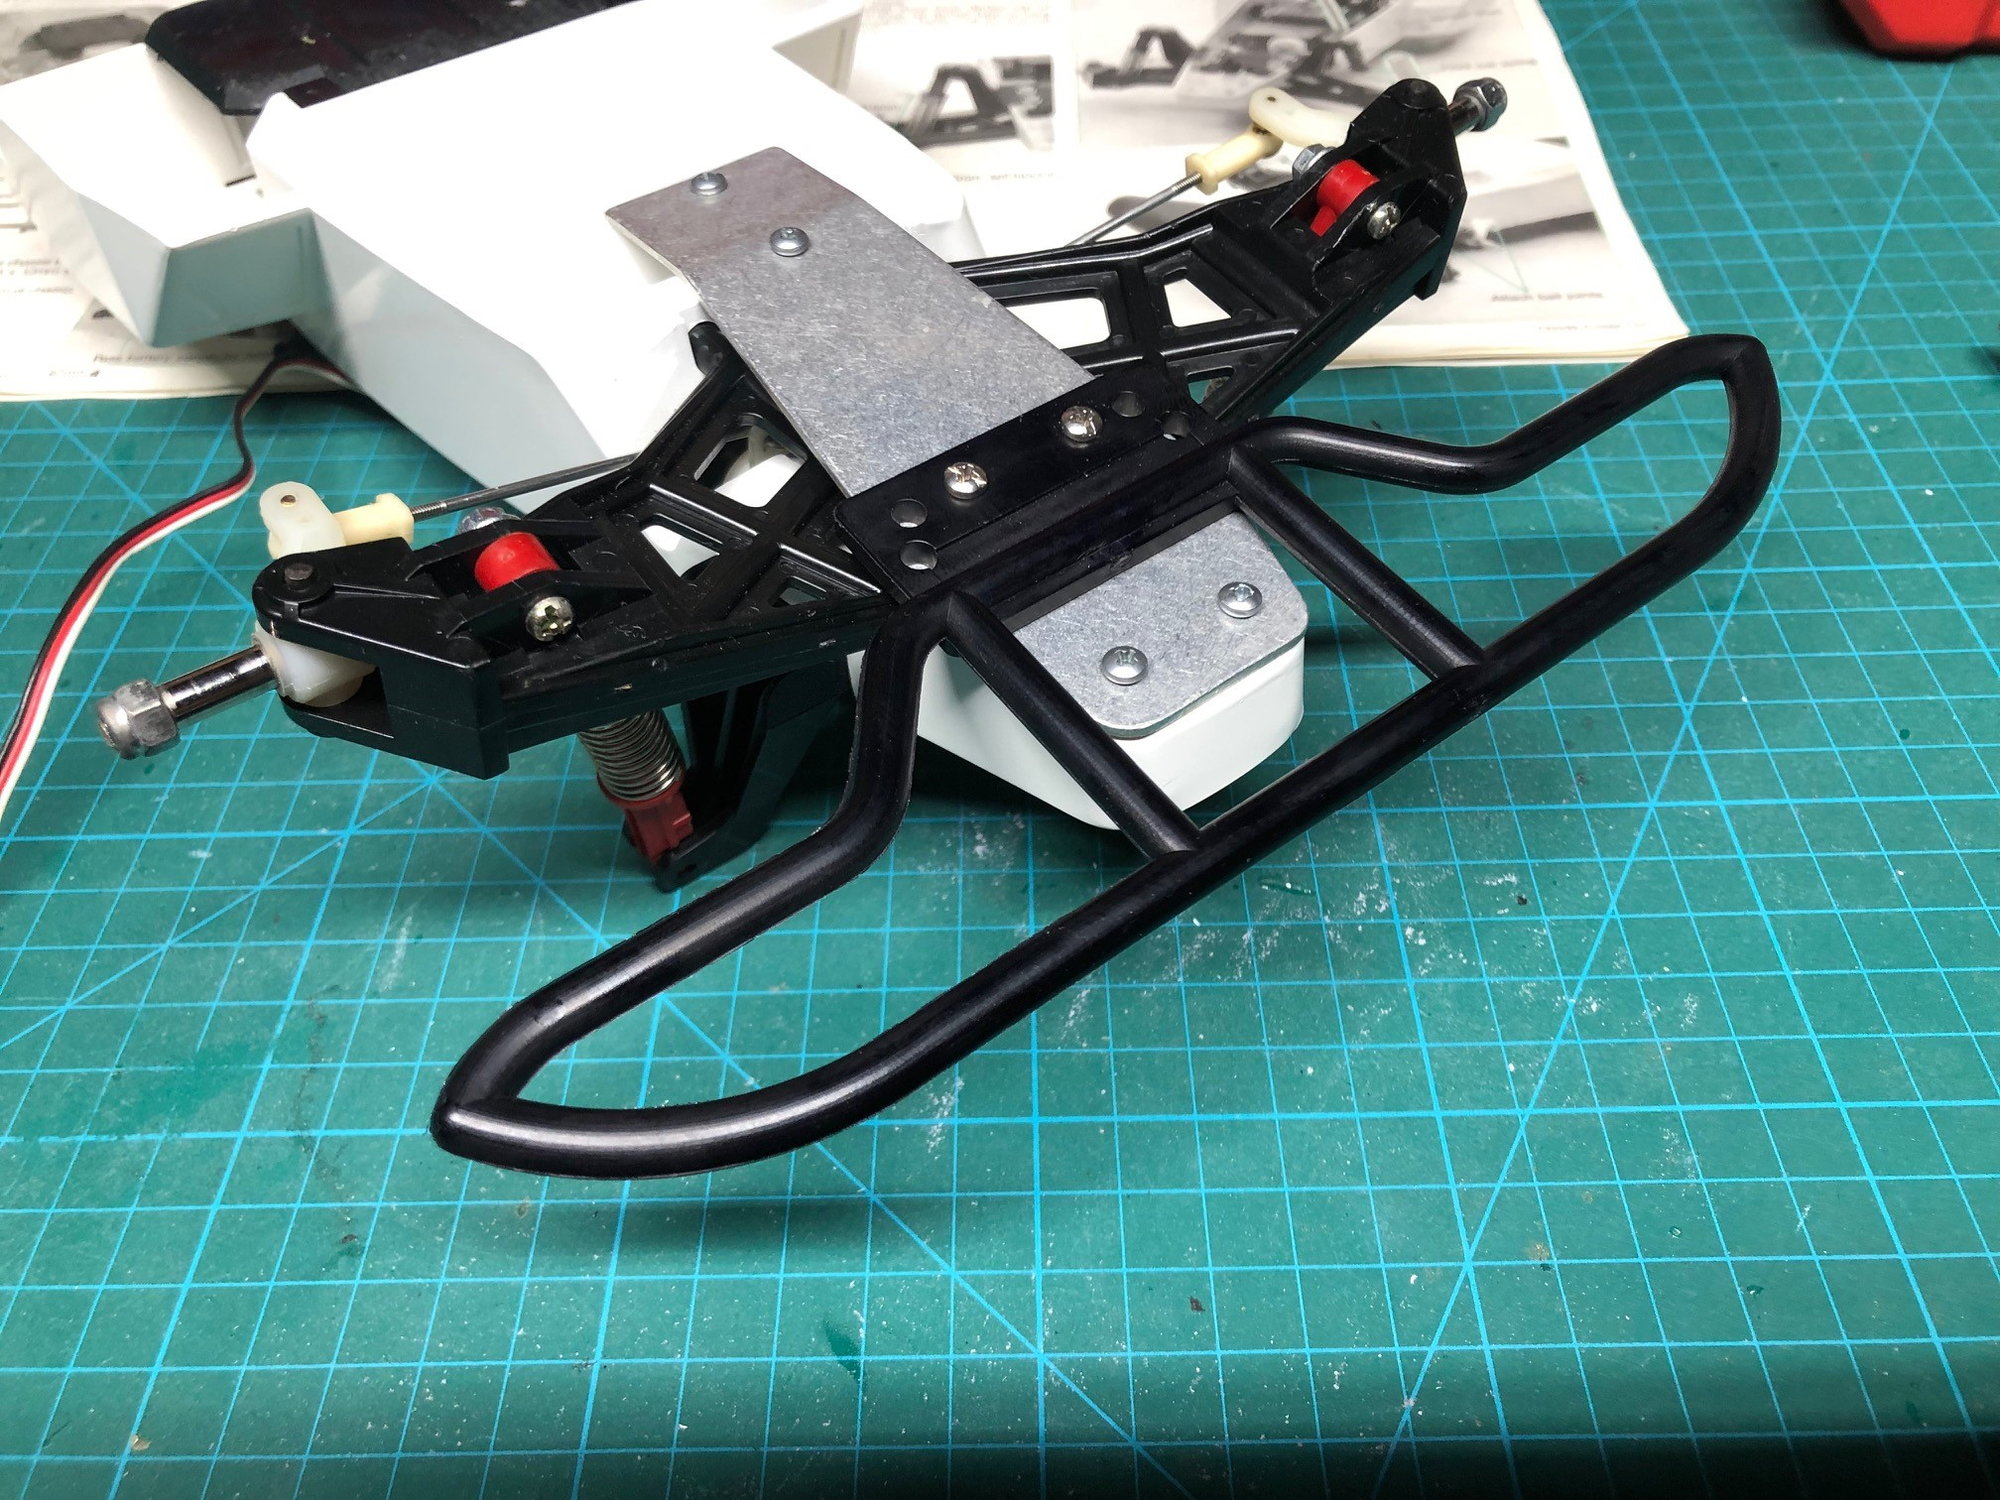
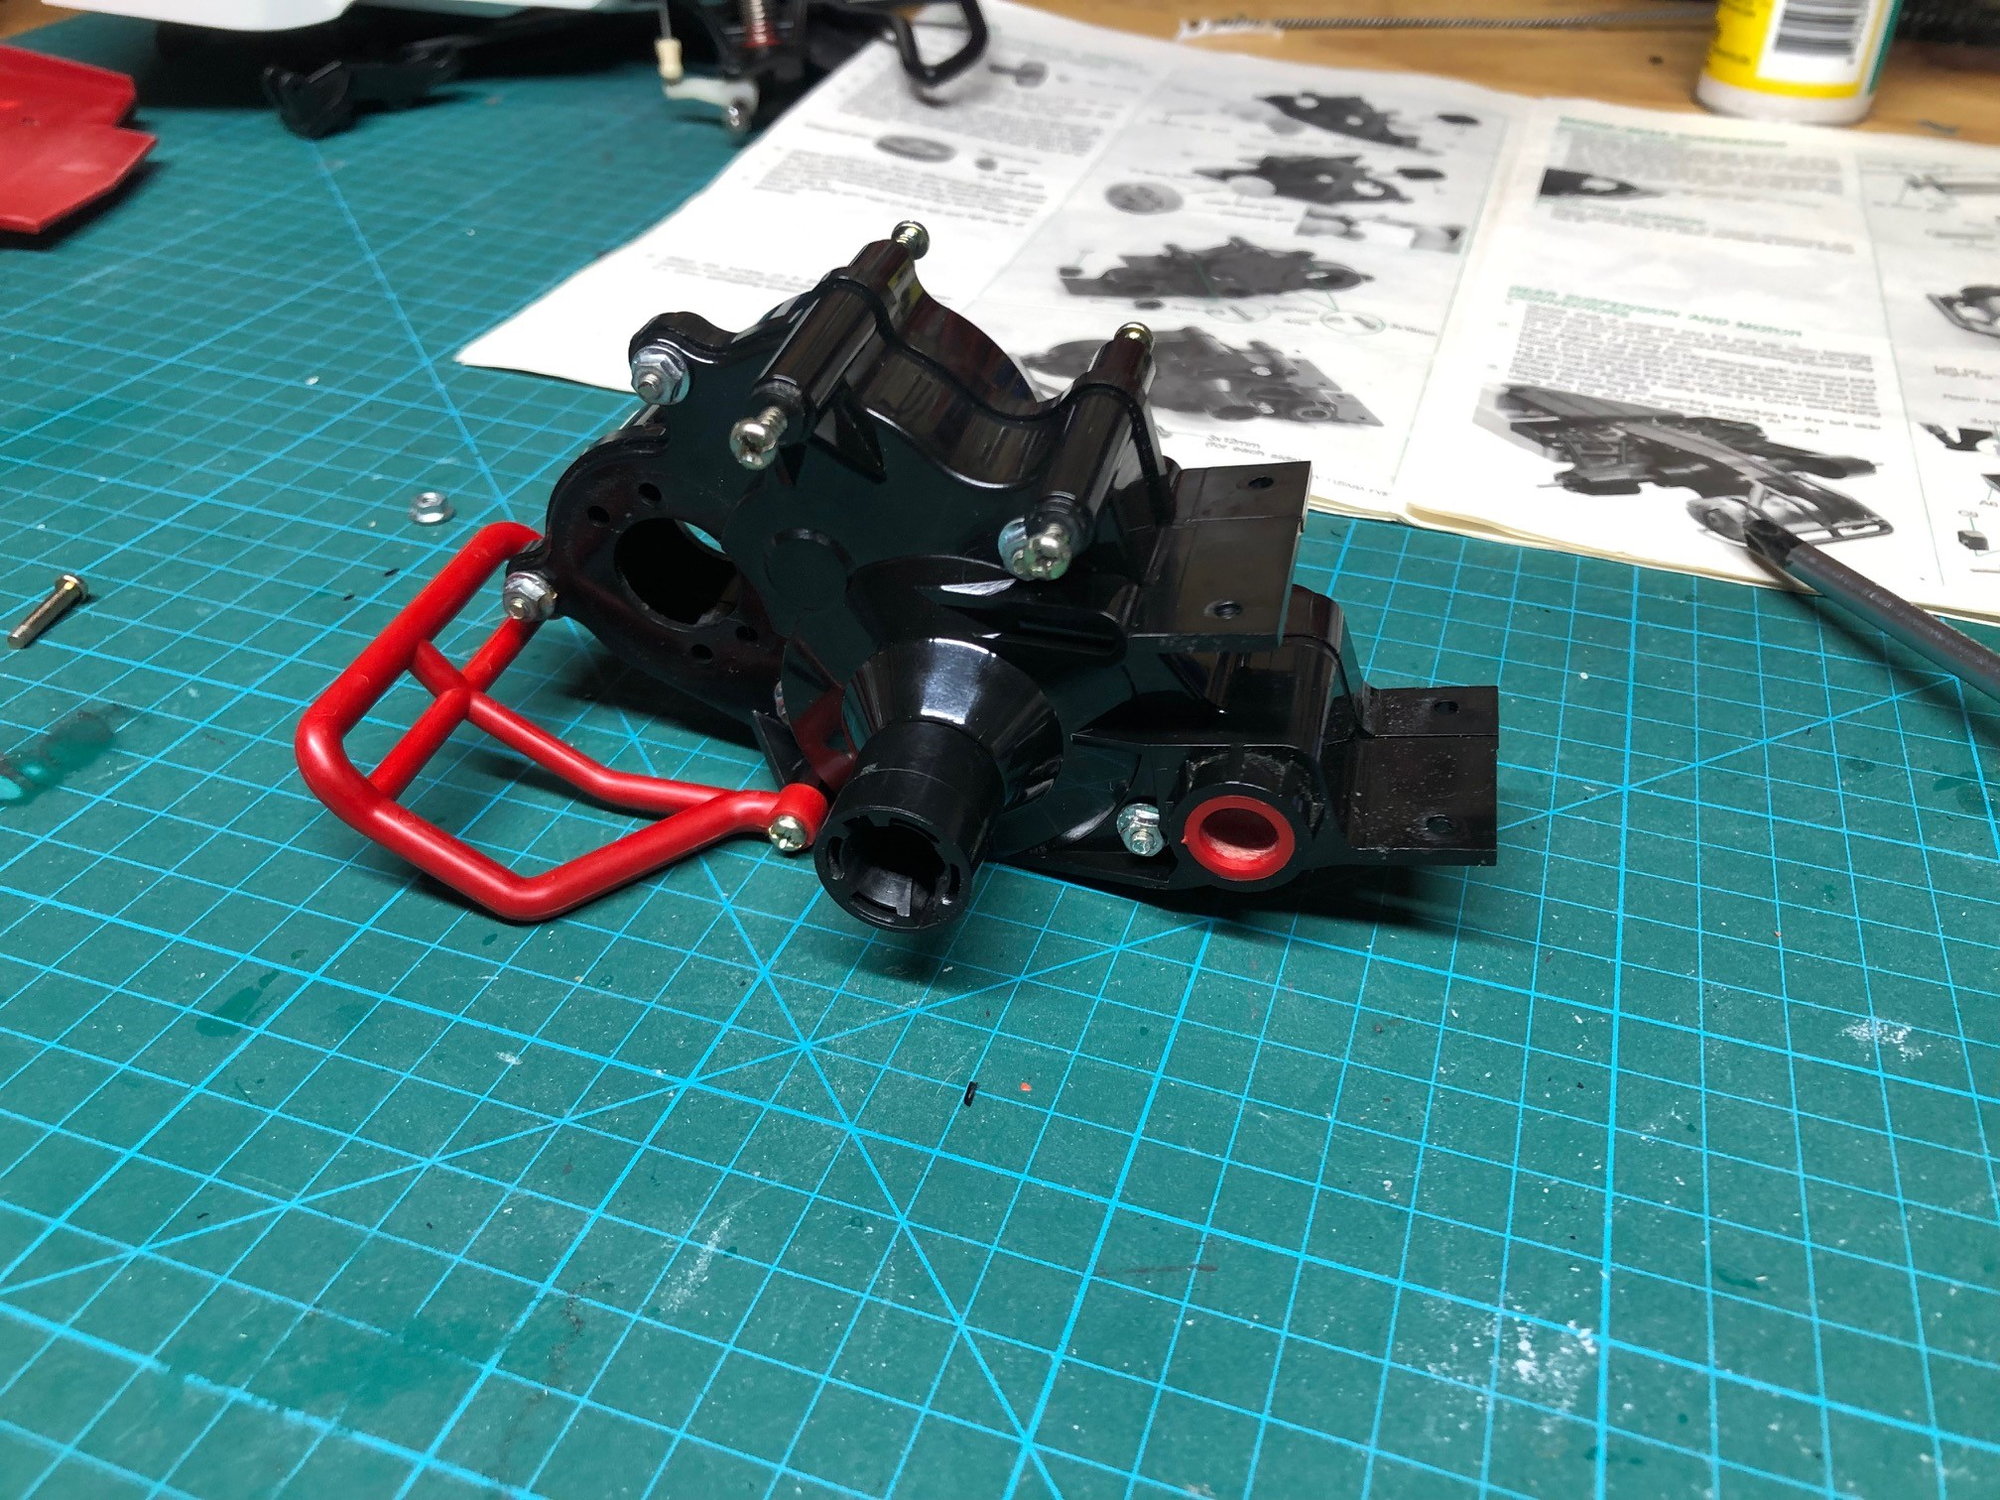
Now for another major upgrade. Continuing wit the strengthening theme, I added the CRP front chassis brace and bumper. This is a really nice and inexpensive kit that really helps save the front of these cars. Used along with the bracing I've done to the tub, there is zero flex in the front end at this point. I wasn't sure i was going to like this bumper but now that it is on the car I do like it.
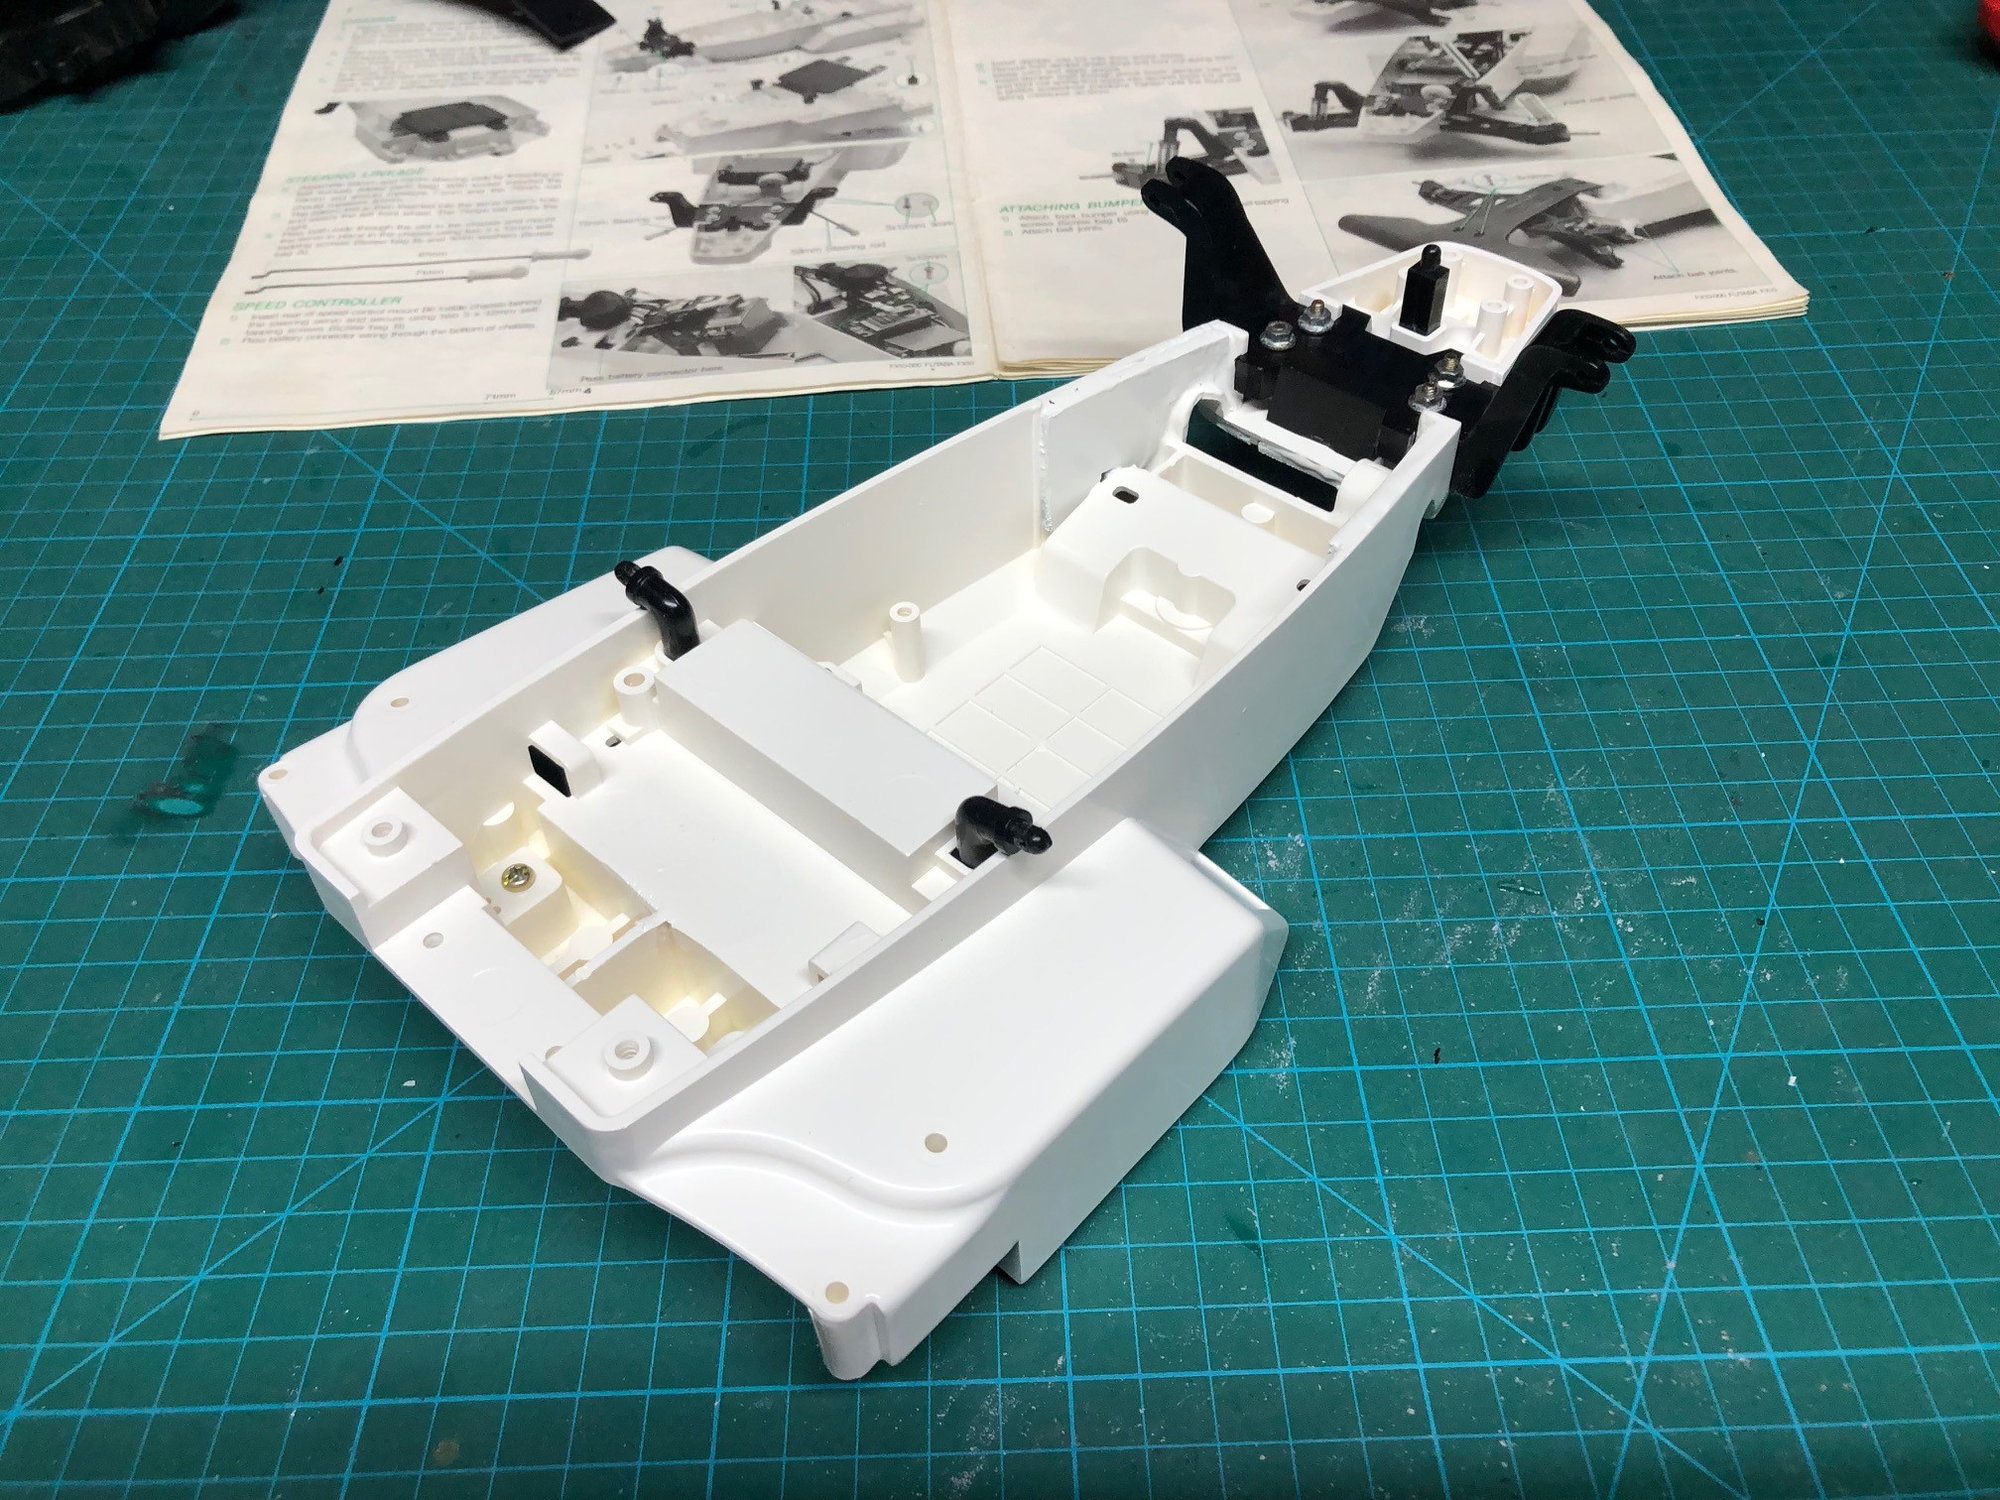
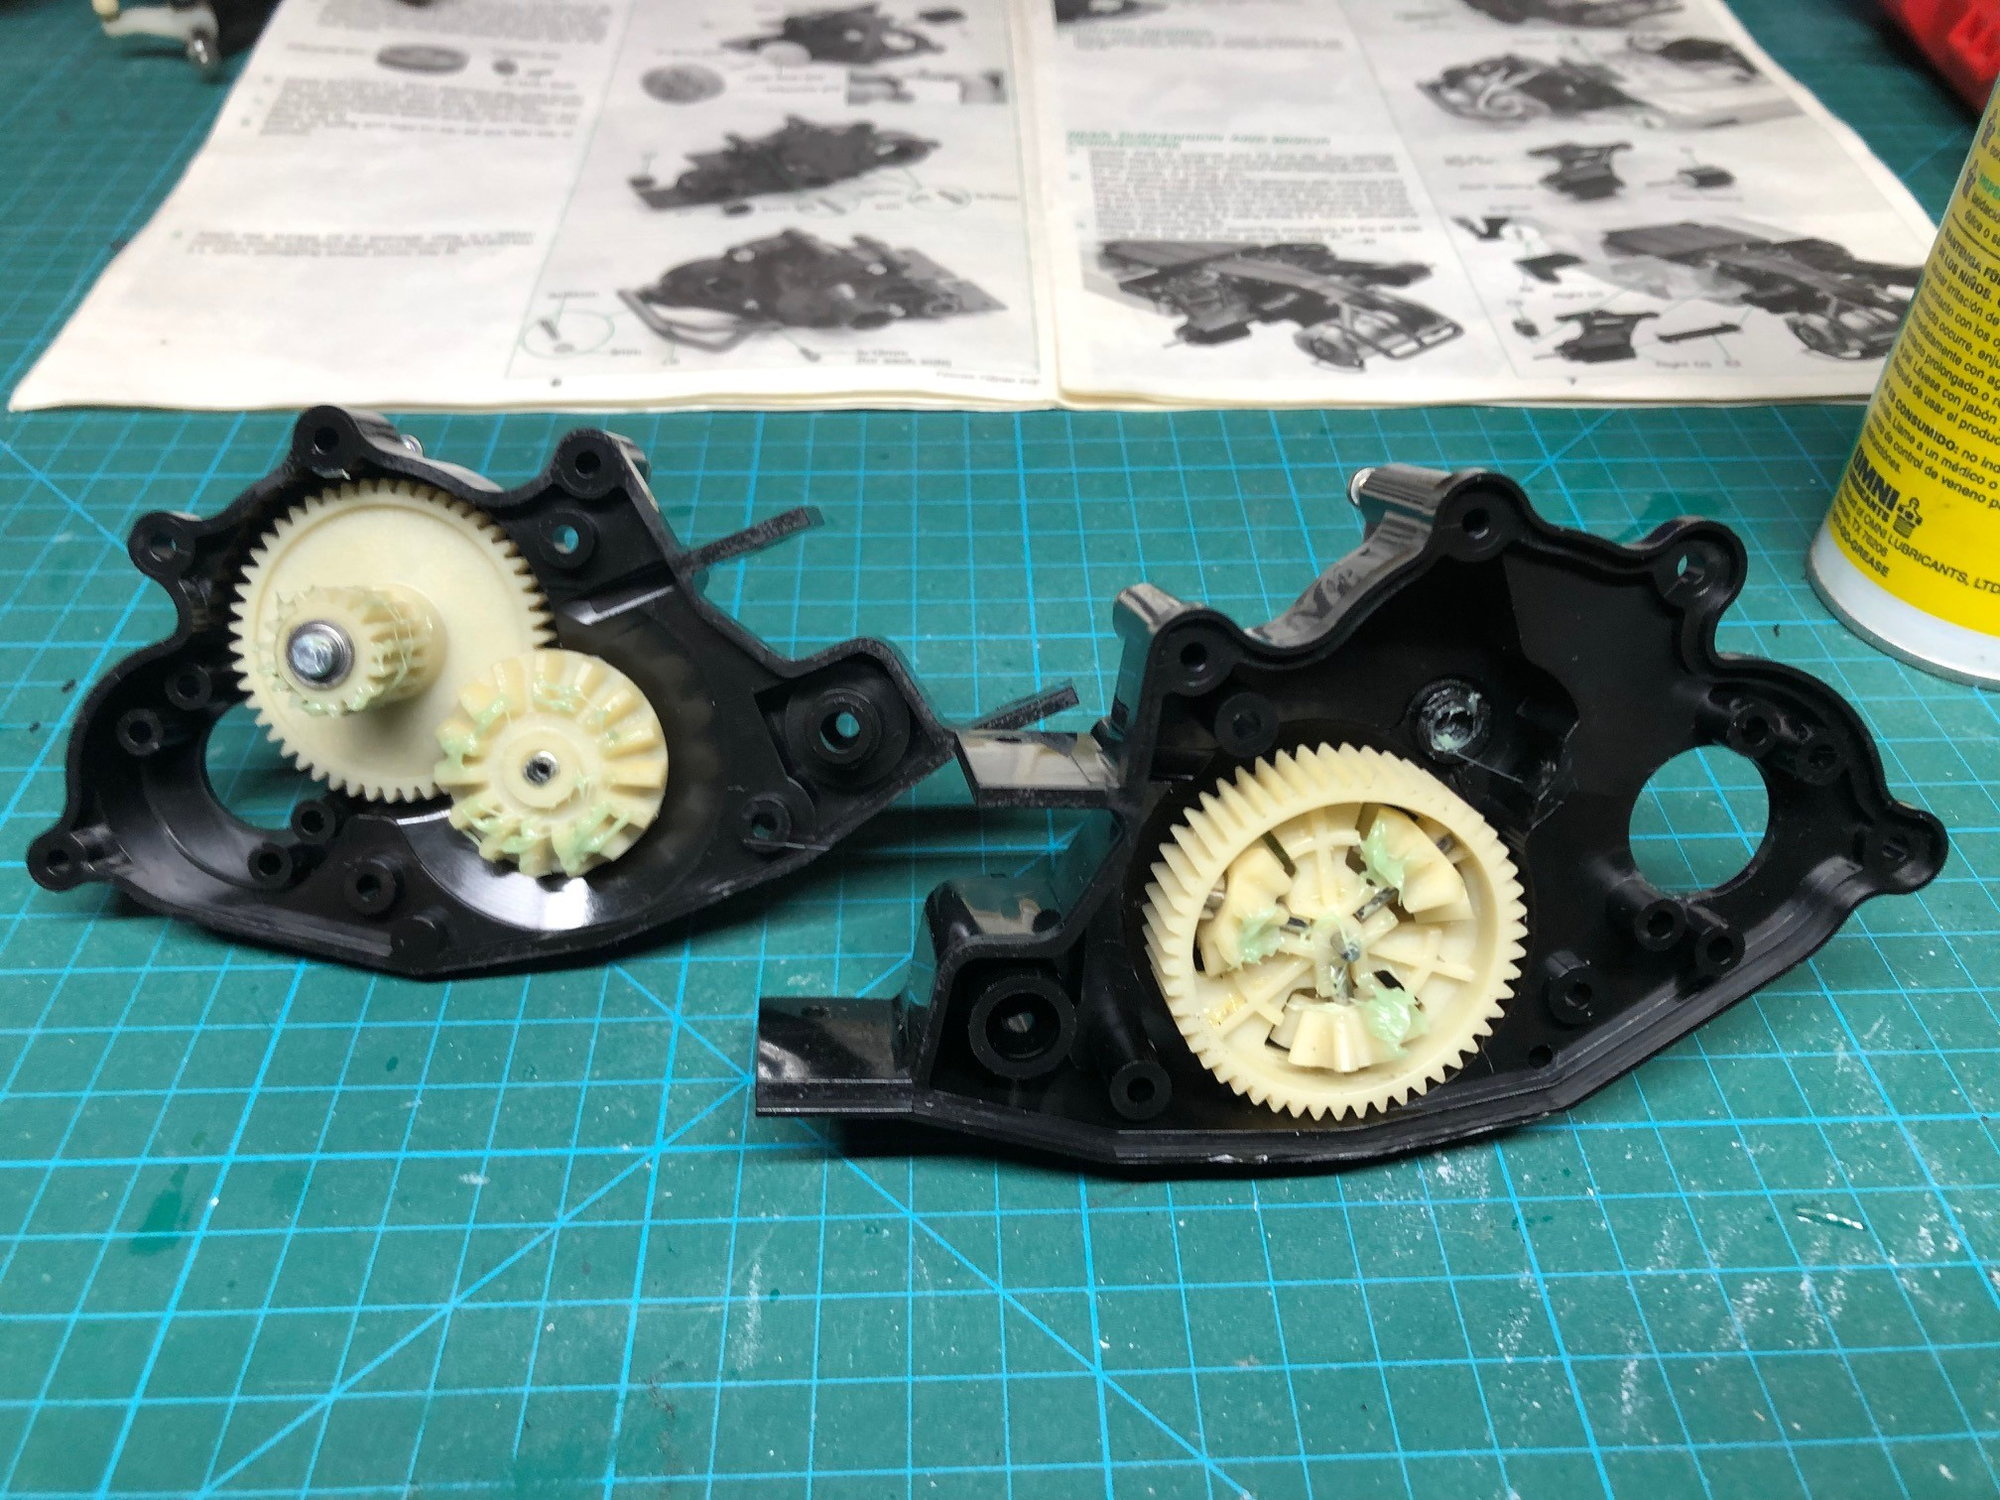
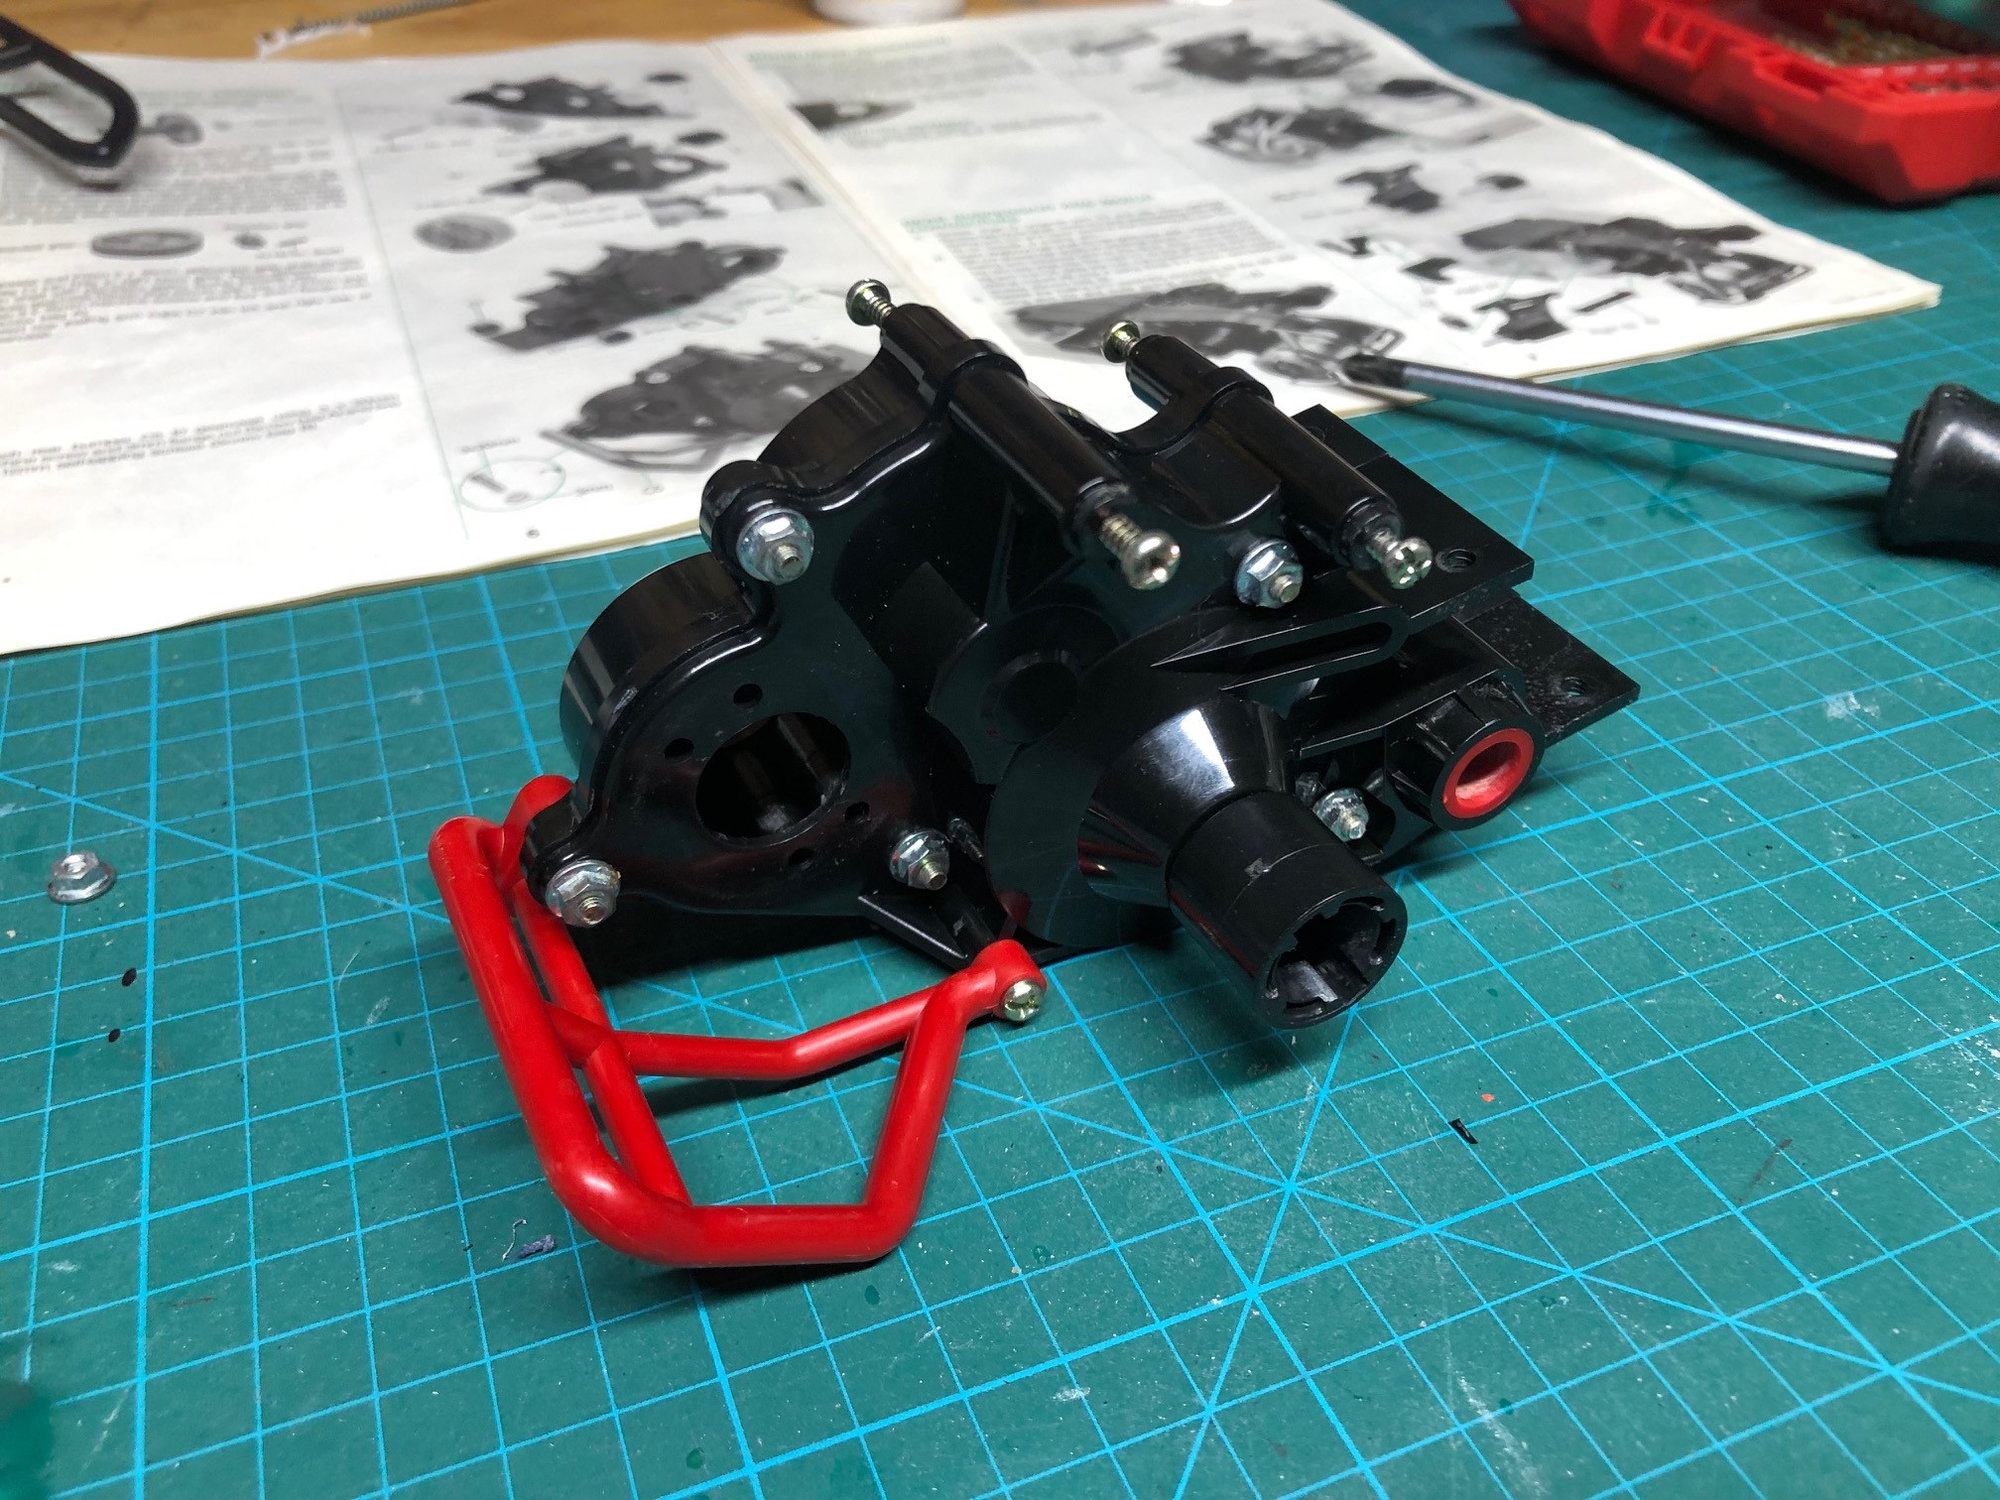
And the final progress for the day was to tackle the gearbox. The gearbox was assembled with bearings throughout. I used marine grade waterproof grease on the gears and assembled the gearbox with the original hardware. Everything is nice and smooth.

That is all the progress I made on FX10 this past weekend. I'm hoping to get the rest of the assembly done this week and having a running driving car next weekend.
Thanks for following along.
As luck would have it I was at a flee market a couple of weeks back and stumbled on a seller that had a large box of misc. RC car parts. Looking through the box I was excited to see a couple of half built but never completed Strikers, an almost completed FX10 and a couple of of fairly well used FX10 Chassis's along with a bunch of new and used parts in bags and containers. I was able to pick up the entire box of parts for a very reasonable amount and it reminded me that I never finished this thread. After Picking through the parts I decided that I wanted to do two different builds.
The first build will be a runner and be documented below. This build will have modifications to the chassis for strength, run bearings and modern electronics. It will look very much stock but stronger with better parts. For this I'm not concerned with scratches on parts etc. The used parts will be what are going into this build. The second build will be a 100% stock build with all original parts including vintage radio gear. This will be a shelf queen that will be done in box art and never driven.
Enough with the back story. Lets get building. Below we see the main chassis. This is a well used chassis that was sanded, filled and painted to make it presentable. Three coats of Duplicolor basic white was what was required to get it to this point. The major issue with these cars were the front of the chassis. It's near impossible to find one that isn't broken or cracked in some way. To strengthen the chassis area I have used 1/8" ABS sheet stock cut to fit the inside and under the chassis. This has been bonded to the tub.
Main Chassis. Not the addition of 1/8 ABS sheet stock to strengthen the front of the chassis
Main chassis underside. Additional bracing was added in the forward locations as shown for strength.
Next up installing the front body mount, Shock tower and rear body mounts. The front shock tower did require screws that were 1/8 longer than stock as they needed to pass through the extra thickness of the ABS sheet. The lower battery door mounts were also installed underneath.
Then it was time for steering. I have a bunch of these old school Futaba S148 servos so I installed one along with the stock servo saver and tie rods.
Next up was the control arm, lower shock mounts along with the axles were installed using all of the original hardware.
The A-Arms were attached to the chassis, springs installed and tie rods attached.
Now for another major upgrade. Continuing wit the strengthening theme, I added the CRP front chassis brace and bumper. This is a really nice and inexpensive kit that really helps save the front of these cars. Used along with the bracing I've done to the tub, there is zero flex in the front end at this point. I wasn't sure i was going to like this bumper but now that it is on the car I do like it.
And the final progress for the day was to tackle the gearbox. The gearbox was assembled with bearings throughout. I used marine grade waterproof grease on the gears and assembled the gearbox with the original hardware. Everything is nice and smooth.
That is all the progress I made on FX10 this past weekend. I'm hoping to get the rest of the assembly done this week and having a running driving car next weekend.
Thanks for following along.
Last edited by john01374; 03-21-2022 at 08:55 AM.
03-22-2022, 10:23 AM
#8
Thread Starter
Made some additional progress last night.
Attached an old silver can to the gearbox. Feel like the old silver can be plenty of power for this old car. Next I attached the gearbox to the main chassis.

Assembled the swing arms with bearings and install on the main chassis.
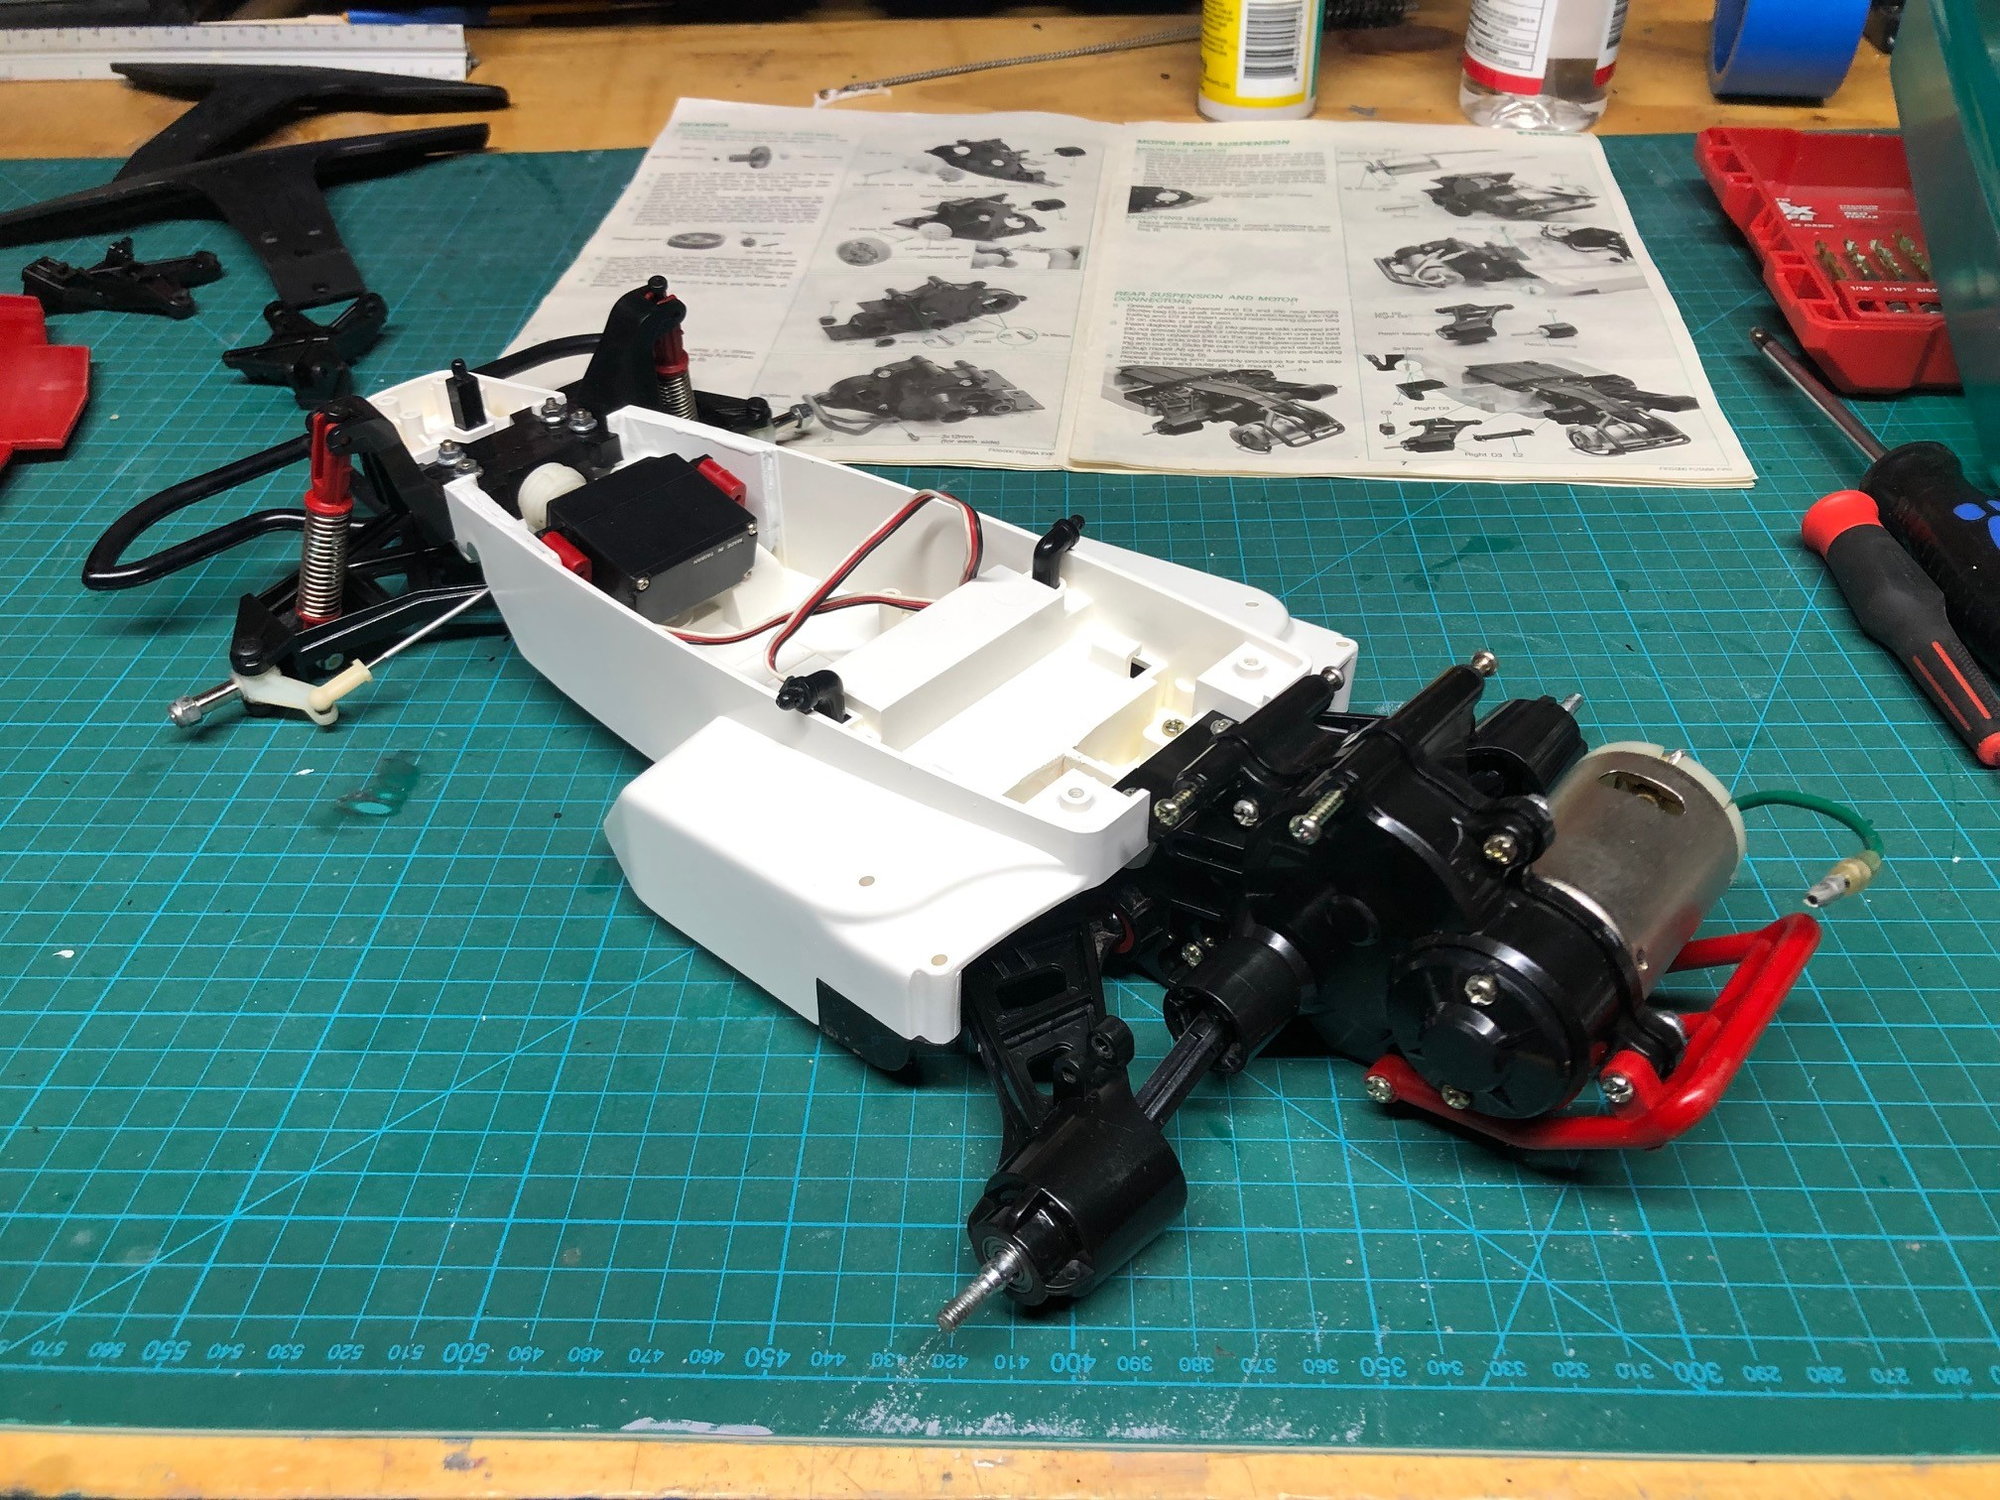

Assembled the rear upper shock mounts and original shocks. Attached the rear shocks to the chassis.
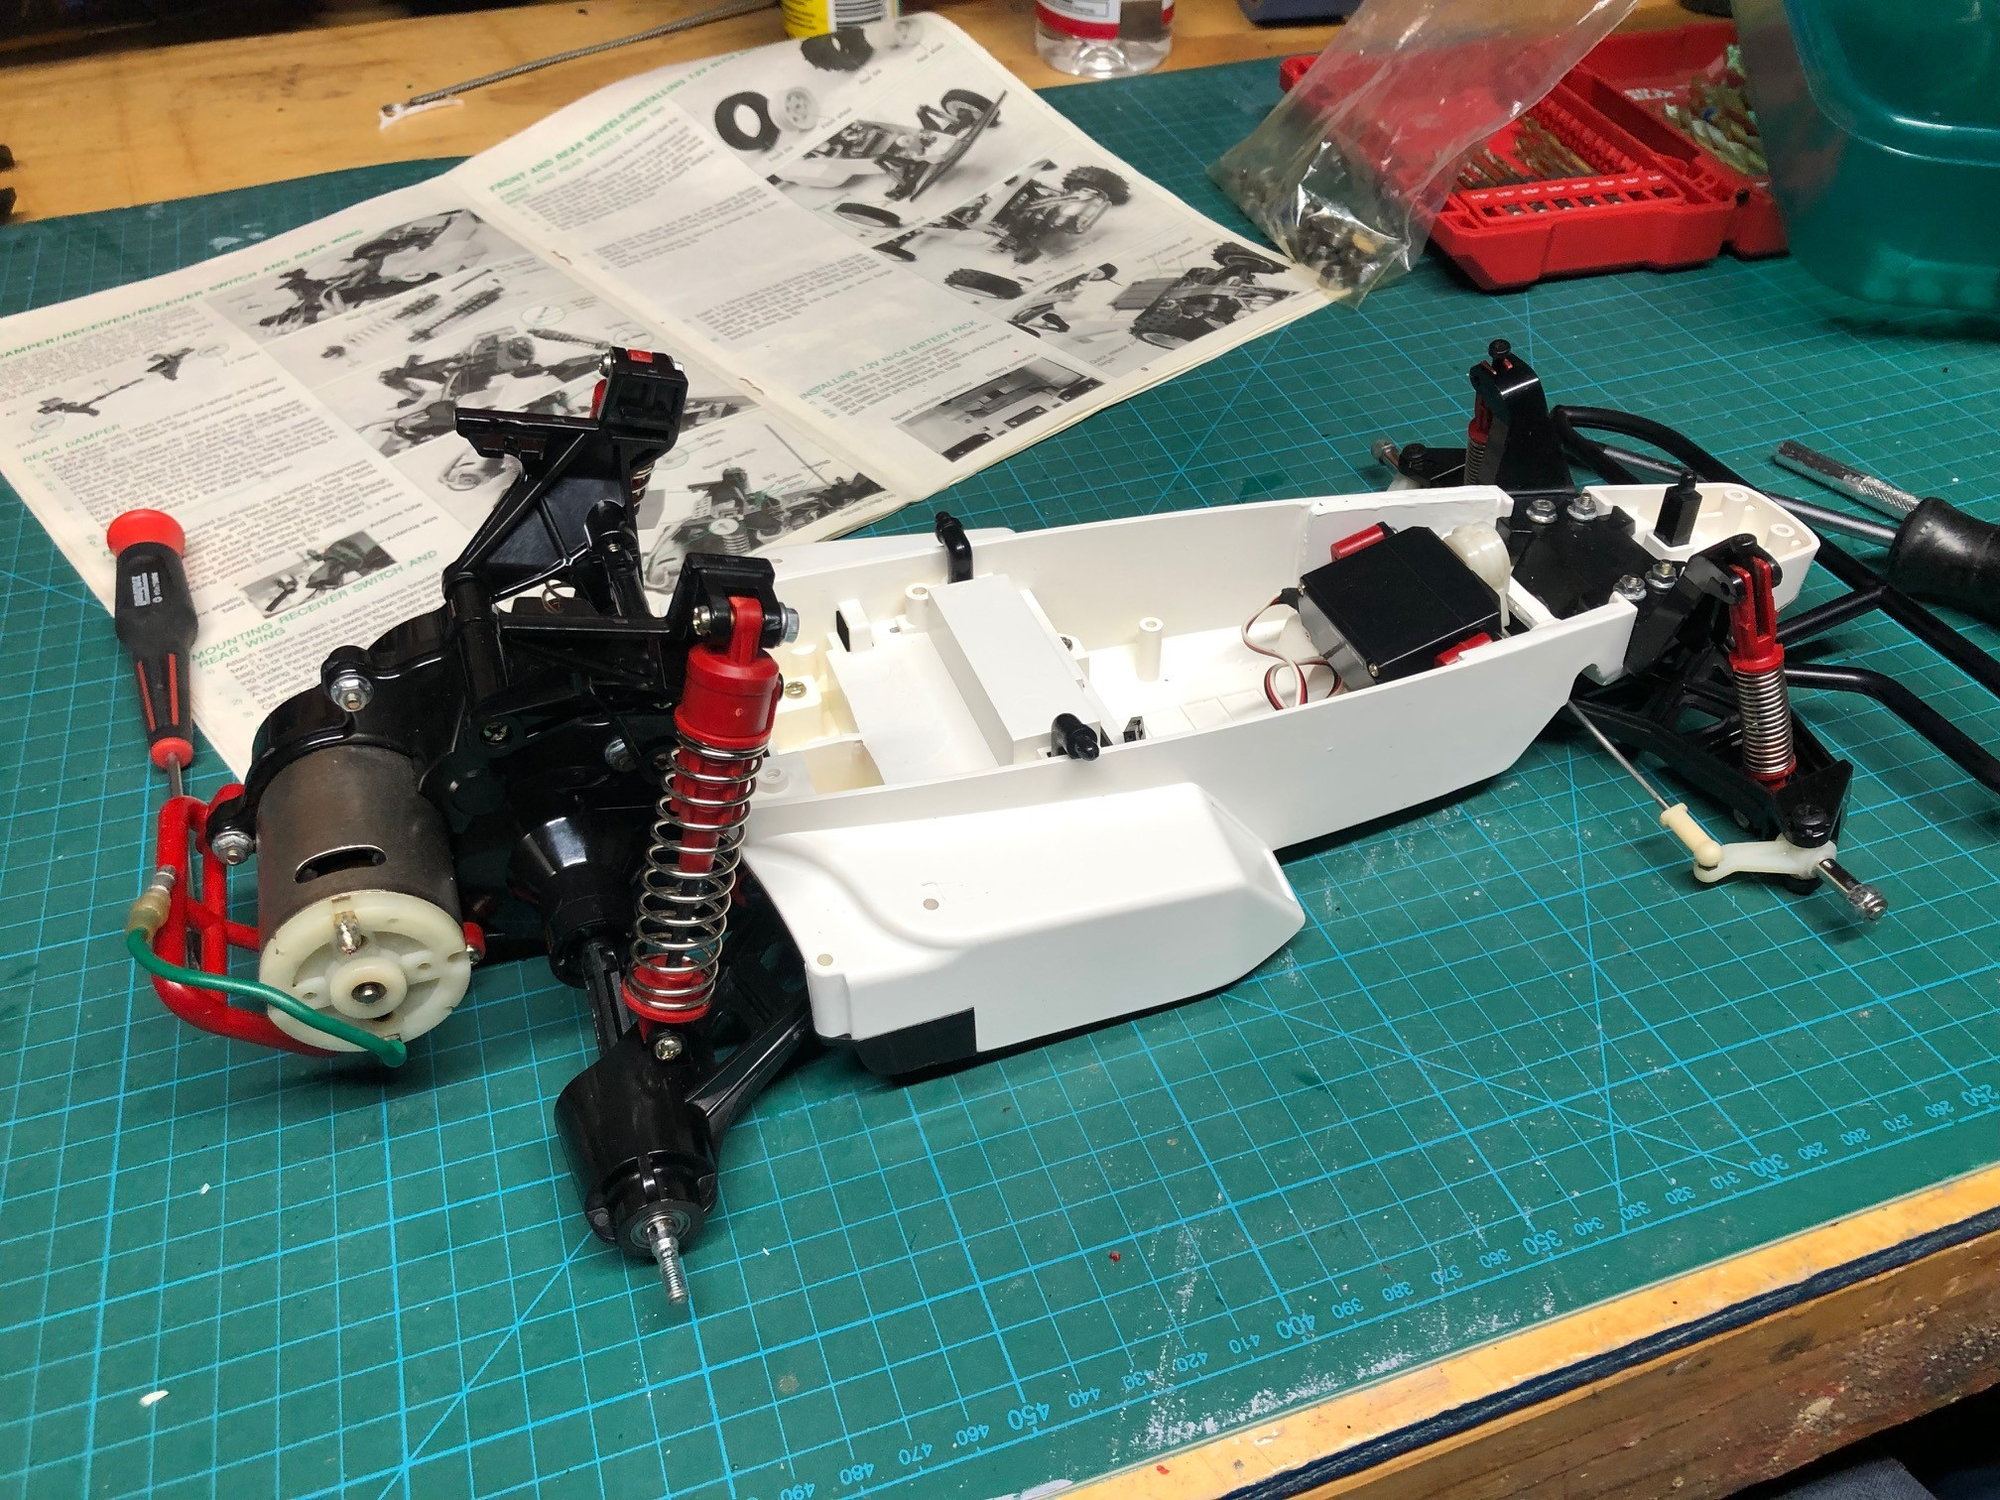
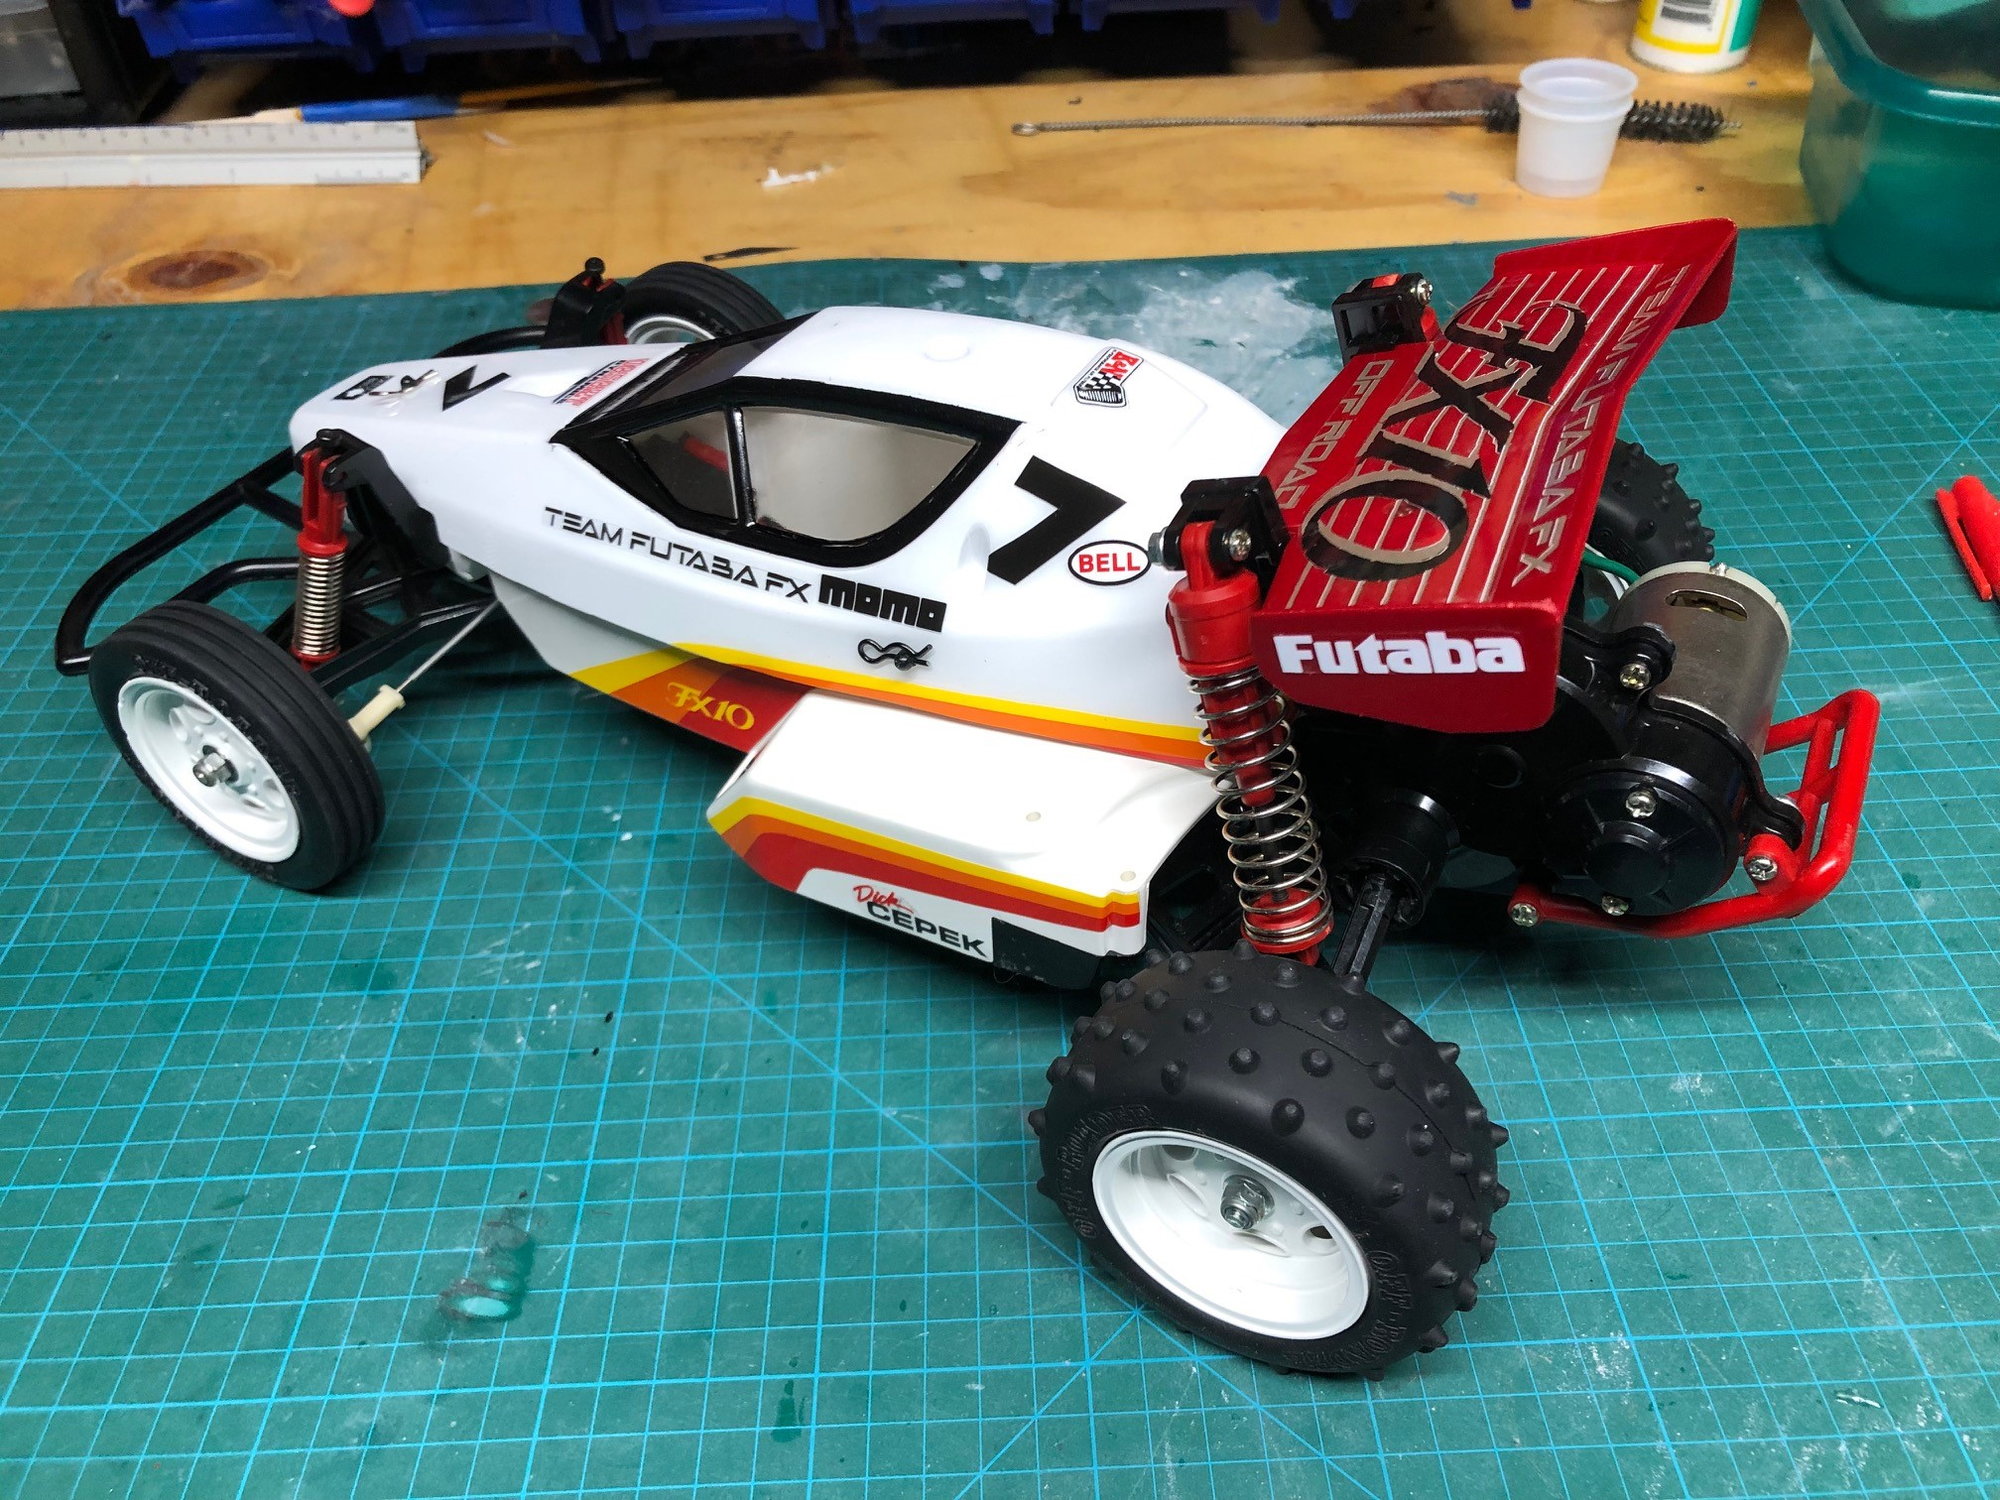
Getting close. I assembled the wheels and tires, Attached the rear wing then through on one of the old original bodies for right now. The body has never been painted but it is in rough shape. Still good enough to use for running but I have a couple of TBG bodies on order.
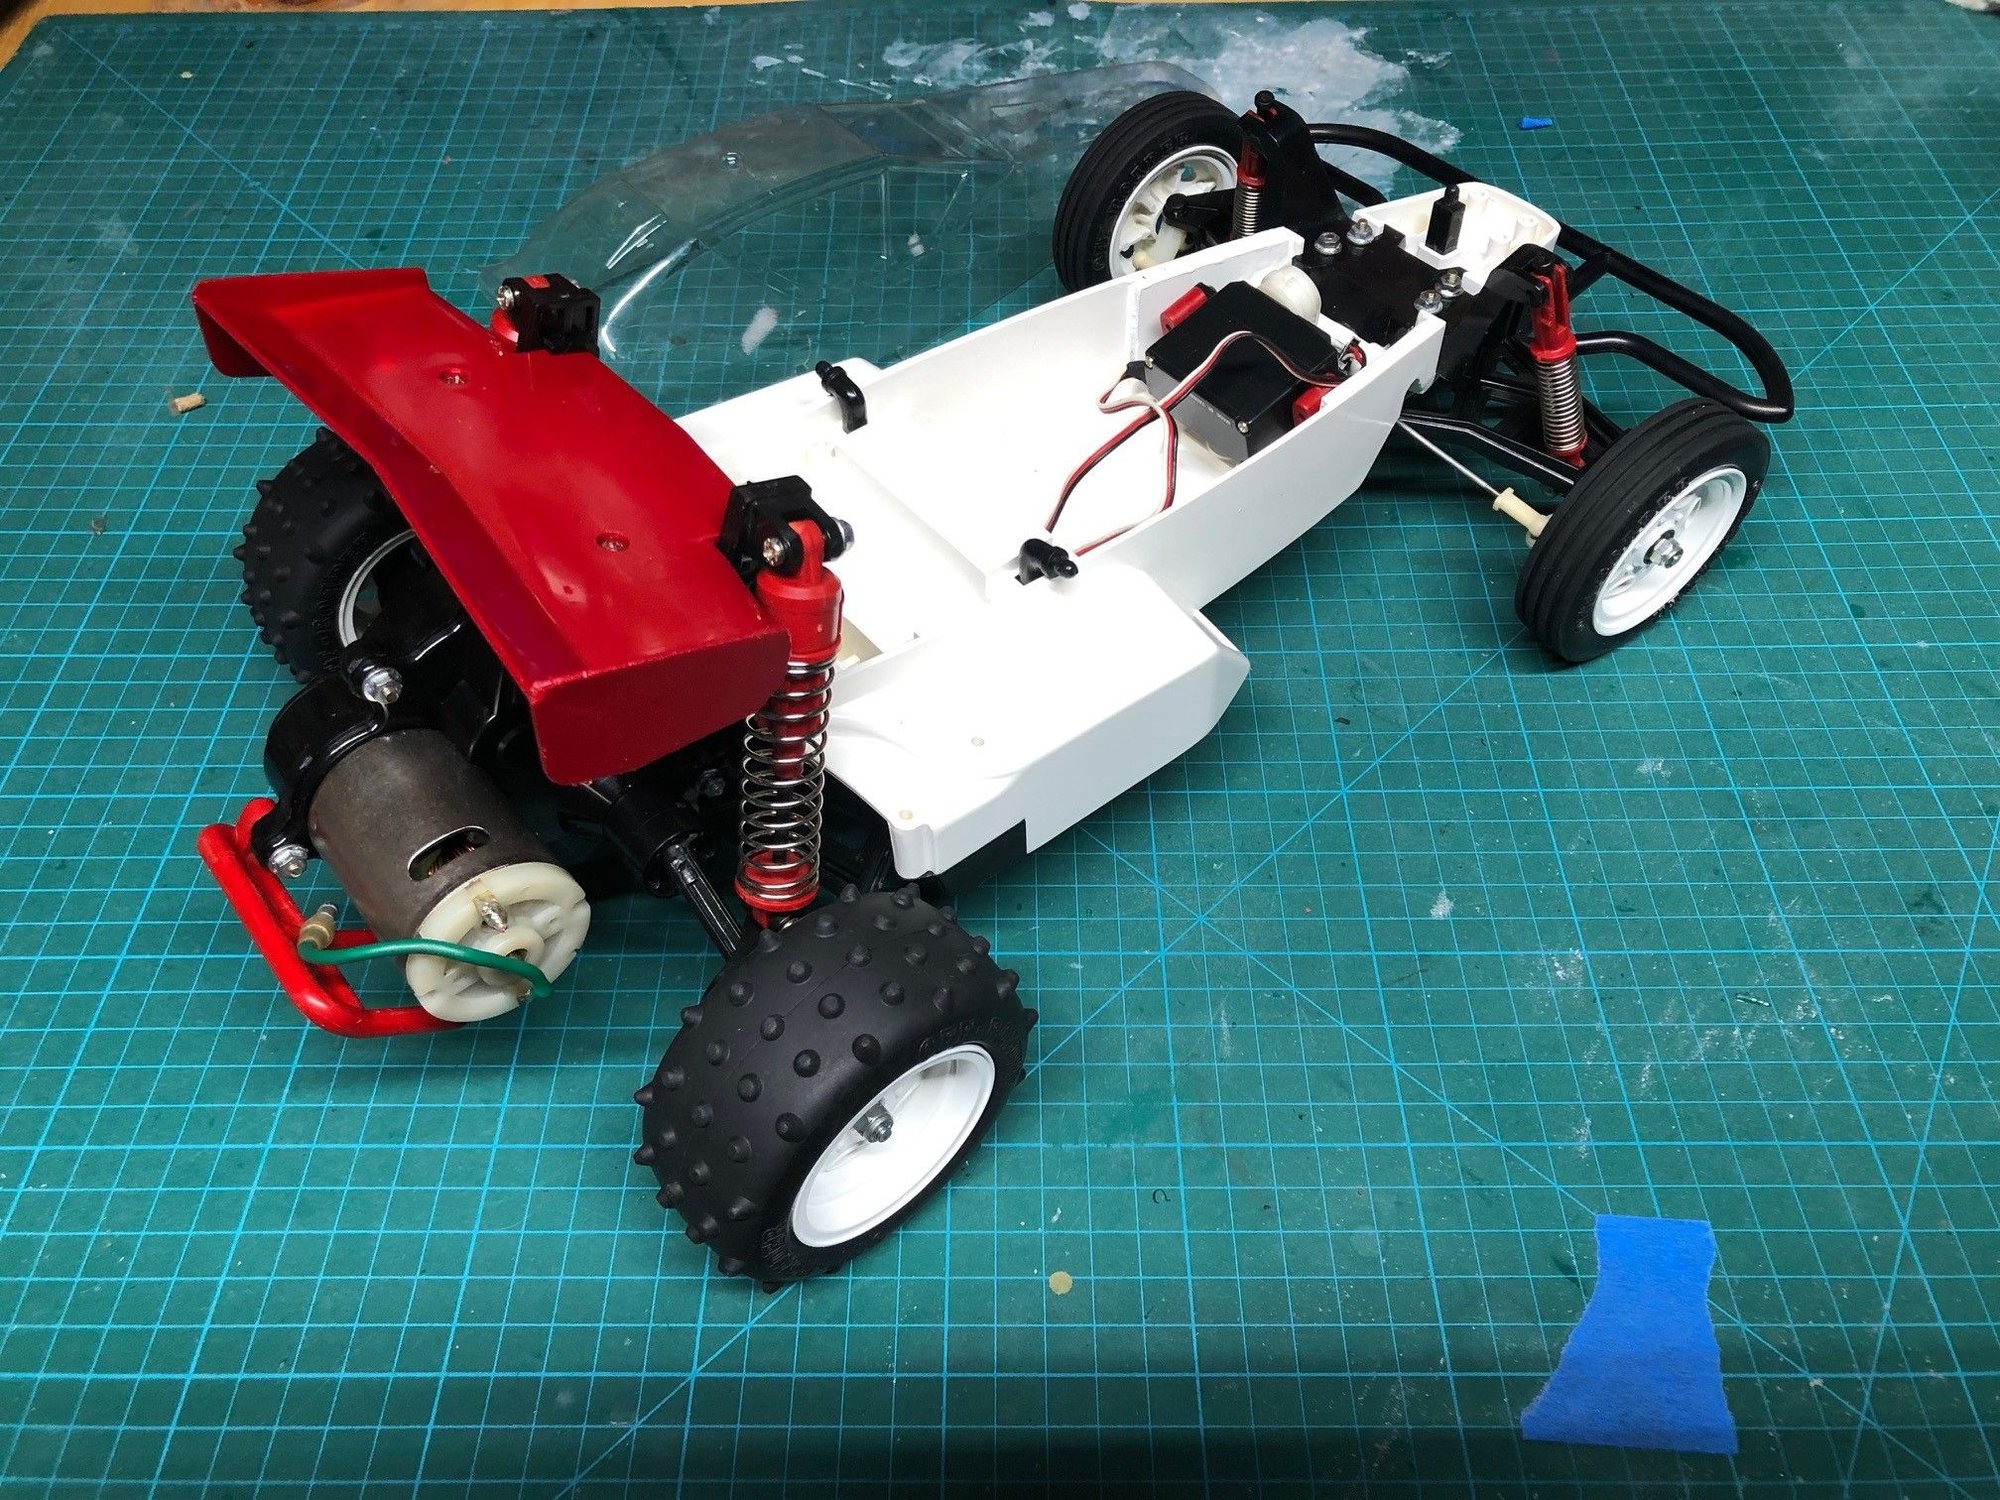
Currently i'm digging through my parts for electronics. Looks like this one will end up running Traxxas radio gear and the XL5ESC.
After I get it running I'll get the bodies painted up and decals applied.
Thanks for following along.
.
Attached an old silver can to the gearbox. Feel like the old silver can be plenty of power for this old car. Next I attached the gearbox to the main chassis.
Assembled the swing arms with bearings and install on the main chassis.
Assembled the rear upper shock mounts and original shocks. Attached the rear shocks to the chassis.
Getting close. I assembled the wheels and tires, Attached the rear wing then through on one of the old original bodies for right now. The body has never been painted but it is in rough shape. Still good enough to use for running but I have a couple of TBG bodies on order.
Currently i'm digging through my parts for electronics. Looks like this one will end up running Traxxas radio gear and the XL5ESC.
After I get it running I'll get the bodies painted up and decals applied.
Thanks for following along.
.
Last edited by john01374; 03-22-2022 at 10:26 AM.
The following users liked this post:
RustyUs (03-27-2022)
")
The following users liked this post:
john01374 (03-28-2022)
03-28-2022, 06:57 PM
#11
Thread Starter
I really did. It was dumb luck. After digging through and separating everything there were two complete but unfinished Strikers, one complete but unfinished FX10, two used FX10's and enough new and used FX10 parts to keep them running for a very long time. Just wish they came with nicer bodies for the FX10's. The unbuild kit has a perfect untouched body and decals new in the box but there was only one other Fx10 body and it's shown above in rough shape.
My order from TBG arrived a couple days ago so I have repo bodies and decals to keep me going. Hoping to get the body painted this week.
My order from TBG arrived a couple days ago so I have repo bodies and decals to keep me going. Hoping to get the body painted this week.
03-31-2022, 06:00 PM
#12
That's a fantastic resto! I've also been collecting Strikers and FX10s. My first RC was an FX10 that I bought on layaway with paper route and other odds and ends as a kid.
Going to be doing a box stock resto on the latest FX10 acquisition as it's in the best shape. I'll try to document here on RCU.
Tim
Going to be doing a box stock resto on the latest FX10 acquisition as it's in the best shape. I'll try to document here on RCU.
Tim
The following users liked this post:
john01374 (04-03-2022)
04-04-2022, 07:58 AM
#13
Thread Starter
Finally had some time to get back to this project. The weather hasn't been great for painting so I wasn't in any hurry.
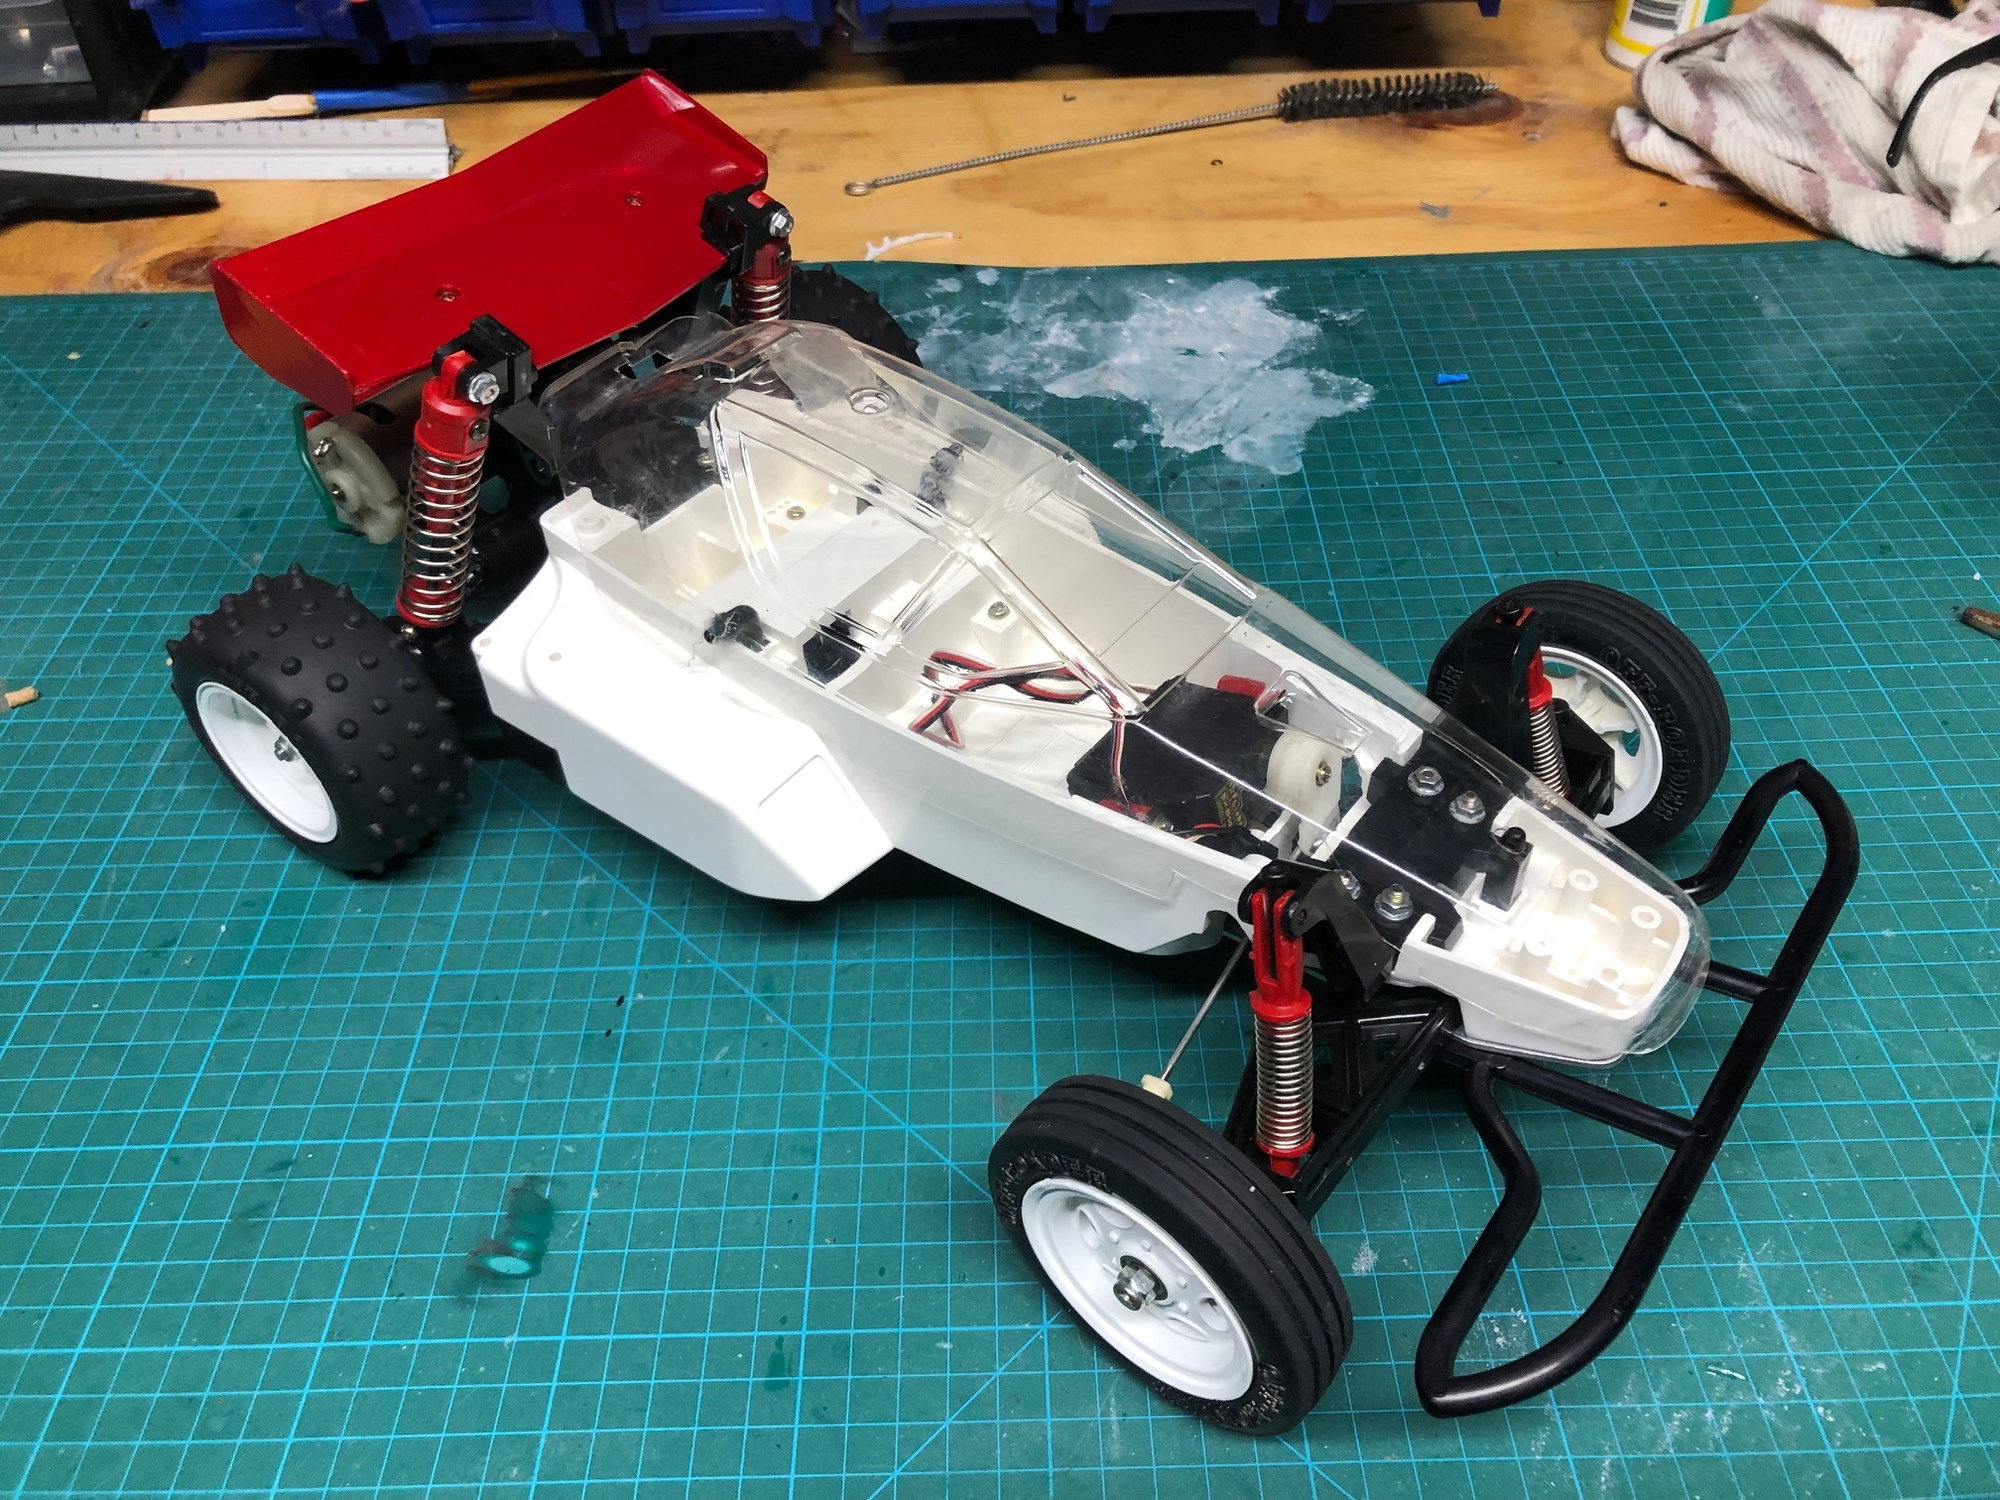
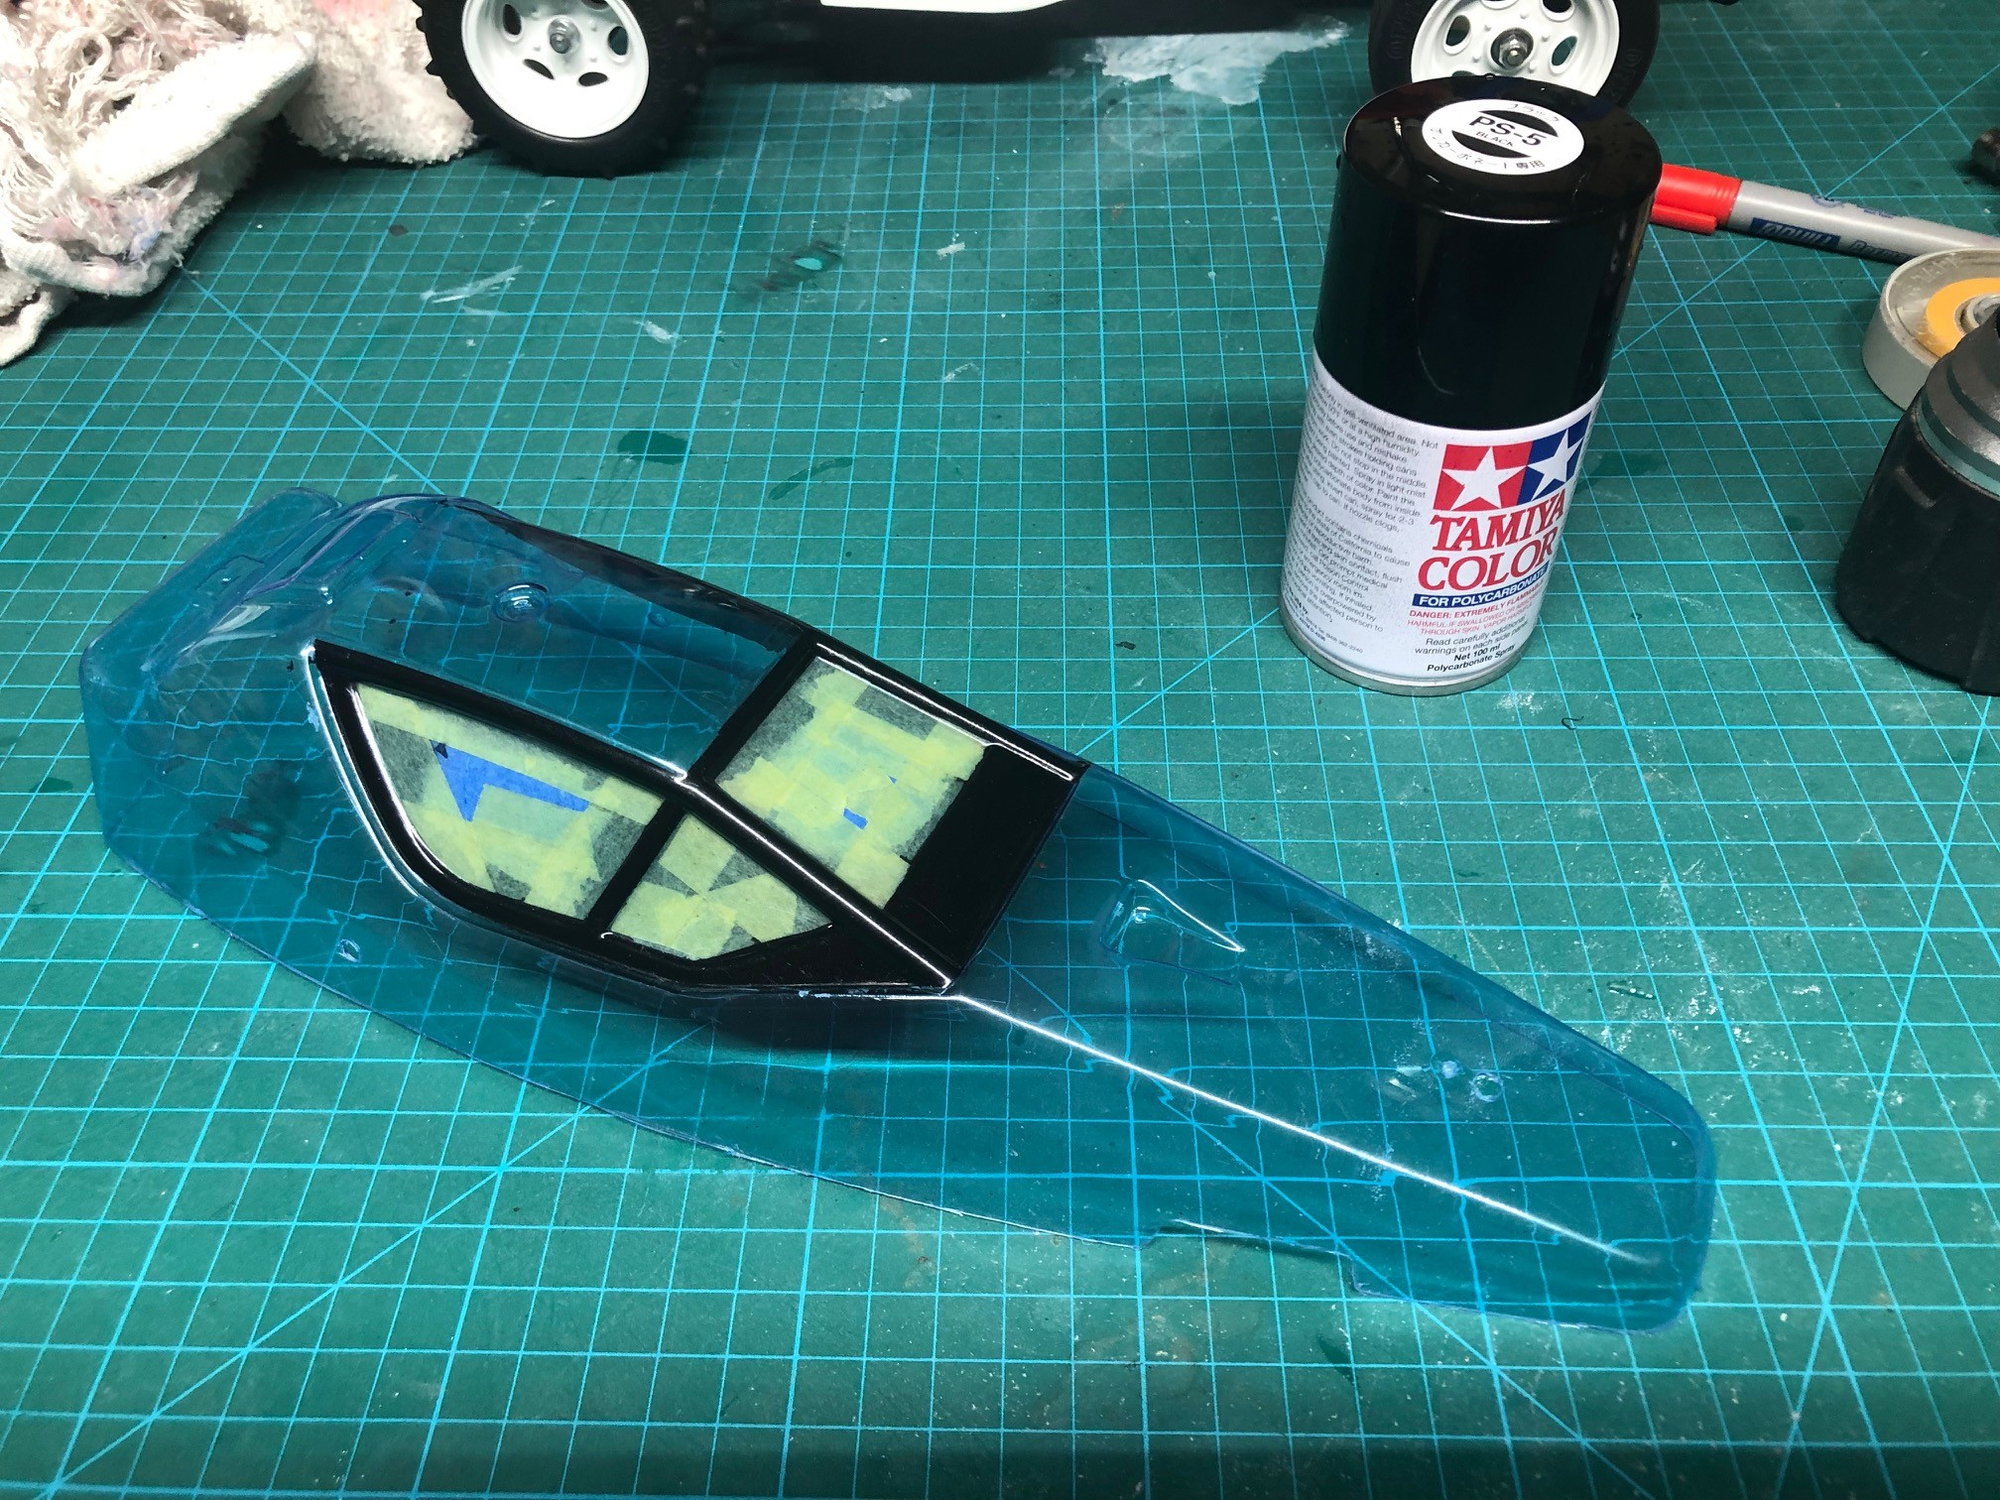
Got the TBG body cut out and I have to say that this body is really very nice and fits the chassis perfect. The parting lines around the lower portion of the body are not very pronounced so you really need to look for them. I used blue painters tape as a guide along the line to help with cutting out.
Next came my least favorite part of RC. Masking the inside of small clear bodies. Masking the windows then the roll bars was a tedious process that took a couple of hours to get correct. Tamiya tape was used for the line edges then the large areas covered in blue painters tape. Little trick I learned a while back was to apply a little heat to the inside of the body then burnish down the edges of the tape. Really cuts down on the bleed through under the tape.
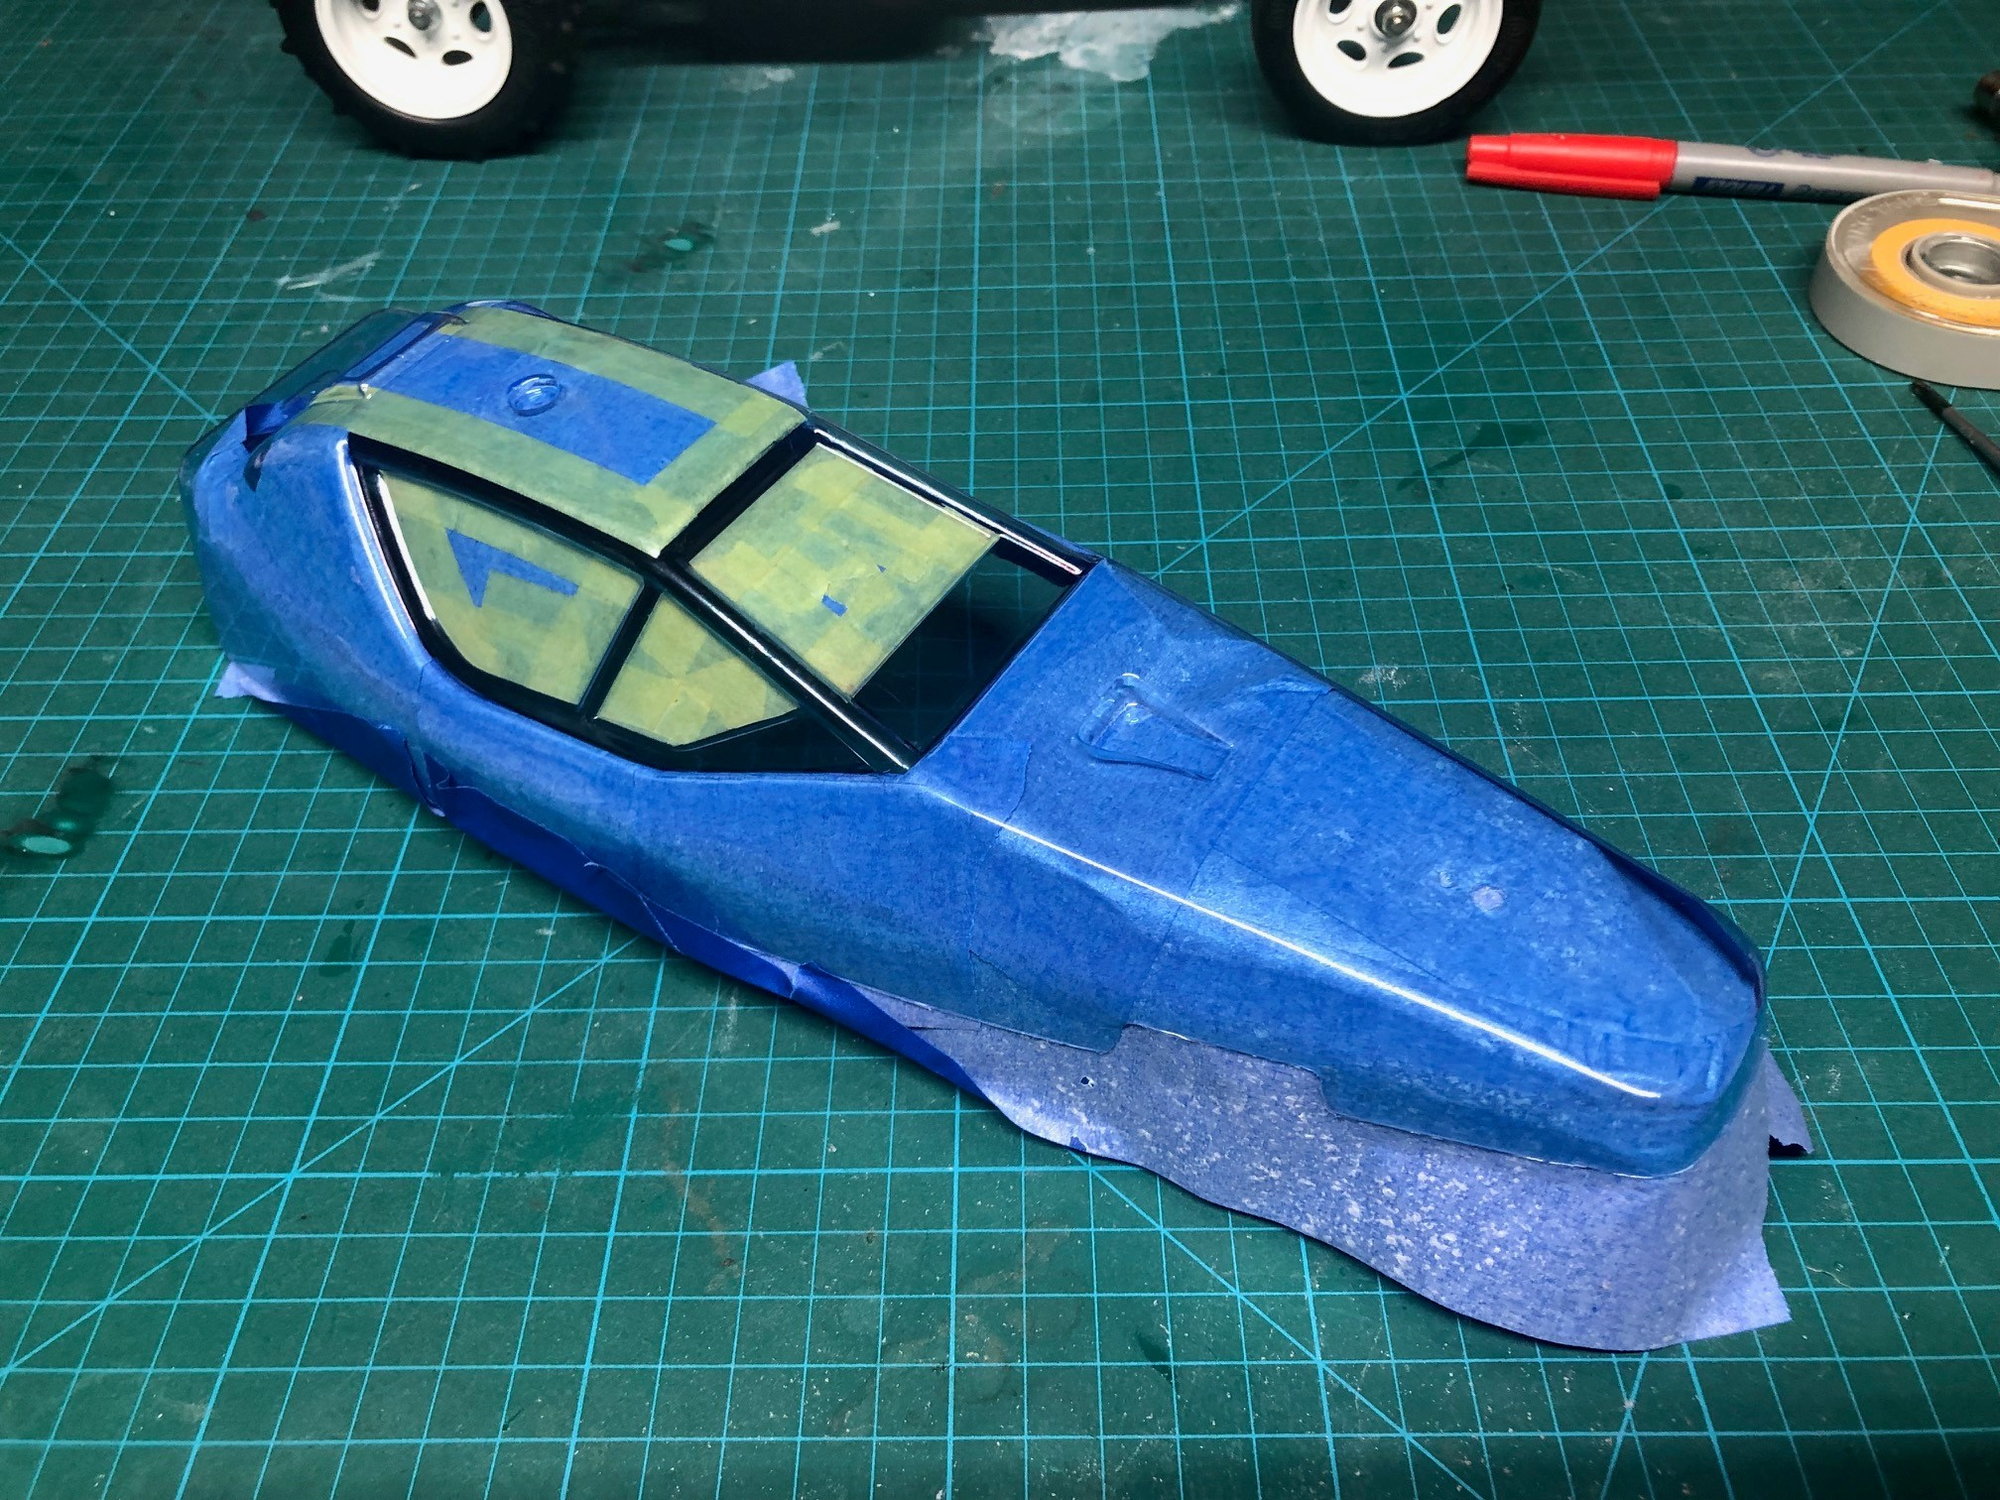
Looks like I might have a couple of areas that will need a little touch up but nothing major. Won't be able to tell until I get the tape off the windows. Going to let the black dry for a day then shoot on the white tomorrow. Hopefully I can get this one wrapped up later in the week.
Got the TBG body cut out and I have to say that this body is really very nice and fits the chassis perfect. The parting lines around the lower portion of the body are not very pronounced so you really need to look for them. I used blue painters tape as a guide along the line to help with cutting out.
Next came my least favorite part of RC. Masking the inside of small clear bodies. Masking the windows then the roll bars was a tedious process that took a couple of hours to get correct. Tamiya tape was used for the line edges then the large areas covered in blue painters tape. Little trick I learned a while back was to apply a little heat to the inside of the body then burnish down the edges of the tape. Really cuts down on the bleed through under the tape.
Looks like I might have a couple of areas that will need a little touch up but nothing major. Won't be able to tell until I get the tape off the windows. Going to let the black dry for a day then shoot on the white tomorrow. Hopefully I can get this one wrapped up later in the week.
Last edited by john01374; 04-04-2022 at 10:48 AM.
The following users liked this post:
Wildecoupe (04-04-2022)
04-12-2022, 10:46 AM
#14
Thread Starter
Finding the time to work on these things seems harder and harder everyday. This one is taking a bit longer than I had hoped but it's coming along.
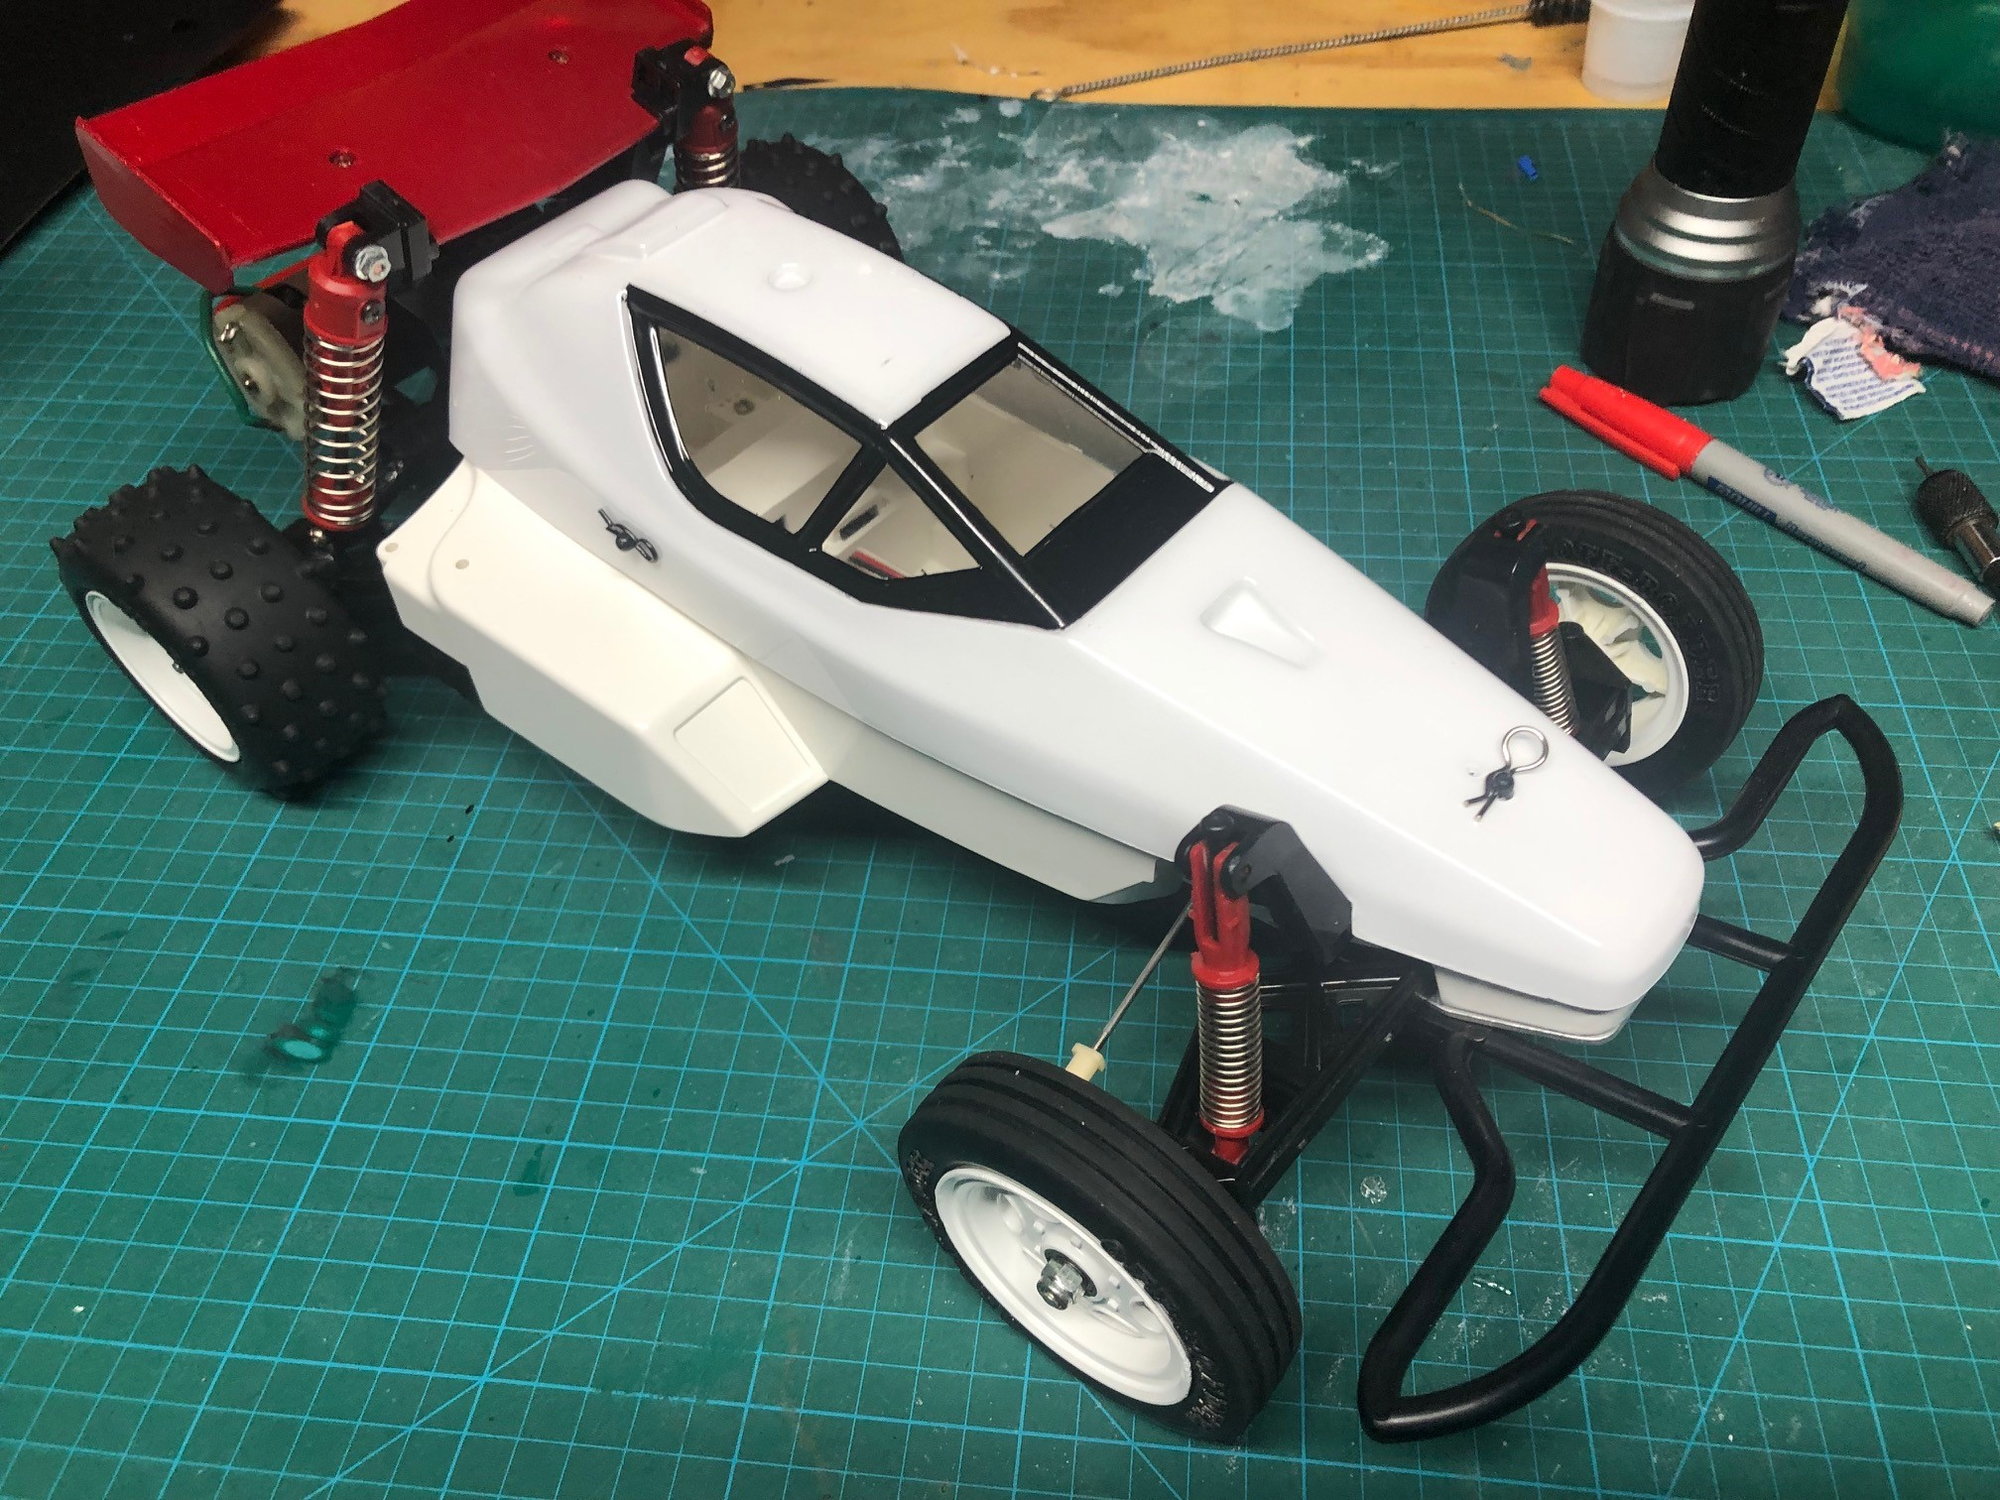
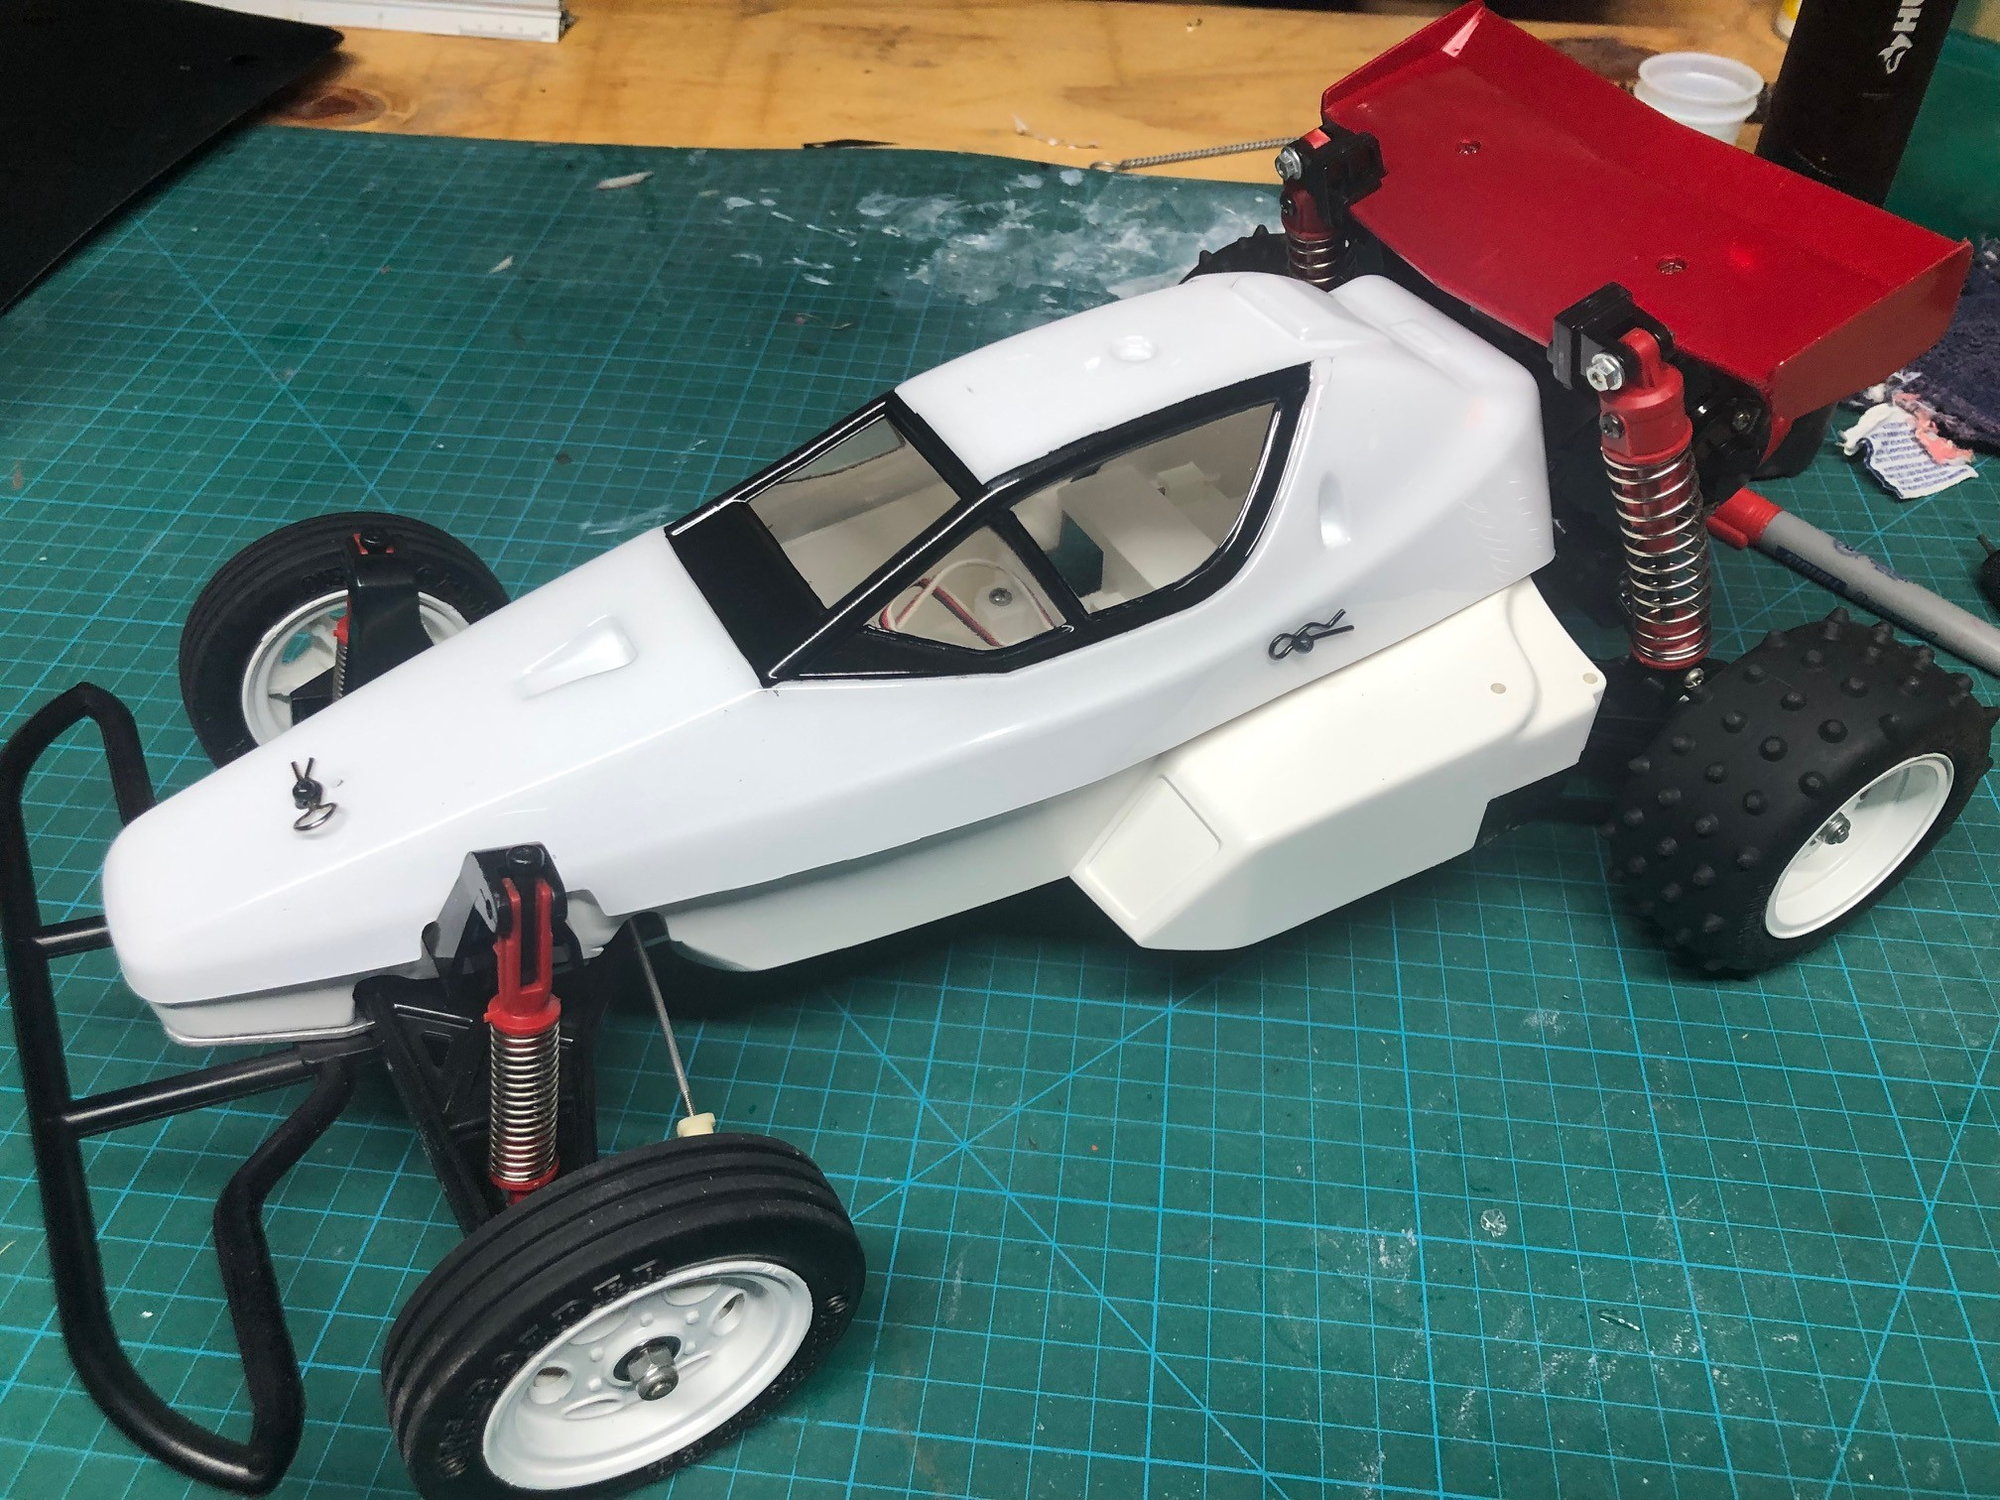
I finally got three coats of Tamiya White on the body. I'm happy to say that the masking lines turned out pretty good and that I'm happy with the results. Yes I could be a bit more picky but overall it's looks good.
Working on the decals this week and finally have the electronics selected so it should be a completed runner in a few days.
04-12-2022, 10:50 AM
#15
Looks good! I picked up some liquid mask to see how well that works compared to masking tape. But probably going to use a combo of that and tape.
I know what you mean about lack of time.
I know what you mean about lack of time.
The following users liked this post:
john01374 (04-19-2022)
06-09-2022, 09:18 AM
#16
Thread Starter
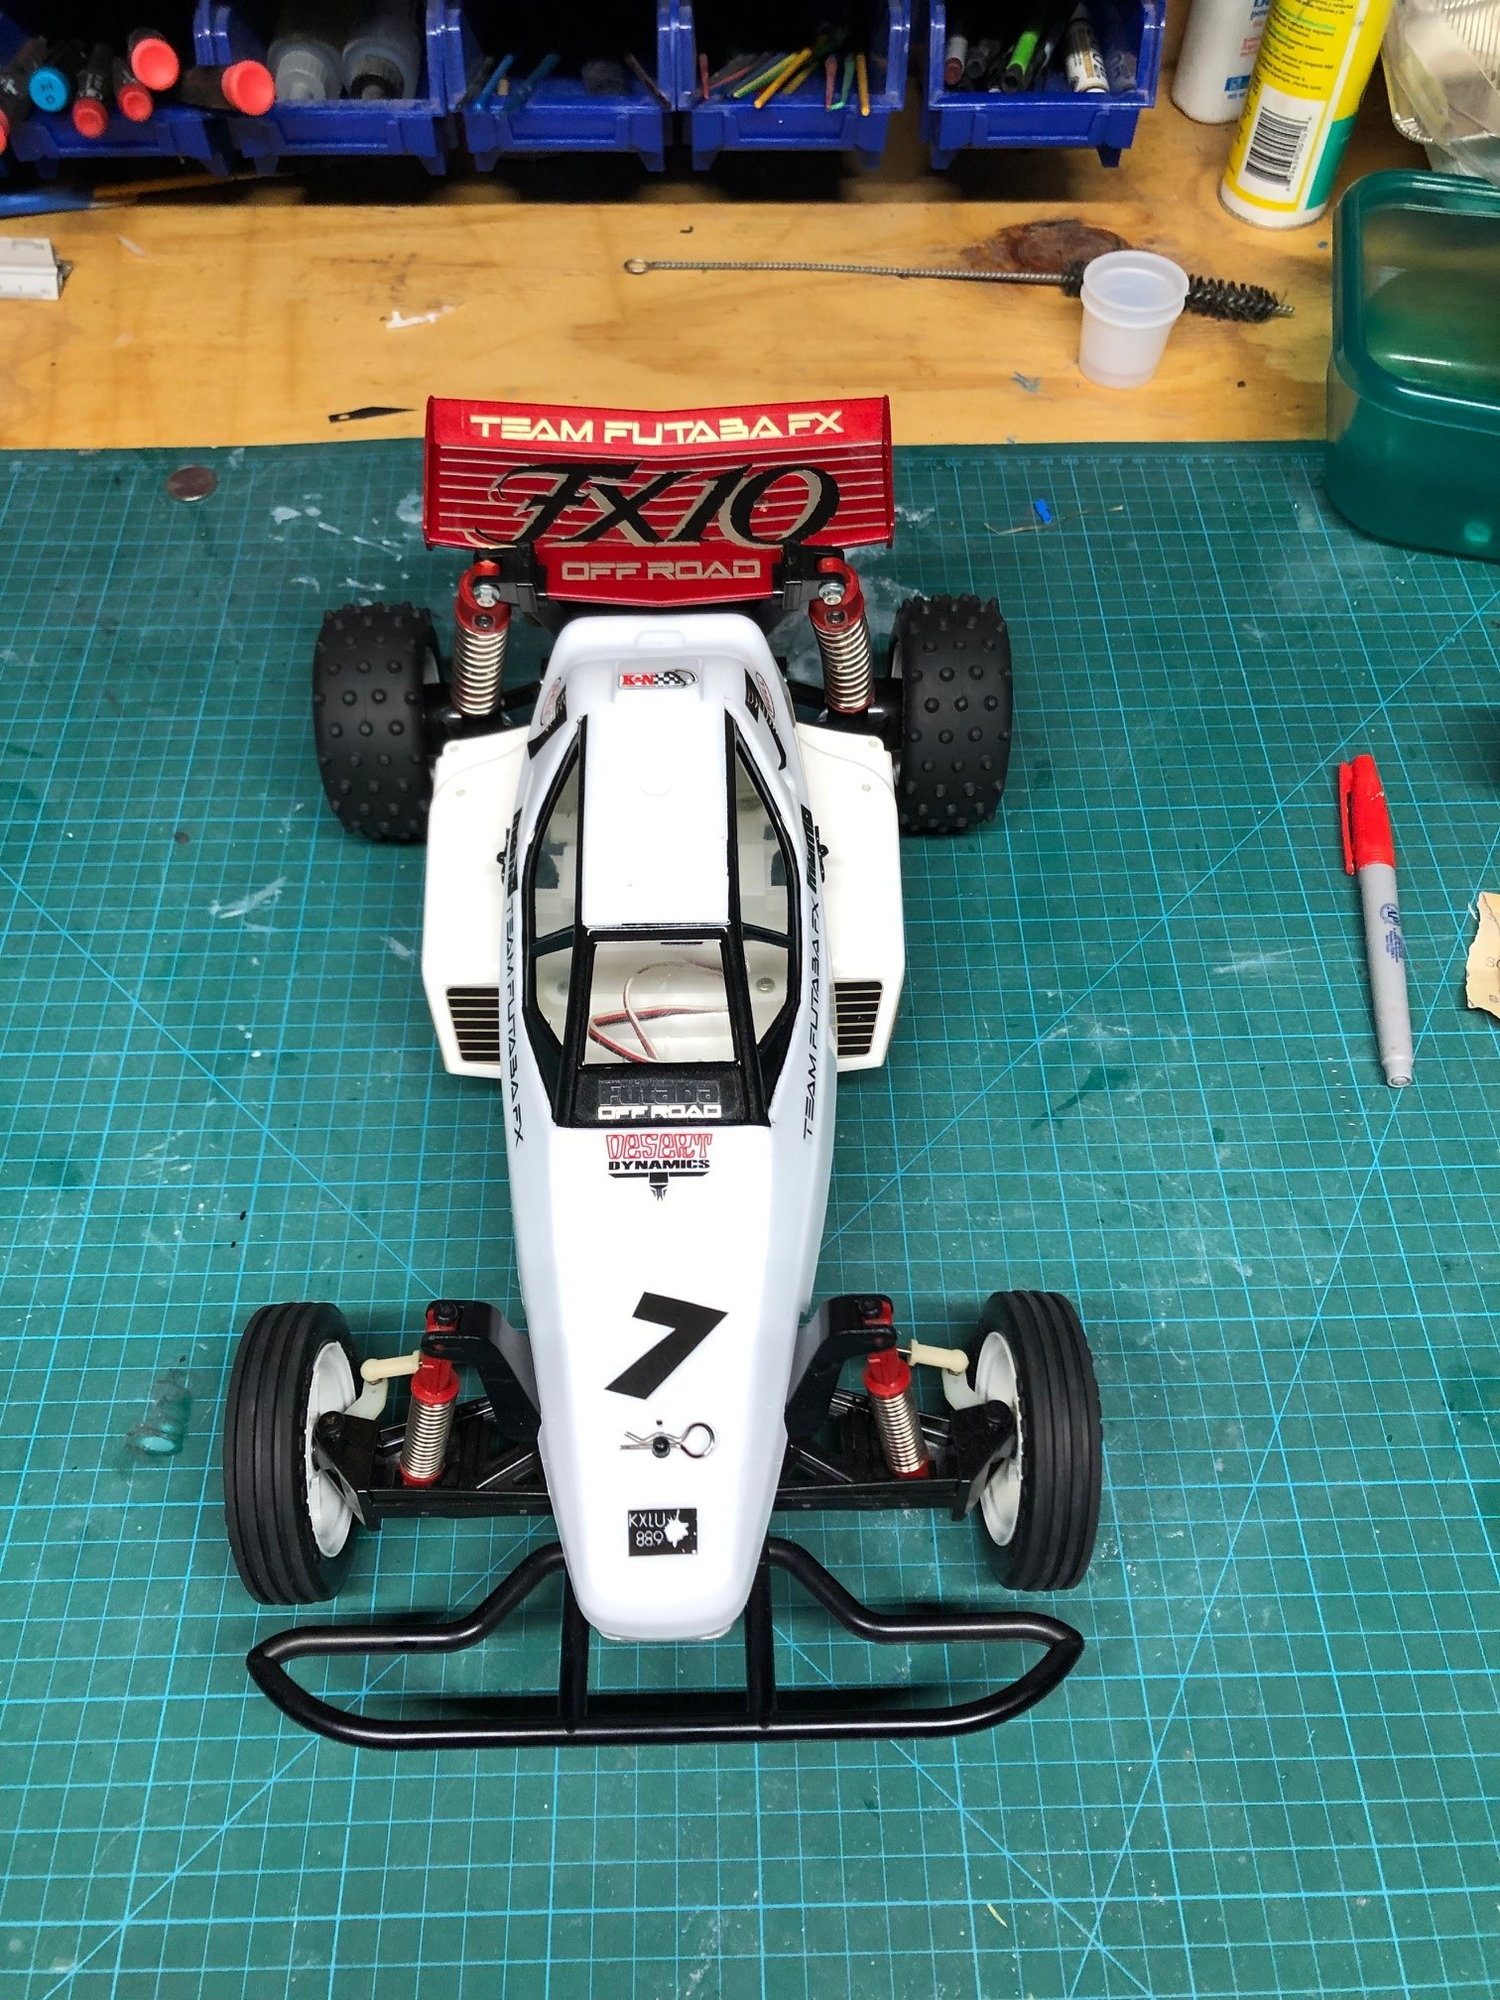
Finally had a chance to apply the decals to this one. I'm happy with the way the project turned out.
As some of you might have noticed, I never put electronics in this car. The reason for this is that I was contacted by a member that saw the build thread and offered to buy the car once the project was completed but didn't want any electronics and didn't want the car to be driven after the restoration. We reached a deal and I'm happy to say that the car is already in the hands of the new owner safe and sound. I don't know if he will post here but it has a new home.
For now, here are the final pics of the car.

