


I want to see more pics of home made RC cars, please.
 07-16-2009, 12:59 AM
#76
Senior Member
My Feedback: (1)
Join Date: Feb 2005
Location: Melbourne, AUSTRALIA
Posts: 506
Likes: 0
Received 0 Likes
on
0 Posts
Thats awsome! The rear suspension setup looks interesting. Got any vids of it in action?
 09-03-2009, 01:21 PM
#78
Senior Member
Join Date: Sep 2006
Location: Modesto,
CA
Posts: 3,965
Likes: 0
Received 0 Likes
on
0 Posts
No its not [>:] I'm getting interested and can't afford to right now [&:]
Ahhhhhhh keep it going, I know you all want my wife to skin me [X(]
Ahhhhhhh keep it going, I know you all want my wife to skin me [X(]
09-03-2009, 02:12 PM
#79
Senior Member
Join Date: Mar 2008
Location: kalamazoo, MI
Posts: 6,812
Likes: 0
Received 0 Likes
on
0 Posts
rclynx, its not too expensive. i have built several chassis's for under $20. all you need is a propane or butane torch, brass or steel tubing or rod, either 60/40 acid core solder or flux core rosin based solder, some medium thickness sheet metal of the same type as your rod/tubing, if using hot rolled steel you will need a grinder or rotory tool and a fireproof surface. you can get most of this stuff at ace hardware. 3 3-foot 1/4 inch hot rolled steel rods, a pound of 60/40 acid core, a cilinder of propane with self igniting torch head, a bench top grinder, a 12"x18" 18 gauge sheet metal and a rotory tool will run you around $125. $35 each aditional build and thats suposing you use the hole pound of solder when really they will last atleat 3 and also that price is using a cilinder a build when thay can last upwards 10 build with minor repairs, plus on top of that if you use the sheet metal only for mounts one sheet will last around 6 builds.
09-03-2009, 05:12 PM
#80
Senior Member

Join Date: Jan 2008
Location: parksville,
BC, CANADA
Posts: 1,786
Likes: 0
Received 0 Likes
on
0 Posts
ORIGINAL: brice_arnold
There is something to be said about any scratch built project whether it be made from CNC or from a hack saw and file. I started out with the basic tools and my first custom car was made using a hack saw and electric drill. I made a chassis from an old street sign for my electric buggy. As I grew older and my skills progressed so did the size of my wallet and I could afford bigger and better machines. I have never forgotten where I started and carry my previous skills wiht me to the new machines and tools. When I am looking at purchasing a new tool or machine I ask myself what is this going to allow me to do? Typically a machine or tool will open up the potential for different process and may allow you to do things more elegant and with more flare.
In college I had acess to a machine shop, all manual macines. After college I was without the machine that I had grown acustomed to. I eventually picked up a bench top mill and lathe from Harbor Freight and I was back in business. One day I found an old CNC router at the company I was working for and offered them 50 buck for it. This was about three years ago. I had to make a custom serial cable for it so that I could control it from my PC. I then had to go and find the correct driver software for the machine. Learn how to convert G-code over to the machines proprietary language. I basically tought my self CNC from scratch. I still use this machine to cut anything from carbon fiber to 5/8'' thick aluminum plate.
Last year I picked up a CNC mill that I now do all of my R&D work on. This year I picked up a nicer gunsmith lathe to replace my benctop lathe. I have now outgrown my garage and am moving into a dedicated shop. All of this has been inspired by my passion for everything radio controlled from helicopters, to boats, to cars, and other strange vehicles. Because I started with the basics I can manually machine almostanything that I can do on my CNC mill. Sure it may take longer and Imight have to get a little more creative but I will always have thatoption.
I don't know where I was going with this but I don't think you can put a weight on what is hand made and what is not based on the tools used to make the part or assembly. There is just as much tallent and creativity in going from a sketch to a computer model to a cnc'd part as there in going form a sketch to a wittled out part using a hack saw and drill press. Having said that I am personally always more impressed with the guys that do the builds with out the right tools but they have the inginuity to make their vision a reality. On the other hand you don't see too many CNC custom builds simply because the machines are expensive and the cost to have a one-off made for you is also a deterent.
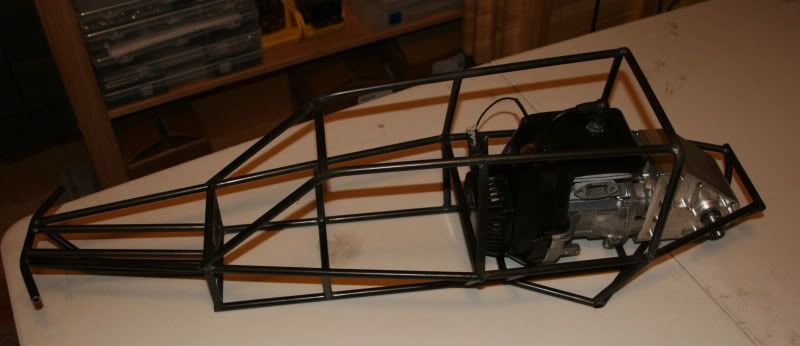
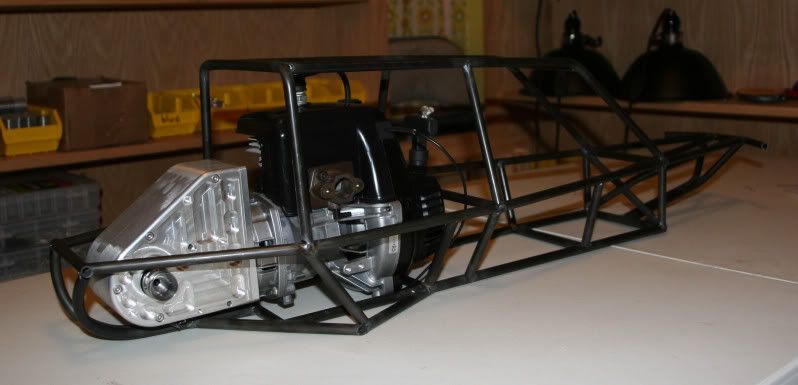
Enough rambling here is my most recent custom build. This was done for RCX of this year. It was inspired by the HPI baja and still uses a couple of components from the baja. There were a couple of motivations behind this project. 1. how can we get a 46cc goped motor into the baja 2. No one has ever done a tube chassis for the baja 3. Lets try and do something scale.
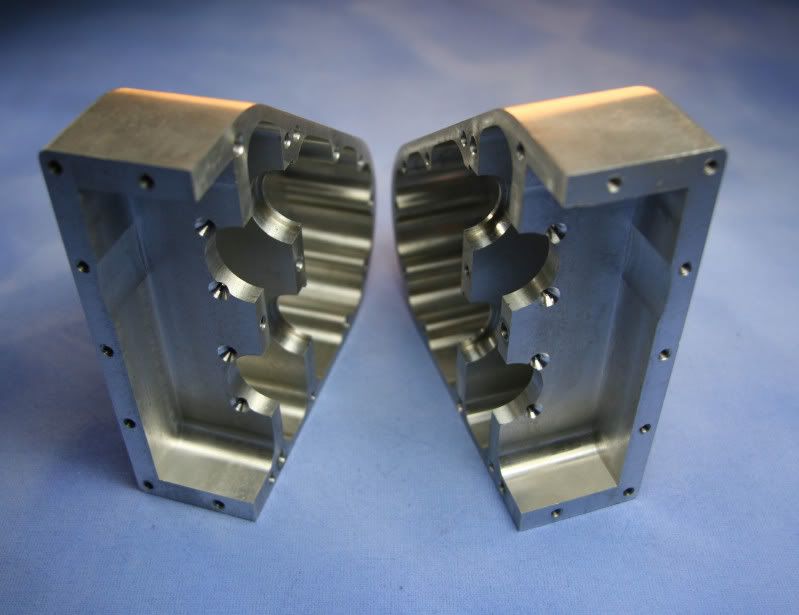
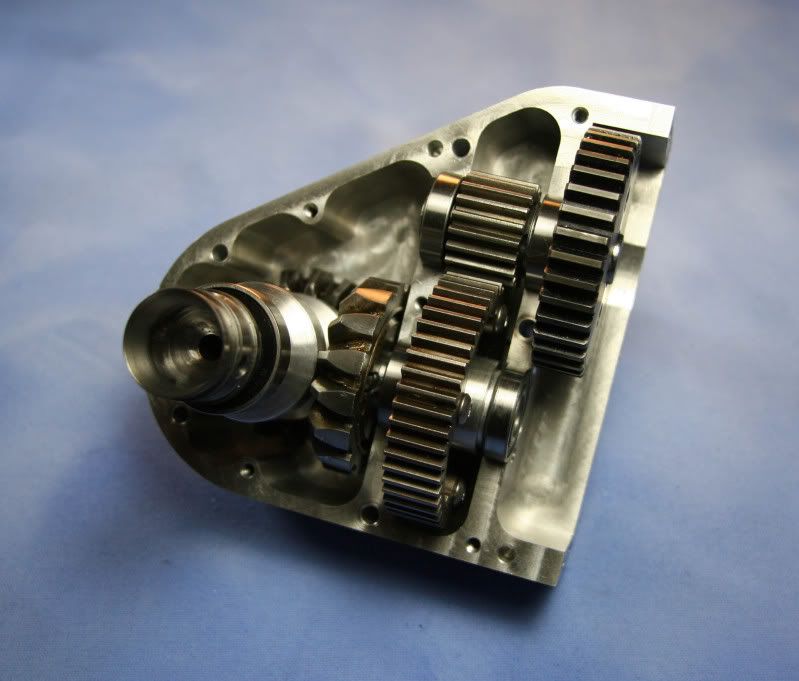
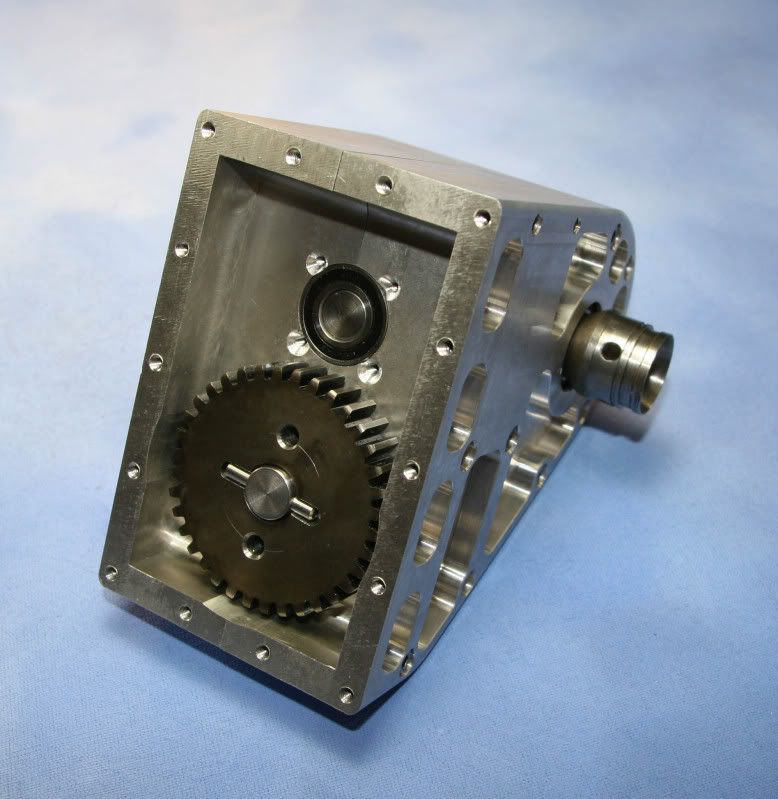
I started with the motor and designed a tranny for it.

Then I made the tranny. There is something satisfying about dreaming of a design and actuatly seeing it come to fruition and look and function the way you imagined it.
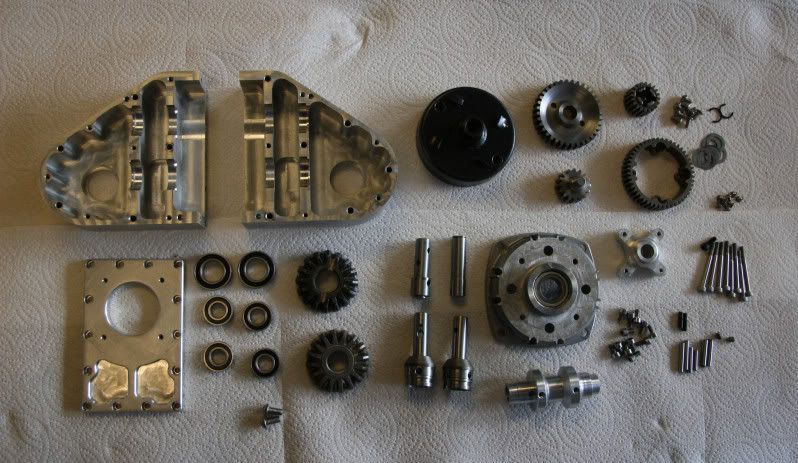

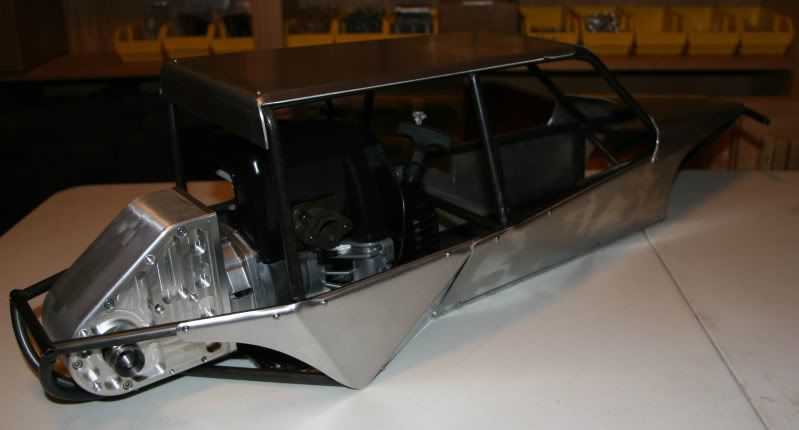
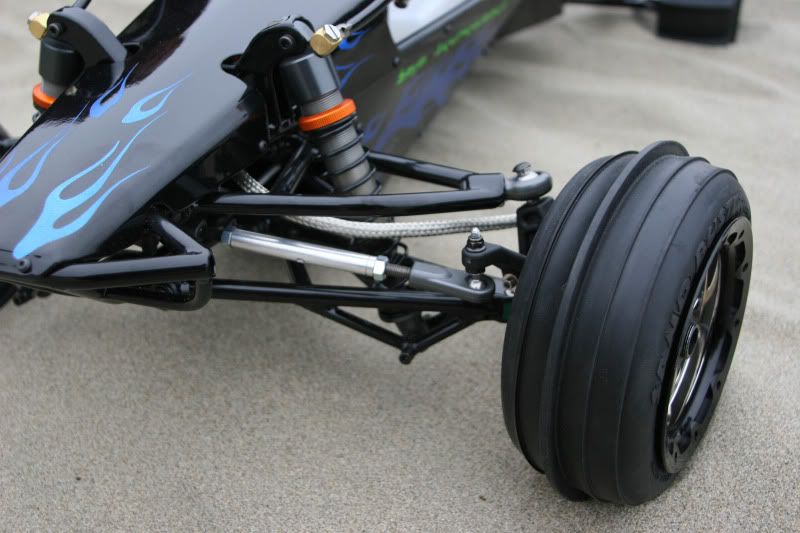
Then I built a chassis around the engine and tranny using TIG welded 4130 thin wall tubing. This is all hand work here.
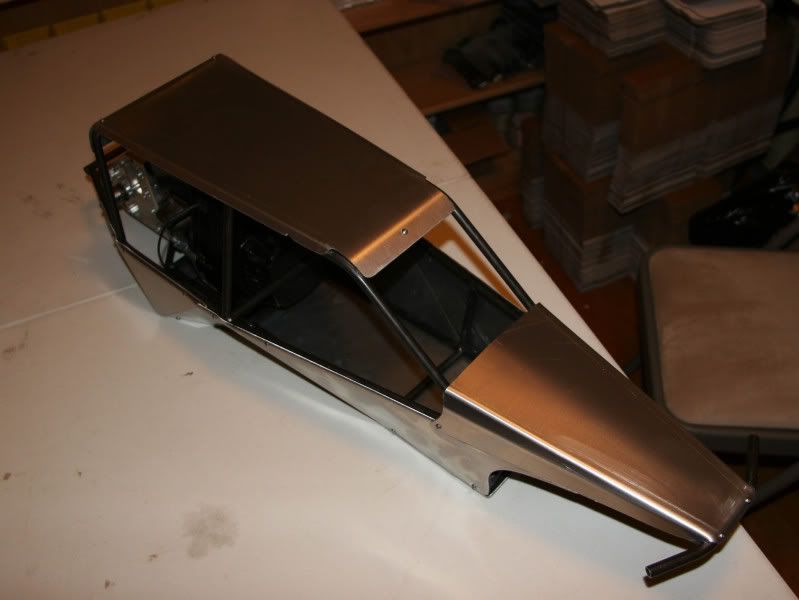
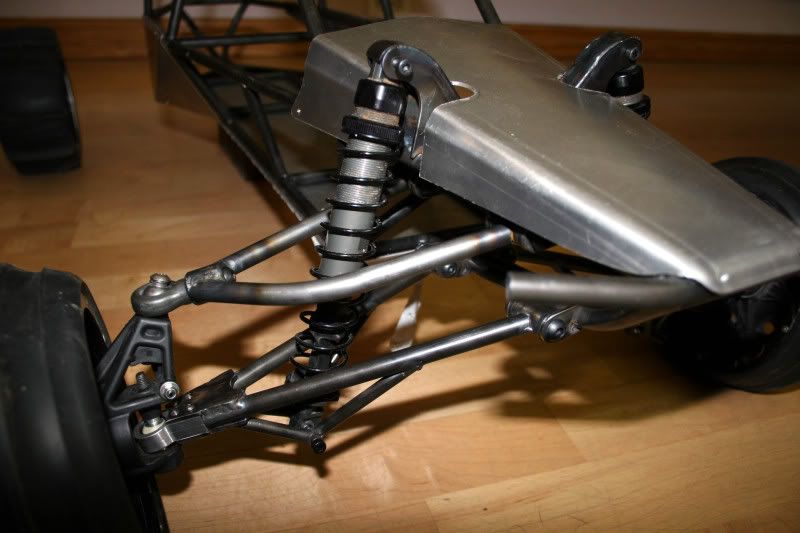
Once I had the rough chassis done I did up the body pannels in aluminum. I hate working with sheet metal and trying to form it. It's the one thing I don't have a good grasp on. I wasted a lot of material to get these panels
To keep the project scale I wanted to also do the suspension arms from 4130 tubing. It was actually not as bad as I thought. I made some welding jigs so that I could get the geometry just right and and have both the left and right side come out exact.
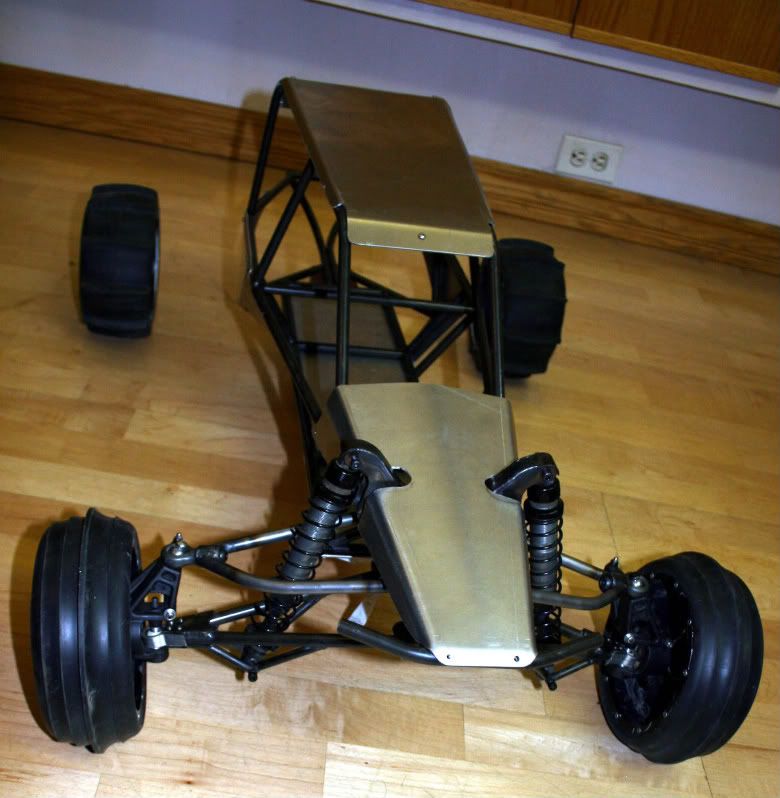

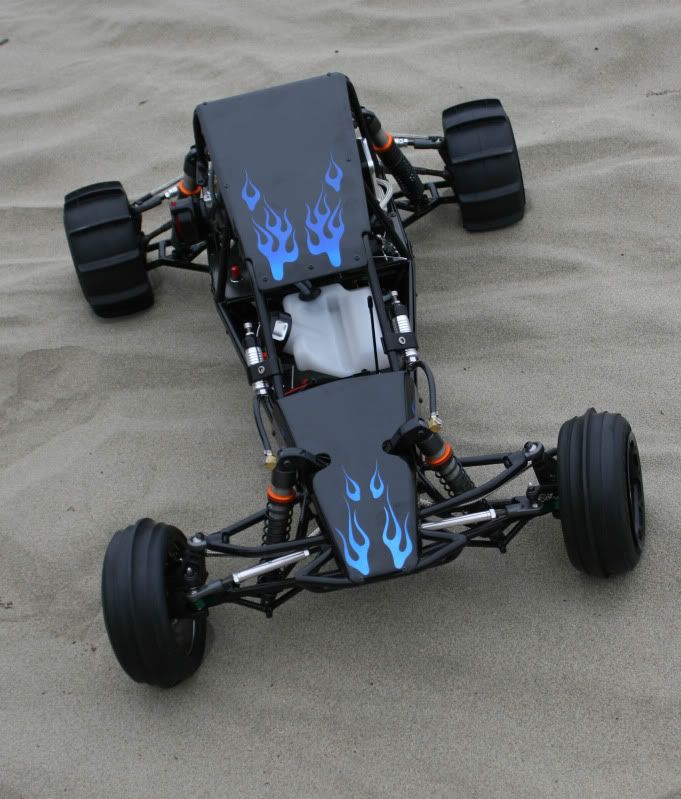
Once I was finished getting everything welded and prepped I had it all powder coated. I finished the body pannels with some painted flames.
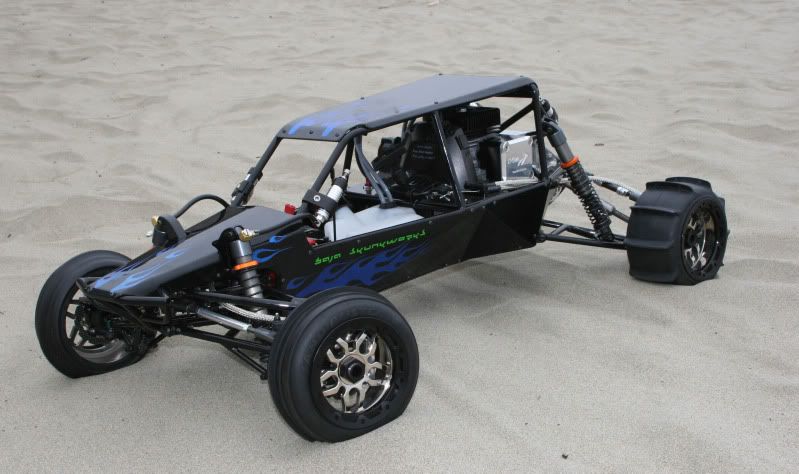
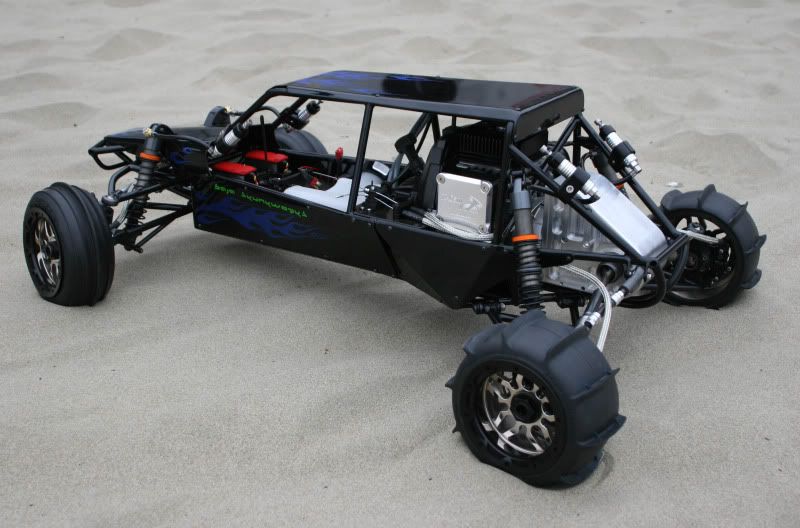
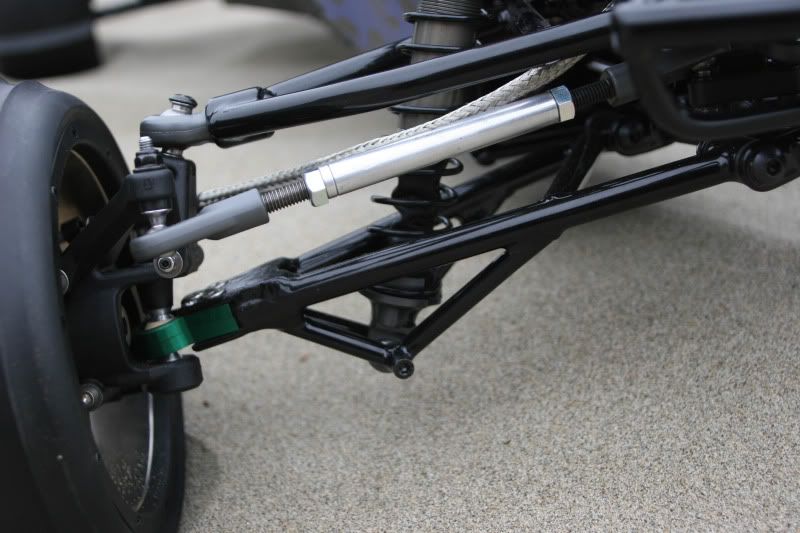
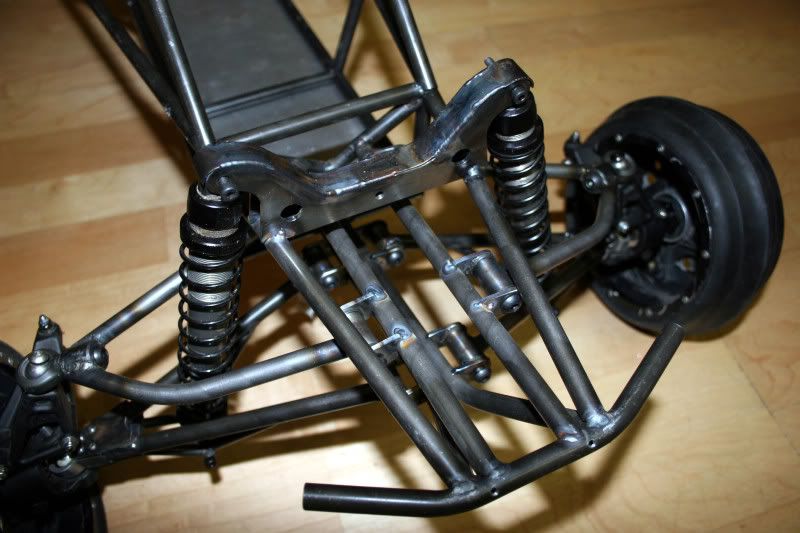
The rear has a pseudo trailing arm setup. Becasue I was using my CVD's for the drive-shafts I needed a telescoping driveshaft to allow for suspension travel.
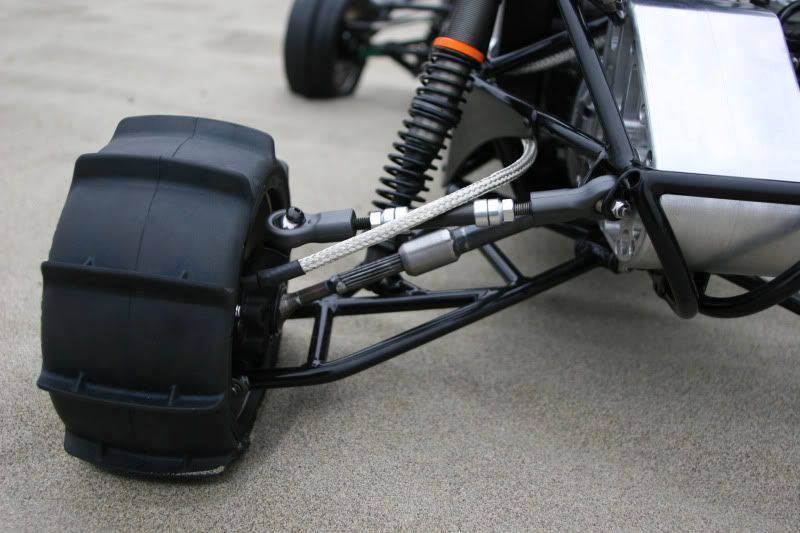
Some other design features include custom machined carbon fiber chassis plates. These support the radio gear and gas tank. The strearing uses dual Rhino servos. I am also using my front and rear disk brakes at the wheels. These are actuated buy independant Hitec 7955 servos.
That's about it. I have driven here once in the grass and now she sits in a box awaiting the next show.
There is something to be said about any scratch built project whether it be made from CNC or from a hack saw and file. I started out with the basic tools and my first custom car was made using a hack saw and electric drill. I made a chassis from an old street sign for my electric buggy. As I grew older and my skills progressed so did the size of my wallet and I could afford bigger and better machines. I have never forgotten where I started and carry my previous skills wiht me to the new machines and tools. When I am looking at purchasing a new tool or machine I ask myself what is this going to allow me to do? Typically a machine or tool will open up the potential for different process and may allow you to do things more elegant and with more flare.
In college I had acess to a machine shop, all manual macines. After college I was without the machine that I had grown acustomed to. I eventually picked up a bench top mill and lathe from Harbor Freight and I was back in business. One day I found an old CNC router at the company I was working for and offered them 50 buck for it. This was about three years ago. I had to make a custom serial cable for it so that I could control it from my PC. I then had to go and find the correct driver software for the machine. Learn how to convert G-code over to the machines proprietary language. I basically tought my self CNC from scratch. I still use this machine to cut anything from carbon fiber to 5/8'' thick aluminum plate.
Last year I picked up a CNC mill that I now do all of my R&D work on. This year I picked up a nicer gunsmith lathe to replace my benctop lathe. I have now outgrown my garage and am moving into a dedicated shop. All of this has been inspired by my passion for everything radio controlled from helicopters, to boats, to cars, and other strange vehicles. Because I started with the basics I can manually machine almostanything that I can do on my CNC mill. Sure it may take longer and Imight have to get a little more creative but I will always have thatoption.
I don't know where I was going with this but I don't think you can put a weight on what is hand made and what is not based on the tools used to make the part or assembly. There is just as much tallent and creativity in going from a sketch to a computer model to a cnc'd part as there in going form a sketch to a wittled out part using a hack saw and drill press. Having said that I am personally always more impressed with the guys that do the builds with out the right tools but they have the inginuity to make their vision a reality. On the other hand you don't see too many CNC custom builds simply because the machines are expensive and the cost to have a one-off made for you is also a deterent.
Enough rambling here is my most recent custom build. This was done for RCX of this year. It was inspired by the HPI baja and still uses a couple of components from the baja. There were a couple of motivations behind this project. 1. how can we get a 46cc goped motor into the baja 2. No one has ever done a tube chassis for the baja 3. Lets try and do something scale.
I started with the motor and designed a tranny for it.
Then I made the tranny. There is something satisfying about dreaming of a design and actuatly seeing it come to fruition and look and function the way you imagined it.
Then I built a chassis around the engine and tranny using TIG welded 4130 thin wall tubing. This is all hand work here.
Once I had the rough chassis done I did up the body pannels in aluminum. I hate working with sheet metal and trying to form it. It's the one thing I don't have a good grasp on. I wasted a lot of material to get these panels
To keep the project scale I wanted to also do the suspension arms from 4130 tubing. It was actually not as bad as I thought. I made some welding jigs so that I could get the geometry just right and and have both the left and right side come out exact.
Once I was finished getting everything welded and prepped I had it all powder coated. I finished the body pannels with some painted flames.
The rear has a pseudo trailing arm setup. Becasue I was using my CVD's for the drive-shafts I needed a telescoping driveshaft to allow for suspension travel.
Some other design features include custom machined carbon fiber chassis plates. These support the radio gear and gas tank. The strearing uses dual Rhino servos. I am also using my front and rear disk brakes at the wheels. These are actuated buy independant Hitec 7955 servos.
That's about it. I have driven here once in the grass and now she sits in a box awaiting the next show.
I have to say that this is probably the best build i've seen to date, I'm a hacksaw and drill guy as I don't have the machines I'd like and I don't have access to them[&o] I've made a couple of 4130 tube cages for my rampages and want to do a full tube 4wd chassis based on the crazy icelandic formula offroad jeeps [link]http://www.youtube.com/watch?v=75HaMmUqz8I&feature=related[/link]. will have to use existing parts from various rc's, i really want to do it with solid axles but will have to brainstorm that one to see what i can modify with my meagre tooling. (excuse the welds, have no tig just an industrial mig)
not a full build but here's my cages

 09-04-2009, 02:23 AM
#81

Thread Starter

Join Date: Jan 2009
Location: Close to the beach, AUSTRALIA
Posts: 3,497
Likes: 0
Received 0 Likes
on
0 Posts
ORIGINAL: rclynx
No its not [>:] I'm getting interested and can't afford to right now [&:]
Ahhhhhhh keep it going, I know you all want my wife to skin me [X(]
No its not [>:] I'm getting interested and can't afford to right now [&:]
Ahhhhhhh keep it going, I know you all want my wife to skin me [X(]
Have a look at what I'm making at the moment from scrap and toy RC cars.
[link=http://www.rcuniverse.com/forum/m_9037222/tm.htm]LINK[/link]


 09-07-2009, 02:08 AM
#83
Thread Starter
Join Date: Jan 2009
Location: Close to the beach, AUSTRALIA
Posts: 3,497
Likes: 0
Received 0 Likes
on
0 Posts
Looks interesting but I think something went wrong when you uploaded the pictures......
09-11-2009, 08:06 AM
#84
Junior Member

Join Date: Feb 2009
Location: , GERMANY
Posts: 5
Likes: 0
Received 0 Likes
on
0 Posts
see the new body for my 1/3rd scaled home made RC stock cars:


full story: [link=http://www.stock-stone.de/]www.stock-stone.de[/link]
full story: [link=http://www.stock-stone.de/]www.stock-stone.de[/link]
09-11-2009, 06:38 PM
#85
Thread Starter
Join Date: Jan 2009
Location: Close to the beach, AUSTRALIA
Posts: 3,497
Likes: 0
Received 0 Likes
on
0 Posts
Stock-Stone, I love your cars.
Awesome work.
Hey how did you go with making your own servo?
I remember you asking about some servo kit a while back.
Any luck?
Also do you have any videos of your cars in action?
Awesome work.
Hey how did you go with making your own servo?
I remember you asking about some servo kit a while back.
Any luck?
Also do you have any videos of your cars in action?
09-18-2009, 02:09 PM
#86
Junior Member
Join Date: Feb 2009
Location: , GERMANY
Posts: 5
Likes: 0
Received 0 Likes
on
0 Posts
ORIGINAL: Dirty_Vinylpusher
Stock-Stone, I love your cars.
Awesome work.
Hey how did you go with making your own servo?
I remember you asking about some servo kit a while back.
Any luck?
Stock-Stone, I love your cars.
Awesome work.
Hey how did you go with making your own servo?
I remember you asking about some servo kit a while back.
Any luck?
01-12-2010, 02:12 AM
#87
Junior Member
Join Date: Jan 2010
Location: Queensland, AUSTRALIA
Posts: 4
Likes: 0
Received 0 Likes
on
0 Posts
This is my home made rc car. Made from kids 50cc quad bike. I was goingto make a tropht truck but i like offroad buggys and sandrails so much more! i removed everything but motor and rear cradle and made a frame from there. I must admit ive changed the look off this buggy 3 times to get it the way i like it. I/ve also made it so it has almost perfect weight balance front to back. I've found through research that too much weight at rear and you car will not want to turn. The original front suspension was crap, as the single a-arms made the wheels angle in when the suspension was used. i made my own front arms using scrap metal and made my own shocks using the original top and bottom mounts only. I used springs from old mountain bike forks i found at the tip. I also used an adjustable mtb shock on the rear but i did have to put a softer spring on it. This shock is alloy and looks good too. For the steering i copied my 1/8 truck and made twin bellcranks using bmx forks and headtubes. these have bearing top and bottom and can take a lot of punishment. i also incorporated a servo saver into the steering bar which has spring each side of a bolt that connects to wiper arm. I mounted my electronics in a box and put on two 12v fans from old computers to cool electronics.(heat kills rc electroncs) i have too voltage adjusters to supply 6v to my reciver and throttle/brkae servo and will put my pwm servo amp in there later. A small 12V motorcycle battery will sit behind the electonics box in the rear section.The switches on top are for the motor, headlights, and a spare. I have 2 rear brake calipers running too a pulley that changes from 2 x cables into 1. I then hooked a bike brake lever up and attached it too my servo with bicycle brake cables. For the throtlle i attached it too the servo with bike brake parts. I also changed the spring in the carb so it has less tension than the original. i had too change the exhaust pipe to make it fit and used bmx handle bar pipe. i added a small skateboard wheel to tension the chain as well as the chain loosens through rear suspension travel. (You can eleminate this by mounting you motor and rear axle together, instead of on a seperate pivot.) I had a set of hope hydraulic brakes i wanted too fit to the front but they where to wide and rubbed the tyre. I hope to finish the steering soon as im wating on some electronic parts for the wiper motor controller. i used an esc to test the function of the steeing and it worked great except for reverse delay and no centering position. I also used a hitech 805bb 1/4 servo but it groaned and buzzed in center postion. I must thank da mad maori and rc cross car on youtube for the great pics and info they posted. Hope to have my beast running soon. Cheers DH1
 01-12-2010, 05:31 AM
#89
Junior Member
Join Date: Jan 2010
Location: Queensland, AUSTRALIA
Posts: 4
Likes: 0
Received 0 Likes
on
0 Posts
Heres more pics thanks for the comments. I noticed some people were having probs with servo amps frying or not working. First 2.4fm radio is essential for no interference from motor frequencies. Second servo amp must have powerful enough components to handle current drawn from wiper motor. most have insufficent mosfets and basic electronics. to get the best performace high current servo amps and quality servos must be used, or you can go the more expensive route of buying a pre wired servo controller or driver that uses pulse width signals to drive the wiper motor. This way you can hook directly to reciever instead of to servo motor output or servo pulse. These are awesome as they have outputs for electric fans, warning and runnning lights, overheat and over current functions and abilty to hook to computers for calibration. Only prob is the quality ones cost from $500 up to $1200 AUS.
The other options such as vantec servos are also very expensive and to use 1/4 scale servos such as hitecs 805mbb servos are costly as you need 2 and a 3 channel reciever. Hope this helps thanks DH!
The other options such as vantec servos are also very expensive and to use 1/4 scale servos such as hitecs 805mbb servos are costly as you need 2 and a 3 channel reciever. Hope this helps thanks DH!
01-12-2010, 08:12 PM
#92
Junior Member
Join Date: Jan 2010
Location: Queensland, AUSTRALIA
Posts: 4
Likes: 0
Received 0 Likes
on
0 Posts
Cooran. its between noosa and gympie. Heres some more pics of my car before i changed it. I also made a truck body out of cardboard that I was going to make a fibreglass mould from but changed my mind. Thanks DH1
04-05-2012, 04:26 AM
#93
Member
Join Date: Oct 2009
Location: Berkshire , UNITED KINGDOM
Posts: 65
Likes: 0
Received 0 Likes
on
0 Posts
Hello buddy,
How much would you make a transmission like this one for me. Even if it''s simpler version?
Surely there are other chaps who could use such a rear end.
Simply fantastic!
Glenn.
How much would you make a transmission like this one for me. Even if it''s simpler version?
Surely there are other chaps who could use such a rear end.
Simply fantastic!
Glenn.
