


Scratch Designed/Built Sailplane Fuselage
 12-25-2012, 05:50 PM
#101

Thread Starter

Join Date: Feb 2012
Location: Fairfield, CT
Posts: 416
Likes: 0
Received 0 Likes
on
0 Posts
Happy holidays guys.
I totally agree Scott, a fiber-glass or composite version of this fuselage would be the next logical step in this air-frame's evolution. Lets see how she flies first, then move on from there. (PM sent regarding the offer to help).
I totally agree Scott, a fiber-glass or composite version of this fuselage would be the next logical step in this air-frame's evolution. Lets see how she flies first, then move on from there. (PM sent regarding the offer to help).
 12-29-2012, 10:07 PM
#103
Thread Starter
Join Date: Feb 2012
Location: Fairfield, CT
Posts: 416
Likes: 0
Received 0 Likes
on
0 Posts
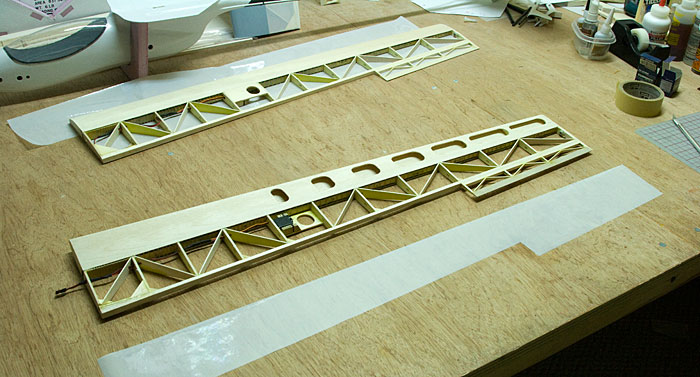
Wrapping up the wing (again)
Apparently Untracote doesn't stick well to spackling. So I decided to re-mask the wing & paint the fiber-glassed center area...
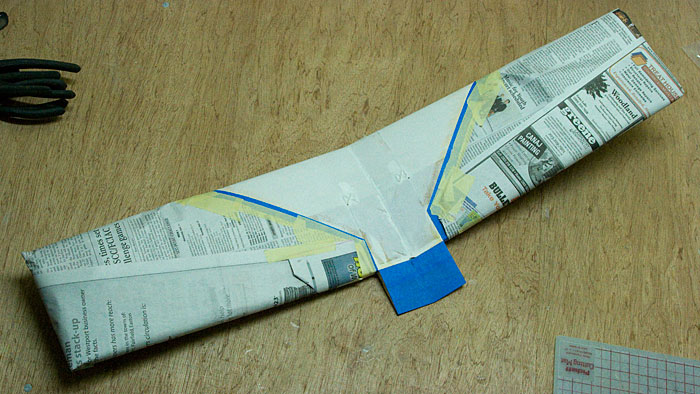
Usual thing, took 20 minutes to mask her, 30 seconds to apply the paint...
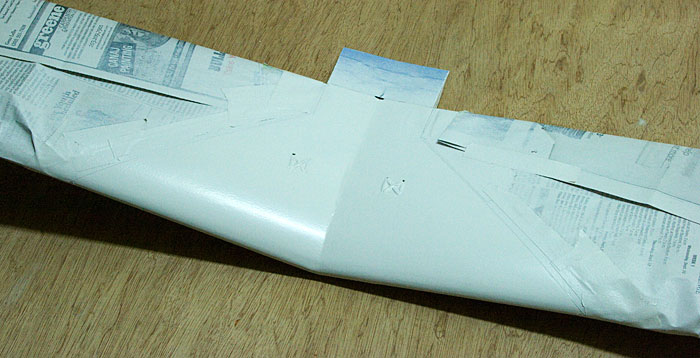
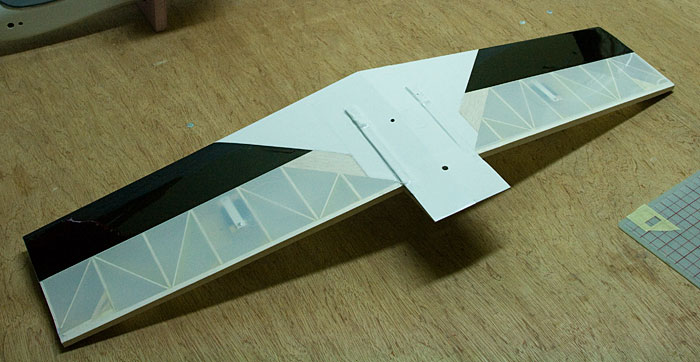
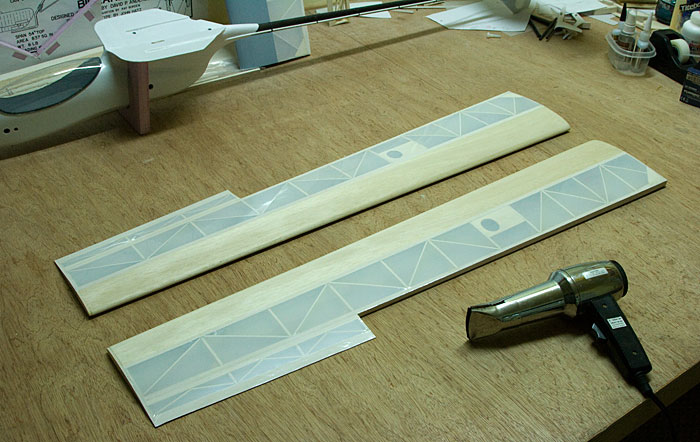
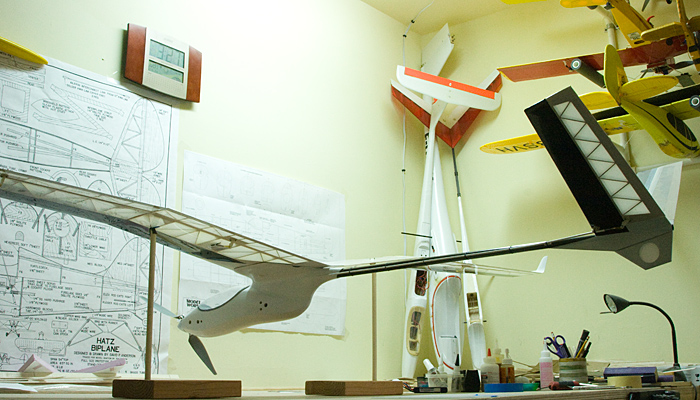
Next I set about applying the covering...
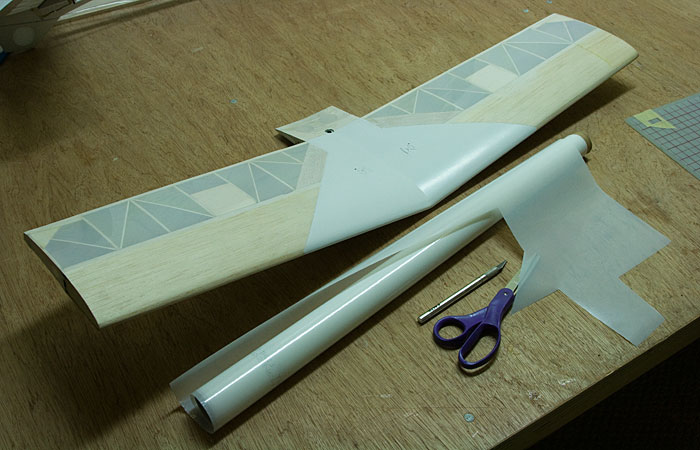
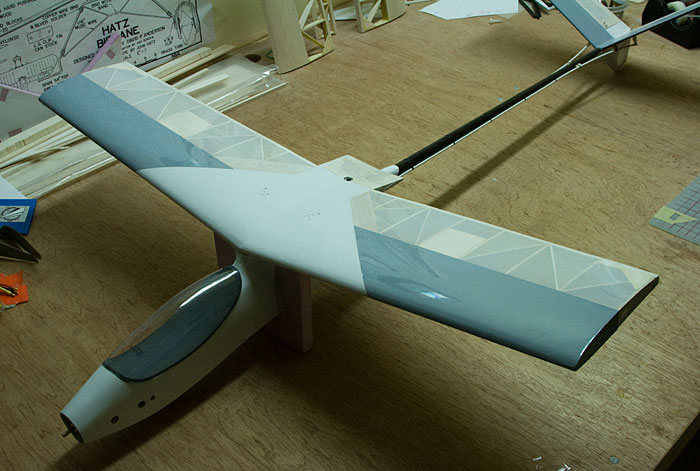
Transparent white on the open structure, gray on the sheeted sections...
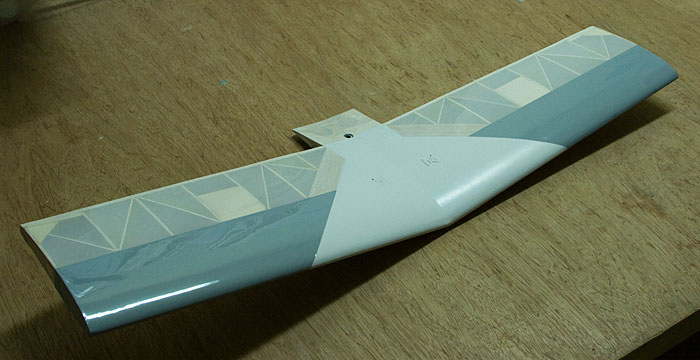
Love the way the light shines through the wing, that should look real nice overhead...

Well that's enough for today...
Apparently Untracote doesn't stick well to spackling. So I decided to re-mask the wing & paint the fiber-glassed center area...
Usual thing, took 20 minutes to mask her, 30 seconds to apply the paint...
Next I set about applying the covering...
Transparent white on the open structure, gray on the sheeted sections...
Love the way the light shines through the wing, that should look real nice overhead...
Well that's enough for today...
12-30-2012, 08:27 PM
#106
Thread Starter
Join Date: Feb 2012
Location: Fairfield, CT
Posts: 416
Likes: 0
Received 0 Likes
on
0 Posts
Yeah we got snow today, only four inches though. Weird though the town over from us got a foot. Can't wait to fly her but warmer weather would be nice.
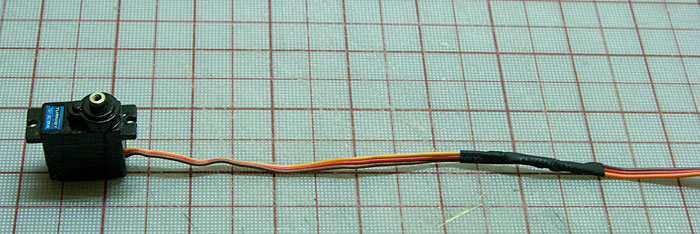
The wires don't reach
I've never been one to use pre-made servo extensions as it's not that difficult to solder together a custom length of wire if need be. Here's a great tip I picked up watching Bruce from xjet & rcmodelreviews on YouTube.
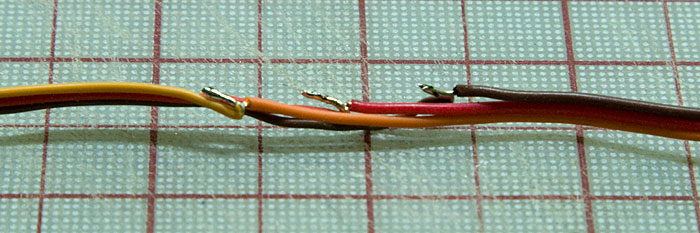
First I cut off the servo plug & find myself a spare length of servo wire...
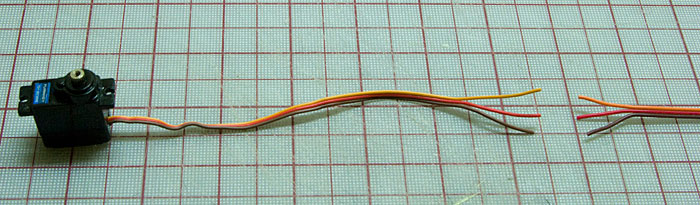
Next I stagger-cut the wires so the connections aren't all in the same spot...

Bare the ends...
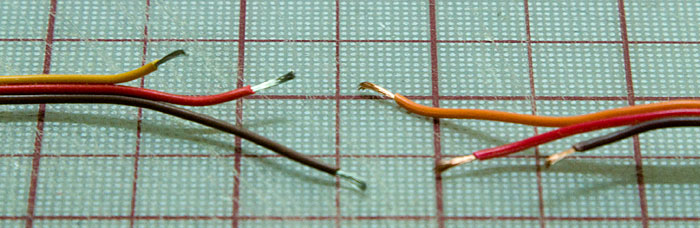
Twist them together...
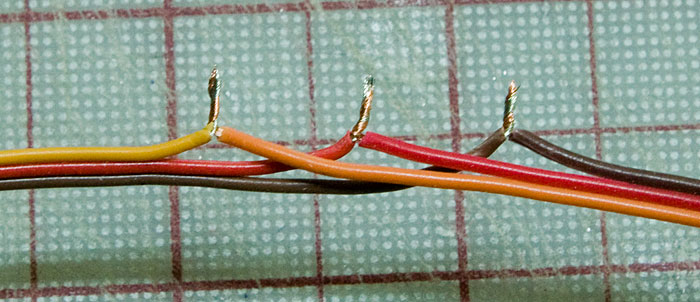
Add a smidgen of solder to each...

Bend em over...
Slip a length of heat-shrink over the whole thing...
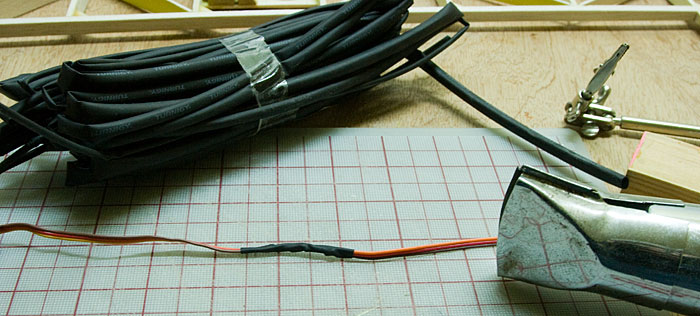
And we're good to go. I like this technique, no need to fiddle about insulating each wire separately. Thanks Bruce...
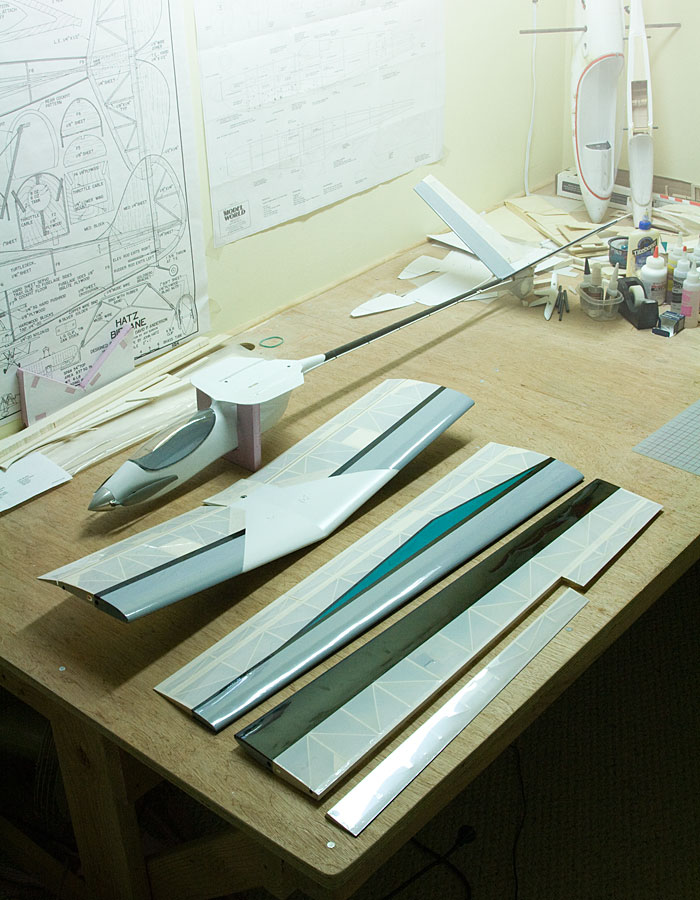
Back to the covering
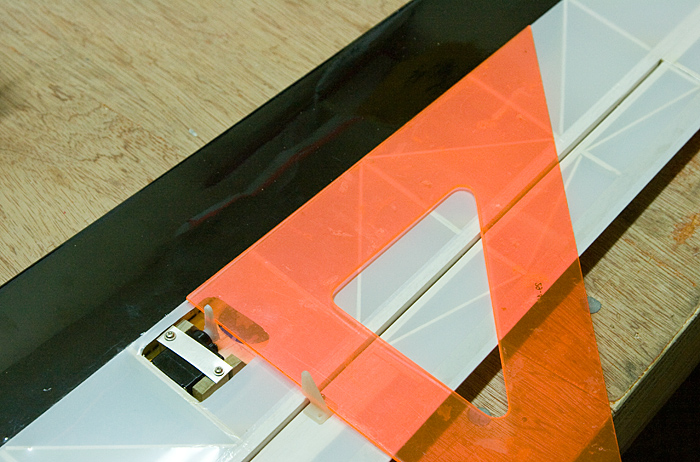
I added the black visibility panels...
Started work on the outboard panels...
That'll do for now, more soon...
The wires don't reach
I've never been one to use pre-made servo extensions as it's not that difficult to solder together a custom length of wire if need be. Here's a great tip I picked up watching Bruce from xjet & rcmodelreviews on YouTube.
First I cut off the servo plug & find myself a spare length of servo wire...
Next I stagger-cut the wires so the connections aren't all in the same spot...
Bare the ends...
Twist them together...
Add a smidgen of solder to each...
Bend em over...
Slip a length of heat-shrink over the whole thing...
And we're good to go. I like this technique, no need to fiddle about insulating each wire separately. Thanks Bruce...
Back to the covering
I added the black visibility panels...
Started work on the outboard panels...
That'll do for now, more soon...
01-01-2013, 08:10 PM
#107
Thread Starter
Join Date: Feb 2012
Location: Fairfield, CT
Posts: 416
Likes: 0
Received 0 Likes
on
0 Posts
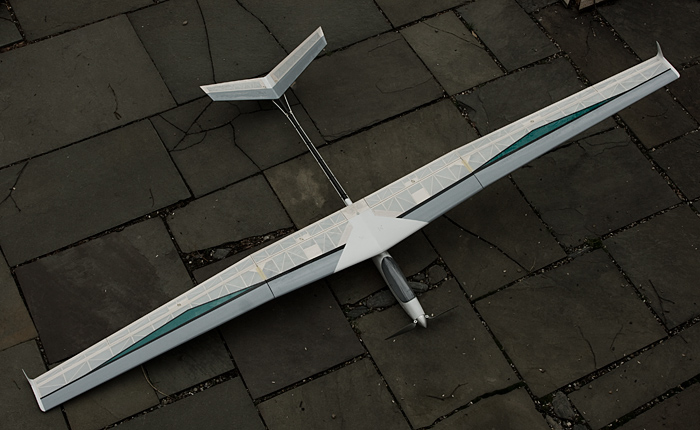
Got-ya Covered!
Finally finished up the covering today...
I know you probably want to see how she looks assembled but I'm an evil bugger, you'll have to wait until she's complete. We're getting real close though :-)
Finally finished up the covering today...
I know you probably want to see how she looks assembled but I'm an evil bugger, you'll have to wait until she's complete. We're getting real close though :-)
01-02-2013, 12:32 PM
#109
Senior Member

Join Date: Nov 2009
Location: , ON, CANADA
Posts: 974
Likes: 0
Received 0 Likes
on
0 Posts
Looks great-
It looks decidedly "bird-like", especially that fuselage! One thing that caught my interest is how much that transparent white covering looks like fabric- kinda retro in appearance.
Lets see her in the air!
Graeme
01-10-2013, 08:02 PM
#112
Thread Starter
Join Date: Feb 2012
Location: Fairfield, CT
Posts: 416
Likes: 0
Received 0 Likes
on
0 Posts
She'll be together soon enough *evil grin*
Yeah I'm liking the transparent white covering, adds a touch of retro class. Its not the look for every plane but I think it works for this one.
Spaghetti for Dinner
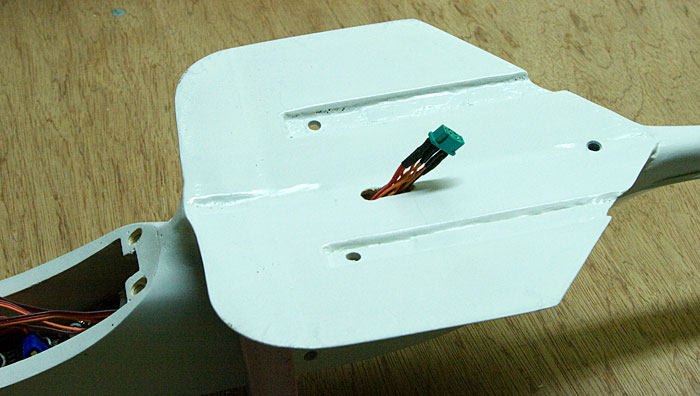
I picked up this nifty six pin connector to power the wing...
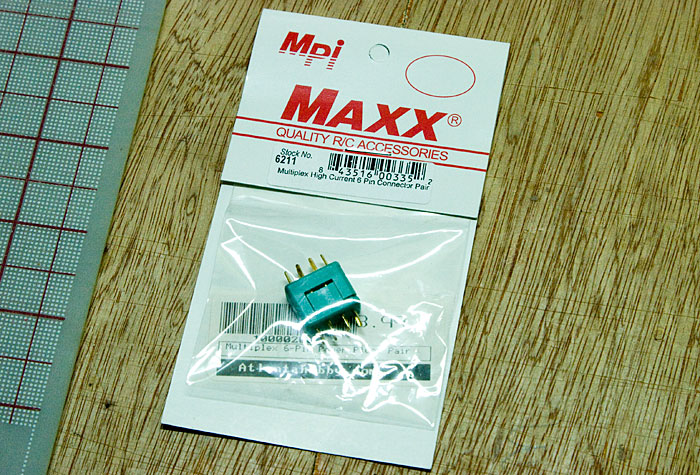
I wanted to avoid having four connectors, one for each of the wing's servos. The red positive wires connect to one pin, the brown ground wires connect to another pin. Then each of the four orange signal wires goes to its own pin...
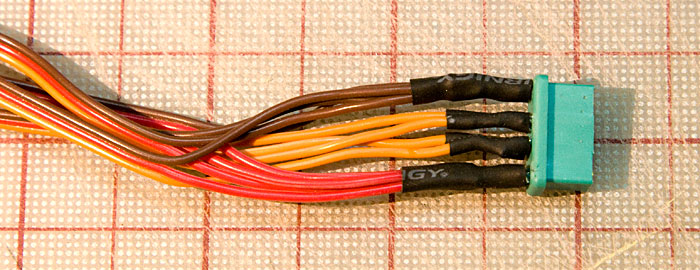
I'm still deciding if I should glue this in solid or leaving it loose...
Here's the other end exiting the bottom of the wing...
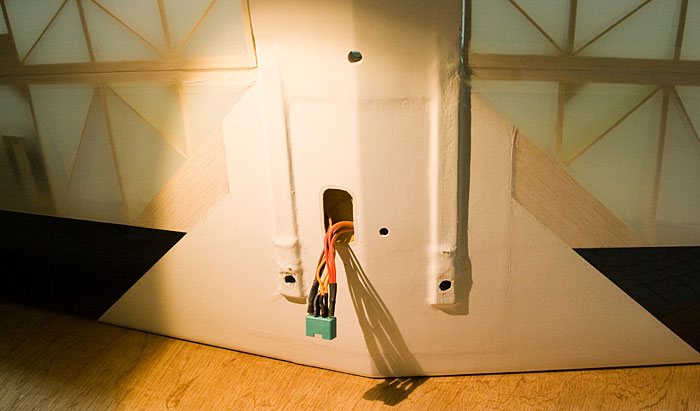
Shockingly, everything seems to be working. That never happens! *grin*...
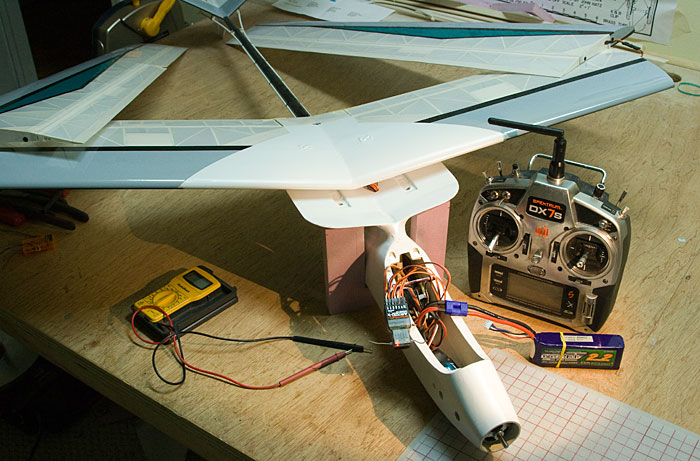
Now that the servos have power I can proceed with installing the flaps & aileron linkages.
Yeah I'm liking the transparent white covering, adds a touch of retro class. Its not the look for every plane but I think it works for this one.
Spaghetti for Dinner
I picked up this nifty six pin connector to power the wing...
I wanted to avoid having four connectors, one for each of the wing's servos. The red positive wires connect to one pin, the brown ground wires connect to another pin. Then each of the four orange signal wires goes to its own pin...
I'm still deciding if I should glue this in solid or leaving it loose...
Here's the other end exiting the bottom of the wing...
Shockingly, everything seems to be working. That never happens! *grin*...
Now that the servos have power I can proceed with installing the flaps & aileron linkages.
01-14-2013, 04:48 PM
#113
Thread Starter
Join Date: Feb 2012
Location: Fairfield, CT
Posts: 416
Likes: 0
Received 0 Likes
on
0 Posts
On with the build
I finished hooking up the control linkages...
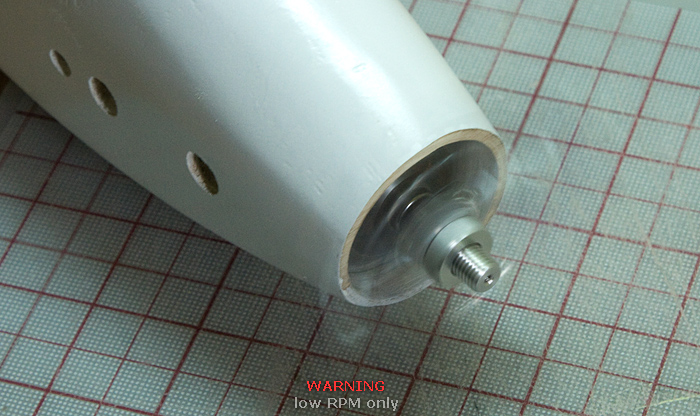
WARNING: The following technique has the potential to go horribly wrong in all sorts of unexpected ways. If you try this take extreme care.
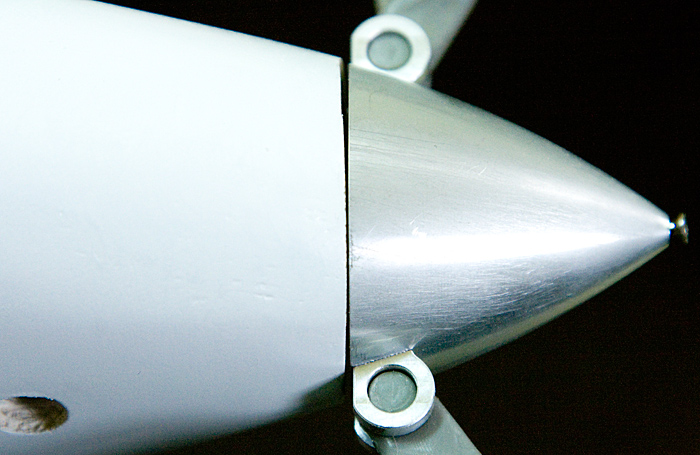
Although pretty close, I noticed the gap between the fuselage & spinner was pretty uneven...
Then I had an idea how to even that up. I slipped a piece of sandpaper onto the folder's hub...
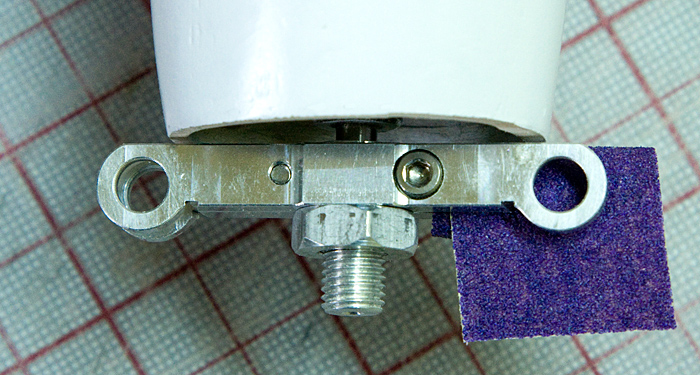
Then I powered up the motor to around 10% & let the sandpaper do its thing...
That worked pretty well, nice even gap...

With the prop installed I stuck her up on the balance stands. Weirdest thing ever, she balanced perfectly, no extra weight needed. How often does that happen, especially on a scratch designed airframe?..
I finished hooking up the control linkages...
WARNING: The following technique has the potential to go horribly wrong in all sorts of unexpected ways. If you try this take extreme care.
Although pretty close, I noticed the gap between the fuselage & spinner was pretty uneven...
Then I had an idea how to even that up. I slipped a piece of sandpaper onto the folder's hub...
Then I powered up the motor to around 10% & let the sandpaper do its thing...
That worked pretty well, nice even gap...
With the prop installed I stuck her up on the balance stands. Weirdest thing ever, she balanced perfectly, no extra weight needed. How often does that happen, especially on a scratch designed airframe?..
01-14-2013, 04:53 PM
#114
Thread Starter
Join Date: Feb 2012
Location: Fairfield, CT
Posts: 416
Likes: 0
Received 0 Likes
on
0 Posts
And then I realized there was nothing further to do...
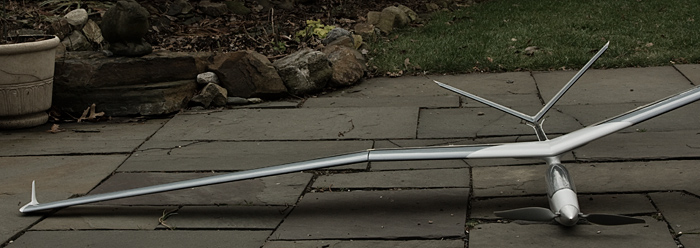
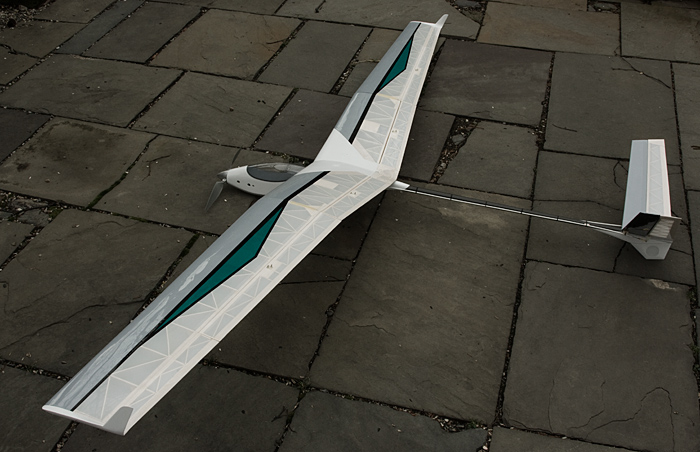
COMPLETE!
Seven months in the making, she's finally ready to fly, woohoo!
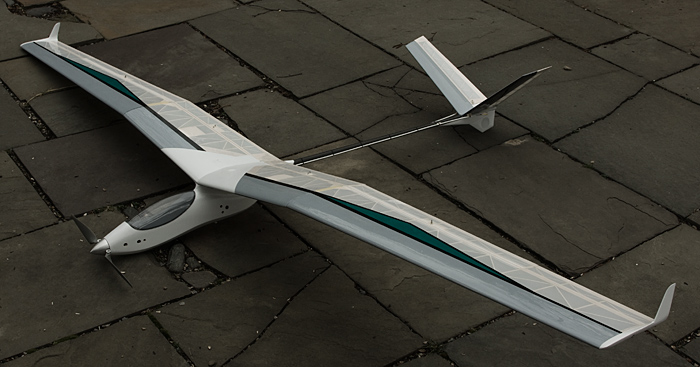


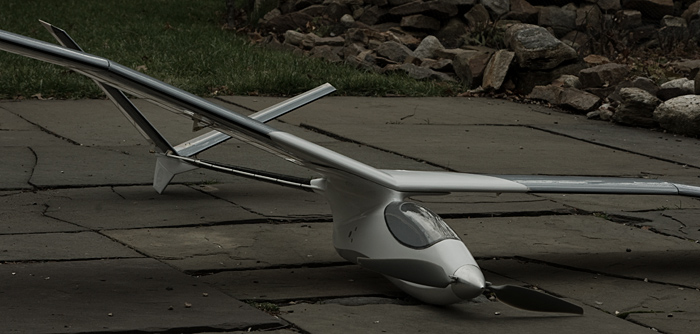


No matter what happens from here on out, that was a great build. I've learned so much, couldn't have done it with out you folks here online. A heart-felt thanks to everyone who contributed.
COMPLETE!
Seven months in the making, she's finally ready to fly, woohoo!
No matter what happens from here on out, that was a great build. I've learned so much, couldn't have done it with out you folks here online. A heart-felt thanks to everyone who contributed.
wingspan: 105" (2667mm)I was hoping to maiden her this Wednesday but the forecast is for rain/snow. I'll keep you posted. And yes there will be video, flight reports & all that good stuff. Thanks again everyone.
weight: 69 oz (1956 g)
wing loading: 12 oz/sq.ft (38 g/sq.dm)
cubic loading: 5.21 oz/cubic.ft
stall speed: 17 mph (28 km/h)
01-14-2013, 05:03 PM
#115

My Feedback: (58)

Join Date: Nov 2002
Location: Knoxville,
TN
Posts: 1,807
Likes: 0
Received 0 Likes
on
0 Posts
Nodd,
And your going to let a little rain and snow ruin your fun.... Can't wait for the reports... Just got a new order of Epoxy in.... Hint Hint..
scott
And your going to let a little rain and snow ruin your fun.... Can't wait for the reports... Just got a new order of Epoxy in....
Hint Hint..scott
01-14-2013, 05:51 PM
#116

Gorgeous! I am sure you mentioned this earlier in the thread, but what CAD software are you using? The early renderings look great.
01-14-2013, 06:22 PM
#117

Nodd,
Looks great! Congrats!
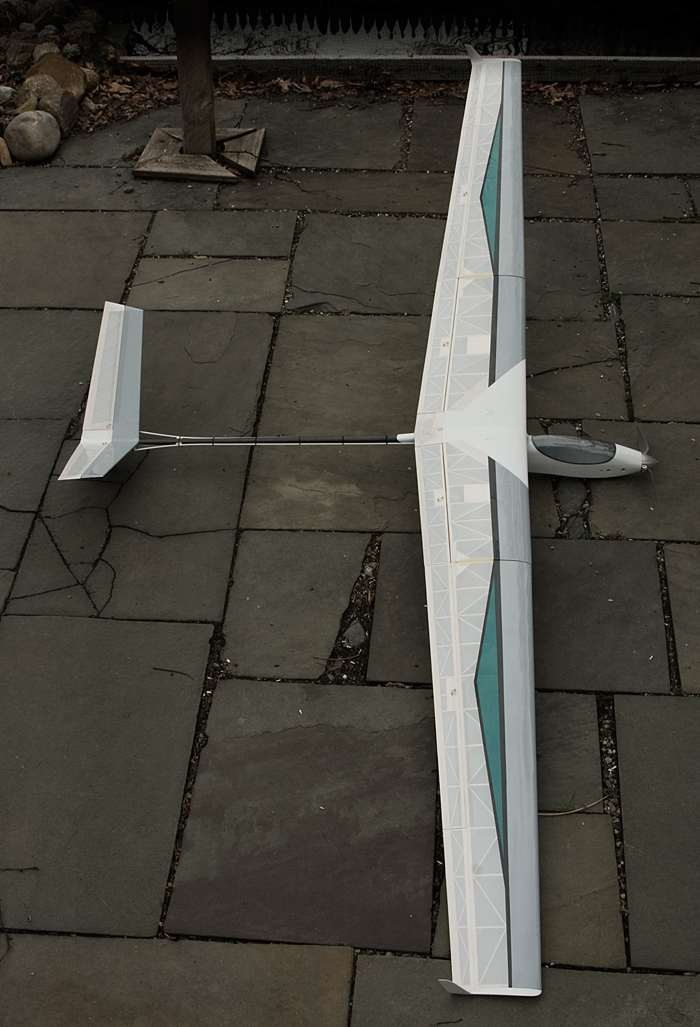
I have one question - with full down flaps and ailerons is there still a gap between them? Looking at the pictures it seems they may touch. Not a good thing in the air.
Looking forward for great flight videos!
Maybe some day we can fly together - I am like 2 hours away in PA.
cheers
Mark
Looks great! Congrats!
I have one question - with full down flaps and ailerons is there still a gap between them? Looking at the pictures it seems they may touch. Not a good thing in the air.
Looking forward for great flight videos!
Maybe some day we can fly together - I am like 2 hours away in PA.
cheers
Mark
01-15-2013, 03:53 AM
#119
Senior Member
ORIGINAL: longsoar
Nodd,
Looks great! Congrats!
I have one question - with full down flaps and ailerons is there still a gap between them? Looking at the pictures it seems they may touch. Not a good thing in the air.
Nodd,
Looks great! Congrats!
I have one question - with full down flaps and ailerons is there still a gap between them? Looking at the pictures it seems they may touch. Not a good thing in the air.
I had the same question. But about all that needs to be done is remember not to deploy the flaps while the ailerons are deflected. Even then, the flap on the conflicted side will probably scrape past. Ailerons probably don't deflect very far at all. It is worth checking to see, of course.
 01-15-2013, 06:40 PM
#121
Thread Starter
Join Date: Feb 2012
Location: Fairfield, CT
Posts: 416
Likes: 0
Received 0 Likes
on
0 Posts
Thanks guys. Yeah I'm pretty pleased with her.
I use a combination of software...
3D Studio MAX
I use this for modeling my designs in 3D. It's total overkill for our hobby but I use it for my graphics business & it's what I know. There's plenty of free/cheap CAD software out there that'll do the basics.
CorelDRAW
I have a really old version of this from the '90s. I use that as my 2D vector editor. It's great for drawing shapes & printing plans. Again this is what I know so it's what I use. These days Adobe Illustrator seems to be the vector editor of choice. In my opinion that's become bloatware though. I like my simple uncluttered CorelDRAW, gets the job done without any fuss.
PhotoShop
Used for manipulating photos & other rasta based graphics. This is usually the final step in creating my graphics. It's where everything comes together & gets pretty.
I'll be at most of the New England RC events again this year. Chances are we'll bump into each other. Just look for the guy in the goofy hat & amber sunglasses *grin*
Yeap it seems I have an issue with control surface binding just as you predicted. I want to include my fix in this build log but it's something better suited to video rather than still photos. So here's a short video illustrating the issue & what I did to fix it...
Click here to view the YouTube Video
ORIGINAL: thailazer
Gorgeous! I am sure you mentioned this earlier in the thread, but what CAD software are you using? The early renderings look great.
Gorgeous! I am sure you mentioned this earlier in the thread, but what CAD software are you using? The early renderings look great.
3D Studio MAX
I use this for modeling my designs in 3D. It's total overkill for our hobby but I use it for my graphics business & it's what I know. There's plenty of free/cheap CAD software out there that'll do the basics.
CorelDRAW
I have a really old version of this from the '90s. I use that as my 2D vector editor. It's great for drawing shapes & printing plans. Again this is what I know so it's what I use. These days Adobe Illustrator seems to be the vector editor of choice. In my opinion that's become bloatware though. I like my simple uncluttered CorelDRAW, gets the job done without any fuss.
PhotoShop
Used for manipulating photos & other rasta based graphics. This is usually the final step in creating my graphics. It's where everything comes together & gets pretty.
ORIGINAL: longsoar
Nodd,
Looks great! Congrats!
I have one question - with full down flaps and ailerons is there still a gap between them? Looking at the pictures it seems they may touch. Not a good thing in the air.
Looking forward for great flight videos!
Maybe some day we can fly together - I am like 2 hours away in PA.
cheers
Mark
Yeap it seems I have an issue with control surface binding just as you predicted. I want to include my fix in this build log but it's something better suited to video rather than still photos. So here's a short video illustrating the issue & what I did to fix it...
Click here to view the YouTube Video
01-20-2013, 03:15 PM
#122
My Feedback: (58)
Join Date: Nov 2002
Location: Knoxville,
TN
Posts: 1,807
Likes: 0
Received 0 Likes
on
0 Posts
Nodd
WELL ?
Had a great day here in Knoxville.. I joined a few DLG guys and flew my Radian..... Had some great lift for all..
WELL ?
Had a great day here in Knoxville.. I joined a few DLG guys and flew my Radian..... Had some great lift for all..
01-20-2013, 04:49 PM
#123
Thread Starter
Join Date: Feb 2012
Location: Fairfield, CT
Posts: 416
Likes: 0
Received 0 Likes
on
0 Posts
Stupid weather is not cooperating. Its either snowing, rainy, foggy or today, too windy. Fingers crossed this Wednesday will be good for the maiden.