


Ziroli F9F Panther - made in Serbia
 11-28-2010, 08:47 PM
#1

Thread Starter
Six month ago I start to made my first jet model. After reading many articles on Internet and here on RCU I decided to buy and build Ziroli Panter.
For me in Serbia, transport and border tax for some plastic model airplane is very expensive so, kit is good choice because boxes with parts are much smaller...
Thank's for Frank Tiano kindness I receive first box with Panther short kit parts.
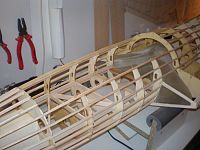
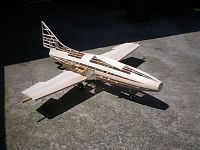
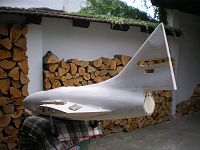
After two months, model start take the form...

I make some changes, first on spar, because I can't find spar 12x6 mm I made it from 15x9 mm. More rigid can't hurt...
I also, add glass on some fuselage ribs, around landing gears and wing tube...
Wing tube, in wings set trough first three ribs (on plan it is set trought two)...
Summer was soooo hot, and I use all tricks for making my model...

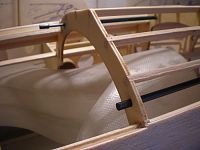
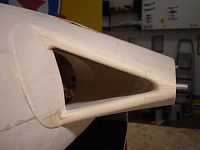
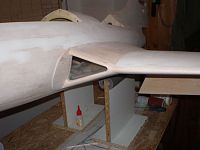
At that time I change top of the fuselage, and instead of one big make two smaller cover. One for servos, receiver, tanks... and another over turbine...
I think that configuration like that is more rigid...


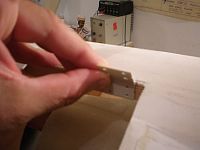
For easy open and close that two covers I made sistem with carbon tubes. On the left and right side of the fuselage and rear cover I fix carbon tube which is apsolutly in line. Trough that tubes passes another carbon tube. So, when I want to open rear cover, I just pull carbon tube forvard as long as is rear cover...
When I want to close rear cover, I put cover in place and push carbon tube trough tube which is glue inside of cover. Tube is little longer, and when it come trough rear cover, it sting in rib behind cover...
Very easy and don't need any equipment for opening...


In July I get new box from Frank Tiano (thank's Frank) with stuff which I need for further building my Panther...
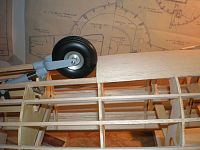
Retracts was coming from Robart and when I want to put front retract in fuselage I discovered that it can't get inside. That is not a problem, and it is easy to fix...

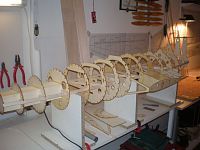
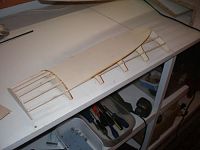
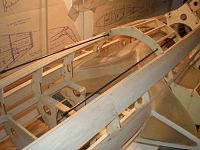
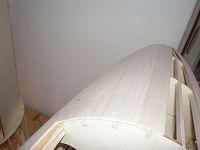
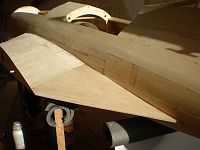
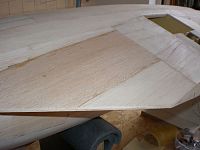
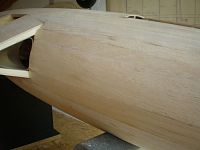
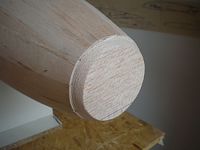
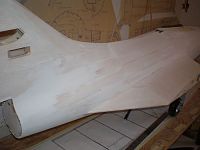
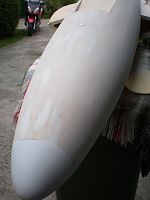
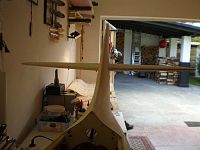
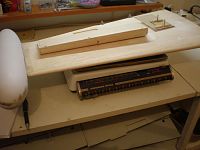
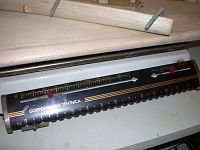
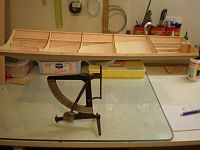
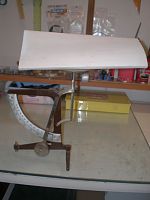
At that time I start to planking wings and fuselage. For that I use 2,5 mm balsa.
Fuselage must planking with 20 mm width strips. I soak every strip in the water to get right shape.


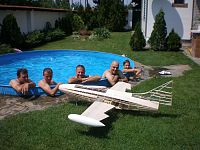
Summer was still hot and one weekend after good lunch, my friend was coming to check construction progress...

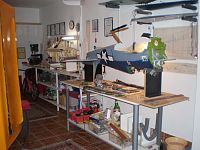
Many nights I spend in my work shop...

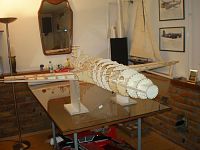
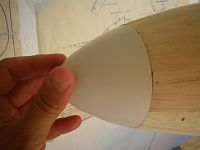
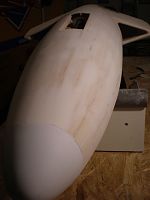
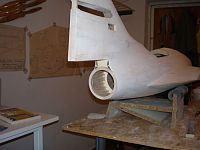
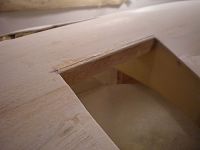
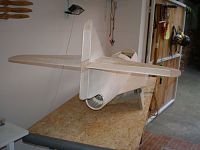
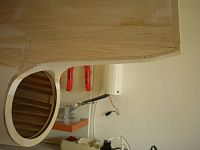
Little by little, Panther was cover with balsa. In front I made gutter for plastic nose...
At that point I change Ziroli plan, and made flaps hinges like on my Top Flite Thunderbolt, because I want to get flow when flaps going down. I change that latter...
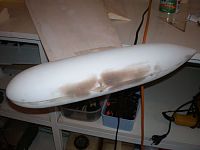
Wing tanks was added and everything was ready for filler. I use acrylic wood filler which is very light and easy for sanding down...


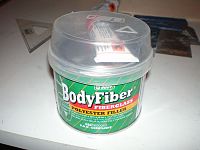
For plastic parts I use filler with fiber parts, but that filler I use just for wing tanks...
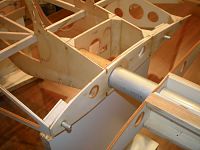
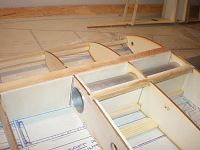
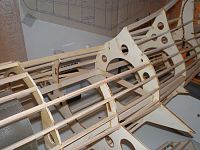
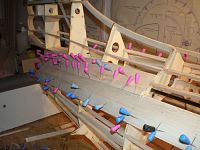
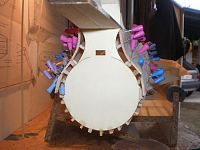
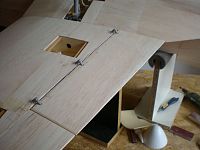
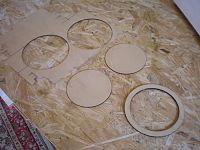
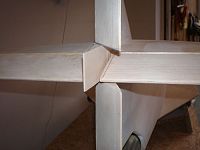
On laser cut I made rings for rear part of fuselage...


Inside of fuselage, in the gear openings, I add wood for gear door hinges...
Before glassing, I glue horizontal tail...
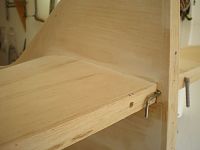

After that fix other parts on tail...
Than made final touch on rear part of model...
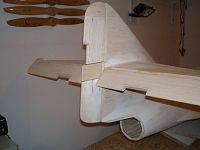
Before glassing I measured parts...
Every wing with eleron, flap and covers for servos is 620 gr.
Fuselage is 2250 gr (I forget to take out one tank - 100 gr) ang covers for servos and engines 110 and 80 gr...
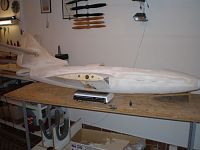

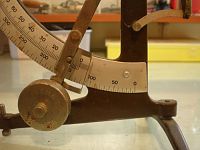
After that I start glassing a model. Use R&G resin and 33 gr glass...
End of part one...
Best regards
Mirce
For me in Serbia, transport and border tax for some plastic model airplane is very expensive so, kit is good choice because boxes with parts are much smaller...
Thank's for Frank Tiano kindness I receive first box with Panther short kit parts.
After two months, model start take the form...
I make some changes, first on spar, because I can't find spar 12x6 mm I made it from 15x9 mm. More rigid can't hurt...
I also, add glass on some fuselage ribs, around landing gears and wing tube...
Wing tube, in wings set trough first three ribs (on plan it is set trought two)...
Summer was soooo hot, and I use all tricks for making my model...
At that time I change top of the fuselage, and instead of one big make two smaller cover. One for servos, receiver, tanks... and another over turbine...
I think that configuration like that is more rigid...
For easy open and close that two covers I made sistem with carbon tubes. On the left and right side of the fuselage and rear cover I fix carbon tube which is apsolutly in line. Trough that tubes passes another carbon tube. So, when I want to open rear cover, I just pull carbon tube forvard as long as is rear cover...
When I want to close rear cover, I put cover in place and push carbon tube trough tube which is glue inside of cover. Tube is little longer, and when it come trough rear cover, it sting in rib behind cover...
Very easy and don't need any equipment for opening...
In July I get new box from Frank Tiano (thank's Frank) with stuff which I need for further building my Panther...
Retracts was coming from Robart and when I want to put front retract in fuselage I discovered that it can't get inside. That is not a problem, and it is easy to fix...
At that time I start to planking wings and fuselage. For that I use 2,5 mm balsa.
Fuselage must planking with 20 mm width strips. I soak every strip in the water to get right shape.
Summer was still hot and one weekend after good lunch, my friend was coming to check construction progress...
Many nights I spend in my work shop...
Little by little, Panther was cover with balsa. In front I made gutter for plastic nose...
At that point I change Ziroli plan, and made flaps hinges like on my Top Flite Thunderbolt, because I want to get flow when flaps going down. I change that latter...
Wing tanks was added and everything was ready for filler. I use acrylic wood filler which is very light and easy for sanding down...
For plastic parts I use filler with fiber parts, but that filler I use just for wing tanks...
On laser cut I made rings for rear part of fuselage...
Inside of fuselage, in the gear openings, I add wood for gear door hinges...
Before glassing, I glue horizontal tail...
After that fix other parts on tail...
Than made final touch on rear part of model...
Before glassing I measured parts...
Every wing with eleron, flap and covers for servos is 620 gr.
Fuselage is 2250 gr (I forget to take out one tank - 100 gr) ang covers for servos and engines 110 and 80 gr...
After that I start glassing a model. Use R&G resin and 33 gr glass...
End of part one...
Best regards
Mirce


 11-29-2010, 03:41 AM
#6
Join Date: Jan 2007
Location: farnborough, , UNITED KINGDOM
Posts: 3,294
Likes: 0
Received 1 Like
on
1 Post
Mirce fantastic build and great to see good old building skills.
One comment, if possible try to avoid using lengths of carbon tube and rod, its not the best material to use when surrounded by radio waves, a good old snake and piano wire works fine for hatch closing systems as you have shown here.
marcs
One comment, if possible try to avoid using lengths of carbon tube and rod, its not the best material to use when surrounded by radio waves, a good old snake and piano wire works fine for hatch closing systems as you have shown here.
marcs
11-29-2010, 05:17 AM
#7
Thread Starter
Thank's guys... Here is a continue...
In meanwhile, I buy Jet Cat P 80. It is new engine and it arrive to me from Lindinger Hobby shop in Austria. Because my country is not in European Union, Jet Cat engine in Austria was export product so, I get 20% down price...

We have here grass airfield so, I need this part...

All gear doors I made from thin (0,3 mm) aluminium plates. It is easy, easy to cut and make them shape.


Steve from Bobs Hobby Center buy in Sierra for me UP 2 retract valve and two small air cilinders. I use them for main gear doors...


Front gear door I made from alu plate also, and use servo to operate it...


I know that Panther have two doors, but...
Hitec servo 645 MG is for front wheel...
For better holding in close position, little magnet was add... You can see it in the middle of a door... On rear doors it is in front corner...


Glass was add on all parts...

...so now I put filler to see where I need to made a little repears...


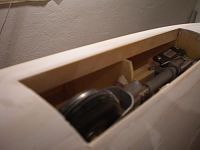
Before adding panel lines, first want to put all stuff in fuselage...
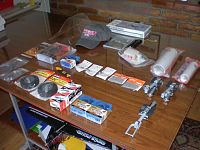
I have two one liter gas tanks, UAT, all jet parts, air valve. servos, batterie...
In front of the plastic intakes I place one tank above other. All what I do in these phase of building need to be easy to assemble and disassemble...


Upper tank will stay in place with velcro strpips...
In front tunnel, in fuselage I made bracket for batteries. Li Po batterie for Jet Cat Ecu must always remove for charging, so bracket for it is with angle for easy operation.
In right side of tunnel is inaf space for lead, if model need it for CG.


I was trying to add in front all heavy parts, so on the botom of the right side fuselage, next front wheel is servo and air valve.


Above that is plate which carry pneumatic tank, ECU and fuel pump. Plate was made from light, 3 mm, plywood...


Air tank and ECU will stay in position with velcro also...
On the right side of the fuselage, I made place for propane gas tank... In front of it on the side of fuselage electronic valve and filter. Filter is in vertical position and it is not niggardly set, because Jet Cat manual wright to set that part in position like that. In that case no any air bubble can stay in filter...


On the top of propane gas tank is quick coupling, which Jet Cat add with engine... Festo can be good also...
Left side of fuselage, near gas tanks, is place for UAT, which is also in position according to user...


On the top of fuselage, I make plate for receiver, switchers, air valve... First must made bracket...


When this stage was finish, I take out all this parts and want to star adding panel lines. But first, want to check how ailerons, flaps and other parts are stand.
I was not satisfied with flap hinges, so made change like on Ziroli plan...


Before...


Last check...


...everything fit OK, ad finaly panel lines...
For panel lines first was made 1,2 mm widht strips of masking tape. I cut it on my Roland vinyl cutter...

For panel lines use few sources, plan, photos, books...

...and add lines...

Next was filler...

...and after taking 1,2 mm lines from surface result was grate...


Next step was adding rivets. For that I use soldering iron and metal template, which is made from saw blade...
Need one week to add rivets on all surface...
When press pick of soldering iron on surface it look like this...


...but after light sanding...


...it look grate.
Few more details on wings...


...and fuselage.

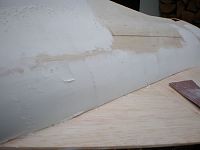
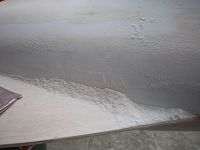
You need to add three to four layers of filler, to get thickness for surface like on photos. But, it is interestint to note, that after adding filler for panel lines, rivets and light sanding at the end of that process, Panther is just approximately 300 gr more heavy.
On this weight, you need to add paint, but paint apply in thinner layer, so I think all finish will not to be more than 500-600 gr.
Rivets on metal parts (gear doors) I made from little circles, made from vinyl tape.


Last process before paintig, was to add details on Panthers surface. For that I use Oracal 641 self adhesive foil. I put one layer on other, so like that I get required thickness.
Because layer is now thicker, on Roland vinyl cutter you need to add more force for cutting, and every part must cut three times.
After that process, it is easy to separate detail parts...
I use silver tape for this process...


Few details in close look...


In next ten days I hope that model will be paint...
Until than, best regards
Mirce
In meanwhile, I buy Jet Cat P 80. It is new engine and it arrive to me from Lindinger Hobby shop in Austria. Because my country is not in European Union, Jet Cat engine in Austria was export product so, I get 20% down price...
We have here grass airfield so, I need this part...
All gear doors I made from thin (0,3 mm) aluminium plates. It is easy, easy to cut and make them shape.
Steve from Bobs Hobby Center buy in Sierra for me UP 2 retract valve and two small air cilinders. I use them for main gear doors...
Front gear door I made from alu plate also, and use servo to operate it...
I know that Panther have two doors, but...
Hitec servo 645 MG is for front wheel...
For better holding in close position, little magnet was add... You can see it in the middle of a door... On rear doors it is in front corner...
Glass was add on all parts...
...so now I put filler to see where I need to made a little repears...
Before adding panel lines, first want to put all stuff in fuselage...
I have two one liter gas tanks, UAT, all jet parts, air valve. servos, batterie...
In front of the plastic intakes I place one tank above other. All what I do in these phase of building need to be easy to assemble and disassemble...
Upper tank will stay in place with velcro strpips...
In front tunnel, in fuselage I made bracket for batteries. Li Po batterie for Jet Cat Ecu must always remove for charging, so bracket for it is with angle for easy operation.
In right side of tunnel is inaf space for lead, if model need it for CG.
I was trying to add in front all heavy parts, so on the botom of the right side fuselage, next front wheel is servo and air valve.
Above that is plate which carry pneumatic tank, ECU and fuel pump. Plate was made from light, 3 mm, plywood...
Air tank and ECU will stay in position with velcro also...
On the right side of the fuselage, I made place for propane gas tank... In front of it on the side of fuselage electronic valve and filter. Filter is in vertical position and it is not niggardly set, because Jet Cat manual wright to set that part in position like that. In that case no any air bubble can stay in filter...
On the top of propane gas tank is quick coupling, which Jet Cat add with engine... Festo can be good also...
Left side of fuselage, near gas tanks, is place for UAT, which is also in position according to user...
On the top of fuselage, I make plate for receiver, switchers, air valve... First must made bracket...
When this stage was finish, I take out all this parts and want to star adding panel lines. But first, want to check how ailerons, flaps and other parts are stand.
I was not satisfied with flap hinges, so made change like on Ziroli plan...
Before...
Last check...
...everything fit OK, ad finaly panel lines...
For panel lines first was made 1,2 mm widht strips of masking tape. I cut it on my Roland vinyl cutter...
For panel lines use few sources, plan, photos, books...
...and add lines...
Next was filler...
...and after taking 1,2 mm lines from surface result was grate...
Next step was adding rivets. For that I use soldering iron and metal template, which is made from saw blade...
Need one week to add rivets on all surface...
When press pick of soldering iron on surface it look like this...
...but after light sanding...
...it look grate.
Few more details on wings...
...and fuselage.
You need to add three to four layers of filler, to get thickness for surface like on photos. But, it is interestint to note, that after adding filler for panel lines, rivets and light sanding at the end of that process, Panther is just approximately 300 gr more heavy.
On this weight, you need to add paint, but paint apply in thinner layer, so I think all finish will not to be more than 500-600 gr.
Rivets on metal parts (gear doors) I made from little circles, made from vinyl tape.
Last process before paintig, was to add details on Panthers surface. For that I use Oracal 641 self adhesive foil. I put one layer on other, so like that I get required thickness.
Because layer is now thicker, on Roland vinyl cutter you need to add more force for cutting, and every part must cut three times.
After that process, it is easy to separate detail parts...
I use silver tape for this process...
Few details in close look...
In next ten days I hope that model will be paint...
Until than, best regards
Mirce
11-29-2010, 11:13 AM
#9
Join Date: Jul 2006
Location: fressenneville, FRANCE
Posts: 33
Likes: 0
Received 0 Likes
on
0 Posts
beautiful!!
regret mine crashed on the second flight tow years ago due to engine failure! I actually build my third panther (I had two ziroli) but it's a pst jets kit for this one!!
dont forget pictures of your plane for us !!!
BRAVO
regret mine crashed on the second flight tow years ago due to engine failure! I actually build my third panther (I had two ziroli) but it's a pst jets kit for this one!!
dont forget pictures of your plane for us !!!
BRAVO
11-30-2010, 02:26 PM
#13
Thread Starter
Thanks guys for nice words, hvala Pjer, hvala Marko, ...
I choose a color scheme. All Panthers was made in just few combination, all blue, all silver, gray with yellow and red wings, blue with same wings... Everything has already been seen earlier...
Looking how to paint my model I find this one... OK, on this photos is Cougar, and this is not maybe in original Panther color, but it is very attractive and nice to me...


If someone have information about this color scheme in combination with Panther airplane, let me wright few words...
Best regards
Mirce
I choose a color scheme. All Panthers was made in just few combination, all blue, all silver, gray with yellow and red wings, blue with same wings... Everything has already been seen earlier...
Looking how to paint my model I find this one... OK, on this photos is Cougar, and this is not maybe in original Panther color, but it is very attractive and nice to me...
If someone have information about this color scheme in combination with Panther airplane, let me wright few words...
Best regards
Mirce
 11-30-2010, 04:36 PM
#16
Thread Starter
Ram-bro, for rivets like this I use solder machine with constant temperature. This is very important...


As you can see, temperature is about 300 degrees Celsius.
Second important is put a few layers of filler on surface on which you want to add rivets. Surface must have thickness. If filler is thin rivets will not be nice, and deep, and paint can fill it...
The most important thing is this operation is saw blade.

On the bottom I glue 2mm balsa. Balsa don't scratch surface, and raise saw blade from surface, so you first lean tip of solder and than gentle push it in surface...


Saw blade you can flax, and with that follow form of surface on which is adding rivets...
Who know, maybe is patience most important...
Mirce
As you can see, temperature is about 300 degrees Celsius.
Second important is put a few layers of filler on surface on which you want to add rivets. Surface must have thickness. If filler is thin rivets will not be nice, and deep, and paint can fill it...
The most important thing is this operation is saw blade.
On the bottom I glue 2mm balsa. Balsa don't scratch surface, and raise saw blade from surface, so you first lean tip of solder and than gentle push it in surface...
Saw blade you can flax, and with that follow form of surface on which is adding rivets...
Who know, maybe is patience most important...
Mirce
 12-05-2010, 12:24 PM
#21
The Cougar color scheme you have pictures of above is an Air World Cougar that belonged to Ali. He described the color scheme as a "fantasy scheme" because it did not come from an actual military aircraft, but was created out of believable elements that could have been a real color scheme.
I agree it is beautiful. If you don't intend to compete in a scale contest, it is a great scheme and I am sure would look great on your Panther. If you keep with his design, I suppose the tip tanks would be mostly yellow with some black trim .. that would be perfect for visibility.
Again, this is an awesome build thread, and you are an amazing builder!
Dave McQ
12-05-2010, 02:09 PM
#22
Thread Starter
Thanks guys for nice words...
Thanks Dave for color scheme explanation. For me this is also wonderful colors combination...
I am now on half way of painting job, so here is a few pictures...


In next few days I must add logo on fin and blue, white and red marks...
Regards
Mirce
Thanks Dave for color scheme explanation. For me this is also wonderful colors combination...
I am now on half way of painting job, so here is a few pictures...
In next few days I must add logo on fin and blue, white and red marks...
Regards
Mirce
12-05-2010, 03:19 PM
#23
Junior Member
Join Date: May 2010
Location: s�o paulo, BRAZIL
Posts: 3
Likes: 0
Received 0 Likes
on
0 Posts
Hi Mirce, it makes you like to see a montage of this. Can not wait to get my kit to assemble here in Brazil too.
Congratulations
Roberto Castro
São Paulo-Brasil
Congratulations
Roberto Castro
São Paulo-Brasil